ctwombley
Member
- First Name
- Cody
- Joined
- May 15, 2019
- Threads
- 2
- Messages
- 10
- Reaction score
- 47
- Location
- Manchester
- Vehicle(s)
- 2018 Jeep Wrangler JLU Sport
- Thread starter
- #1
The 3.6L in my 2018 JL Sport with 95k miles had been ticking for a few months. It happened at startup and got louder as I accelerated. Originally I thought it was just the 3.6L Pentastar "tick", but as it got worse I knew it wasn't. I took it to my dealer, and they said that they thought it was the vacuum pump, and I should have it replaced. I knew that wasn't right so I left. The problem persisted so I took it to a non-dealer garage and they said that I should take it to the dealer because it probably needed a valve adjustment, they didn't want to touch it.
After researching on the forums, I knew it was probably rocker arm failure. So I ordered a mechanic's stethoscope for $7 to see if I could pinpoint which side it was. I put the stethoscope up to the valve cover at different points on both sides, and sure enough I heard a steady tick at the rear of the passenger side bank. So I started researching and ordering the parts. I already had a good amount of tools but knew I would need some specialty items after watching some YouTube videos. There were no videos online for the updated version of the 3.6L with variable valve lift, just the old JK engines that were just VVT. Almost everything was the same with a few key differences. Here's a summary of the repair, only replacing the passenger side intake cam & rocker arms (the driver's side will be different).
*Disclaimer- This is a guide for somebody on a budget and out of warranty. If you value your time more than money, have the dealer do it. Also, others will say that you should just replace all the rocker arms and lifters while you're inside the engine. I didn't do that because the intake side rocker arms were $107 apiece and the lifters were $18/piece. Multiply that by 12 on each side of the engine, and it adds up.
Tools needed:
Procedure

Camshaft:
18. Remove the bad rocker arms, or all of them if you can afford it, and install new ones and new lifters after you've soaked them in oil for 10-20 minutes. Reallign the old camshaft, or replace it with the new one if you need it. Make sure to put assembly lube on the whole cam if you're installing a new one. Reverse all the previous steps, making sure that you follow the torque specs. The only things you really need to torque are the cam bearing caps, oil control valves, and the valve cover bolts if you're feeling nitpicky.
19. Finally, change your oil and filter. I ran my engine for a little while first to wash any shavings from the cam bearing bolt I stripped down into the oil pan, but you don't have to.
The whole job took about 6 hours of work time, but probably would've been a lot faster and easier if I had a guide like this, so here it is.
If anyone has questions I'll happily reply while it's still fresh in my mind
After researching on the forums, I knew it was probably rocker arm failure. So I ordered a mechanic's stethoscope for $7 to see if I could pinpoint which side it was. I put the stethoscope up to the valve cover at different points on both sides, and sure enough I heard a steady tick at the rear of the passenger side bank. So I started researching and ordering the parts. I already had a good amount of tools but knew I would need some specialty items after watching some YouTube videos. There were no videos online for the updated version of the 3.6L with variable valve lift, just the old JK engines that were just VVT. Almost everything was the same with a few key differences. Here's a summary of the repair, only replacing the passenger side intake cam & rocker arms (the driver's side will be different).
*Disclaimer- This is a guide for somebody on a budget and out of warranty. If you value your time more than money, have the dealer do it. Also, others will say that you should just replace all the rocker arms and lifters while you're inside the engine. I didn't do that because the intake side rocker arms were $107 apiece and the lifters were $18/piece. Multiply that by 12 on each side of the engine, and it adds up.
Tools needed:
- Ratchet & Socket set- Will need a deep 10mm socket for the valve cover bolts. Will also need a a 36mm socket for the oil control valves, and a 1 & 1/16" socket for the crank bolt.
- Having a good set of ratcheting wrenches would be good too, but probably not necessary. My Milwaukee electric ratchet also helped a lot, but it can be done with basic tools.
- You will also need a tool to loosen the cam tensioner. This is the only one I could find that works. It's a little pricey but it works. Do not get the cheaper plastic ones on Amazon, because they are for the JK version of the wrangler.
- You will however need a piece from one of the cheaper kits to freeze the cam phasers (these are the same on the JK & JL). That kit can be found here.
- You'll also need vice grips or hose clamp pliers because coolant hoses lay over the valve cover and need to be disconnected to be moved out of the way.
- You should also have a gasket scraper because the engine comes from the factory with RTV in the crease between the cylinder head and the timing cover. A razor blade will also work if you want to save money.
- You'll need a T-25 & T-30 Torx bit for the cam bearing caps and a few other things
- You'll also need a torque wrench that measures foot-lbs (for the cam phaser bolts), and one that measures inch-lbs (for the cam bearing caps)
- RTV- to replace factory RTV on the seam between cylinder head and timing cover
- Valve cover gaskets- I bought this set, they worked just fine
- Assembly Lube- Only really necessary if you find out you have to replace the camshaft
- OW-20 Oil- or whatever oil you run in your jeep. I bought 6 quarts, 1 quart to soak the lifters and rocker arms in, and 5 quarts & a filter to change oil after I was done the repair.
- Brake Clean- always good to use to clean up dirty surfaces
- Paint pen- to mark cam phaser covers, camshaft, chain, and phasers
- rocker arms- I needed 2 on the intake side, you may need intake, exhaust, or both. The exhaust side can be found here
- Lifters- Different for intake & exhaust as well. I needed intake side lifters
- Cam bearing cap bolts- I stripped one trying to get it out (be careful lol) so I just replaced them all
- Camshaft- If you catch it early enough, you might not need this, but I did. Here's a link to the passenger-side intake camshaft
- The total cost was somewhere around $700
- About $275 for 2 rocker arms and 2 lifters (insanity)
- About $225 for the cam
- About $160 for the gaskets and special tools
- About $30 for the cam bearing bolts
Procedure
- Determine which side the tick is coming from by touching the end of the stethoscope at different points along the valve covers
- If the tick is on the driver's side, you'll have to remove the intake manifold, but my tick was on the passenger side so I didn't.
- Remove the engine shroud cover (2 T-30 Torx bolts)
- Remove air cleaner and housing (Will give you a lot more room to work). There are 5 screws that need to be removed, and the hose clamp will need to be loosened. After that you can pull it straight up, there are 2 grommets on the bottom that will pull out.
- Remove battery- good practice when working with electrical components
- Use hose clamp pliers or vice grips to push back the 4 hose clamp clips on the 4 coolant hoses over the valve cover (irrelevant for driver's side), moving them from the grille side of the jeep to the windshield side. Once they are pushed back, try twisting the hose to break the bond between the rubber hose and the metal tube. This was difficult for me so I ended up using vice grips (gently) to break the hoses free. I also used a slim screwdriver to carefully go around under the edge of the hose to unstick it. Be careful during this step because coolant will come out of the hoses. Put a drain pan underneath the Jeep to catch as much as you can.
- Unclip the fuel hardline and move it out of the way
- Unbolt coolant hoses from the rear bracket, and unbolt the front bracket from the valve cover to move the hoses out of your way towards the front of the Jeep
- Unbolt the rear bracket from the valve cover. The top bolt is easy enough, but the bottom one is attached with a nut that is screwed onto one of the valve cover studs and it is very difficult to reach. I had the best luck with a 10mm regular wrench, sockets don't really fit and neither does a ratcheting wrench.
- Unclip coil packs (push white tabs up with a screwdriver then pinch them and pull connectors off), unbolt coil packs (10mm), and pull them straight out.
- Unscrew & unclip the camshaft position sensor as well as the other sensor at the opposite end of the valve cover
- Unclip and remove the PCV valve next to the firewall, It twists clockwise and then you can pull it out
- Unscrew and unclip the cam phaser covers on the grille side of the valve cover and set them aside. Do not put them in a magnetic parts tray. They are secured with 3 Torx bolts each, either T-25 or T-30. Make sure you label them with a paint pen to remember which one goes where. I put one dot on the left one and 2 dots on the right one.
- Unscrew the valve cover bolts (10mm), there are 10 or so of them. They stay in the valve cover when you remove it. The valve cover is may be difficult to get off because there are bits of RTV on the front corners. Pry the front corners up gently, remember the valve cover is made of plastic. Once you have the front corners up, lift the whole thing up and push it backward a bit to clear the lip on the backside.
- Once you have the valve cover off, set it aside.
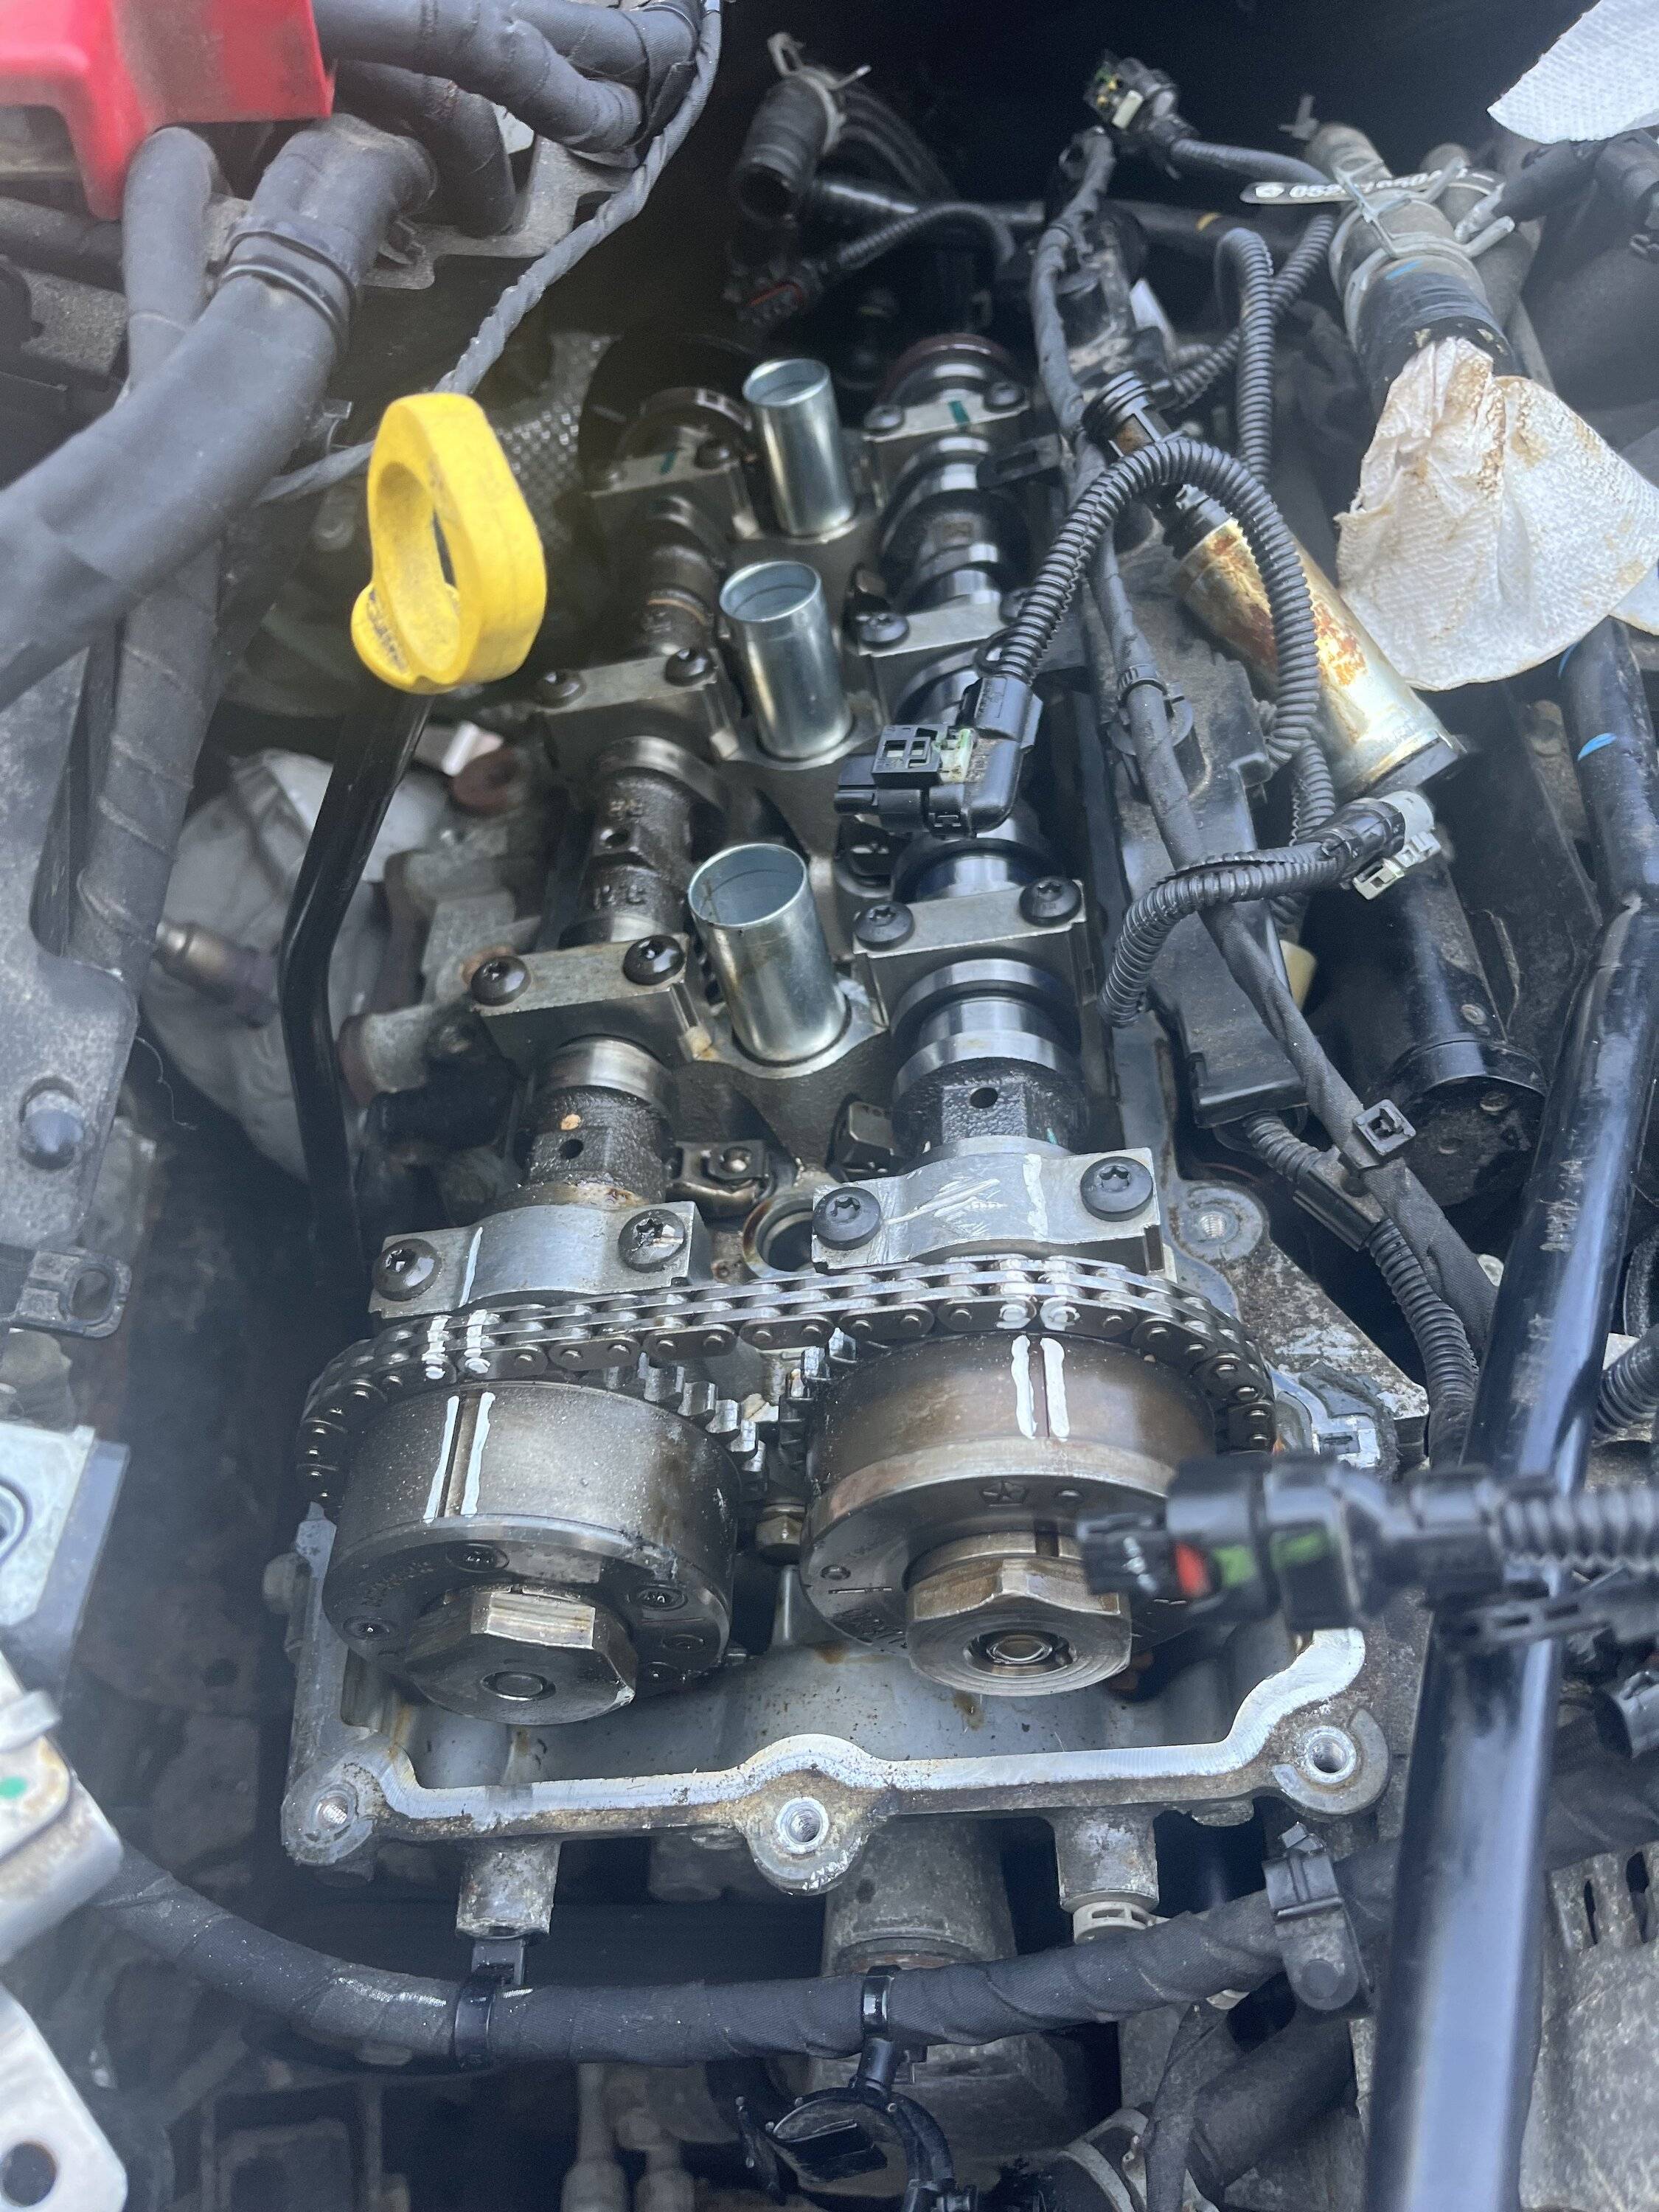
- The next step is to get the camshafts into the correct position, mark them, the chain, and the phasers with a paint pen to ensure proper alignment, then use the special tools to release the tension, lock the phasers in place, remove the oil control valve (36mm), remove the cam bearing caps and remove the camshaft (make sure you do one cam at a time). I'm not going to write details on this part, but this video seriesdescribes the process in great detail. There's a part 2 video that you should also watch. The only difference is the chain tension release tool. In the video, he uses the JK tools, which will not work. Use the tool I referenced above. It should look like this before the cam removal
-
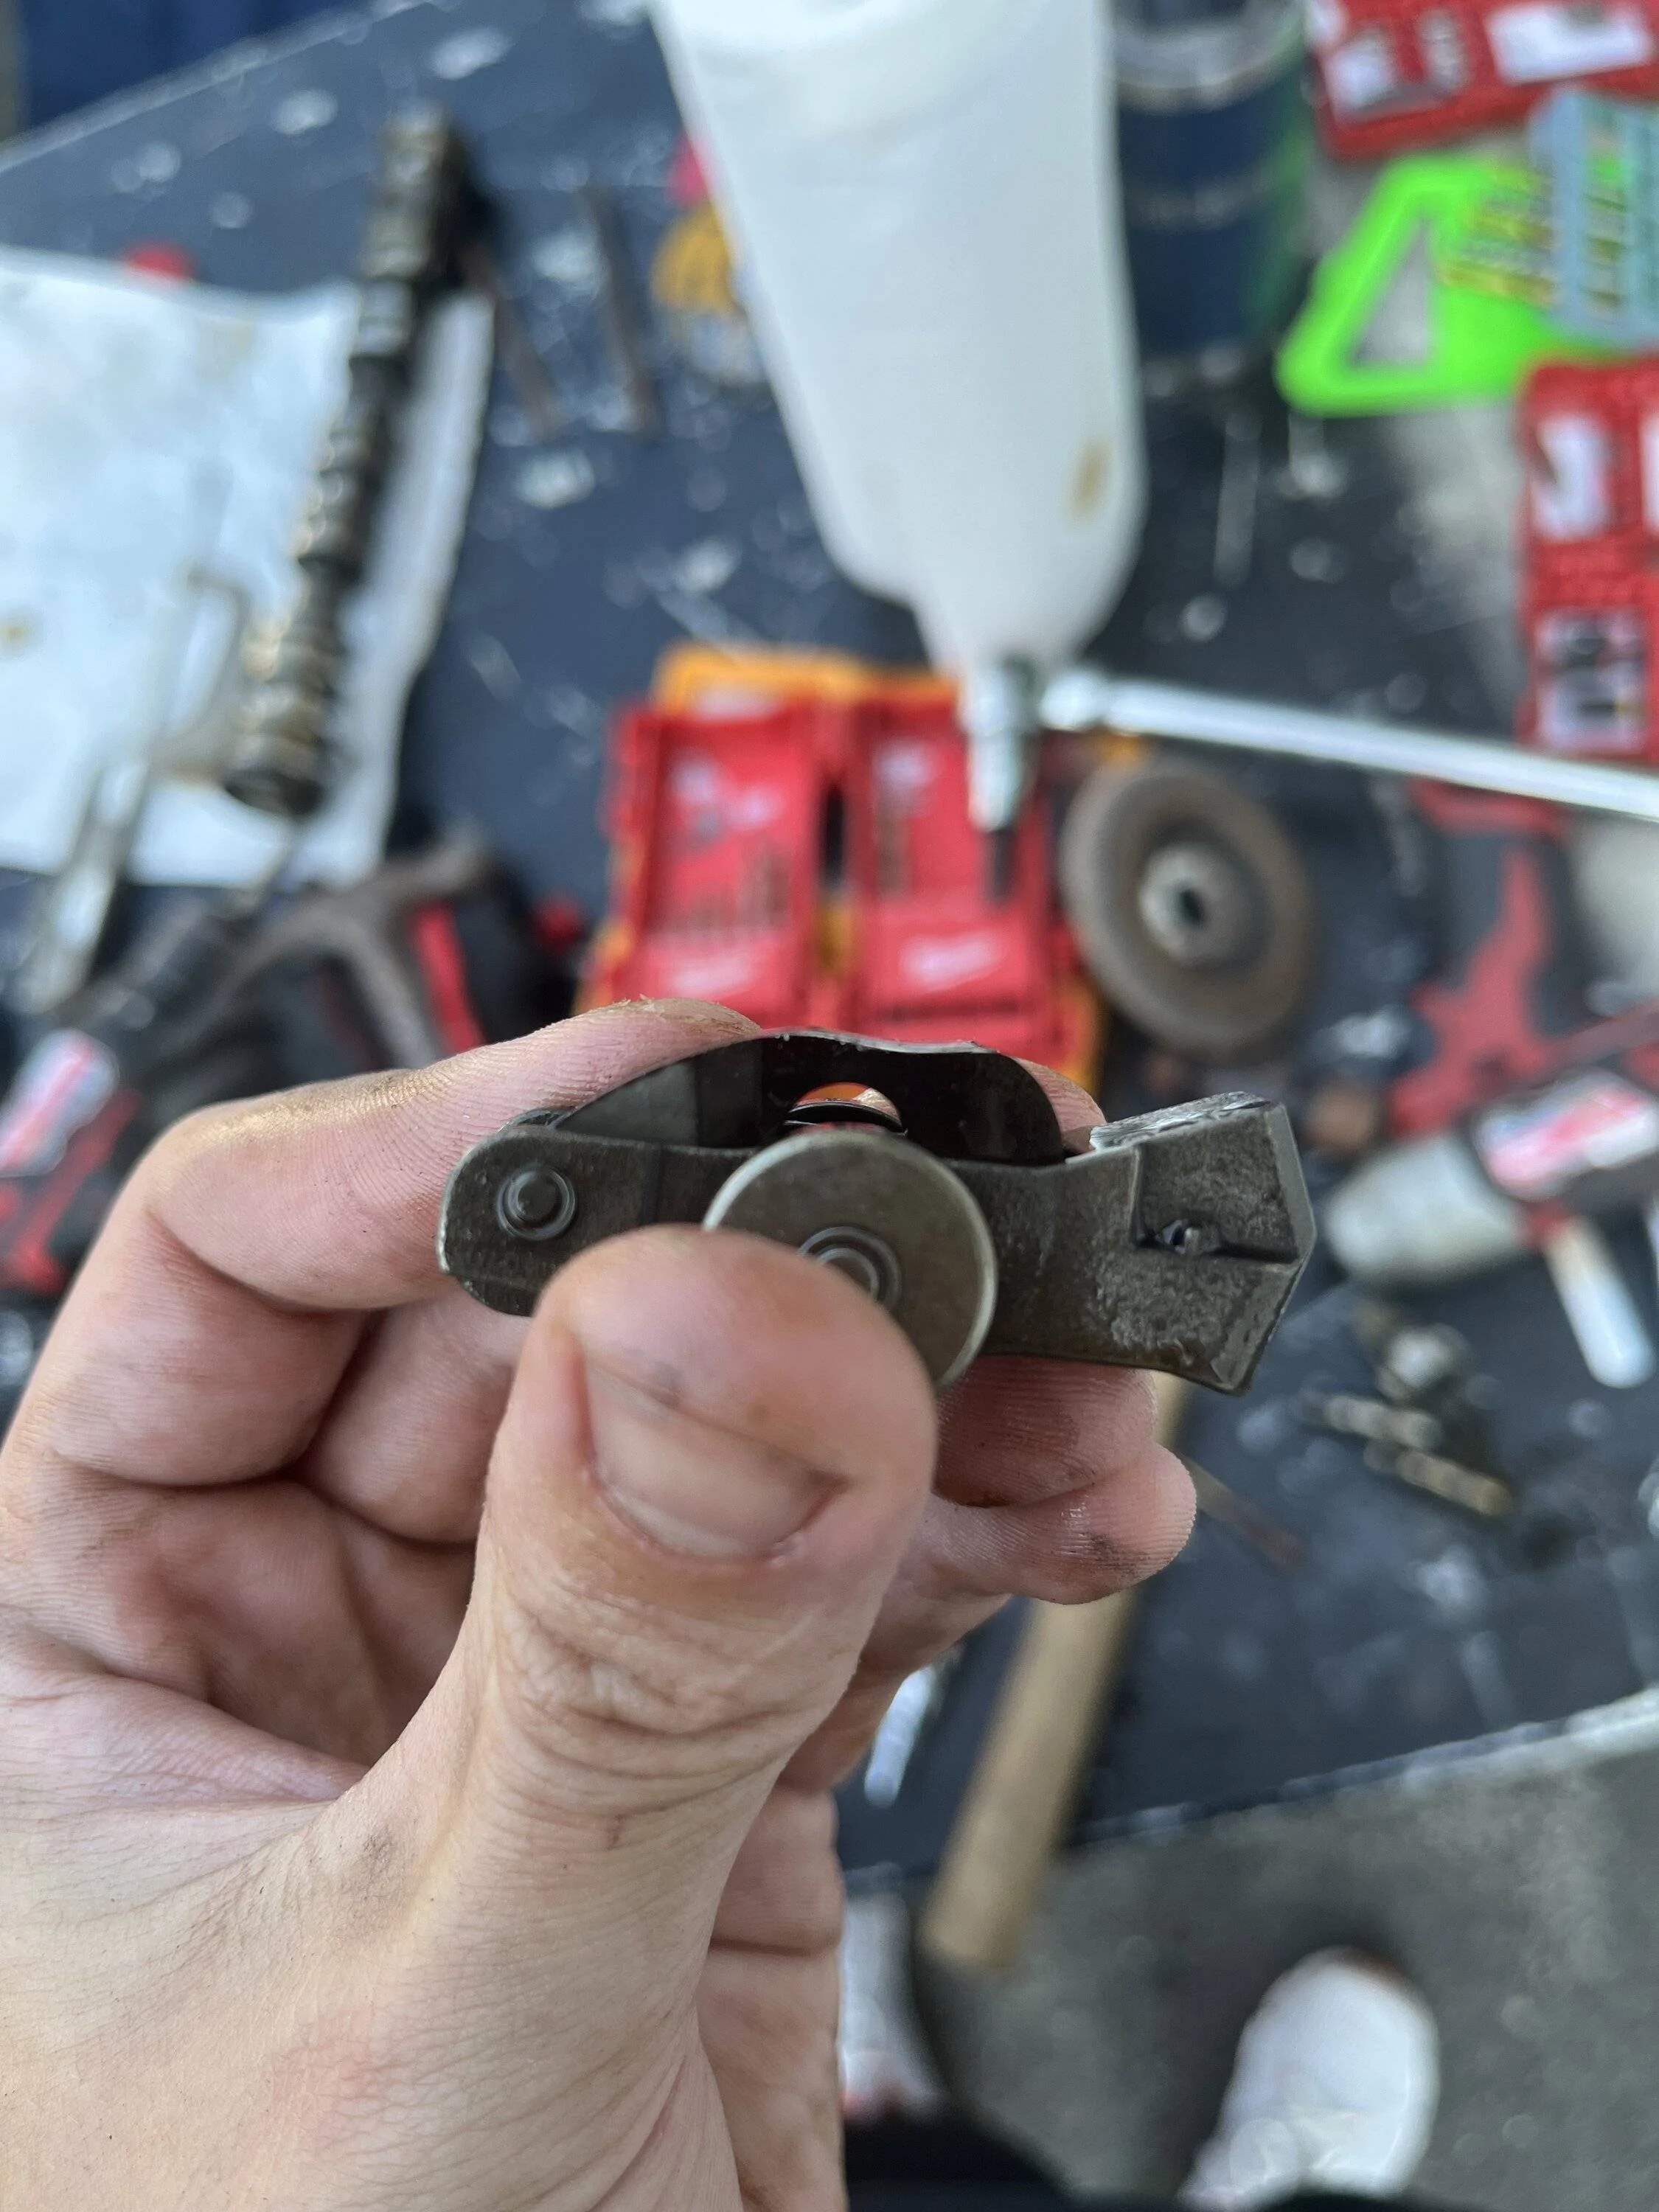
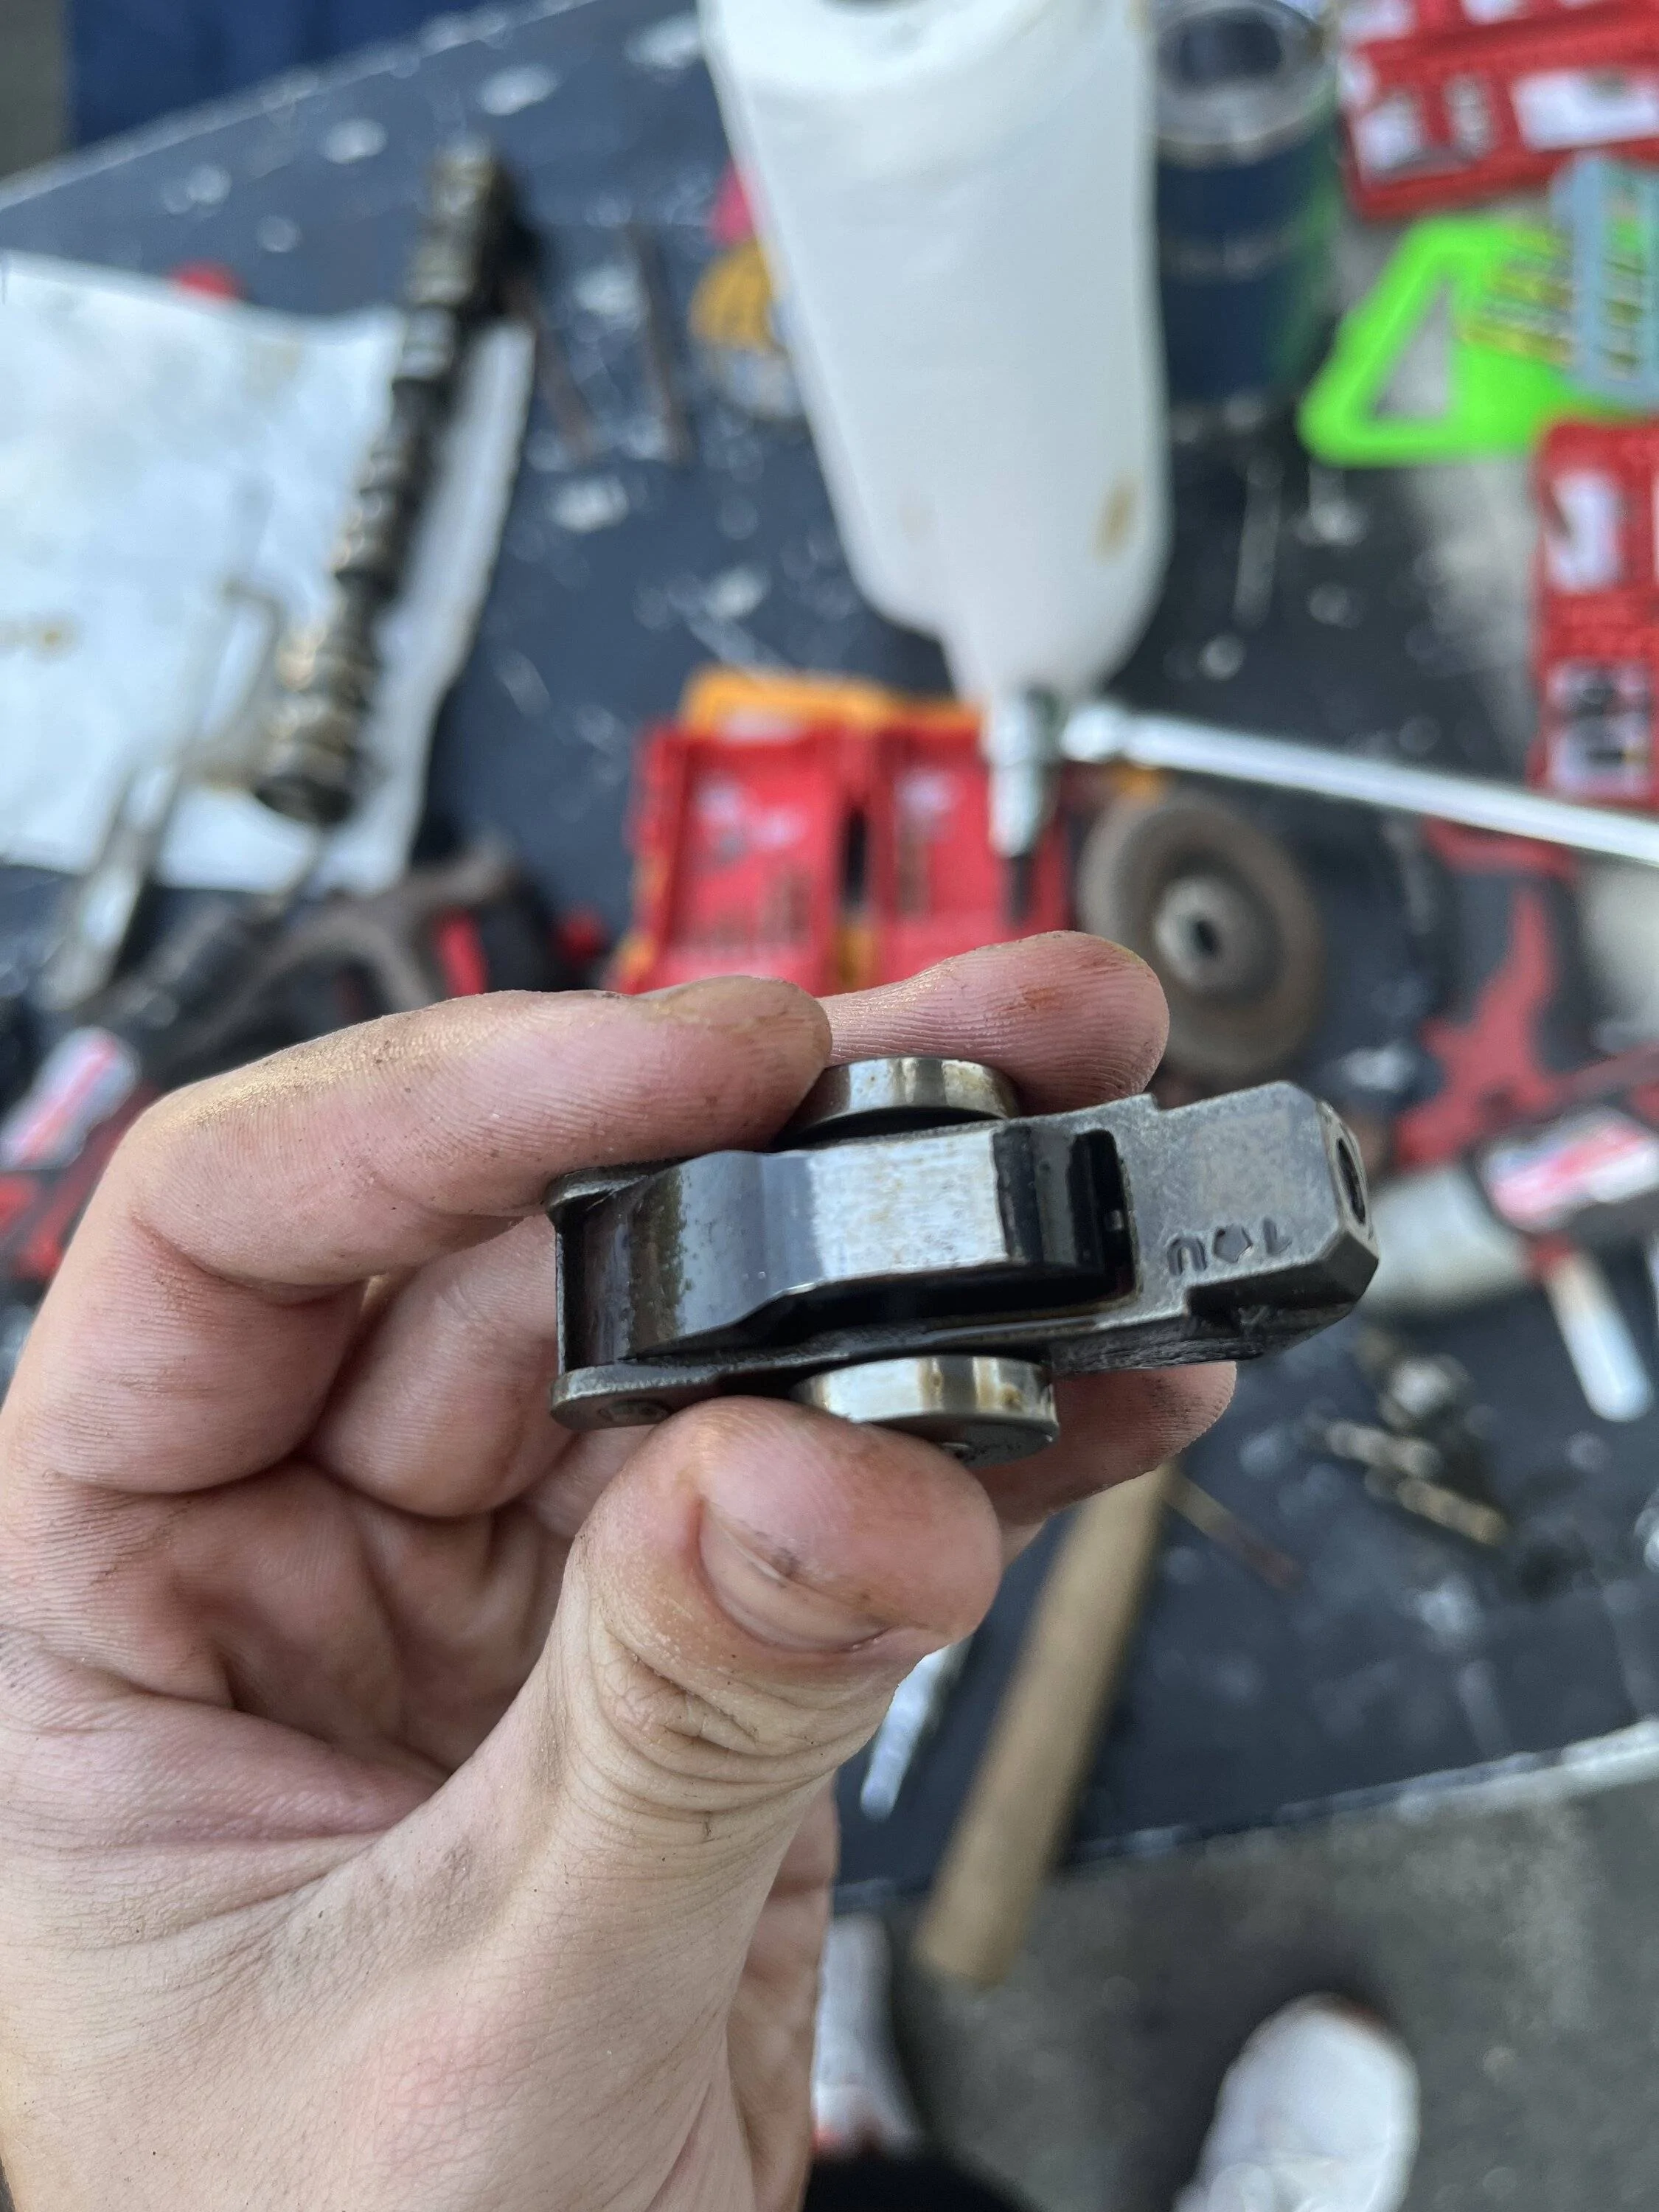
- Once you have the camshaft out, you can inspect it and the rockers for wear. Here's what the 2 bad rocker arms and cam lobes I had looked like:
Camshaft:

18. Remove the bad rocker arms, or all of them if you can afford it, and install new ones and new lifters after you've soaked them in oil for 10-20 minutes. Reallign the old camshaft, or replace it with the new one if you need it. Make sure to put assembly lube on the whole cam if you're installing a new one. Reverse all the previous steps, making sure that you follow the torque specs. The only things you really need to torque are the cam bearing caps, oil control valves, and the valve cover bolts if you're feeling nitpicky.
19. Finally, change your oil and filter. I ran my engine for a little while first to wash any shavings from the cam bearing bolt I stripped down into the oil pan, but you don't have to.
The whole job took about 6 hours of work time, but probably would've been a lot faster and easier if I had a guide like this, so here it is.
If anyone has questions I'll happily reply while it's still fresh in my mind
Sponsored
 I looked all around for parts but didn’t find any camshafts, rocker arms, or lifters from anyone but Mopar. I looked just now and it looks like lifters and cams are available on rock auto. The rocker arm they have on there I believe only works for exhaust side, but it’s out of stock anyway. I don’t think many companies are making replacement internals for the updated 3.6L’s with VVL because they’re so new in the grand scheme of things. I even called Melling directly to see if they had the rockers and they don’t make them. I had a tight timeframe to get mine done because it’s my only vehicle so it was easier and faster to just go to the dealer.