Sponsored

LOD Destroyer Rock Sliders - need install tips

ek1

Well-Known Member
Joined
Oct 3, 2022
Threads
15
Messages
208
Reaction score
224
Location
People's Republic of New York
Vehicle(s)
Private
Trying to install the damn rock sliders....not having a lot of fun. Following the document here: https://lodoffroad.com/assets/pdfs/JRS1814INS.pdf

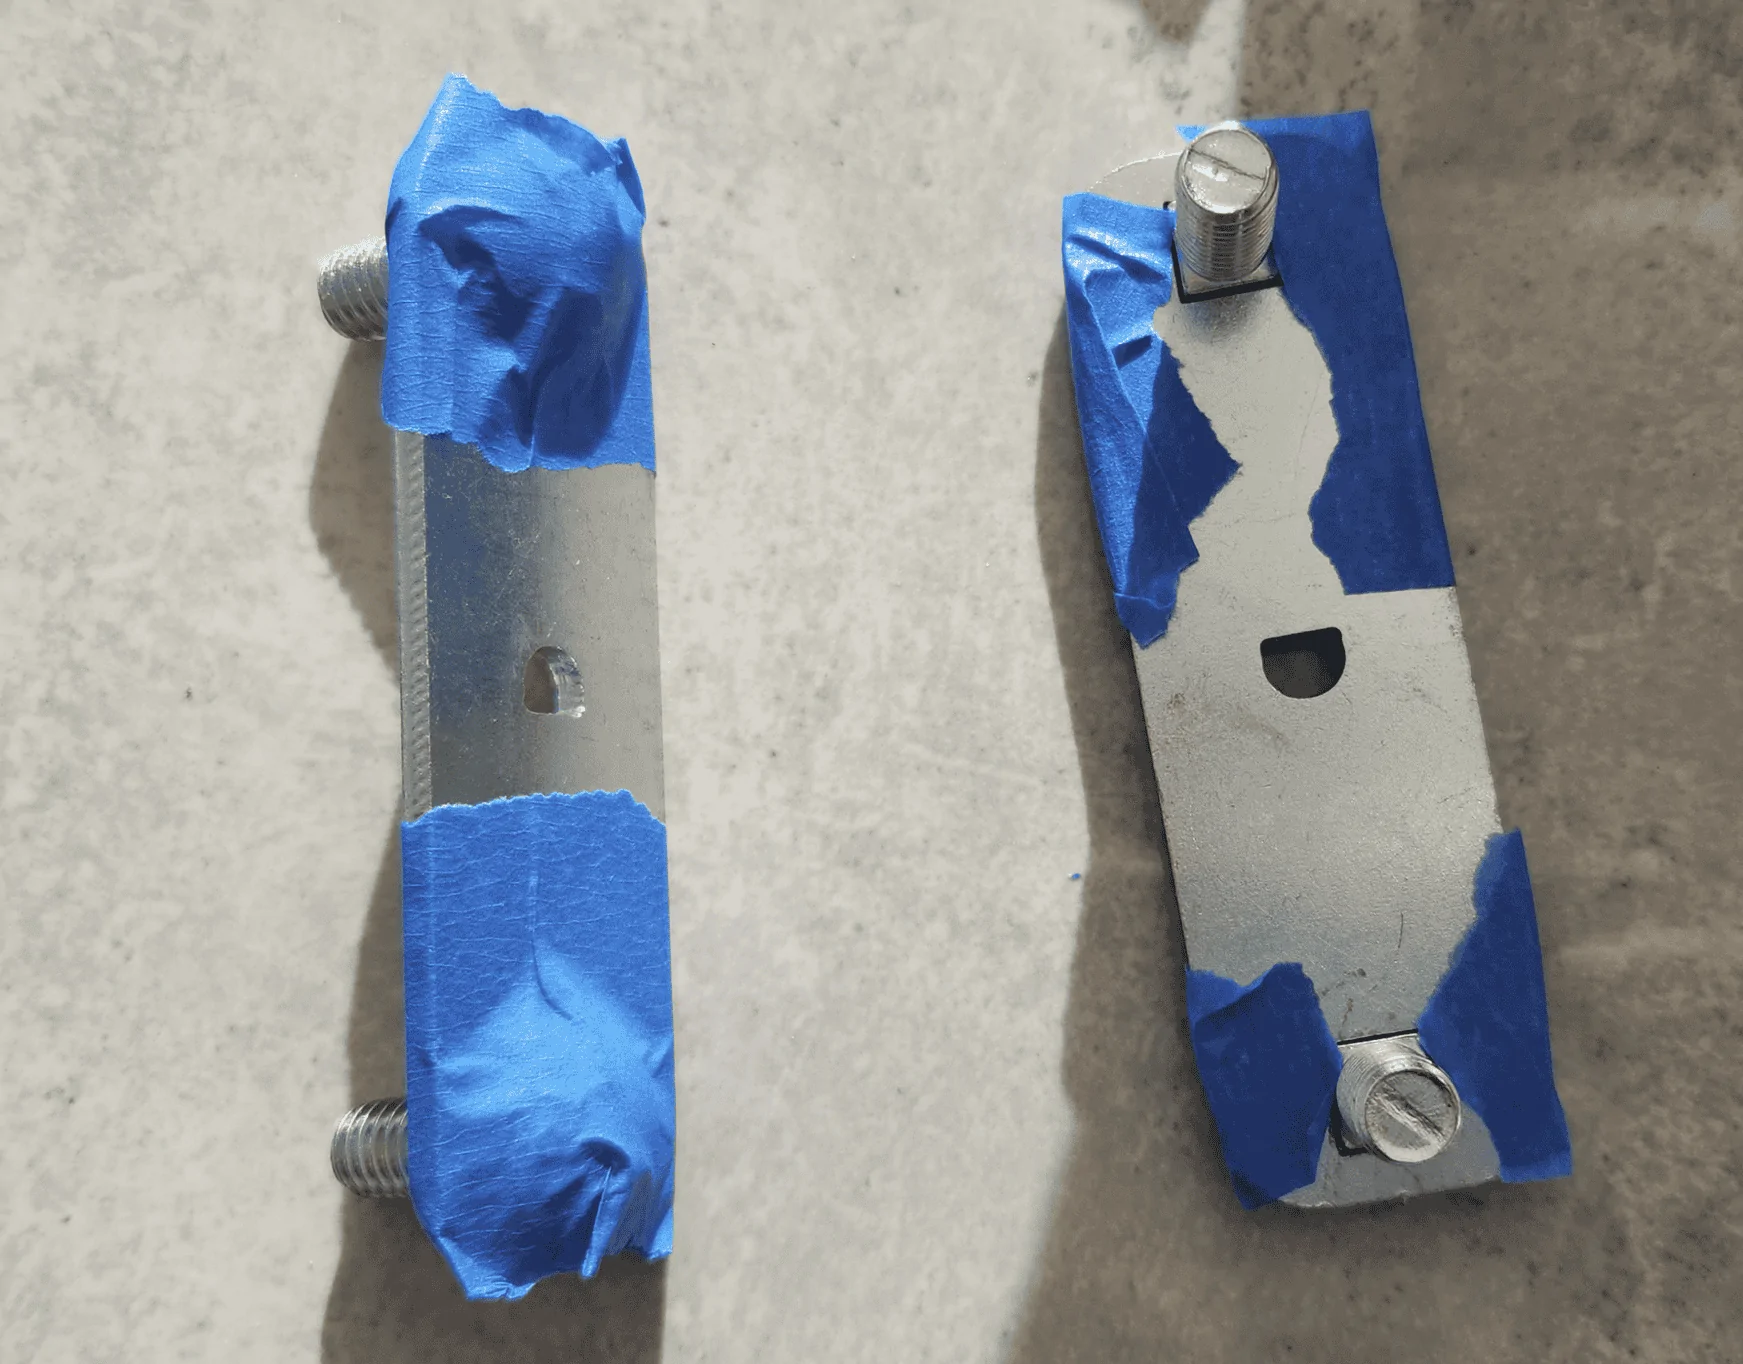
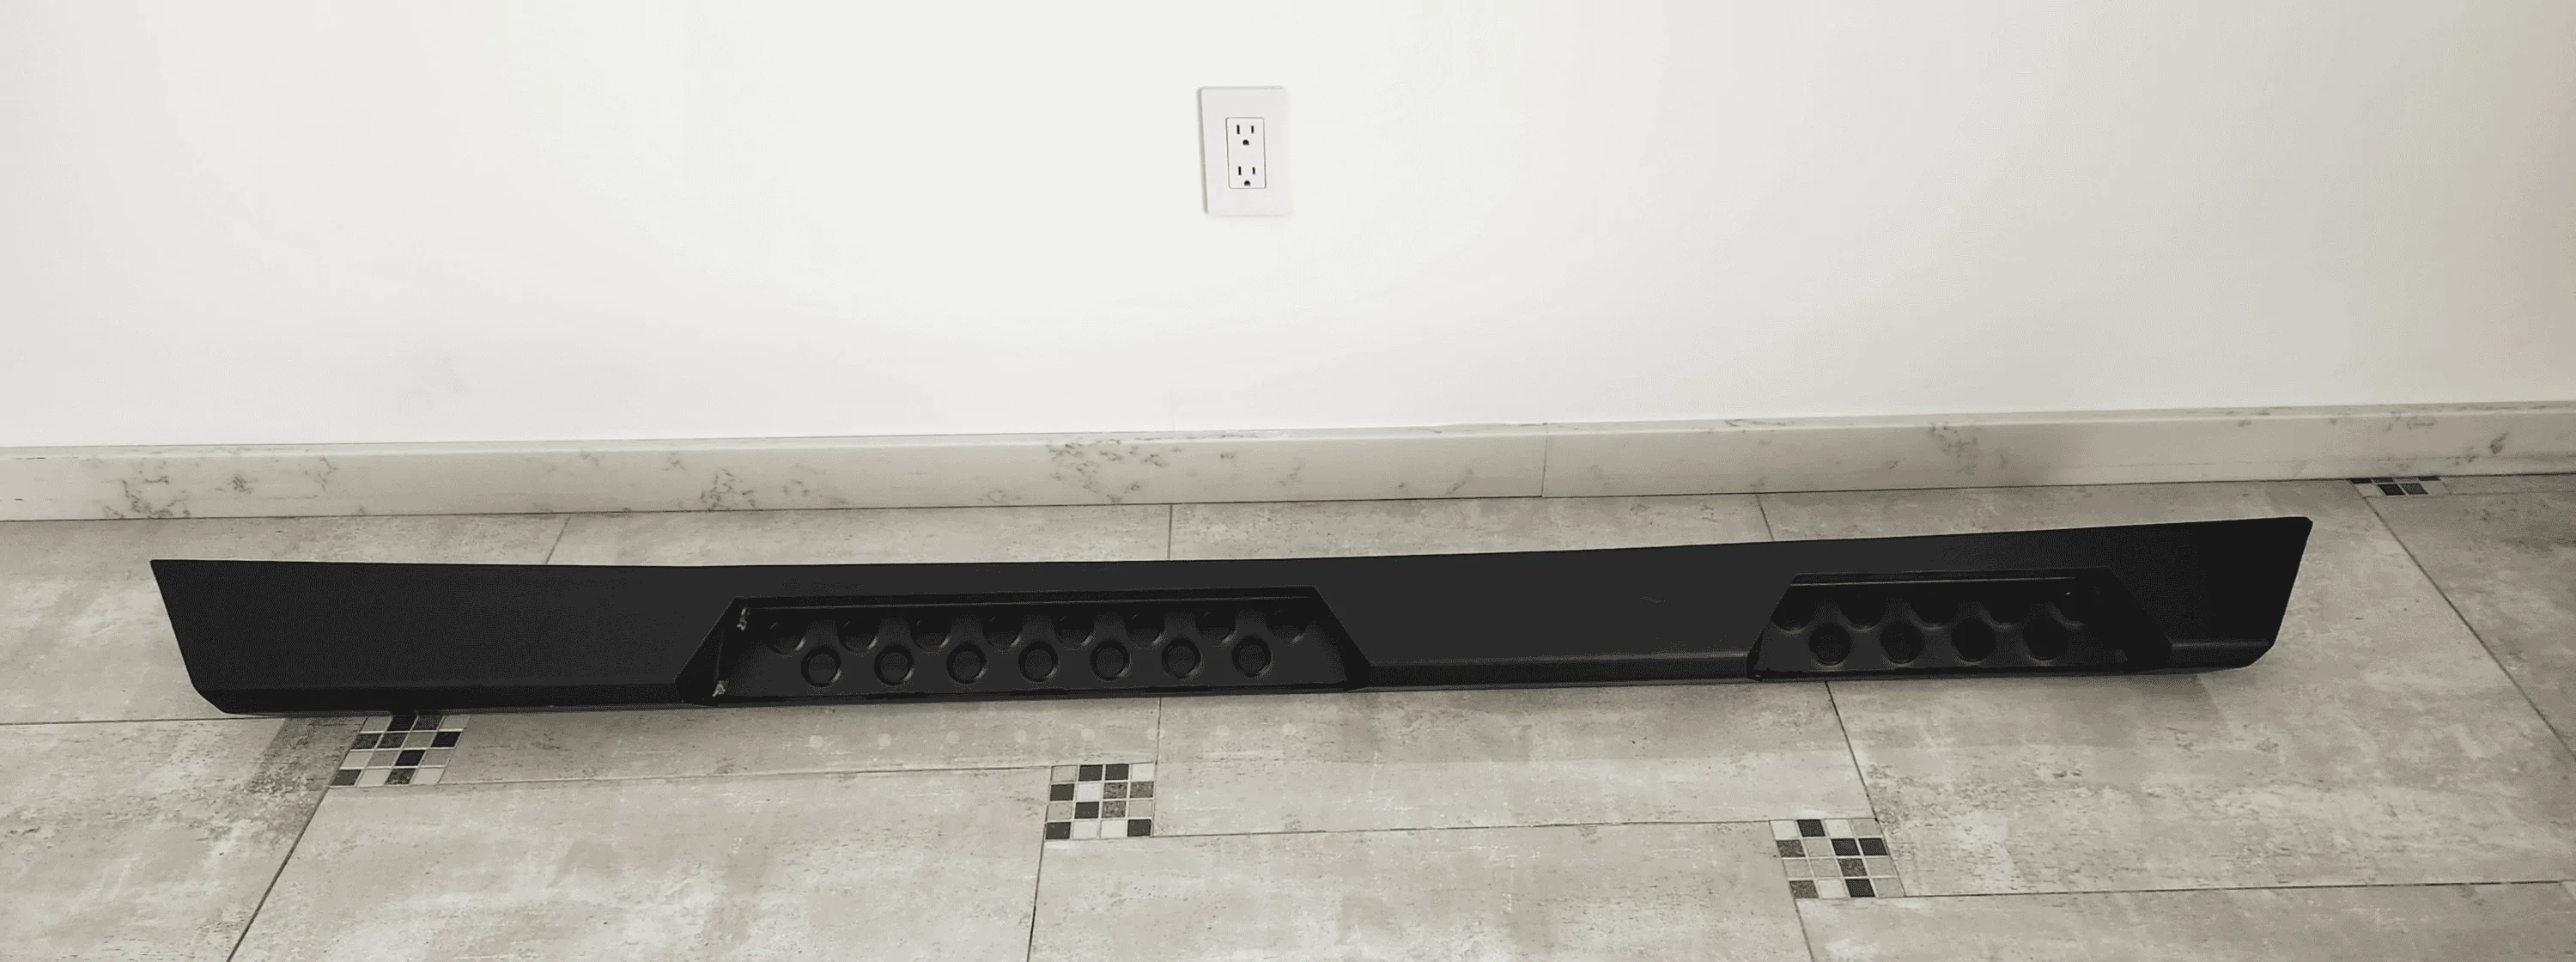
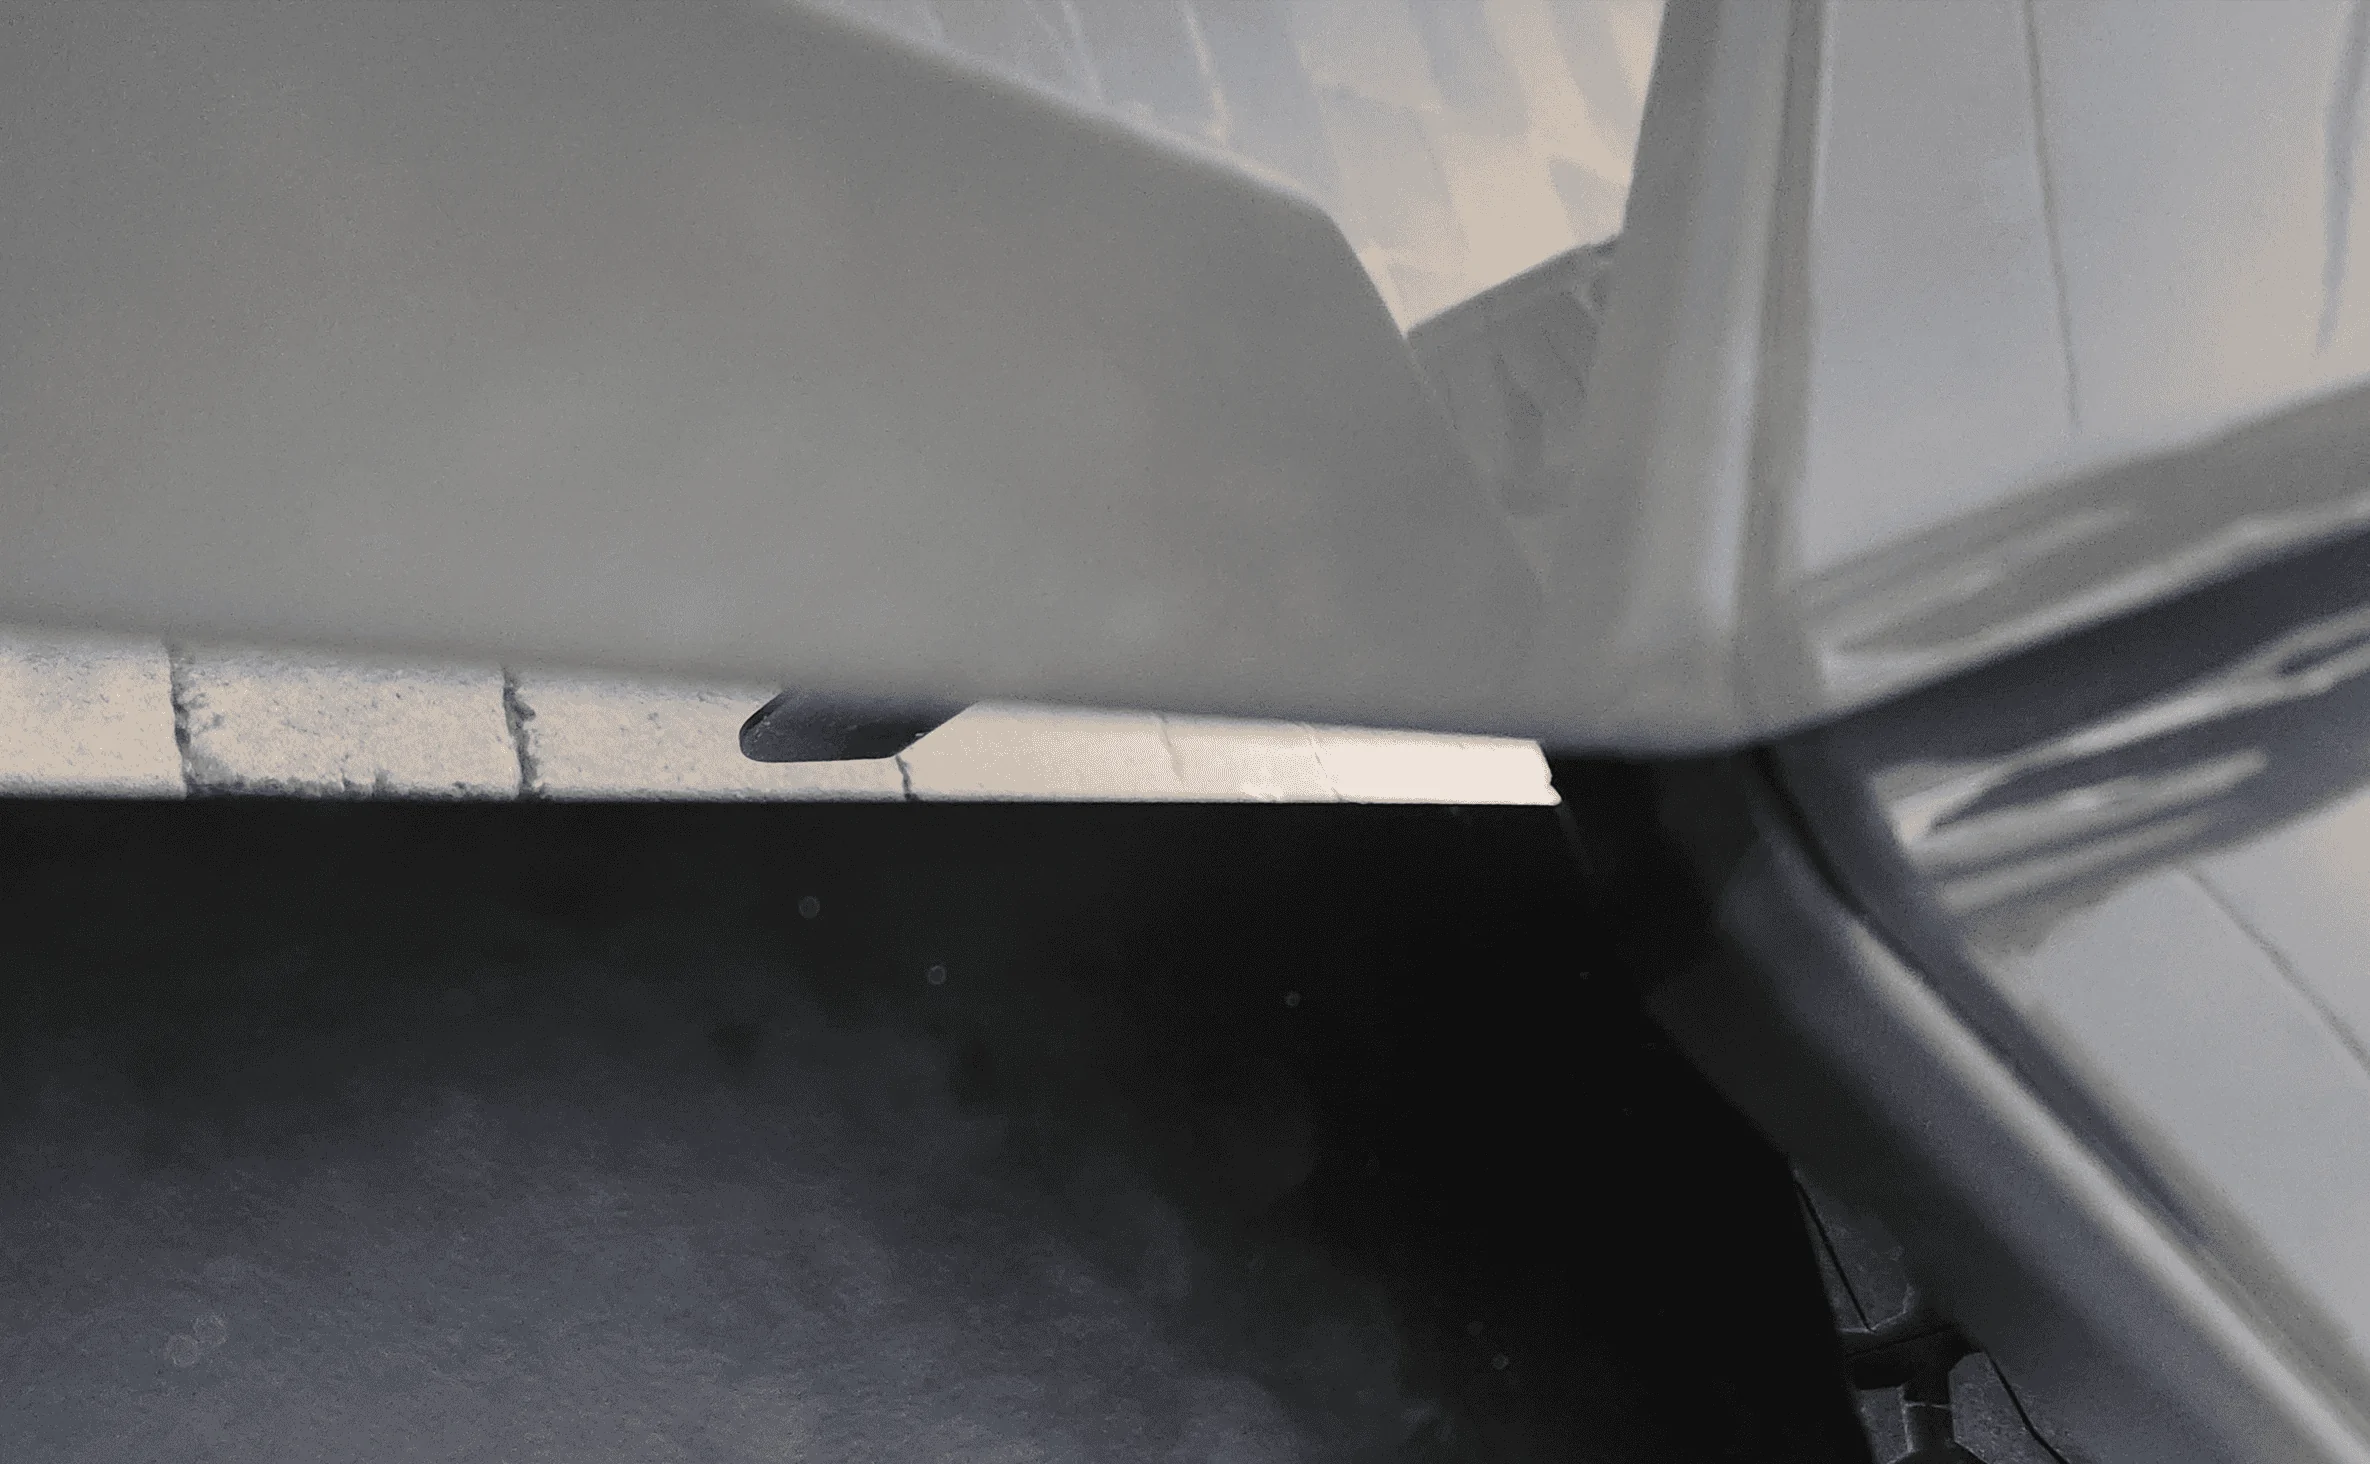
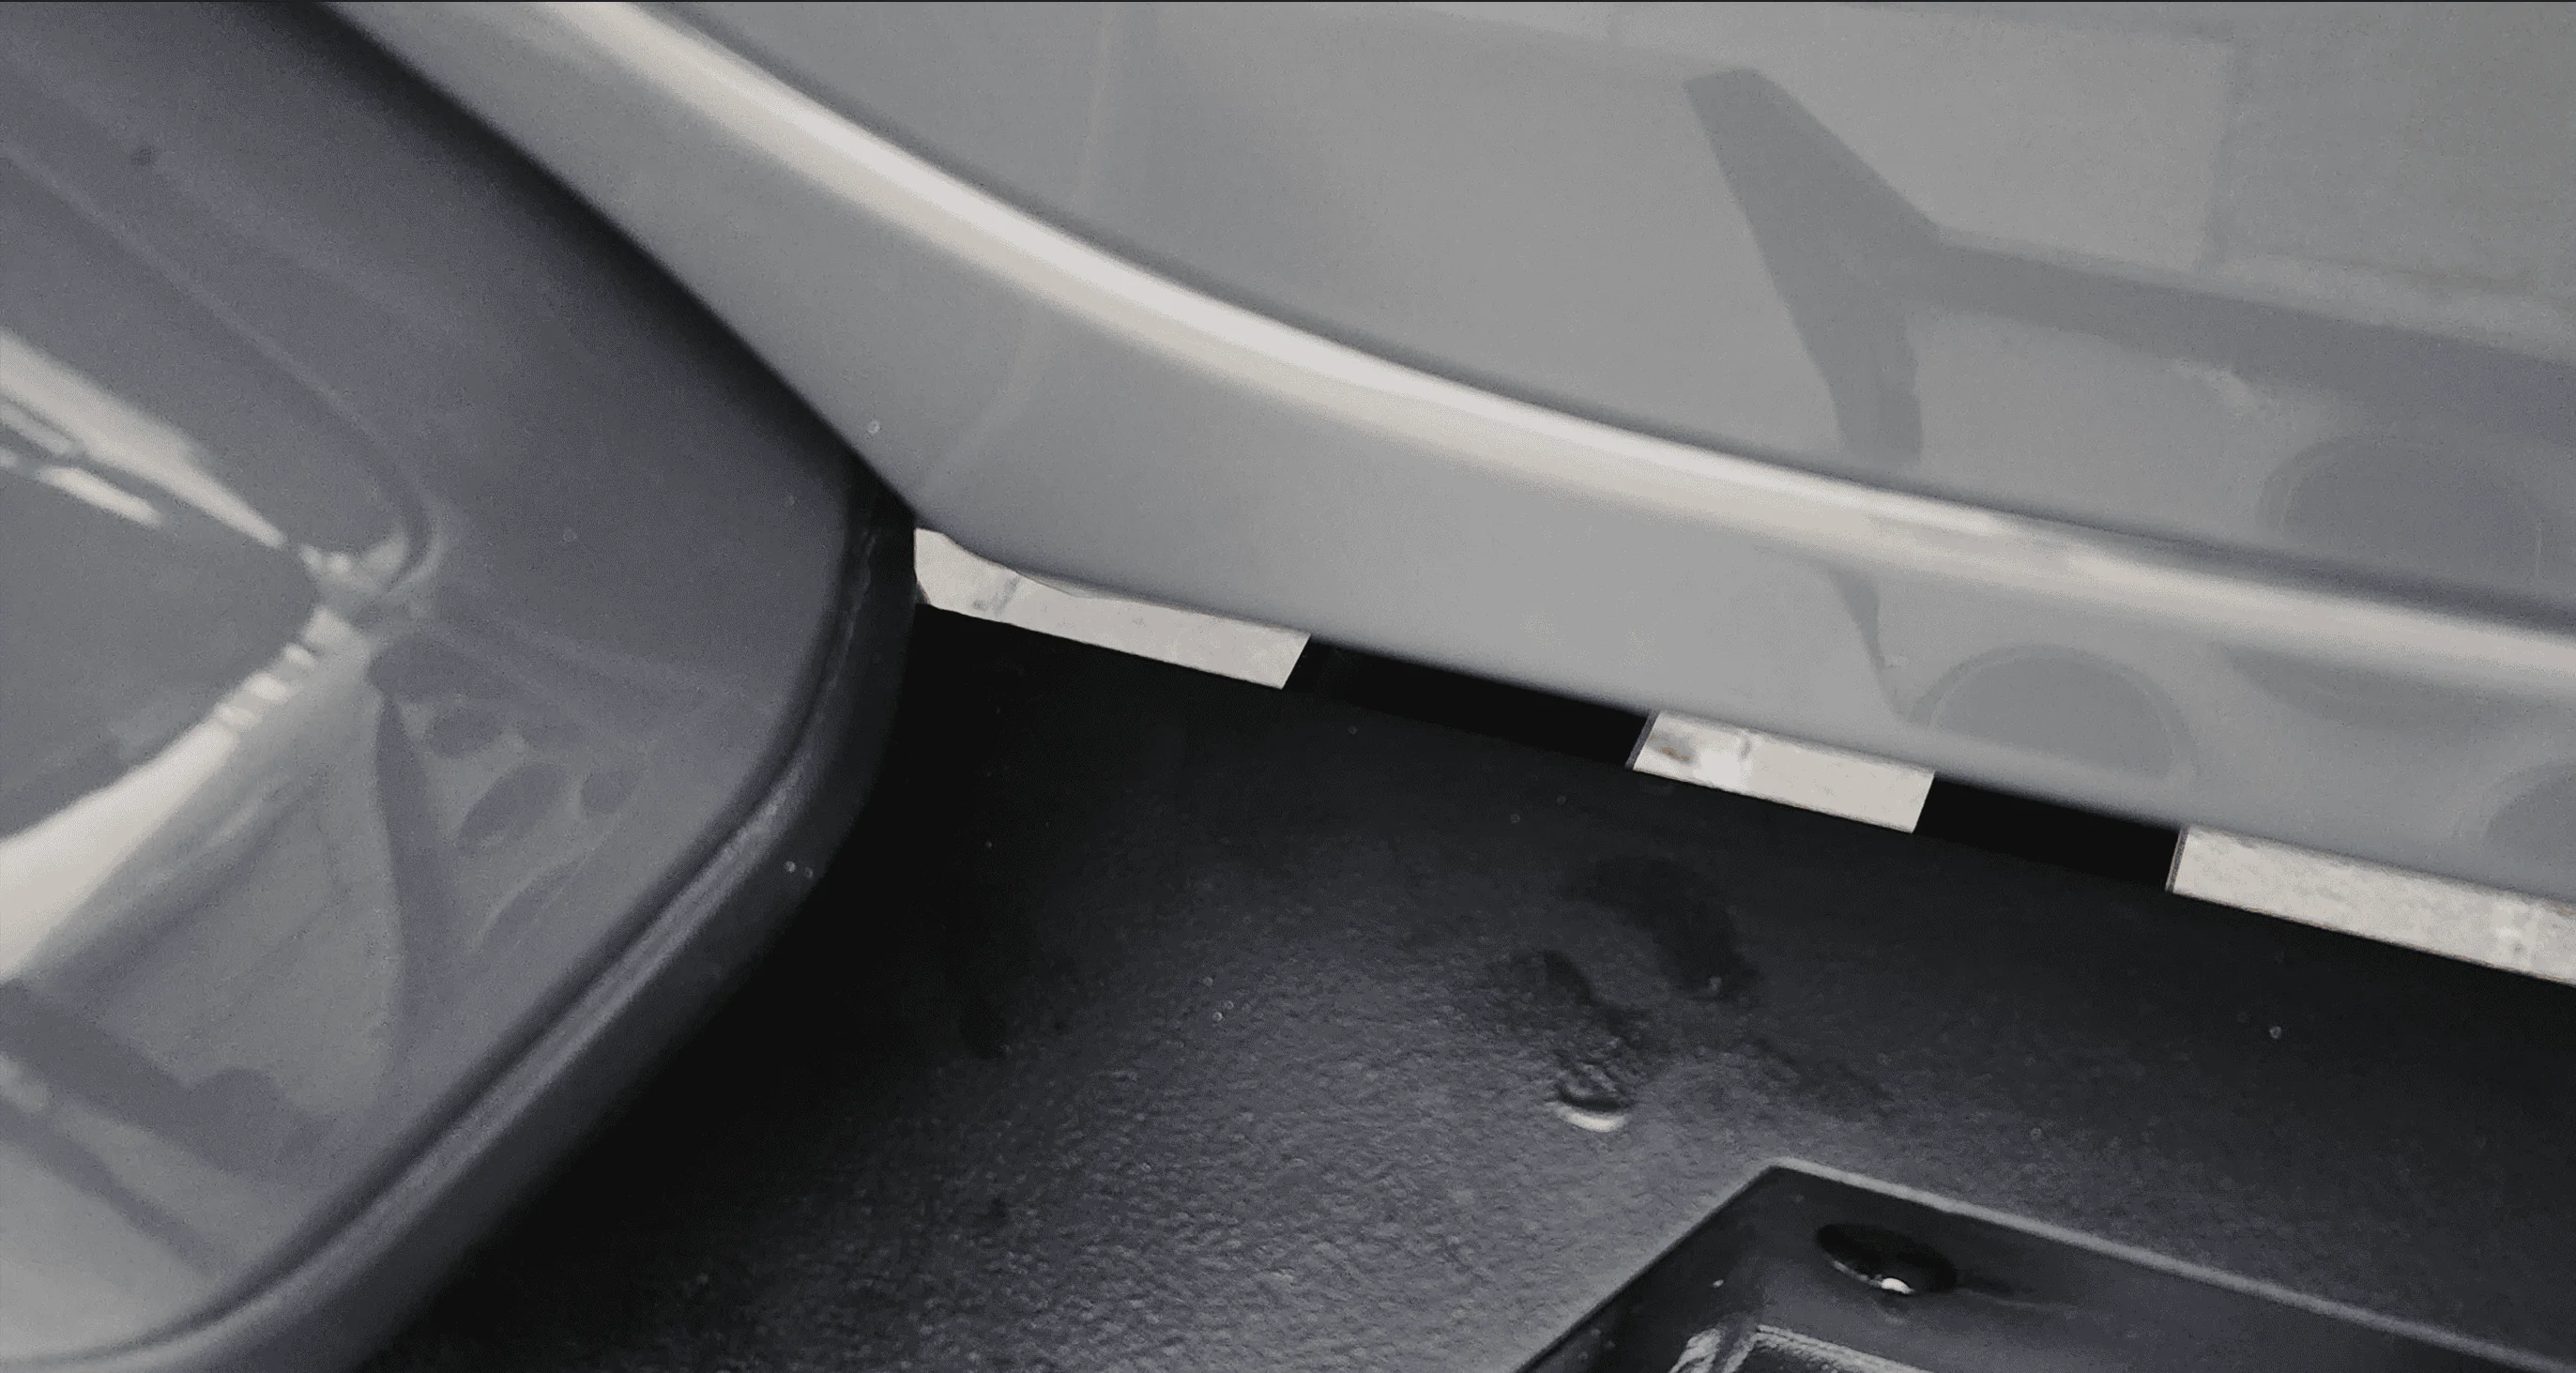
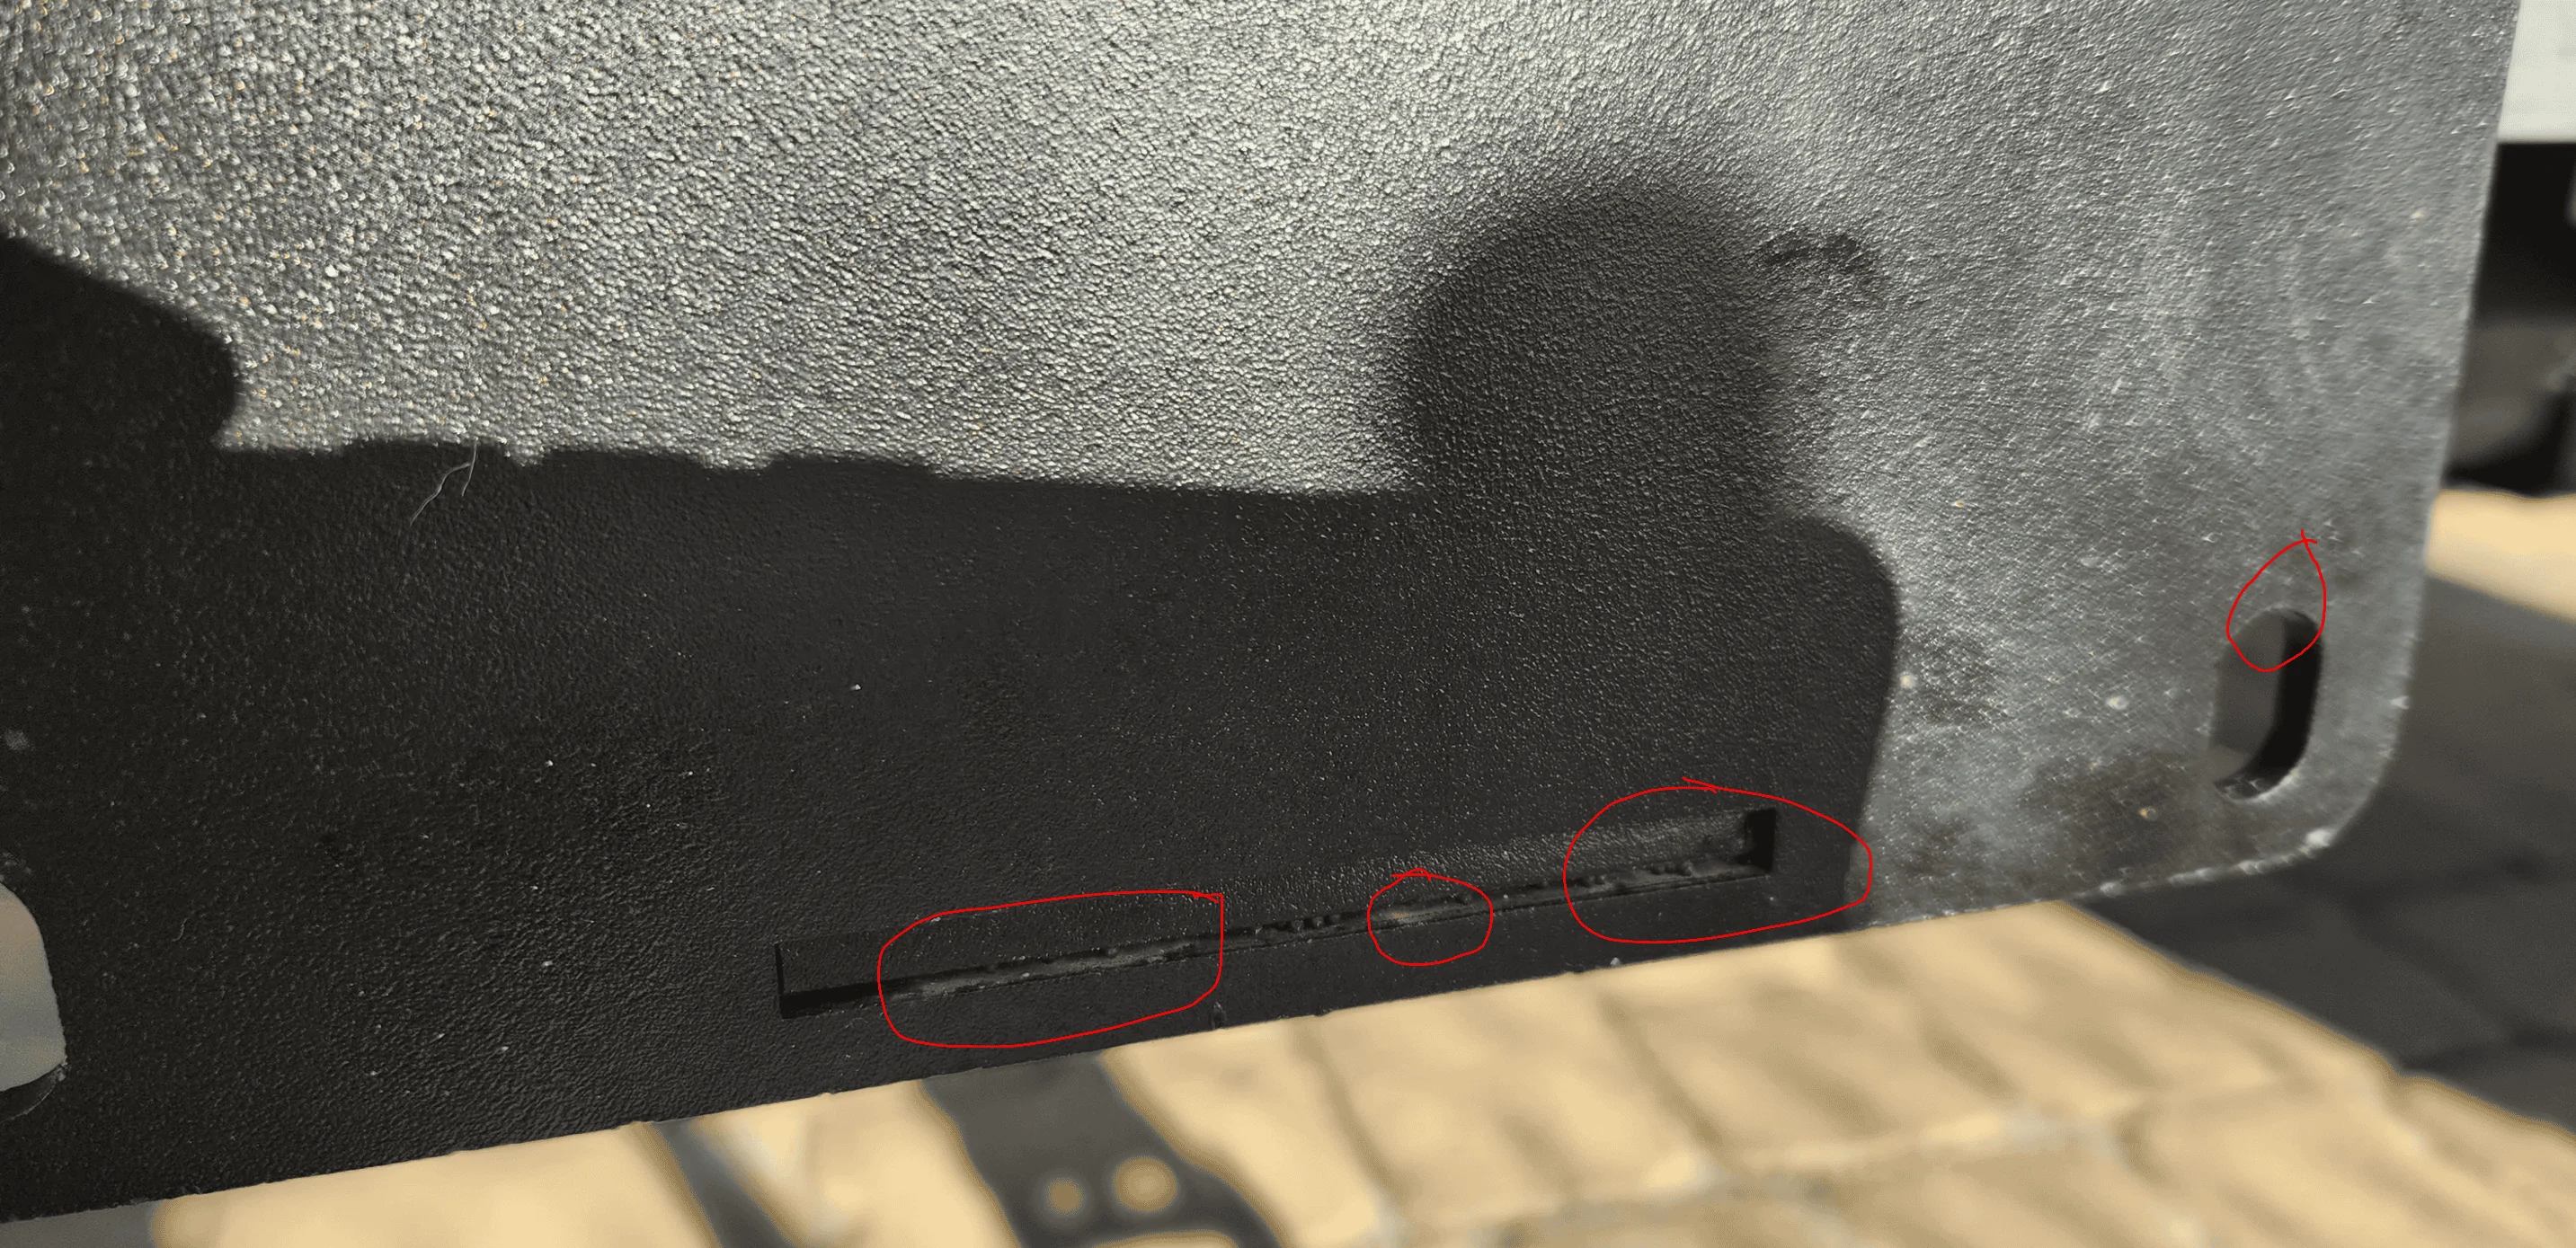
Got the brackets installed without any issues. The problem is attaching the rails. The manual says " Install the Backup Plate from inside the Slider Body and secure with the 3/8” Carriage Bolt, Hex Nut and Washer ". That's a GREAT idea, except there is nothing that holds the bolt to the backup plate, so basically you need to somehow hold the bolts AND the backup plate together, WHILE trying to insert it into the small opening in the rail. I can do it relatively easily with the rail resting on the floor (especially if I use masking tape to hold the bolt and the backing plate together. However, there is no way I can do it when the rail is sitting next to the bracket. There is no way I can get my fingers in there. And this is with the front and middle brackets. With the rear it's much worse because it has very little space inside.

I am doing this with the Jeep sitting on the ground and I do not have a lift. I even tried stuffing a bunch of bubble wrap inside the rail to hold the backing plate and bolts to the surface of the rail, but I can't manage to get all 10 bolts to align with bracket holes at the same time.

Anyone has any suggestions/tricks/hacks? I wasted an hour today trying to get one rail mounted and could not do it.

This is a really idiotic design. They should have used bolts with heads that can be held by a socket and should have made a small hole in the body of the slider adjacent to each bracket slot , so you can stick a ratchet extension in and hold the bolt in place. Magnetized bolts would have been nice too.
Sponsored


lodoffroad

Well-Known Member
Joined
Sep 5, 2018
Threads
8
Messages
472
Reaction score
595
Location
Indiana
Vehicle(s)
2018 White JLU
Tape the bolt and backup plate together. Try with just one carriage bolt at a time first, that way your can hold the backup plate like a short handle. Then add the second carriage bolt.
 

danald01

New Member
First Name
Don
Joined
Nov 28, 2018
Threads
0
Messages
2
Reaction score
0
Location
Greensboro, nc
Vehicle(s)
2019 JL Rubicon Unlimited
What he said. I used aluminum tape to hold the bolts into place.
 
OP
OP
ek1

ek1

Well-Known Member
Joined
Oct 3, 2022
Threads
15
Messages
208
Reaction score
224
Location
People's Republic of New York
Vehicle(s)
Private
Finally got the install finished. Took a LONG time because I was doing this by myself. Just a few notes for people who are considering them:

  • The ONLY way for me to get the bolts to stay in place was to tape them to backing plates. Without it, you need to somehow hold both the backing plate AND the bolt together against the body of the rail (from the INSIDE of the rail), while simultaneously putting on the washer and the nut. This is ESPECIALLY fun on the upper bolts that hold the rail to the brackets, since there is very little space between the rail and the body of the Jeep. It may be possible for someone who has three very small hands, with fingers that bend sideways and backwards, while having the Jeep mounted on a rotisserie, etc. Otherwise, good luck. Of course, if you are using tape, just know that you are leaving it in there since there is no way to remove it after everything is installed - there is not enough room. I used some painter's tape...hopefully it will just "bio-degrade" after a while:
Jeep Wrangler JL LOD Destroyer Rock Sliders - need install tips 1680044718473


  • You NEED to have something (or someone) to hold the rails at the exact height where bracket holes alight with rail holes in order to get the bolts going. I used two jacks with some wooden blocks to hold the rail up.
  • The only way for me to be able to install the washers and nuts was to get under the Jeep. I don't think it's possible to do it any other way since there is simply not enough space between the upper bolt and the body of the Jeep to do it from any other position.
  • The rails are NOT straight. They are a bit bowed, probably because the body of the Jeep is as well. However, the curvature of the rail is steeper than the body of the Jeep, which delivers extra fun when it comes time to align the rails with the body evenly (more on that later). Here is a pic showing how curved the rails are:
Jeep Wrangler JL LOD Destroyer Rock Sliders - need install tips 1680045041106


  • The alignment part was a lot of fun as well. Due to the curvature of these rails, the ends will always end up being closer to the body of the Jeep than the middle is. After you loosely attach the rail to all 3 brackets (and make sure that all the bolts holding the brackets to the body are loosened a bit), you can adjust the rail somewhat by pivoting it on the center bracket, while trying to make sure that the front and the rear edges are equally far from the body. You can also move it back and forth to get the fit you like. This is a lot of fun to do if you are installing these by yourself. I had to loosen and tighten all the bolts 3 times on one side and twice on the other before I got the rails where I want them. What a PITA.
  • Spacers: When the manual tells you "every Jeep is different", they mean it. I don't know whether every Jeep is different or every set of rails/brackets is different (I wasted enough time on this install and didn't want to spend more time measuring), but I ended up using 4 spacers on the passenger side and only 2 on the driver's side. Of course, LOD only includes 6 spacers (enough for 3 brackets), so if your Jeep or sliders are crooked enough so that BOTH rails are too close to the body, you are SOL and will need to try to get extra spacers from LOD. Even WITH spacers, you may end up with the end of the rail being a little too close for comfort to the body. Mine look like this (I think I have about 7-10mm gap between each end of the rail and the body). Passenger side is closer (despite having spacers). Hopefully the brackets won't flex:
Driver's front:
Jeep Wrangler JL LOD Destroyer Rock Sliders - need install tips 1680046326769


Driver's rear:
Jeep Wrangler JL LOD Destroyer Rock Sliders - need install tips 1680046365733


Passenger front:
Jeep Wrangler JL LOD Destroyer Rock Sliders - need install tips 1680046441602


Passenger rear:
Jeep Wrangler JL LOD Destroyer Rock Sliders - need install tips 1680046482876


  • I am no expert in powdercoating, but I've been around long enough to see MANY powdercoated objects and the quality of coating on these rails and brackets leaves a lot to be desired. My rails came with powder coat chipped on all 4 corners, as well as in the middle of one rail and I could peel more pieces of powdercoating off with just my fingernail:
Jeep Wrangler JL LOD Destroyer Rock Sliders - need install tips 1680046811961

....this caused me to waste more time on buying sandpaper, Rust Oleum enamel, sponge brush, etc. Again, not a big deal since these rails will get beat up anyway and I will end up patching them many more times.

  • The coating does not cover all the nooks and crannies enough and rust was already starting to appear on my brackets after 3 days of being mounted on the Jeep:
Jeep Wrangler JL LOD Destroyer Rock Sliders - need install tips 1680046887772


I didn't care about it, since I was covering everything with a thick layer of Blaster SurfaceShield anyway, but definitely inspect your rails and brackets carefully after taking them out of the box and do something to control rust.

End result:
Jeep Wrangler JL LOD Destroyer Rock Sliders - need install tips 1680048281887

  • I had big hopes of using these sliders as steps (actually one of the main reasons I chose these over some other brands) but they ended up being uncomfortable. Since the top of the step is only about 4" below the door sill and I am 6' tall, standing on the step places the roof of the jeep 4" below my shoulder level. Then I have to crouch down to get in. Basically imagine taking wheels off your Jeep, resting it on 4" tall wooden blocks and then trying to get into it. Definitely not comfortable. To be clear, this has nothing to do with LOD, but definitely try to find someone who has these installed to understand whether these steps work for you. They are great for small kids for sure.
  • I didn't install the optional bolt because I didn't have the balls to drill into the frame. I decided to see what happens when use these sliders on actual rocks....I guess I can always add it later if needed. I'm not planning to tackle 5' boulders anyway.
 

Some Random Guy

Well-Known Member
Joined
Sep 16, 2020
Threads
61
Messages
1,808
Reaction score
2,157
Location
Washington
Vehicle(s)
2022 JL Sport, 2022 Ford Mustang
Occupation
Comptroller
I’m 6’2” and find mine comfortable for getting in/out. I also like being able to stand on them and comfortably work the top at eye level or below.
Now, I am on 39’s with a 2.5” lift that likely netted me 3.5-4.5. So the step is at the limit of comfortable and makes a good intermediary to get into the tub. I never stand all the way up while climbing in, just use it to boost my posterior into the seat.
 

Sponsored

redsyphon

Well-Known Member
First Name
James
Joined
Mar 26, 2018
Threads
29
Messages
567
Reaction score
838
Location
North Florida
Vehicle(s)
2018 JLU Rubicon
Occupation
IT Project Manager
Vehicle Showcase
1
It's a bummer that your first impressions and experience with these have been negative thus far, but good job getting the deed done.

As someone who's been running these steps (first gen) for many years, I can confirm they are bomb proof and comfortable to use, but then again I'm 5'4". So, that may make a difference for sure.

Even so, I'd recommend giving them a good chance on and off road (as you already hinted at).

Your Jeep looks damn good with them on there, and hey, at least you didnt have one of them dropped on your forehead from about 4 feet while laying underneath... Because even with a second person to hold the rails for you while you get some bolts in, it doesn't mean it'll go smoothly or without slight pain! LOL
 

Tncdrew

Well-Known Member
First Name
Tom
Joined
May 3, 2022
Threads
19
Messages
1,237
Reaction score
2,415
Location
East Tennessee
Vehicle(s)
2022 JL Willys, 3.6L - 8spd
Hmmm, you now have to bolt the frame brackets to the rails? Bought mine (2dr) last summer and they're fully welded.
Installation was fairly easy. Love them.
 

JP29

Well-Known Member
First Name
Zach
Joined
Jun 14, 2020
Threads
18
Messages
723
Reaction score
1,214
Location
Olathe
Vehicle(s)
2020 JL Sport
The ones I put on my two door last week were also one piece. Could be they made the move to the two piece on the four door version first? I will say mine weren't without issue, and I am also over six feet tall and at Sport trim height, the step puts me on a collision course for the roofline. That'll change when I go to a taller lift and 35s, and I'm starting to adapt to using them for entry. Dismount is still confusing me to be honest!
 

MOOG5050

Well-Known Member
First Name
Brian
Joined
Mar 8, 2023
Threads
22
Messages
383
Reaction score
524
Location
Ny
Vehicle(s)
Rubicon XR
Finally got the install finished. Took a LONG time because I was doing this by myself. Just a few notes for people who are considering them:

  • The ONLY way for me to get the bolts to stay in place was to tape them to backing plates. Without it, you need to somehow hold both the backing plate AND the bolt together against the body of the rail (from the INSIDE of the rail), while simultaneously putting on the washer and the nut. This is ESPECIALLY fun on the upper bolts that hold the rail to the brackets, since there is very little space between the rail and the body of the Jeep. It may be possible for someone who has three very small hands, with fingers that bend sideways and backwards, while having the Jeep mounted on a rotisserie, etc. Otherwise, good luck. Of course, if you are using tape, just know that you are leaving it in there since there is no way to remove it after everything is installed - there is not enough room. I used some painter's tape...hopefully it will just "bio-degrade" after a while:
1680044718473.png


  • You NEED to have something (or someone) to hold the rails at the exact height where bracket holes alight with rail holes in order to get the bolts going. I used two jacks with some wooden blocks to hold the rail up.
  • The only way for me to be able to install the washers and nuts was to get under the Jeep. I don't think it's possible to do it any other way since there is simply not enough space between the upper bolt and the body of the Jeep to do it from any other position.
  • The rails are NOT straight. They are a bit bowed, probably because the body of the Jeep is as well. However, the curvature of the rail is steeper than the body of the Jeep, which delivers extra fun when it comes time to align the rails with the body evenly (more on that later). Here is a pic showing how curved the rails are:
1680045041106.png


  • The alignment part was a lot of fun as well. Due to the curvature of these rails, the ends will always end up being closer to the body of the Jeep than the middle is. After you loosely attach the rail to all 3 brackets (and make sure that all the bolts holding the brackets to the body are loosened a bit), you can adjust the rail somewhat by pivoting it on the center bracket, while trying to make sure that the front and the rear edges are equally far from the body. You can also move it back and forth to get the fit you like. This is a lot of fun to do if you are installing these by yourself. I had to loosen and tighten all the bolts 3 times on one side and twice on the other before I got the rails where I want them. What a PITA.
  • Spacers: When the manual tells you "every Jeep is different", they mean it. I don't know whether every Jeep is different or every set of rails/brackets is different (I wasted enough time on this install and didn't want to spend more time measuring), but I ended up using 4 spacers on the passenger side and only 2 on the driver's side. Of course, LOD only includes 6 spacers (enough for 3 brackets), so if your Jeep or sliders are crooked enough so that BOTH rails are too close to the body, you are SOL and will need to try to get extra spacers from LOD. Even WITH spacers, you may end up with the end of the rail being a little too close for comfort to the body. Mine look like this (I think I have about 7-10mm gap between each end of the rail and the body). Passenger side is closer (despite having spacers). Hopefully the brackets won't flex:
Driver's front:
1680046326769.png


Driver's rear:
1680046365733.png


Passenger front:
1680046441602.png


Passenger rear:
1680046482876.png


  • I am no expert in powdercoating, but I've been around long enough to see MANY powdercoated objects and the quality of coating on these rails and brackets leaves a lot to be desired. My rails came with powder coat chipped on all 4 corners, as well as in the middle of one rail and I could peel more pieces of powdercoating off with just my fingernail:
1680046811961.png

....this caused me to waste more time on buying sandpaper, Rust Oleum enamel, sponge brush, etc. Again, not a big deal since these rails will get beat up anyway and I will end up patching them many more times.

  • The coating does not cover all the nooks and crannies enough and rust was already starting to appear on my brackets after 3 days of being mounted on the Jeep:
1680046887772.png


I didn't care about it, since I was covering everything with a thick layer of Blaster SurfaceShield anyway, but definitely inspect your rails and brackets carefully after taking them out of the box and do something to control rust.

End result:
1680048281887.png

  • I had big hopes of using these sliders as steps (actually one of the main reasons I chose these over some other brands) but they ended up being uncomfortable. Since the top of the step is only about 4" below the door sill and I am 6' tall, standing on the step places the roof of the jeep 4" below my shoulder level. Then I have to crouch down to get in. Basically imagine taking wheels off your Jeep, resting it on 4" tall wooden blocks and then trying to get into it. Definitely not comfortable. To be clear, this has nothing to do with LOD, but definitely try to find someone who has these installed to understand whether these steps work for you. They are great for small kids for sure.
  • I didn't install the optional bolt because I didn't have the balls to drill into the frame. I decided to see what happens when use these sliders on actual rocks....I guess I can always add it later if needed. I'm not planning to tackle 5' boulders anyway.
Have the same on my rubicon xr. Having had something similar step up sliders on my Jku rubicon recon, I knew that at 6’1”, I could not stand on the step and comfortably get in the Jeep. It’s just easier for me to step over it and pull up in. It’s the nature of the vehicle. I stand on my ford raptor steps and fall in all the time but it doesn’t work in the Jeep.

So why install them? My wife and kids use them as steps and I can go as high as I want without For me, the original no step rails were better. But we all compromise. I do like em for rock sliders.
 

Sponsored

OP
OP
ek1

ek1

Well-Known Member
Joined
Oct 3, 2022
Threads
15
Messages
208
Reaction score
224
Location
People's Republic of New York
Vehicle(s)
Private
The ones I put on my two door last week were also one piece. Could be they made the move to the two piece on the four door version first? I will say mine weren't without issue, and I am also over six feet tall and at Sport trim height, the step puts me on a collision course for the roofline. That'll change when I go to a taller lift and 35s, and I'm starting to adapt to using them for entry. Dismount is still confusing me to be honest!
The 2-door version is 1-piece. The 4-door version used to be 1-piece too, but the current 4-door version (v2) is 4-piece (3 brackets+1 rail).
 

JP29

Well-Known Member
First Name
Zach
Joined
Jun 14, 2020
Threads
18
Messages
723
Reaction score
1,214
Location
Olathe
Vehicle(s)
2020 JL Sport
The 2-door version is 1-piece. The 4-door version used to be 1-piece too, but the current 4-door version (v2) is 4-piece (3 brackets+1 rail).
Yeah TIL, I just meant the difference between a one piece construction and the bracket on rail. They made the move to a bolt together construction a while back and I was under the impression that applied to both the 2 and 4 door models.
 

Jgc650i

Well-Known Member
Joined
Jan 3, 2023
Threads
2
Messages
68
Reaction score
173
Location
North Carolina
Vehicle(s)
22 Wrangler 392XR, 22 Ram 1500 Lmtd, 24 Audi SQ8
In addition to the tape on the bolts/backup plates, I used heavy duty zip ties to hold the sliders in place while getting the bolts in place and threading started. Made a world of difference and still allowed for sliding the sliders up and back when working on and reaching the bolts on different sides of the brackets. I agree, this is a crazy design from the install perspective. Once installed though, love the Destroyers!
 

Tpom

Well-Known Member
First Name
Tyler
Joined
Sep 8, 2020
Threads
11
Messages
177
Reaction score
255
Location
Olympic Peninsula - WA
Vehicle(s)
2021 JLUR
Build Thread
Link
Clubs
 
Glad some of the tips helped install the sliders @ek1.

Living with mine for a little while now I have grown into a routine getting in and out of the Jeep. Takes a bit to break the habit without them. I would say getting out (especially allowing less pressure on the bolster) and getting access to the roof is the best perks for me. My wife loves the step though. Even with a 2.5in lift and 37s, it was difficult for her to get in and out. Now she can use the step to help get in.
 
OP
OP
ek1

ek1

Well-Known Member
Joined
Oct 3, 2022
Threads
15
Messages
208
Reaction score
224
Location
People's Republic of New York
Vehicle(s)
Private
In addition to the tape on the bolts/backup plates, I used heavy duty zip ties to hold the sliders in place while getting the bolts in place and threading started. Made a world of difference and still allowed for sliding the sliders up and back when working on and reaching the bolts on different sides of the brackets. I agree, this is a crazy design from the install perspective. Once installed though, love the Destroyers!
Yup, great idea....I thought of that after I finished the install :facepalm:
Sponsored


Top