Sponsored

Backup Lights

Sprint7

Well-Known Member
First Name
Mike
Joined
May 31, 2018
Threads
9
Messages
144
Reaction score
160
Location
Louisiana
Vehicle(s)
2004 LJ 2018 JL
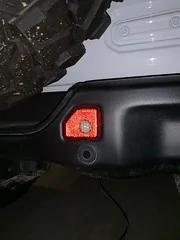
I'm going to try to answer several of the questions that i have gotten. I have the steel bumper with sensors.

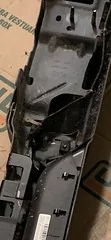
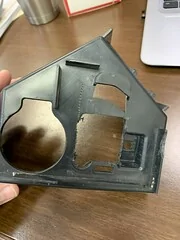
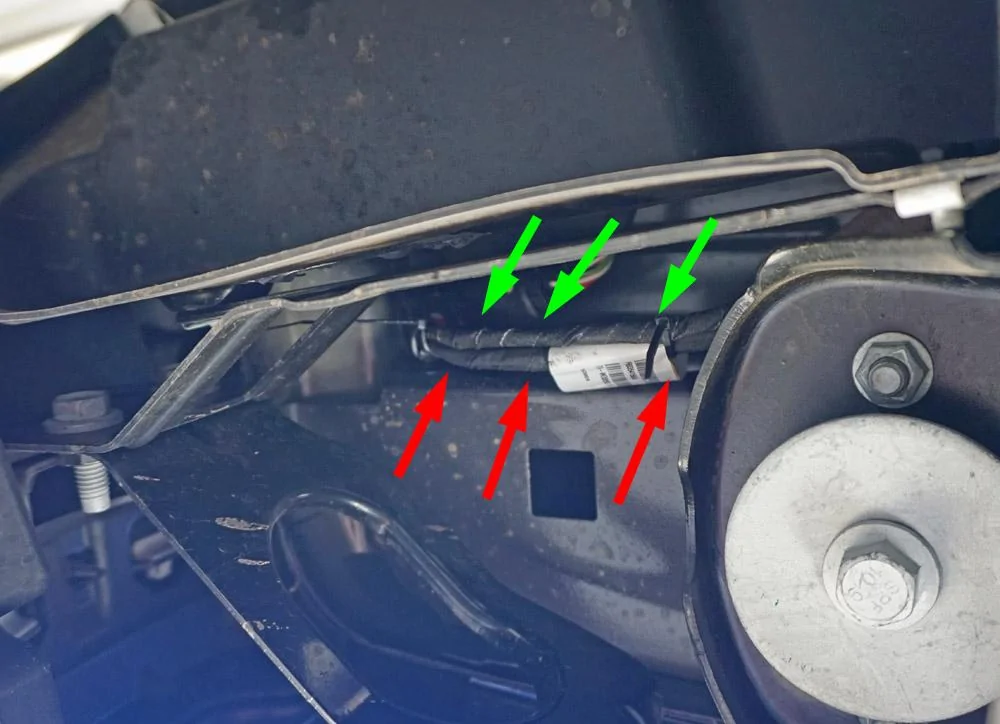
First you have to remove the bumper completely to remove the bracket and reflector.
40620656983_3a49f8e3f3_h.webp


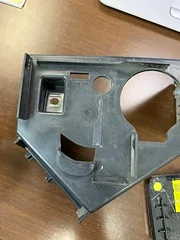
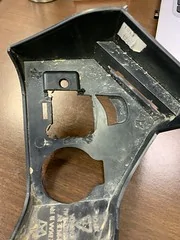
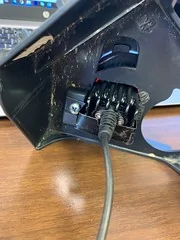
Here is the backside of the bumper showing the bracket.
46671219815_99981ce487_m.webp


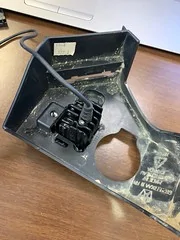
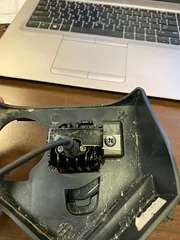
Then you remove the bracket and the reflector
46862675744_f6d978d476_m.webp


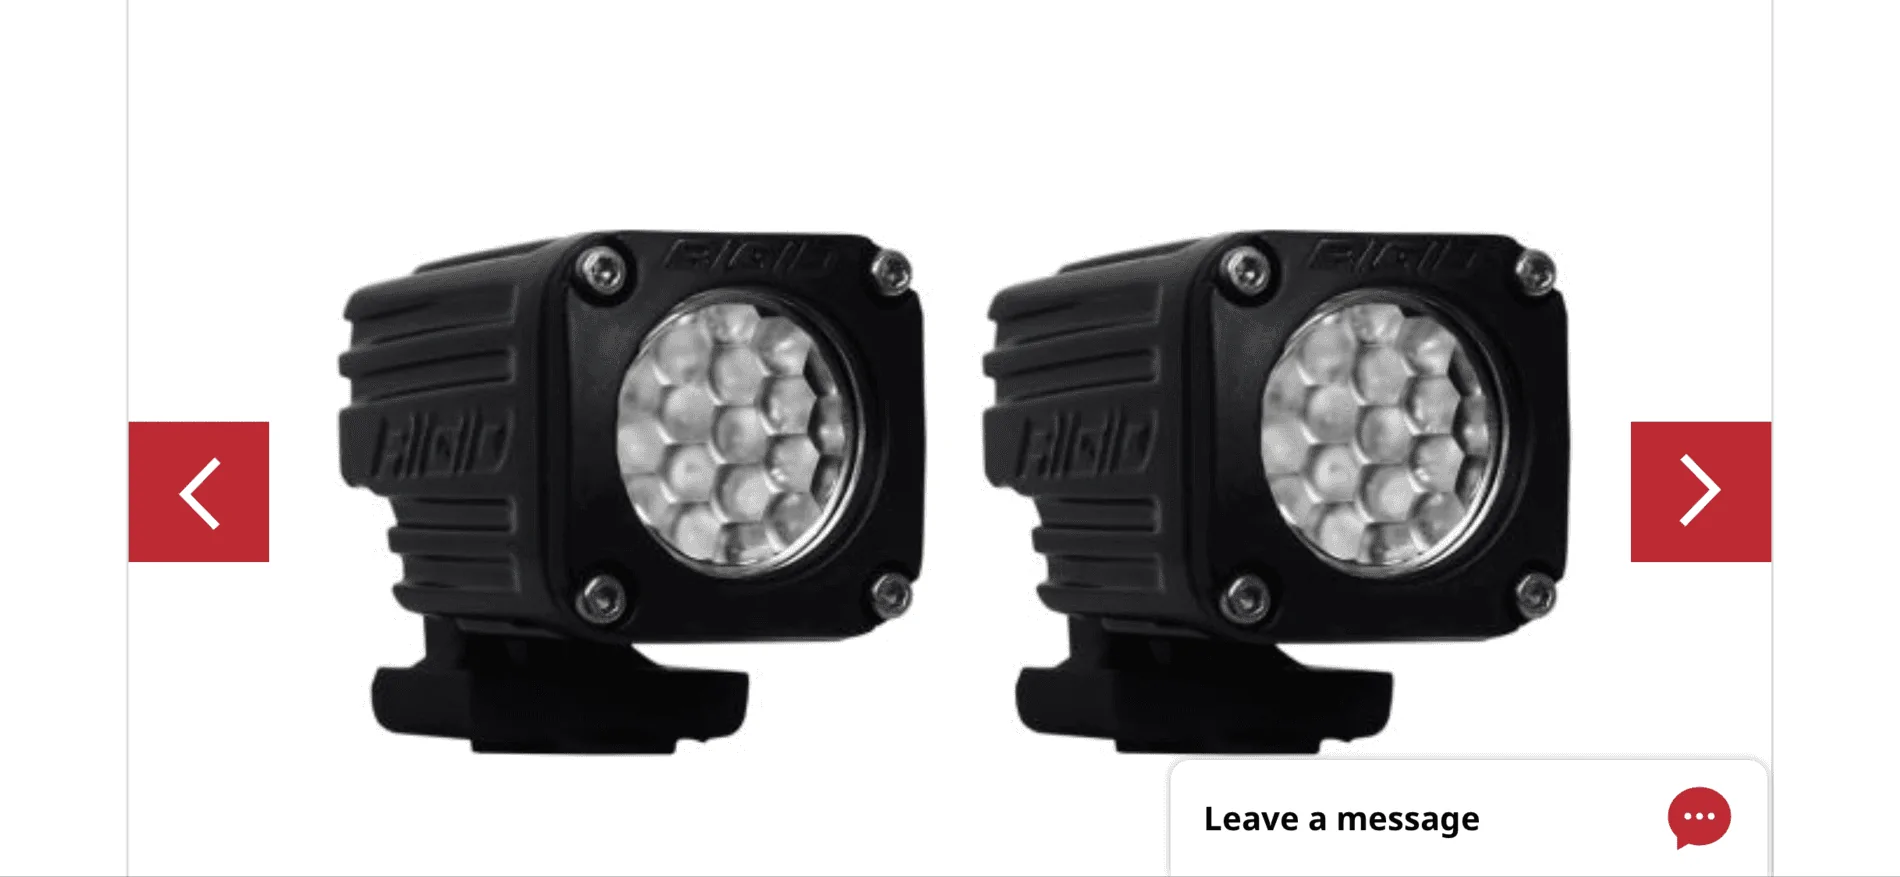
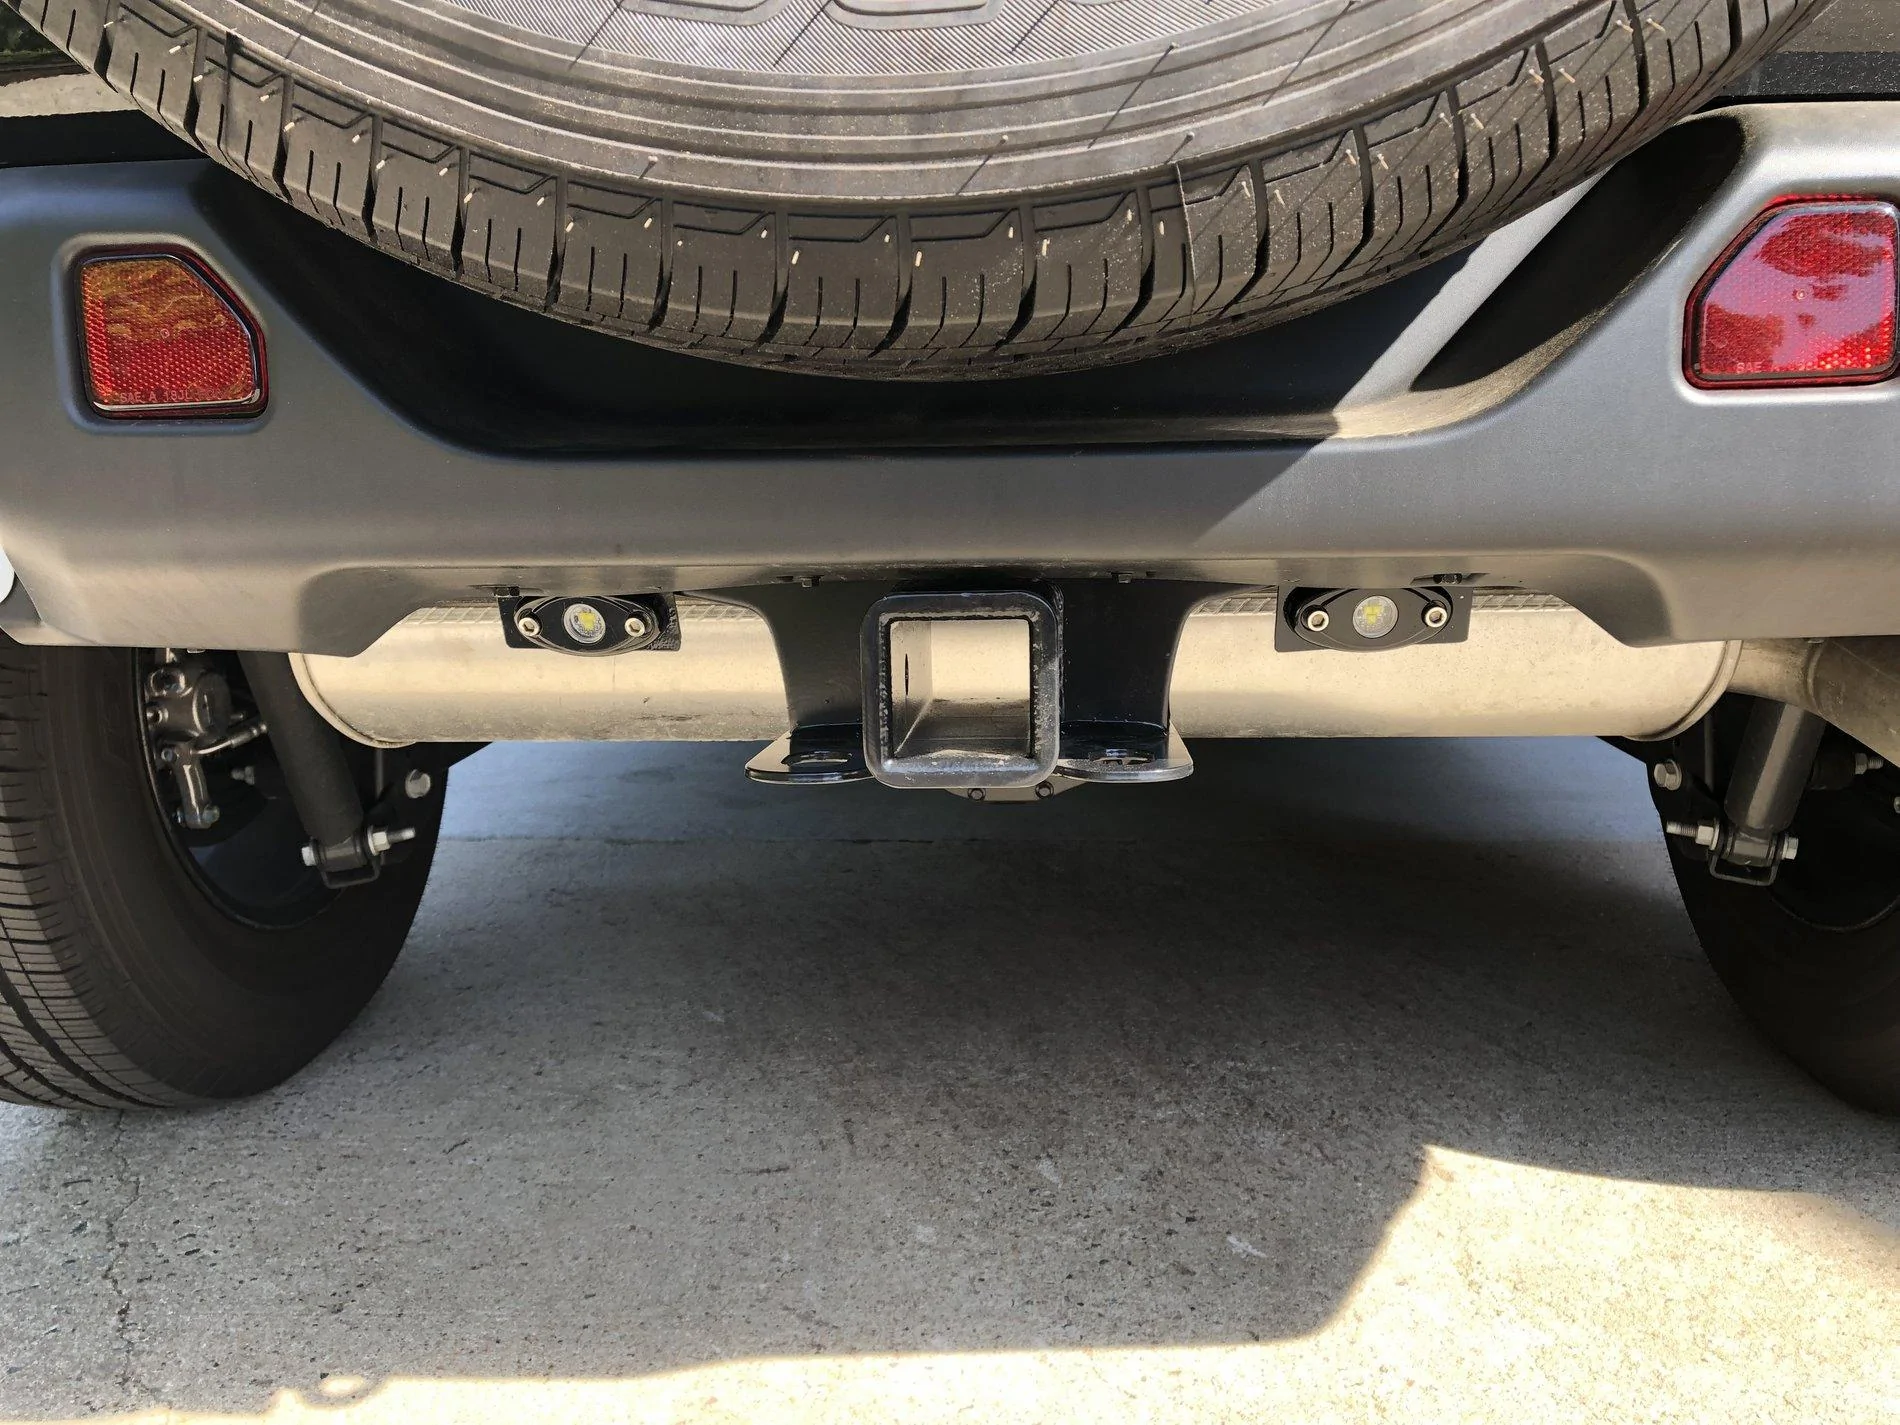
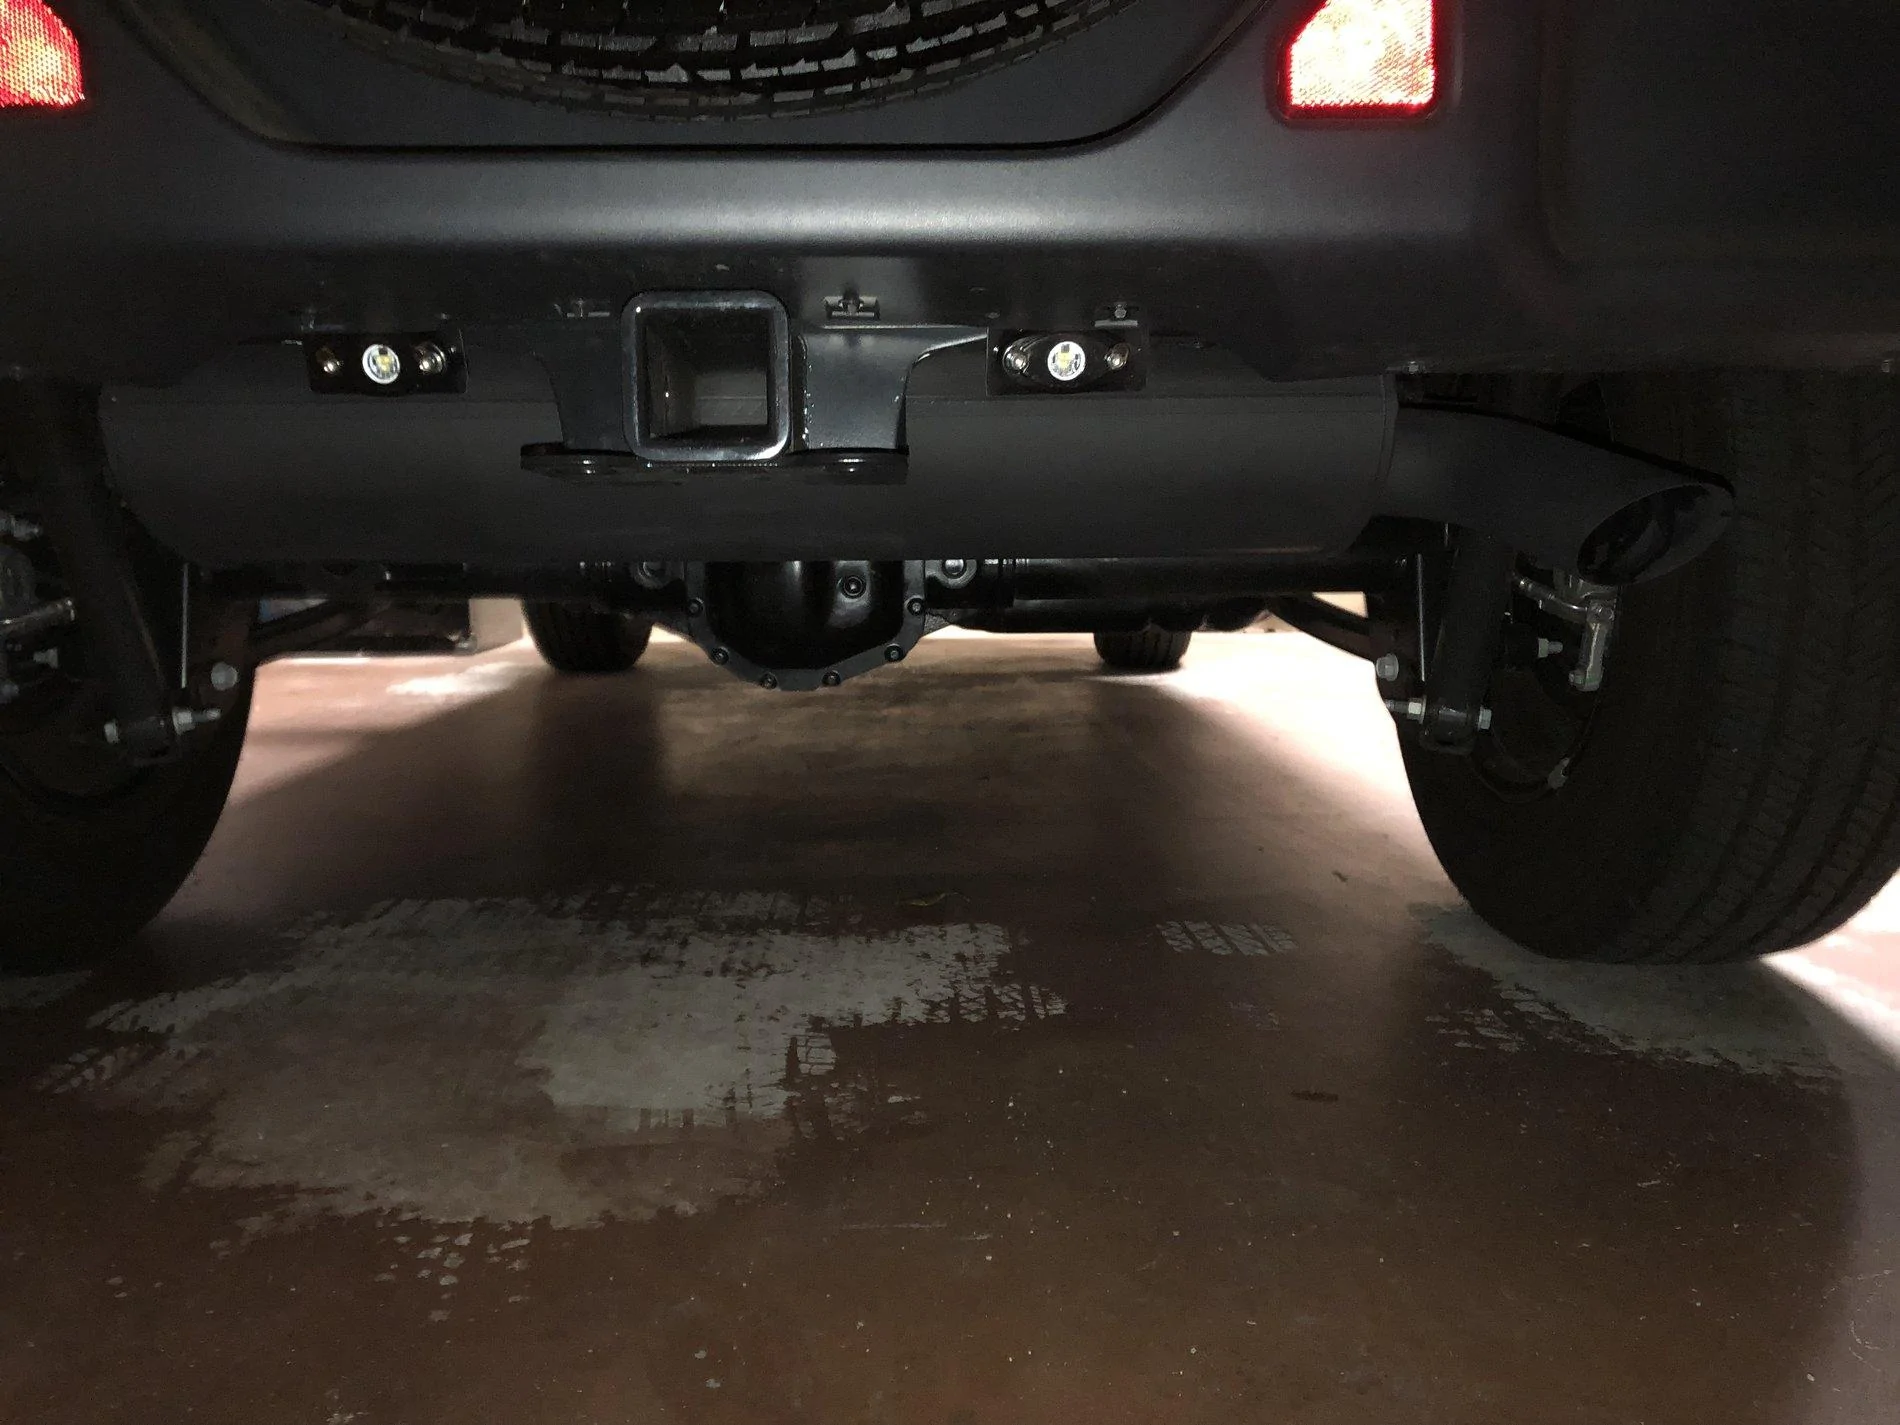
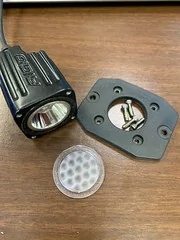
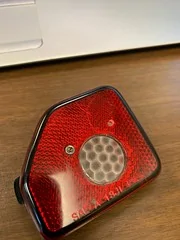
I purchased the Ridgid Flush mount light and took off the mounting bracket and lens
47586787661_efe8a4af08_m.webp


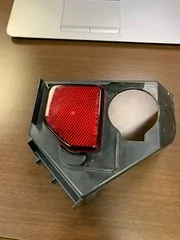
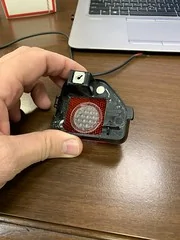
I cut the back plastic of the reflector and then used the lens as a templet to carefully cut a hole in the reflector with a dremel tool.

BEFORE
46862676304_58eb48895f_m.webp


AFTER
47171422202_1b0460c92f_m.webp


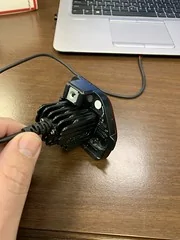
Then i trimmed the back piece until the light was snug.
47171418352_c0f446bb42_m.webp


Then i turned to the bracket and trimmed it until the light would pass through
BEFORE
46862676604_49e19b3250_m.webp


AFTER
46862677314_84937eeee0_m.webp
46862677044_4b9efe9266_m.webp


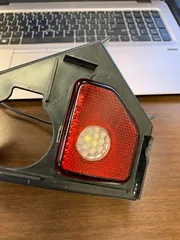
Then install the reflector back into the bracket
46862682294_65607e43cc_m.webp


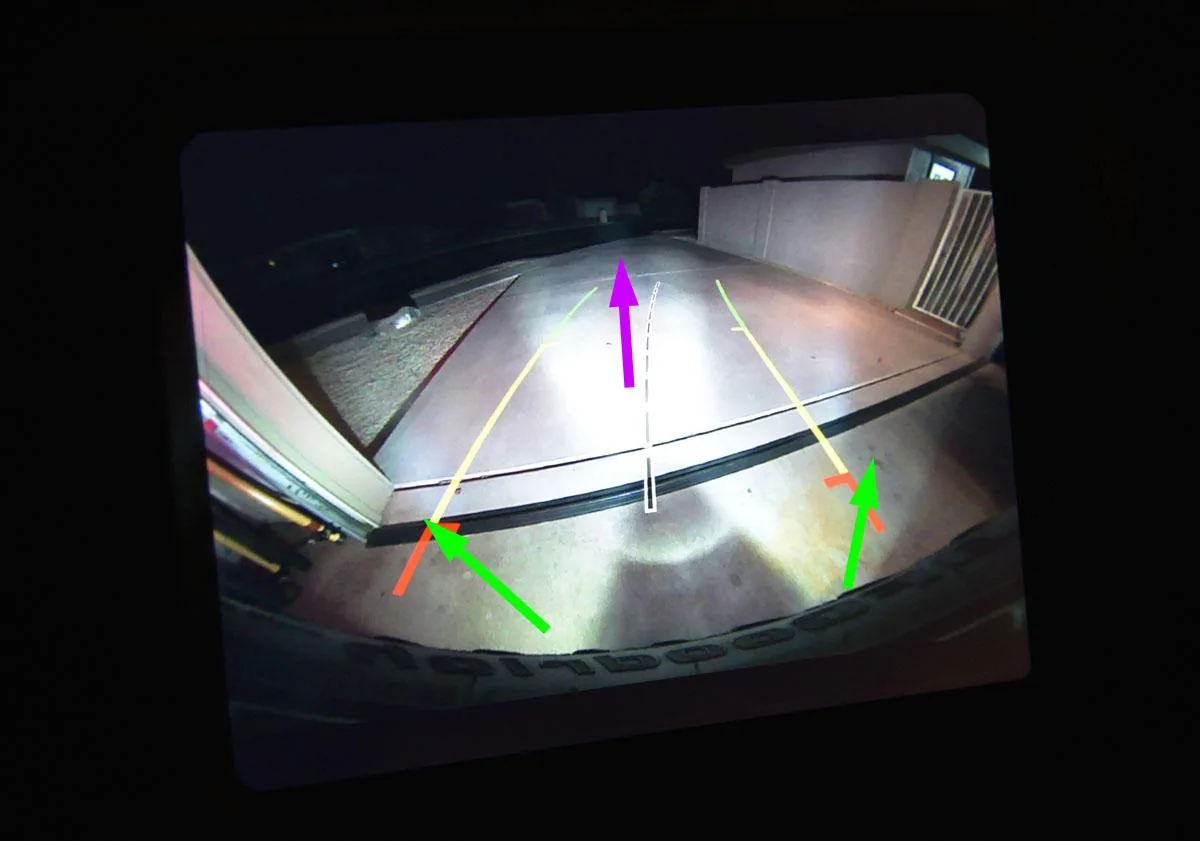
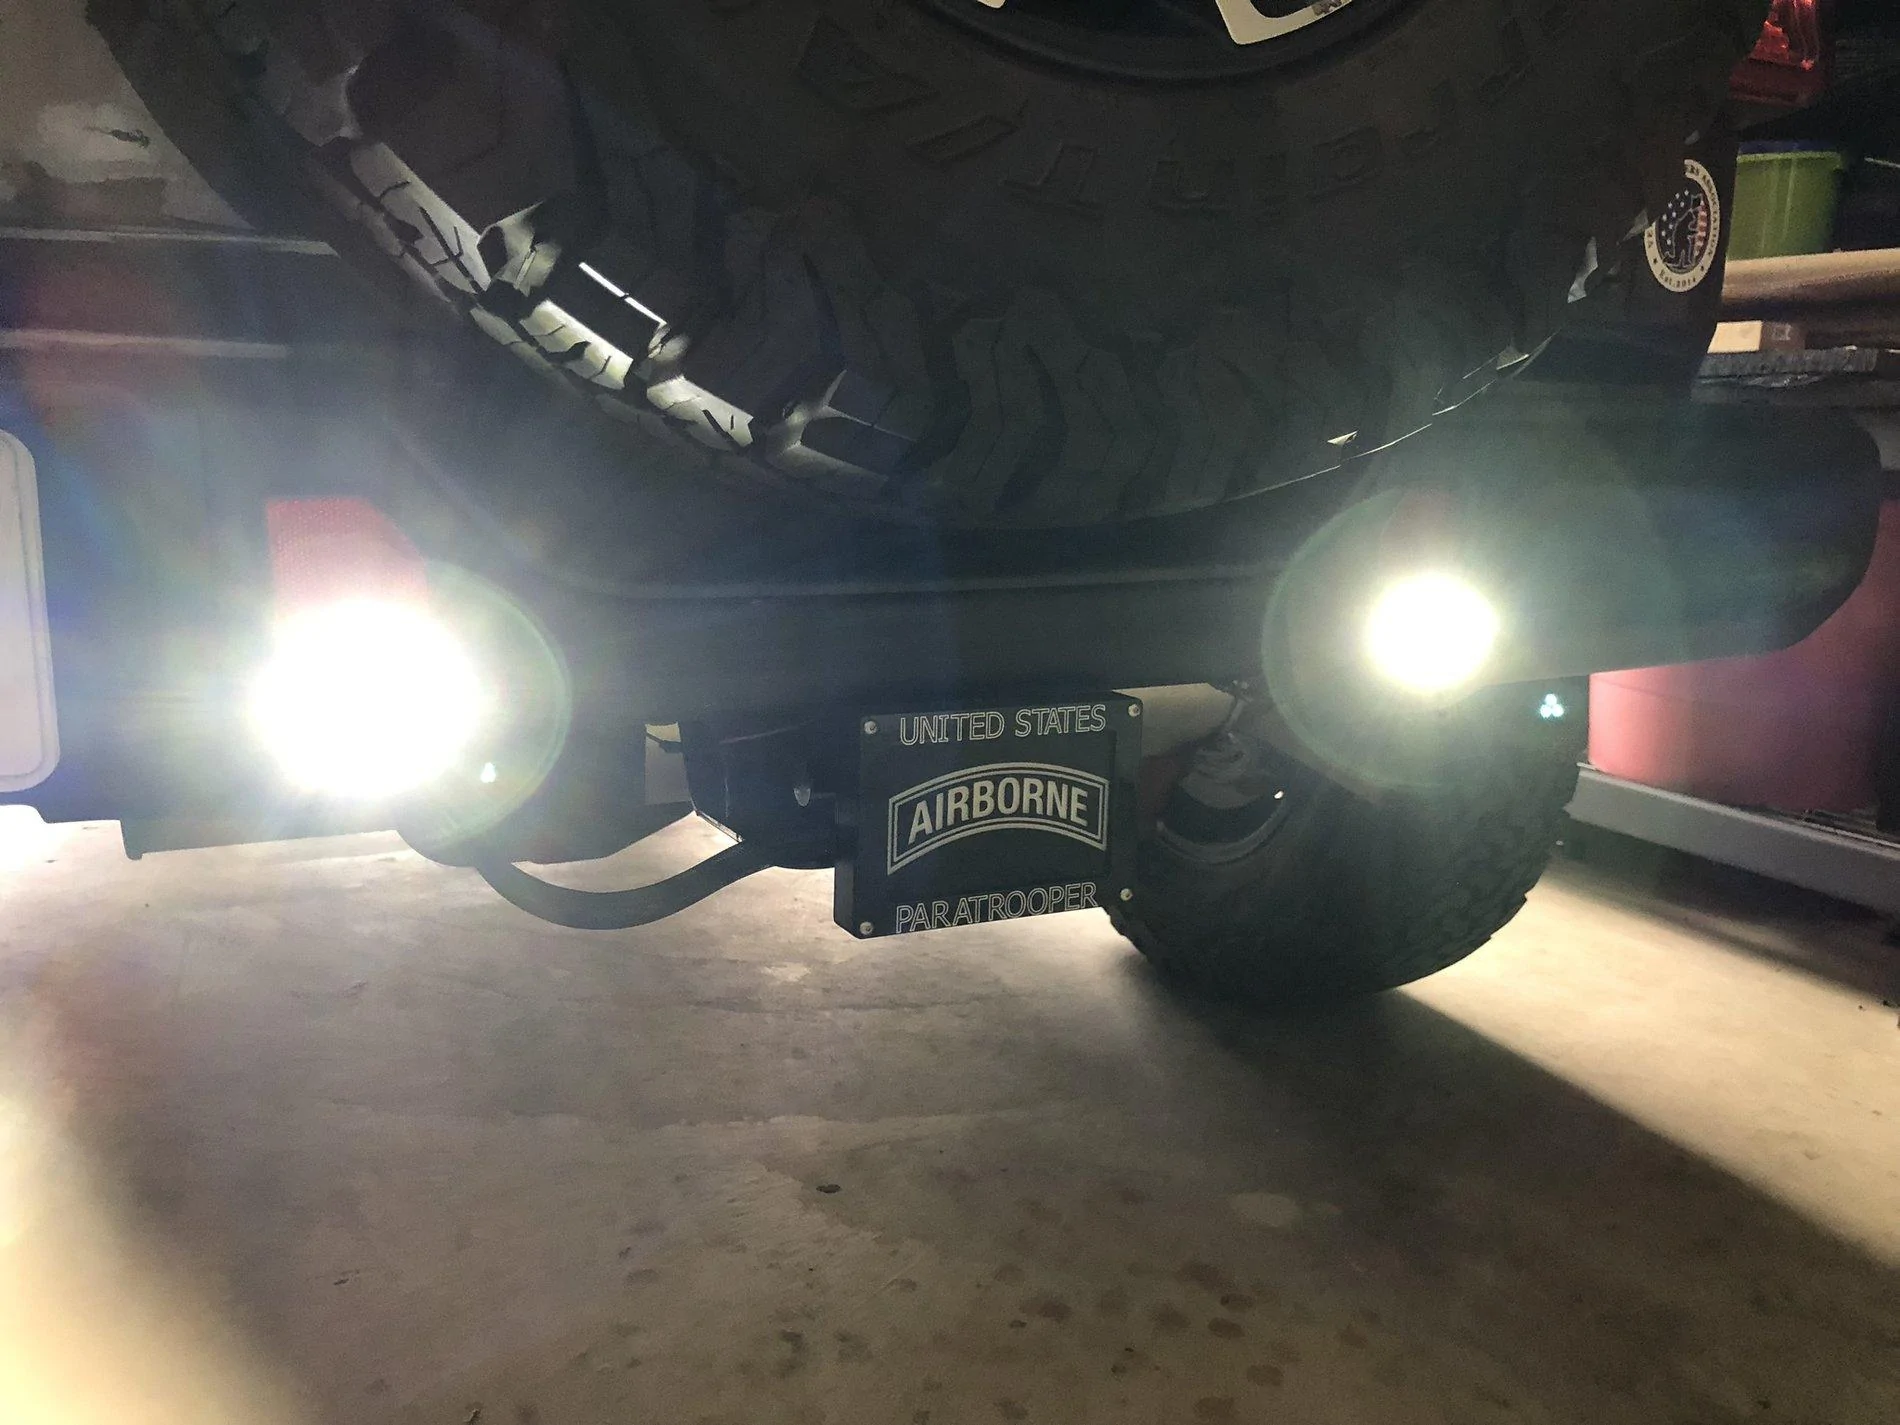
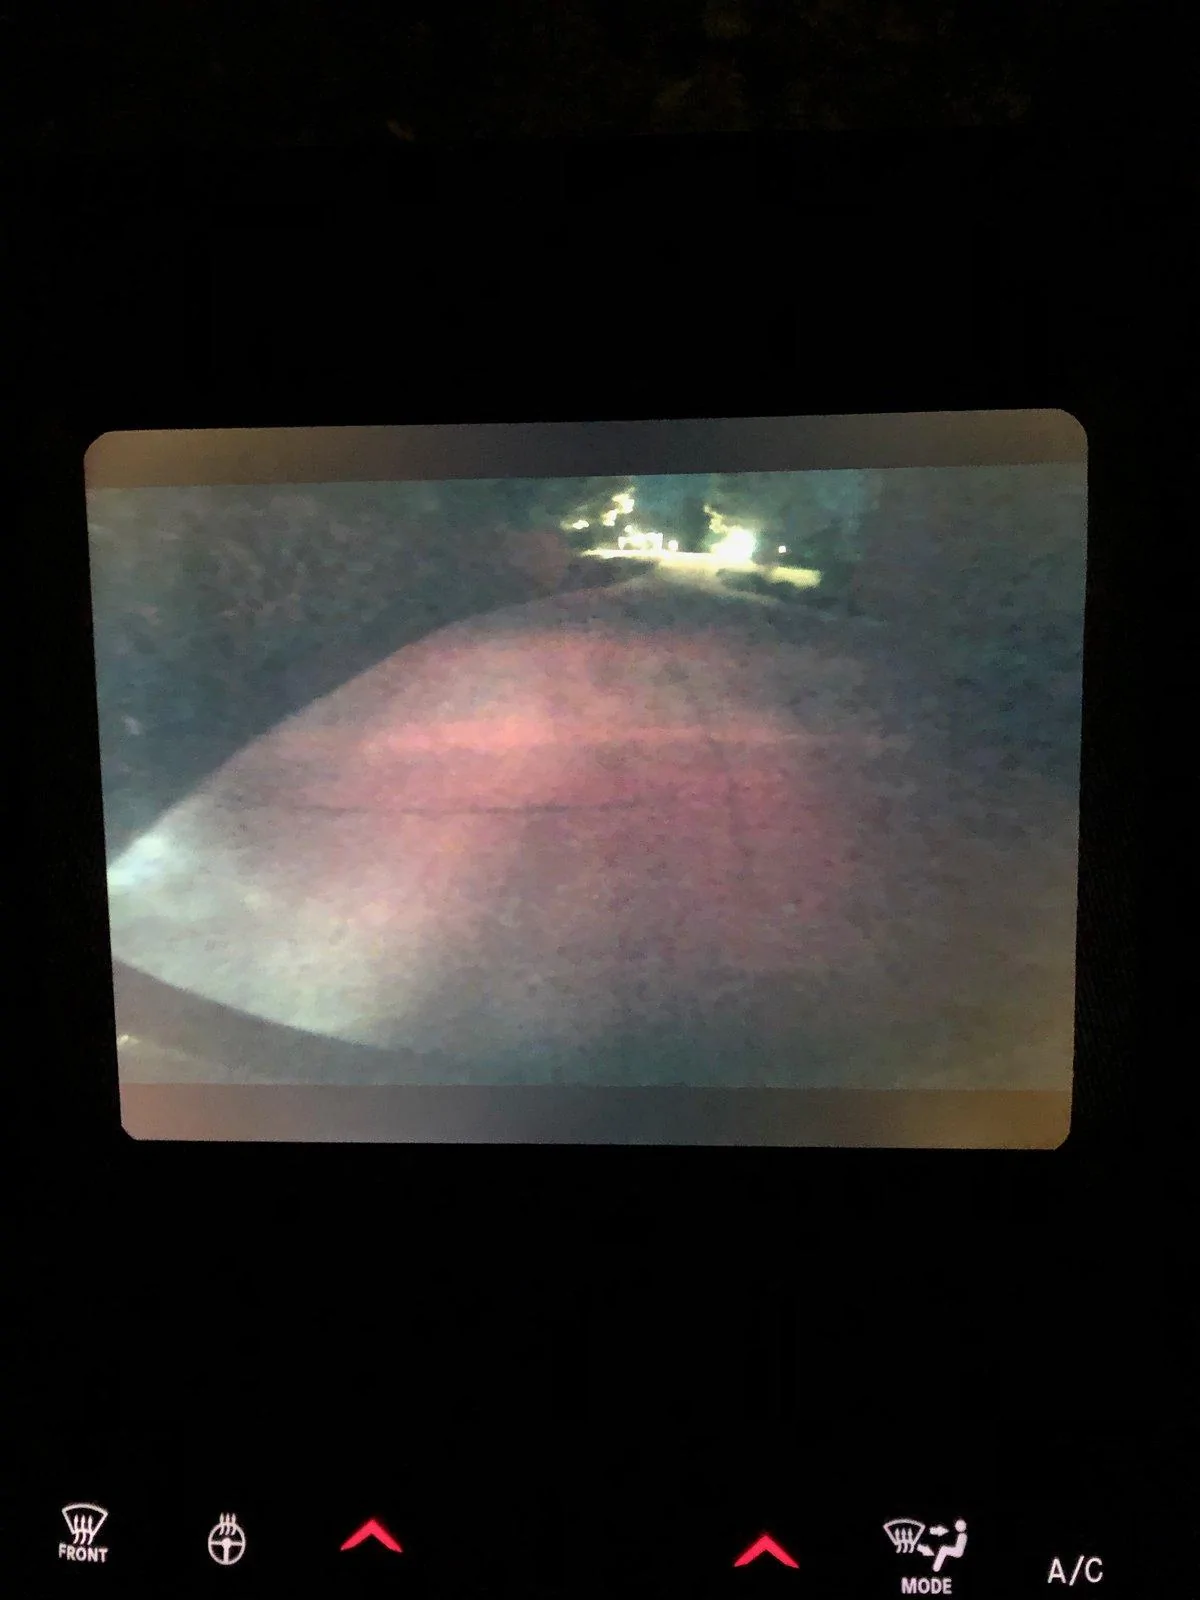
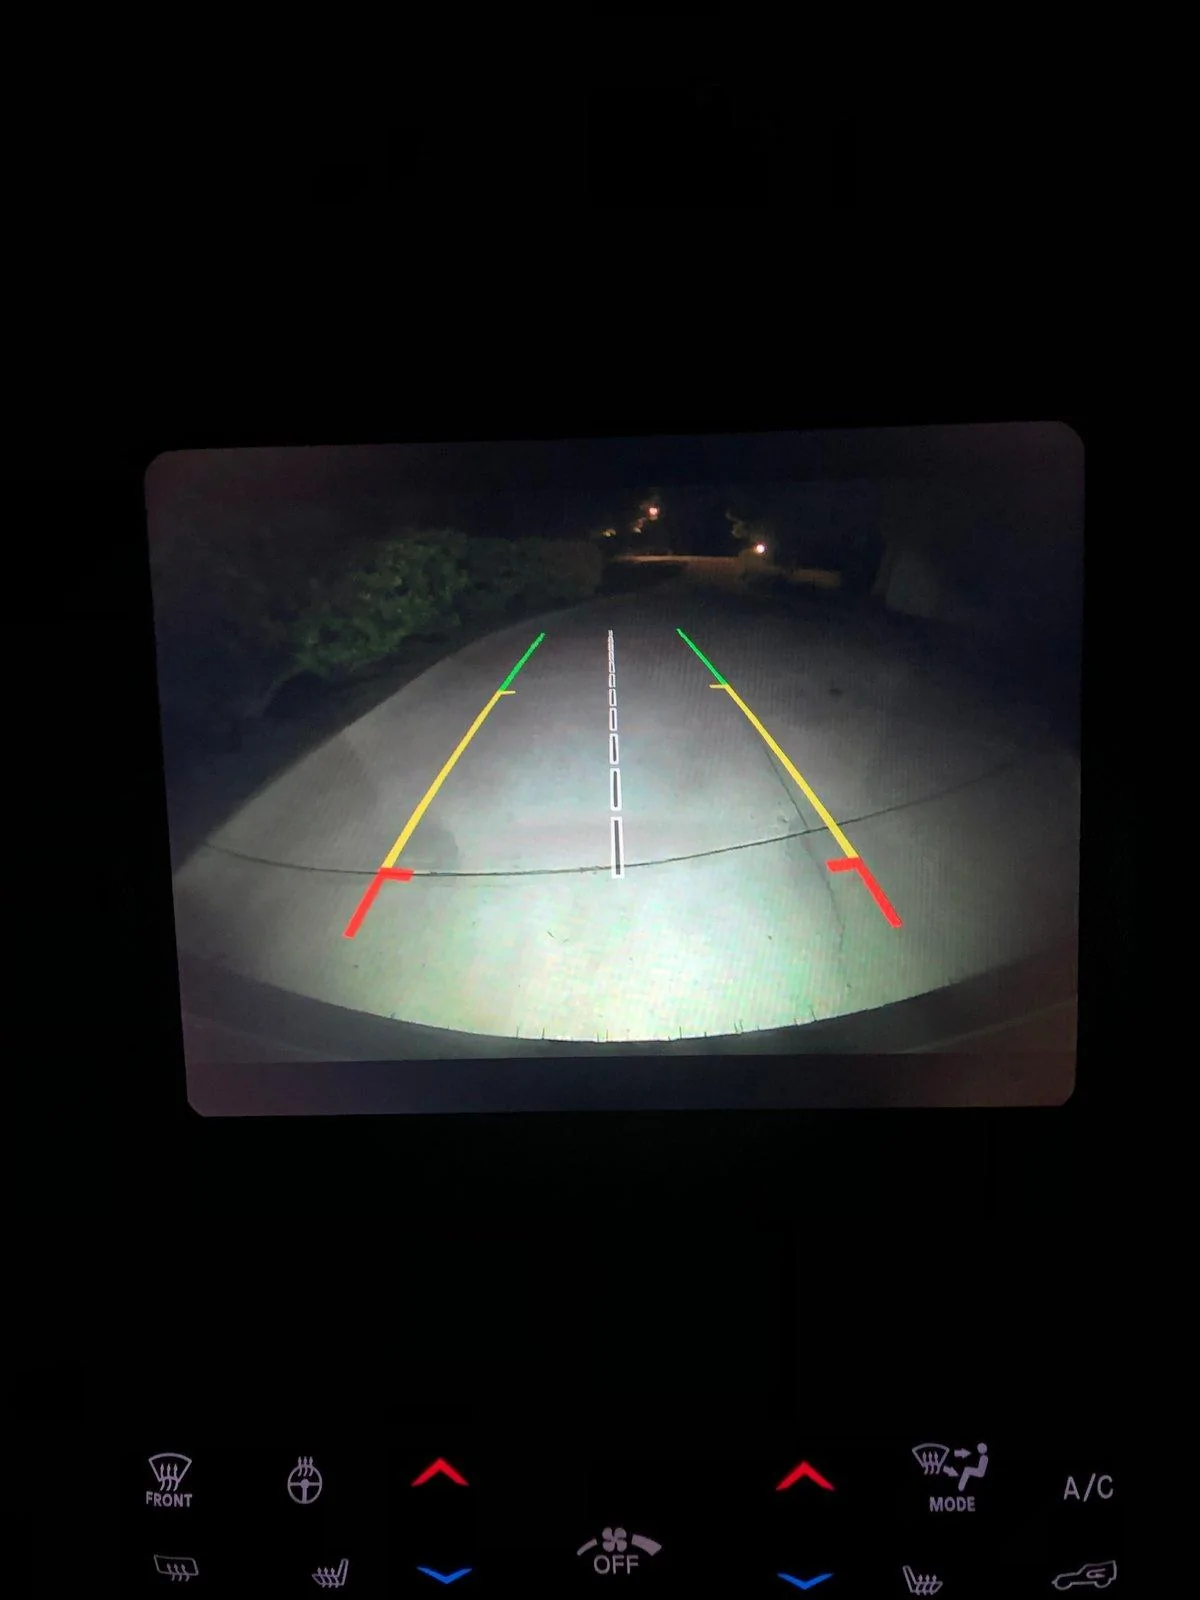
At this point i was rolling and dreaming about the blinding light i was going to cast behind my jeep. Only one thing left to do. The reflector bolts into the bracket but i wanted to use the four small allen bolts to secure the light to the reflector.

33709986108_ea9b218146_m.webp


Well i only measured once not twice and drilled the hole in the wrong place. I put the bumper back on with a missing reflector while i ordered another lens and everything is sitting on my desk waiting to finish up.

Overall it is not a hard project but the bracket behind the bracket is the reason i think you don't see more "bolt in" lights offered. This will motivate me to finish this up and hope to have it done within the next week.

If anyone has any questions please let me know.


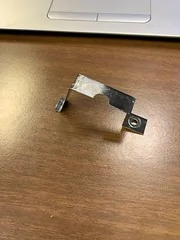
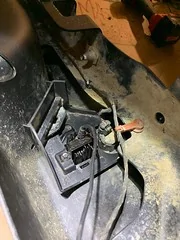
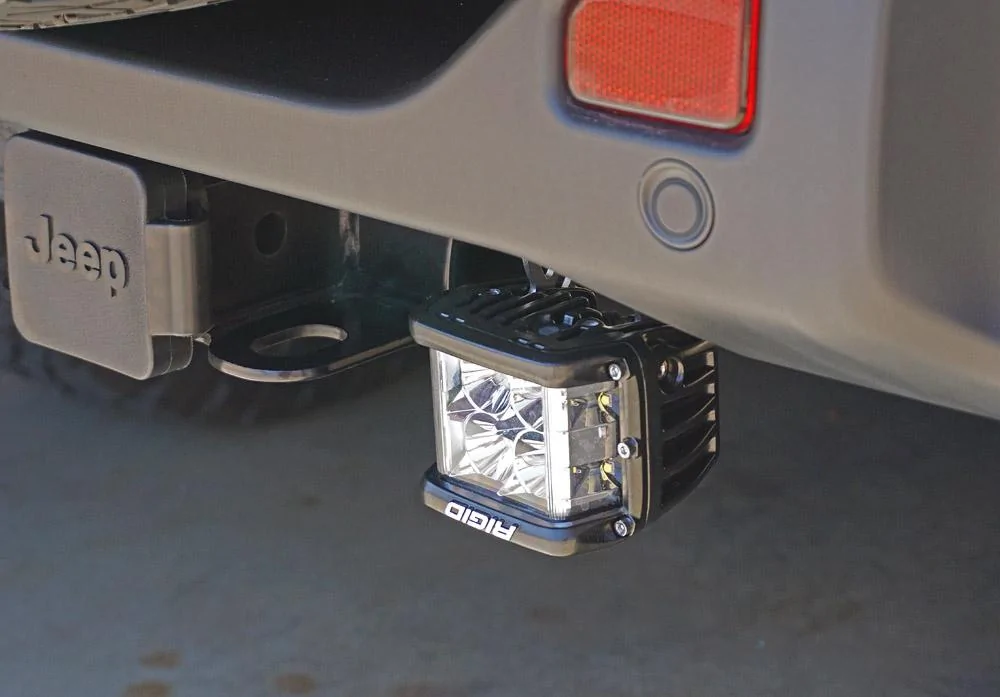
OK. I worked on this again today. I didn't like my original idea of drilling the four mounting hole in the reflector so i decided another way. I made a little bracket out of some scrap i had.
Jeep Wrangler JL Backup Lights 47631709541_5e20869773_m


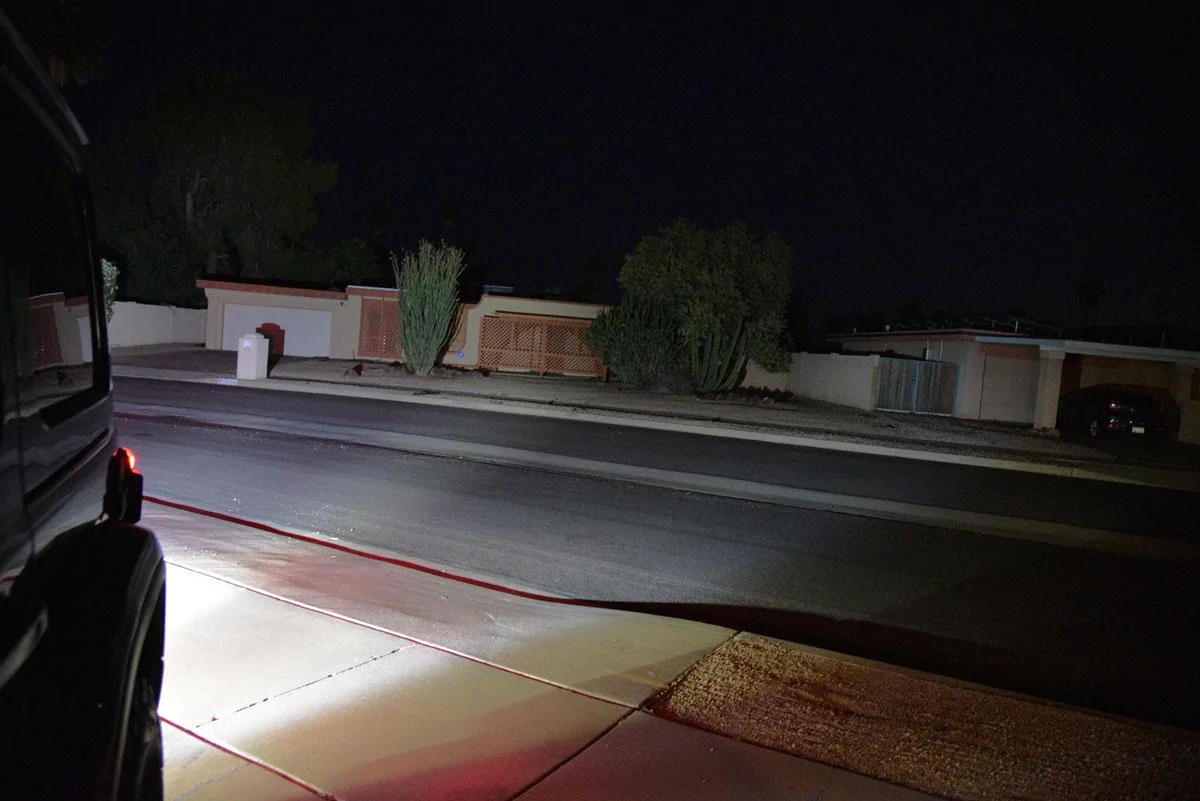
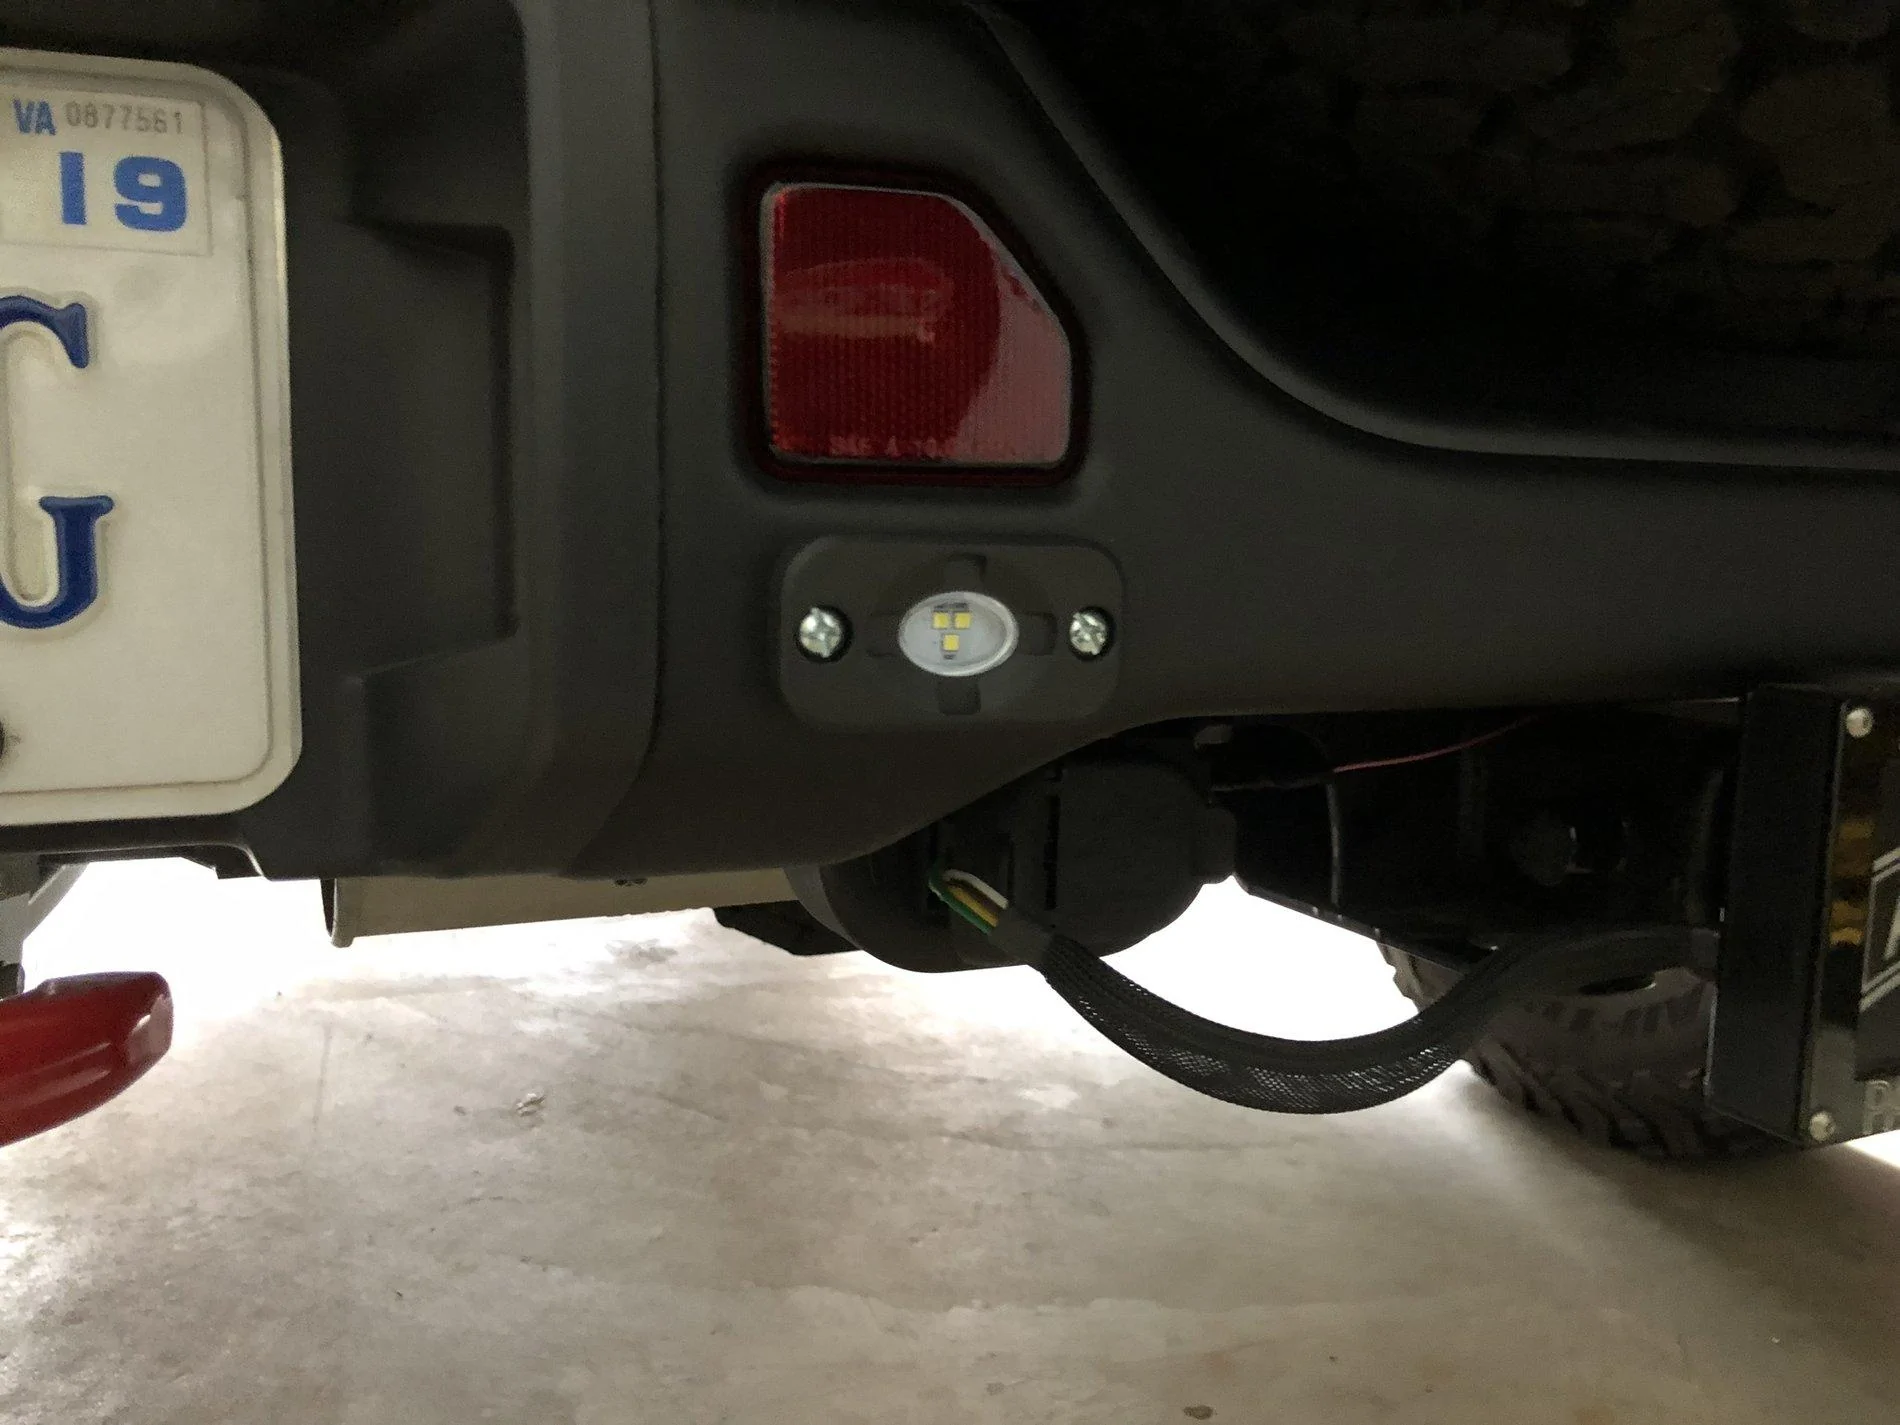
Then i installed the reflector into the mounting bracket and then put the light in from behind. I put a little silicon around the lens to try to help keep water out.
Jeep Wrangler JL Backup Lights 47631710691_6c73506999_m
Jeep Wrangler JL Backup Lights 47631710191_3d6d8df493_m

Jeep Wrangler JL Backup Lights 47631711061_a03636ca7a_m


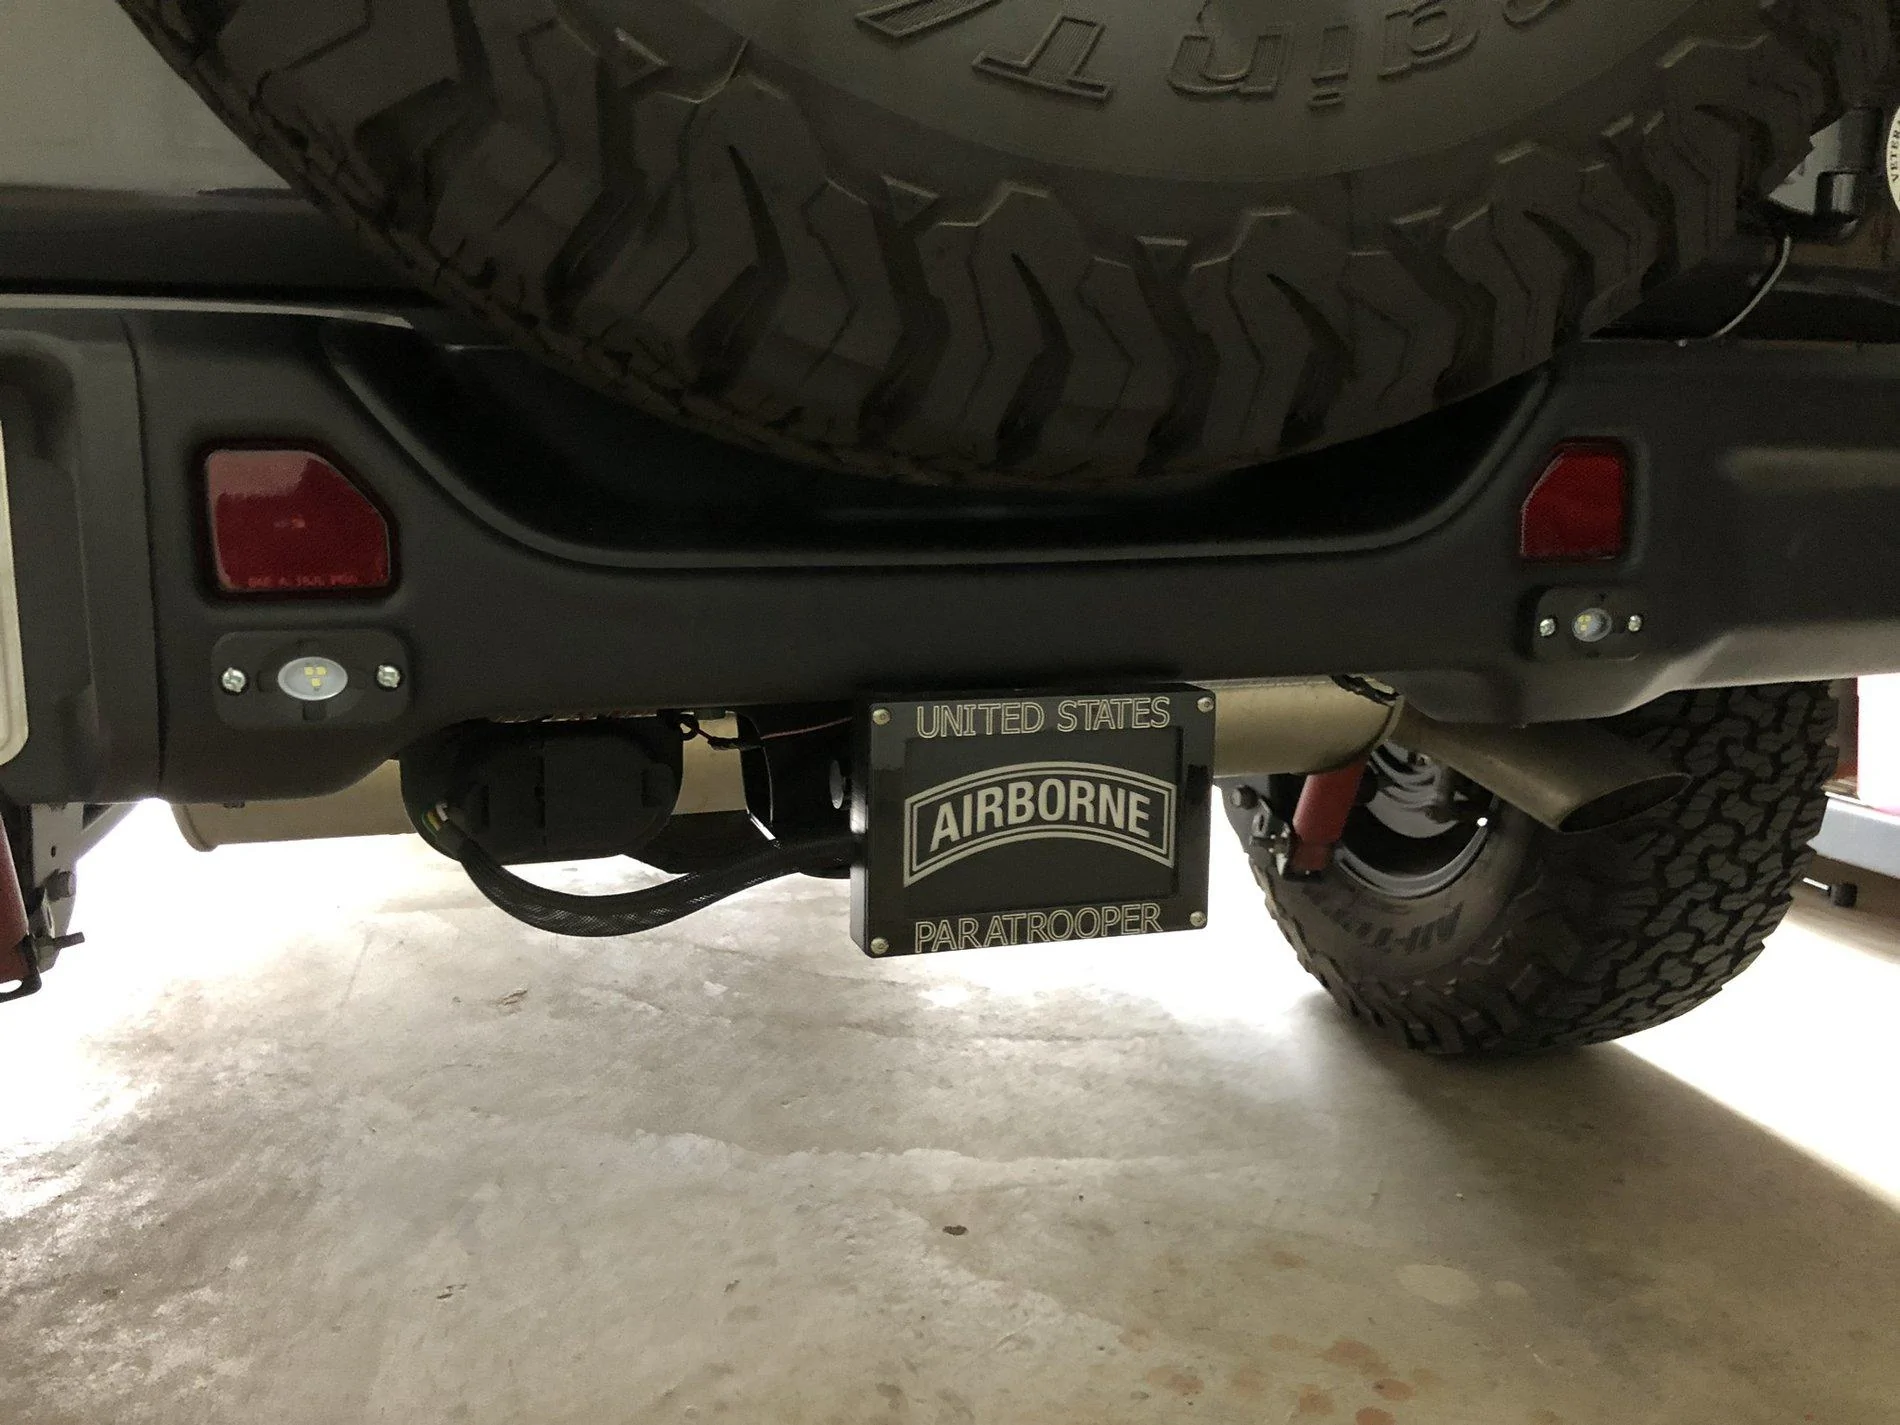
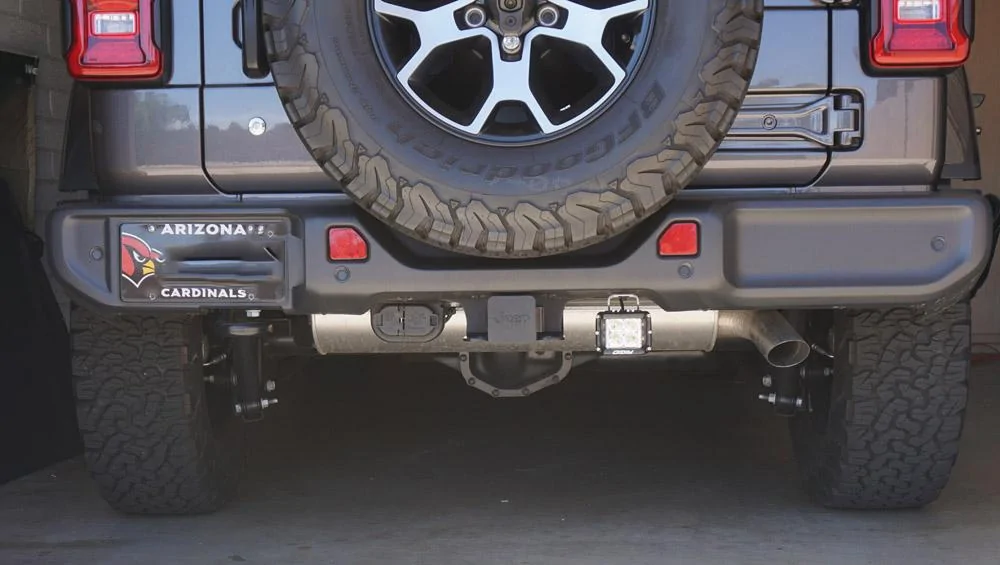
Then back into the bumper.

Jeep Wrangler JL Backup Lights 33762588158_a4ffccc3cb_m


Jeep Wrangler JL Backup Lights 33762588408_e676a8b43e_m


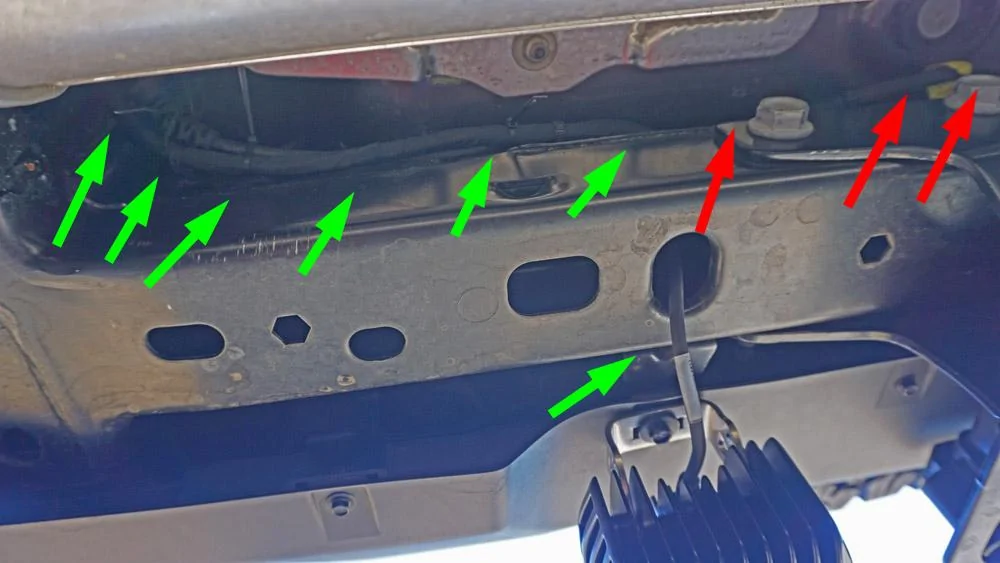
I didn't have time to finish the wiring so i will do that tomorrow and will post and update.
Sponsored

 
First Name
Josh
Joined
May 24, 2018
Threads
0
Messages
19
Reaction score
11
Location
Gilbert, AZ
Vehicle(s)
1985 GMC Jimmy, 1986 Chevy Silverado, 2014 Ram Sport 4x4, Future JL
That's way cool Sprint7, I like it! Very clean and subtle, while retaining use of the reflector.
 

Frustration

Well-Known Member
Joined
Mar 17, 2019
Threads
8
Messages
61
Reaction score
29
Location
Arizona
Vehicle(s)
19-JLU
Went a different route: Rigid DSS PRO SIDE SHOOTER - Single
https://www.amazon.com/Rigid-Indust...rigid+dss+pro&qid=1555958918&s=gateway&sr=8-3

Jeep Wrangler JL Backup Lights DSC05345


LED's on the side (both sides) cast plenty of light laterally (and close enough to the back end to fully light up the rear cam and also be visible through dark tint) and the Center LED's are Very bright.

The profile is roughly the same depth as the hitch.

Jeep Wrangler JL Backup Lights DSC05348


Install was pretty easy. Ran from the light to the vendor supplied wire run, taping off the connect. Just screwed it to the existing bumper fastener and ran the wire (GREEN) up through the open hole and followed the existing line for the hitch wiring (RED). (zip ties).

Jeep Wrangler JL Backup Lights DSC05351


Wrapped the run wire with cloth heat resistant tape and continued this straight up to the Passenger side Tail light...


Jeep Wrangler JL Backup Lights DSC05355


once you remove the passenger tail light (as seen in prior posts) the wiring is easy and the splice is up away from the road and gunk.

NOTE the passenger side tail light wiring is clipped with a very FRAGILE clip direct to the tail light and if you dont reach in and unclip the harness from the tail light you'll break it (fixable, but nice to know ahead of time so you dont goof it).

The Hitch isnt in the way of the side shooter LED's as the light sits close enough that it still shines out to the side of the drivers side.

Jeep Wrangler JL Backup Lights DSC05349


Not inexpensive, but one of these is WAY more than you'll need for just backing up...

I would also get the DRIVING version as it actually casts a wider beam than the "flood" version... Either will work though and be more than enough to let you see off to the side and WAAAY out behind you.
 

AnthemAVM

Well-Known Member
Joined
Apr 29, 2018
Threads
22
Messages
260
Reaction score
159
Location
92646
Vehicle(s)
Jeep JL
Went a different route: Rigid DSS PRO SIDE SHOOTER - Single
https://www.amazon.com/Rigid-Indust...rigid+dss+pro&qid=1555958918&s=gateway&sr=8-3

DSC05345.webp


LED's on the side (both sides) cast plenty of light laterally (and close enough to the back end to fully light up the rear cam and also be visible through dark tint) and the Center LED's are Very bright.

The profile is roughly the same depth as the hitch.

DSC05348.webp


Install was pretty easy. Ran from the light to the vendor supplied wire run, taping off the connect. Just screwed it to the existing bumper fastener and ran the wire (GREEN) up through the open hole and followed the existing line for the hitch wiring (RED). (zip ties).

DSC05351.webp


Wrapped the run wire with cloth heat resistant tape and continued this straight up to the Passenger side Tail light...


DSC05355.webp


once you remove the passenger tail light (as seen in prior posts) the wiring is easy and the splice is up away from the road and gunk.

NOTE the passenger side tail light wiring is clipped with a very FRAGILE clip direct to the tail light and if you dont reach in and unclip the harness from the tail light you'll break it (fixable, but nice to know ahead of time so you dont goof it).

The Hitch isnt in the way of the side shooter LED's as the light sits close enough that it still shines out to the side of the drivers side.

DSC05349.webp


Not inexpensive, but one of these is WAY more than you'll need for just backing up...

I would also get the DRIVING version as it actually casts a wider beam than the "flood" version... Either will work though and be more than enough to let you see off to the side and WAAAY out behind you.

@Frustration very nice write up. If you had a chance could you share some photos at night?
 
First Name
Josh
Joined
May 24, 2018
Threads
0
Messages
19
Reaction score
11
Location
Gilbert, AZ
Vehicle(s)
1985 GMC Jimmy, 1986 Chevy Silverado, 2014 Ram Sport 4x4, Future JL

Sponsored

millerjl

Well-Known Member
First Name
Chuck
Joined
Jun 28, 2018
Threads
50
Messages
714
Reaction score
714
Location
San Diego, CA
Vehicle(s)
JLU Rubicon
Vehicle Showcase
1
Will snap some pics later buy I used a Rigid Industries 86610 - Scene LED Light, as a few others have done but since I was running the wire for my CB, I ran it inside and put all the wiring into the cubby where the jack is and ran it out the drain plug. That's where the diodes and everything are. Wire tapped into the hitch plug lights for ground and power.
 

Frustration

Well-Known Member
Joined
Mar 17, 2019
Threads
8
Messages
61
Reaction score
29
Location
Arizona
Vehicle(s)
19-JLU
Went a different route: Rigid DSS PRO SIDE SHOOTER - Single
https://www.amazon.com/Rigid-Indust...rigid+dss+pro&qid=1555958918&s=gateway&sr=8-3

DSC05345.webp


LED's on the side (both sides) cast plenty of light laterally (and close enough to the back end to fully light up the rear cam and also be visible through dark tint) and the Center LED's are Very bright.

The profile is roughly the same depth as the hitch.

DSC05348.webp


Install was pretty easy. Ran from the light to the vendor supplied wire run, taping off the connect. Just screwed it to the existing bumper fastener and ran the wire (GREEN) up through the open hole and followed the existing line for the hitch wiring (RED). (zip ties).

DSC05351.webp


Wrapped the run wire with cloth heat resistant tape and continued this straight up to the Passenger side Tail light...


DSC05355.webp


once you remove the passenger tail light (as seen in prior posts) the wiring is easy and the splice is up away from the road and gunk.

NOTE the passenger side tail light wiring is clipped with a very FRAGILE clip direct to the tail light and if you dont reach in and unclip the harness from the tail light you'll break it (fixable, but nice to know ahead of time so you dont goof it).

The Hitch isnt in the way of the side shooter LED's as the light sits close enough that it still shines out to the side of the drivers side.

DSC05349.webp


Not inexpensive, but one of these is WAY more than you'll need for just backing up...

I would also get the DRIVING version as it actually casts a wider beam than the "flood" version... Either will work though and be more than enough to let you see off to the side and WAAAY out behind you.

A couple of added pictures...

No Reverse lights on (but there is light from the garage that slightly brightens up the houses across the street):

Jeep Wrangler JL Backup Lights DSC_5447


Reverse lights on:


Jeep Wrangler JL Backup Lights DSC_5441


And the camera view... (NOTE the jeep is sitting at a different angle, still in the garage, than the pictures taken outside)

Jeep Wrangler JL Backup Lights DSC_5433


The GREEN arrows are the light out of the side shooters and the Purple is the center...
Note the driveway angles down to the street a couple feet. The spread and the cast (out from center) are more pronounced on flat ground.

Overall it's a LOT of light and the usable light using the rearview or looking out the back is great, even with VERY dark tint...

The lights not inexpensive, but this is very good for a single light and plug and play with existing fasteners (except the pilot hole for the ground).

maybe overkill, but then Jeep=overkill for virtually everything else anyhoo.
 

Shub_32

Well-Known Member
First Name
Scott
Joined
May 19, 2018
Threads
35
Messages
105
Reaction score
34
Location
PA
Vehicle(s)
21 Runicon
Jeep Wrangler JL Backup Lights 2B74519E-684A-4952-B615-2FD2A5BA9355
Looks great. I’m waiting for my ridged ignites. I ran the wire already. I installed them on my previous jk and they were awesome. I’m more of a balanced look guy so I ordered 2 lol
 

Sponsored

Frustration

Well-Known Member
Joined
Mar 17, 2019
Threads
8
Messages
61
Reaction score
29
Location
Arizona
Vehicle(s)
19-JLU
oh, and after seeing my pictures, GOODGOD...
I had to paint the can and Pipe. 10 Minutes, steel wool whipe and spray with High Heat matte Rusto...
Jeep Wrangler JL Backup Lights IMG_0742
Jeep Wrangler JL Backup Lights IMG_0744


This is soooo easy. Nobody should have a silver can.
 

Will_Jeep

Well-Known Member
First Name
Will
Joined
Feb 27, 2019
Threads
14
Messages
383
Reaction score
356
Location
Atlanta
Vehicle(s)
Black 2108 JKU Sahara, Black 2016 Mercedes CLS400
Vehicle Showcase
1
@TimR I like what you have done with your install, I wasn't brave enough to mount in/on the bumper.

After adding aftermarket LED tail lights, i decided that I needed to add some more light at the back, so I wired a couple of rock lights directly into the reverse circuit behind the drivers tail light. (Black and White/Brown). I made a couple of mounts out of some flat and mounted them next to the hitch, I don't have wiring there as I only put a bike rack on the back.

After the LED tail lights, but before the rock/back up lights
Jeep Wrangler JL Backup Lights Befor


After the rock/back up lights were installed
Jeep Wrangler JL Backup Lights After


And the lights themselves
Jeep Wrangler JL Backup Lights Lights


@Frustration I like the black exhaust, I picked up a can of High Heat Matte at HD on Saturday, and then put it back down. Looks like I might need to make another trip!
 

T-Rob

Well-Known Member
First Name
Tim
Joined
Aug 28, 2018
Threads
13
Messages
346
Reaction score
603
Location
Virginia, USA
Vehicle(s)
2019 JLUR
@TimR I like what you have done with your install, I wasn't brave enough to mount in/on the bumper.

After adding aftermarket LED tail lights, i decided that I needed to add some more light at the back, so I wired a couple of rock lights directly into the reverse circuit behind the drivers tail light. (Black and White/Brown). I made a couple of mounts out of some flat and mounted them next to the hitch, I don't have wiring there as I only put a bike rack on the back.

After the LED tail lights, but before the rock/back up lights
Before.webp


After the rock/back up lights were installed
After.webp


And the lights themselves
Lights.webp


@Frustration I like the black exhaust, I picked up a can of High Heat Matte at HD on Saturday, and then put it back down. Looks like I might need to make another trip!
Yeah, it ended up being a little more work than I originally thought, but I got it done. Funny thing is that after I got the bumper back on I apparently forgot to re-attach the wire than lights up the license plate. Had to take it off again, but it was MUCH easier second time around since I knew what I was doing. LOL
 

Frustration

Well-Known Member
Joined
Mar 17, 2019
Threads
8
Messages
61
Reaction score
29
Location
Arizona
Vehicle(s)
19-JLU
@TimR
Lights.webp


@Frustration I like the black exhaust, I picked up a can of High Heat Matte at HD on Saturday, and then put it back down. Looks like I might need to make another trip!
Super easy... one piece of course steel wool, rub down everything and scuff, and shoot it... you can use a paper bag to block off overspray in the couple spots it will matter. really it was 10 minutes total and 3 of those were shaking the crap out of the can...
 

Will_Jeep

Well-Known Member
First Name
Will
Joined
Feb 27, 2019
Threads
14
Messages
383
Reaction score
356
Location
Atlanta
Vehicle(s)
Black 2108 JKU Sahara, Black 2016 Mercedes CLS400
Vehicle Showcase
1
Super easy... one piece of course steel wool, rub down everything and scuff, and shoot it... you can use a paper bag to block off overspray in the couple spots it will matter. really it was 10 minutes total and 3 of those were shaking the crap out of the can...
@Frustration You’re right, it was super easy
Jeep Wrangler JL Backup Lights 6D1D7806-B82D-4F46-8086-1E46B922B202
Sponsored


Top