Sponsored

Tailgate Brawlee LED light

melendez69

Well-Known Member
First Name
Marc
Joined
Jun 22, 2018
Threads
29
Messages
3,158
Reaction score
5,917
Location
Waxhaw NC
Vehicle(s)
2018 3.6 JLR / 2013 911 / 2013 E92 M3
Occupation
...huh?
Vehicle Showcase
1
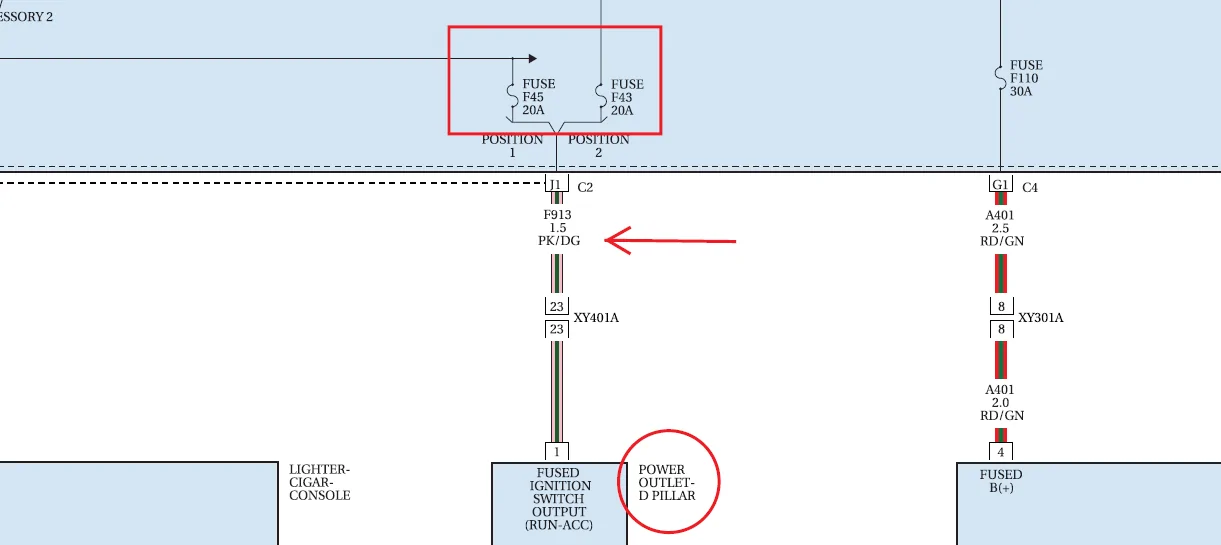
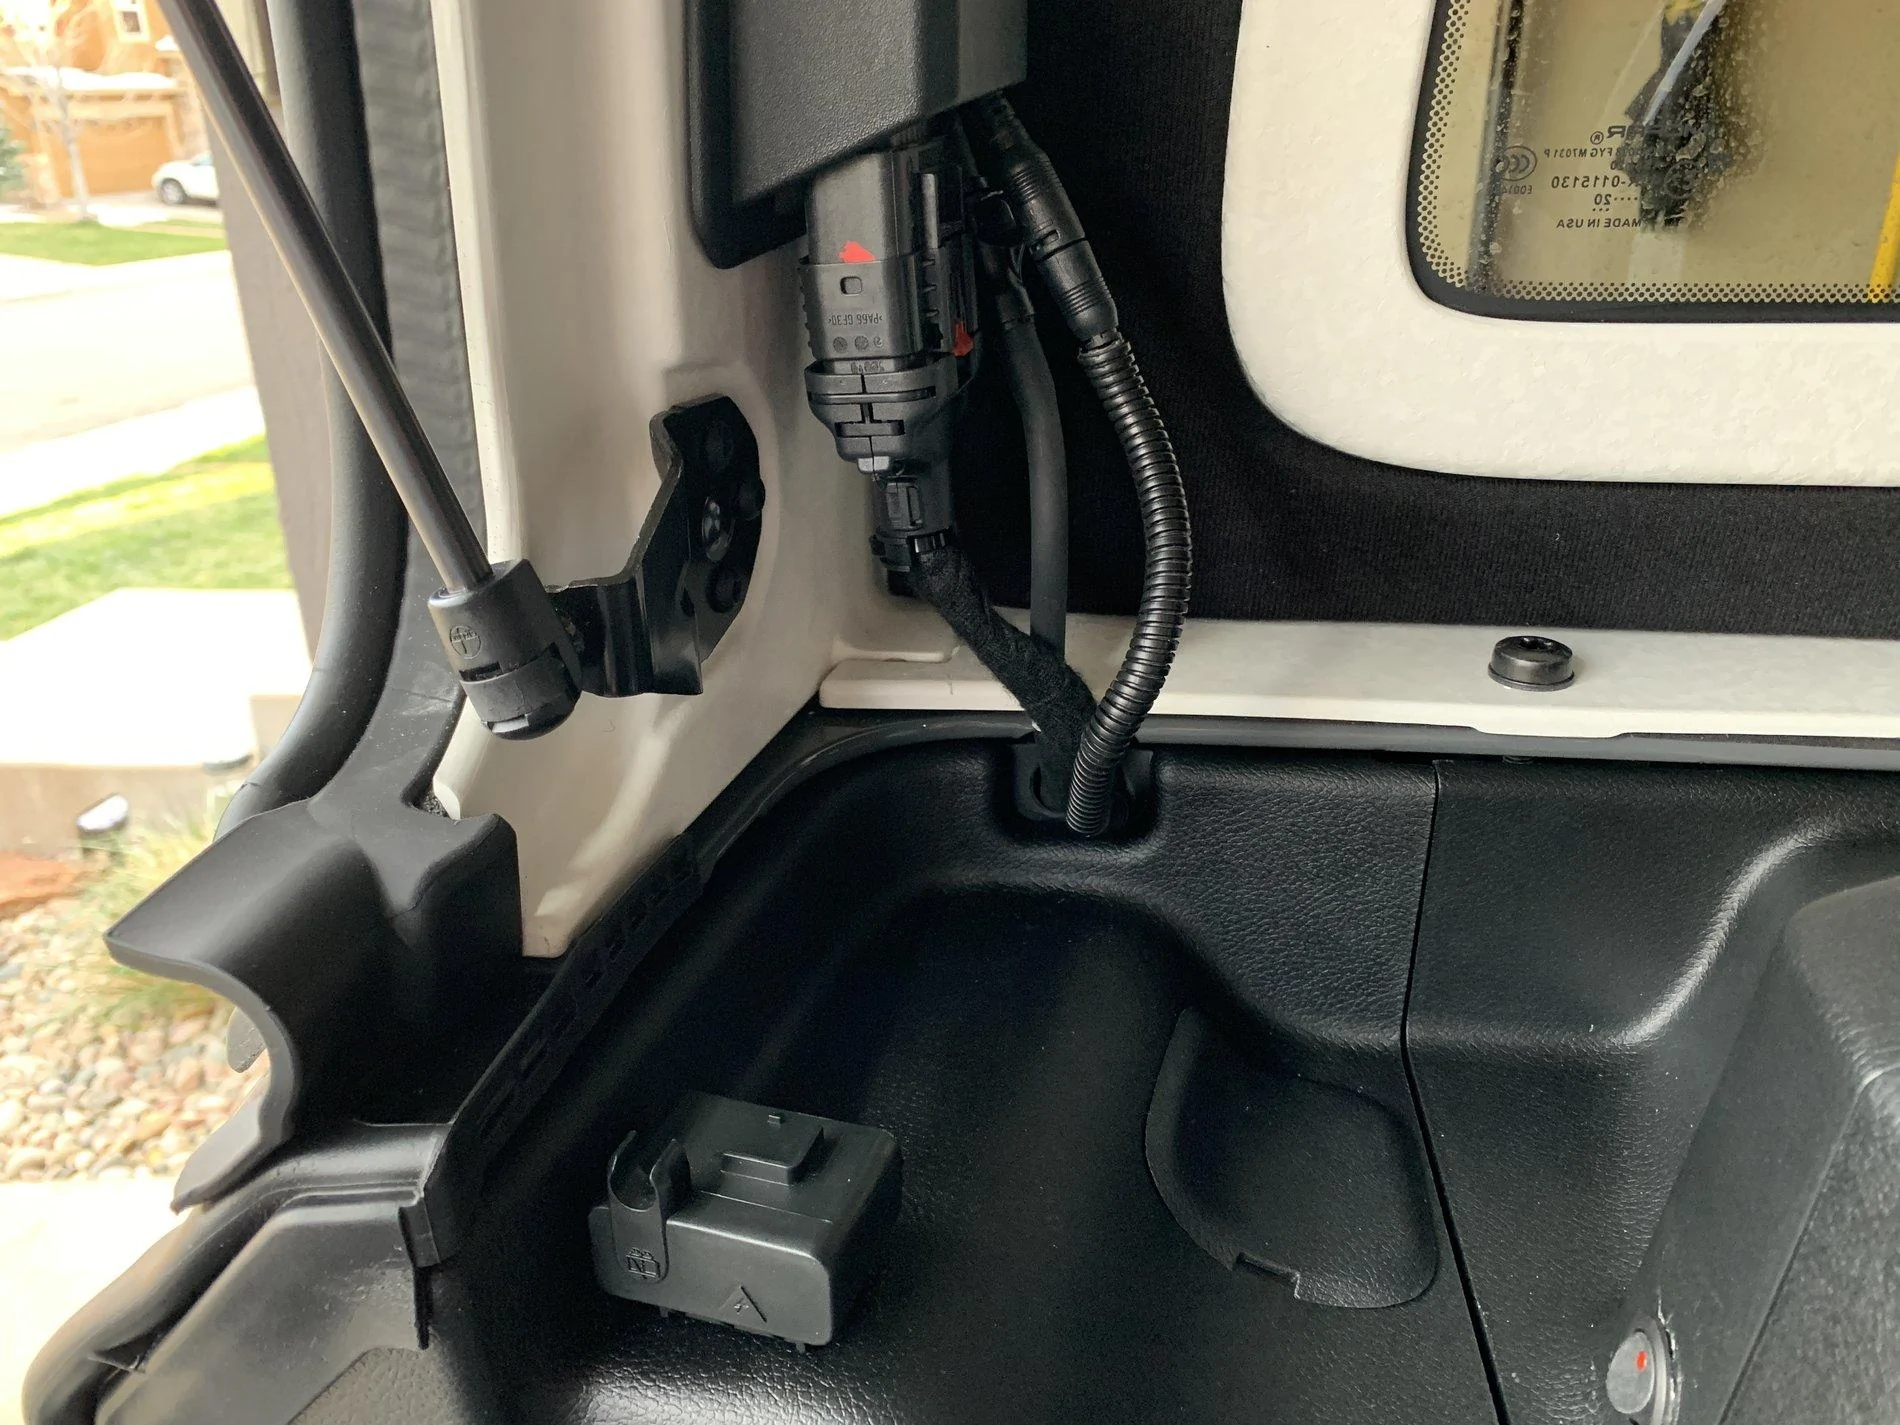
If the lighter itself has no power, you might want to check the fuse (20 amp yellow) itself first before cutting. I believe its fuse location # 45. I don't remember, but I did this Brawlee tailgate lightbar awhile back and had to move the fuse over to the constant hot side (#43 position) from the intermittent side(#45) of the socket where the fuse goes in at. Also, get a meter and check the fuse as well for continuity. Get a flashlight and look directly down at the place where that fuse goes into and you'll see there's a way to insert the fuse over a bit. (I did a write up on this issue of power on another site.)

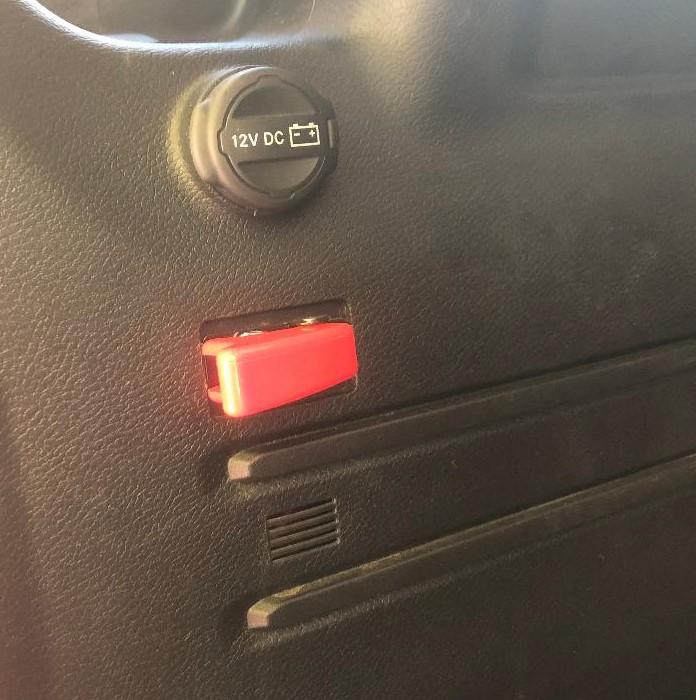
Well, if you had the F word as being the cause, you were right. Initially, I only checked F43, but F45 was toast. I totally forgot about F43. I finished it up with a different switch since I wanted to keep the 12v location and didn't want to drill a hole for a lighted switch. Works just fine. Thank you, and @JSFoster75 for the guidance.

switch_01.jpg
switch_02.jpg
Sponsored


jason0341

Well-Known Member
First Name
Jason
Joined
Aug 21, 2019
Threads
32
Messages
444
Reaction score
1,137
Location
Colorado
Vehicle(s)
2020 2.0L Rubicon
Anyone have a schematic for wiring directly to the 12v outlet in the rear for a switch with a light built in?
 

fyr145

Well-Known Member
First Name
Lon
Joined
May 25, 2019
Threads
2
Messages
80
Reaction score
124
Location
AZ
Vehicle(s)
2019 JLU Rubicon
Occupation
Public Safety - (ret.)
Vehicle Showcase
1
Here ya go.....................

The area in the schematic has been highlighted in red for you. I also have done this mod and have written this up a few times as well. Note your position on the yellow 20 amp fuse. One position is for accessory power only while the other position is for constant power.

upload_2020-4-14_6-43-56.png
 

Attachments

Last edited:

jason0341

Well-Known Member
First Name
Jason
Joined
Aug 21, 2019
Threads
32
Messages
444
Reaction score
1,137
Location
Colorado
Vehicle(s)
2020 2.0L Rubicon
Ok got around to installing mine today. Wired it to my Rocker Switch but the light on the switch won’t come on. Here are some pics of my install and how I wired the light and switch.

Any suggestions on the switch would be appreciated.

DC0AFA2F-55CC-4941-965C-191B406770AC.jpeg


1234B32D-B8E3-48AD-91FC-8F8A026E4C7B.jpeg


190E7971-7B9A-4132-9DC8-42FFC0D28A8A.jpeg


0B582A1F-8429-4F2A-8E72-EE40A6532BCB.jpeg


0C211EF9-F5B7-4DFF-B660-F07CE2F90179.jpeg
 

fyr145

Well-Known Member
First Name
Lon
Joined
May 25, 2019
Threads
2
Messages
80
Reaction score
124
Location
AZ
Vehicle(s)
2019 JLU Rubicon
Occupation
Public Safety - (ret.)
Vehicle Showcase
1
Jason0341,

In looking at your diagram, it would appear that you need to change places between the center wire of the switch with the power wire going to the light so that way both the light AND the LED on the switch get power at the same time. try that and post back.

round-rocker-switch-connection-wiring-how-to-option-1.jpg
 

Sponsored

jason0341

Well-Known Member
First Name
Jason
Joined
Aug 21, 2019
Threads
32
Messages
444
Reaction score
1,137
Location
Colorado
Vehicle(s)
2020 2.0L Rubicon
Jason0341,

In looking at your diagram, it would appear that you need to change places between the center wire of the switch with the power wire going to the light so that way both the light AND the LED on the switch get power at the same time. try that and post back.

round-rocker-switch-connection-wiring-how-to-option-1.jpg
Thanks! I'll get it switched over tomorrow and let you know.
 

jason0341

Well-Known Member
First Name
Jason
Joined
Aug 21, 2019
Threads
32
Messages
444
Reaction score
1,137
Location
Colorado
Vehicle(s)
2020 2.0L Rubicon
Jason0341,

In looking at your diagram, it would appear that you need to change places between the center wire of the switch with the power wire going to the light so that way both the light AND the LED on the switch get power at the same time. try that and post back.

round-rocker-switch-connection-wiring-how-to-option-1.jpg
So I found this diagram as well and it resembles how I am wired up, but it’s different from the diagram above but the same switch.

A8DA46AB-61D1-46BD-8718-189BE5694784.png
 
First Name
Andy
Joined
May 11, 2020
Threads
0
Messages
7
Reaction score
1
Location
Georgia
Vehicle(s)
Jeep JL
I put on the Brawlee Led light bar for the rear window so I can have a light while overlanding/camping! I decided to wire it into the cigarette lighter so I can have it running with the jeep off and then added a switch into the small cutout. I can't tell if that spot was made for a switch since it fits perfectly!


IMG_20180803_211126.jpg IMG_20180803_211120.jpg IMG_20180803_211117.jpg IMG_20180803_211114.jpg IMG_20180803_211057.jpg IMG_20180803_211102.jpg

Hey can you help me out? I'm planning on doing the same install and even bought the identical rocker switch. As you know the rocker switch only has two terminals versus the three terminal switches seen in some of the threads. Can you map out for me how to connect the wires where you spliced, did you need additional wires????????????? Help!
 
First Name
Andy
Joined
May 11, 2020
Threads
0
Messages
7
Reaction score
1
Location
Georgia
Vehicle(s)
Jeep JL
I'm considering adding a Brawlee light inside my cab for more light but I have a quick question. I'm not electrically challenged when it comes to homes but when it comes to wiring my car I am.

In the diagram the 12v power supply that's taped directly supplies the switch. Does that mean an in-line fuse is unnecessary and the wire can handle a direct connection? Also is there any requirements for the switch used e.g. amp rating?

Any input would be appreciated
Just curious but how do you wire it if you have a two terminal switch such as the following:

https://www.amazon.com/gp/product/B07QKFD7Z7/ref=ppx_yo_dt_b_asin_title_o04_s01?ie=UTF8&psc=1

Can you provide some instructions on how to wire? I would love to do this install this weekend.
 
First Name
Andy
Joined
May 11, 2020
Threads
0
Messages
7
Reaction score
1
Location
Georgia
Vehicle(s)
Jeep JL
Jason0341,

In looking at your diagram, it would appear that you need to change places between the center wire of the switch with the power wire going to the light so that way both the light AND the LED on the switch get power at the same time. try that and post back.

Jeep Wrangler JL Tailgate Brawlee LED light A8DA46AB-61D1-46BD-8718-189BE5694784
Just curious but how do you wire it if you have a two terminal switch such as the following:

https://www.amazon.com/gp/product/B07QKFD7Z7/ref=ppx_yo_dt_b_asin_title_o04_s01?ie=UTF8&psc=1

Can you provide some instructions on how to wire? I would love to do this install this weekend.
 

Sponsored

First Name
Andy
Joined
May 11, 2020
Threads
0
Messages
7
Reaction score
1
Location
Georgia
Vehicle(s)
Jeep JL
I put on the Brawlee Led light bar for the rear window so I can have a light while overlanding/camping! I decided to wire it into the cigarette lighter so I can have it running with the jeep off and then added a switch into the small cutout. I can't tell if that spot was made for a switch since it fits perfectly!


IMG_20180803_211126.jpg IMG_20180803_211120.jpg IMG_20180803_211117.jpg IMG_20180803_211114.jpg IMG_20180803_211057.jpg IMG_20180803_211102.jpg

Hey can you help me out? I'm planning on doing the same install and even bought the identical rocker switch. As you know the rocker switch only has two terminals versus the three terminal switches seen in some of the threads. Can you map out for me how to connect the wires where you spliced...
 

fyr145

Well-Known Member
First Name
Lon
Joined
May 25, 2019
Threads
2
Messages
80
Reaction score
124
Location
AZ
Vehicle(s)
2019 JLU Rubicon
Occupation
Public Safety - (ret.)
Vehicle Showcase
1
Hey can you help me out? I'm planning on doing the same install and even bought the identical rocker switch. As you know the rocker switch only has two terminals versus the three terminal switches seen in some of the threads. Can you map out for me how to connect the wires where you spliced...
Wiring a 2 connector switch is a bit easier than the 3 connector switch. Look at the switch, all your basically trying to do is control the flow of the power through the switch on one side and out through the other.
So, the black wire from the light is ground. Find a good ground and connect to that. Now all you have left is the power wire (red usually) and run that wire to the switch itself. Based on the photo that you provided, connect the power wire from the light to the "on" side of the switch. Next, connect another power wire from the "off" side of the switch and find a 12volt power source (usually the cigarette lighter in the back like the others have done in the pics above), and connect to that. If it has an inline fuse, be sure to insert the correct amperage fuse and dress up the wiring after testing the circuit. If the lights worked in reverse, simply swap positions on the switch but I believe that this is right. The flow of the current should be viewed as it coming from the power source to the switch then from the other side of the switch to the light. The ground side will complete the circuit for you, just be sure that you have a good ground.

Note: If you choose to connect to the cigarette lighter plug in the back of the JL, be aware that depending on the fuse placement of that particular circuit, it has two different settings in the fuse box under the hood behind the battery. One way the fuse itself in the fuse box for that circuit is dedicated to being hot at all times while the other placement of the same fuse is to be hot ONLY when the ignition is on. If you look carefully in the fusebox and look directly over the fuse you will see 3 outlets and 2 are being used while the other is not. This is to allow the owner the choice to have that circuit constant hot or hot with the ignition on only. I believe the fuse is a yellow 20 amp fuse at the F43 (hot all time) or F45 (hot on ignition only) position. Below is the basic idea of how the power flows and the wiring scheme should look like. Hope this helps!
 

Attachments

Last edited:
First Name
Andy
Joined
May 11, 2020
Threads
0
Messages
7
Reaction score
1
Location
Georgia
Vehicle(s)
Jeep JL
Wiring a 2 connector switch is easier than the 3 wire switch. Look at the switch, all your basically trying to do is control the flow of the power through the switch on one side and out through the other.
So, the black wire from the light is ground. Find a good ground and connect to that. Now all you have left is the power wire (red usually) and run that wire to the switch itself. Based on the photo that you provided, connect the power wire from the light to the "on" side of the switch. Next, connect another power wire from the "off" side of the switch and find a 12volt power source (usually the cigarette lighter in the back like the others have done in the pics above) and connect to that. If it has an inline fuse, be sure to insert the correct amperage fuse and dress up the wiring after testing the circuit. If the lights worked in reverse, simply swap positions on the switch but I believe that this is right. The flow of the current should be viewed as it coming from the power source to the switch then from the other side of the switch to the light. The ground side will complete the circuit for you, just be sure that you have a good ground.

Note: If you choose to connect to the cigarette lighter plug in the back of the JL, be aware that depending on the fuse placement of that particular circuit, it has two different settings in the fuse box under the hood behind the battery. One way the fuse itself in the fuse box for that circuit is dedicated to being hot at all times while the other placement of the same fuse is to be hot ONLY when the ignition is on. If you look carefully in the fusebox and look directly over the fuse you will see 3 outlets and 2 are being used while the other is not. This is to allow the owner the choice to have that circuit constant hot or hot with the ignition on only. I believe the fuse is a yellow 20 amp fuse at the F43 (hot all time) or F45 (hot on ignition only) position. Below is the basic idea of how the power flows and the wiring scheme should look like. Hope this helps!
Thanks a million this is really helpful. Happy Trails!!!
 

MILT

Well-Known Member
First Name
Milt
Joined
Apr 17, 2020
Threads
15
Messages
113
Reaction score
165
Location
MN
Vehicle(s)
2019 JLU Sahara
Occupation
Honda technician

psdtime

Well-Known Member
First Name
Tom
Joined
Nov 21, 2019
Threads
12
Messages
335
Reaction score
304
Location
California
Vehicle(s)
2005 LJ Rubicon, 2016 Ram 2500 CTD, 2020 JLRU
Vehicle Showcase
1
So I found this diagram as well and it resembles how I am wired up, but it’s different from the diagram above but the same switch.

A8DA46AB-61D1-46BD-8718-189BE5694784.png
Are the posts if the switch labeled? You might have the ground on the wrong side. The switch itself may not be grounded correctly. Do you have a test light? I would pull the switch and test it's operation with some jumper wires using the car's battery or another 12v DC source. I have a Power Probe, kind of a pro's tool and little expensive, but once you own one, you'll never want to be without it.
Sponsored


Top