Sponsored
What side steps / rock rails to add to JL Wrangler?
TTEChris
Well-Known Member
- First Name
- Chris
- Joined
- May 17, 2017
- Threads
- 71
- Messages
- 2,175
- Reaction score
- 5,292
- Location
- Houston, TX
- Website
- www.tankcustoms.com
- Vehicle(s)
- 2021 JTD & 2021 4XE
- Vehicle Showcase
- 5
Thanks, I still have a long way to go!Chris, that Jeep looks great. Well done sir!
Thanks for the tips too.

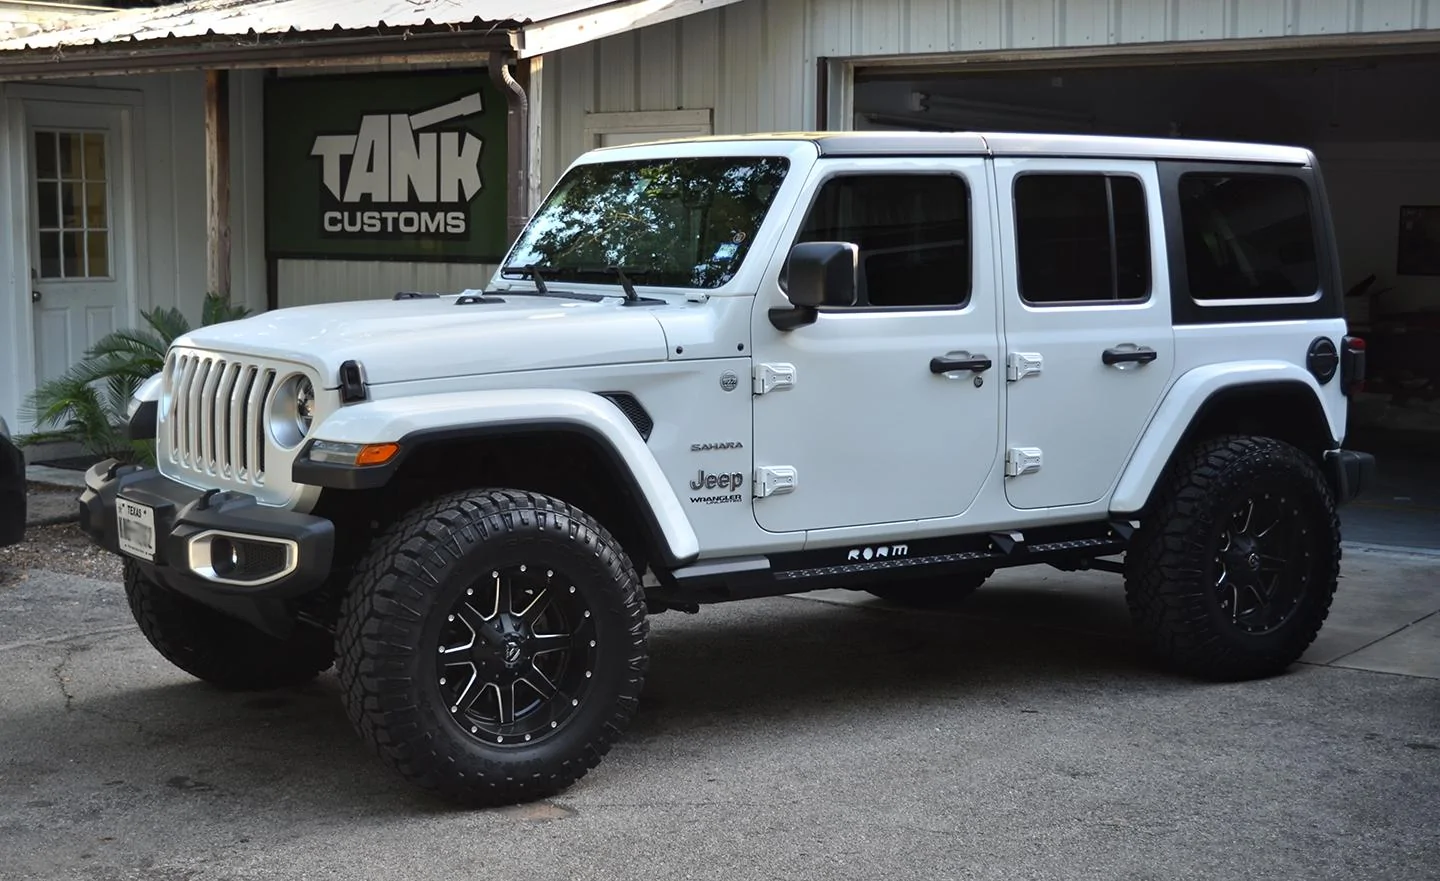
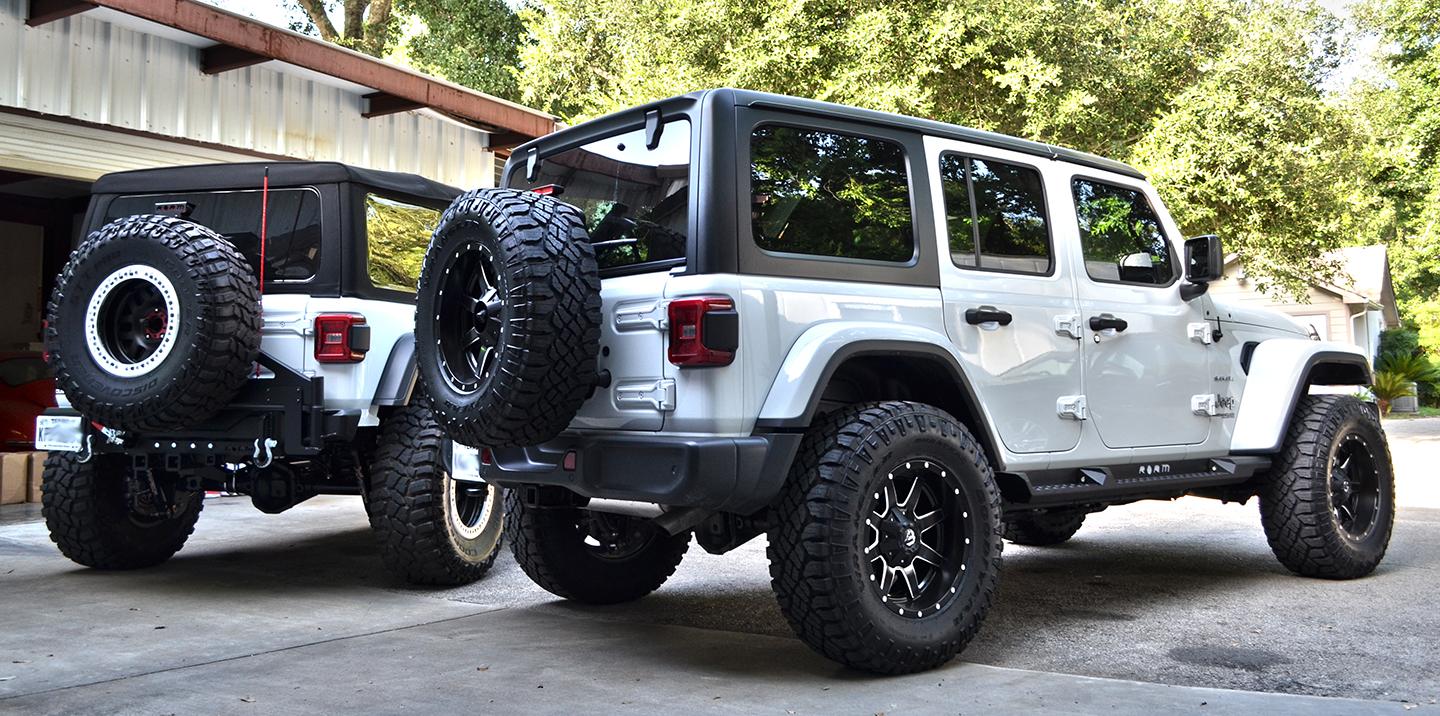
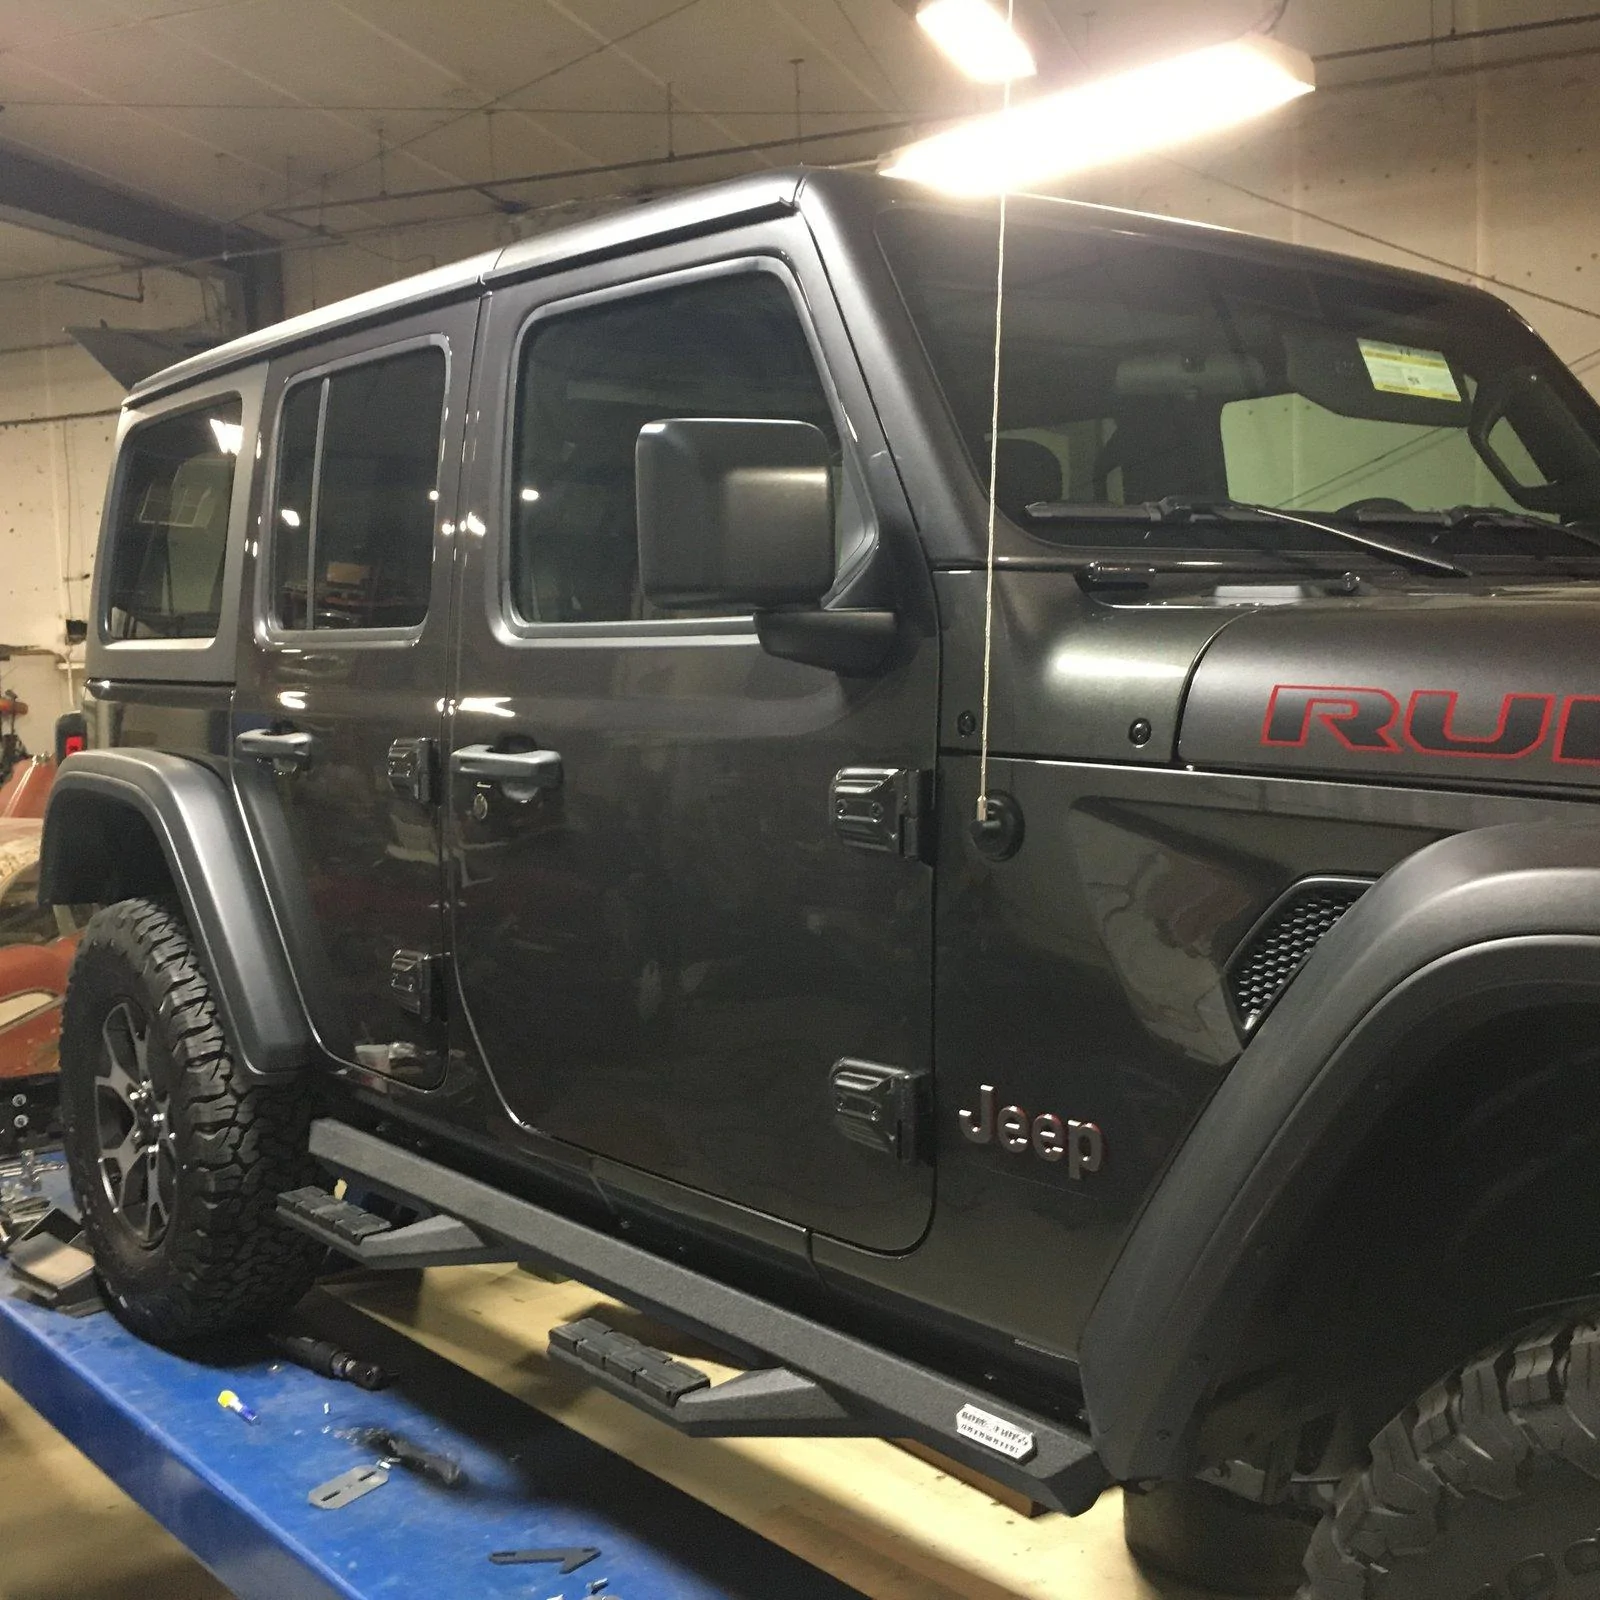
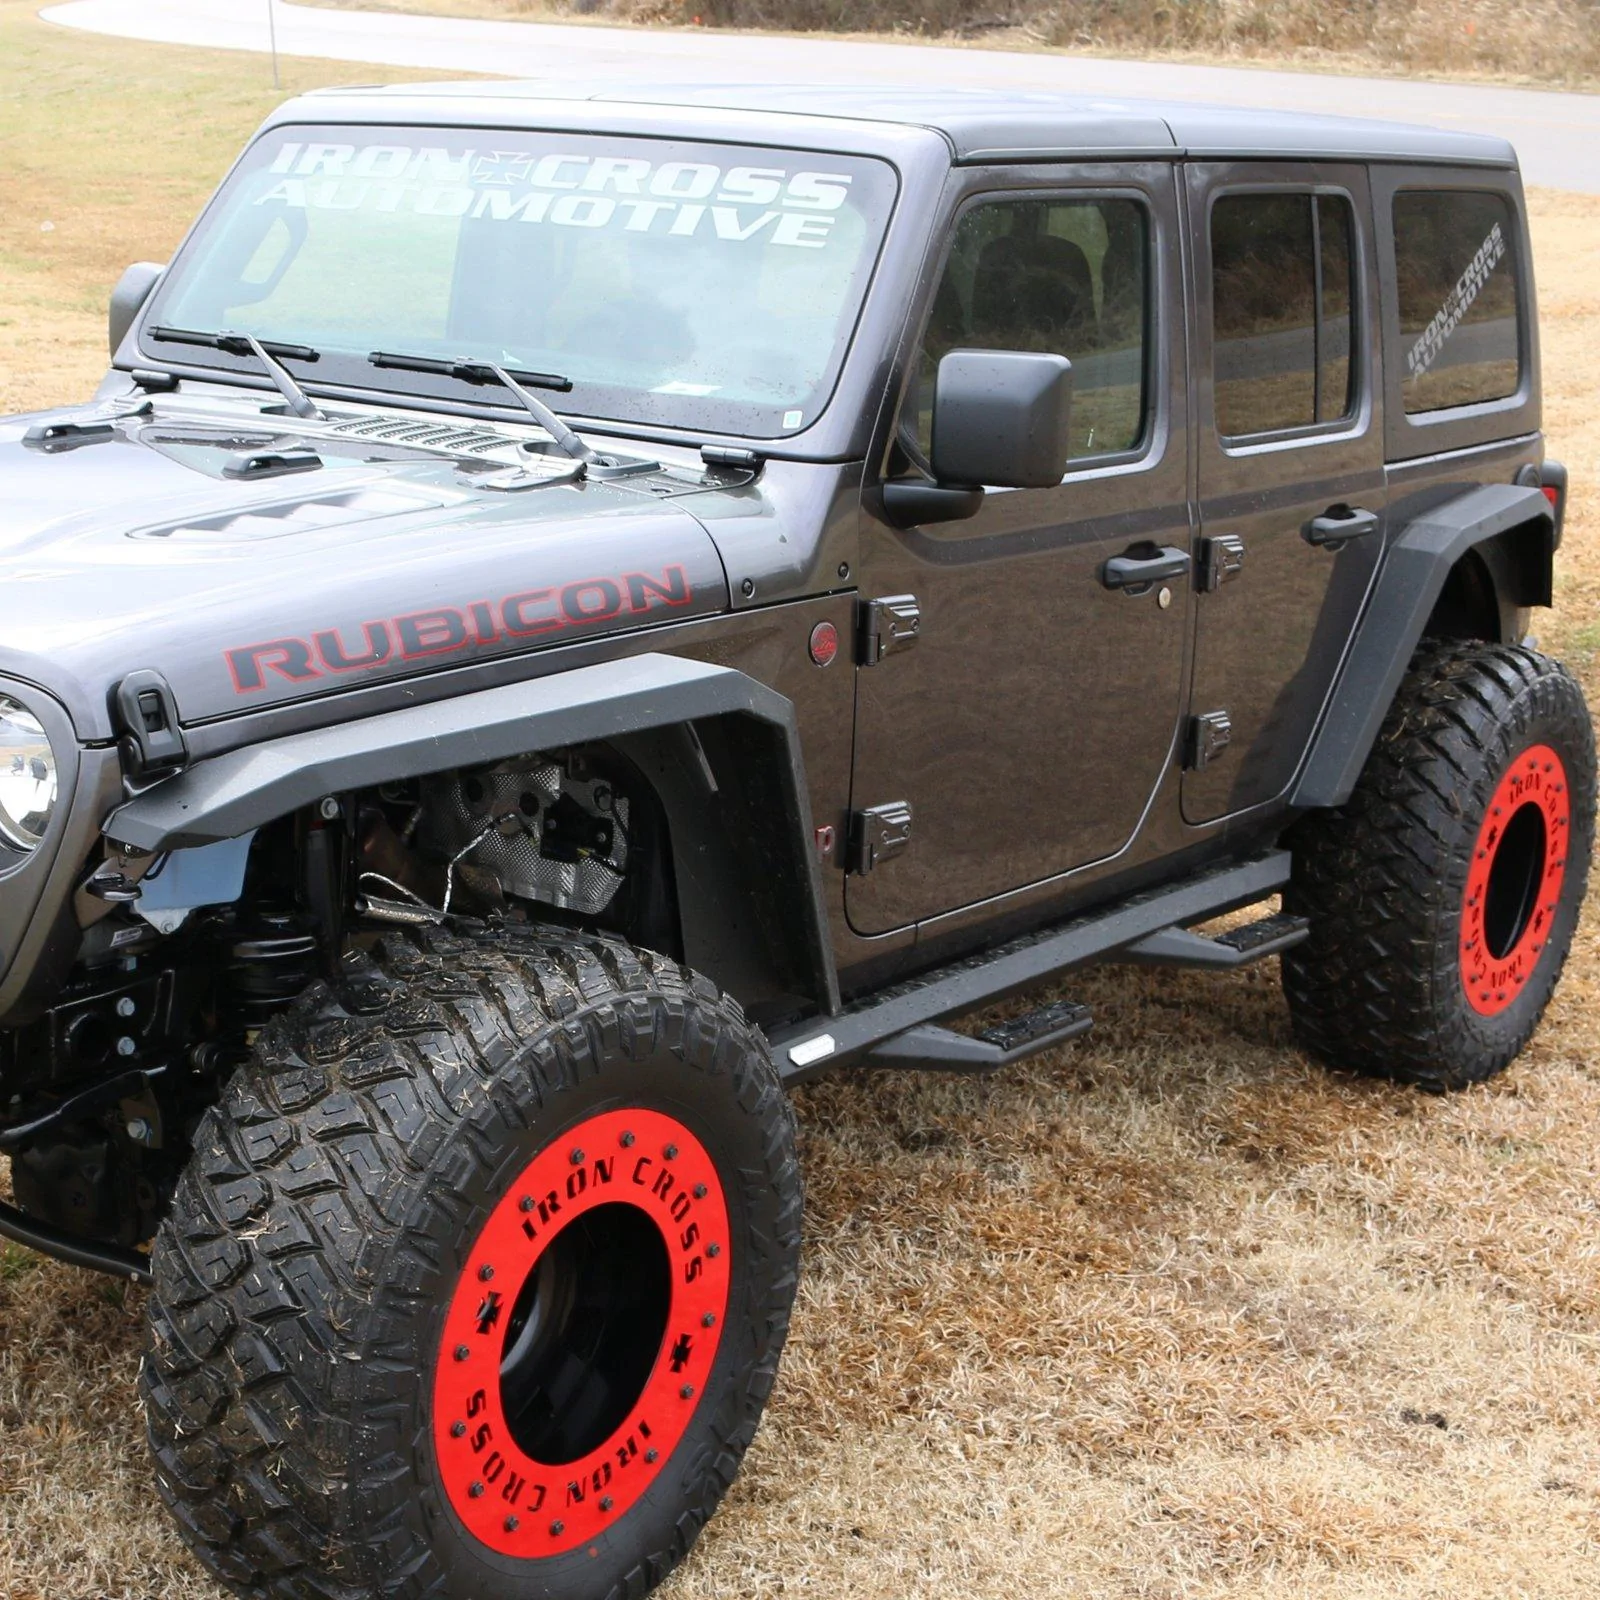
Anthony dropped off a set for a customer and I this afternoon. I had to finish installing another customers big brake kit on his JK. After I took a break from this 100 degree weather we are having in Houston I decided I might as well install the steps and document it to make life easier for others that have already received them. Hopefully it helps someone!
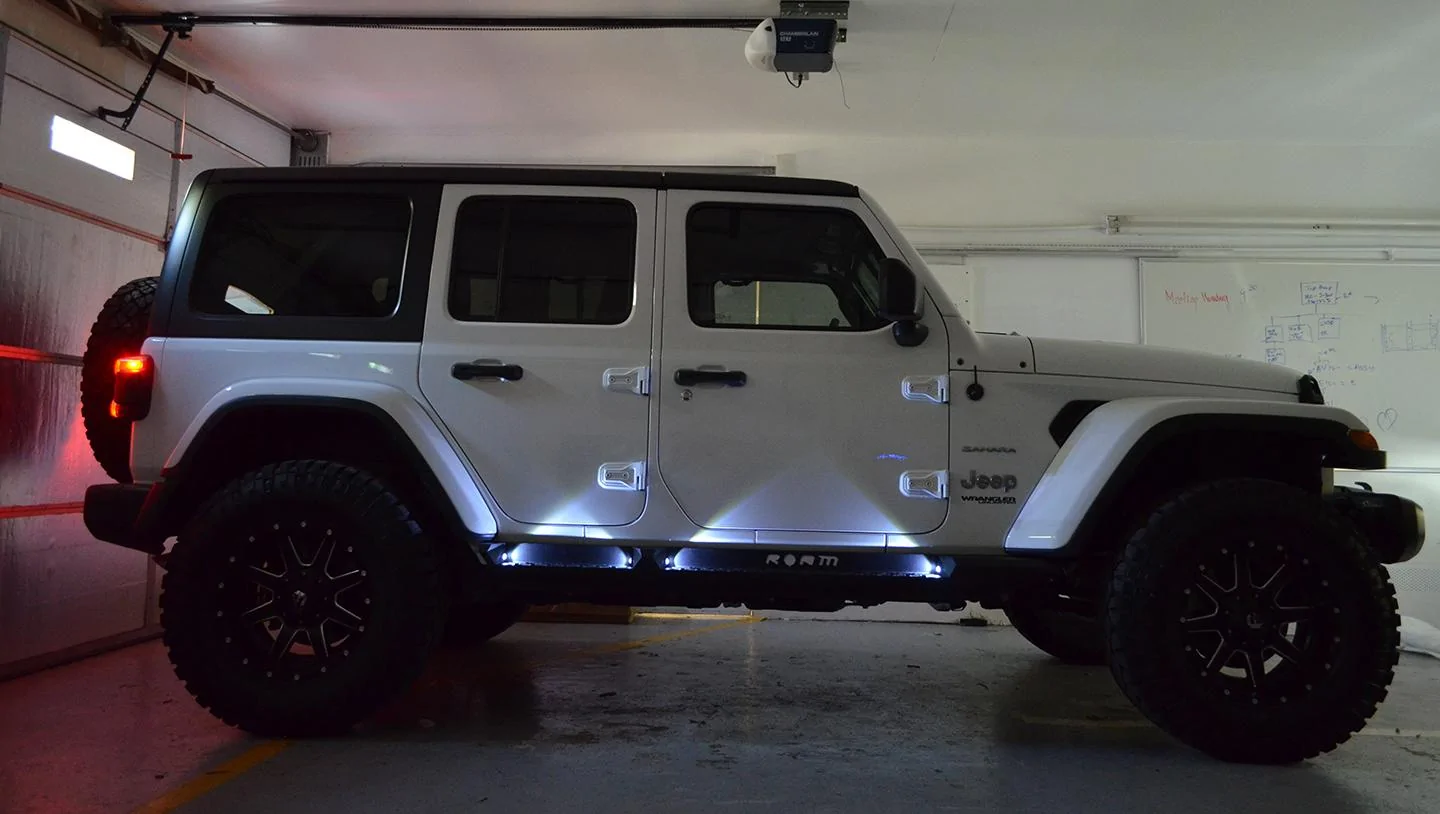
I will be installing another set with lights tomorrow. I may change up my writeup on the light install since this time around I am making my own harness.
jeremyjeep
Well-Known Member
Thanks for the additional photos. Do you have any photos with the stock JL fenders? I'm curious how they line up, how close and if they match.I hope these help!


Sgt Beavis
Well-Known Member
Thanks for the pictures and instructions Chris. That is very much appreciated.
Sponsored
Jebiruph
Well-Known Member
I went through this same decision process. I like the look of the tubes better, but I eventually went with the molded for the better body protection from debris kicked up from the tires and the wider step for easier entry of expected toddler and elder passengers. No chance of corrosion, won't dent and scratches will be less noticeable. I also like the light weight and the fact that if anything hits them, they are more likely to self destruct as opposed to causing damage to the body mount points, in my opinion.Thanks for this!
Tbh I'm looking to purchase either this or the Tubular side steps tomorrow for Lil' Hulk. Dealer is giving me 10% off...so still not sure which I should get. The molded are more affordable and I like the fact that you say they are solid! However, I'm feeling the look of these tubulars . the Dealer actually told me that he likes the look of the molded on Wranglers better...and that the tubulars look better on trucks to him. However, I've been trying to see the tubulars on a full size Wrangler Picture.
Anyone's opinion on this? Tubular vs Molded?
TaiMc
Well-Known Member
- First Name
- Tai
- Joined
- Jun 23, 2018
- Threads
- 9
- Messages
- 2,051
- Reaction score
- 3,538
- Location
- Houston, TX
- Website
- www.instagram.com
- Vehicle(s)
- '18 JLU Sport Mojito!, 3.6L & '18 Ninja 400 KRT
- Occupation
- Communications Manager
- Vehicle Showcase
- 2
Thank you for this feedback!!!I went through this same decision process. I like the look of the tubes better, but I eventually went with the molded for the better body protection from debris kicked up from the tires and the wider step for easier entry of expected toddler and elder passengers. No chance of corrosion, won't dent and scratches will be less noticeable. I also like the light weight and the fact that if anything hits them, they are more likely to self destruct as opposed to causing damage to the body mount points, in my opinion.
I actually purchased the molded today
") I spoke to the Parts Dept (from the dealership I purchased my Jeep from) and I told him what my concerns were (my parents) and he could've sold me the tubular, because he had them there...he even showed them to me so I could see. However, he highly recommended the molded bc of what I needed. I knew then I made the right decision as he wasn't trying to sell me the more expensive ones.
I spoke to the Parts Dept (from the dealership I purchased my Jeep from) and I told him what my concerns were (my parents) and he could've sold me the tubular, because he had them there...he even showed them to me so I could see. However, he highly recommended the molded bc of what I needed. I knew then I made the right decision as he wasn't trying to sell me the more expensive ones.DirtyTj
Active Member
- First Name
- Paul
- Joined
- Jun 20, 2018
- Threads
- 0
- Messages
- 35
- Reaction score
- 24
- Location
- MA
- Vehicle(s)
- On its way 2018 JLUR in granite crystal with most everything but smokers group and dual top.2003 Sahara ARB air lockers front and rear, G2 Dana 60 in the rear, Dana 30 with RCV shafts Upfront 4.88 gearing.
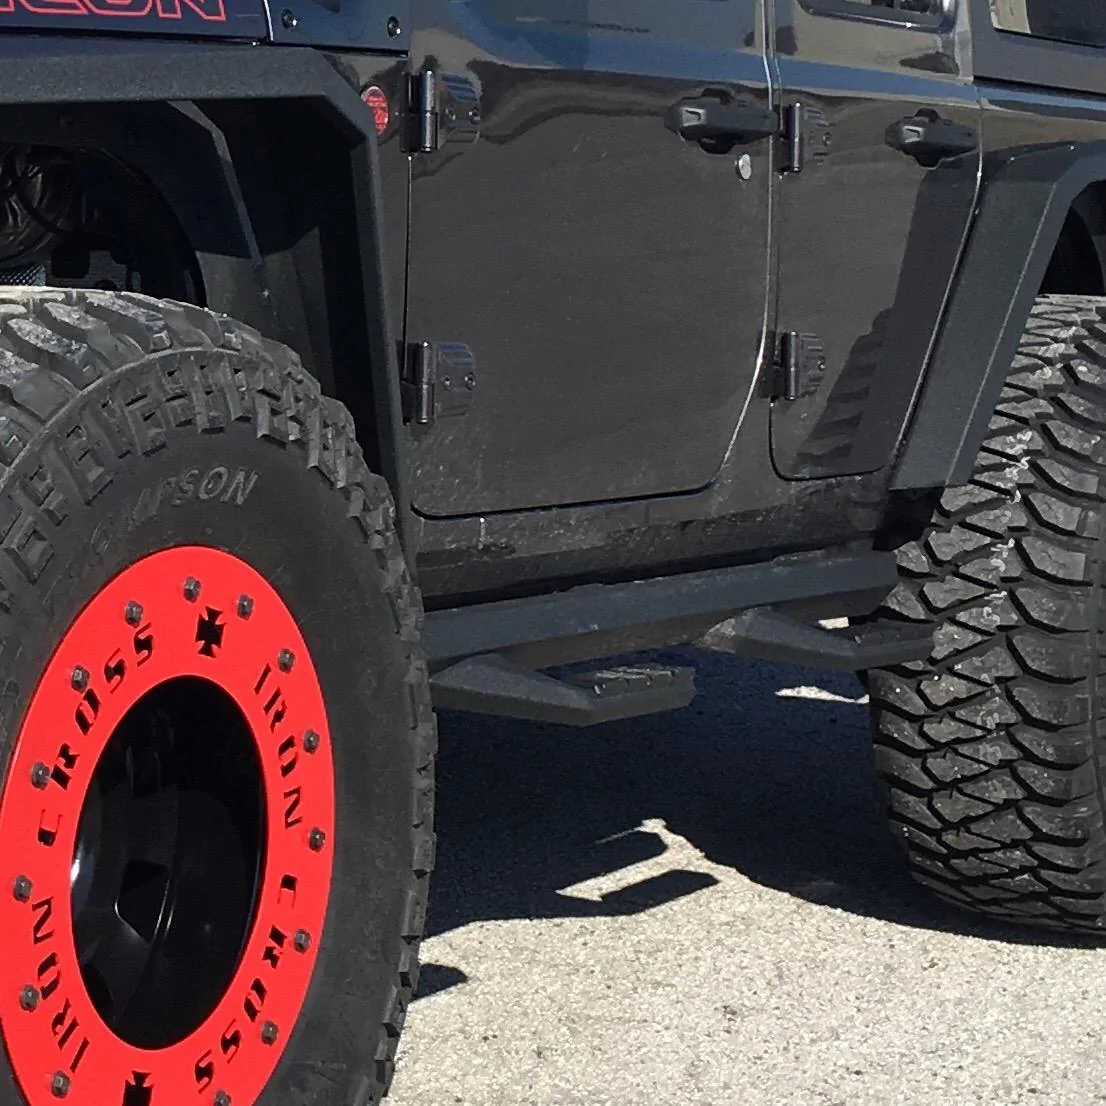
Which side step can be used with hi lift jack? Every thing so far on this thread seems either decorative or just a good step. I want both a step and a lift point.[/QUOTE
LOD Destroyers.
MDG
Well-Known Member
- First Name
- Marc
- Joined
- Jul 13, 2018
- Threads
- 29
- Messages
- 255
- Reaction score
- 113
- Location
- Burlington, CT
- Vehicle(s)
- 2018 JKUR
Finally got a tracking number this morning.I exchanged emails with him on Friday 7/13 and he said mine would go out Monday 7/16. Guess what, today is now Wednesday 7/18 and nothing!
eaglesjw
Member
- Joined
- May 31, 2018
- Threads
- 0
- Messages
- 22
- Reaction score
- 35
- Location
- Elkhorn, NE
- Vehicle(s)
- 2018 JL Wrangler Unlimited Rubicon; 2014 Road King
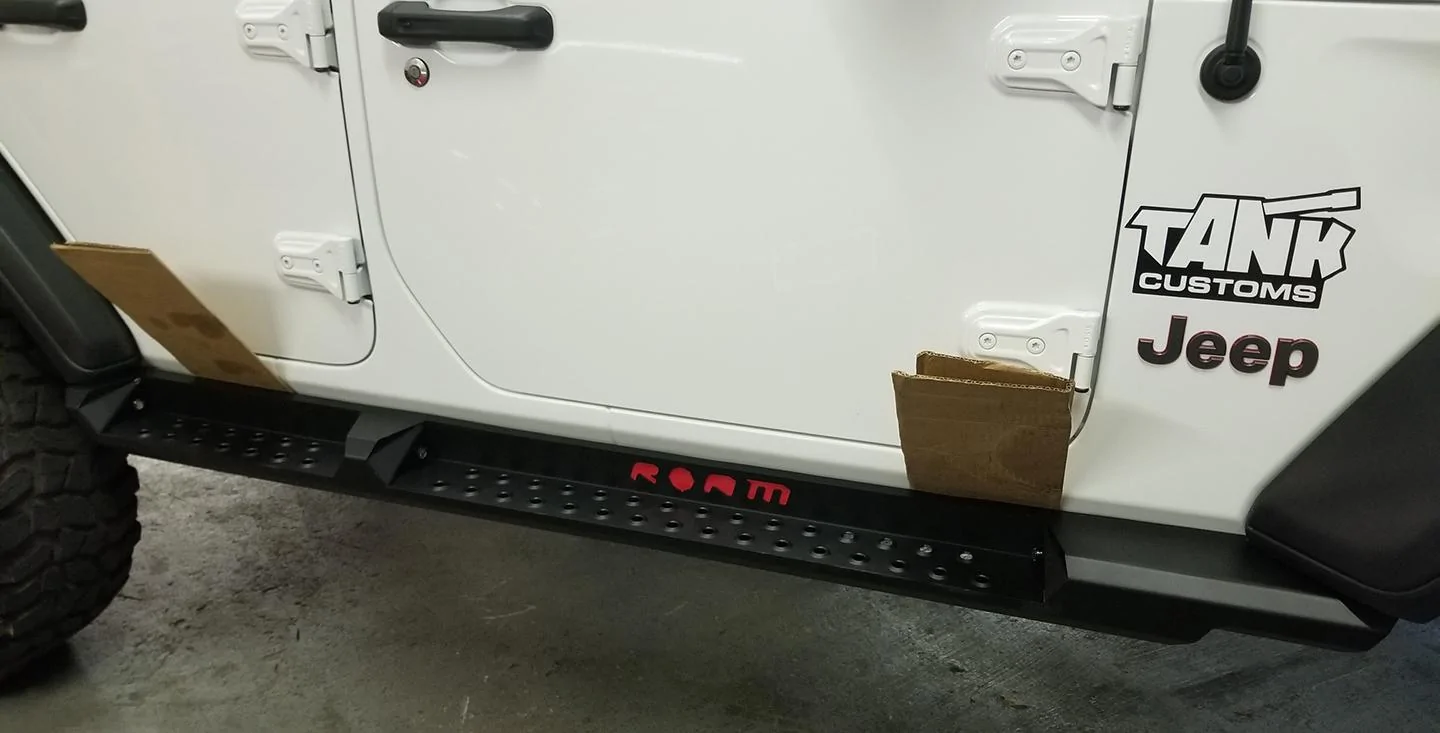
What paint did you use for the Roam logo plate? Looks great!For those that have received their ROAM steps here is a very simple/short walk through of the install process. Sorry for the crappy pictures, started late and wanted to get home to my wife/kids.
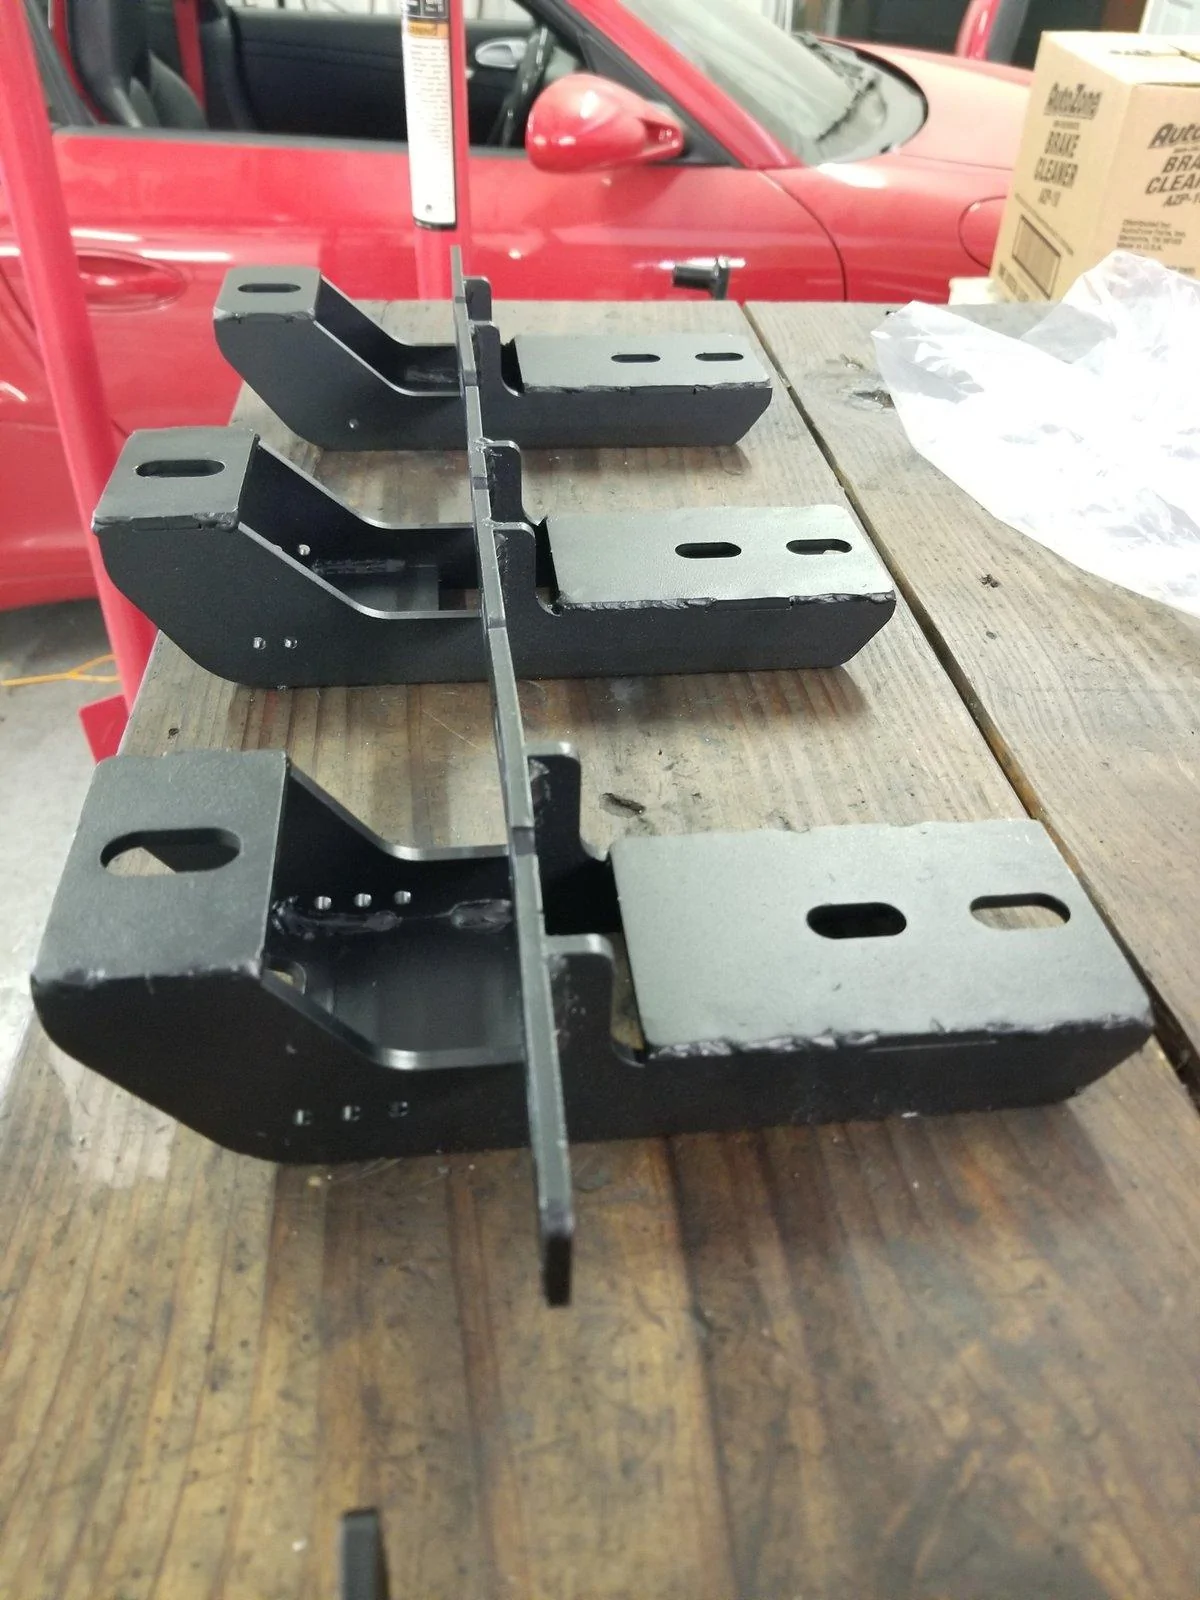
For Starters the three brackets for the steps are marked on the bag, and all have little indexing holes(one, two or three depending on location.) One goes in the front, three in the back. I'm sure you can guess where two goes

Once you go to put them on the Jeep pay attention to the size of the holes in the pinch seem. Roam has included two different size bolts due to this variation. The small holes get a black bolt with a washer, and the large holes get the longer/larger bolts with the 13mm head.
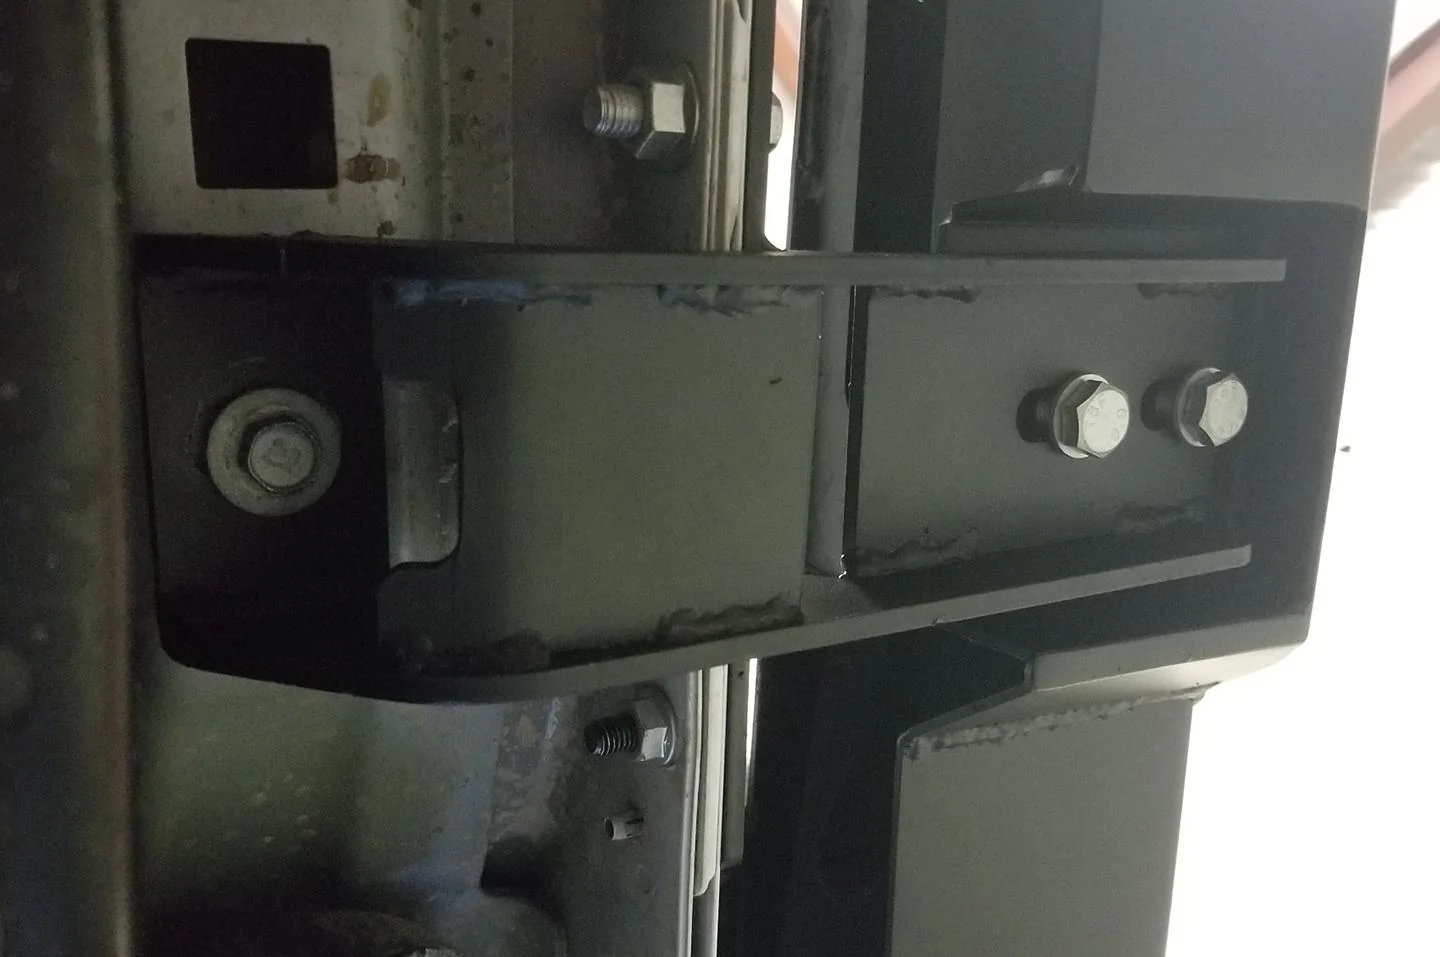
The center mount is the only one that has two larger holes. I like to put the bolts in the brackets finger tight with nuts behind the pinch seem, then install the bolt from the bottom also finger tight(I used the factory Rubicon bolts here, but they included extra black bolts/washers if you didn't have the Rubicon rails.)
Once you have the brackets loosely installed lay the ROAM steps on top of the brackets and thread in the shorter bolts/washers but don't tighten them at this point. I like to push them all the way outwards until I have tightened the brackets. From this point I like to tighten the three bolts that go into the tub first making sure the brackets stay flush with the pinch seem while doing so. Once they are tight, go ahead and tighen the 6 bolts/nuts that go through the brackets and through the pinch seem.

Now you can go about adjusting the preferred gap for the steps. I like it a little loose, so I double up a piece of cardboard and insert it at both ends. While applying a little pressure I lightly tighten one of the bolts in the front or rear. I then move to the opposite end and did the same. Once the spacing looks correct I tighten them all. Be careful as when tightening some of the bolts the steps may want to move(Keep applying a little pressure inwards.)

Done!


Sponsored
TTEChris
Well-Known Member
- First Name
- Chris
- Joined
- May 17, 2017
- Threads
- 71
- Messages
- 2,175
- Reaction score
- 5,292
- Location
- Houston, TX
- Website
- www.tankcustoms.com
- Vehicle(s)
- 2021 JTD & 2021 4XE
- Vehicle Showcase
- 5
Thanks,What paint did you use for the Roam logo plate? Looks great!
I covered it in red vinyl I had laying around from a previous project.

GoGators353
Well-Known Member
- First Name
- Patrick
- Joined
- Apr 8, 2018
- Threads
- 3
- Messages
- 152
- Reaction score
- 144
- Location
- South Florida
- Vehicle(s)
- Jeep Wrangler
Chris, Jeep looks incredible and the red is a nice touch.
Also, ROAM steps will be here tomorrow Anthony said he will be sending out tracking information today (he added mine to my PayPal receipt and I received an email from PP) if you haven't received it yet. The long wait is almost over and hopefully Anthony will be able to get a good nights rest soon!
Also, ROAM steps will be here tomorrow
Anthony said he will be sending out tracking information today (he added mine to my PayPal receipt and I received an email from PP) if you haven't received it yet. The long wait is almost over and hopefully Anthony will be able to get a good nights rest soon!ROAM
Well-Known Member
- Joined
- Mar 12, 2018
- Threads
- 27
- Messages
- 149
- Reaction score
- 446
- Location
- Texas
- Website
- www.roamoffroad.com
- Vehicle(s)
- JL Rubicon
We are shipping the last few from June 26th today and will most likely finish all purchases made during June 27-30 by the end of the day.@ROAM Does that imply that those who have been on the wait list since May and paid since June (27th to be exact) will be caught up and shipped?
TTEChris
Well-Known Member
- First Name
- Chris
- Joined
- May 17, 2017
- Threads
- 71
- Messages
- 2,175
- Reaction score
- 5,292
- Location
- Houston, TX
- Website
- www.tankcustoms.com
- Vehicle(s)
- 2021 JTD & 2021 4XE
- Vehicle Showcase
- 5