Sponsored

ROAM Side Steps Install

Vawildjeep

Well-Known Member
First Name
Rick
Joined
Sep 5, 2018
Threads
17
Messages
255
Reaction score
230
Location
Virginia Beach
Vehicle(s)
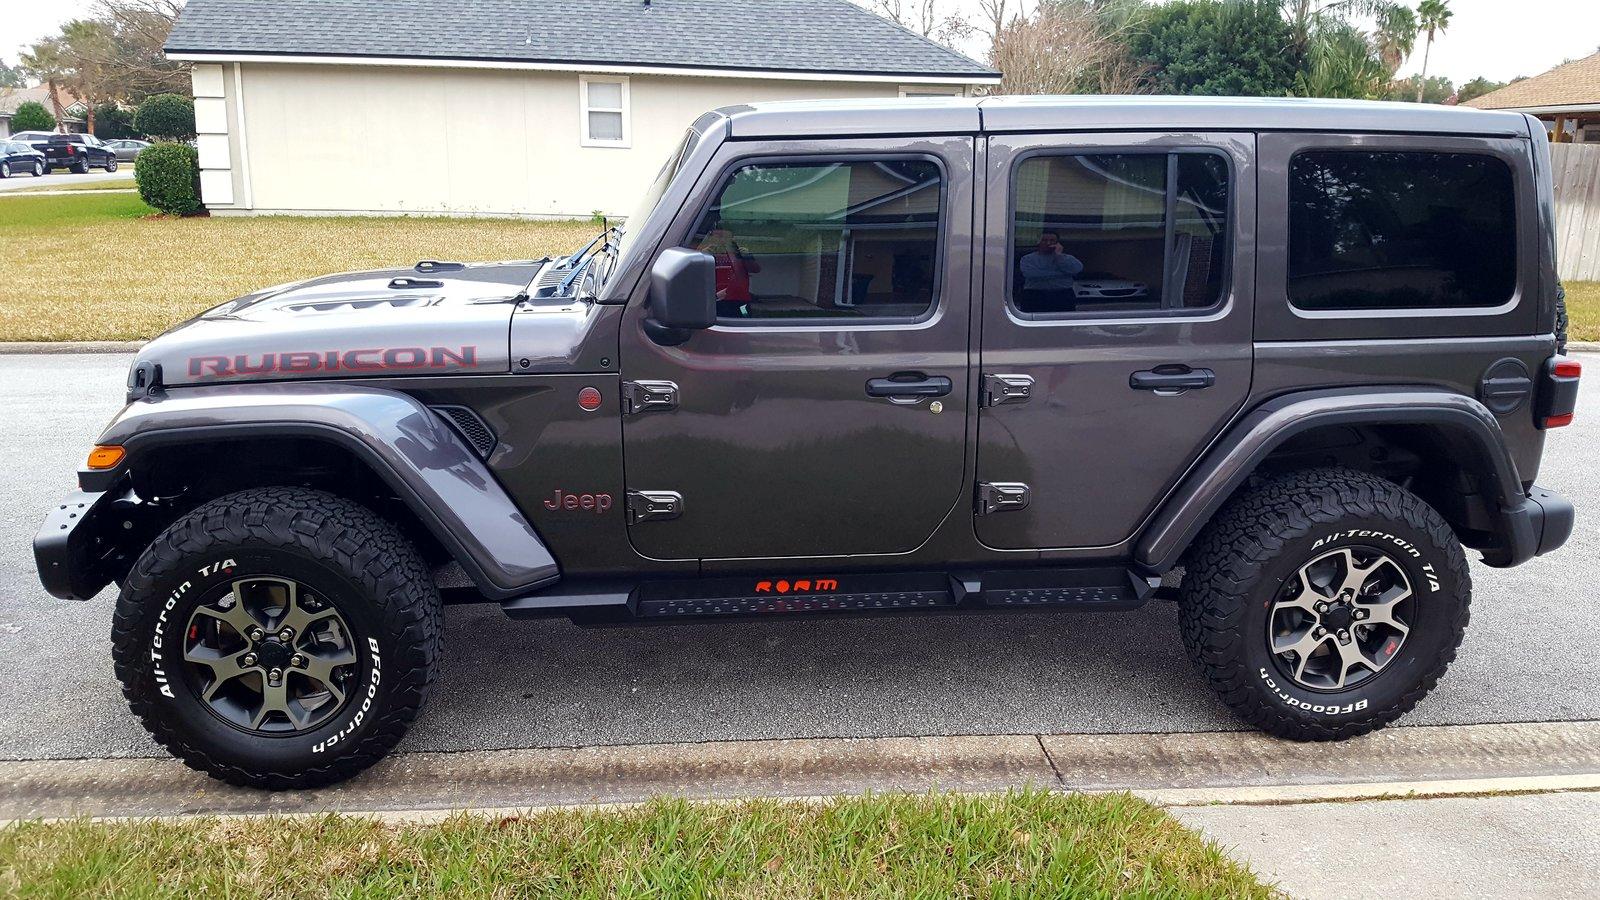
2018 JLU Rubicon 2 1/2” stage 2 Icon lift 37” Nitto Ridge Grapplers on 20” Fuel Beasts.
Occupation
Business owner
Vehicle Showcase
1
What size wheels and tires ? Do you have the Mopar 2 lift?
37 Nitto RG’s on 20” Fuels Beasts. 2 1/2” Icon lift
Sponsored


2wheelz4me

Member
First Name
Jay
Joined
Feb 19, 2018
Threads
2
Messages
23
Reaction score
9
Location
Texas
Vehicle(s)
Jeep JL 4 door
So what is every doing about these hair width led wires?? I get it doesn't need to be very heavy gauge to function but good grief these wire break if you blow on them Is there a better alternative to the standard eagle eye led's? Anyone tried anything different or found the lights with a heavier gauge wire I really like the looks of the lights but dont like fixing them every 6 months. Surely there's a better way... thanks all!!
 

jlewissystem

Well-Known Member
First Name
J
Joined
Jan 24, 2019
Threads
55
Messages
1,163
Reaction score
2,325
Location
STL
Vehicle(s)
2019 JLUR MANUAL Mojito!
Build Thread
Link
Vehicle Showcase
1
So what is every doing about these hair width led wires?? I get it doesn't need to be very heavy gauge to function but good grief these wire break if you blow on them Is there a better alternative to the standard eagle eye led's? Anyone tried anything different or found the lights with a heavier gauge wire I really like the looks of the lights but dont like fixing them every 6 months. Surely there's a better way... thanks all!!
There’s a wiring thread about how to wire these that started me off. I felt the same way, but addressed this in 2 ways: I cut 1 short and replaced with thicker gauge, then I used heat shrink and electrical tape around the others and tucked them. As long as they’re not exposed, they should be ok.
 

2wheelz4me

Member
First Name
Jay
Joined
Feb 19, 2018
Threads
2
Messages
23
Reaction score
9
Location
Texas
Vehicle(s)
Jeep JL 4 door
Thanks JLewis. Crazy something is not available in the marketplace already.
 

jlewissystem

Well-Known Member
First Name
J
Joined
Jan 24, 2019
Threads
55
Messages
1,163
Reaction score
2,325
Location
STL
Vehicle(s)
2019 JLUR MANUAL Mojito!
Build Thread
Link
Vehicle Showcase
1
Thanks JLewis. Crazy something is not available in the marketplace already.
NP! I think there are other lights that people are replacing them with as well, but I don’t have much experience with those. Not sure if they have thicker wire or not. Looks like they might. Oznium LEDs
 

Sponsored

BigBruse

Well-Known Member
First Name
Robbie
Joined
Apr 7, 2019
Threads
33
Messages
299
Reaction score
61
Location
Va
Vehicle(s)
2019 Jeep rubicon
I installed my Roam sidesteps today. Very easy install and I painted my backing plate red to match the Rubicon and Trail Rated badge.
20190202_153854.jpg
20190202_164708.jpg
20190202_171952 (3).jpg
Are these the powder coated ones?
 

Brandon3333

Well-Known Member
First Name
Brandon
Joined
Oct 14, 2019
Threads
2
Messages
47
Reaction score
91
Location
Folsom, CA
Vehicle(s)
2020 JLU Rubicon
Hello All,

After receiving my Roam body mounted side steps this week for a 2020 JLU Rubicon, I read through this thread for all the GREAT help installing these, but I wanted to clarify the installation and one post that took me a while to figure out that showed the nuts/bolts/washers that come with the steps and clarify what you should have received and where each go.

Here is a re-post of the helpful photo he posted showing the hardware and count of each:
c41384a4-a88b-4950-94b9-9b861033005d-jpeg.jpg


Now let me explain a bit more clearly what each is and where they go:

INVENTORY:
You should have received the following items: Mine came in two separate sealed packages:
Package 1:
11 Small Bolts and Washers of equal size (Yes 11...you get one extra)
- 6 are for mounting the bracket to the under body/frame (1 for each of the 6 brackets)
- 4 are for the pinch seem and go with the 4 small nuts for the pinch seem bolts (explained below)
- 1 extra as noted above
8 Larger bolts and nuts but no separate washers for the pinch seem
4 separate smaller bolts that are only used for mounting the back plate to the steps
Package 2:
12 smaller bolts/washers (no nuts) for mounting the steps to the brackets

Okay...now the explanation:
On the JLU Rubicon, there are 2 pinch seem holes on each side of the Jeep (Driver & Passenger) that are actually smaller than the other 4 on each side, which is why you have a total of 4 small nuts/bolts (2 for each side) and 8 large nuts/bolts (4 for each side). This is actually shown/explained on the original post but not in great detail.

The 4 smaller nuts/bolts go only on Brackets 1 & 3 on each side of Jeep.
When installing Brackets 1 & 3, you will use the small nuts/bolts as follows:
- Left pinch seem hole Bracket 1
- Left pinch seem hole Bracket 3
The remaining seem holes, as well as both holes in middle Bracket (Bracket 2), only use 2 of the larger bolts/nuts for both holes.
NOTE: Only the Pinch Seem holes are smaller...the Bracket holes are all the same size, so it wasn't quite obvious to me looking at the brackets until I figured out only the pinch seem holes were smaller.

So, the bolts/nuts you use should look like this for each bracket lining up to each pinch seem hole for installation on both driver/passenger side:

Bracket 1.....Bracket 2.....Bracket 3
Sm.....Lrg......Lrg.....Lrg.......Sm...Lrg

Hope this makes sense and helps. It saved me from an unnecessary trip to Home Depot to pick up what I thought was missing bolts/nuts/washers.

Good luck!
 
Last edited:

Brandon3333

Well-Known Member
First Name
Brandon
Joined
Oct 14, 2019
Threads
2
Messages
47
Reaction score
91
Location
Folsom, CA
Vehicle(s)
2020 JLU Rubicon
Follow up to my installation:
I purchased the "Bedliner" coated version. First...I love it. Seems rugged enough to take some abuse and looks cool.
However, this particular coating made a couple of things difficult:
1.) The LED holes are about 1/16th to 1/32nd of an inch too small. Just small enough that the LED's will not fit.
2.) Plate that goes behind logo - same thing as LED. The plate is about 1/16th of an inch too big (or the plate hole is 1/16th too small however you want to look at it), I had to pay $40 to a local machine shop to have them shave off the 1/16th of an inch off the plate so it would fit. Once that was done...whala!! Worked!
As for the LED...not much you can do..either drill out the holes or go find another set of LED lights.
If anyone knows of a better/smaller set of LED's that you used, please post a link and/or description.
Thanks!
 

Sponsored

Amrkrocks0685

Member
First Name
Mark
Joined
Sep 20, 2019
Threads
0
Messages
12
Reaction score
14
Location
Colorado
Vehicle(s)
2018 JL Rubicon
Hello All,

After receiving my Roam body mounted side steps this week for a 2020 JLU Rubicon, I read through this thread for all the GREAT help installing these, but I wanted to clarify the installation and one post that took me a while to figure out that showed the nuts/bolts/washers that come with the steps and clarify what you should have received and where each go.

Here is a re-post of the helpful photo he posted showing the hardware and count of each:
c41384a4-a88b-4950-94b9-9b861033005d-jpeg.jpg


Now let me explain a bit more clearly what each is and where they go:

INVENTORY:
You should have received the following items: Mine came in two separate sealed packages:
Package 1:
11 Small Bolts and Washers of equal size (Yes 11...you get one extra)
- 6 are for mounting the bracket to the under body/frame (1 for each of the 6 brackets)
- 4 are for the pinch seem and go with the 4 small nuts for the pinch seem bolts (explained below)
- 1 extra as noted above
8 Larger bolts and nuts but no separate washers for the pinch seem
4 separate smaller bolts that are only used for mounting the back plate to the steps
Package 2:
12 smaller bolts/washers (no nuts) for mounting the steps to the brackets

Okay...now the explanation:
On the JLU Rubicon, there are 2 pinch seem holes on each side of the Jeep (Driver & Passenger) that are actually smaller than the other 4 on each side, which is why you have a total of 4 small nuts/bolts (2 for each side) and 8 large nuts/bolts (4 for each side). This is actually shown/explained on the original post but not in great detail.

The 4 smaller nuts/bolts go only on Brackets 1 & 3 on each side of Jeep.
When installing Brackets 1 & 3, you will use the small nuts/bolts as follows:
- Left pinch seem hole Bracket 1
- Left pinch seem hole Bracket 3
The remaining seem holes, as well as both holes in middle Bracket (Bracket 2), only use 2 of the larger bolts/nuts for both holes.
NOTE: Only the Pinch Seem holes are smaller...the Bracket holes are all the same size, so it wasn't quite obvious to me looking at the brackets until I figured out only the pinch seem holes were smaller.

So, the bolts/nuts you use should look like this for each bracket lining up to each pinch seem hole for installation on both driver/passenger side:

Bracket 1.....Bracket 2.....Bracket 3
Sm.....Lrg......Lrg.....Lrg.......Sm...Lrg

Hope this makes sense and helps. It saved me from an unnecessary trip to Home Depot to pick up what I thought was missing bolts/nuts/washers.

Good luck!
Very helpful!
 

CaddyshackGopher

Well-Known Member
Joined
Apr 14, 2018
Threads
7
Messages
301
Reaction score
274
Location
North Dakota
Vehicle(s)
2019 Sting Gray JLUR
Vehicle Showcase
1
Went w/ the Bed-Liner option & could not be happier. Add 1 hour to install time due to getting through the superb packaging! My experience w/ ROAM has been exceptional. Thanks to Anthony at ROAM for great customer service & to those who have taken the time to post install guidance. So thankful!

D81E2706-8B55-4ED3-BC04-3DC518503C7A.jpeg


A3E63070-C542-49DE-B597-7F063EF837CF.jpeg


F71A986E-006E-4DDF-9FDE-871FF75EF40B.jpeg
 

greenerobnmu

Well-Known Member
First Name
Rob
Joined
Aug 4, 2019
Threads
3
Messages
58
Reaction score
22
Location
Clarkston, MI
Vehicle(s)
2019 JLUR
UPDATE 10/29/2019.
Anthony @ROAM contacted me with pictures of new brackets. They look totally legit. The mounting hole for the body mount is elongated to match the pinch seam holes so that will allow for more fore and aft adjustment as the bracket they originally sent were the opposite. Hopefully he sends them soon. My Jeep looks totally naked with no steps or sliders.

-------------------------------------------------------------------------------------------------------------
I received mine a few days ago and was planning to install today. Yesterday I asked Anthony what hardware included because I had a guy buying my sliders this morning and didn't want to give him anything I will need. He said "everything" in included in the hardware bag. Well, that is not even close to the truth. There are zero bolts that mount to the body. There are also several nuts, washers and bolts missing. I can run to the store for that.

The real issue is the garbage quality of the brackets. The welds are simply AWFUL. I have seen some of the pictures in the various threads and see that this seems to be normal. The problem is that the extreme excess material on the surfaces that are supposed to be flat. If I were to mount the brackets and properly torque them down I would cause damage to the body of my Jeep which would eventually cause rust. The same issue is present on the bracket were the steps attach. This should have been ground down prior to powdercoat. Very disappointed.

The second issue on the brackets is the part that mounts to the pinch seem. All of these are bent. My first thought was the reason this is because of the contour of the body at the pinch seem. However when you put them up to the body all of them are bent away from the pinch seem. If I were to mount these and properly torque them the pinch seam of the Jeep would bend and eventually cause rusting issues.

Seems like the person @ROAM who assembled these mounted the didn’t care that they were bent or used way too much heat and they warped and didn't care to do even a half way decent job of a quality weld.
 
Last edited:

psdtime

Well-Known Member
First Name
Tom
Joined
Nov 21, 2019
Threads
12
Messages
335
Reaction score
308
Location
California
Vehicle(s)
2005 LJ Rubicon, 2016 Ram 2500 CTD, 2020 JLRU
Vehicle Showcase
1
I received my Roam body mounted steps early last week and installed over the weekend. All parts needed including the body mount bolts that I didn't need were included. The only omission was any type of instructions. I spent more time trying to figure out what bolt to use where than the actual install. All Roam needs is one piece of paper with some instructions to make this a truly brainless install. My box arrived promptly and all parts were undamaged. Everything bolted up just fine. I did it myself in the driveway with no special tools (no jacks needed). It is actually pretty easy. Probably easier than mounting the factory rock rails since you don't have to try to hold it up and bolt at the same time. I think it took me about an hour to do the whole thing.
 

maxjlu

Well-Known Member
First Name
fred
Joined
Dec 3, 2018
Threads
0
Messages
358
Reaction score
314
Location
california
Vehicle(s)
jeep jl
I received my Roam body mounted steps early last week and installed over the weekend. All parts needed including the body mount bolts that I didn't need were included. The only omission was any type of instructions. I spent more time trying to figure out what bolt to use where than the actual install. All Roam needs is one piece of paper with some instructions to make this a truly brainless install. My box arrived promptly and all parts were undamaged. Everything bolted up just fine. I did it myself in the driveway with no special tools (no jacks needed). It is actually pretty easy. Probably easier than mounting the factory rock rails since you don't have to try to hold it up and bolt at the same time. I think it took me about an hour to do the whole thing.
Those roam steps are very easy install and good looking! They sent me the instructions through email, but went to spam. Found several links here for wiring up the lights, cost me 3 hours to finish the lights.
Sponsored


Top