Sponsored

Off-Road Camera (front facing) writeup

mazeppa

Well-Known Member
First Name
y = x/0
Joined
Feb 11, 2018
Threads
9
Messages
291
Reaction score
428
Location
ICBM complex at Kodlosk
Vehicle(s)
2021 JTR Panda
Occupation
knife sharpening snob
<snip>

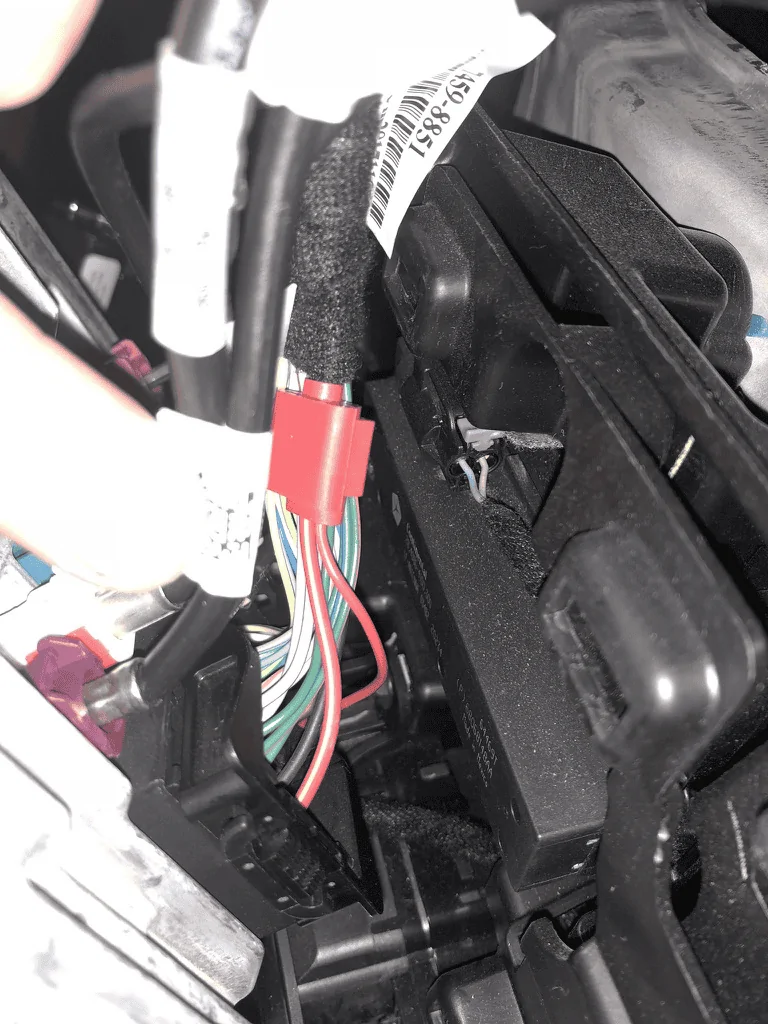
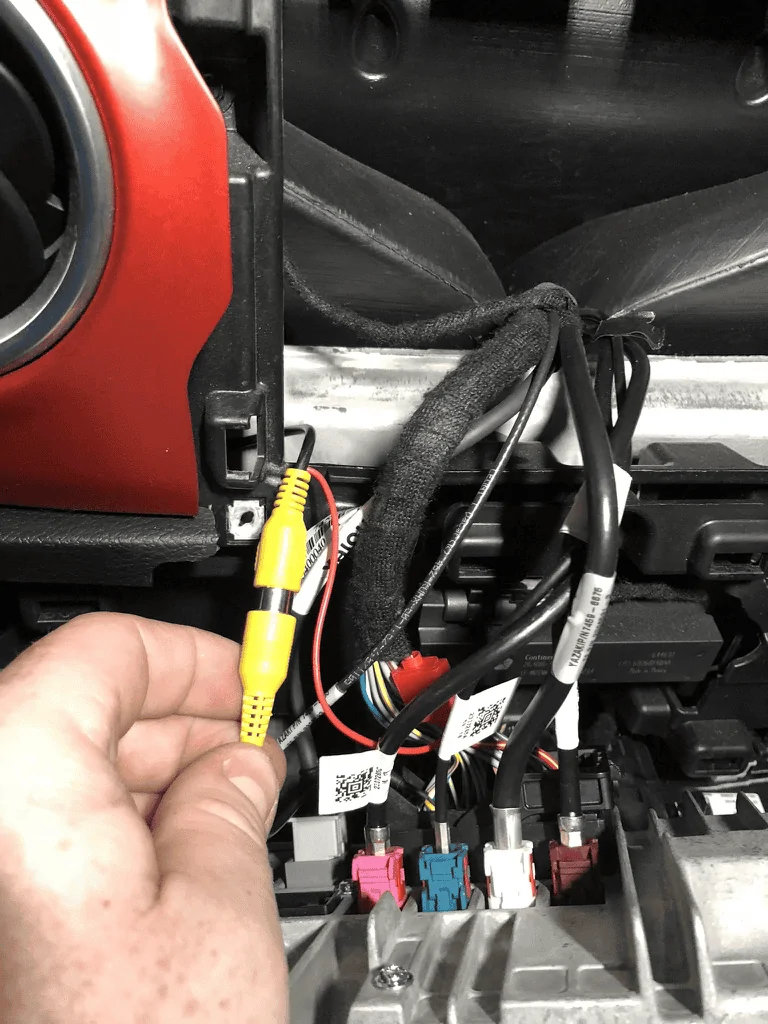
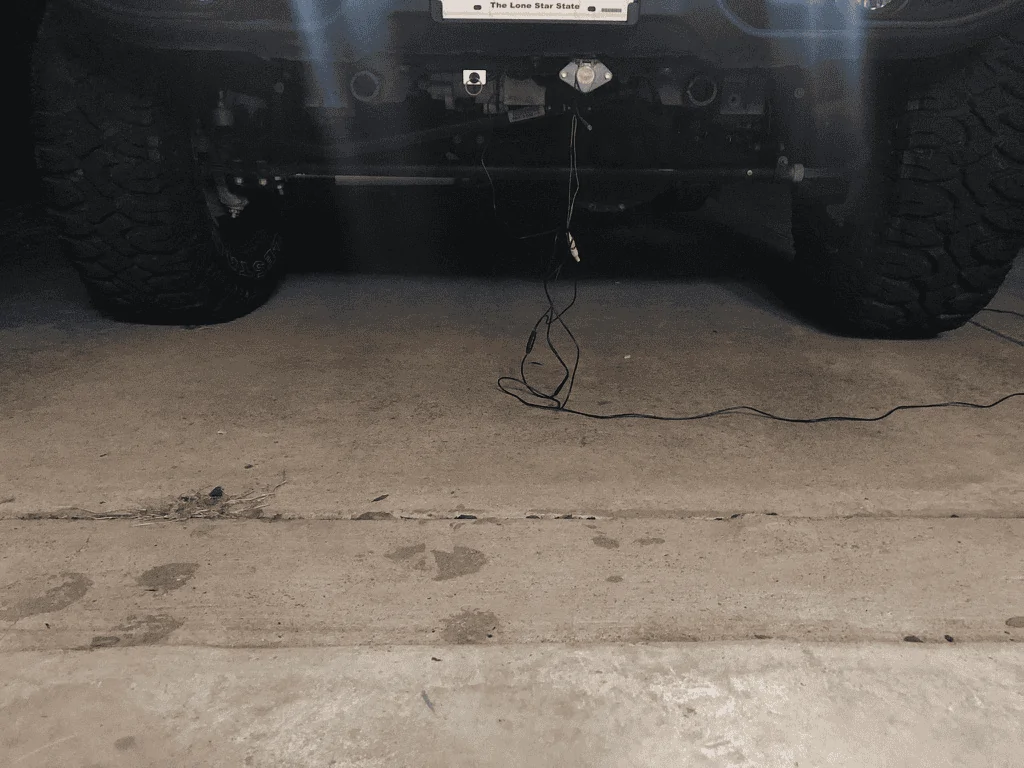
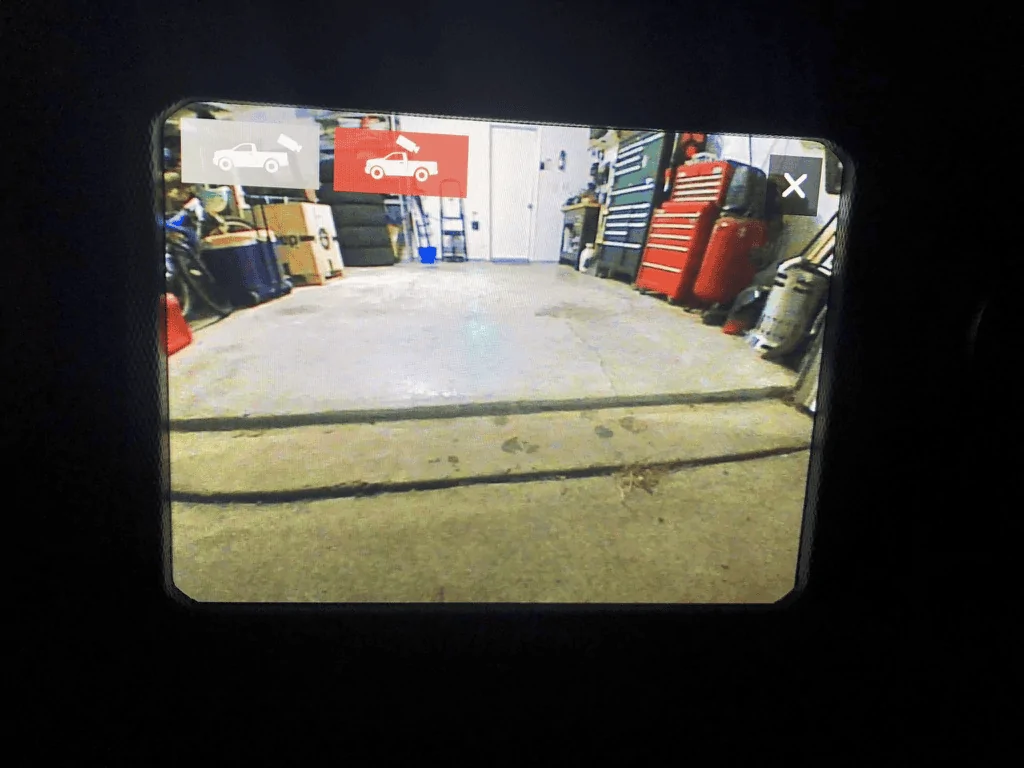
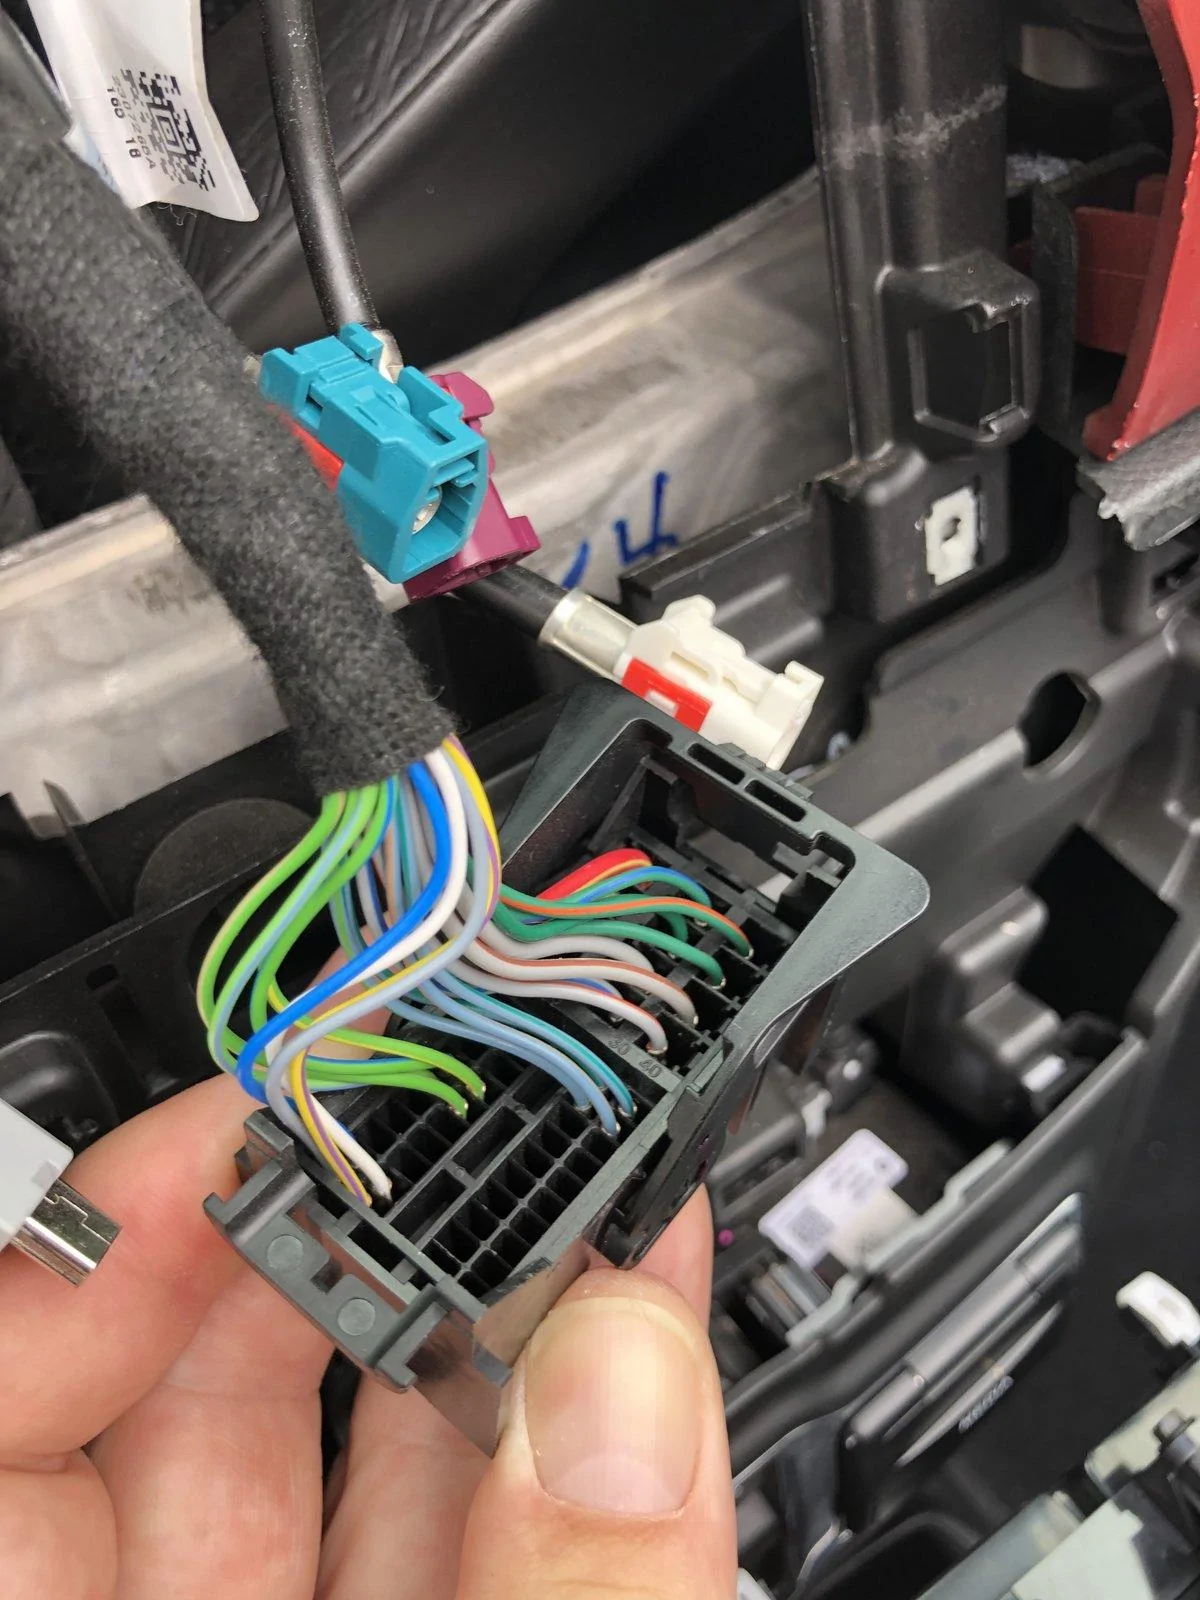
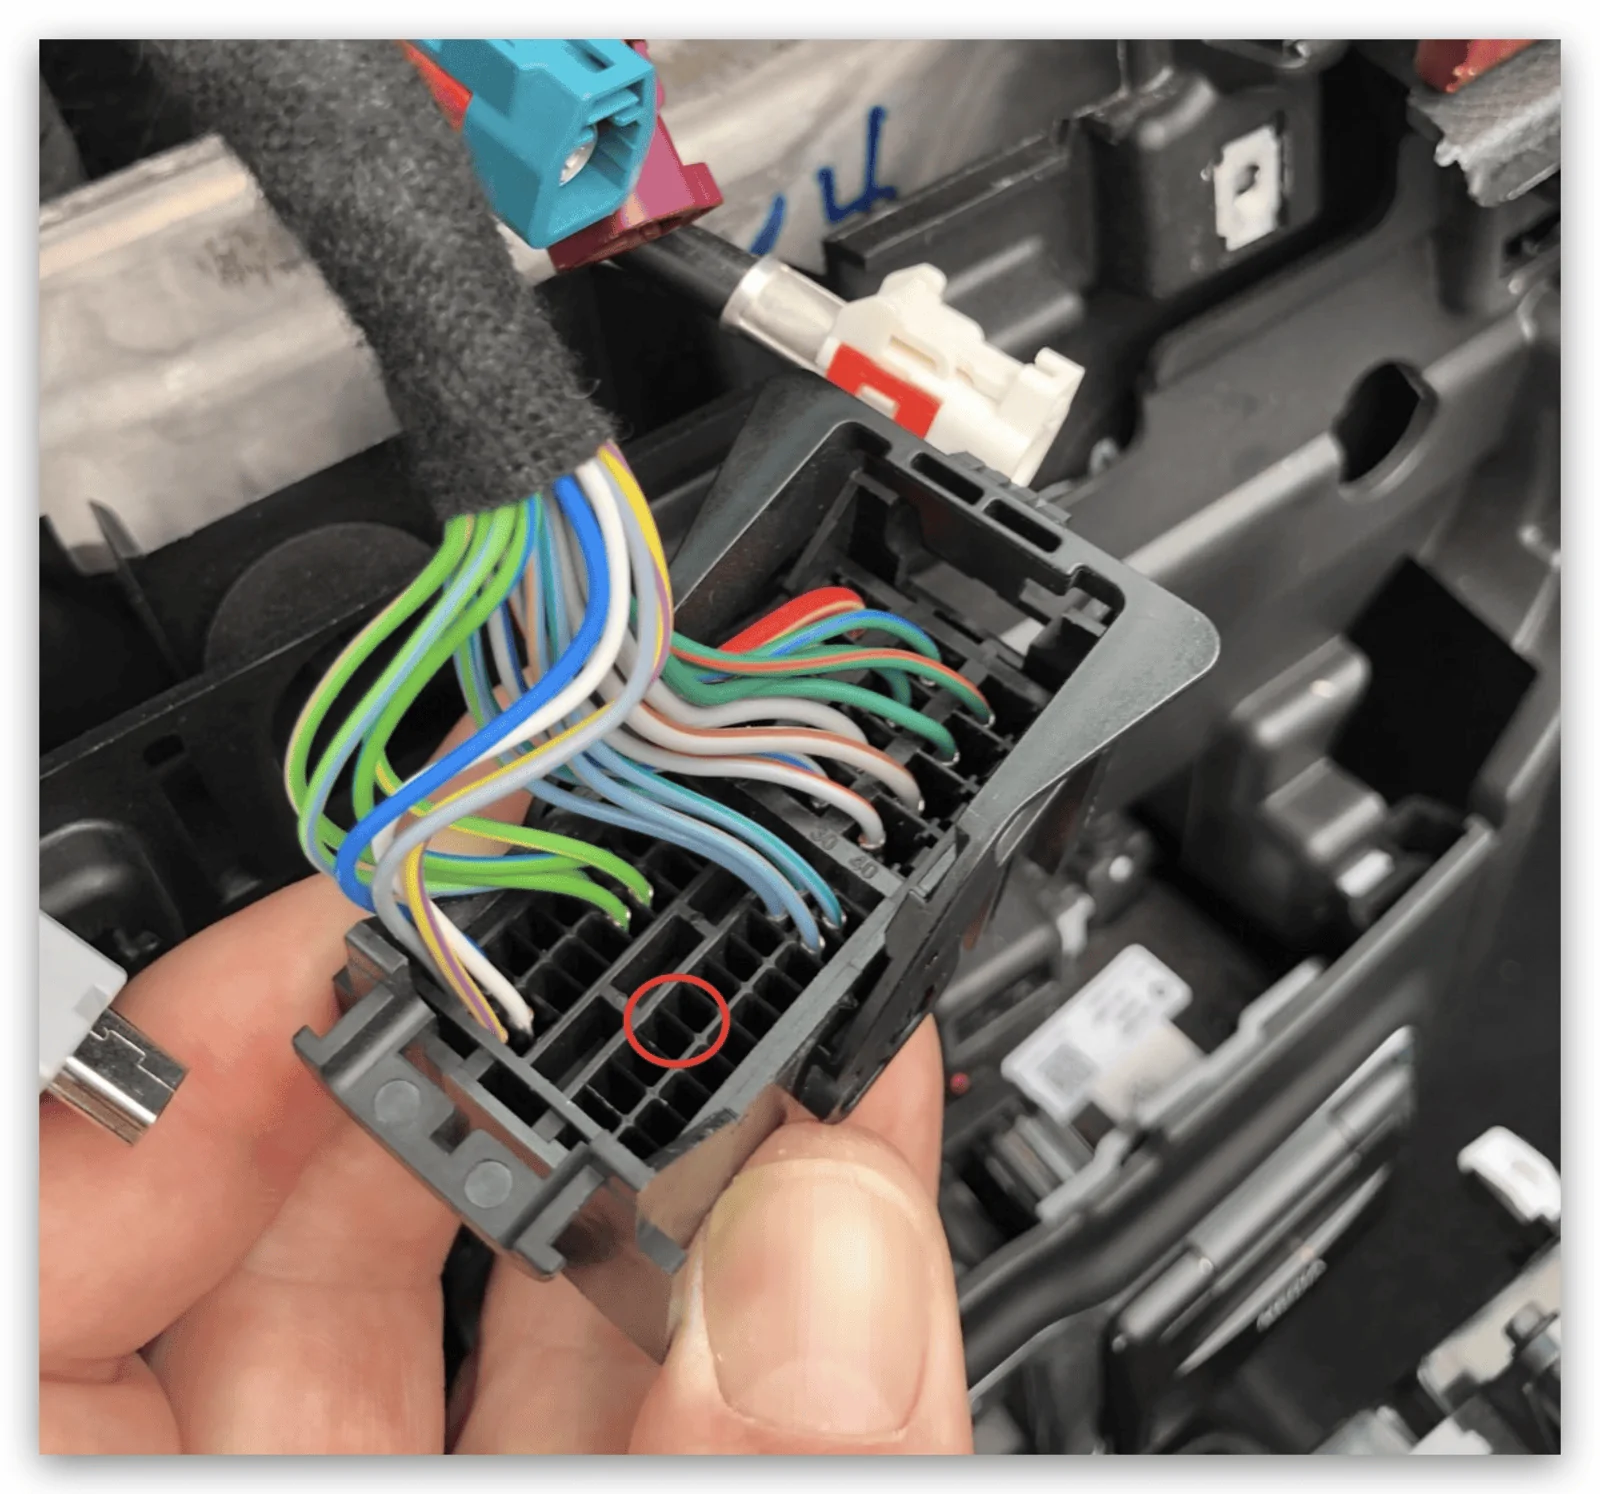
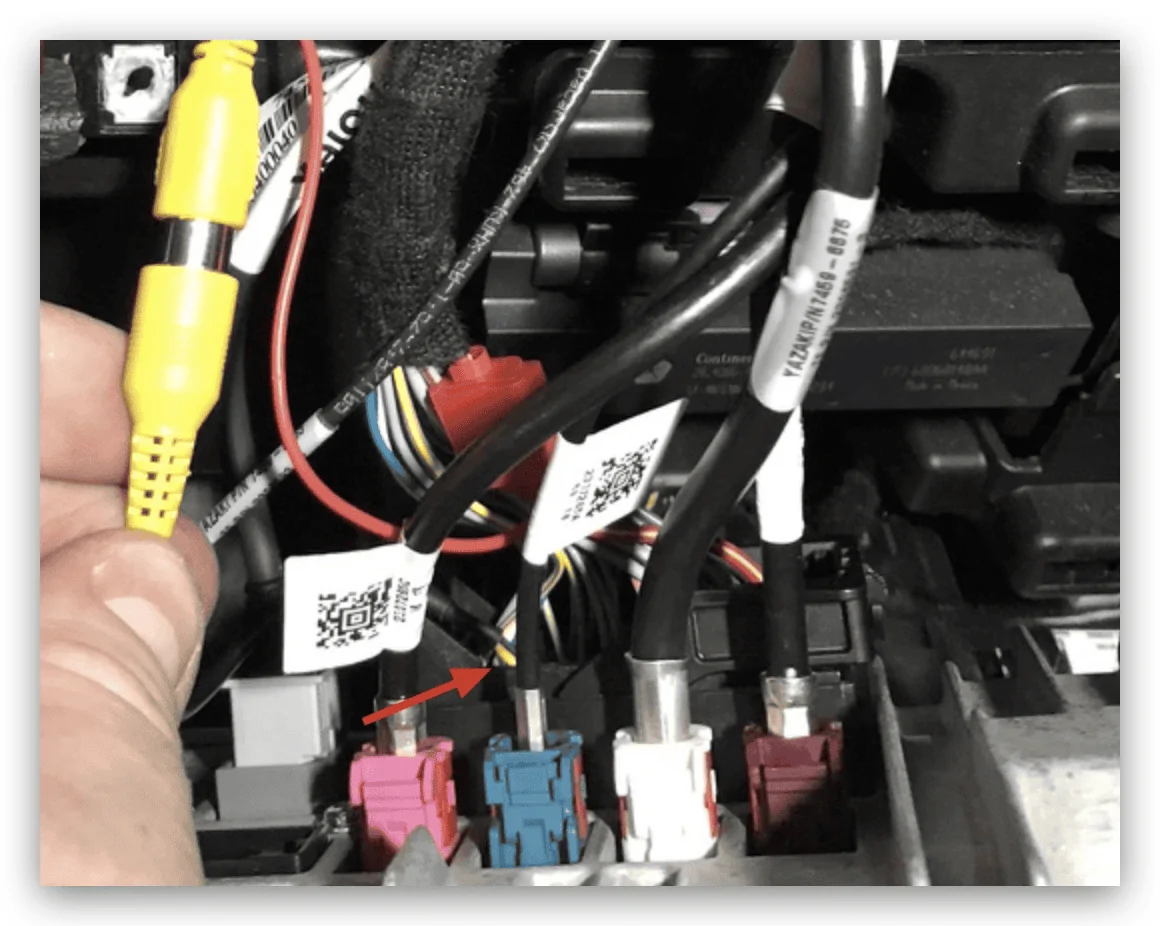
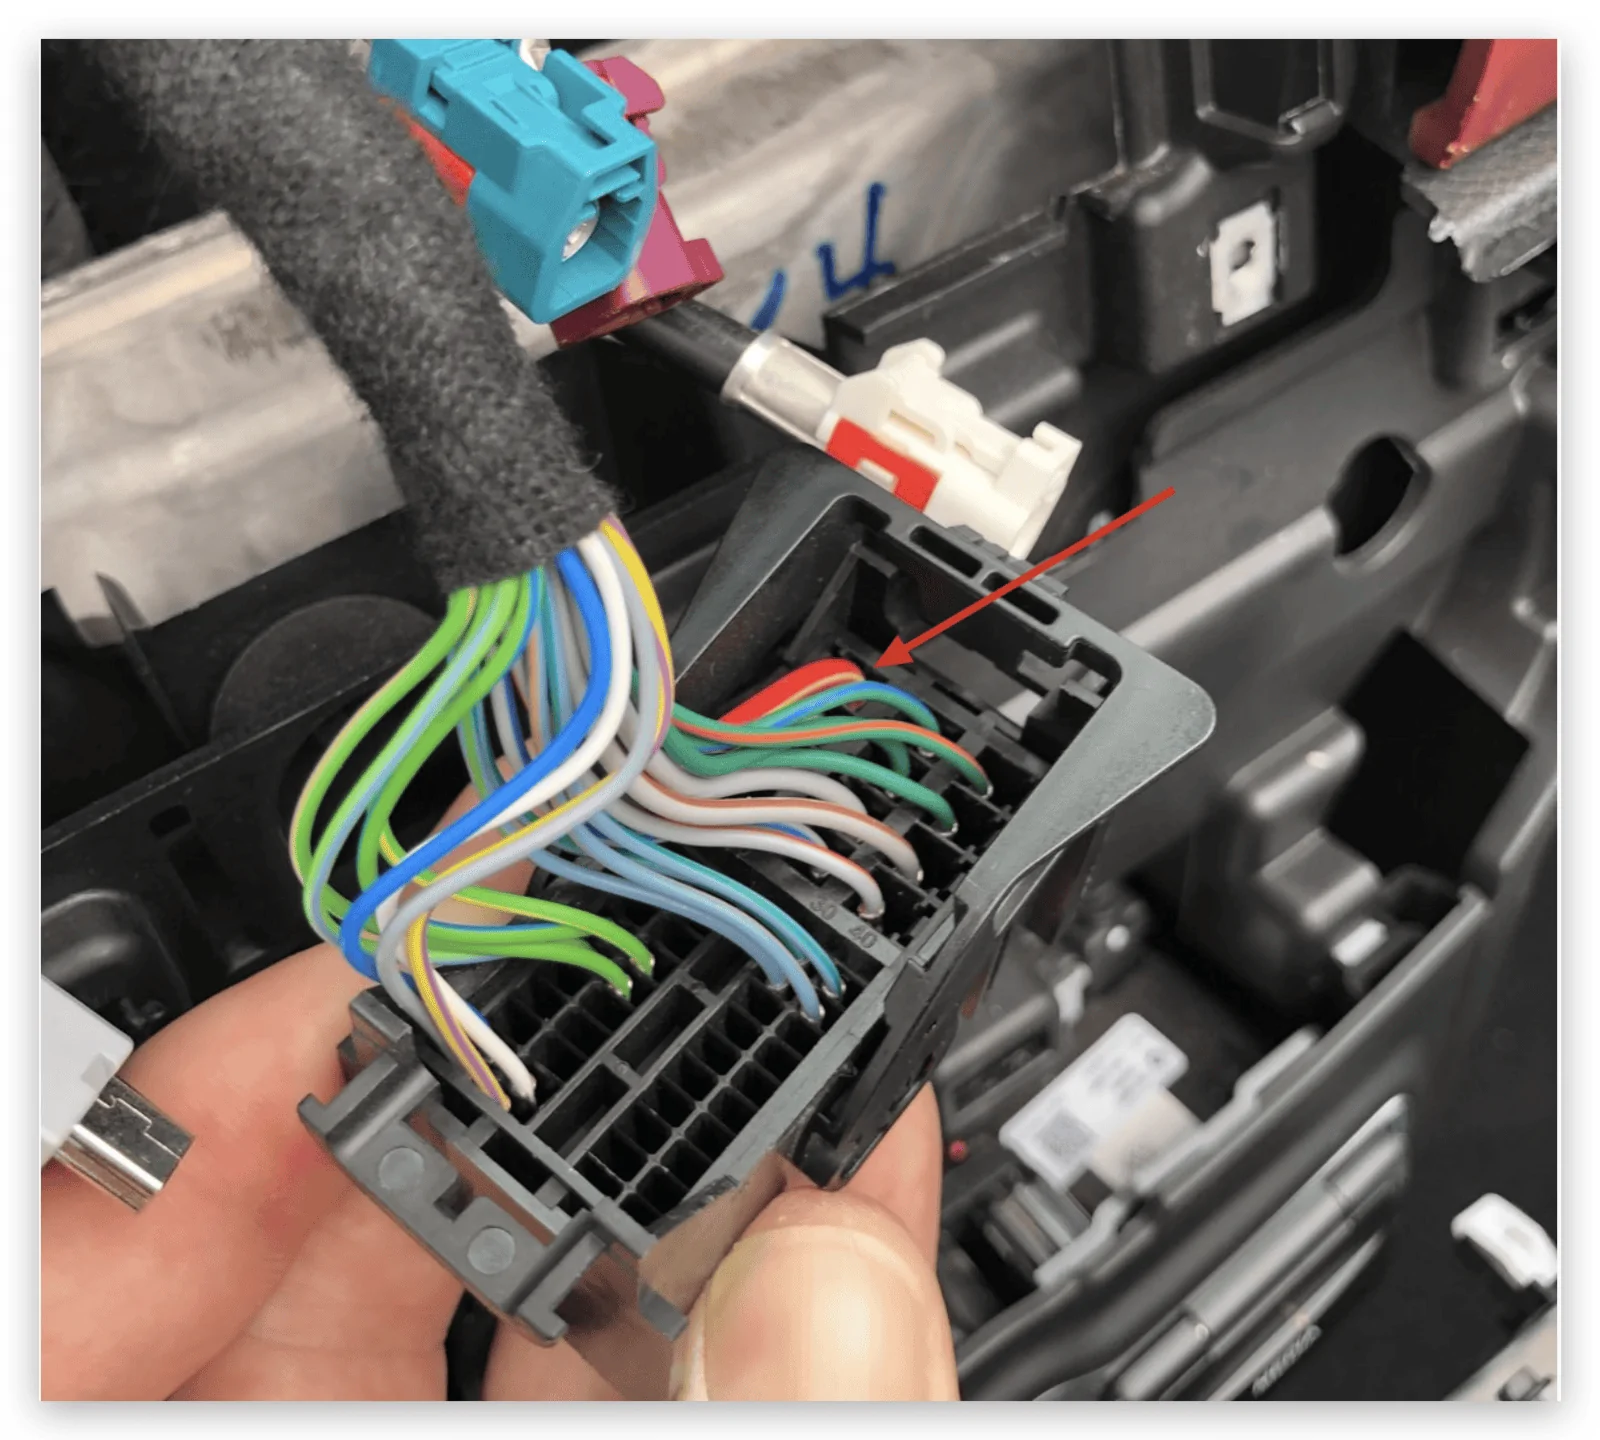
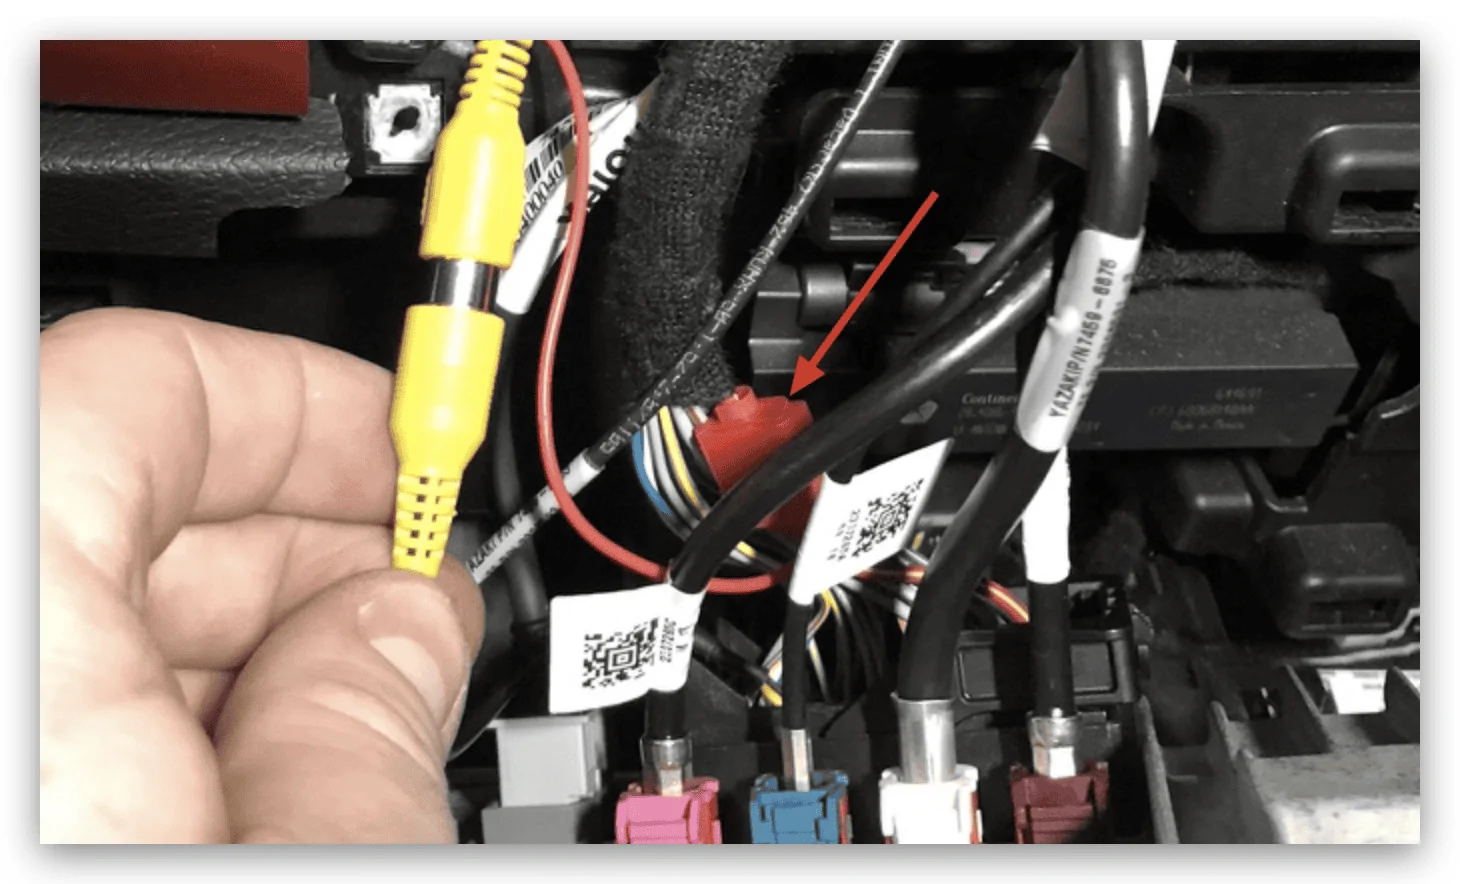
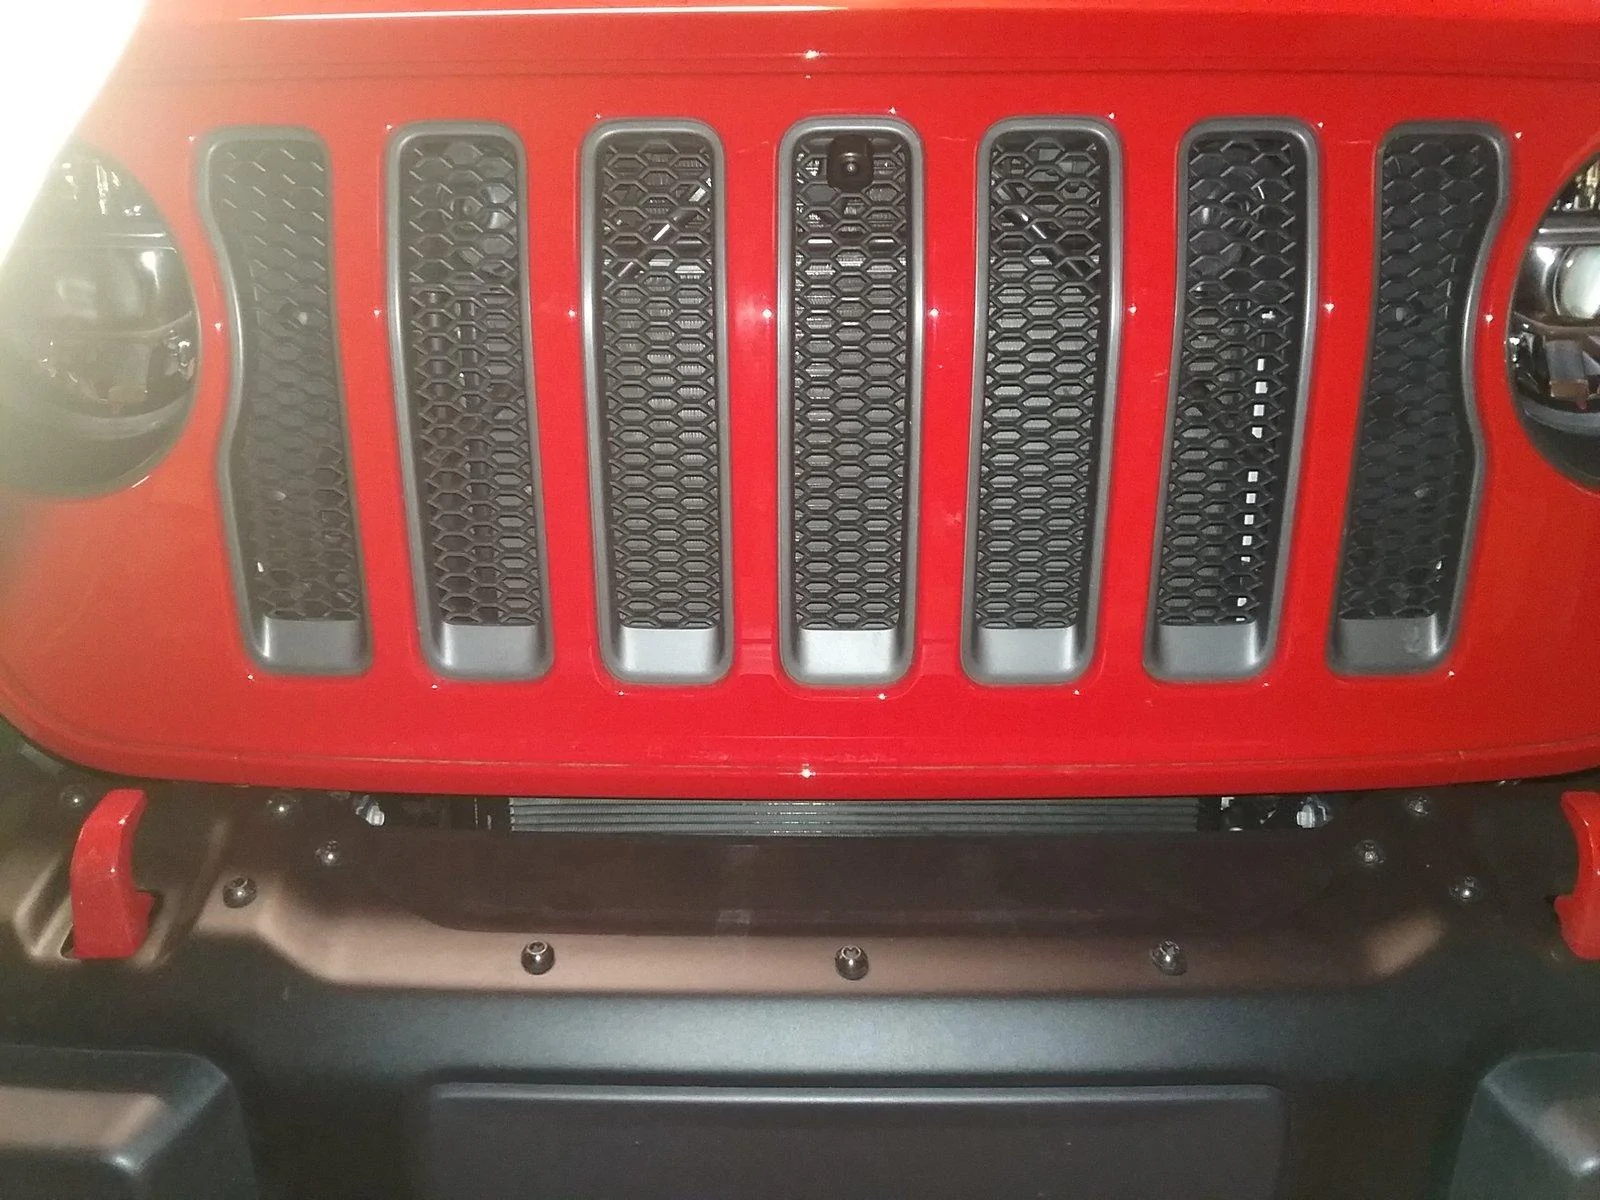
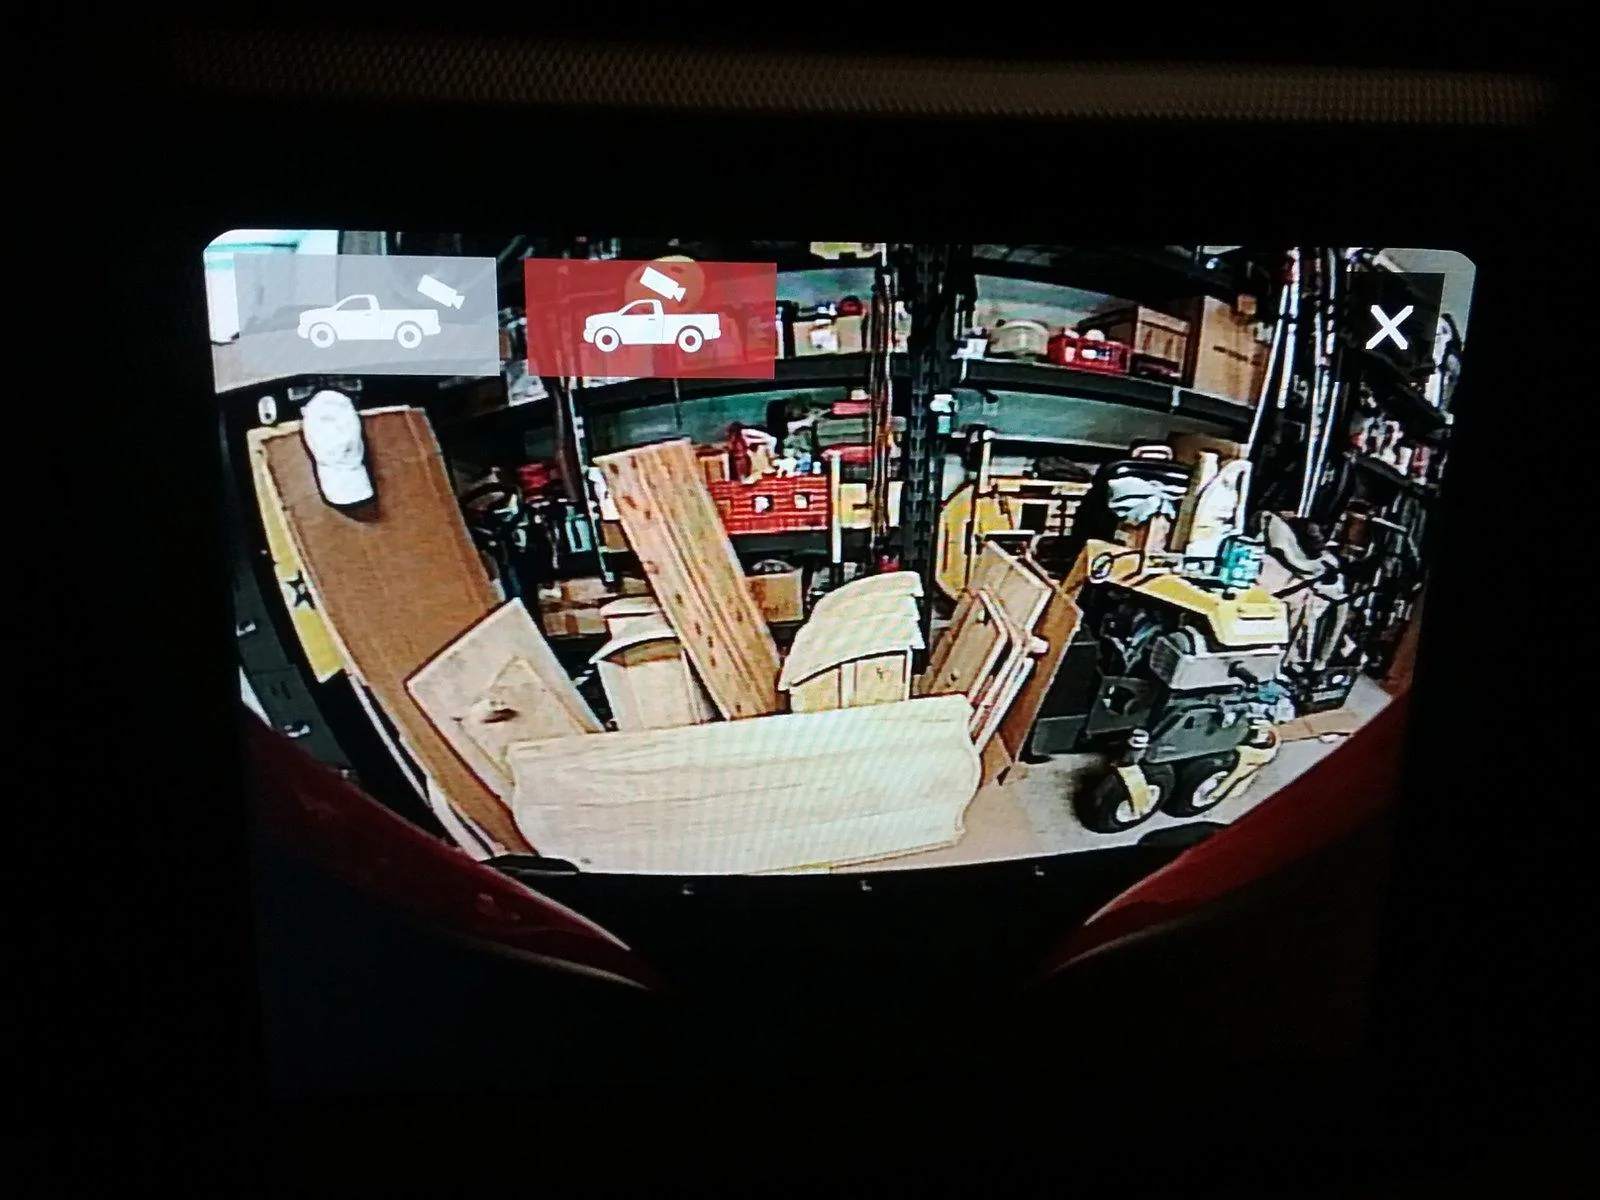
I don't know of any way other way to enable the second camera without the Tazer. It's an option you have to enable/disable through the Tazer itself and once enabled, presents a second camera option in the apps screen and when you have the front/rear camera being displayed. It technically shows up as a bed camera as if it were for a truck, but it's just a camera and you can put it wherever you want.

<snip>
Thanks for this info, ordering a camera and wiring harness now.
Sponsored


Stickerhead

Well-Known Member
Joined
Mar 14, 2018
Threads
13
Messages
444
Reaction score
278
Location
McKinney, Texas
Vehicle(s)
2018 JLUR, 1997 TJ on 37’s, 2017 Powerstoke Tow Pig
Vehicle Showcase
2
As per Z-Automotive's install instructions, if you have the automatic transmission, there's a clutch pass-through grommet that you can use to run the wiring through.
Yep, found it, forward looking camera up and running! Thanks for help bwilliam79
 

wanderer

Well-Known Member
First Name
Ralph
Joined
Aug 10, 2017
Threads
122
Messages
1,419
Reaction score
772
Location
Carlsbad CA
Vehicle(s)
2018 jlu rubicon. Surfboard. Bare feet, moose drawn air sled, Interstellar time warp space transport fighter
Occupation
Engineering Geologist
On my old jku i did the same thing there was a device called a loc pic that you installed behind the radio it had 3 option for cameras i used one as a back up andv2 in front one on each side of the bumper tgeir view ovelapped i screwed a piece of a neon green plastic cutting board about a 1/4 " thick behind the cut outs of a w in my old warn winch bumper and mounted the camera into those it worked great snd by using 2 i coukd see what to put my wheels on i am going to do it just as thevop did here but with a high defcamera
 

TrailTorque

Well-Known Member
Joined
Nov 11, 2018
Threads
43
Messages
4,143
Reaction score
6,096
Location
Florida
Vehicle(s)
JLU
Vehicle Showcase
1
I wonder if this could be rigged to the 5.3" screen option?

Under the "more" option on the 5.3" you can select "rear facing camera" and it'll run while you're moving. Very trippy haha

I don't see any other options though for cameras and such..
 

Brew211

Well-Known Member
Joined
Jun 18, 2018
Threads
41
Messages
806
Reaction score
704
Location
Peoria, Arizona
Vehicle(s)
2018 JLURM, Tundra, 2022 JLU 392 XR
Vehicle Showcase
1
@tmakaro In case you're interested in changing your power source, I did get mine wired in to a 12v power source at the head unit. I just used a simple quick connect to tie into the larger red wire with a yellow stripe going into the 52 pin connector. It's right next to a black ground wire and pretty easy to verify with a voltmeter. On the RCA cable I had, the red power wire was super thin, so I stripped it back and folded the wire over itself before putting it into the connector to ensure good metal to metal contact.

upload_2018-8-23_7-29-51.png


upload_2018-8-23_7-32-36.png


While the wiring in the dash is all done, I still need to pull the camera through the firewall and get it mounted. Here are a couple of shots from it being roughed in, though. The camera is on the bottom of the bumper, centered between trailer breakaway connector on the left and the six pin trailer connector on the right.

upload_2018-8-23_7-33-27.png

upload_2018-8-23_7-33-17.png
Question for you guys, I purchased everything you have recommended but unfortunately pin #24 & #25 were taken. What do I do?
Thanks,
Todd
IMG_0266.jpg
IMG_0267.jpg
 

Sponsored

bwilliam79

Well-Known Member
First Name
Brandon
Joined
Feb 6, 2018
Threads
5
Messages
87
Reaction score
97
Location
Dallas, TX
Vehicle(s)
2016 F-150, 2018 JLUR
Question for you guys, I purchased everything you have recommended but unfortunately pin #24 & #25 were taken. What do I do?
Thanks,
Todd
IMG_0266.jpg
IMG_0267.jpg
Is yours a 2019? If so, the wiring could be a little different. Either way, it looks to me like the pins you need are open. Comparing your plug to the instructions from the Z Automotive site (https://zautomotive.com/wp-content/uploads/2018/06/Tazer-JL-AV-Cable-install-guide.pdf), these appear to be the pins you're looking for.

upload_2018-11-28_14-42-43.png


I didn't grab a good picture of mine, but if you look closely, you can see where the camera pin wire is in one of my screen shots and it looks to be about where I circled the two open pins on your connector.

upload_2018-11-28_14-41-21.png
 
Last edited:

DToxic

Well-Known Member
First Name
Blake
Joined
Jun 20, 2018
Threads
14
Messages
252
Reaction score
89
Location
Bay Area, CA
Vehicle(s)
2018 JL Rubicon
could you post a quick video going through the process of navigating the menus to get to the camera? Is the reverse camera operation unaffected? Easy to swap between cameras?
 

bwilliam79

Well-Known Member
First Name
Brandon
Joined
Feb 6, 2018
Threads
5
Messages
87
Reaction score
97
Location
Dallas, TX
Vehicle(s)
2016 F-150, 2018 JLUR
could you post a quick video going through the process of navigating the menus to get to the camera? Is the reverse camera operation unaffected? Easy to swap between cameras?
Reverse camera is unaffected. Under the apps view, you'll still have the option for the backup camera and after adding the new camera and configuring the Tazer, you'll see a Cargo Cam option as well. When you put the vehicle in reverse, you can also toggle between the two cameras using the icons in the top left corner. Rear view is still the backup camera and the cargo cam is the front camera.

80941.png
 

Brew211

Well-Known Member
Joined
Jun 18, 2018
Threads
41
Messages
806
Reaction score
704
Location
Peoria, Arizona
Vehicle(s)
2018 JLURM, Tundra, 2022 JLU 392 XR
Vehicle Showcase
1
Is yours a 2019? If so, the wiring could be a little different. Either way, it looks to me like the pins you need are open. Comparing your plug to the instructions from the Z Automotive site (https://zautomotive.com/wp-content/uploads/2018/06/Tazer-JL-AV-Cable-install-guide.pdf), these appear to be the pins you're looking for.

upload_2018-11-28_14-42-43.png


I didn't grab a good picture of mine, but if you look closely, you can see where the camera pin wire is in one of my screen shots and it looks to be about where I circled the two open pins on your connector.

upload_2018-11-28_14-41-21.png
Thank you so much for taking the time to respond. I also texted Zautomotive and they were nice enough to respond too. Apparently I was counting backwards, I thought pin 10 was 1 and 1 was 10. I should be good, I'll try this weekend. Thanks again.
 

bwilliam79

Well-Known Member
First Name
Brandon
Joined
Feb 6, 2018
Threads
5
Messages
87
Reaction score
97
Location
Dallas, TX
Vehicle(s)
2016 F-150, 2018 JLUR
Thank you so much for taking the time to respond. I also texted Zautomotive and they were nice enough to respond too. Apparently I was counting backwards, I thought pin 10 was 1 and 1 was 10. I should be good, I'll try this weekend. Thanks again.
No worries! Good luck and let us know how it turns out.
 

Sponsored

Brew211

Well-Known Member
Joined
Jun 18, 2018
Threads
41
Messages
806
Reaction score
704
Location
Peoria, Arizona
Vehicle(s)
2018 JLURM, Tundra, 2022 JLU 392 XR
Vehicle Showcase
1
No worries! Good luck and let us know how it turns out.
Thank you again. Can I pick your brain one more time? I'm looking at your pick on connecting the power source, it looks like you are in pin 44 not 52, would you mind circling the power source like you did in your last response?
 

bwilliam79

Well-Known Member
First Name
Brandon
Joined
Feb 6, 2018
Threads
5
Messages
87
Reaction score
97
Location
Dallas, TX
Vehicle(s)
2016 F-150, 2018 JLUR
Thank you again. Can I pick your brain one more time? I'm looking at your pick on connecting the power source, it looks like you are in pin 44 not 52, would you mind circling the power source like you did in your last response?
Sure thing. Power source should be the larger red wire indicated below. Safest thing to do is to verify with a volt meter, but that's the one it was for me.
upload_2018-11-28_15-22-46.png


If your camera is like mine and has the hot wire pigtailed off the RCA connector, just make sure you get a good connection. That wire for me was super thin, so I stripped it back and folded it over the insulation in order to get good contact and not have it fall out. I used a simple vampire connector to tie into the 12v source instead of trying to pull that pin and splice something in. For the ground, I just picked a bolt on the front end near the camera and grounded it there.
upload_2018-11-28_15-26-35.png
 

Brew211

Well-Known Member
Joined
Jun 18, 2018
Threads
41
Messages
806
Reaction score
704
Location
Peoria, Arizona
Vehicle(s)
2018 JLURM, Tundra, 2022 JLU 392 XR
Vehicle Showcase
1
Sure thing. Power source should be the larger red wire indicated below. Safest thing to do is to verify with a volt meter, but that's the one it was for me.
upload_2018-11-28_15-22-46.png


If your camera is like mine and has the hot wire pigtailed off the RCA connector, just make sure you get a good connection. That wire for me was super thin, so I stripped it back and folded it over the insulation in order to get good contact and not have it fall out. I used a simple vampire connector to tie into the 12v source instead of trying to pull that pin and splice something in. For the ground, I just picked a bolt on the front end near the camera and grounded it there.
upload_2018-11-28_15-26-35.png
You rock, thanks again for taking the time to help. Yes I bought the same camera you did based on your recommendation.
 

jforse

Well-Known Member
First Name
J
Joined
Jul 2, 2018
Threads
4
Messages
157
Reaction score
87
Location
Minnesota
Vehicle(s)
2018 F-150 XLT Sport, 2018 JLUR
Occupation
Aerospace Quality Engineer
Does this only work for the 8.4"?
 

mazeppa

Well-Known Member
First Name
y = x/0
Joined
Feb 11, 2018
Threads
9
Messages
291
Reaction score
428
Location
ICBM complex at Kodlosk
Vehicle(s)
2021 JTR Panda
Occupation
knife sharpening snob
I used the same type of camera as @bwilliam79. For now I have it mounted high as possible in the center grille using a washer on the back to hold in place without drilling any holes, I may move it under the bumper later and having to drill a hole. The edge of the bumper cuts the view off a little, and the view cutoff is about 16 inches in front of the bumper at ground level, the higher off the ground level the shorter the view cutoff is.

https://www.amazon.com/gp/product/B07H852D49/ref=oh_aui_detailpage_o03_s00?ie=UTF8&psc=1


camera.jpg


view.jpg


Sorry about my poor quality screen view picture.
Sponsored


Top