Sponsored

Install question

kantho

Well-Known Member
First Name
Karl
Joined
Oct 3, 2018
Threads
12
Messages
58
Reaction score
31
Location
San Marcos, CA
Vehicle(s)
2018 JL Sport 2 door with premium soft top
I just bought a Tazer JL Lite (from Quadratec) and am reading the manual. I have updated the firmware but I have a quick easy question or two.

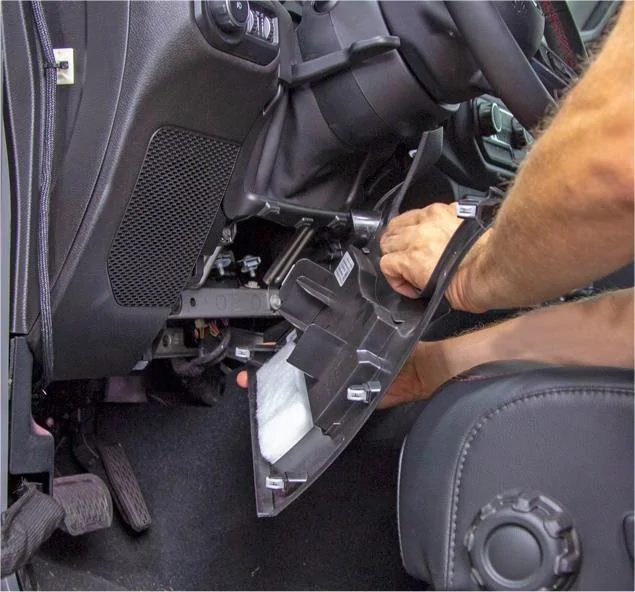
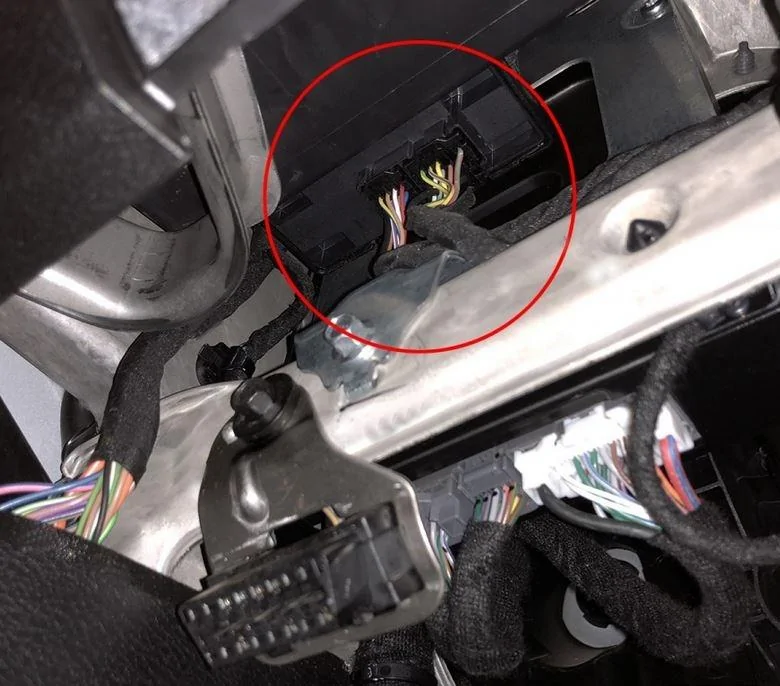
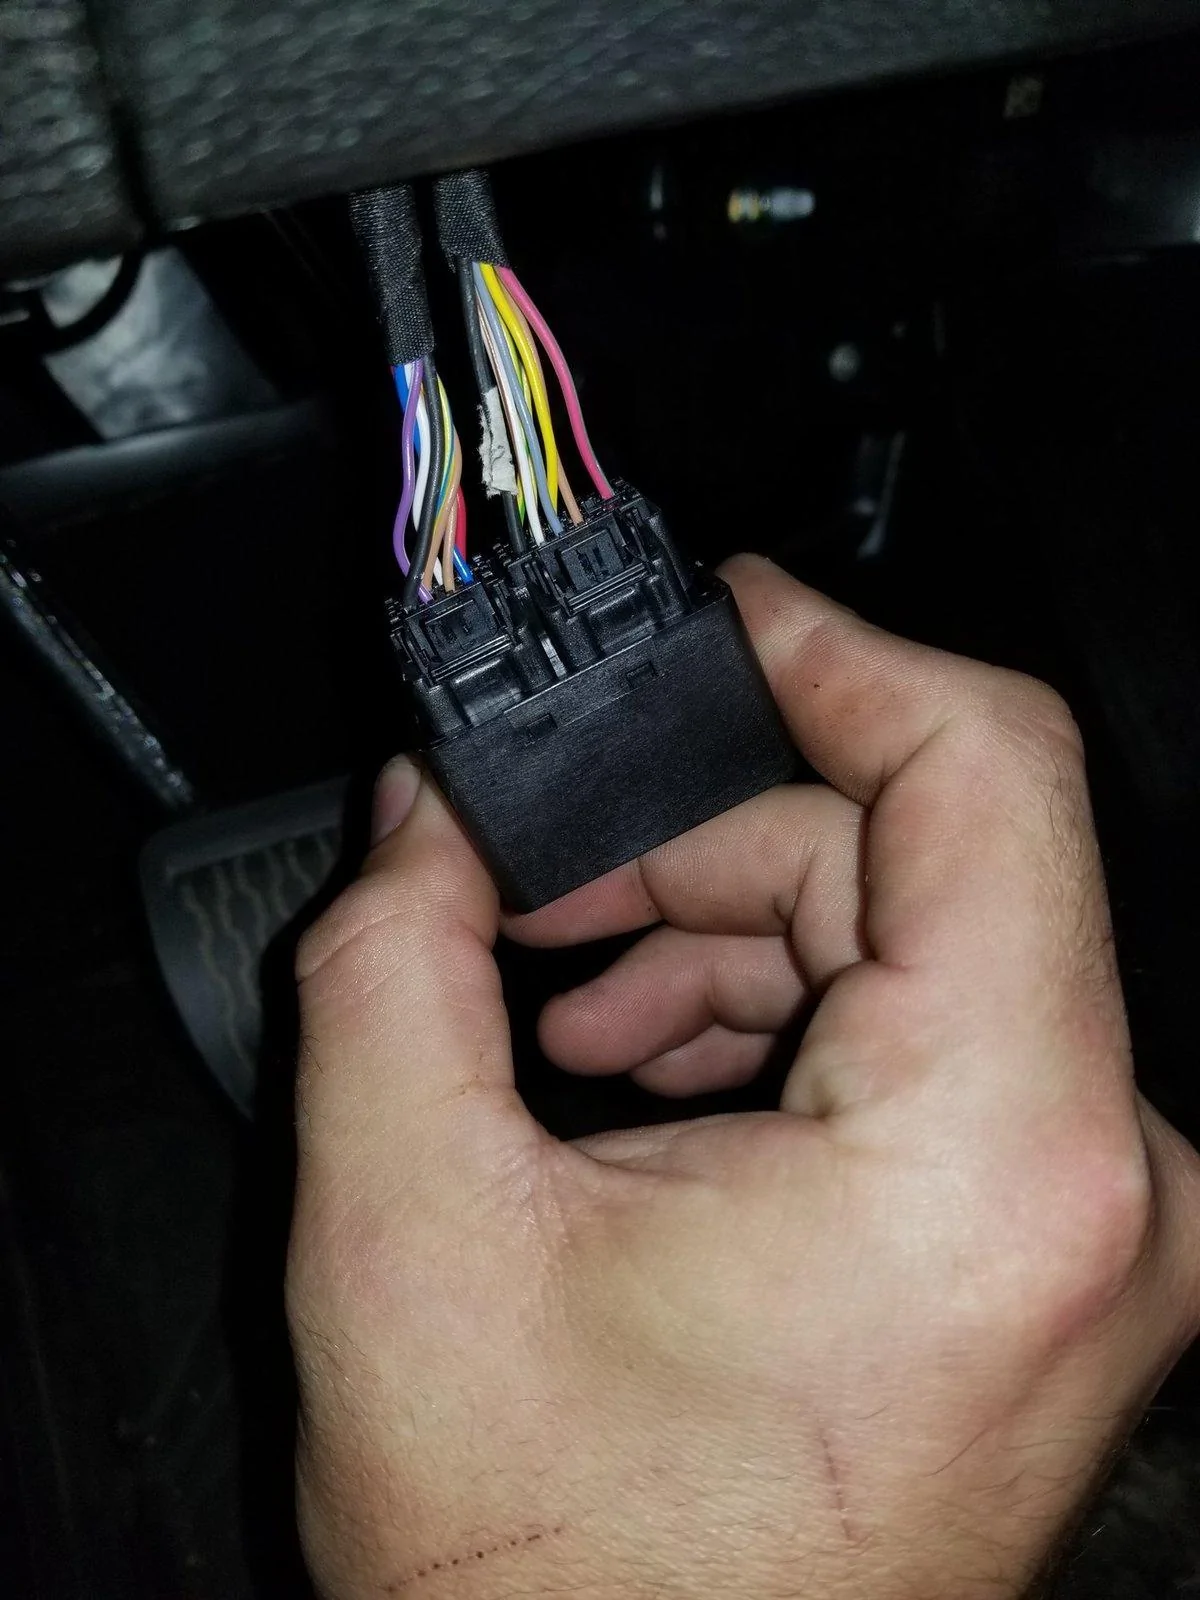
I install the Tazer by unplugging the SGW module and putting the Tazer in its place, correct? What is the SGW module?

Secondly if I want to just use it to change the settings then remove it from the vehicle do I plug the SGW module back in? I want to leave my changed settings in place. Not planning to UNMARRY it, just remove it.

Thanks
Sponsored


Rhinebeck01

Well-Known Member
Joined
May 9, 2018
Threads
155
Messages
11,875
Reaction score
17,120
Location
Multiple places..
Vehicle(s)
'18 JL Rubi, '22 Prevost M H3-45,'01 Harley FatBoy
@kantho

The video below is not in regard to the Tazer JL Mini but it does show how you access the SWG gateway, module, where it is etc.. Watch the video.

Yes, you disconnect both wires from the SWG and those disconnected wires plug into the Tazer JL Mini.

IF you want to use Live features, you MUST leave the Tazer JL Mini married and the Tazer JL Mini, hooked up to the 2 wires !

I can't imagine you would not keep it hooked up as the much desired, ESS disable is a live feature.

SO, my recommendation is leave the Tazer JL Mini married and attached. Only unmarry and remove the Tazer JL and reattach the SWG cables if you take the JL to the dealership Service Dept.

Note: Suggest you go to the ZAutomotive website and buy / pay $20 for the available 2 yr. warranty.

Don't care for this video much but it will give you the info you seek.. Forward it to 4:35 min. point and start watching from there...
 
Last edited:

Rhinebeck01

Well-Known Member
Joined
May 9, 2018
Threads
155
Messages
11,875
Reaction score
17,120
Location
Multiple places..
Vehicle(s)
'18 JL Rubi, '22 Prevost M H3-45,'01 Harley FatBoy
Pics...

.
Jeep Wrangler JL Install question Remove panel

Jeep Wrangler JL Install question gateway.JPG


Jeep Wrangler JL Install question 20180426_194230
 

Rhinebeck01

Well-Known Member
Joined
May 9, 2018
Threads
155
Messages
11,875
Reaction score
17,120
Location
Multiple places..
Vehicle(s)
'18 JL Rubi, '22 Prevost M H3-45,'01 Harley FatBoy
Install hints:

Pull panel below the steering column straight out and off. Careful not to lose any of the 6 white plastic female connectors that can fly off the black panel.

Don't even bother trying to do the install if you do not have a bright light in the passenger footwell to light things up well under there.

Locate the SWG. Do know that each of the 2 wires that you will be dealing with have a push in release tab so to speak on the connector that you have to push in firmly on, in order to get the connector to release. This release is on the back side if the connector, the side closest to the firewall. BEST BET, is to first push upward / push the cable inward. Now, push firmly on the release and at the same exact time, pull downward on the cable itself. Sometimes a little wiggle of the cable while pulling the cable firmly will help you get it disconnected.

When reinstalling the black plastic, go easy.. start at top and work down. Push straight in. Don't be overly rough or you may damage the black male that holds the white plastic female.
 
OP
OP
kantho

kantho

Well-Known Member
First Name
Karl
Joined
Oct 3, 2018
Threads
12
Messages
58
Reaction score
31
Location
San Marcos, CA
Vehicle(s)
2018 JL Sport 2 door with premium soft top
Install hints:

Pull panel below the steering column straight out and off. Careful not to lose any of the 6 white plastic female connectors that can fly off the black panel.

Don't even bother trying to do the install if you do not have a bright light in the passenger footwell to light things up well under there.

Locate the SWG. Do know that each of the 2 wires that you will be dealing with have a push in release tab so to speak on the connector that you have to push in firmly on, in order to get the connector to release. This release is on the back side if the connector, the side closest to the firewall. BEST BET, is to first push upward / push the cable inward. Now, push firmly on the release and at the same exact time, pull downward on the cable itself. Sometimes a little wiggle of the cable while pulling the cable firmly will help you get it disconnected.

When reinstalling the black plastic, go easy.. start at top and work down. Push straight in. Don't be overly rough or you may damage the black male that holds the white plastic female.
Thanks for all the great detail, photos and recommendations. I am not a fan of those plastic fittings that can easily snap off with the wrong amount of force or wrong direction so your advice is quite meaningful. "straight out" tells me what I need vs straight down. :)
 

Sponsored

FrostQ

Well-Known Member
Joined
May 31, 2020
Threads
7
Messages
144
Reaction score
183
Location
Canada
Vehicle(s)
Rubicon
Vehicle Showcase
1
How the F#^*&#^*&^ do you remove the SGW plugs...I've located it...bloodied my knuckles trying to unplug the damn thing. It won't come off!
 

Rhinebeck01

Well-Known Member
Joined
May 9, 2018
Threads
155
Messages
11,875
Reaction score
17,120
Location
Multiple places..
Vehicle(s)
'18 JL Rubi, '22 Prevost M H3-45,'01 Harley FatBoy
How the F#^*&#^*&^ do you remove the SGW plugs...I've located it...bloodied my knuckles trying to unplug the damn thing. It won't come off!
@FrostQ

First off, have a good light source to light up the working field.

Install hints:

Pull panel below the steering column straight out and off. Careful not to lose any of the 6 white plastic female connectors that can fly off the black panel.

Don't even bother trying to do the install if you do not have a bright light in the passenger footwell to light things up well under there.

Locate the SWG. Do know that each of the 2 wires that you will be dealing with have a push in release tab so to speak on the connector that you have to push in firmly on, in order to get the connector to release. This release is on the back side if the connector, the side closest to the firewall. BEST BET, is to first push upward / push the cable inward. Now, push firmly on the release and at the same exact time, pull downward on the cable itself. Sometimes a little wiggle of the cable while pulling the cable firmly will help you get it disconnected.

When reinstalling the black plastic, go easy.. start at top and work down. Push straight in. Don't be overly rough or you may damage the black male that holds the white plastic female.


Note: Teen Sons / Daughter or Wife seem to be able to easily do the disconnect... Small hands!


Do yourself a favor and buy the SGW Extension Cable from ZAutomotive... Makes life easier lets say..
 

FrostQ

Well-Known Member
Joined
May 31, 2020
Threads
7
Messages
144
Reaction score
183
Location
Canada
Vehicle(s)
Rubicon
Vehicle Showcase
1
Yeah I've tried your tips you posted earlier. But the cable won't come loose. I've resorted to my last option to ask someone online how to remove a connector...lol.
 

Rhinebeck01

Well-Known Member
Joined
May 9, 2018
Threads
155
Messages
11,875
Reaction score
17,120
Location
Multiple places..
Vehicle(s)
'18 JL Rubi, '22 Prevost M H3-45,'01 Harley FatBoy
Yeah I've tried your tips you posted earlier. But the cable won't come loose. I've resorted to my last option to ask someone online how to remove a connector...lol.
@FrostQ

When you push firmly up, push in on little disconnect.... at same time wiggle wiggle wiggle in different directions as you pull downward.. Sometimes connector plastic edges catch a bit and keep the connector from coming free easily..

Cuss at it in French... that might help.

Try again... if a no go, take a break and try again... It is a pain but you will get it. Don't discount my suggestion of sicking a smaller set of hands on it.

DO, do buy the SGW Extension Cable!!!!!!!!!!!!!!!!!!!!!!!!!!!
 

dpike

Well-Known Member
Joined
May 28, 2020
Threads
34
Messages
744
Reaction score
1,057
Location
New Jersey
Vehicle(s)
'20 JLUR 3.6
@FrostQ

Do yourself a favor and buy the SGW Extension Cable from ZAutomotive... Makes life easier lets say..
! this !

i think last time i removed my tazer i resorted the a long flatblade screwrdiver that i used to press the tab in. still sucked and i still tore my hands up pretty bad.
 

Sponsored

Rhinebeck01

Well-Known Member
Joined
May 9, 2018
Threads
155
Messages
11,875
Reaction score
17,120
Location
Multiple places..
Vehicle(s)
'18 JL Rubi, '22 Prevost M H3-45,'01 Harley FatBoy
! this !

i think last time i removed my tazer i resorted the a long flatblade screwrdiver that i used to press the tab in. still sucked and i still tore my hands up pretty bad.
@dpike

I don't encourage using a screwdriver, etc. as I am afraid the guy/gal will damage the connector, female.
 

Ripsaw502

Active Member
First Name
Mark
Joined
Jun 20, 2021
Threads
5
Messages
36
Reaction score
9
Location
Millersport, Ohio
Vehicle(s)
2018 WRANGLER UNLIMITED RUBICON 4X4
Occupation
Dump truck Driver
@FrostQ

First off, have a good light source to light up the working field.

Install hints:

Pull panel below the steering column straight out and off. Careful not to lose any of the 6 white plastic female connectors that can fly off the black panel.

Don't even bother trying to do the install if you do not have a bright light in the passenger footwell to light things up well under there.

Locate the SWG. Do know that each of the 2 wires that you will be dealing with have a push in release tab so to speak on the connector that you have to push in firmly on, in order to get the connector to release. This release is on the back side if the connector, the side closest to the firewall. BEST BET, is to first push upward / push the cable inward. Now, push firmly on the release and at the same exact time, pull downward on the cable itself. Sometimes a little wiggle of the cable while pulling the cable firmly will help you get it disconnected.

When reinstalling the black plastic, go easy.. start at top and work down. Push straight in. Don't be overly rough or you may damage the black male that holds the white plastic female.


Note: Teen Sons / Daughter or Wife seem to be able to easily do the disconnect... Small hands!


Do yourself a favor and buy the SGW Extension Cable from ZAutomotive... Makes life easier lets say..
I love how they make it look so easy in there video yea not so much. I even had the wife try nope AAAARRRGH and we had no luck .
 

tomk62

Well-Known Member
First Name
Tom
Joined
May 26, 2023
Threads
15
Messages
706
Reaction score
1,032
Location
South Carolina
Vehicle(s)
2024 JLU Sahara Anvil, 2019 Cherokee
Build Thread
Link
Clubs
 
Yeah I've tried your tips you posted earlier. But the cable won't come loose. I've resorted to my last option to ask someone online how to remove a connector...lol.
For those playing along at home, if you have a 2024 I think the space is even tighter. The first time I tried to get mine out I ended up giving up, and then came back the next day with a bit more patience and finally got it.
 

rohdawg

Well-Known Member
First Name
Matt
Joined
Sep 18, 2018
Threads
6
Messages
1,639
Reaction score
3,700
Location
Long Island, New York
Vehicle(s)
2024 JLUR Anvil / 2021 JLUR Hydro Blue
Occupation
Merchant Marine
For those playing along at home, if you have a 2024 I think the space is even tighter.
100% agree.
I’ve tried three separate times now and keep failing to get even one of the connectors to budge.


Top