MCJA
Well-Known Member
- First Name
- Matthew
- Joined
- Oct 12, 2019
- Threads
- 7
- Messages
- 287
- Reaction score
- 608
- Location
- Olympia, WA
- Vehicle(s)
- 2020 Wrangler Unlimited Rubicon EcoDiesel
- Thread starter
- #1
This is an older version of this project. For an updated version (more pictures, fewer words), check out my build journal here.
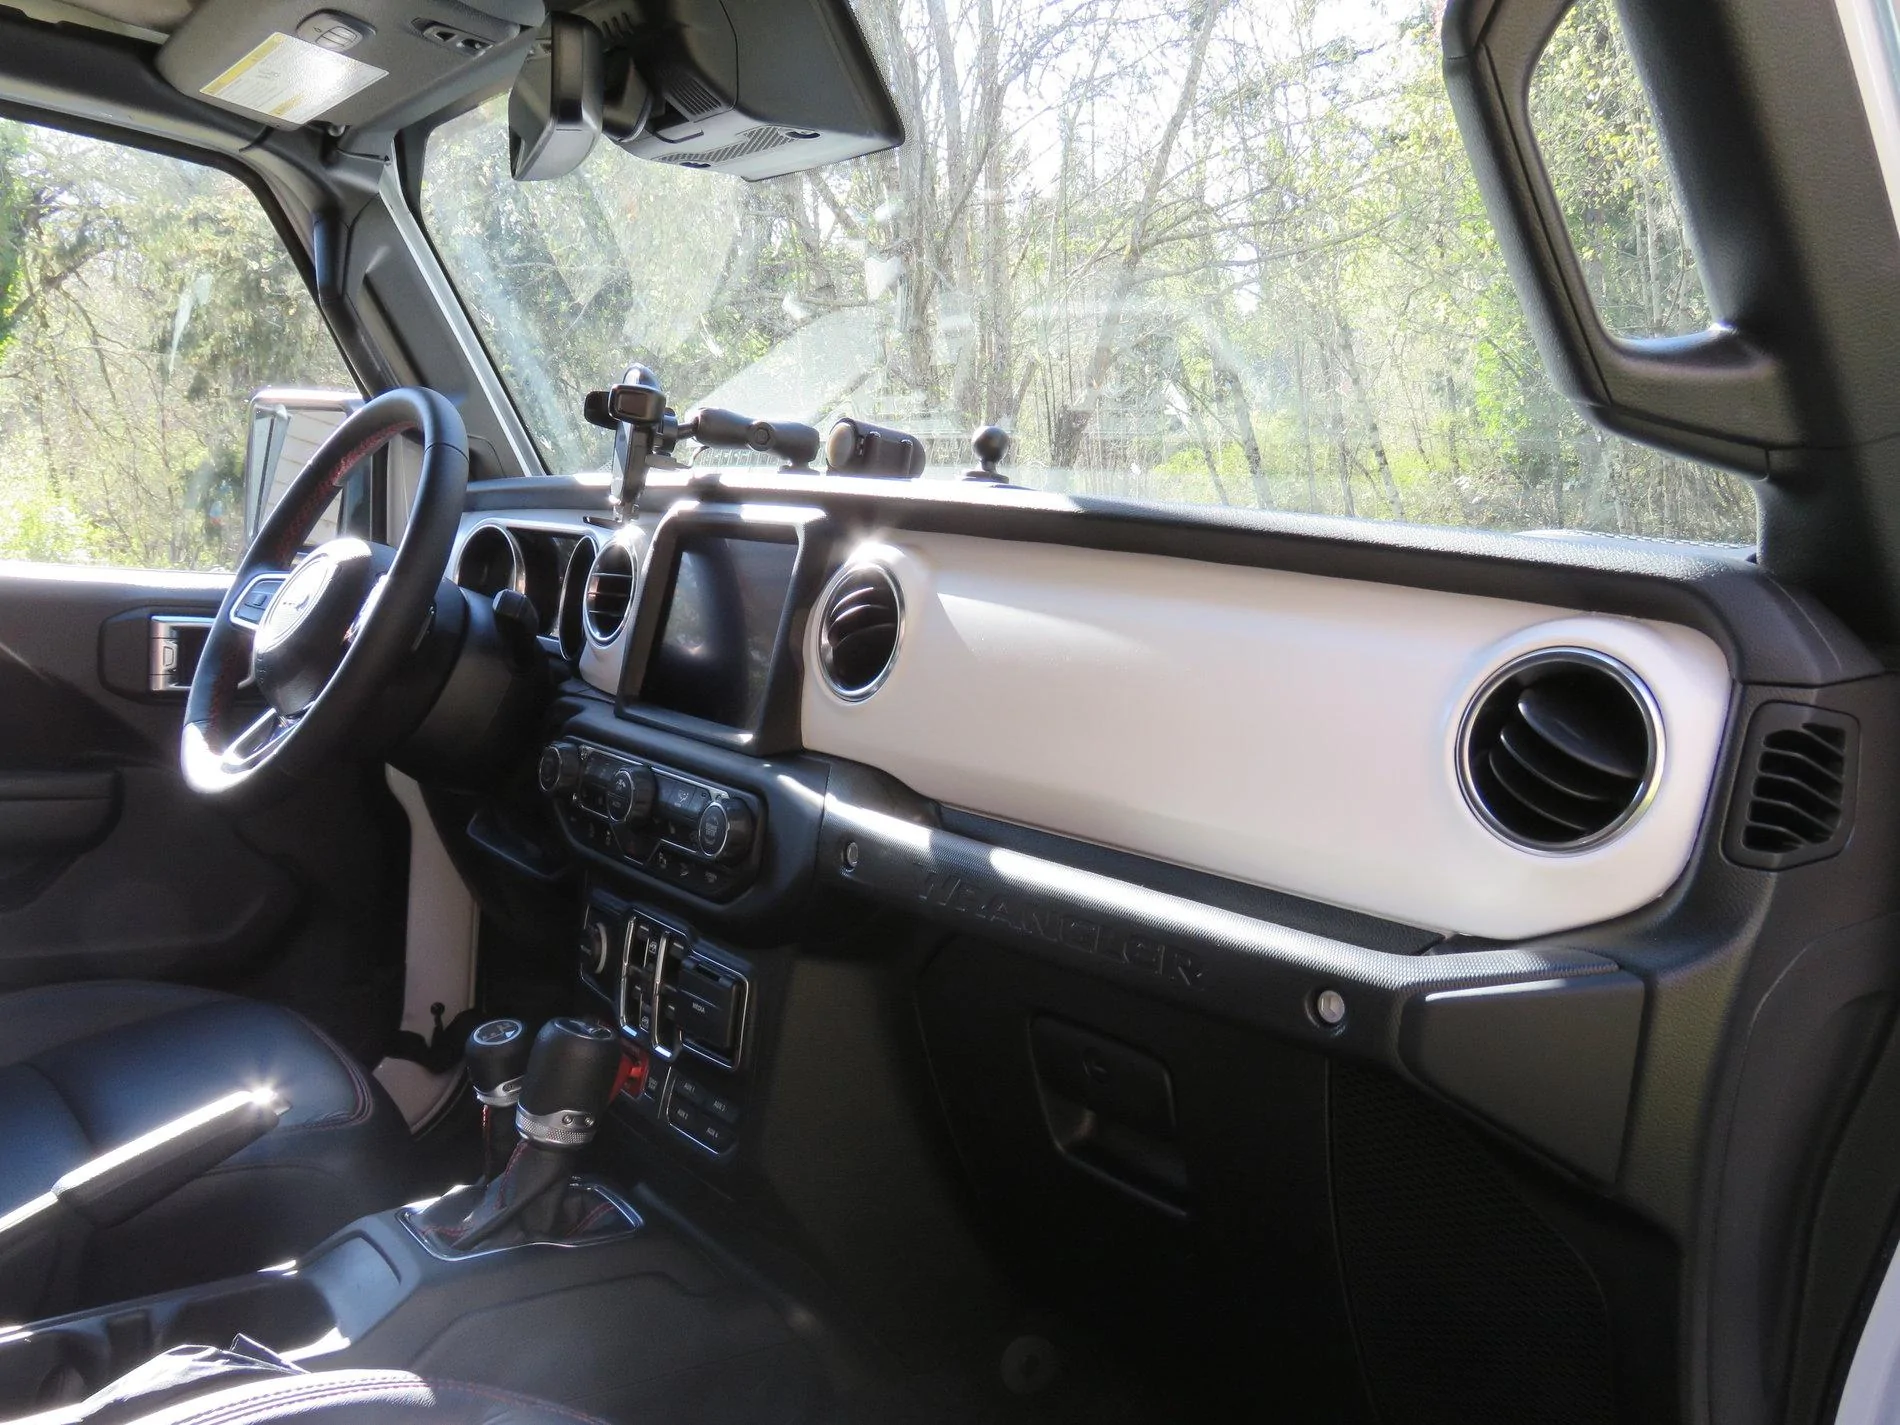
This is a write-up on how I installed my dash-mounted wireless charging phone cradle and dual USB outlet. Note that I used a USB outlet housing that I designed myself and had professionally 3D printed. If folks are interested, I’ll figure out a way to make them available. On to the write-up.

NOTE: A picture is worth a thousand words. Unfortunately, I didn't plan on doing a write-up, so I didn't think to take many pictures. So instead of pictures, you get a thousand words. #SorryNotSorry.
I wanted a way to mount my electronic accessories to my dash within easy reach and power them without any visible wires. This write up includes the components, tools and supplies I used to install the pictured solution.
The installation assumes you have some electrical DIY savvy. If you’re uncomfortable, hire a professional or call a friend. I didn’t take pictures of the basic installation – but it’s really straightforward if you follow the instructions included with the components below. The real “DIY” part is the fuse box I installed behind the glove box, which is entirely optional.
While I had the dash opened up, I also removed the panels and wrapped them in satin white.
Main components:
Wireless phone charger components
Optional 3-circuit fuse box for all accessories
Installation


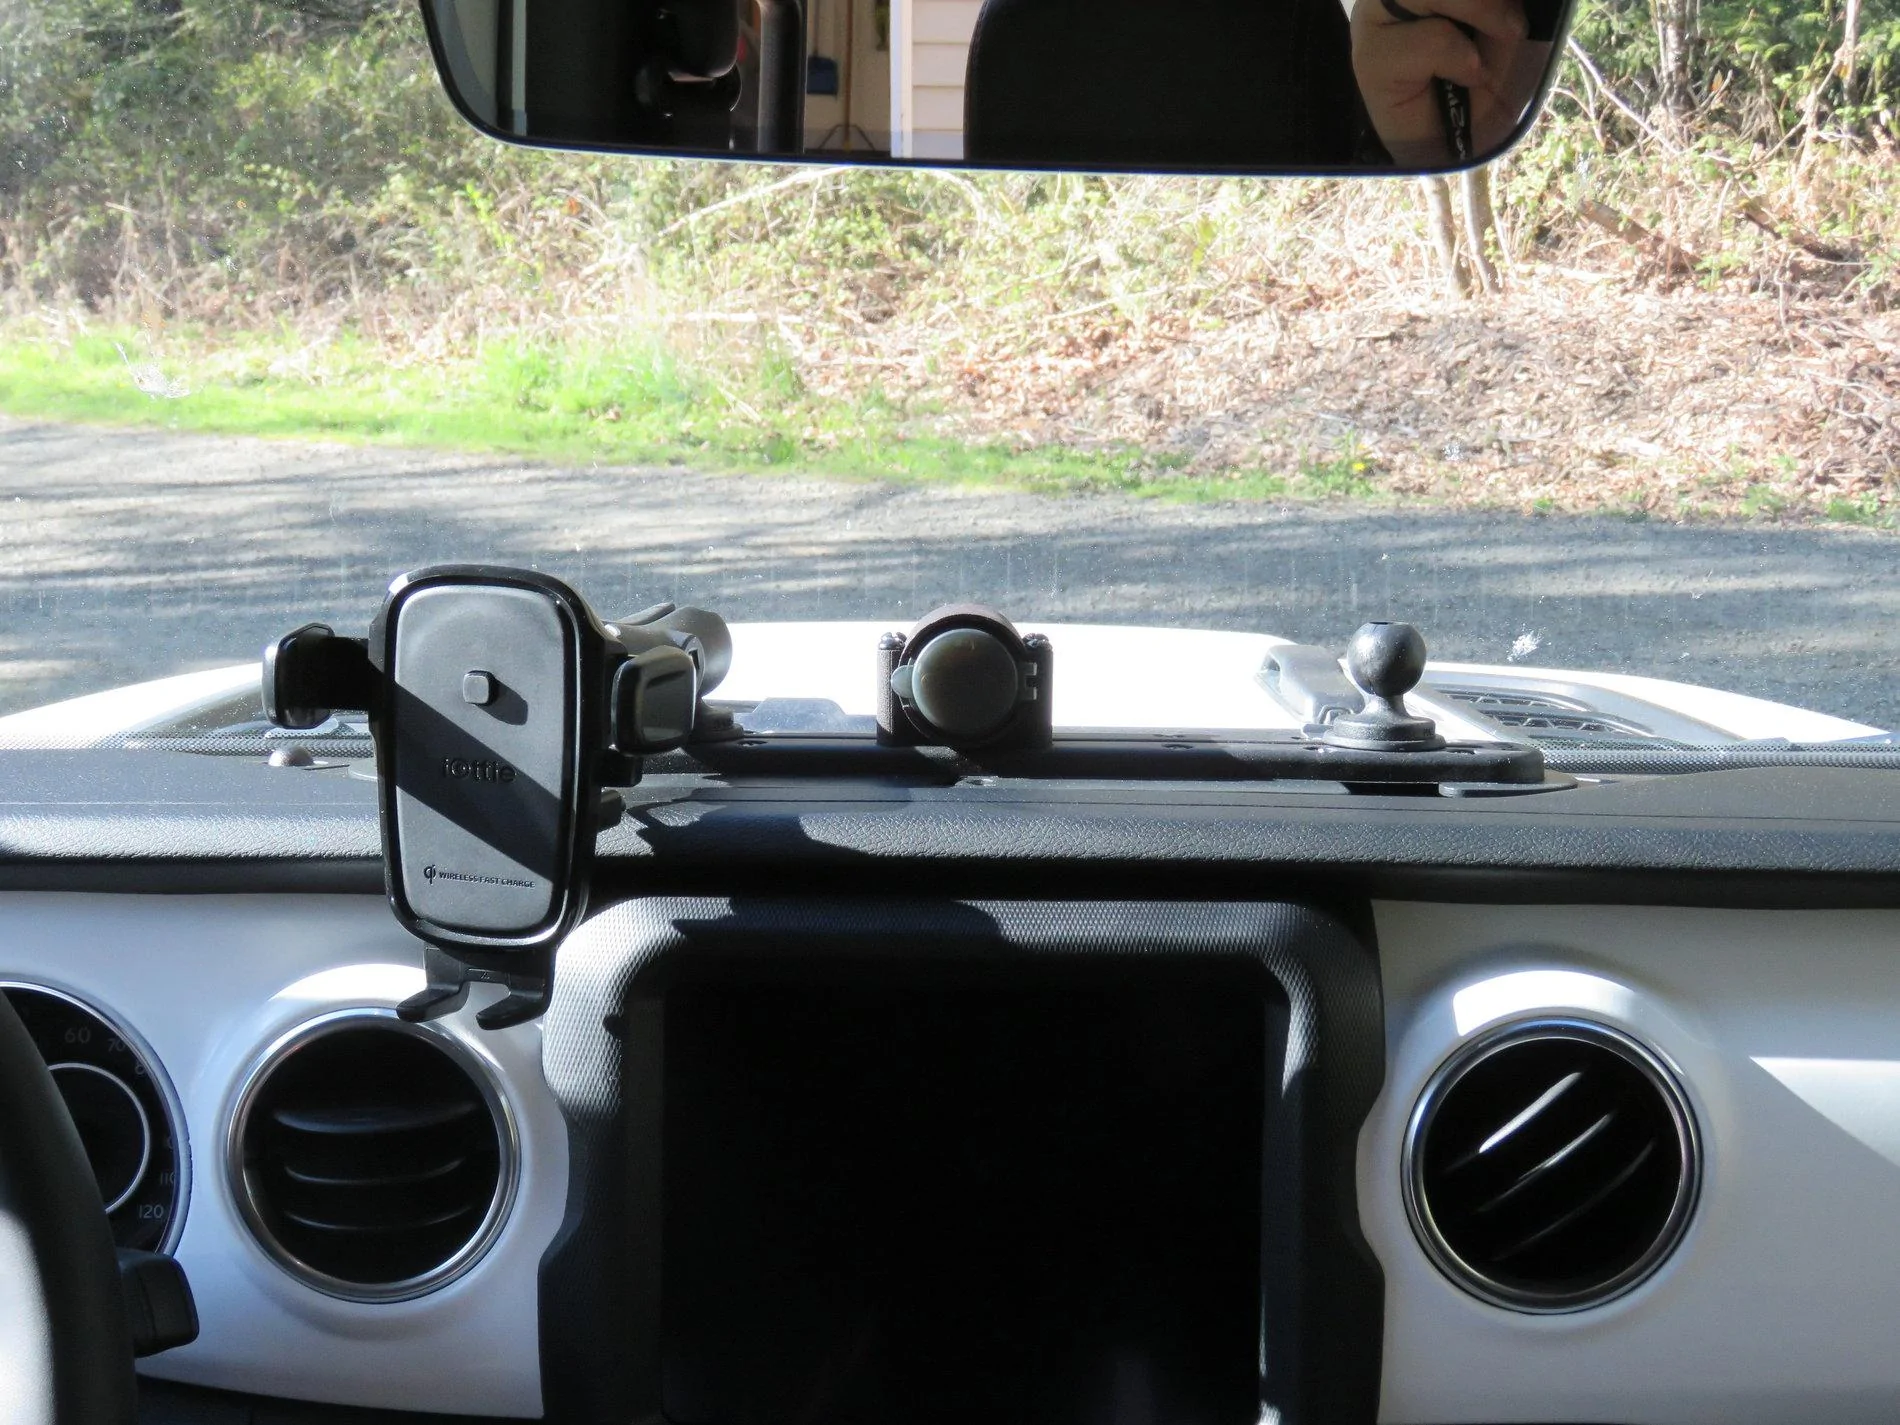
I designed this housing specifically for the RAM MOUNTS Tough Track system. The mounting holes align with the T-track mounting holes. It has internal channels for wiring and a snap-on cap, so no wiring is visible once installed. I also designed a GoPro mount for the top of it… but I designed it before I had my Jeep. Turns out, it’s too close to the windshield to work. Back to the drawing board.
I had the housing 3D printed by Shapeways.com using black versatile plastic. You can even get them printed in different colors to suit your tastes. I must say, I’m very pleased with how it all turned out. If anyone reads this far and is interested in getting one, send me a PM and I’ll figure out a way to make them available.
This is a write-up on how I installed my dash-mounted wireless charging phone cradle and dual USB outlet. Note that I used a USB outlet housing that I designed myself and had professionally 3D printed. If folks are interested, I’ll figure out a way to make them available. On to the write-up.
NOTE: A picture is worth a thousand words. Unfortunately, I didn't plan on doing a write-up, so I didn't think to take many pictures. So instead of pictures, you get a thousand words. #SorryNotSorry.
I wanted a way to mount my electronic accessories to my dash within easy reach and power them without any visible wires. This write up includes the components, tools and supplies I used to install the pictured solution.
The installation assumes you have some electrical DIY savvy. If you’re uncomfortable, hire a professional or call a friend. I didn’t take pictures of the basic installation – but it’s really straightforward if you follow the instructions included with the components below. The real “DIY” part is the fuse box I installed behind the glove box, which is entirely optional.
While I had the dash opened up, I also removed the panels and wrapped them in satin white.
Main components:
Wireless phone charger components
- Easy one-touch Qi wireless phone charger (supports wireless fast charging)
- Track ball size B (1”)
- 25mm to 17mm ball adapter
- 3” composite double socket arm
- Hardwired 12v to 5v USB QC 3.0 adapter (supports fast charging)
- 3’ USB A to USB micro B cable
- “Waterproof” dual USB QC 3.0 outlet (supports fast charging, and is water resistant, not waterproof)
- Custom 3D printed USB outlet housing (more info at the end of the write-up)
- 4x #10-24 x 2” screws, black – purchased at my local Ace Hardware store
Optional 3-circuit fuse box for all accessories
- “6 circuit” power distribution module (it’s called a “6 circuit” but it’s really only 3)
- 20-18 ga female terminals
- 20-16 ga wire seals
- 2x #8 x 2” trim screws (Ace Hardware)
- 2x 3/8” OD x 1/8” ID x 1/2” L nylon bushing (Ace Hardware)
- 2x 3/8” OD x 1/8” ID x 1/8” L nylon bushing (Ace Hardware)
- 20 ga wire, various colors including black
- Your splice method of choice. I’m not gonna get into whether you should crimp or solder. May as well start a conversation about dino-oil vs synthetic while we’re at it.
- Shrink tube
- Electrical tape
- Wire wrap (mesh or split loom)
- #2 Phillips head screwdriver
- Small screwdriver (for pinch-screw style connector on Quadratec power adapter)
- Electrical pliers (snips, stripper, crimper)
- Drill with a bit large enough to fit the USB micro B plug (I used a 7/16”)
- Heat gun
- Terminal crimper
- Drill with 1/8” drill bit
- Ratchet wrench with T20 Torx bit
Installation
- Disconnect your batteries. Plural.
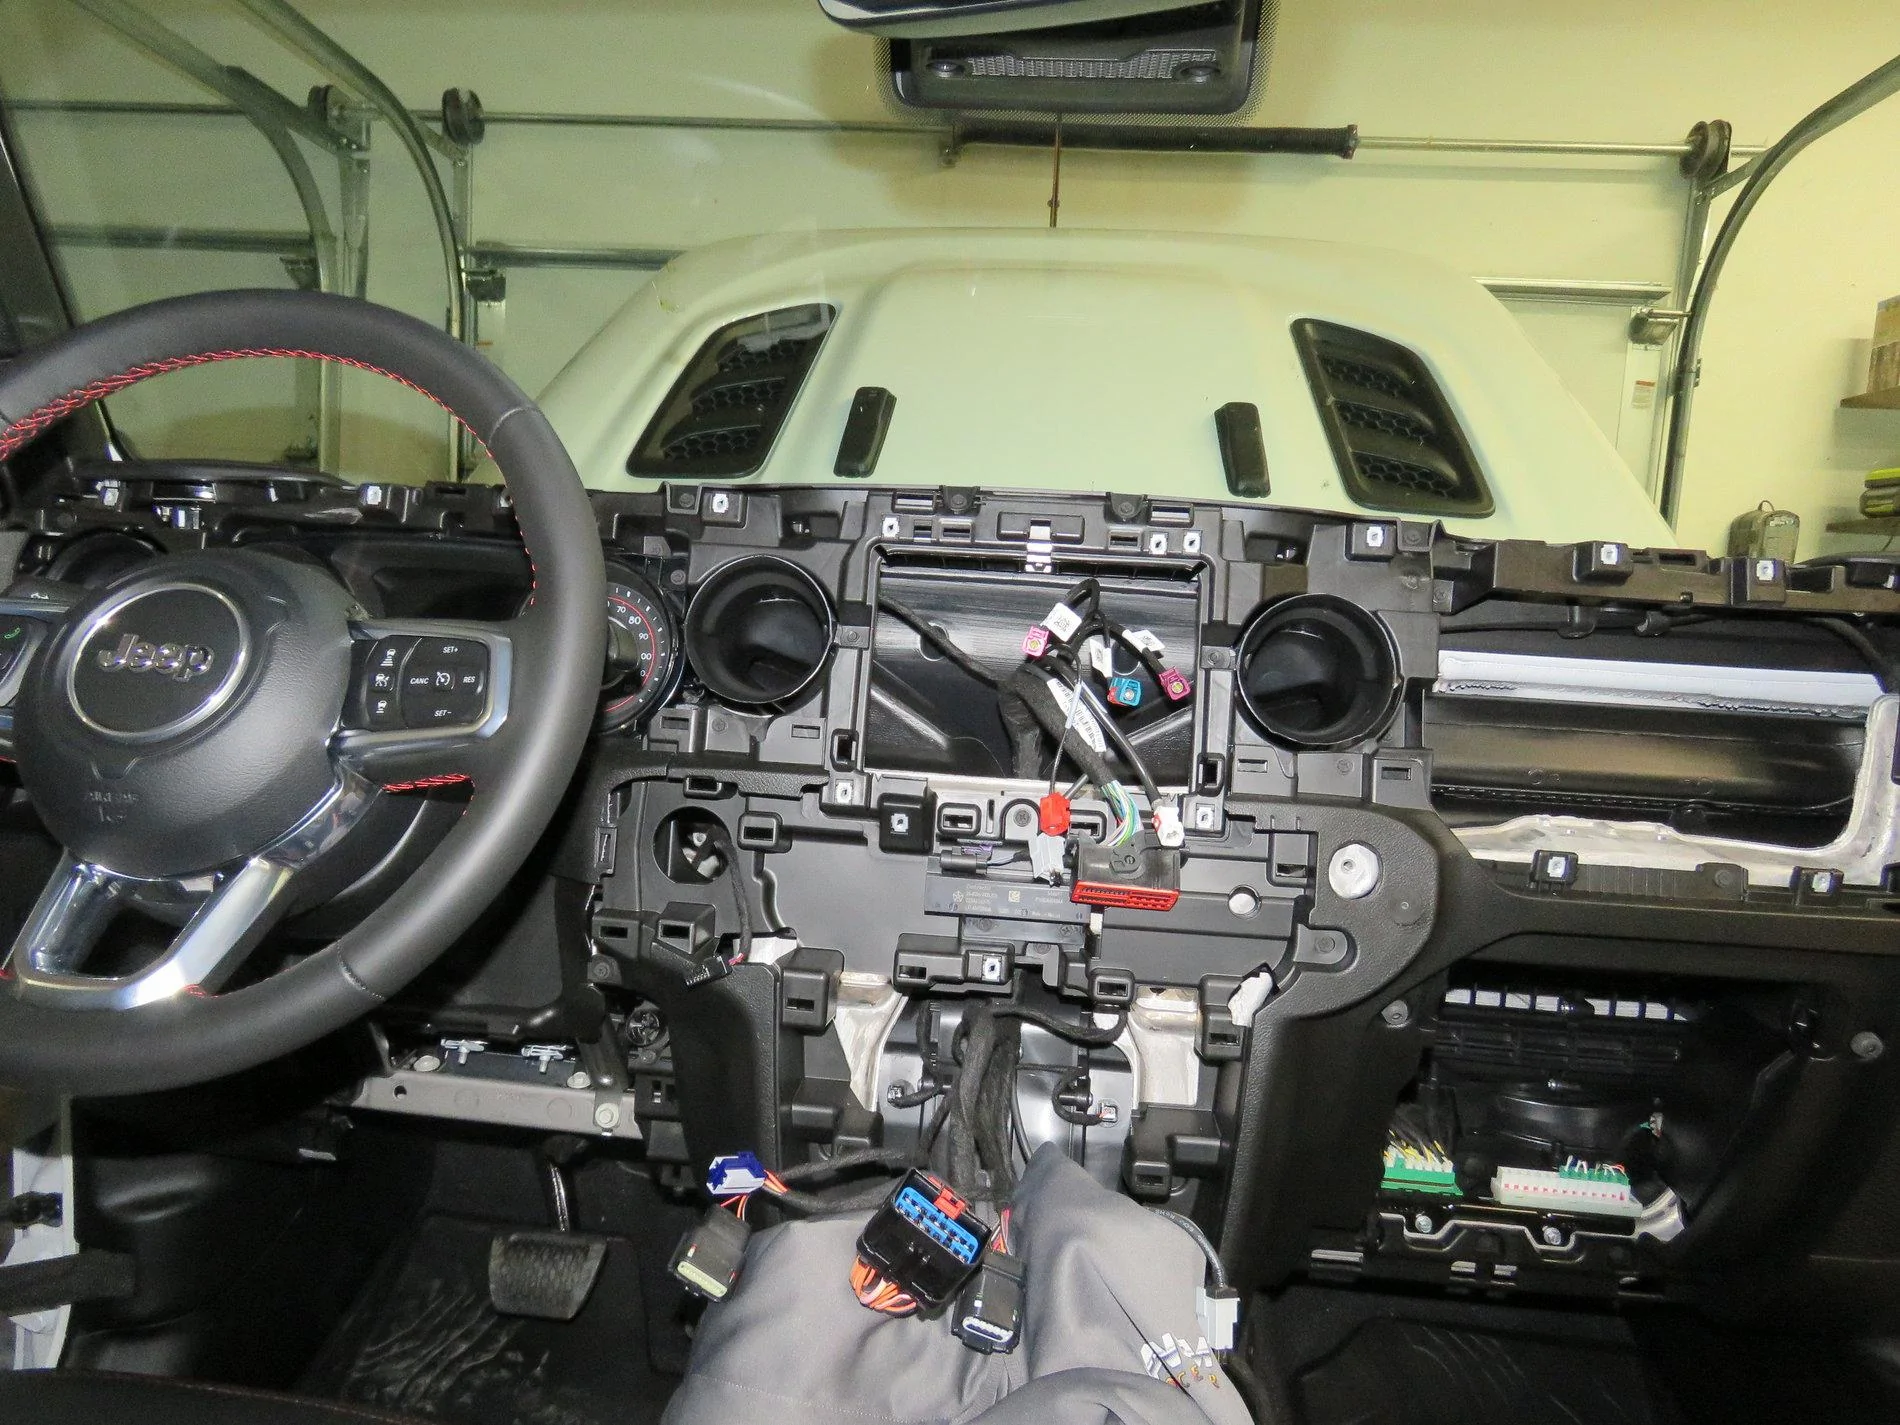
- Remove your HVAC controls, radio bezel and radio screen. Don’t worry – it’s not as difficult as it sounds! Here’s a great video on how to remove your dash on YouTube. You don’t need to remove the colored dash panels or top (full width) trim piece. I only removed those components because I vinyl wrapped the dash panels.
- One note about the video: If you do want to remove your colored dash panels, instead of trying to remove the small trim piece behind the grab handle like playing a game of Operation, just remove the grab handle instead. There’s a small trapezoidal shaped trim piece on the outboard side of the grab handle (visible in the 2nd photo above). It pops off easily – directly outward (from the center of the Jeep toward the passenger side mirror). The grab handle is easily removed via 2 bolts (see 3rd photo above).
- Next, install the Quadratec power adapter. The adapter comes with instructions on how to remove the HVAC controls. The adapter shunts between the stock wiring harness and the 12v power socket in the dash. In the picture above, it's the gray plug with the bright blue clip on it.
- The power adapter includes a pinch-screw style connector (for positive and ground), and an in-line fuse. Candidly, the fuse is completely unnecessary. I think it’s there more for lawsuit protection than electrical hazard protection. The adapter pulls power from the 12V power socket in the dash, which is already fused in the Power Distribution Center (PDC) under the hood. Connecting the power adapter is the electrical equivalent of plugging something into the socket. Adding another fuse means the items on your dash will be double-fused. And do you really want to have to remove your dash to replace a blown fuse? Bottom line: if the accessories you install plus anything you plug into the 12v power socket exceed the power capacity of the 12v power socket, you’ll blow the fuse under the hood – as designed.
- Option 1: Use the included fuse (easiest)
- Option 2: Cut the wires at the small fuse receptacle and re-attach the pinch screw connector (or splice using your technique of choice (makes a bit more sense, doesn’t take much time or effort)
- Option 3: Install a 3-circuit fuse box behind the glove box (explained later)
- Remove the rubber insert in the dash tray, per the Tough Track instructions. It lifts right out.
- Remove the two trim screws under the rubber insert, but don’t install the Tough Track yet.
- Drill a hole in your dash tray large enough for your wires of choice to pass through. I used a rubber grommet on my wire bundle, so I made the hole sized for the grommet – which was large enough for the USB micro B to easily pass through.
- If you don’t have a right-angle drill or drill attachment, you’ll need to lower your windshield. It’s so much easier on the JLs! Just lower it. Do it. Do it!
- I wanted my wires to pass directly through the bottom of the Tough Track bracket, so I drilled a corresponding hole in the center. If you do that, be sure to deburr the hole and seal it with some touch-up paint. It doesn’t have to be pretty – you won’t see the hole. You just need to keep it from rusting. You don’t have to drill a hole though – you can route the wires around the mounting tab and inside the track itself if you want to.
- Wrap your wires in a mesh sleeve and route them up through the hole in the dash. Be sure there’s enough length on top of the dash to reach all of your intended accessories. I used 2x 20 ga wires (power and ground for the center USB outlet) and a USB micro B.
- Route your wires as desired and install the Tough Track base bracket using the two trim screws you removed previously.
- At this point, all you need to do is make your wire connections and reinstall your dash.
- If you chose Option 1 or Option 2 above, simply connect your devices of choice to the supplied pinch-screw connector. The USB voltage adapter for the phone charger has a red and black wire for power and ground respectively. The dual USB outlet also comes with a red and black wire pair. Twist the reds together, connect to the red wire in the Quadratec power adapter. Twist the blacks together and connect to the brown wire in the Quadratec power adapter. Super easy.
- Install the Tough Track and your accessories onto the mounting bracket.
- If you chose Option 3 (the optional 3 circuit fuse box), then read on. If not, reassemble your dash, reconnect your batteries, and you’re done!

- I chose to fuse each individual accessory. It’s overkill since, as I mentioned before, I pulled power from the fused 12v power socket in the dash. However, adding individual fuses would help isolate and troubleshoot any issues I may have later down the road. It also ensures each individual accessory is fused appropriately based on its power draw, rather than one oversized fused for all accessories combined.
- Remove your glove box (instructions are only a forum search away)
- Route all wires behind the dash into the area behind the glove box. This includes the Quadratec power adapter wires, coming up from the HVAC area, and the accessory connection wires, coming down from the dash. Bundle them together and route them over. Be sure to keep them away from any sharp edges.
- Splice 3 different color wires to the red wire in the Quadratec power adapter. I used 20 ga wire – these are all very low power accessories. Splice 3 black wires of the same gauge to the brown wire in the Quadratech power adapter. (I’m not sure why they used brown for ground.)
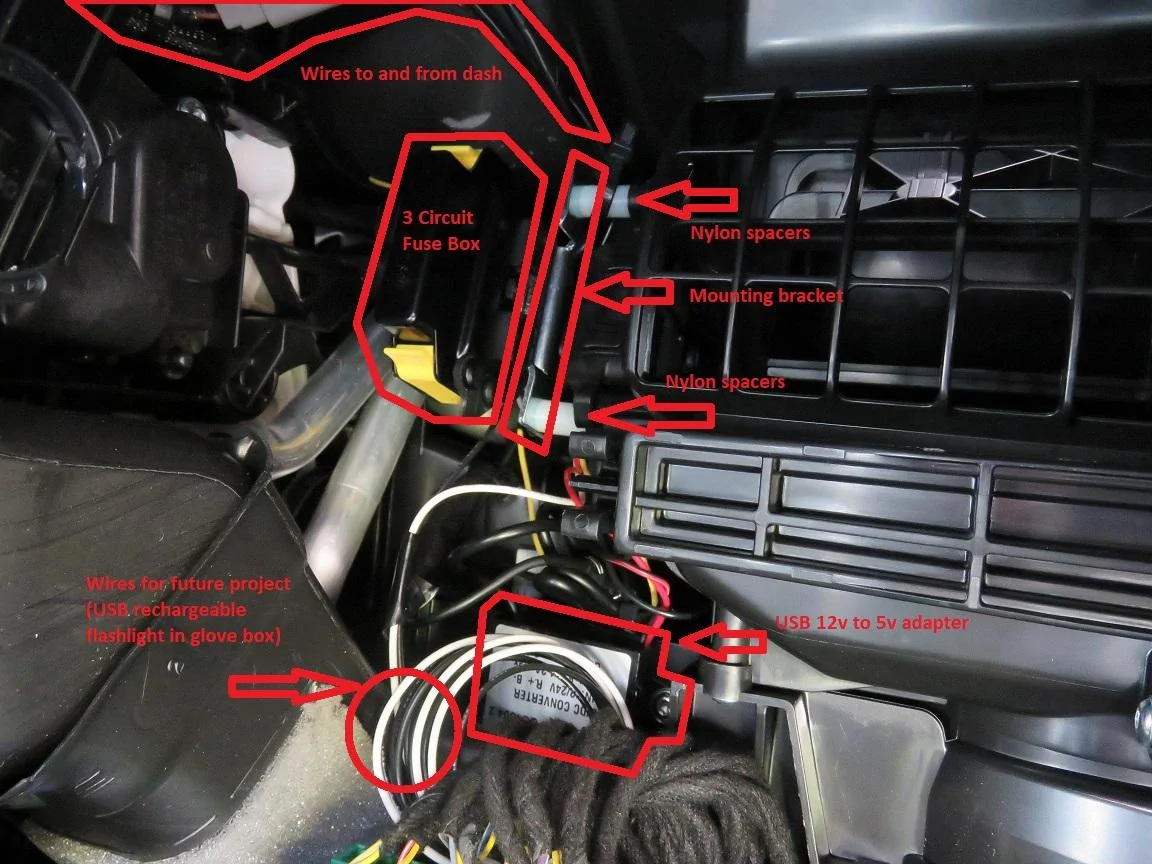
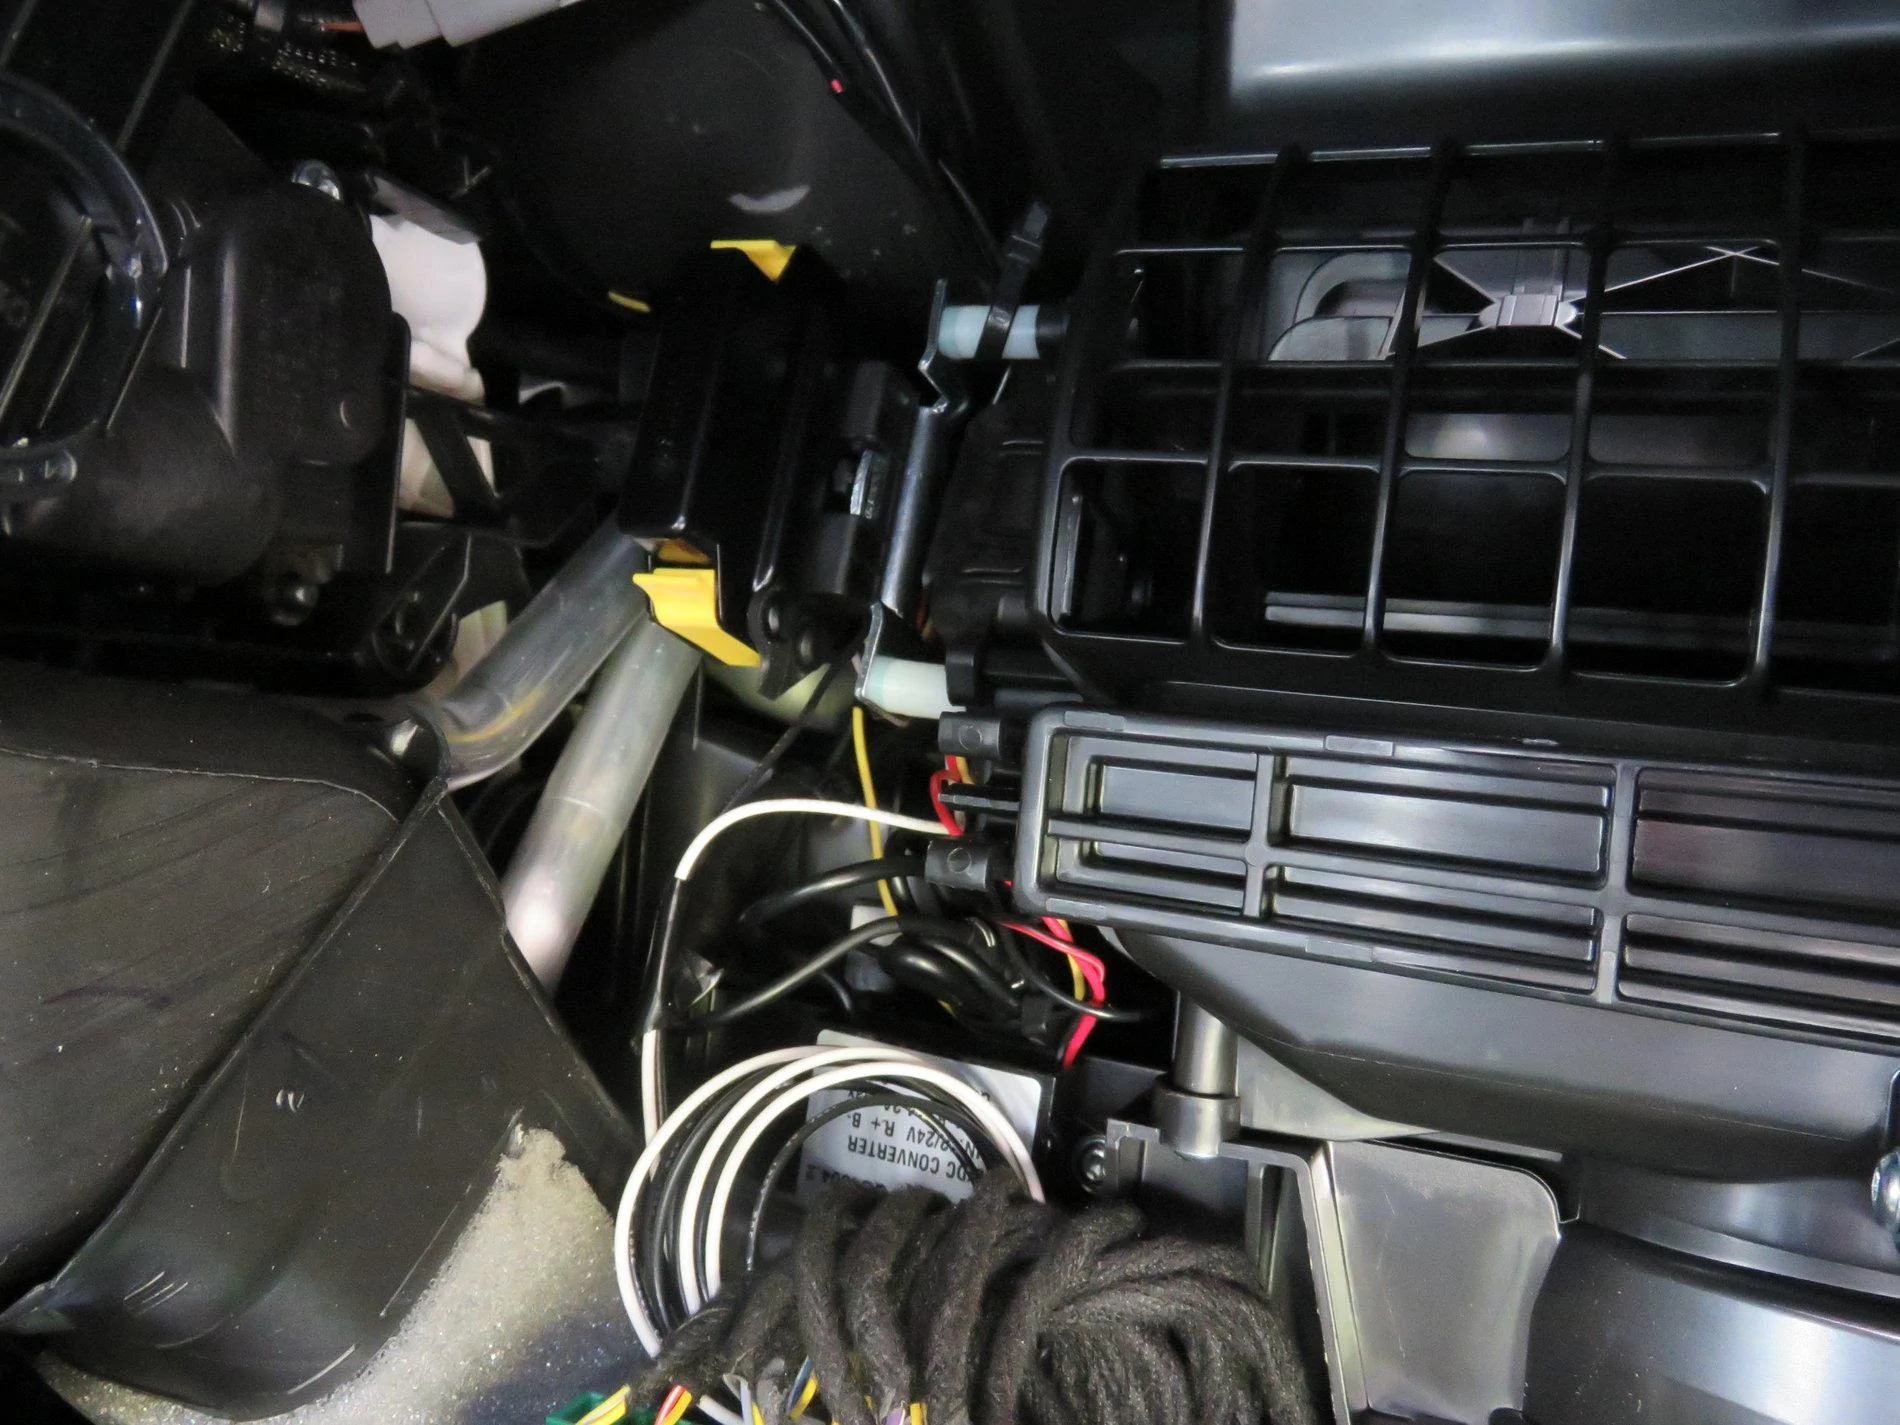
- In the picture above, you can see the wires coming in from the upper-left corner in a mesh sleeve. I used a 2-pin Deutsch connector – but that isn’t necessary. In the top-center of the picture, you can also see the wires feeding down into the back of the fuse box (with the yellow tabs).
- Pay special attention to the two aluminum HVAC tubes to the left of the fuse box. Those get VERY HOT. Be sure you route your wires along existing wire paths and zip tie them in place.
- I used a Littelfuse HWB6 power distribution module for this project. Turns out, it was a perfect match for this project. On the inboard side of the cabin filter housing (the cage looking structure in the right side of the picture) is a small enclosure that houses the motor that controls the air recirculation flap. It’s held in place with some T20 trim screws. Two of those screws just happen to be spaced perfectly to line up with the holes in the fuse box mounting bracket. And there’s a big open space with plenty of room for the fuse box to piggyback in that area. It couldn’t have been easier.
- Remove the two trim screws – save them for later. Don’t worry, there’s another screw still holding the motor housing in place, so it won’t fall out or wiggle out of position.
- Install the fuse box mounting bracket using some 2” #8 trim screws and some nylon bushings as spacers. The nylon spacers are the white tubes you see in the picture, sandwiched between the metal bracket (left) and the HVAC assembly (right). The top one has a zip tie around it to hold wires in place.
- I used the first circuit (fuse #1, wire positions #1 and #2) for my phone charger. Those are the red wires you see in the picture, and they connect to the hardwire USB adapter, which is mounted directly below the fuse box. (Look for the silver label sticker in the picture, right behind the black and white wires.)
- Again, this almost seemed too easy. There’s a flat, smooth vertical surface right below where the fuse box mounts. (It’s covered by the USB adapter in the picture.) I mounted the USB adapter to that surface using the trim screws I removed previously. Just drill a couple of small pilot holes. I used an “alligator clip” to hold the USB adapter in place while drilling the holes.
- I used the second circuit (fuse #2, wire positions #3 and #4) for my dual USB charger. These are the yellow wires you see in the picture.
- Last, I installed a “dead circuit” (fuse #3, wire positions #5 and #6). That’s the white and black wires you see coiled up at the bottom center of the picture. The wires are terminated in the back of the fuse box, but there’s no fuse in that position yet. I did this so I can install another accessory later down the road without having to repeat all of this work. More than likely, I’ll use it for a USB rechargeable flashlight mounted inside the glovebox. Use it for whatever you want, such as a CB radio – just be sure to use the appropriate gauge wire, and to not exceed the total power rating of the 12v power socket.
- Terminate your wires using the appropriate connectors and insert them into the back of the fuse box. The fuse box clips easily onto its mounting bracket.
- Plug your USB A male cable (to the phone charger) into the USB A female socket on the USB power adapter, and connections are all complete. I taped the connectors together using electrical tape, just to make sure they don’t vibrate loose.
- On that note – you can get USB power adapters that have a male USB micro B tip instead of a female USB A. I chose to use a USB cord instead so that if I decide to use a different charger later on, and if that charger has a different USB connection (such as USB C), then I wouldn’t have to remove the USB power adapter. I would just have to swap out the USB cable between the adapter and the phone charger.
- Reinstall your dash and glove box, reconnect your batteries, and you’re done!

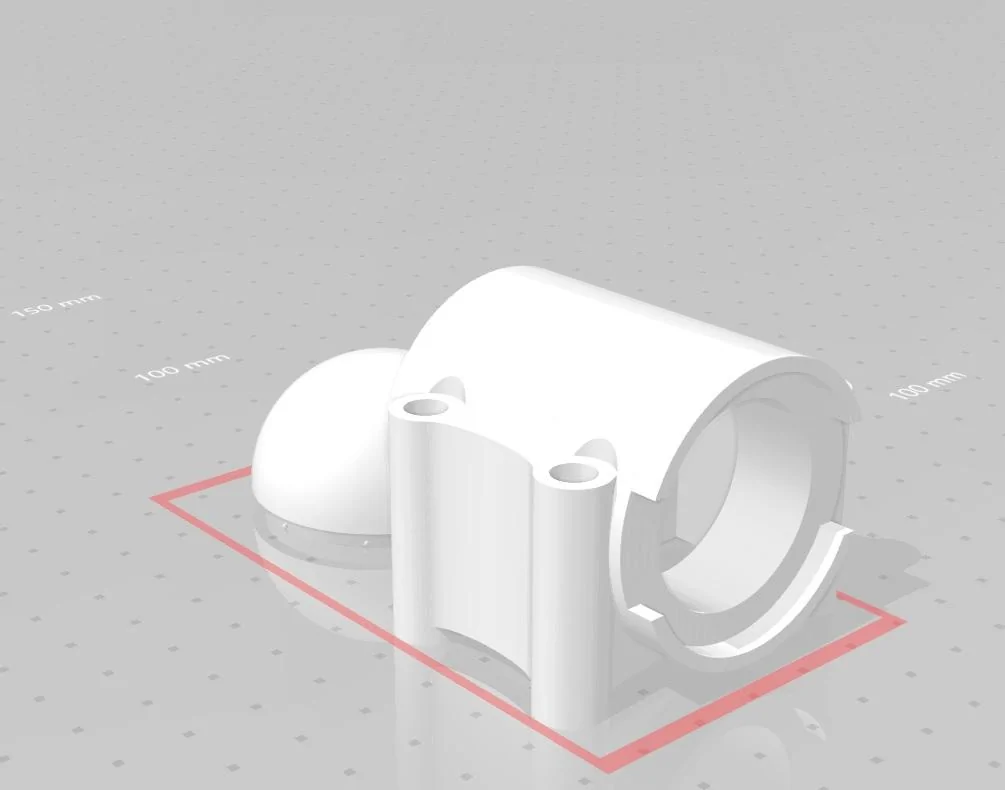
I designed this housing specifically for the RAM MOUNTS Tough Track system. The mounting holes align with the T-track mounting holes. It has internal channels for wiring and a snap-on cap, so no wiring is visible once installed. I also designed a GoPro mount for the top of it… but I designed it before I had my Jeep. Turns out, it’s too close to the windshield to work. Back to the drawing board.
I had the housing 3D printed by Shapeways.com using black versatile plastic. You can even get them printed in different colors to suit your tastes. I must say, I’m very pleased with how it all turned out. If anyone reads this far and is interested in getting one, send me a PM and I’ll figure out a way to make them available.
Sponsored
Last edited: