Sponsored
Mopar Tailgate Table Installation Writeup
- Thread starter TrailTorque
- Start date
- Watchers 29
OP
OP
TrailTorque
Well-Known Member
- Thread starter
- #62
On the parts listing if I remember wasn’t there dimensions or no? It couldn’t have been larger than a half inch though?.?. It’s been awhile since I installed this. Best bet is to call and have whoever send out another one. Shipping shouldn’t take long with something that small..Does anyone know the size of the larger spacer? Mine is missing from the parts kit.
bpdunsta
Well-Known Member
- Joined
- Mar 16, 2019
- Threads
- 15
- Messages
- 229
- Reaction score
- 168
- Location
- Chicagoland
- Vehicle(s)
- 2019 JLU Moab
For those that have this installed, do the freedom panels still fit in the cargo area of the JLU laid flat on the floor (not standing up behind the seats), with the seats up?
bpdunsta
Well-Known Member
- Joined
- Mar 16, 2019
- Threads
- 15
- Messages
- 229
- Reaction score
- 168
- Location
- Chicagoland
- Vehicle(s)
- 2019 JLU Moab
I finally got around to checking for myself, and the answer is “No”. I swapped tops today (back to hard to) and removed the tailgate table. Will reinstall next Spring when I swap back to soft top.For those that have this installed, do the freedom panels still fit in the cargo area of the JLU laid flat on the floor (not standing up behind the seats), with the seats up?
OP
OP
TrailTorque
Well-Known Member
- Thread starter
- #65
Sorry I couldn’t weigh in as I don’t have a hard top. I am glad you reported back though. This is interesting as it is an OEM part and should function with other OEM parts such as the freedom panels. It’s footprint in the cargo area is minimal at best.I finally got around to checking for myself, and the answer is “No”. I swapped tops today (back to hard to) and removed the tailgate table. Will reinstall next Spring when I swap back to soft top.
Sponsored
bpdunsta
Well-Known Member
- Joined
- Mar 16, 2019
- Threads
- 15
- Messages
- 229
- Reaction score
- 168
- Location
- Chicagoland
- Vehicle(s)
- 2019 JLU Moab
"They" expect you to stand up the Freedom Panel bag behind the back seat rather than lay them flat on the floor of the cargo area so you can, you know, actually see out of the rear windowSorry I couldn’t weigh in as I don’t have a hard top. I am glad you reported back though. This is interesting as it is an OEM part and should function with other OEM parts such as the freedom panels. It’s footprint in the cargo area is minimal at best.
")
Not only did I have to remove the tailgate table, I also had to remove the OEM molded cargo tray (part #82215185AC) since it has protection for the gap hider and rear seat backs.
In the Mopar bag, the Freedom Panels barely fit laying flat in the rear cargo area.
OP
OP
TrailTorque
Well-Known Member
- Thread starter
- #67
Wow so you had to remove the cargo tray too? What the heck lol"They" expect you to stand up the Freedom Panel bag behind the back seat rather than lay them flat on the floor of the cargo area so you can, you know, actually see out of the rear window
Not only did I have to remove the tailgate table, I also had to remove the OEM molded cargo tray (part #82215185AC) since it has protection for the gap hider and rear seat backs.
In the Mopar bag, the Freedom Panels barely fit laying flat in the rear cargo area.
bpdunsta
Well-Known Member
- Joined
- Mar 16, 2019
- Threads
- 15
- Messages
- 229
- Reaction score
- 168
- Location
- Chicagoland
- Vehicle(s)
- 2019 JLU Moab
They call it a “tray” or “mat” but it’s really more than that. It has a mat for the floor and mats for the seatbacks and gap hider (for those with leather interior). The name is very misleading.Wow so you had to remove the cargo tray too? What the heck lol

OP
OP
TrailTorque
Well-Known Member
- Thread starter
- #69
Seems a bit too fancy for me lolThey call it a “tray” or “mat” but it’s really more than that. It has a mat for the floor and mats for the seatbacks and gap hider (for those with leather interior). The name is very misleading.

freddiegs
Well-Known Member
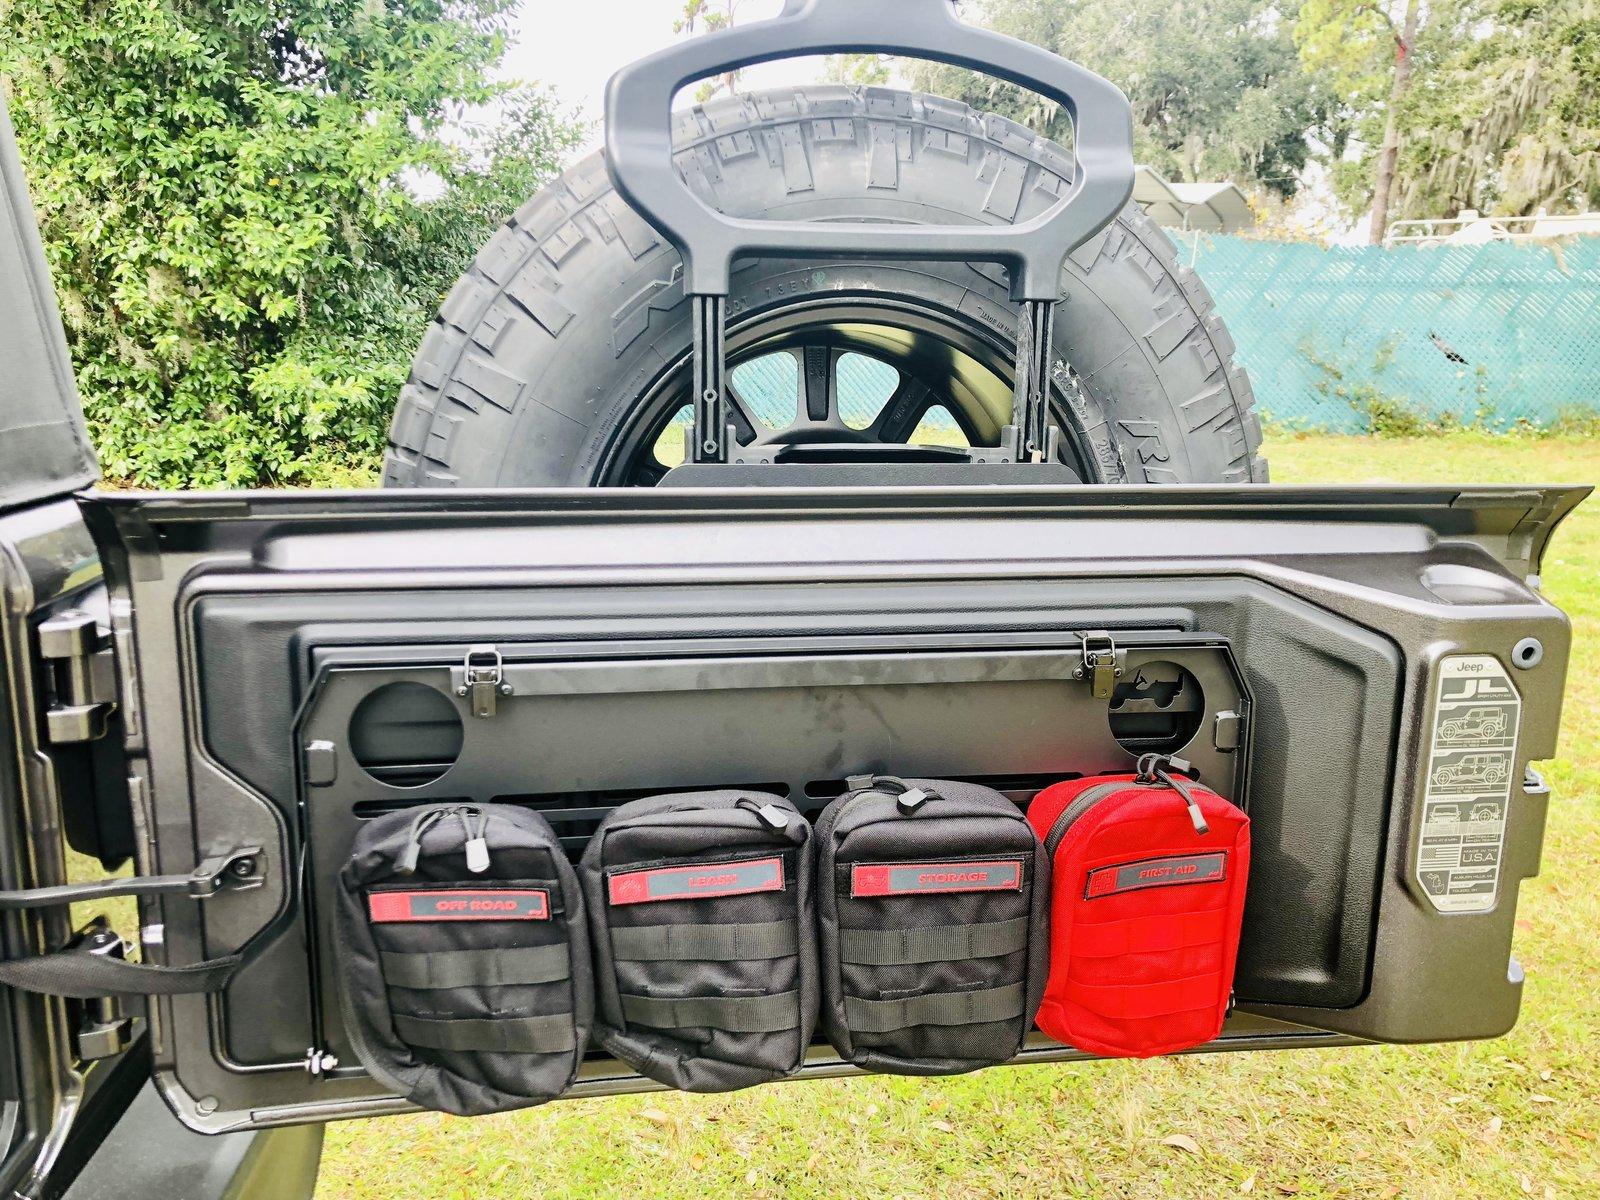
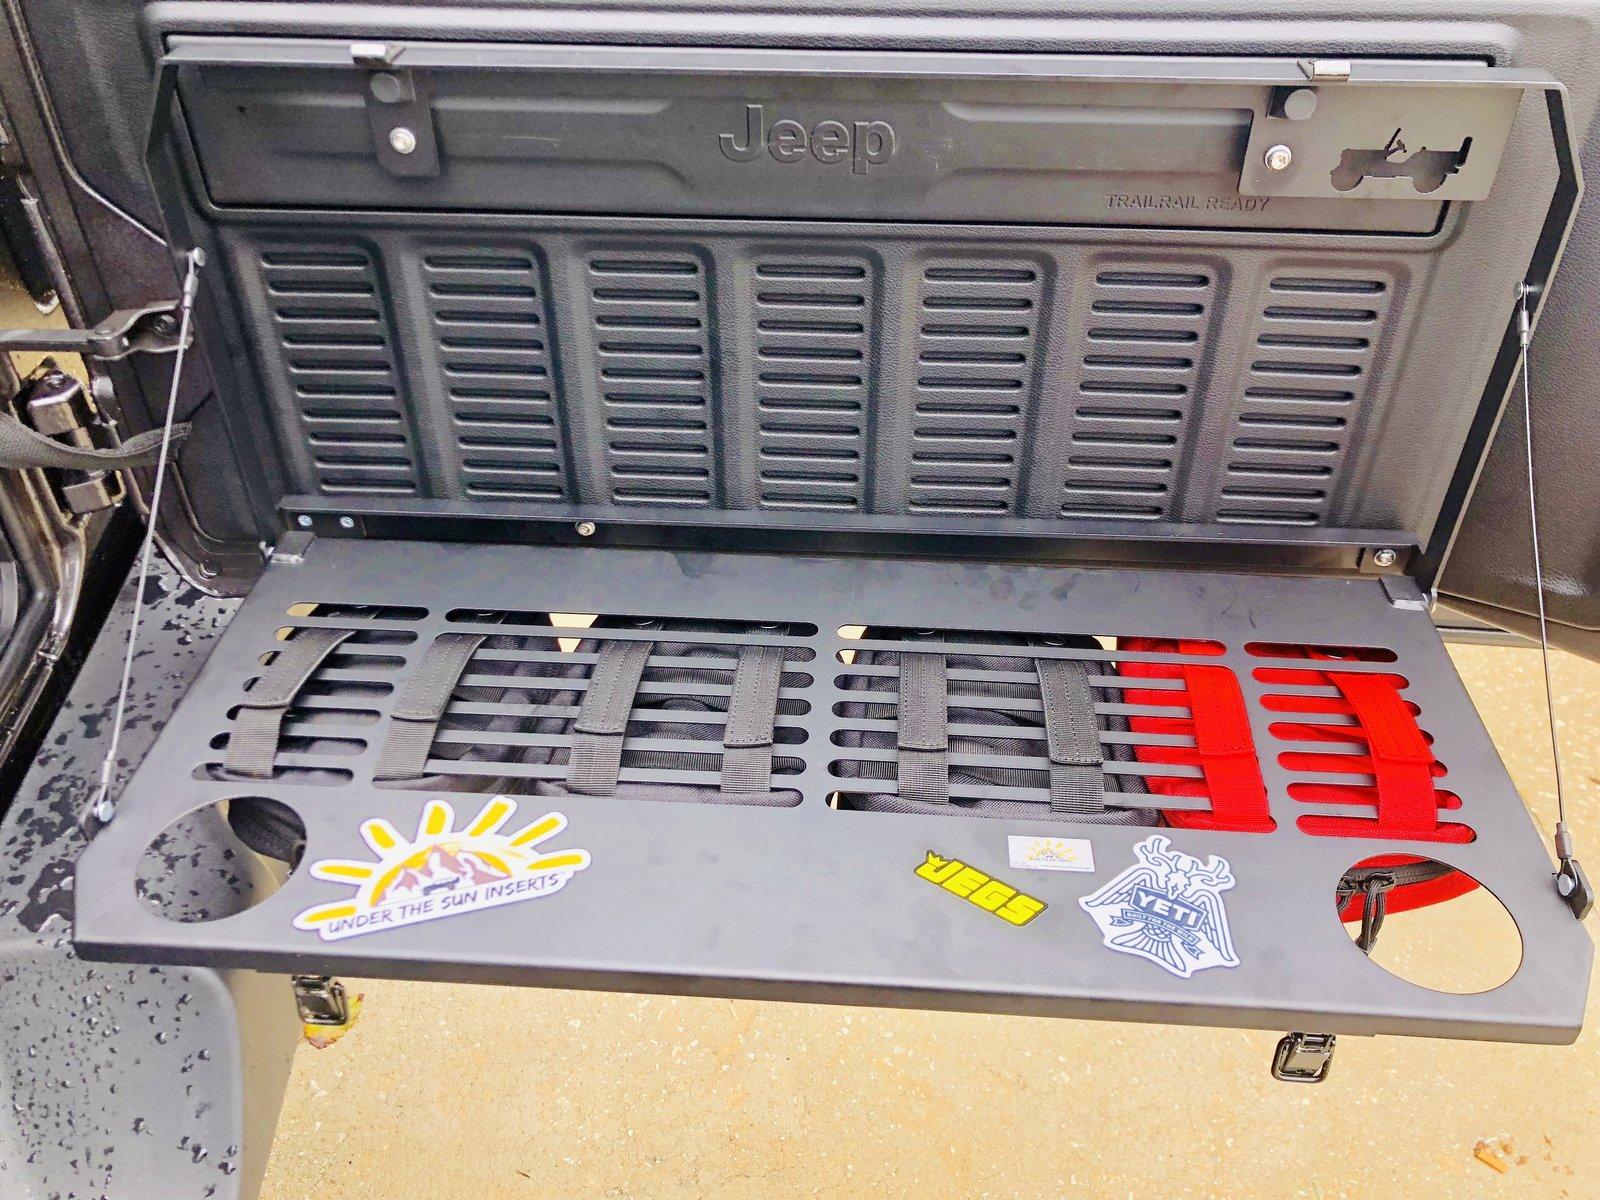
Where did you get the labels for the bags at?Yes definitely a nice touch by Mopar. Very high quality and obviously OE fitment. I would highly recommend. I’ve already used the $h!t out of it and it fits the Yeti 20’s & 30’s as an added bonus. Also, great for molle bags and decals you don’t want all over the exterior of your Jeep.

Sponsored
OP
OP
TrailTorque
Well-Known Member
- Thread starter
- #71
I’ll have to look back but it’s a company online, very cheap and very fast! I’ll report back after work today, stay tuned.Where did you get the labels for the bags at?
OP
OP
TrailTorque
Well-Known Member
- Thread starter
- #72
Alright I found the information (I did this a LONG time ago so it took a minute to find it)Where did you get the labels for the bags at?
Sending you a PM now with all of the info and the images you'll need to upload when you order.
freddiegs
Well-Known Member
Alright ThanksAlright I found the information (I did this a LONG time ago so it took a minute to find it)
Sending you a PM now with all of the info and the images you'll need to upload when you order.
F800
Well-Known Member
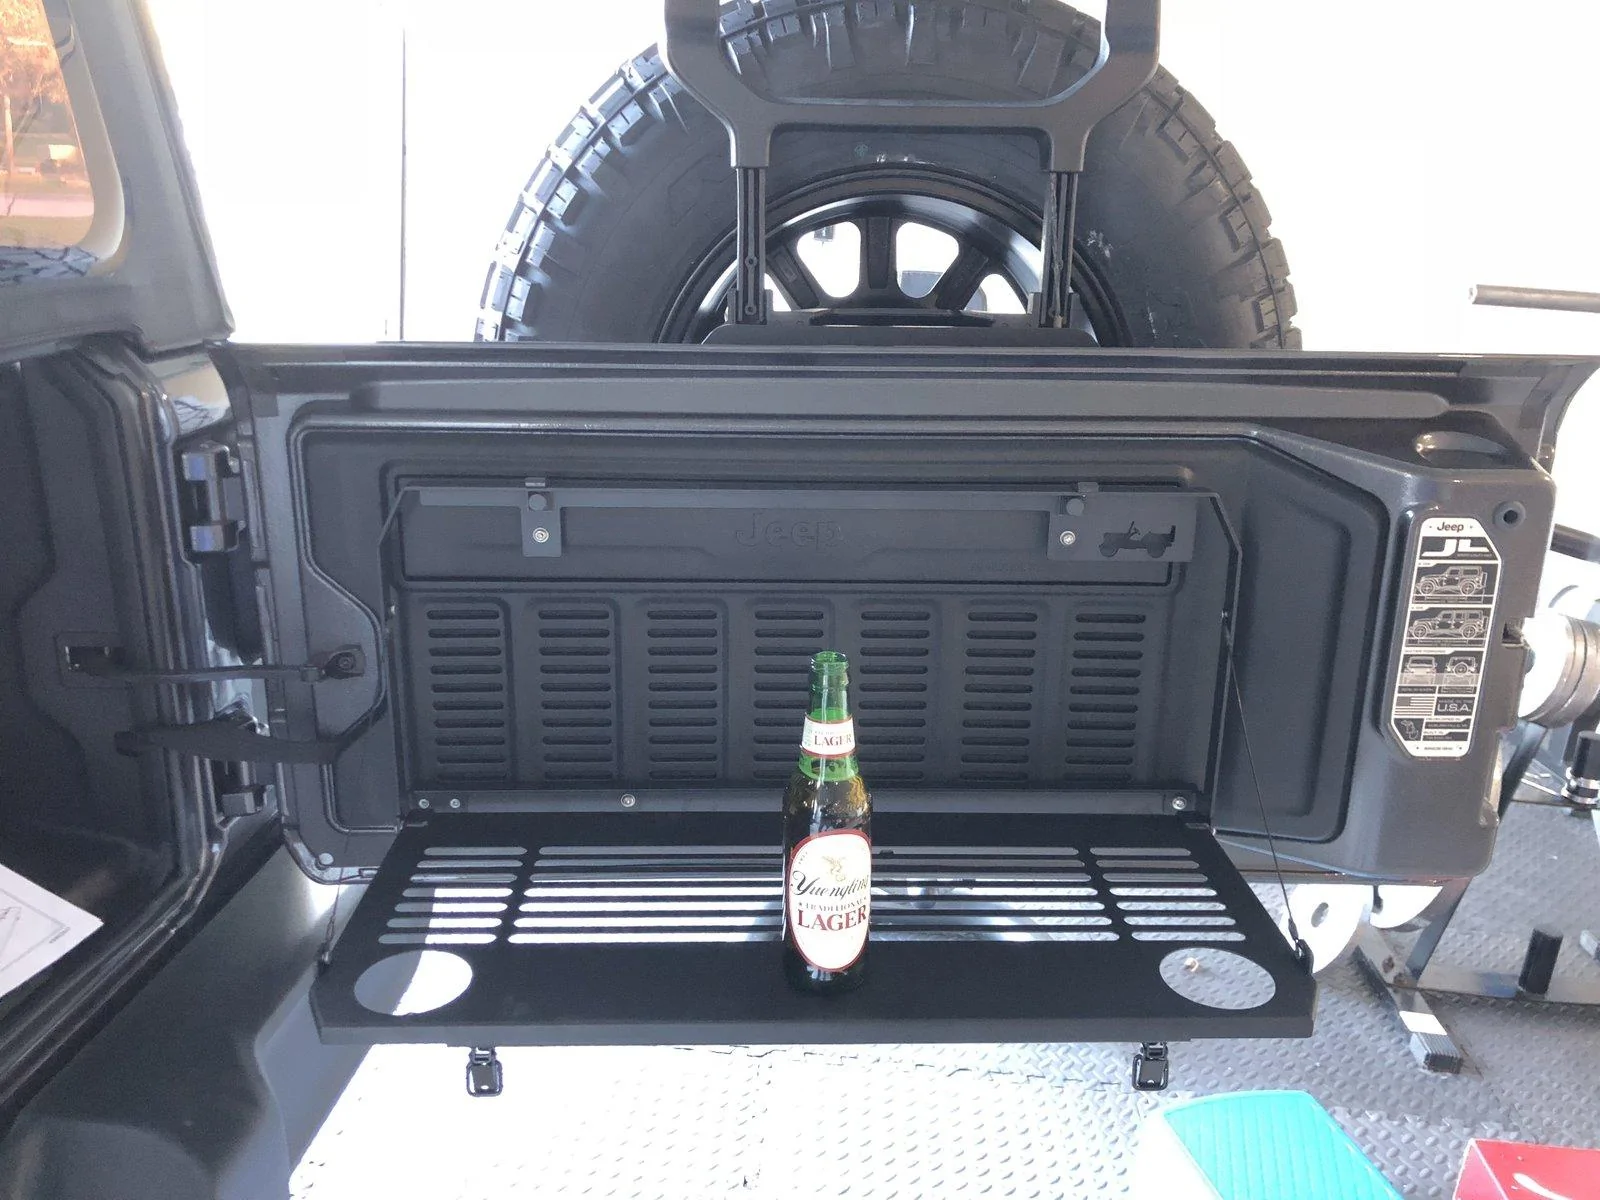
Very quick and easy install.
Approx Install Time .50 mins. It took me .25 of a beer.
The Mopar Tailgate Table can hold up to 25lbs and is made of metal that is coated.
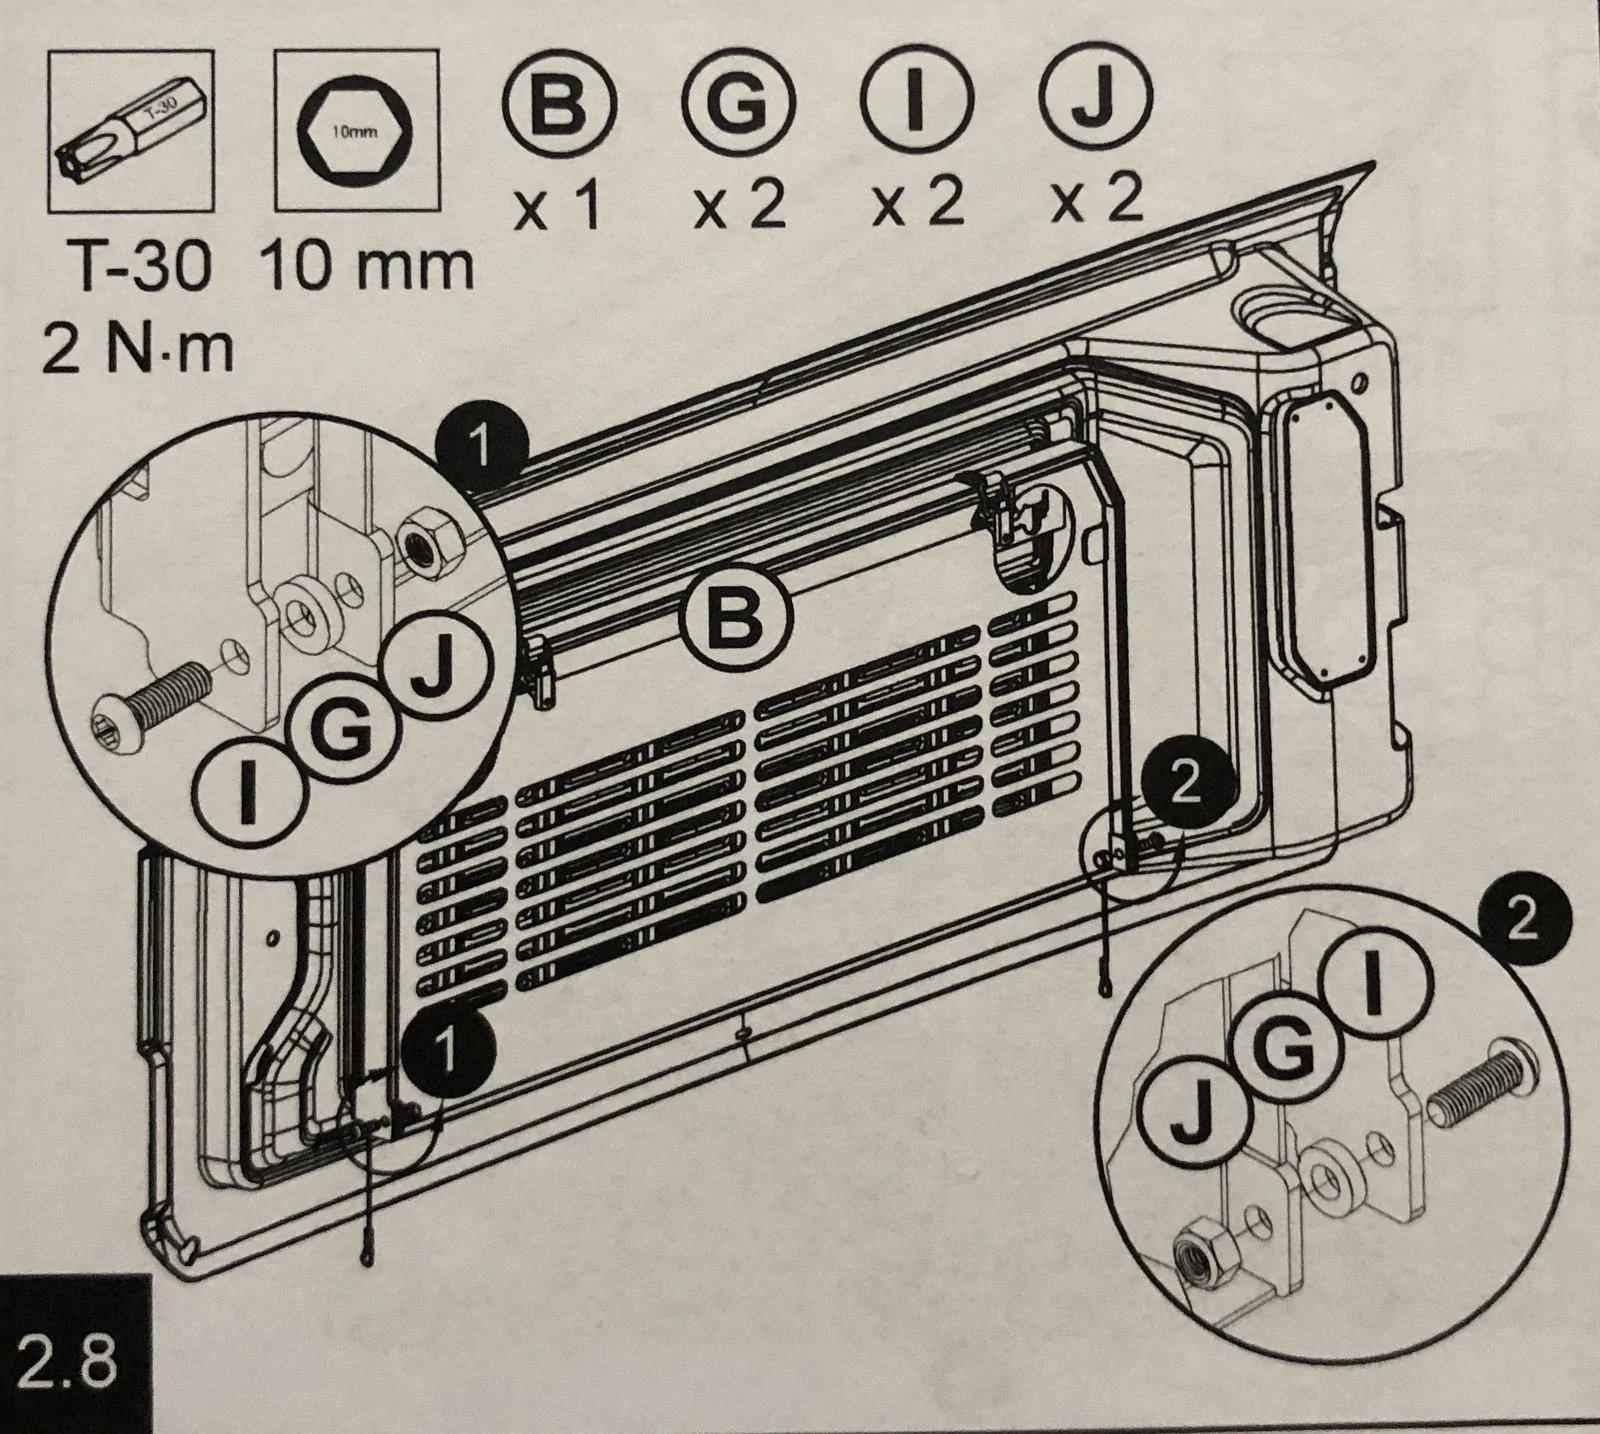
Tools required:
Drill
1/2” Drill Bit
10mm wrench
T-30 Torx Bit
Trim removal tool
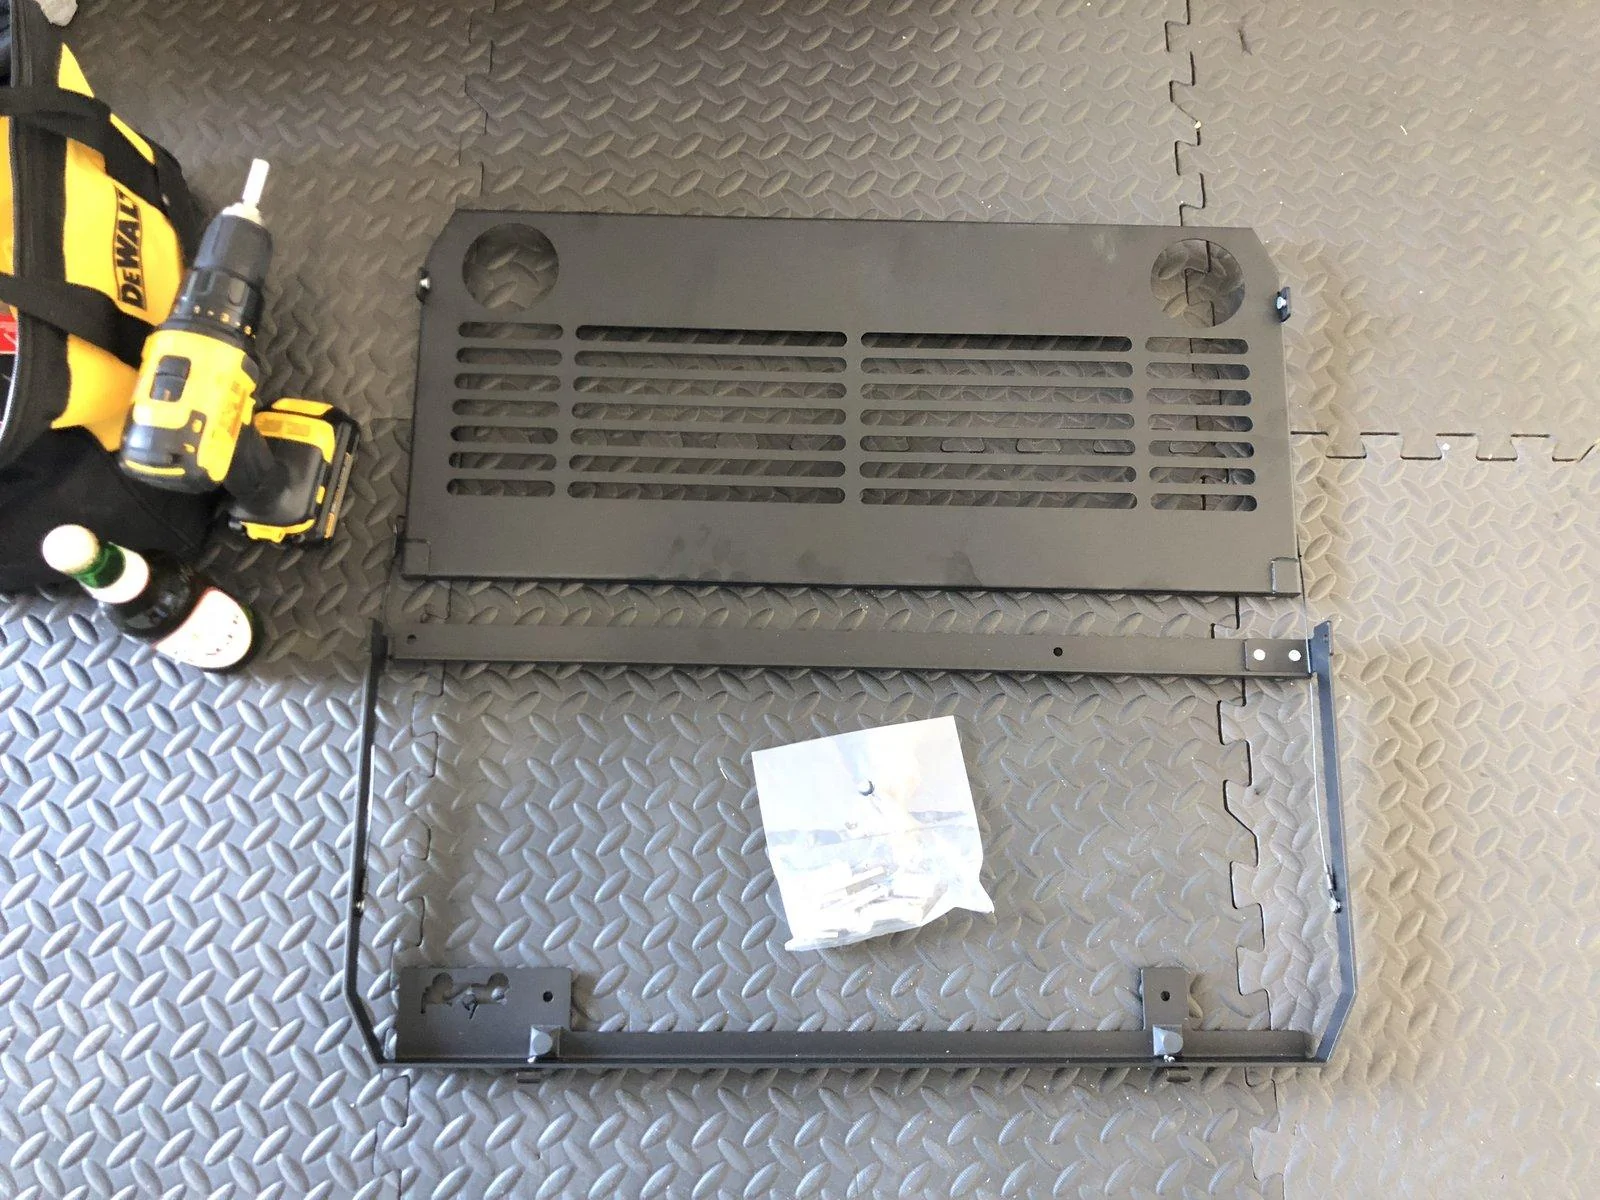
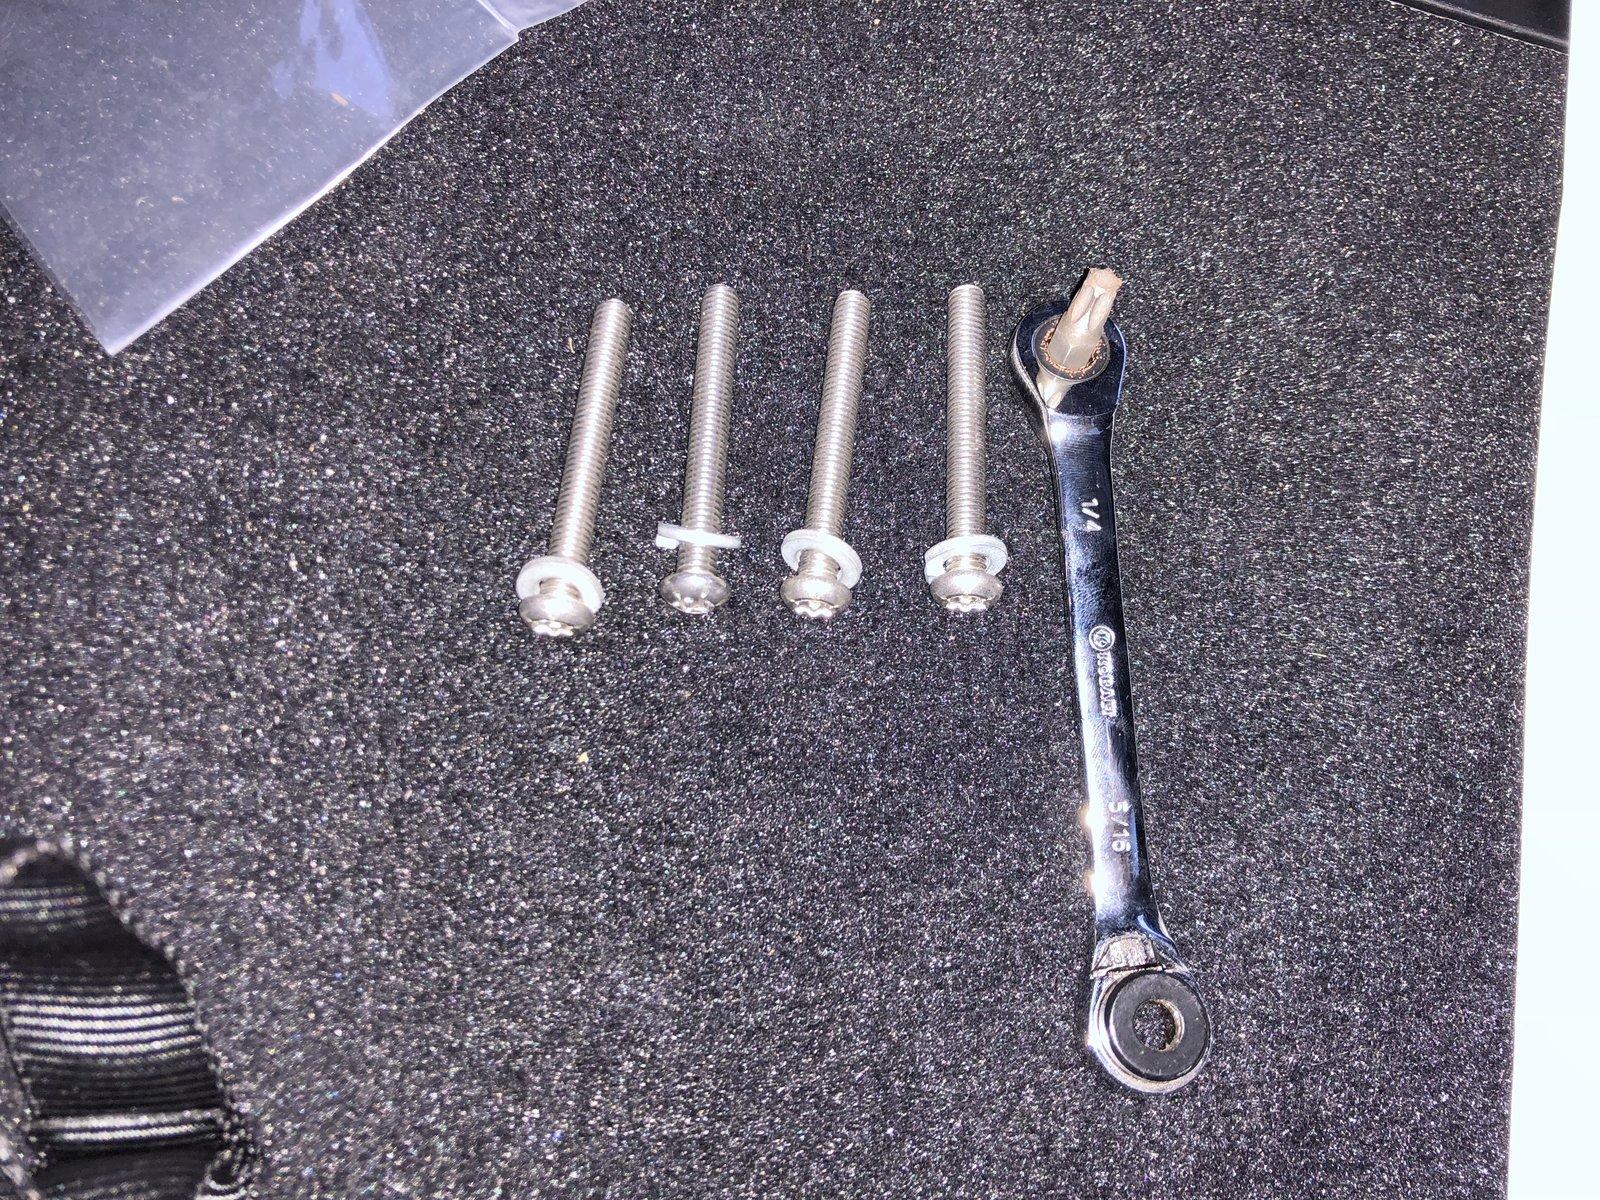
You will be provided in the kit the following:
x4 Long screws (T-30 Torx Heads)
x2 Short screws (T-30 Torx Heads)
x1 Long Aluminum Spacer
x3 Short Aluminum Spacer
x2 Small Plastic Spacer
x4 Lock Washers
x2 Nuts
Additionally there will be:
x2 Fat Aluminum Spacers (Only used if you have the TRMS (Trail Management System) already installed.
______________________
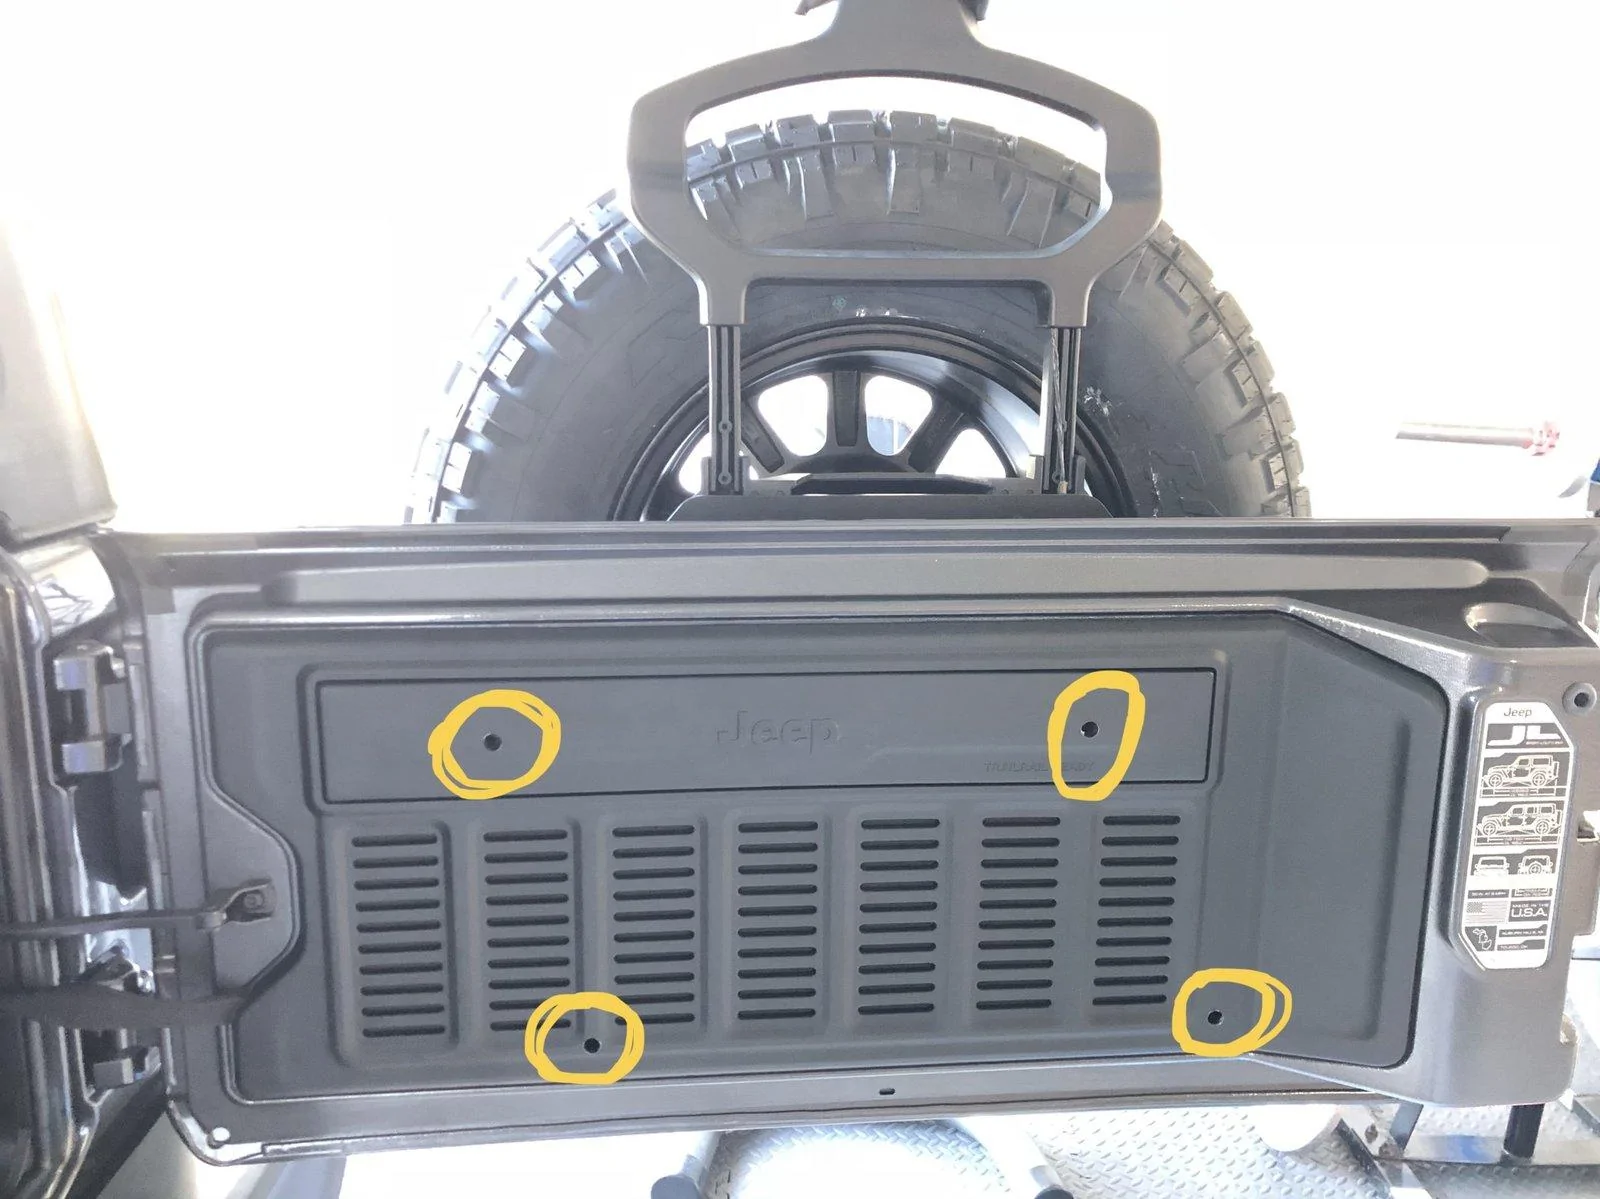
First, layout your kit and ensure all hardware required is provided with your kit as shown below:
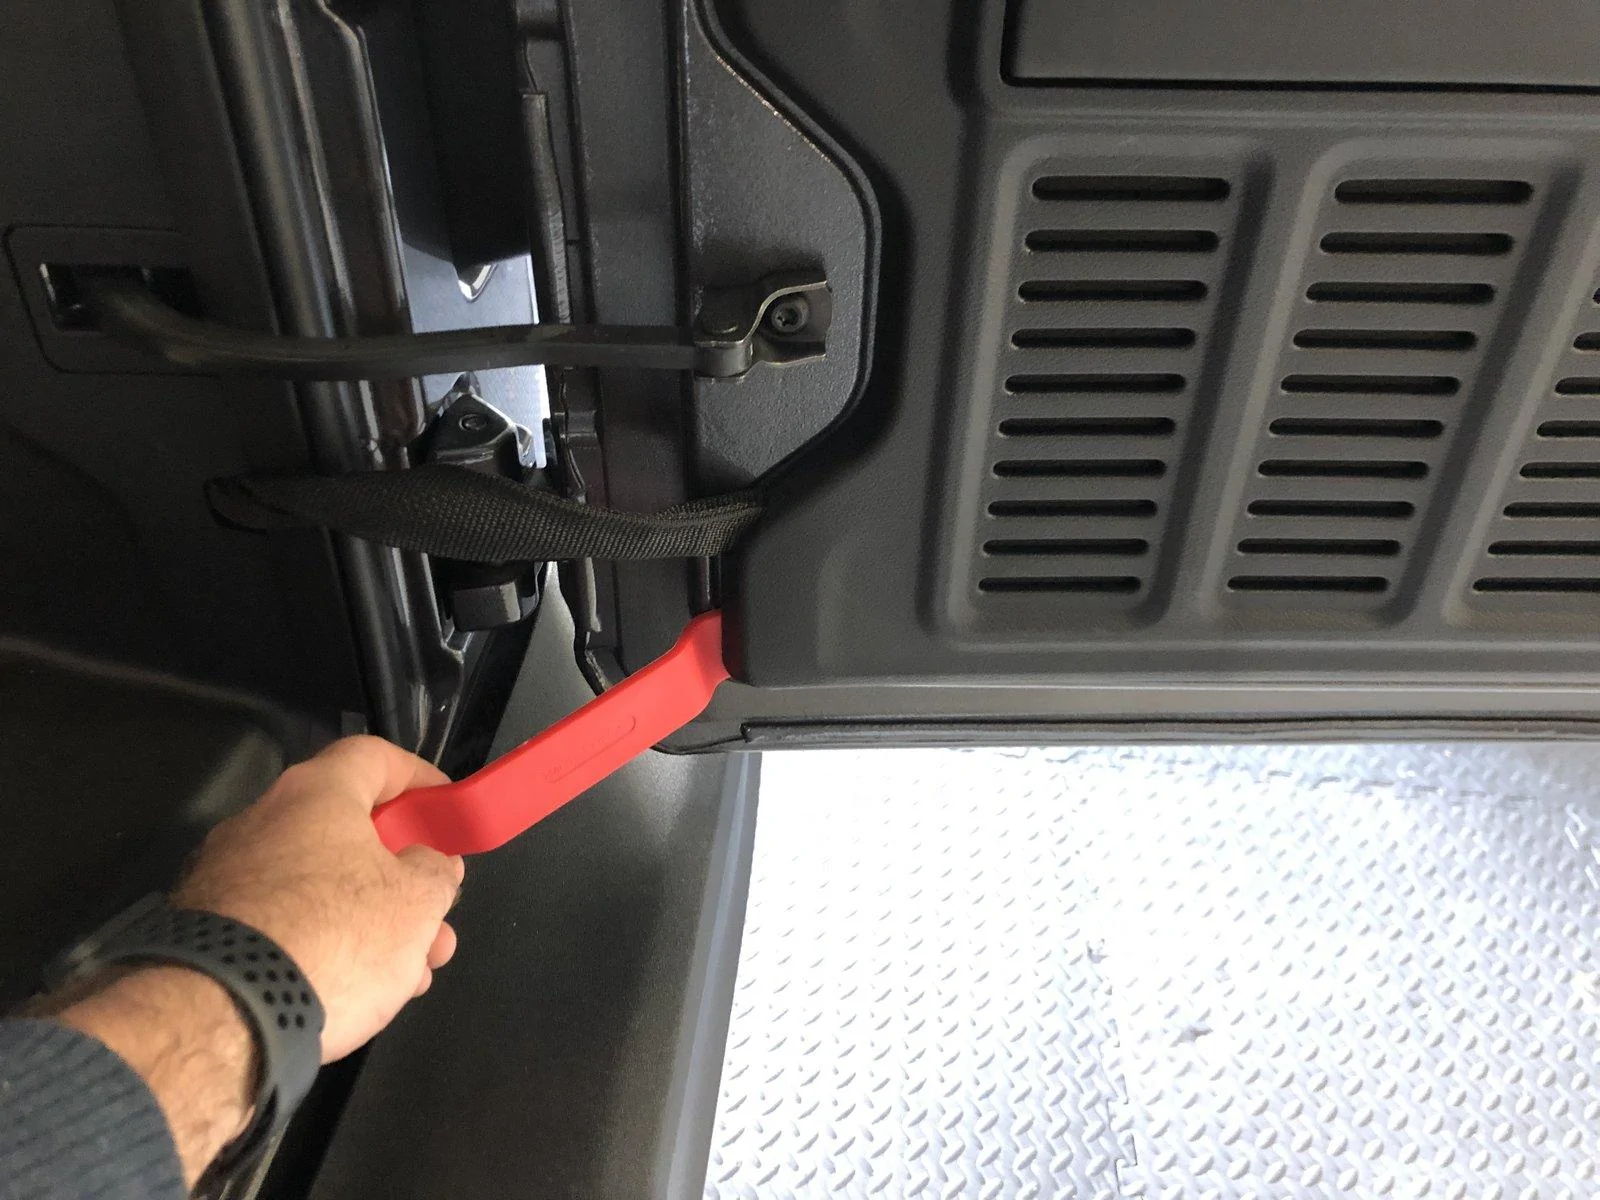
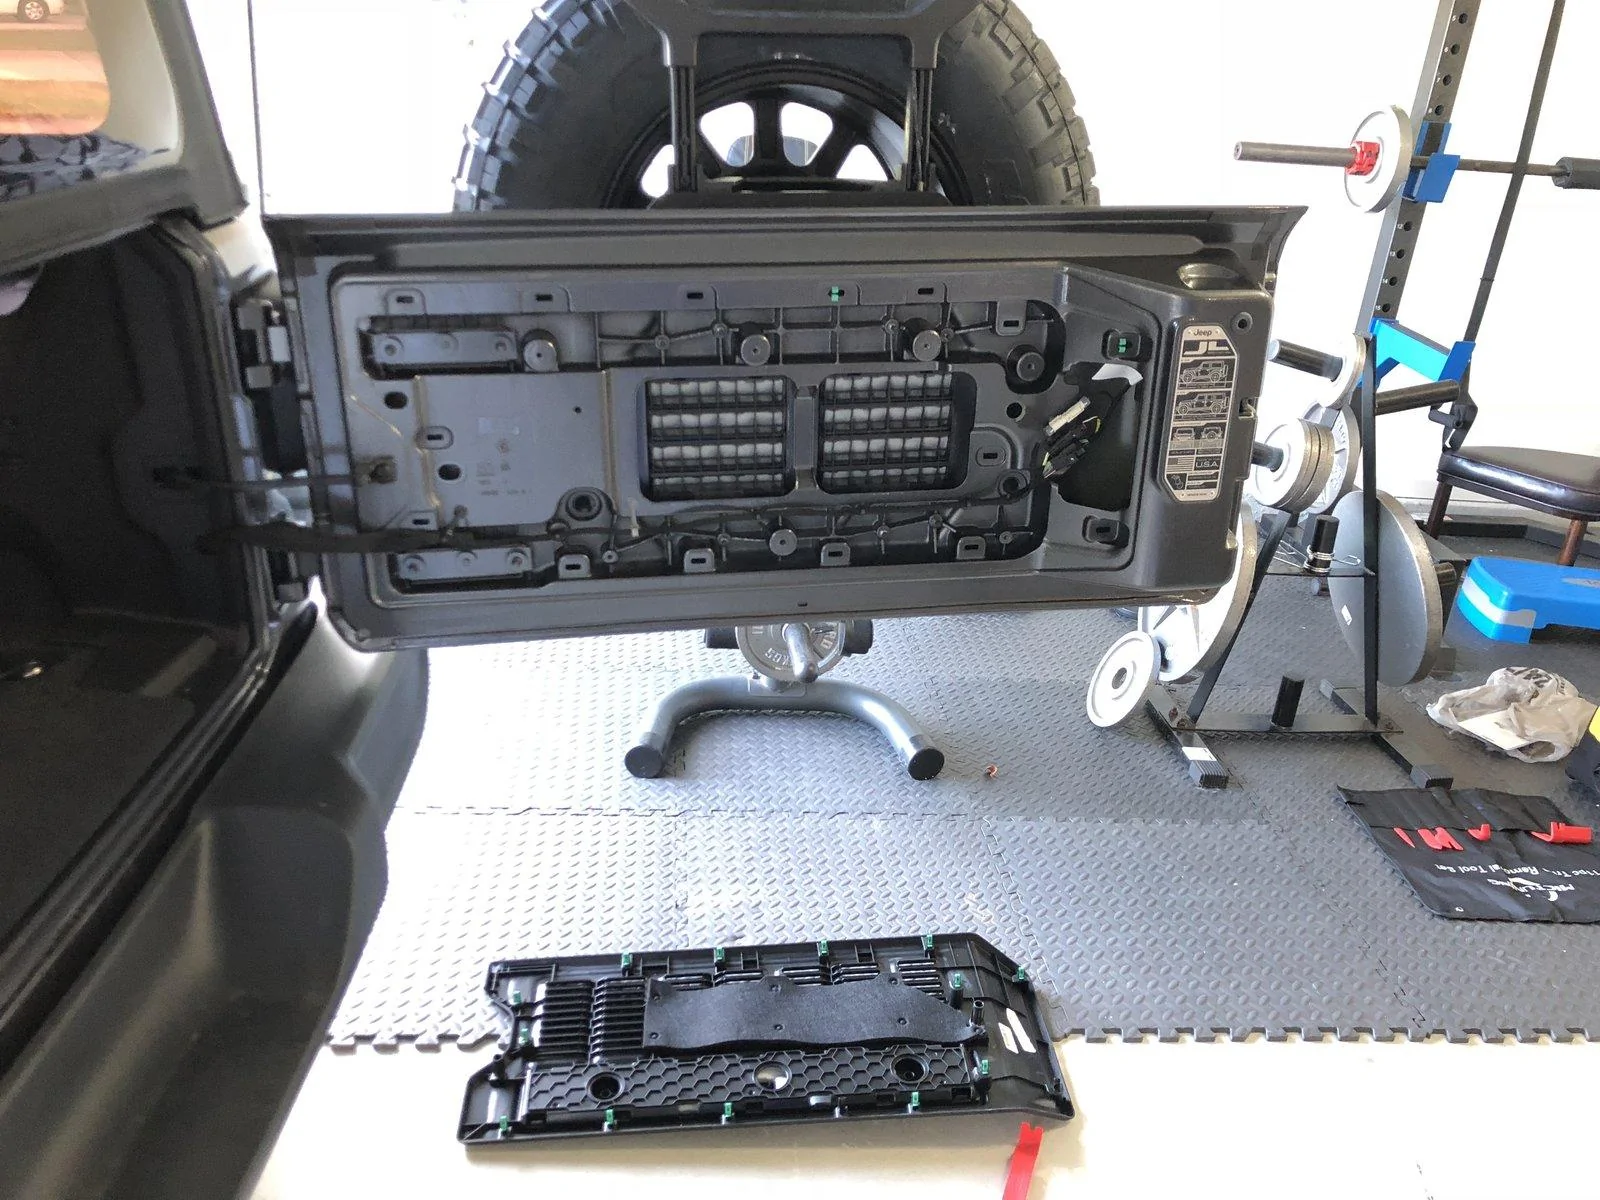
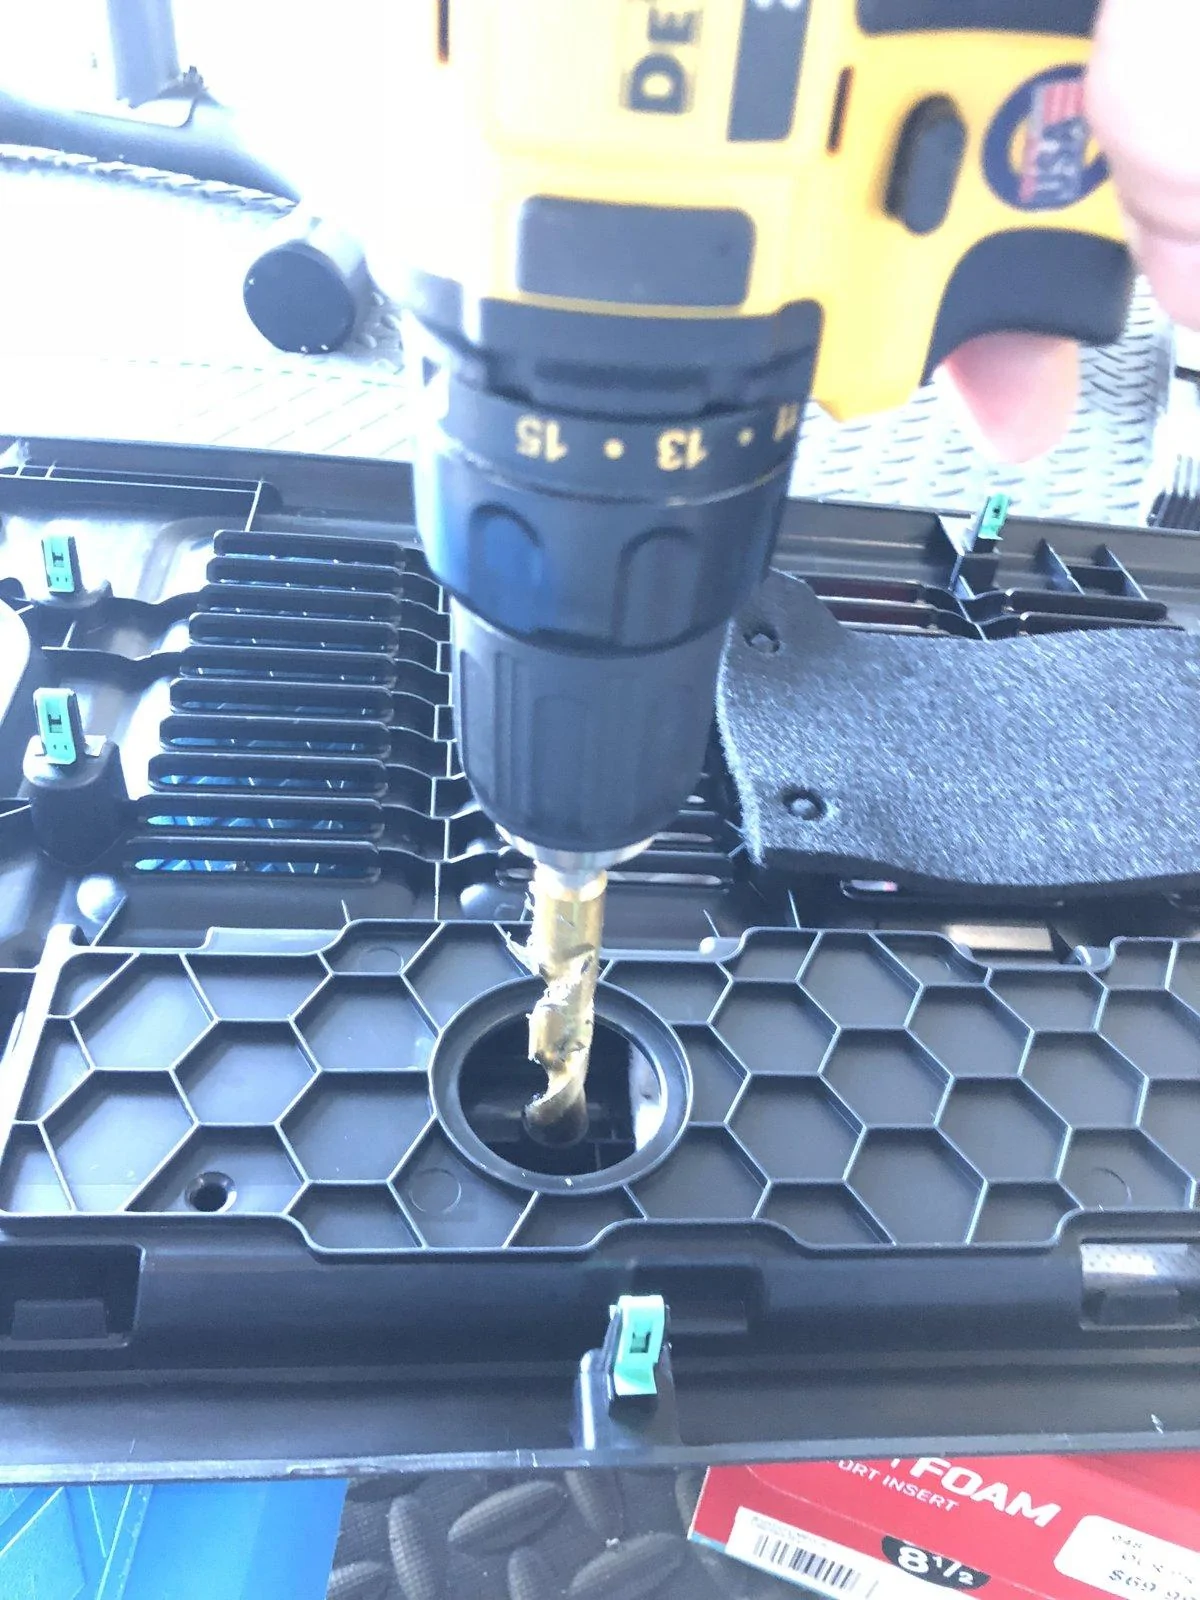
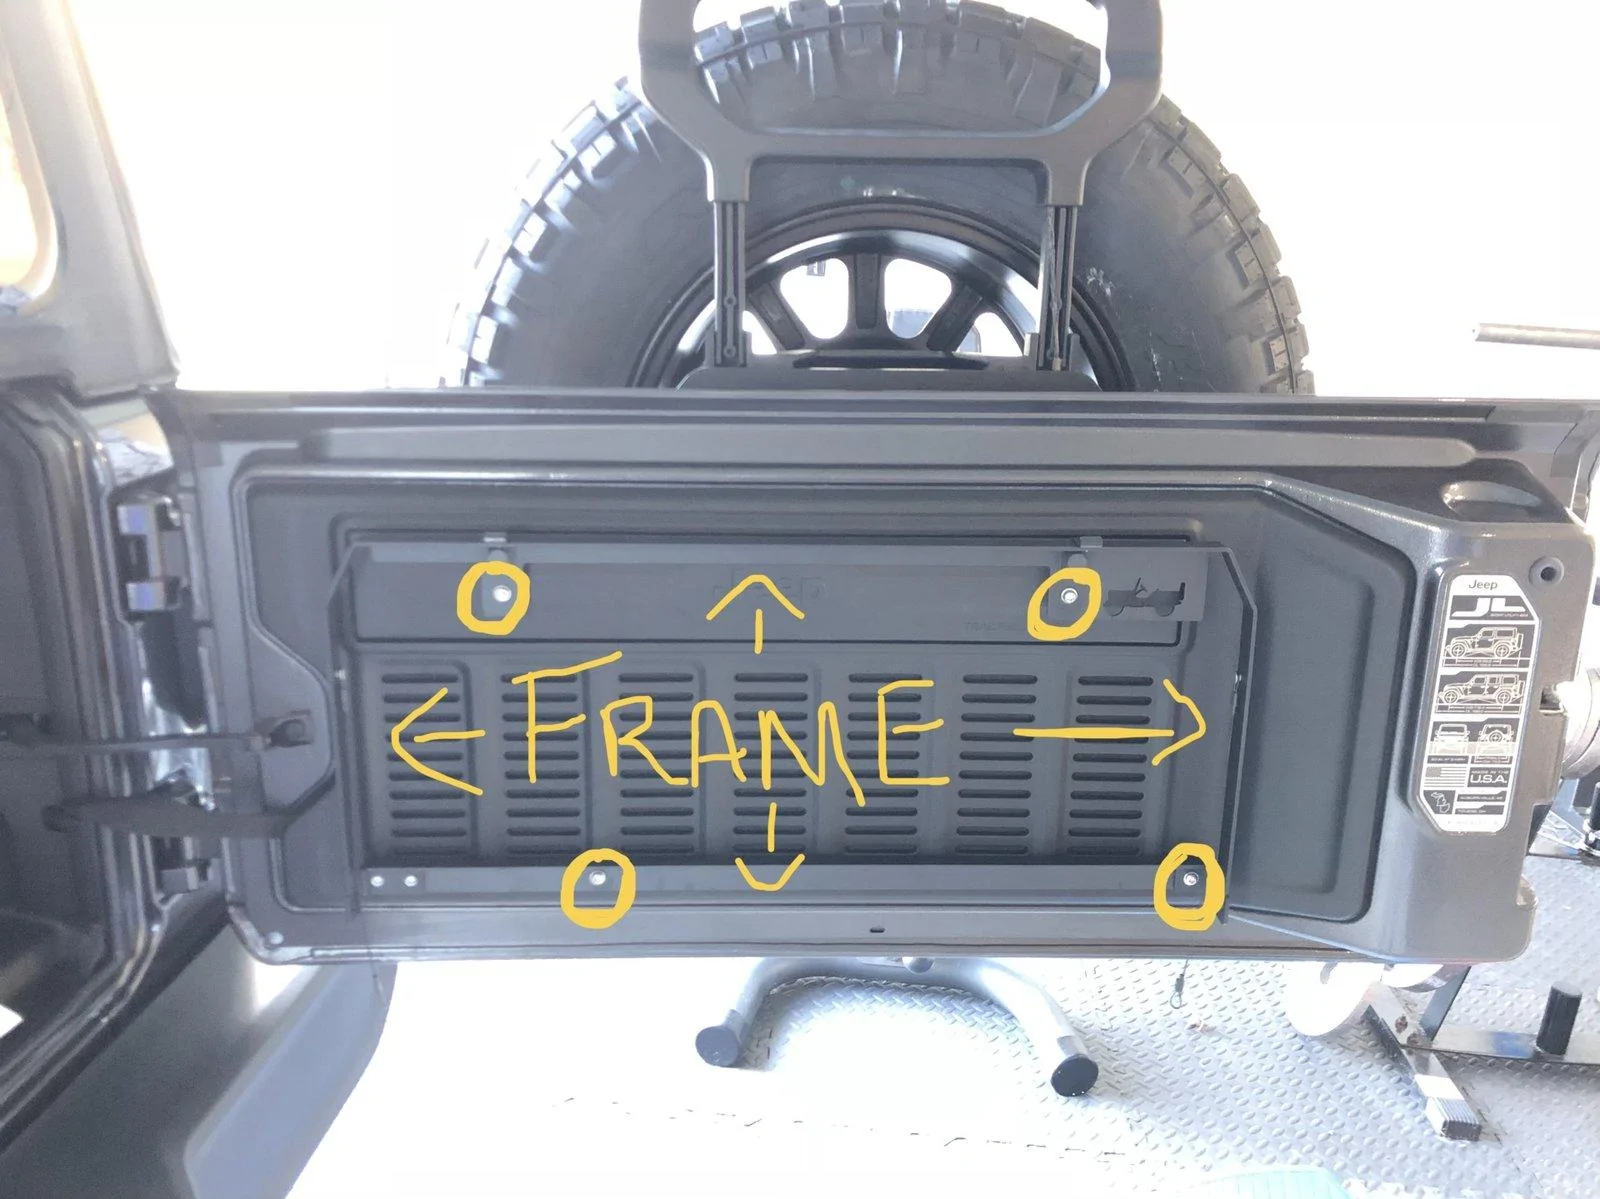
Second, open your tailgate, grab your trim removal tool and start by removing your tailgates trim piece in the bottom LEFT hand corner as shown:
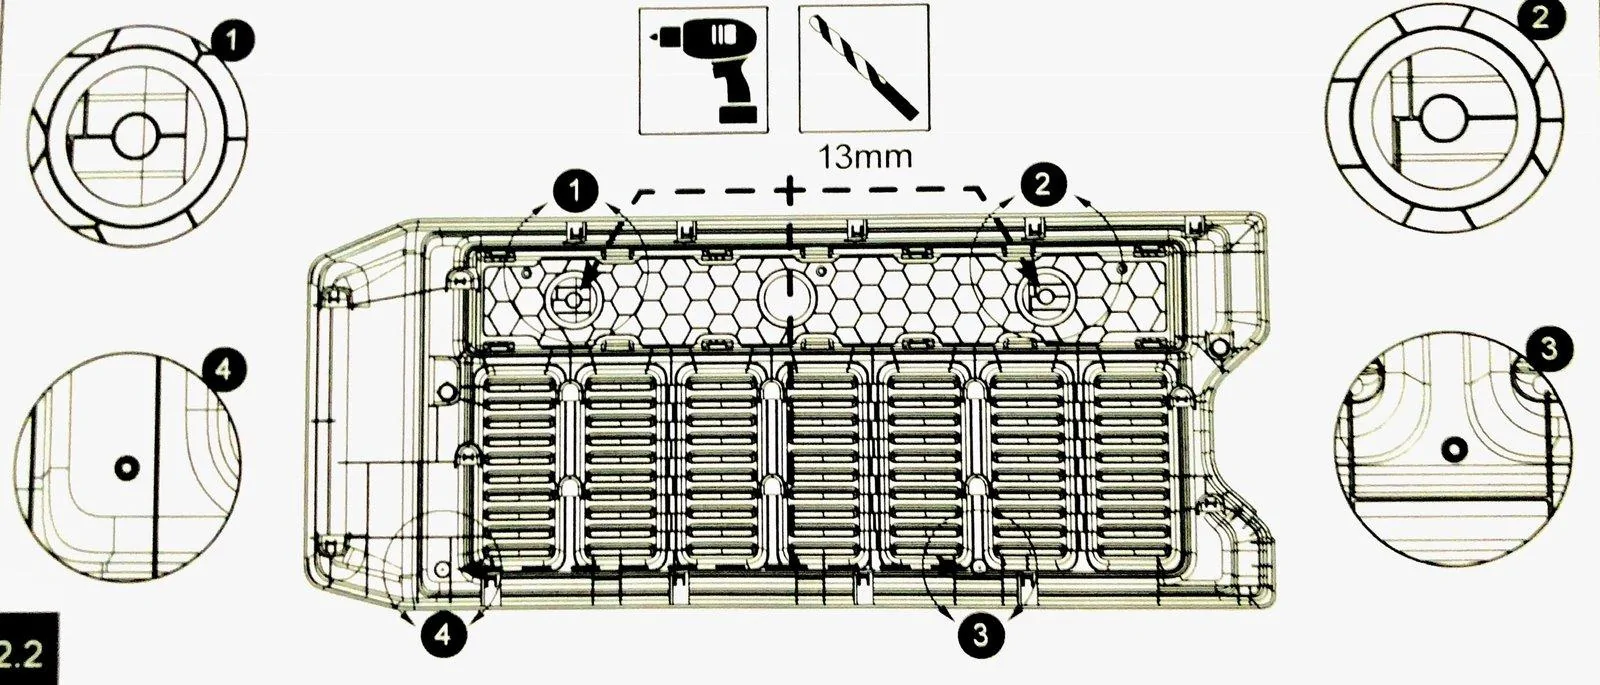
Once the trim piece is removed, take your trim piece and lay it on a shoe box/box/step with the trim piece facing down as you will be drilling from the back side.
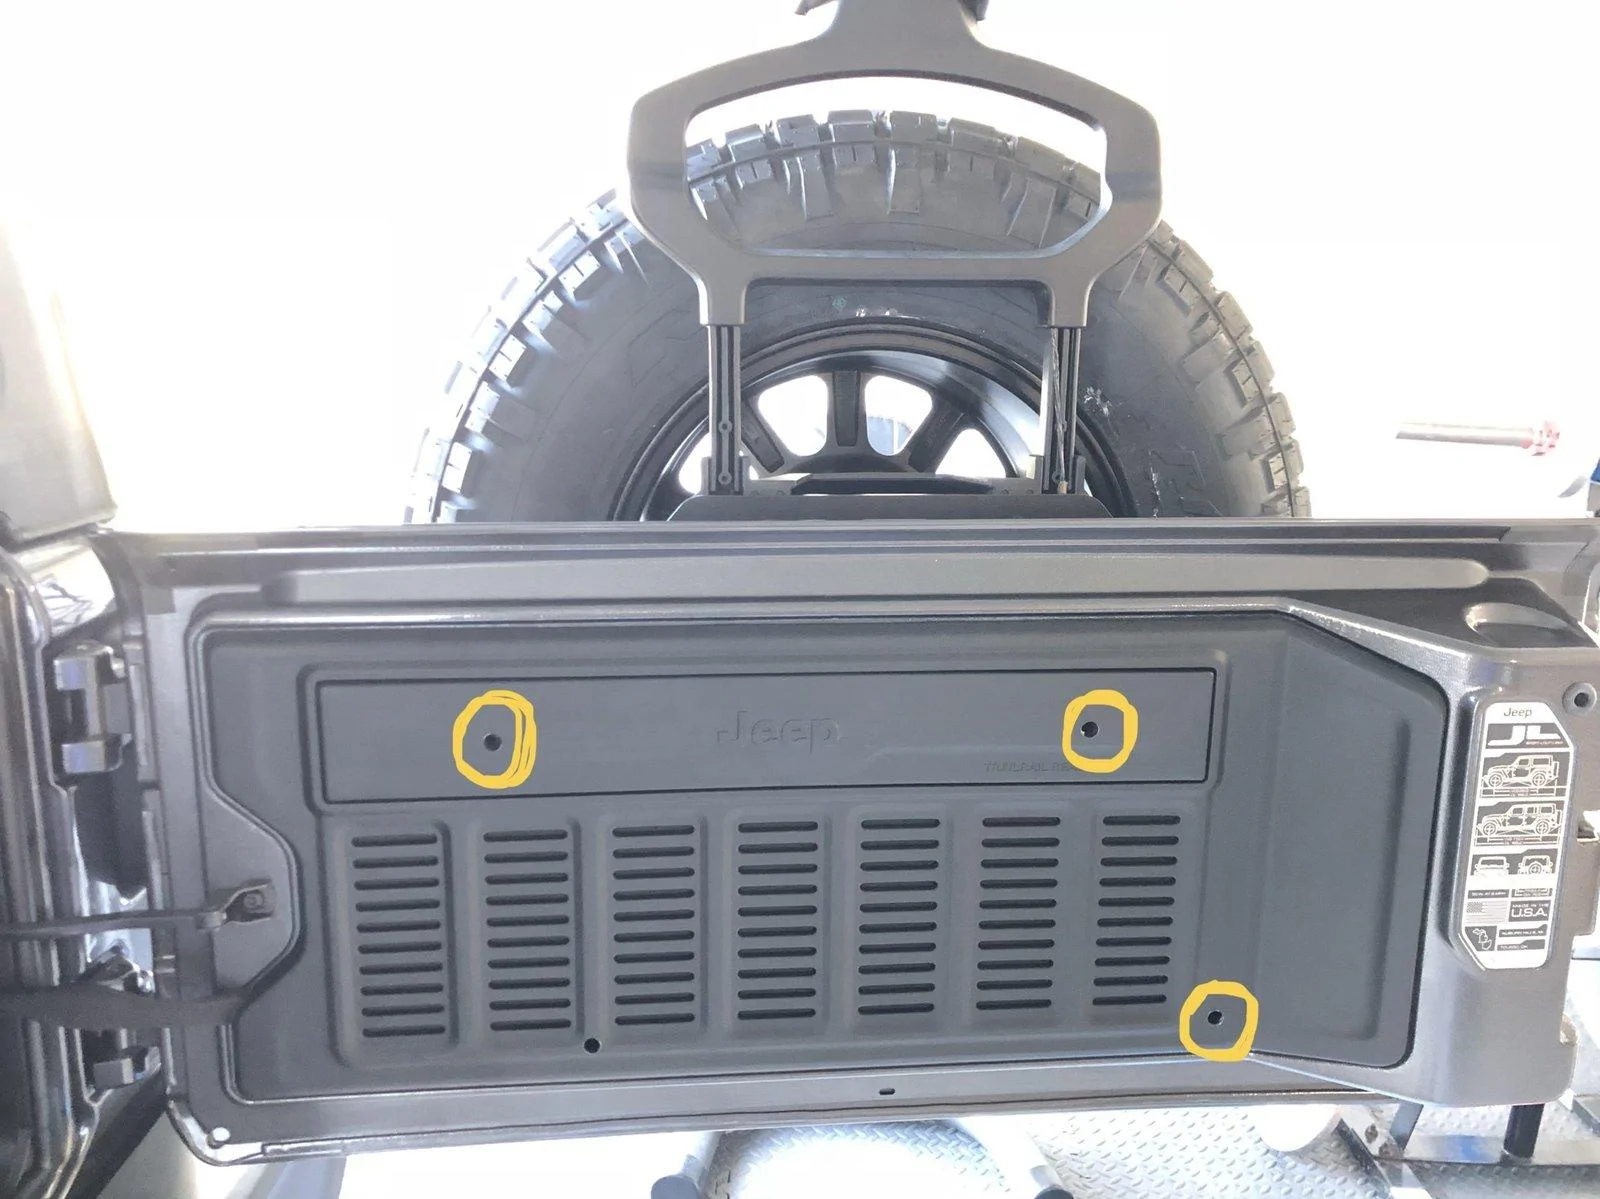
There are (2) factory indented spots which are your drilling points for the bottom (2) holes. The other (2) drilling points for the top are large circles with hollow studs in the middle.


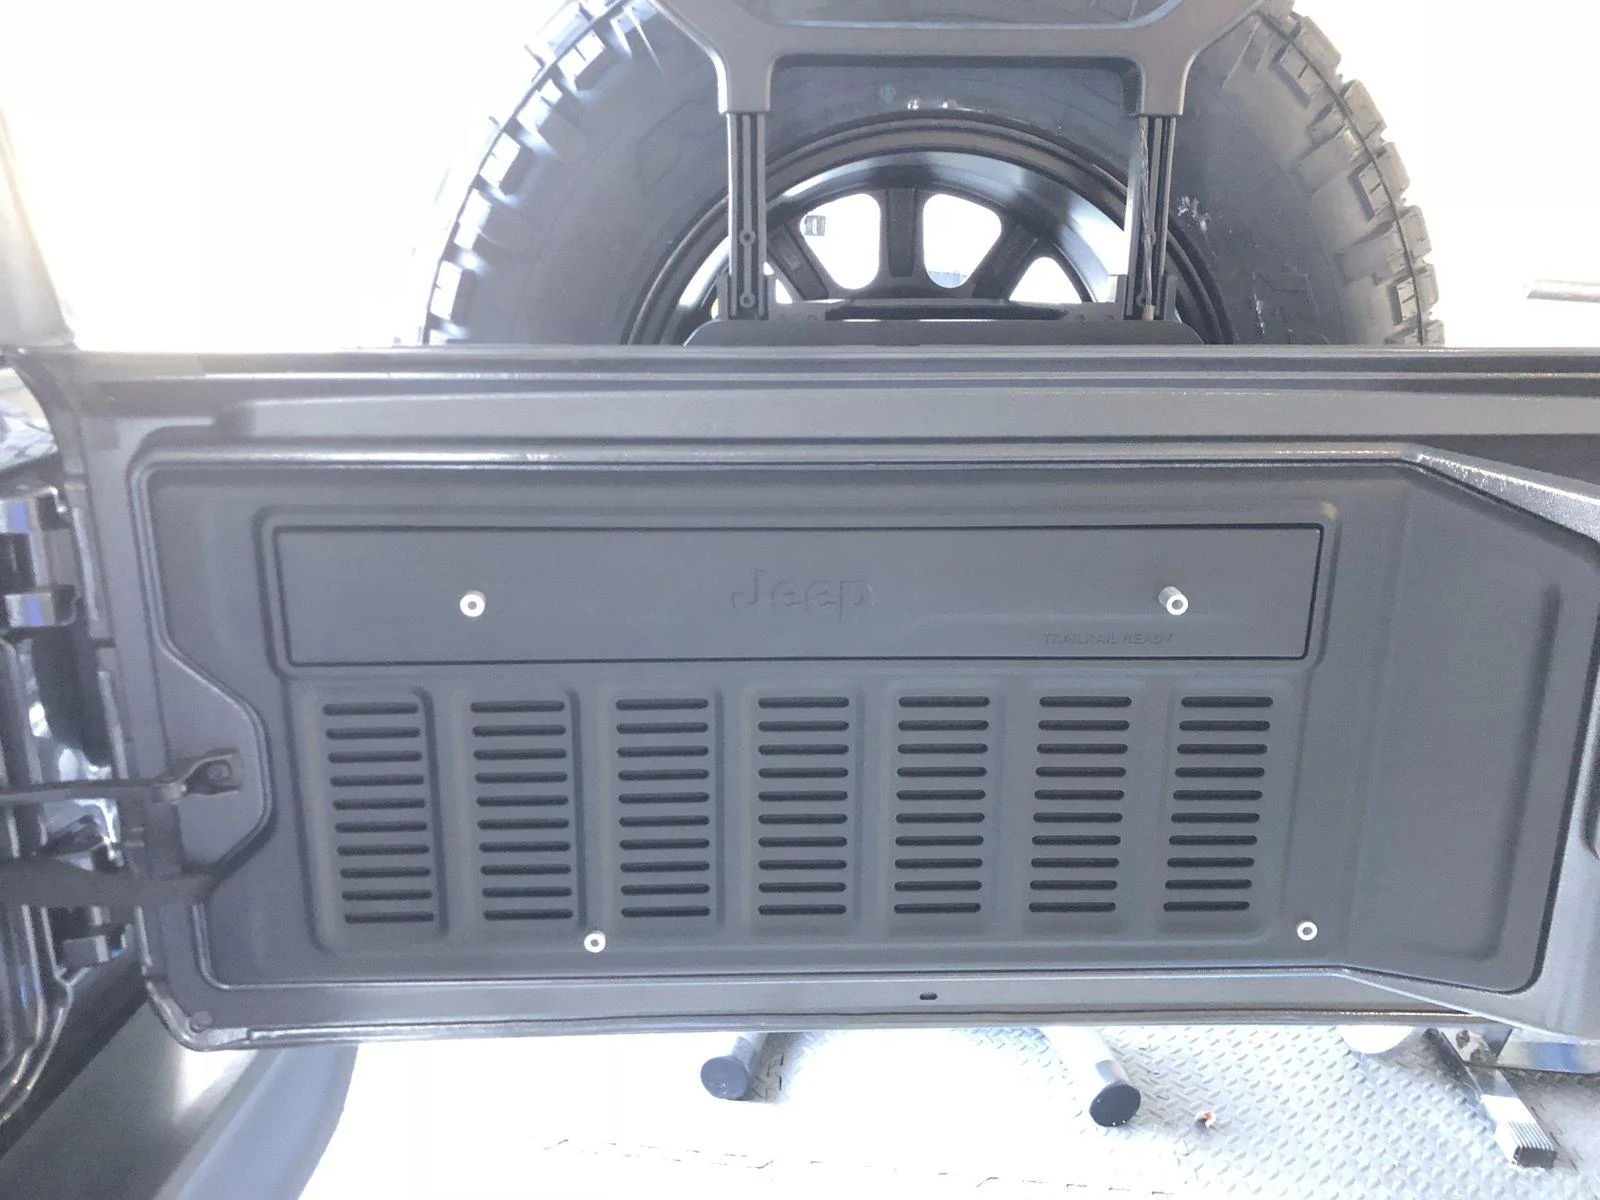
Next reinstall the tailgate trim piece:
Next you will grab your x3 Short Aluminum Spacers and push them into the holes shown below:
(NOTE: They will be hard to get into the freshly drilled holes. Also, they do not go all the way in and will go in different depth for all spacers, that is normal.)
Next grab your x1 Long Aluminum Spacer and push it into the hole shown below:
Should look like this at this point:
Next you will need the following tool and provided hardware:
T-30 Torx Bit
x4 Long Screws (T-30 Torx Heads)
x4 Lock Washers
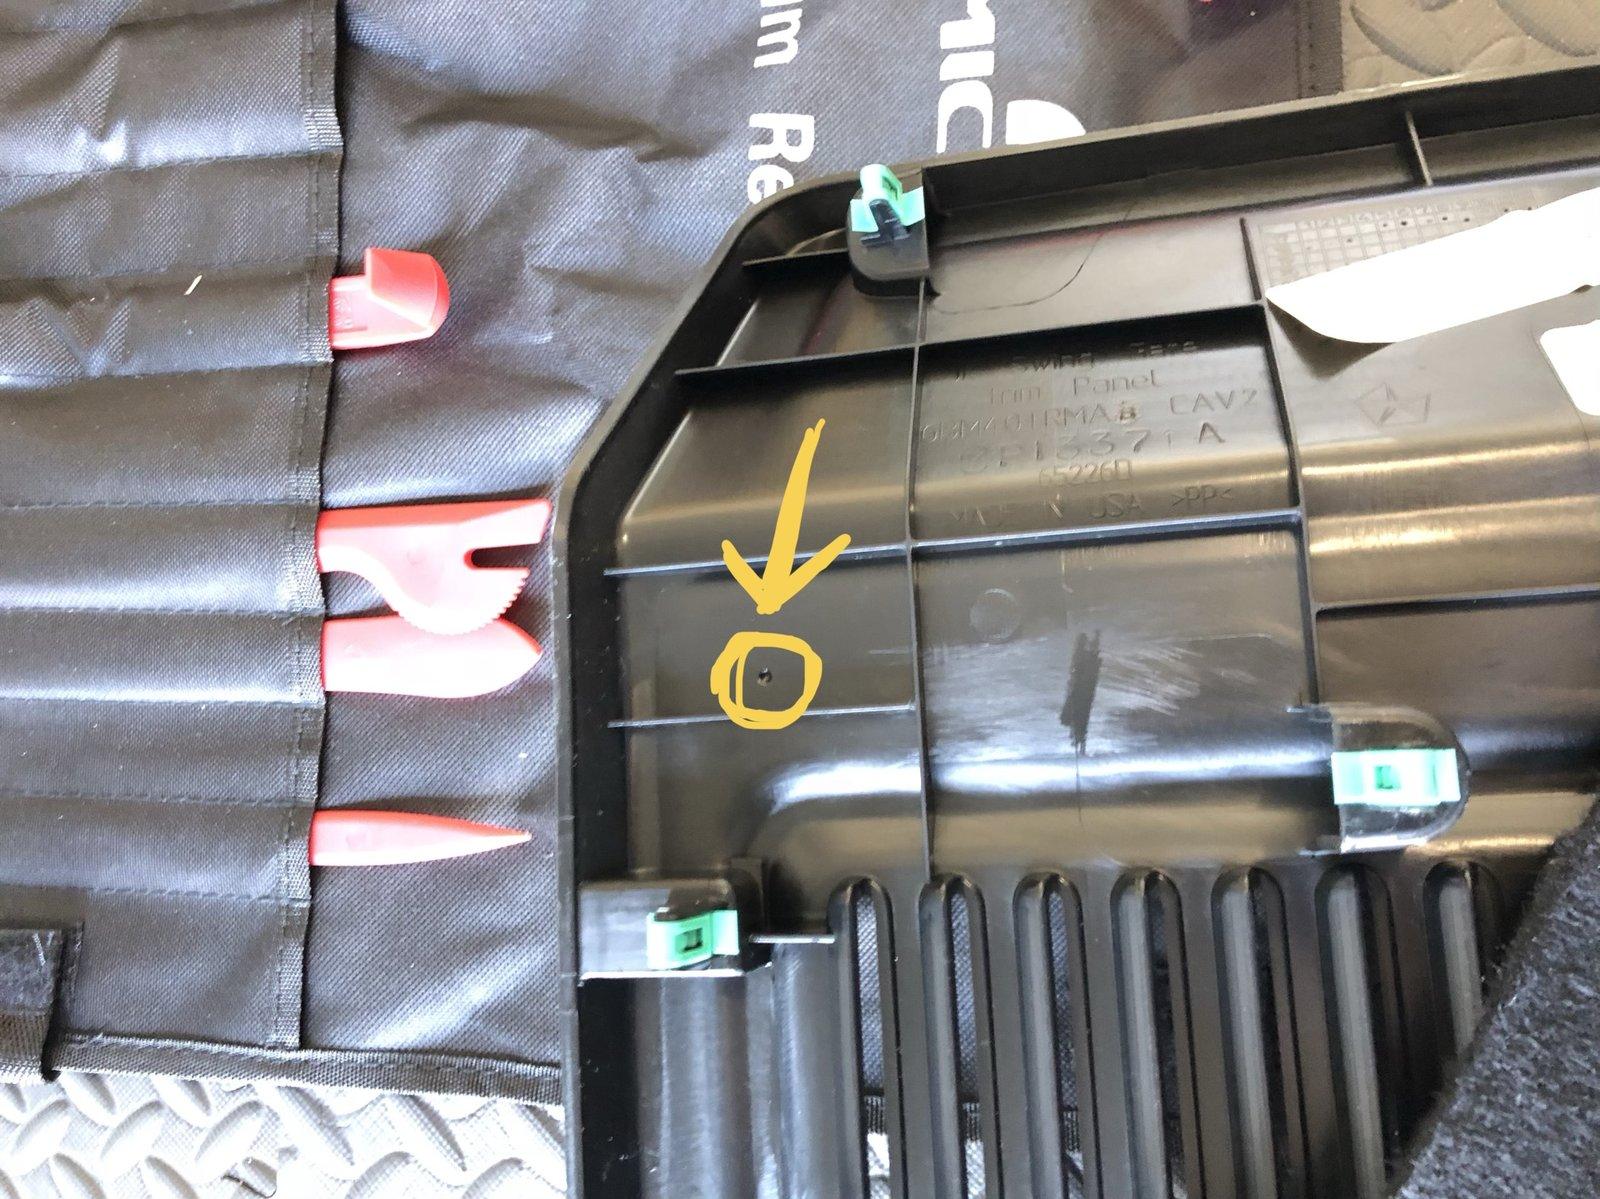
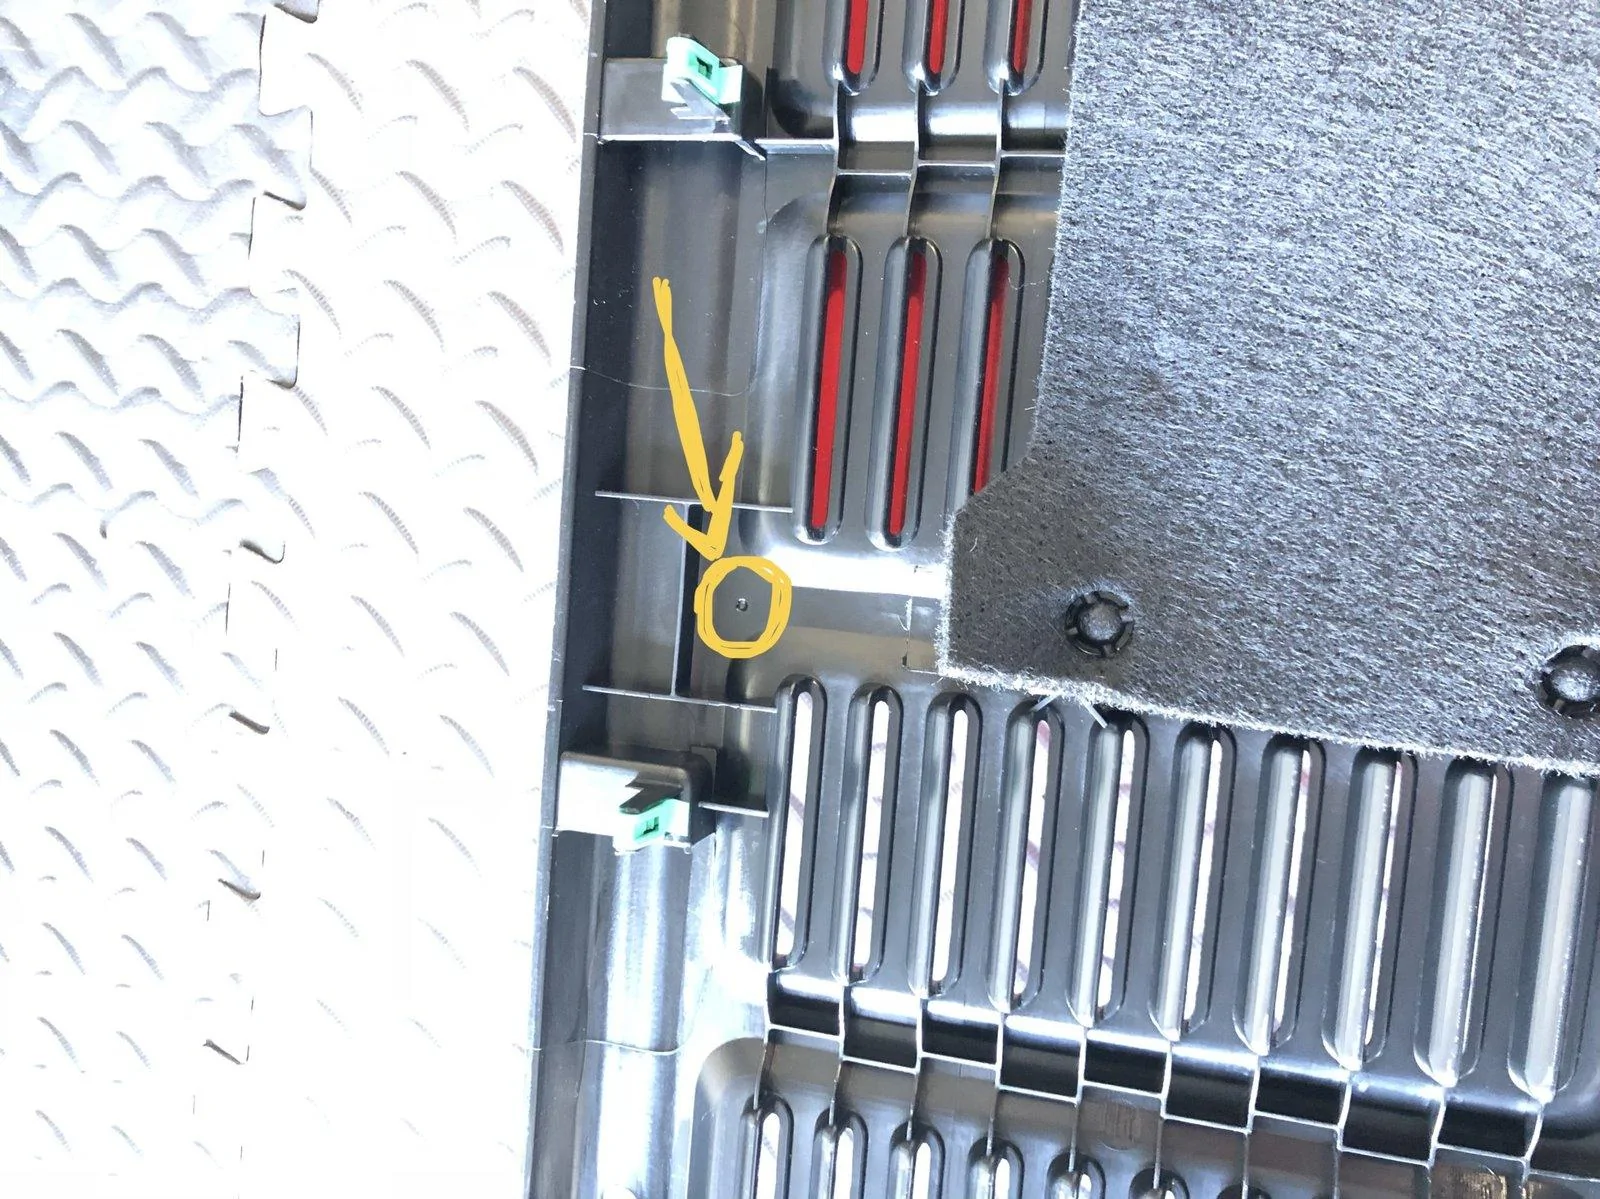
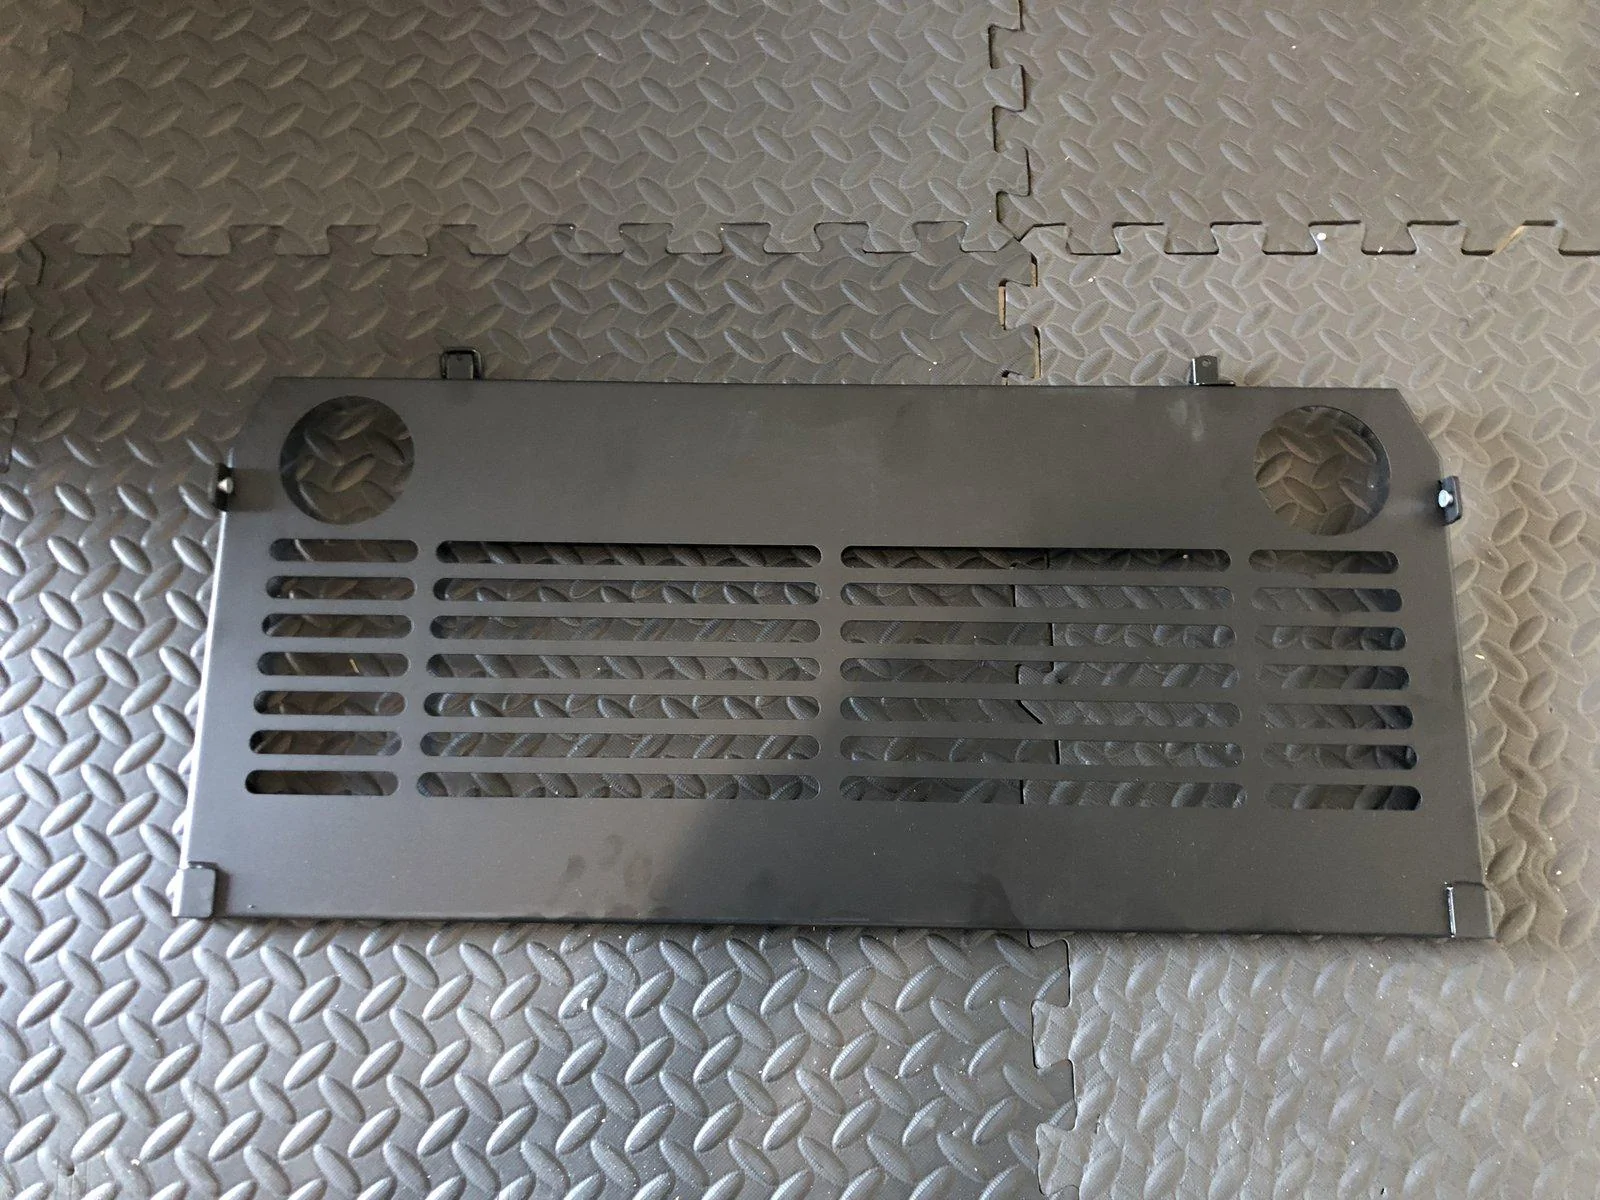
Grab your frame piece (the piece that has the Jeep cut out on it) ensure that the Jeep cut out is upright and in the upper right hand corner when holding the frame up to your tailgate trim piece.
Hold the frame piece up with one hand and align it with the holes you drilled. Then begin to start threading your screws into the circled locations shown below.
Tighten screws down using your T-30 Torx Bit.
Next you will need the shelf piece and the following tool and provided hardware:
T-30 Torx Bit
10mm Wrench
x2 Short Screws
x2 Small Plastic Spacers
x2 Nuts
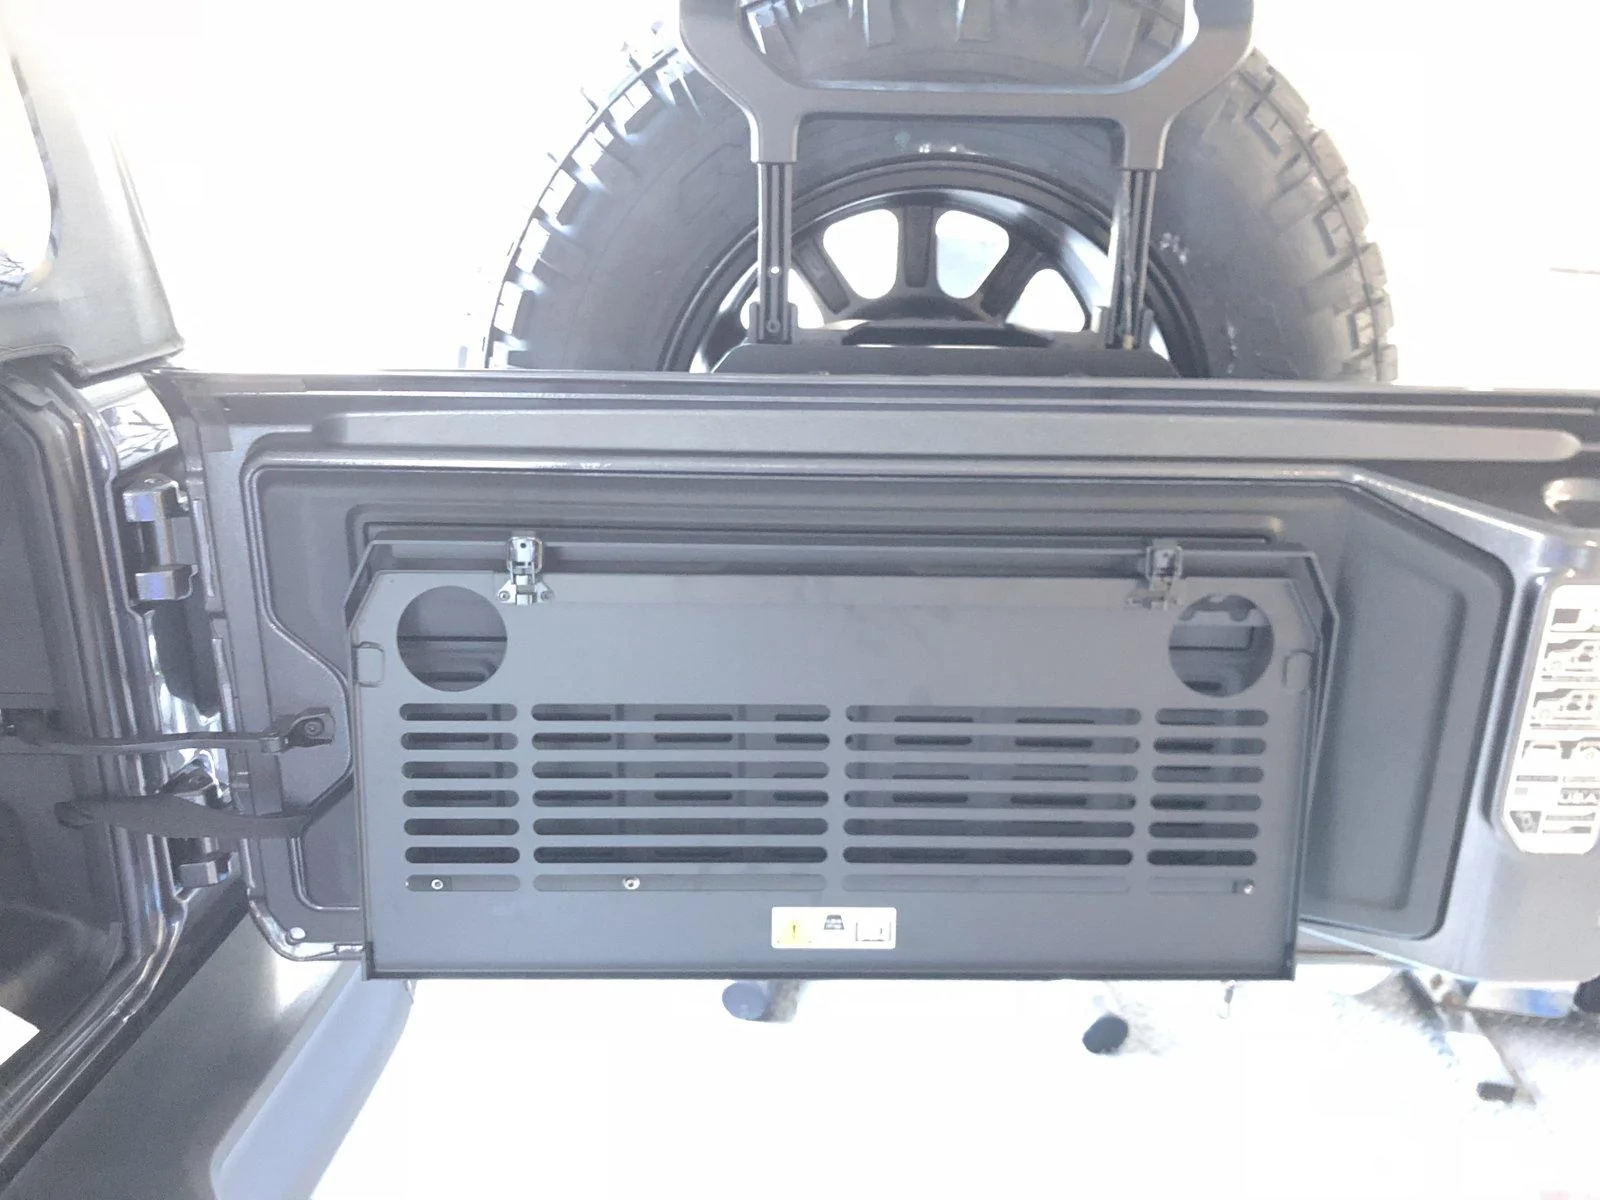
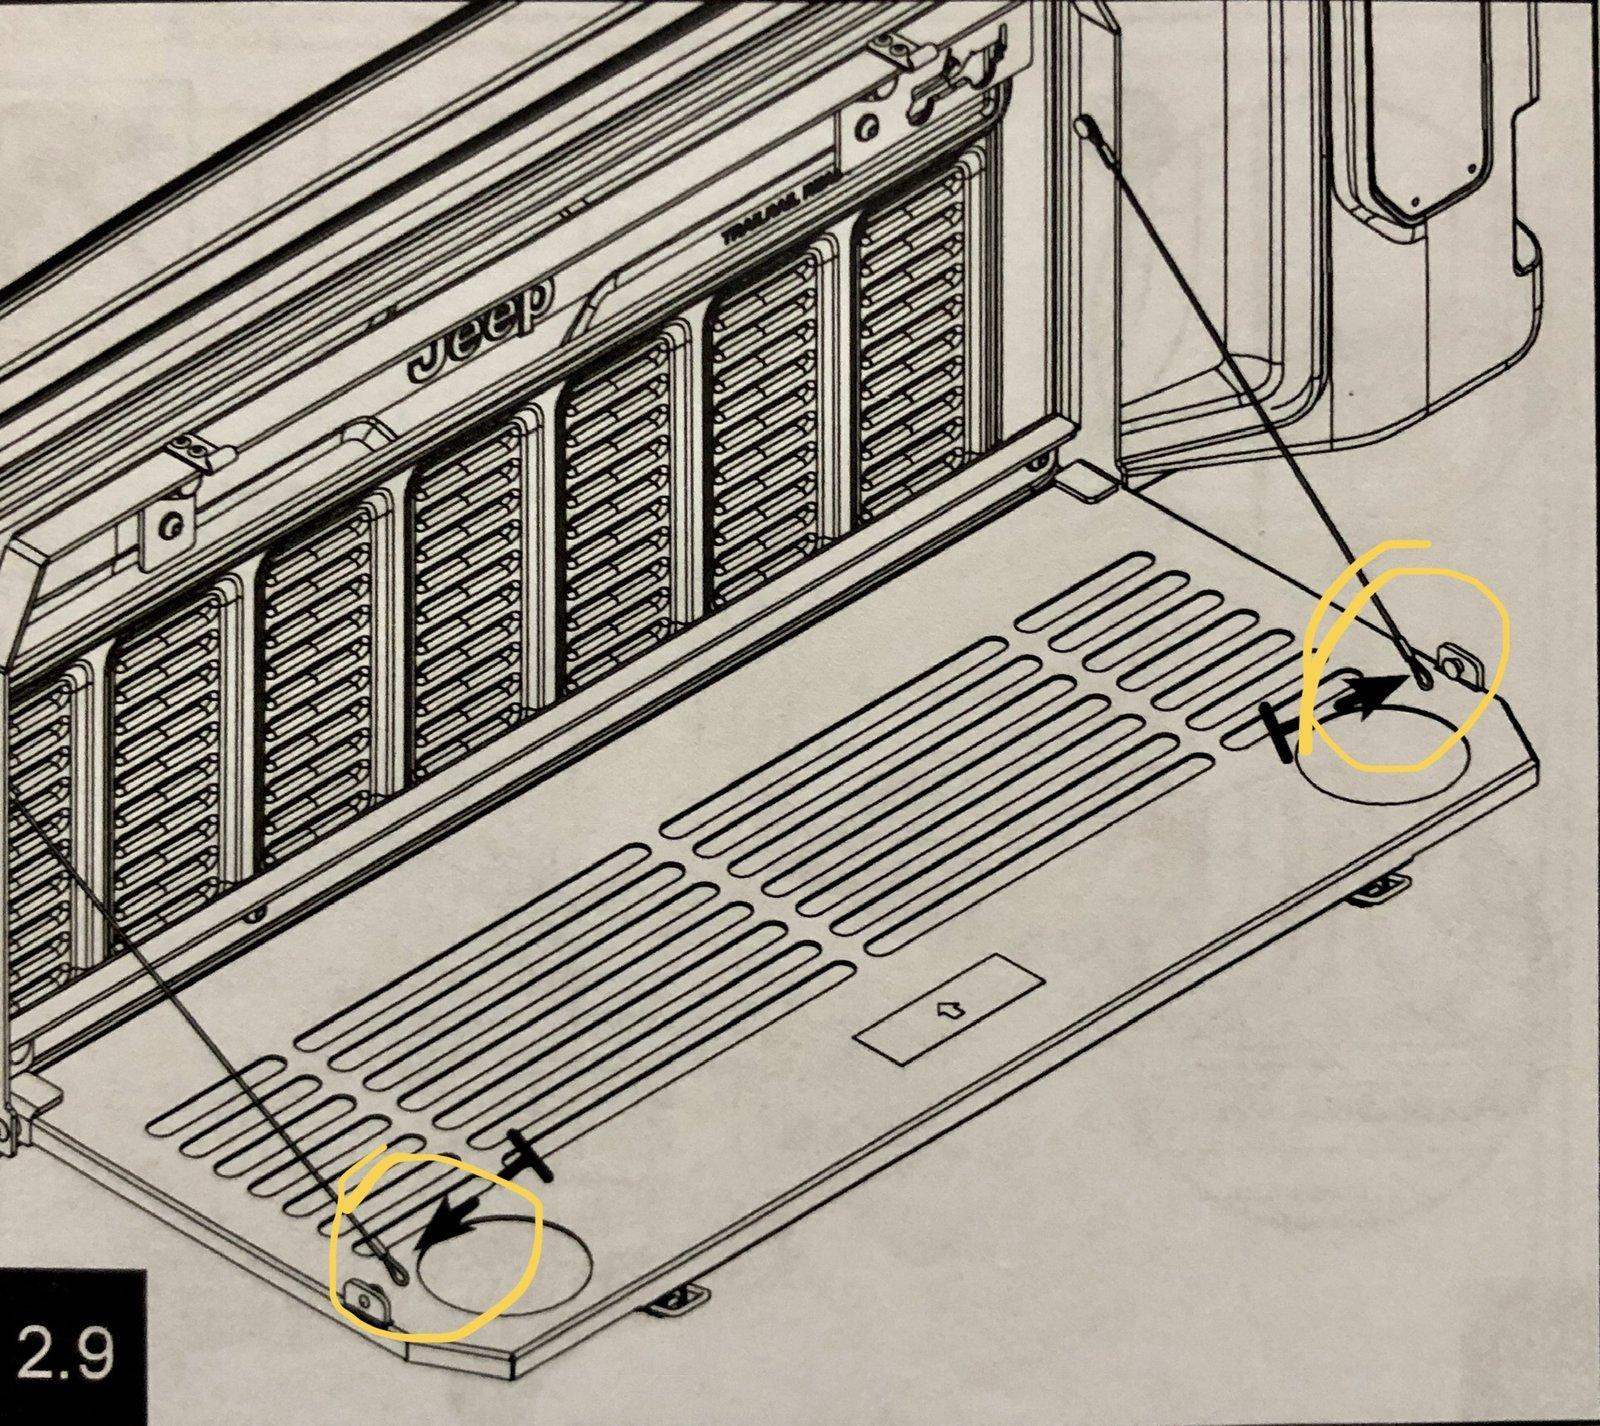
Shelf Piece:
Using the latch points hang the shelf on the frame. (It will just dangle there as the bottom is not attached yet.

Grab your Small Plastic Spacer and place it in between the frame piece and shelf piece and push your small screw inboard and thread your nut until finger tight. Do the same for the other side and tighten down (NOT GERMAN TIGHT). As shown below:

Attach your two tethers on the left and right side and your all done!!


Hey guys, im going to install this today. I noticed the instructions call for a 13mm drill bit - but this post says that a 1/2" bit works. Can anybody confirm that before I drill out?
Cheers guys!
jeepdriver99
Well-Known Member
- First Name
- JD
- Joined
- Jan 27, 2018
- Threads
- 6
- Messages
- 256
- Reaction score
- 341
- Location
- Central Ohio
- Vehicle(s)
- 18 JLR 2 Door, 21 JLU TD, 06 GC, 54 Willys SW
- Occupation
- Retired, W8BWD
There are 25.4 mm in an inch so a 1/2 inch is 12.7 mm. So the short answer is yes, a 13mm is the same as 1/2 inch. You'll also notice that with wrenches where a 13 will fit a 1/2 in bolt head and the other way around.Hey guys, im going to install this today. I noticed the instructions call for a 13mm drill bit - but this post says that a 1/2" bit works. Can anybody confirm that before I drill out?
Cheers guys!
Sponsored
Similar threads
- Replies
- 6
- Views
- 4,077