Sponsored

Locker Position Sensor Potting - DANA 44

Gorilla57

Well-Known Member
Joined
Jan 3, 2019
Threads
11
Messages
974
Reaction score
1,394
Location
Chandler AZ
Vehicle(s)
2019 JLUR Mojito
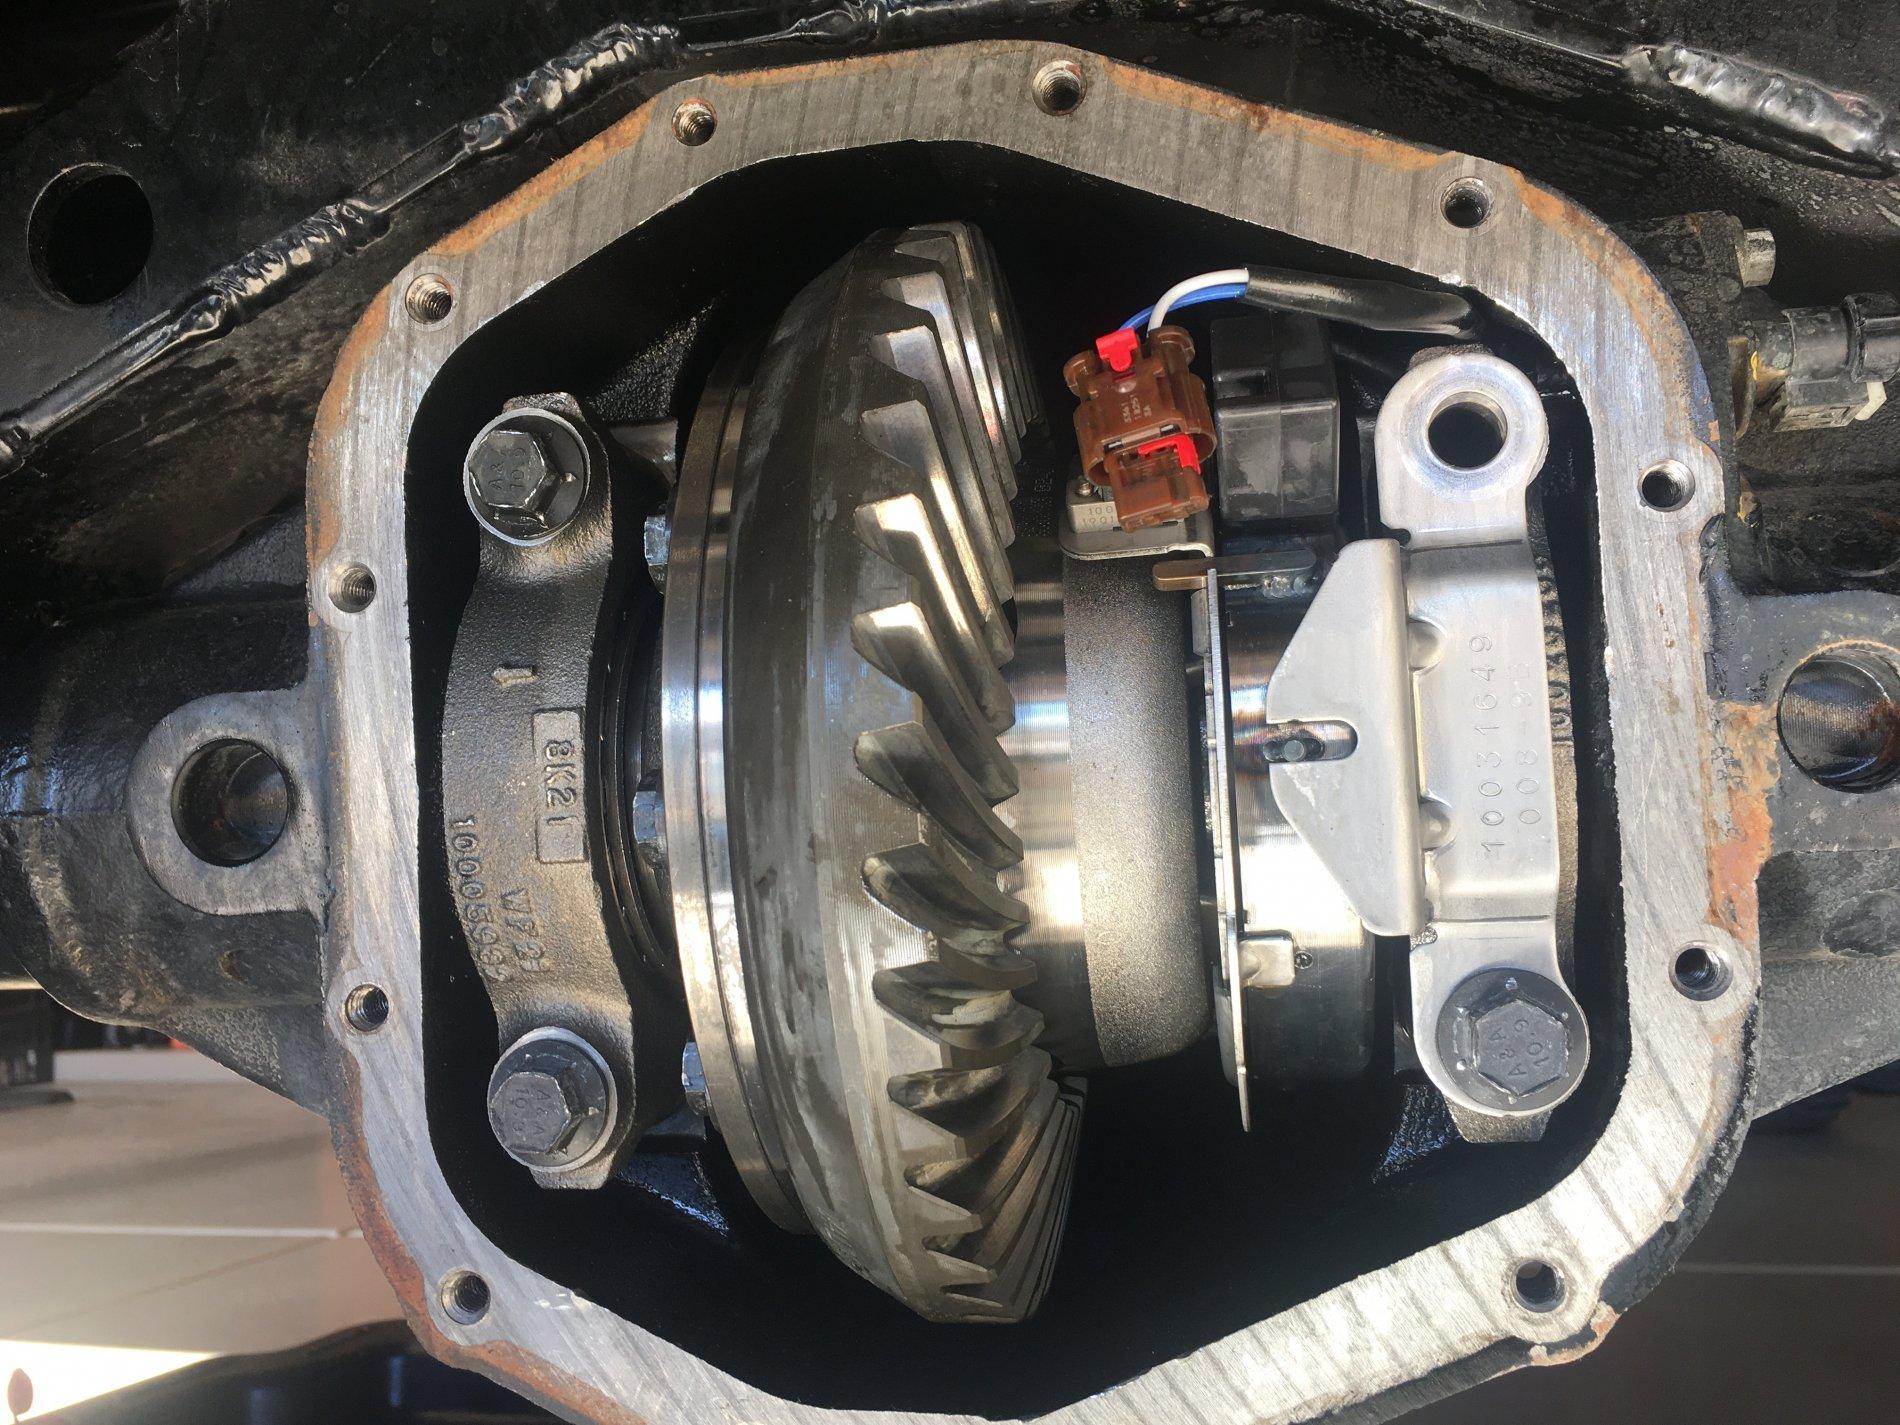
Getting ready to tackle this soon, but am I reading the torque specs right???

Bearing cap bolts:
Front 80ft/lb
Rear 48ft/lb

Why such a big difference?
Sponsored

 
OP
OP
chevymitchell

chevymitchell

Well-Known Member
First Name
Shawn
Joined
Feb 18, 2018
Threads
94
Messages
4,269
Reaction score
10,231
Location
K-ville, NC
Vehicle(s)
2019 JLUR (Pain Train), 2022 2500 AT4
Occupation
Avi Engineer

Moto_21

Well-Known Member
First Name
Erik
Joined
Jul 18, 2018
Threads
39
Messages
2,526
Reaction score
5,692
Location
Corona
Vehicle(s)
2018 JLU Sport
Occupation
Maintenance
Vehicle Showcase
1
Good evening everyone.

I took the time today to run through the potting of my locker sensors. This seems to be a very frustrating point of failure for all of us. I have experienced it myself.

Here are the DIY steps you can follow to properly pot the sensors.

**Keep in mind the amount of time required for the potting material to cure. Tacky at 3-5 hours. 24 hour full cure. Best to do both sensors at the same time when you can wait, at least, overnight.

Also, please understand that this is a temporary fix to an issue we all hope FCA is going to remedy. Hopefully there is, at a minimum, a part number for this sensor we can order through Dealers and Distributors**

Jeep JL TQ Specs: https://www.jlwranglerforums.com/complete-torque-values-for-jeep-jl-wrangler/

Tools Required:
  • 1/4" Ratchet
  • 1/4" Drive T20 Bit
  • 3/8" Drive Ratchet
  • 3/8" Drive 10mm
  • 1/2" Drive Ratchet
  • 1/2" Drive 15mm
  • Drill
  • 3/32" Drill Bit
  • Flathead Screwdriver
  • Drain Pan
Parts Required:

These steps are the same for the Front and Rear Axles.
  • Using a 3/8" Drive ratchet, drain the diff fluid into your drain pan. Wait for the diff to finish draining. Clean the drain plug and apply teflon tape to the threads. Reinstall at this time.
1602464714957.png

  • Using a 10mm socket, remove the diff cover bolts.
1602464775652.png

  • Using a flathead (or finger tips), remove diff cover.
  • Remove the reusable diff gasket.
  • Using a 15mm socket, remove the R/H side Cap Bolts.
  • Remove Cap Bolts with alignment plate. Keep the bolts with the plate so they go back in the same spots they came out of.
1602464845373.png

  • Using a T20 bit, remove the screw holding the Locker Sensor in place.
1602464888664.png

  • Using a flathead (or fingers), disengage connector safety clip.
  • Remove Connector and Sensor.
1602464919467.png

  • Wipe sensor off using a shop towel or microfiber cloth.
  • Mark sensor as shown in the picture with a sharpe.
1602464965968.png

  • Using a 3/32" drill bit, drill 3 holes as shown in the pictures. Be VERY careful with this step as the PCB (Circuit Board) is located very close to the clear cap on the sensor. Drill at a very low speed, with light pressure. We need 3 holes for this work properly. One is used to inject potting compound into the top side of the PCB, one for the bottom side of the PCB, and one to let air escape as we are injecting potting compound. Without an air escape, there will be air pockets and this whole thing will be for nothing.
1602465011481.png


1602465033444.png

  • Inject potting compound as shown in the video. Once you inject the compound in the bottom hole, you will notice the air being pushed out first and then a rush of compound will come out when it's full.

  • Once the sensor is full, wipe the top side off with a shop towel.
  • Apply electrical tape over the two holes and set the sensor down on its top.
1602465448118.png


  • Wipe off any excess potting compound and fill the void in the back of the sensor with more compound. Let sit for 3-5 hours. Once tacky, clean the sensor using Acetone so there isn't any left over potting material on the outside of the sensor once fully cured.
1602465505989.png

  • Once cleaned, let sit for 24 hours. (At least 12 hours before reinstallation.)
1602465561579.png

  • Once cured, install sensor in reverse order. (Use Dielectric Grease on the connector and Loctite on the T20 screw.)
  • Install alignment plate and R/H side Cap Bolts. Be sure to TQ to spec. The TQ specs are different front to rear.
  • Install Diff Cover.
  • Service Diff.
  • Test Locker System.
I think ill do this before i stall the rubi axles on my girlfriends jeep. Good tip and good write up
 

Mud2Sno

Well-Known Member
First Name
Mickey
Joined
Jan 4, 2018
Threads
6
Messages
177
Reaction score
288
Location
California
Vehicle(s)
2018 JLUR Rubicon
just got new front and rear axles on my jeep last week and took it apart this weekend to pot the new sensors before I have trouble again. great write up on instructions!
 

Gorilla57

Well-Known Member
Joined
Jan 3, 2019
Threads
11
Messages
974
Reaction score
1,394
Location
Chandler AZ
Vehicle(s)
2019 JLUR Mojito
Welp, 1/2 way done. Slowest part for me was taking off the Next Venture rear skid. That thing is BEEFY and heavy. Only doing the rear since I’ve got a Z-Auto bypass module that I can use for the front if needed. Plus, if I screw this up, I can swap the front good one to the rear. Mine was still sealed, no diff oil in the sensor.

B3020034-E73E-41C3-B48E-5836AB04E405.jpeg


2D5DC498-71DA-4A24-B08F-E3CE5E855DE4.jpeg
 

Sponsored

SwissSteph

Well-Known Member
First Name
Steph
Joined
Oct 29, 2019
Threads
14
Messages
344
Reaction score
241
Location
Switzerland
Website
www.swissjeepjl.com
Vehicle(s)
JL Wrangler Rubicon - Hella Yella - 2.2 Diesel
Vehicle Showcase
1
A very big thank you for this and all the detailed explanations (and especially the video) for doing it!!!

A question for those who already made the change, I ordered the "832HD Potting Compound" and it was delivered within a few days.

First my rear deck which is still in good shape and then the front one once Jeep will finally decide what to do to repair it (they've been dragging for more than two months).

Once the "832HD Potting Compound" is used, is it easy to clean the bottle/tube, and store the bottle/tube for a second use several weeks later?
Is it necessary to store it in a special environment so that it doesn't dry out or become unusable?
How do I clean the injector so that it can be used a second time?
Is it necessary to store it with a penny without "the injector" (the liquid or the liquid passes, I don't know how to translate it, sorry).

All your advice is welcome so that I can avoid making mistakes. Thank you for your help and advice.
 
OP
OP
chevymitchell

chevymitchell

Well-Known Member
First Name
Shawn
Joined
Feb 18, 2018
Threads
94
Messages
4,269
Reaction score
10,231
Location
K-ville, NC
Vehicle(s)
2019 JLUR (Pain Train), 2022 2500 AT4
Occupation
Avi Engineer
A very big thank you for this and all the detailed explanations (and especially the video) for doing it!!!

A question for those who already made the change, I ordered the "832HD Potting Compound" and it was delivered within a few days.

First my rear deck which is still in good shape and then the front one once Jeep will finally decide what to do to repair it (they've been dragging for more than two months).

Once the "832HD Potting Compound" is used, is it easy to clean the bottle/tube, and store the bottle/tube for a second use several weeks later?
Is it necessary to store it in a special environment so that it doesn't dry out or become unusable?
How do I clean the injector so that it can be used a second time?
Is it necessary to store it with a penny without "the injector" (the liquid or the liquid passes, I don't know how to translate it, sorry).

All your advice is welcome so that I can avoid making mistakes. Thank you for your help and advice.
You're welcome.

The compound will come with a little grey cap that will be used to secure the remaining Part A and B so you can store it. Cool, dry place is best. Storage instructions should be on the container itself.

You can either buy additional nozzles or clean the one it comes with. Cleaning it is pretty simple. You can use Acetone or equivalent. I can't remember the last time I really cleaned the nozzles. I've always just purchased extra.
 

Chocolate Thunder

Well-Known Member
First Name
Jeremy
Joined
Feb 20, 2018
Threads
221
Messages
5,354
Reaction score
10,454
Location
Texas
Vehicle(s)
2019 Wrangler Unlimited Rubicon
Build Thread
Link
@chevymitchell is this something that you’d advise to do preemptively even before sensor failure if the differentials are already open, for example during a gear swap? Both front and rear?
 
Last edited:
OP
OP
chevymitchell

chevymitchell

Well-Known Member
First Name
Shawn
Joined
Feb 18, 2018
Threads
94
Messages
4,269
Reaction score
10,231
Location
K-ville, NC
Vehicle(s)
2019 JLUR (Pain Train), 2022 2500 AT4
Occupation
Avi Engineer
@chevymitchell is this something that you’d advise to do preemptively even before sensor failure if the differentials are already open, for example during a gear swap? Both from by and rear?
Yes, sir, absolutely.

After the sensor fails, potting them will do no good.
 

SwissSteph

Well-Known Member
First Name
Steph
Joined
Oct 29, 2019
Threads
14
Messages
344
Reaction score
241
Location
Switzerland
Website
www.swissjeepjl.com
Vehicle(s)
JL Wrangler Rubicon - Hella Yella - 2.2 Diesel
Vehicle Showcase
1

Sponsored

Chocolate Thunder

Well-Known Member
First Name
Jeremy
Joined
Feb 20, 2018
Threads
221
Messages
5,354
Reaction score
10,454
Location
Texas
Vehicle(s)
2019 Wrangler Unlimited Rubicon
Build Thread
Link
Yes, sir, absolutely.

After the sensor fails, potting them will do no good.
Sooooo, if one had their sensors out but felt more comfortable with this process being performed by someone skilled and experienced rather than an amateur DIY, do you know of anyone that might perform said work for financial remuneration? Hypothetically...
 
OP
OP
chevymitchell

chevymitchell

Well-Known Member
First Name
Shawn
Joined
Feb 18, 2018
Threads
94
Messages
4,269
Reaction score
10,231
Location
K-ville, NC
Vehicle(s)
2019 JLUR (Pain Train), 2022 2500 AT4
Occupation
Avi Engineer
Sooooo, if one had their sensors out but felt more comfortable with this process being performed by someone skilled and experienced rather than an amateur DIY, do you know of anyone that might perform said work for financial remuneration? Hypothetically...
Haha, yes. If you don't have anyone local, you're welcome to ship yours to me.

You pay for shipping to and from and I'll do them, that's no problem. I would just need to order some more potting compound. I have nozzles, but I'm out of the compound. PM me if this is something you'd like to do.
 

oceanblue2019

Well-Known Member
First Name
John
Joined
Apr 13, 2019
Threads
18
Messages
3,099
Reaction score
4,760
Location
Maryland
Vehicle(s)
2019 JLUR 2.0L Auto
Occupation
Metrology
Just remember these modules are irreplaceable so if they get lost in the mail you got an interesting problem on your hands to get it sorted out.....

Then again our mail is probably safe now that the election has passed :(
 

Chocolate Thunder

Well-Known Member
First Name
Jeremy
Joined
Feb 20, 2018
Threads
221
Messages
5,354
Reaction score
10,454
Location
Texas
Vehicle(s)
2019 Wrangler Unlimited Rubicon
Build Thread
Link
Haha, yes. If you don't have anyone local, you're welcome to ship yours to me.

You pay for shipping to and from and I'll do them, that's no problem. I would just need to order some more potting compound. I have nozzles, but I'm out of the compound. PM me if this is something you'd like to do.
I’m not able to PM you, I think you have them turned off. PM me please.


Top