Sponsored

Locker Position Sensor Potting - DANA 44

chevymitchell

Well-Known Member
First Name
Shawn
Joined
Feb 18, 2018
Threads
94
Messages
4,268
Reaction score
10,228
Location
K-ville, NC
Vehicle(s)
2019 JLUR (Pain Train), 2022 2500 AT4
Occupation
Avi Engineer
Good evening everyone.

I took the time today to run through the potting of my locker sensors. This seems to be a very frustrating point of failure for all of us. I have experienced it myself.

Here are the DIY steps you can follow to properly pot the sensors.

**Keep in mind the amount of time required for the potting material to cure. Tacky at 3-5 hours. 24 hour full cure. Best to do both sensors at the same time when you can wait, at least, overnight.

Also, please understand that this is a temporary fix to an issue we all hope FCA is going to remedy. Hopefully there is, at a minimum, a part number for this sensor we can order through Dealers and Distributors**

Jeep JL TQ Specs: https://www.jlwranglerforums.com/complete-torque-values-for-jeep-jl-wrangler/

Tools Required:
  • 1/4" Ratchet
  • 1/4" Drive T20 Bit
  • 3/8" Drive Ratchet
  • 3/8" Drive 10mm
  • 1/2" Drive Ratchet
  • 1/2" Drive 15mm
  • Drill
  • 3/32" Drill Bit
  • Flathead Screwdriver
  • Drain Pan
Parts Required:

These steps are the same for the Front and Rear Axles.
  • Using a 3/8" Drive ratchet, drain the diff fluid into your drain pan. Wait for the diff to finish draining. Clean the drain plug and apply teflon tape to the threads. Reinstall at this time.
Jeep Wrangler JL Locker Position Sensor Potting - DANA 44 1602464714957

  • Using a 10mm socket, remove the diff cover bolts.
Jeep Wrangler JL Locker Position Sensor Potting - DANA 44 1602464775652

  • Using a flathead (or finger tips), remove diff cover.
  • Remove the reusable diff gasket.
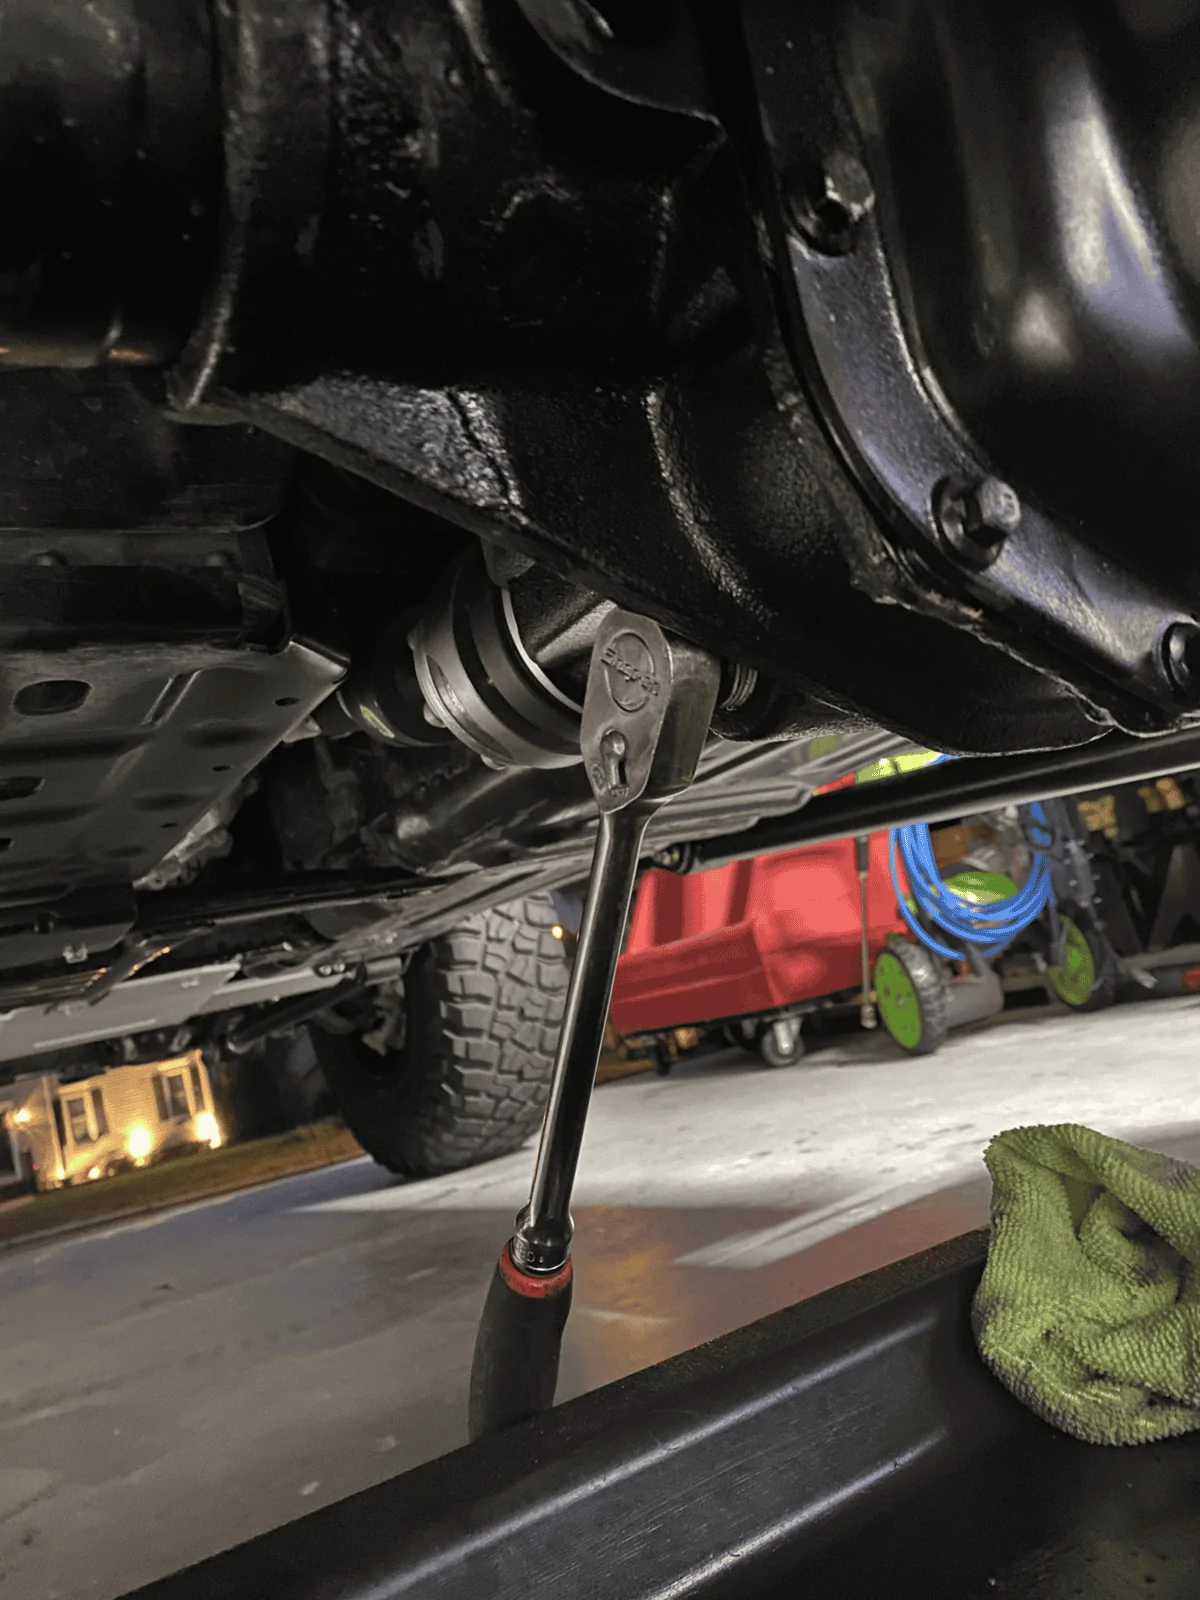
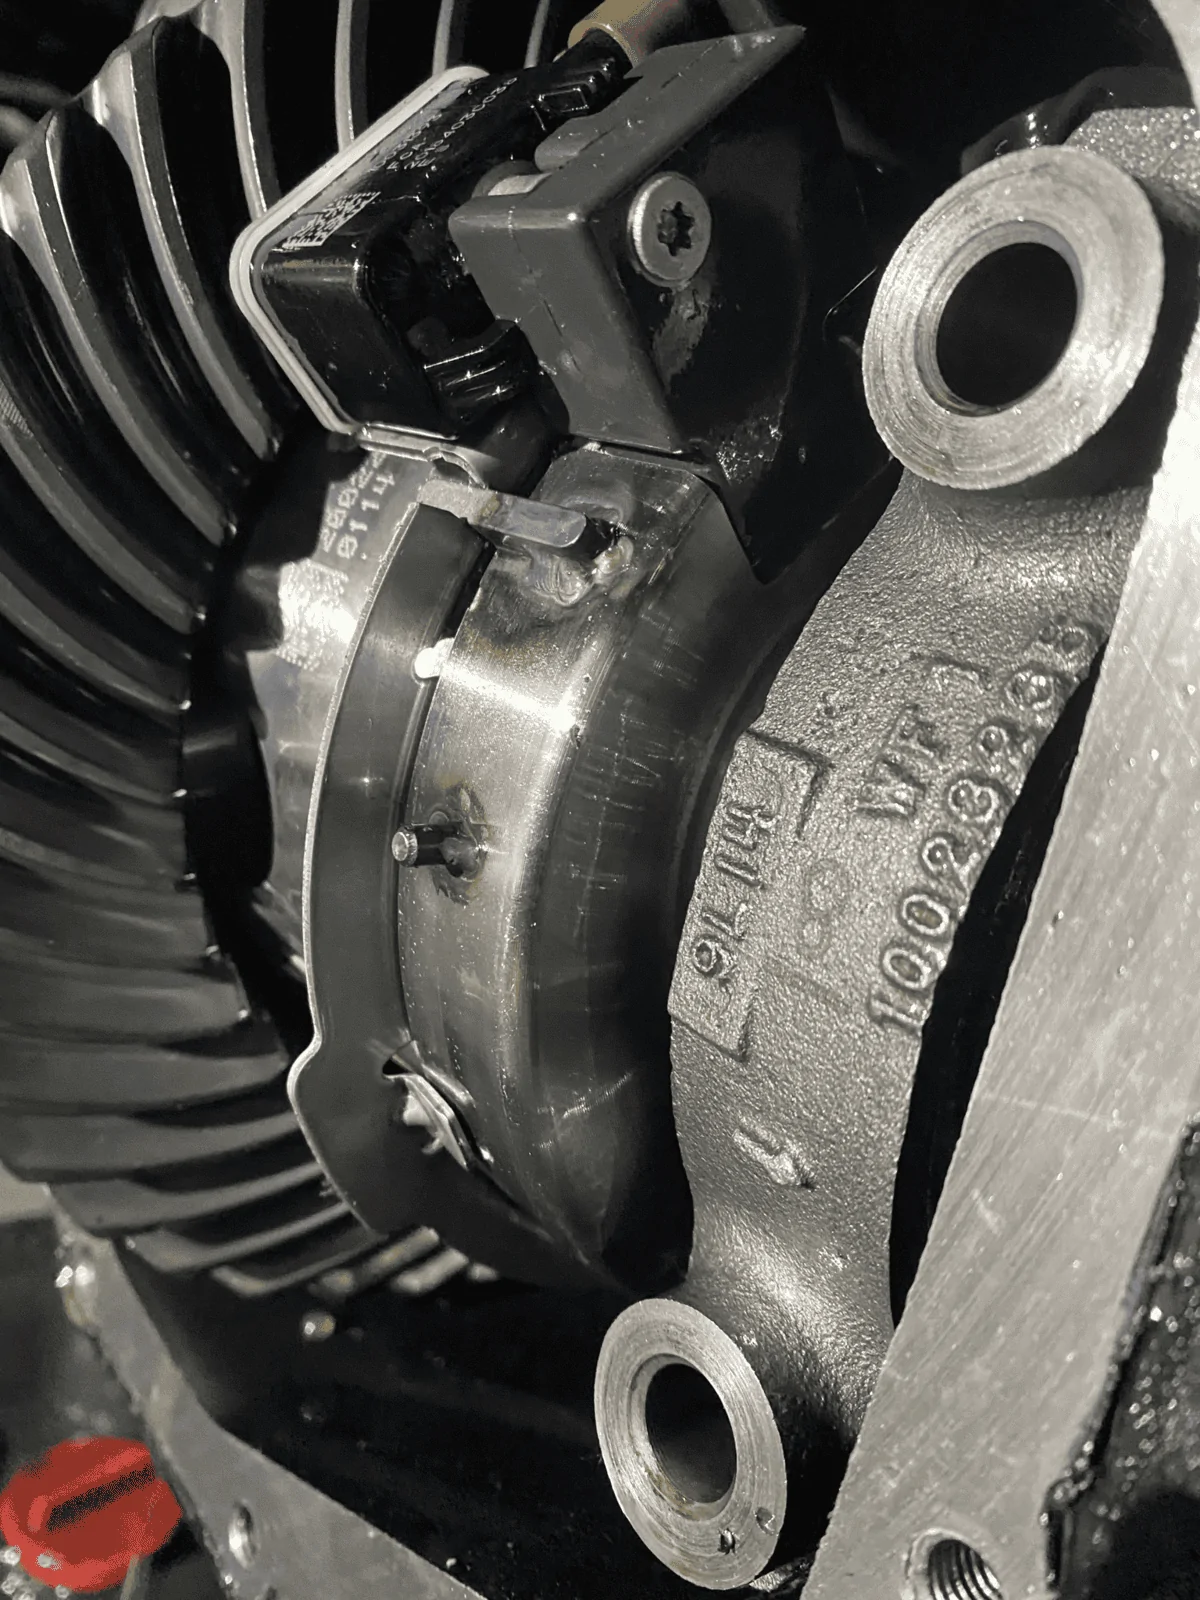
  • Using a 15mm socket, remove the R/H side Cap Bolts.
  • Remove Cap Bolts with alignment plate. Keep the bolts with the plate so they go back in the same spots they came out of.
Jeep Wrangler JL Locker Position Sensor Potting - DANA 44 1602464845373

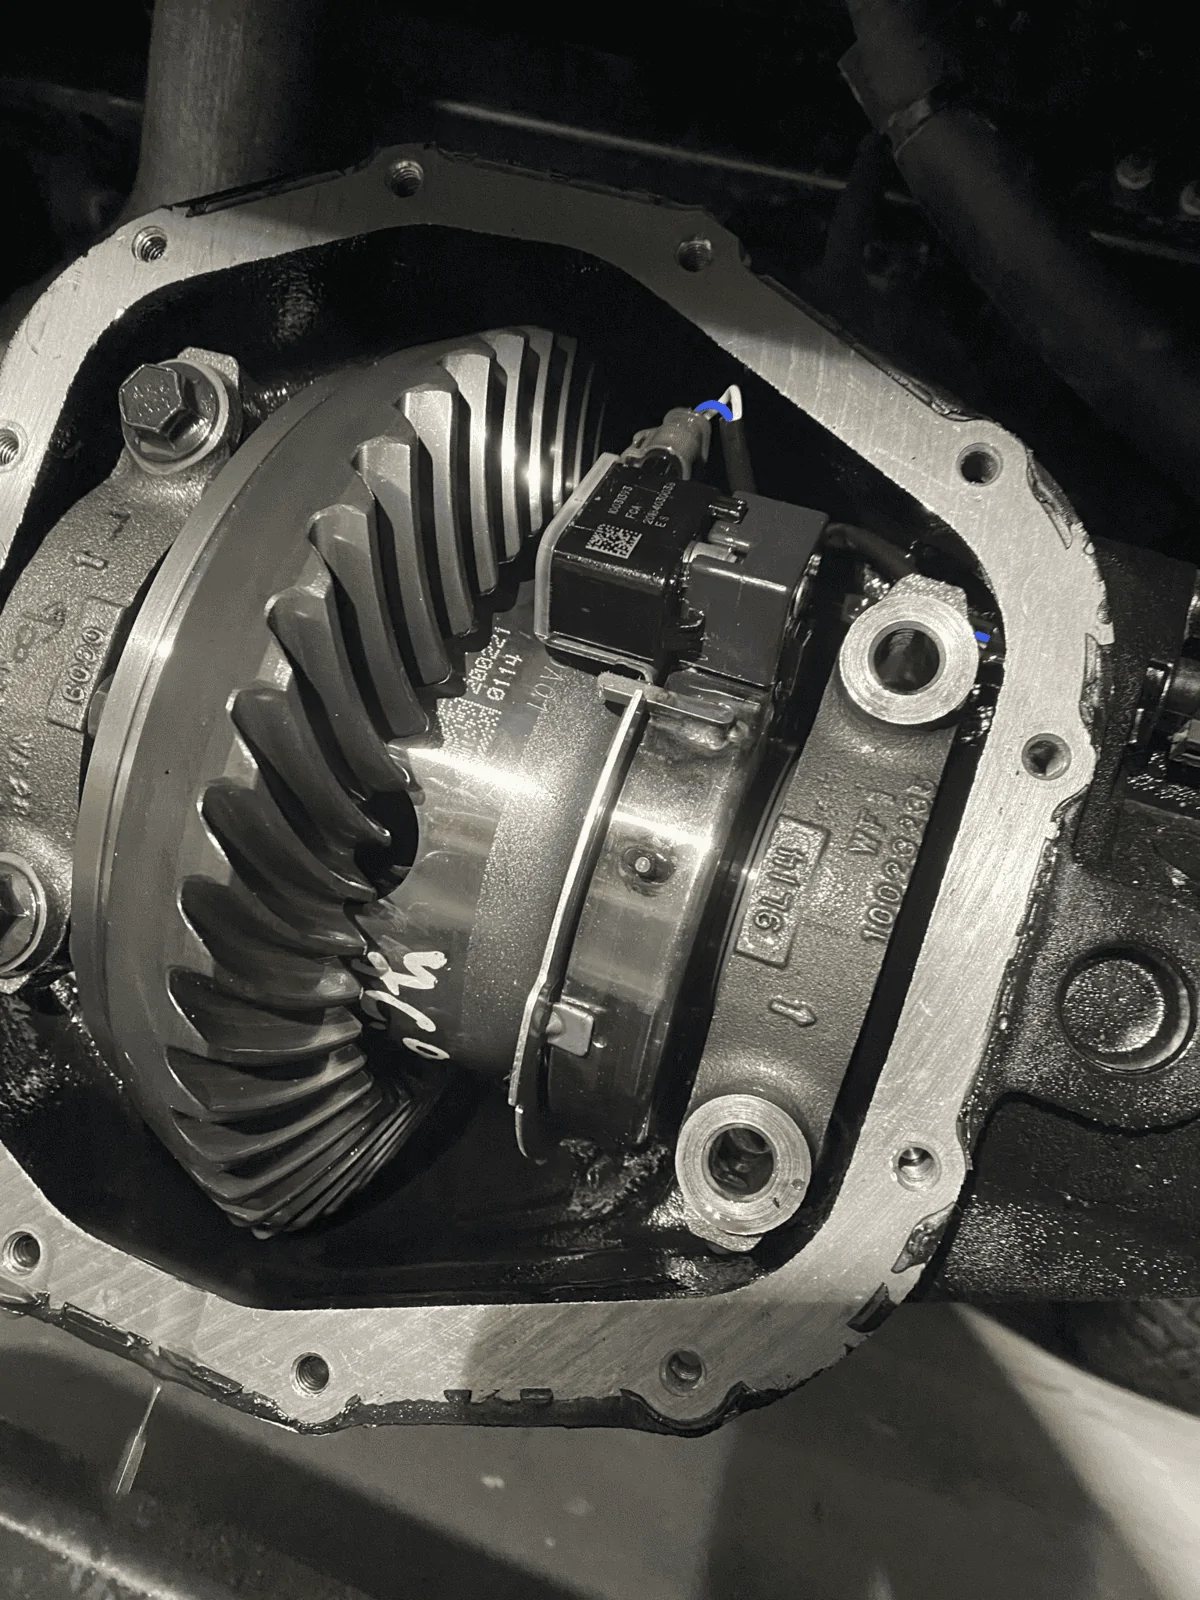
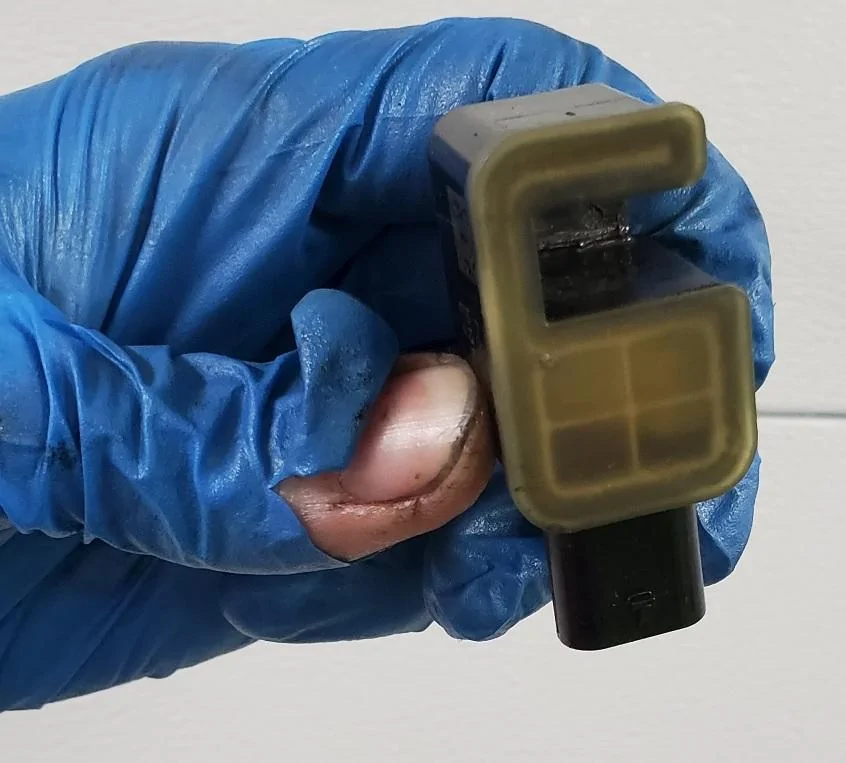
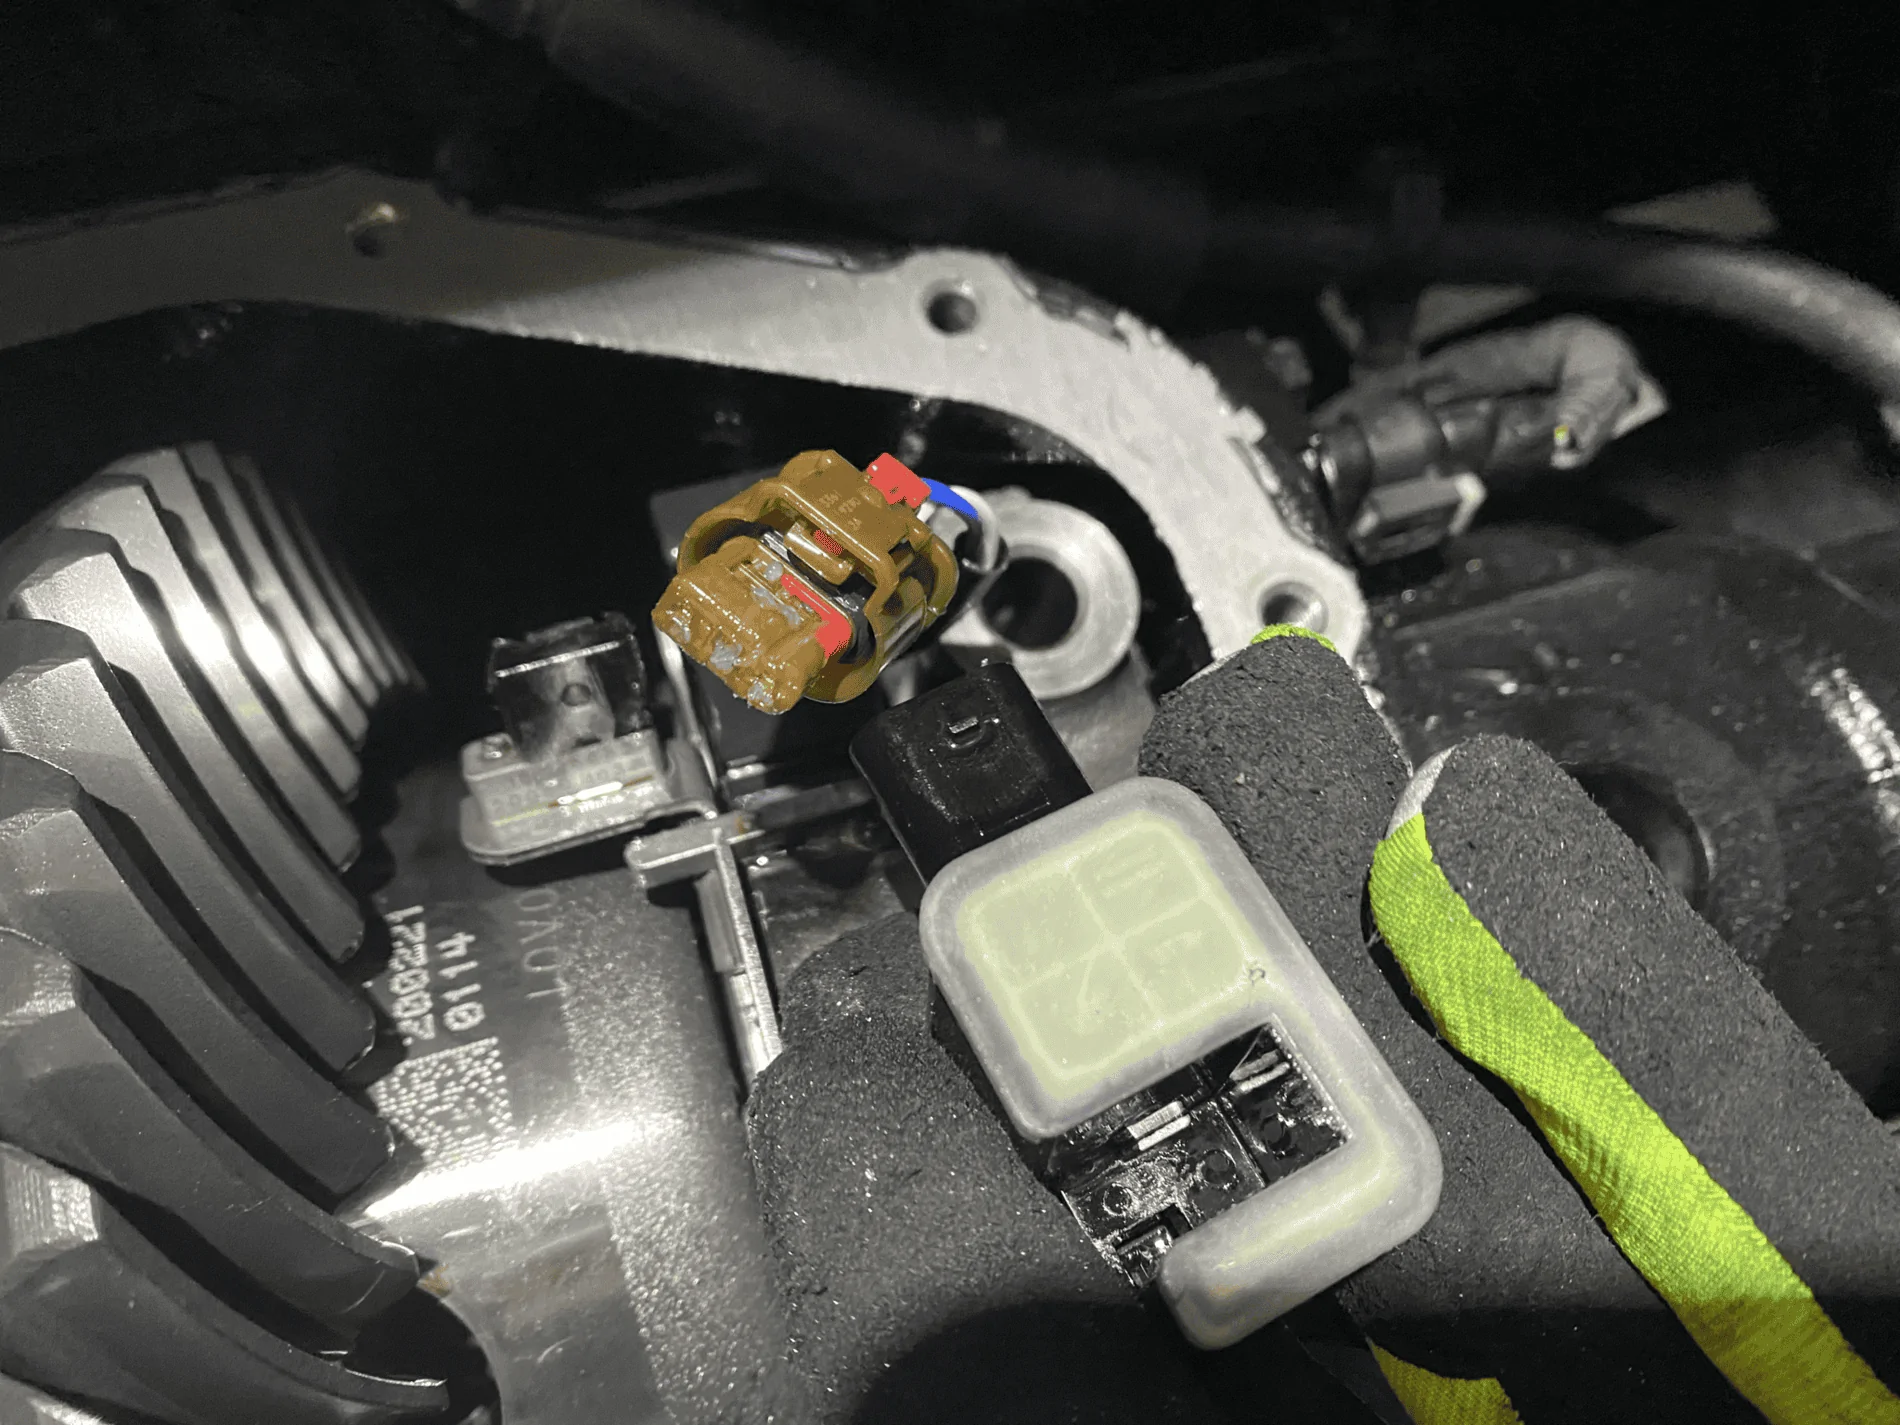
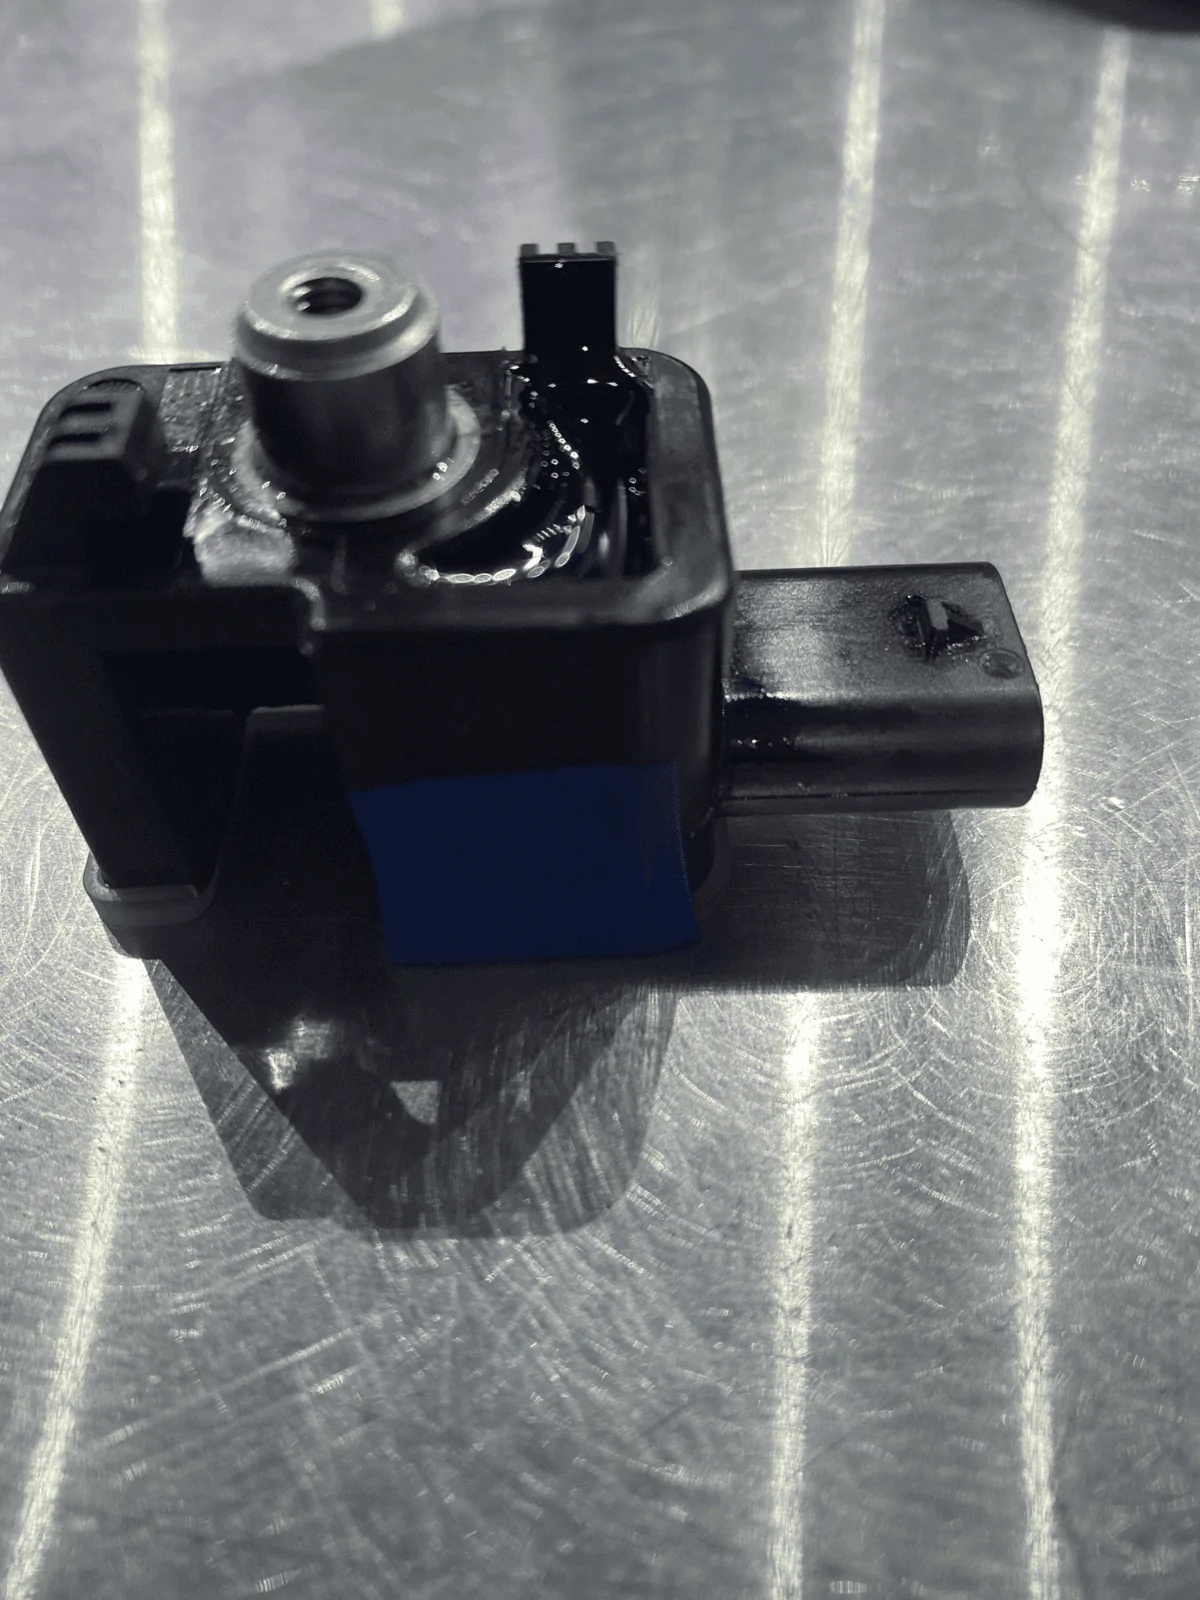
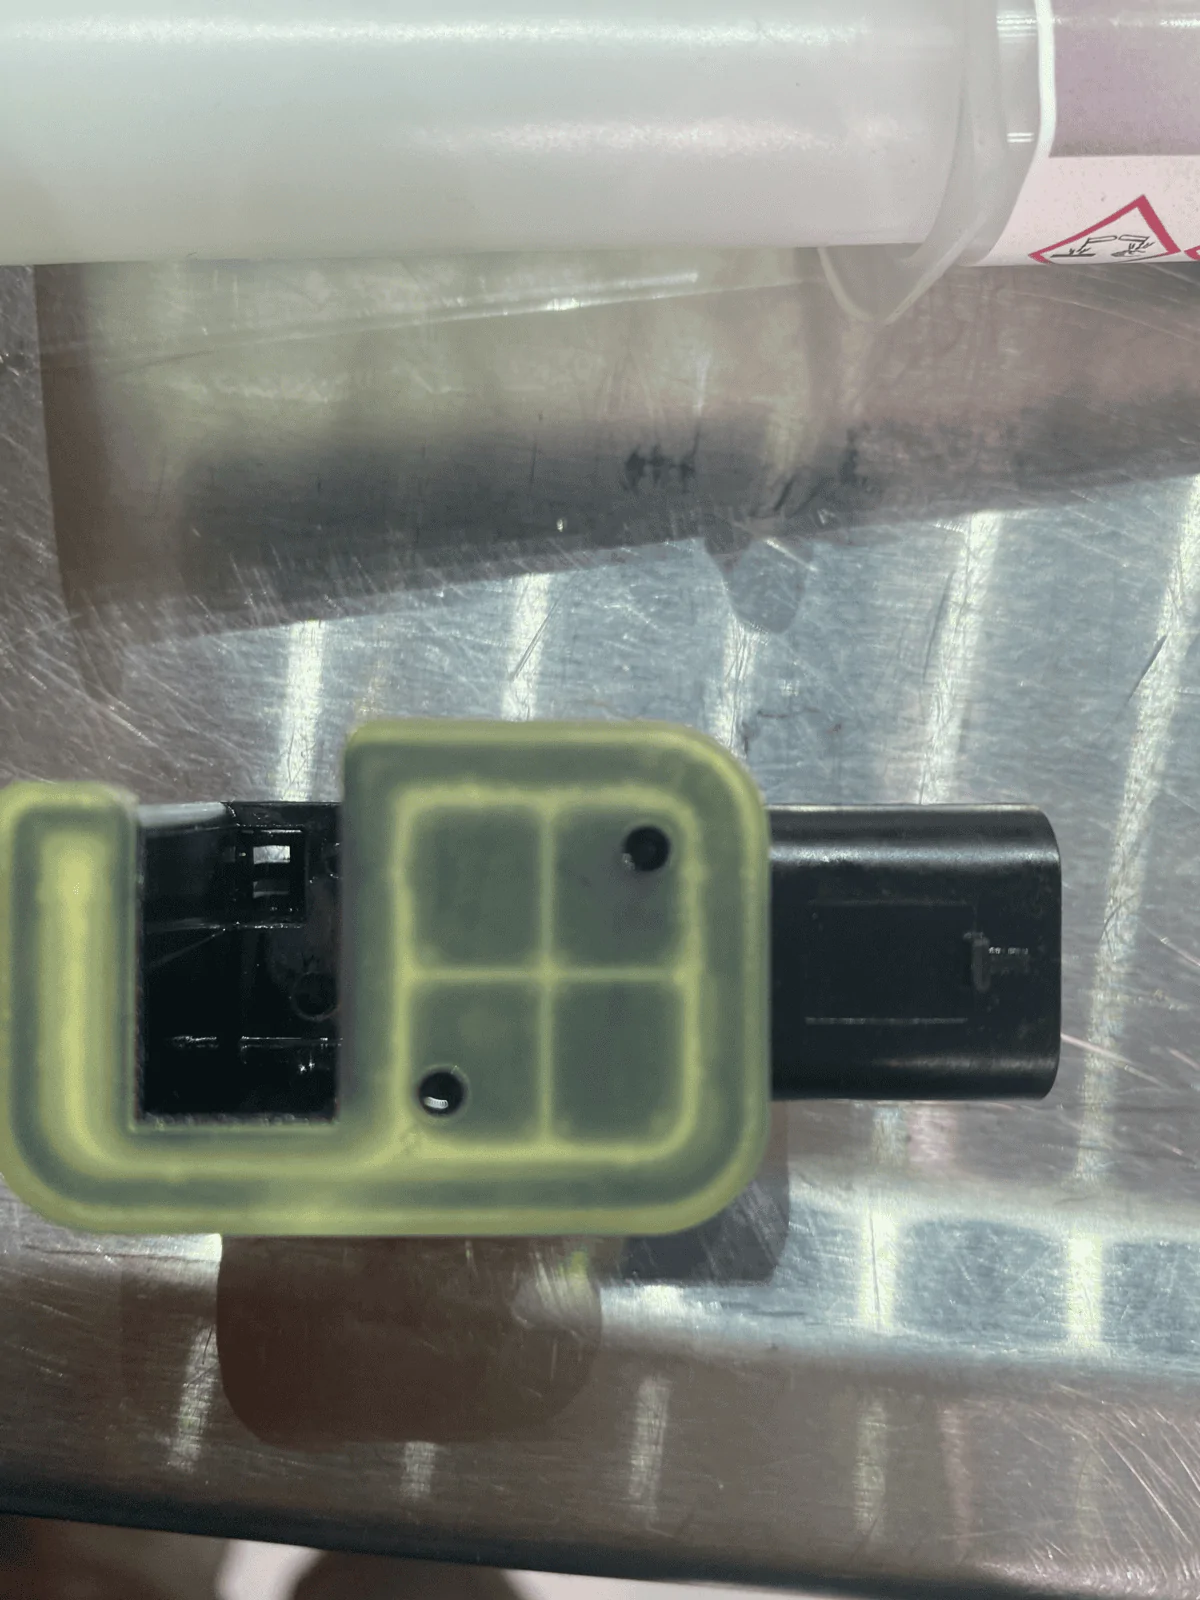
  • Using a T20 bit, remove the screw holding the Locker Sensor in place.
Jeep Wrangler JL Locker Position Sensor Potting - DANA 44 1602464888664

  • Using a flathead (or fingers), disengage connector safety clip.
  • Remove Connector and Sensor.
Jeep Wrangler JL Locker Position Sensor Potting - DANA 44 1602464919467

  • Wipe sensor off using a shop towel or microfiber cloth.
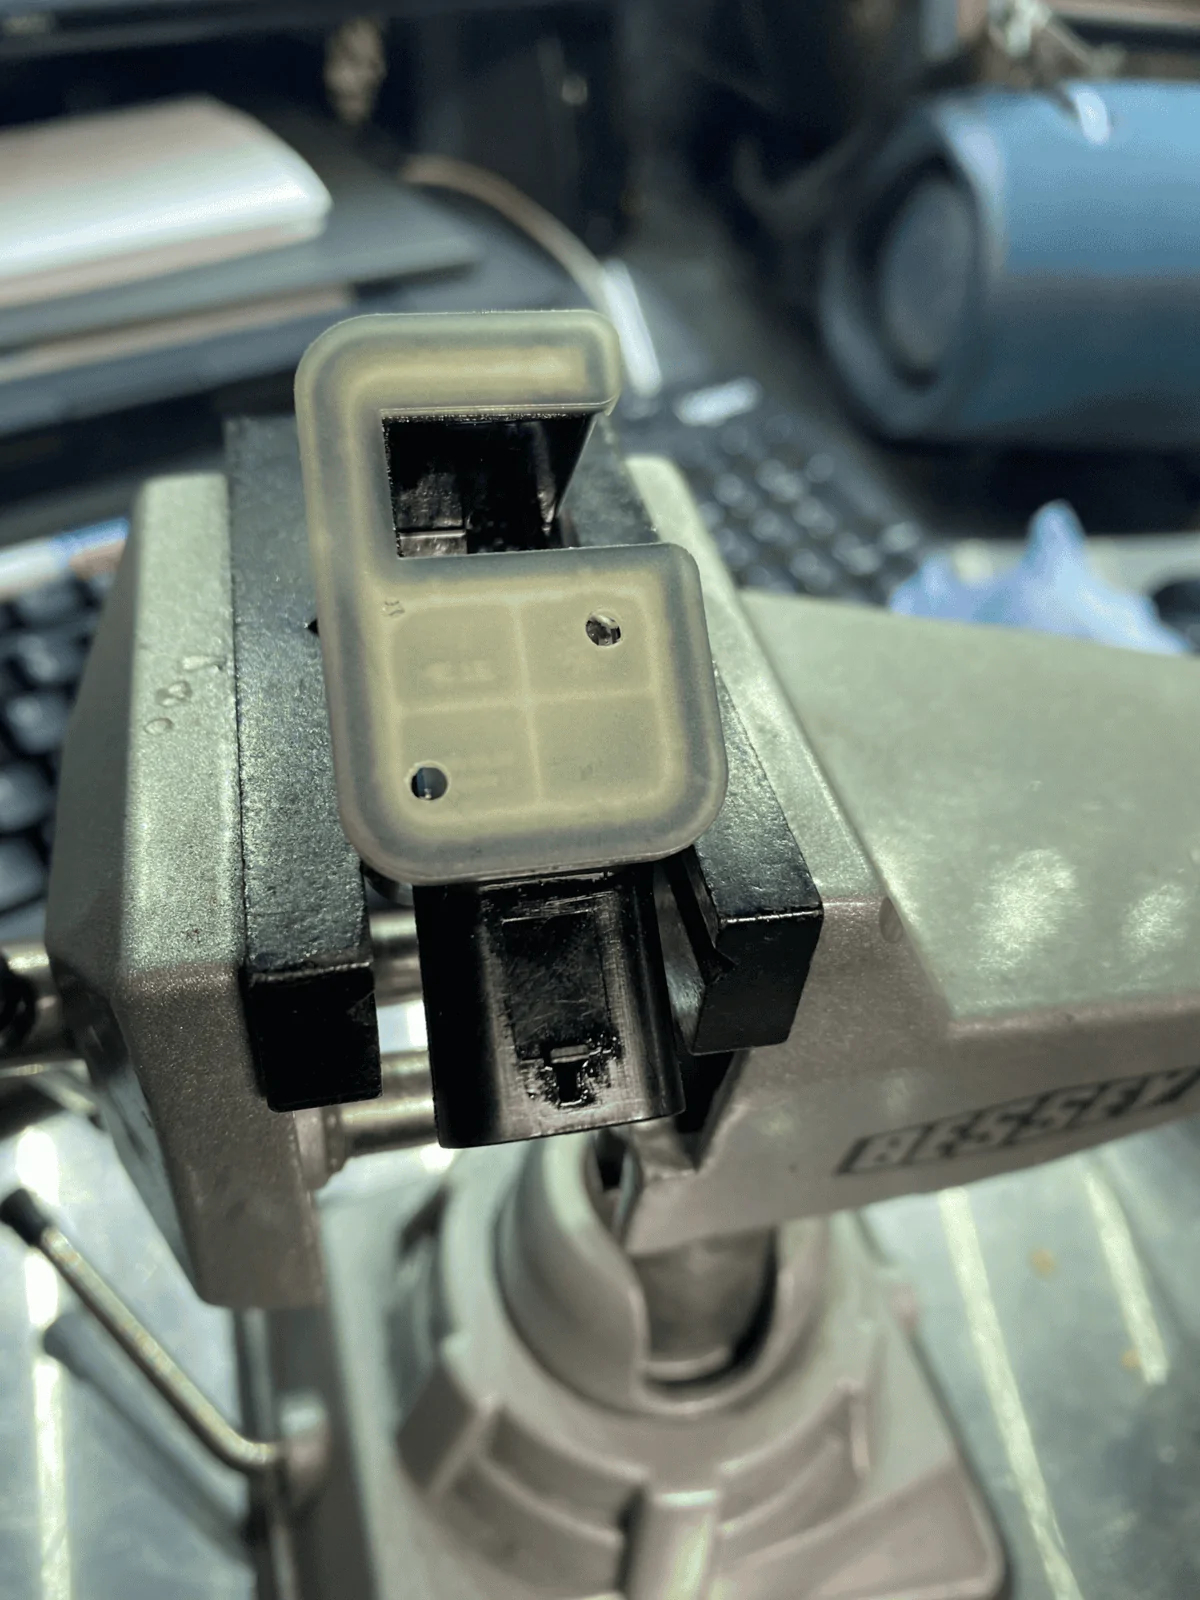
  • Mark sensor as shown in the picture with a sharpe.
Jeep Wrangler JL Locker Position Sensor Potting - DANA 44 1602464965968

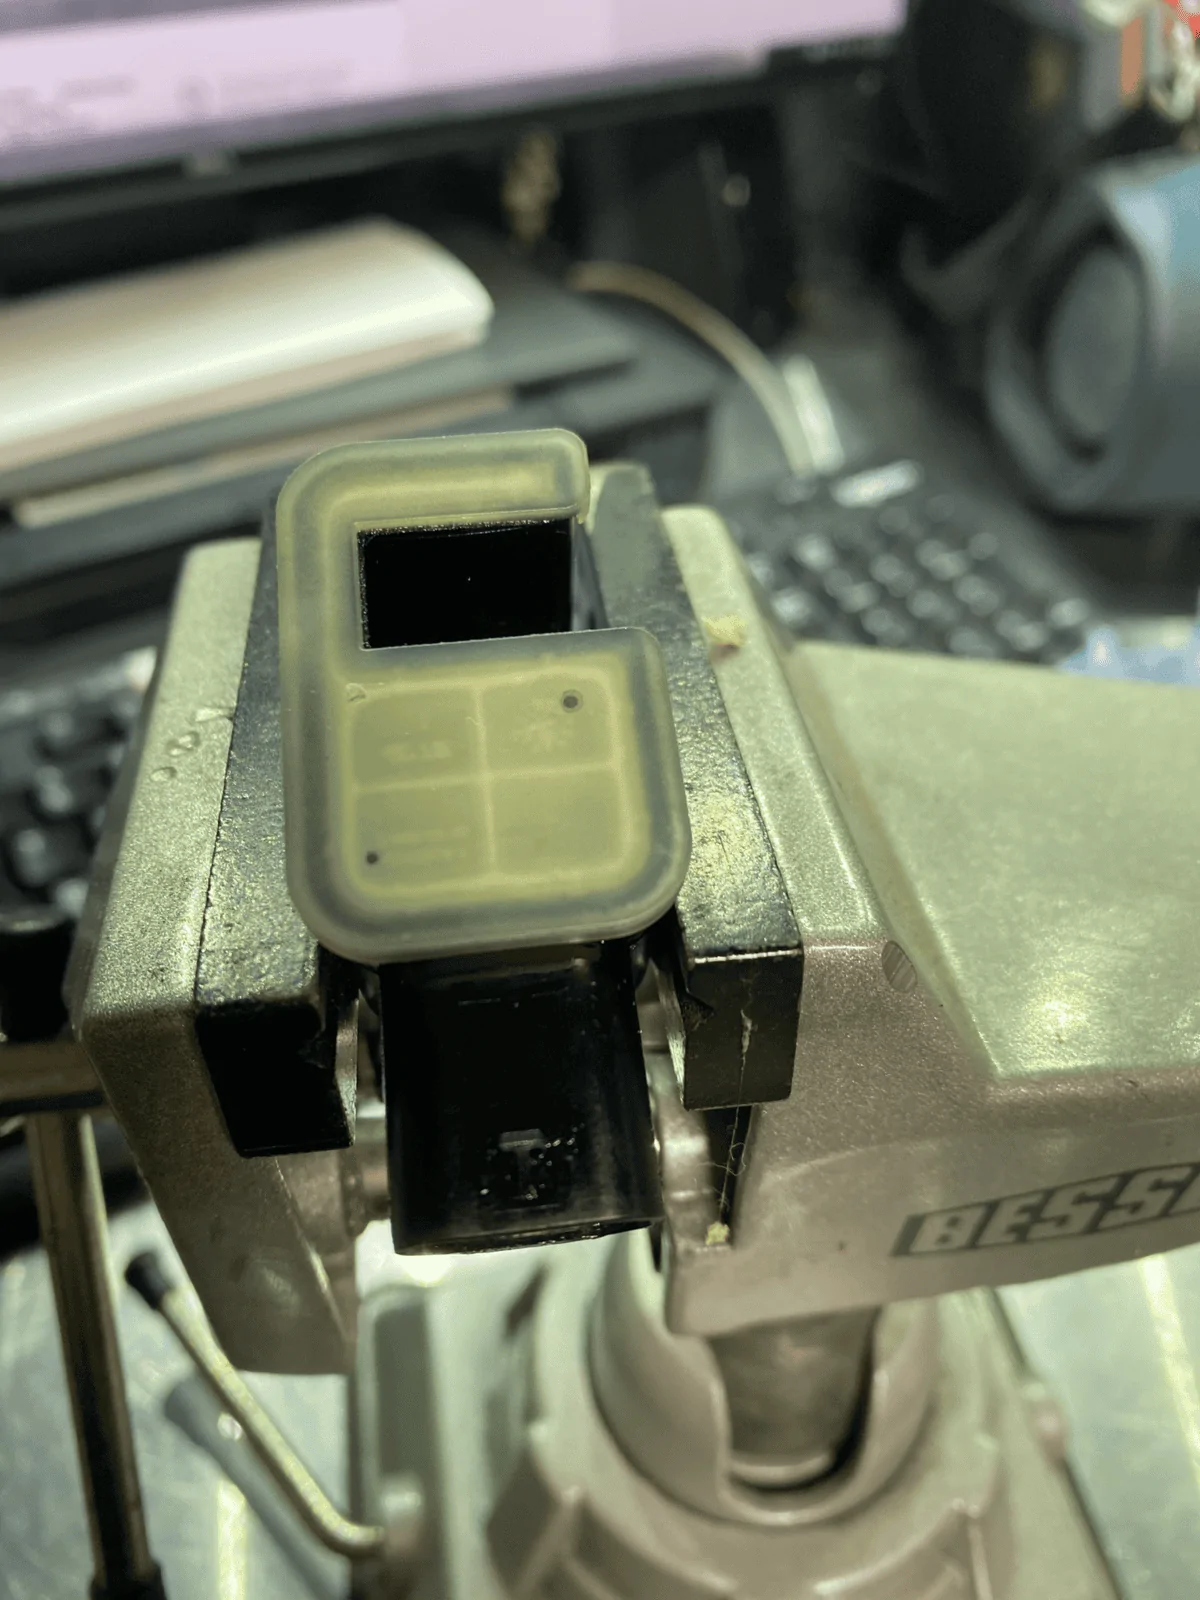
  • Using a 3/32" drill bit, drill 3 holes as shown in the pictures. Be VERY careful with this step as the PCB (Circuit Board) is located very close to the clear cap on the sensor. Drill at a very low speed, with light pressure. We need 3 holes for this work properly. One is used to inject potting compound into the top side of the PCB, one for the bottom side of the PCB, and one to let air escape as we are injecting potting compound. Without an air escape, there will be air pockets and this whole thing will be for nothing.
  • At this point, if your sensor has oil in it, would be a good time to clean it out. Spray some connector/electronics cleaner through each hole to rinse the sensor out. Be sure to let it dry completely before continuing to the next step. You don't want to dilute the potting compound too much. A little bit is ok.
Jeep Wrangler JL Locker Position Sensor Potting - DANA 44 1602465011481


Jeep Wrangler JL Locker Position Sensor Potting - DANA 44 1602465033444

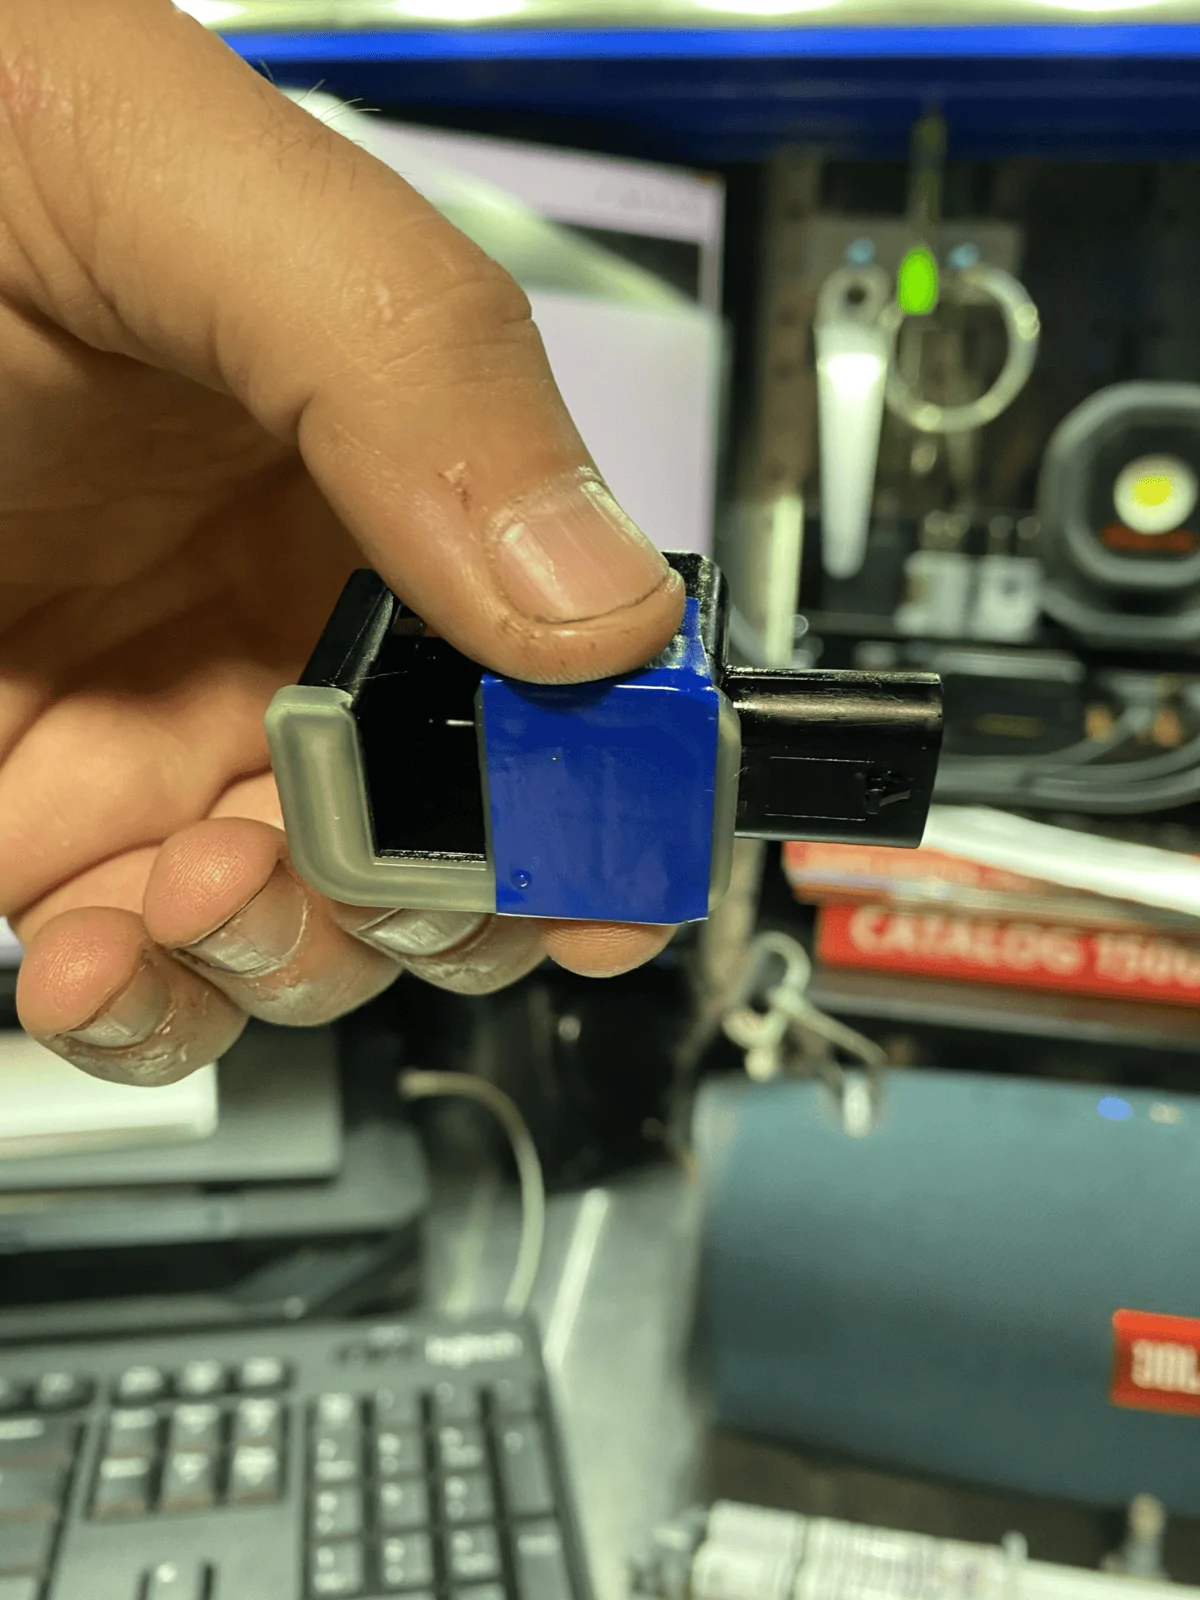
  • Inject potting compound as shown in the video. Once you inject the compound in the bottom hole, you will notice the air being pushed out first and then a rush of compound will come out when it's full.

  • Once the sensor is full, wipe the top side off with a shop towel.
  • Apply electrical tape over the two holes and set the sensor down on its top.
Jeep Wrangler JL Locker Position Sensor Potting - DANA 44 1602465448118


  • Wipe off any excess potting compound and fill the void in the back of the sensor with more compound. Let sit for 3-5 hours. Once tacky, clean the sensor using Acetone so there isn't any left over potting material on the outside of the sensor once fully cured.
Jeep Wrangler JL Locker Position Sensor Potting - DANA 44 1602465505989

  • Once cleaned, let sit for 24 hours. (At least 12 hours before reinstallation.)
Jeep Wrangler JL Locker Position Sensor Potting - DANA 44 1602465561579

  • Once cured, install sensor in reverse order. (Use Dielectric Grease on the connector and Loctite on the T20 screw.)
  • Install alignment plate and R/H side Cap Bolts. Be sure to TQ to spec. The TQ specs are different front to rear.
  • Install Diff Cover.
  • Service Diff.
  • Test Locker System.
Sponsored

 
Last edited:

oceanblue2019

Well-Known Member
First Name
John
Joined
Apr 13, 2019
Threads
18
Messages
3,099
Reaction score
4,759
Location
Maryland
Vehicle(s)
2019 JLUR 2.0L Auto
Occupation
Metrology
So the assumption is the failure is oil getting into the sensor?
 
OP
OP
chevymitchell

chevymitchell

Well-Known Member
First Name
Shawn
Joined
Feb 18, 2018
Threads
94
Messages
4,268
Reaction score
10,228
Location
K-ville, NC
Vehicle(s)
2019 JLUR (Pain Train), 2022 2500 AT4
Occupation
Avi Engineer
So the assumption is the failure is oil getting into the sensor?
Yeah... That is exactly what's happening (Most of the time). If you pull off a failed sensor, you can tip it and see oil inside of it.

That's only one possible cause to the same light though. Many people are going through many different causes to the same symptom. This is meant to help prevent the majority from needing to wait weeks for a rear axle replacement.

@mgroeger - Do you still have pictures of the sensor off of Fat Ninja? Pic of the oil inside the sensor?

Thank you.
 

oceanblue2019

Well-Known Member
First Name
John
Joined
Apr 13, 2019
Threads
18
Messages
3,099
Reaction score
4,759
Location
Maryland
Vehicle(s)
2019 JLUR 2.0L Auto
Occupation
Metrology
Yeah... That is exactly what's happening (Most of the time). If you pull off a failed sensor, you can tip it and see oil inside of it.

That's only one possible cause to the same light though. Many people are going through many different causes to the same symptom. This is meant to help prevent the majority from needing to wait weeks for a rear axle replacement.

@mgroeger - Do you still have pictures of the sensor off of Fat Ninja? Pic of the oil inside the sensor?

Thank you.
With a failed sensor could you not drill it like you have (the 3 holes), and use the hole as an access point to flush it out with contact spray cleaner, and once that dries pot it to bring a bad sensor back from the grave?

Nice potting work - I pot all my Deutsch connectors for lights and such, and appreciate when someone does a nice job doing it. Your aviation background is showing with this workmanship.
 
OP
OP
chevymitchell

chevymitchell

Well-Known Member
First Name
Shawn
Joined
Feb 18, 2018
Threads
94
Messages
4,268
Reaction score
10,228
Location
K-ville, NC
Vehicle(s)
2019 JLUR (Pain Train), 2022 2500 AT4
Occupation
Avi Engineer
With a failed sensor could you not drill it like you have (the 3 holes), and use the hole as an access point to flush it out with contact spray cleaner, and once that dries pot it to bring a bad sensor back from the grave?

Nice potting work - I pot all my Deutsch connectors for lights and such, and appreciate when someone does a nice job doing it. Your aviation background is showing with this workmanship.
That would be a good thing to try. If I can get my hands on a bad sensor, I can scope it and bring it back to life, if it's possible.

From other posts that have been made on this subject, I believe the hall affect sensor itself or one of the two capacitors are failing once shorted.

Thanks man. I just enjoy working on things. They're all big Lego's to me.
 

Sponsored

mgroeger

Well-Known Member
First Name
Mike
Joined
Feb 1, 2018
Threads
150
Messages
5,454
Reaction score
7,844
Location
Hurricane, UT
Vehicle(s)
2021 JLUR 2.0T, 1991 YJ rock crawler
Occupation
I make microchips for a living.
Vehicle Showcase
1
Yeah... That is exactly what's happening (Most of the time). If you pull off a failed sensor, you can tip it and see oil inside of it.

That's only one possible cause to the same light though. Many people are going through many different causes to the same symptom. This is meant to help prevent the majority from needing to wait weeks for a rear axle replacement.

@mgroeger - Do you still have pictures of the sensor off of Fat Ninja? Pic of the oil inside the sensor?

Thank you.
I never took pics of the sensor showing all the oil in it unfortunately. I can tell you it was 3/4 full of oil though. In my case it was the clear plastic top of the sensor that had started to separate at the seam so I was able to gently pop the entire top off and let all of the oil drain out.
My goal was then to clean the sensor, put the cover back on and silicon it real good. Then next time I had the diff open I was going to test it out.
At this point it got packed up over the weekend for the move so I don't have access to it right now for pics or testing.
 

Jasper519

Active Member
First Name
Jason
Joined
Apr 30, 2019
Threads
0
Messages
41
Reaction score
62
Location
Texas
Vehicle(s)
2019 JLUR
How much potting material did each sensor take?
 
OP
OP
chevymitchell

chevymitchell

Well-Known Member
First Name
Shawn
Joined
Feb 18, 2018
Threads
94
Messages
4,268
Reaction score
10,228
Location
K-ville, NC
Vehicle(s)
2019 JLUR (Pain Train), 2022 2500 AT4
Occupation
Avi Engineer
How much potting material did each sensor take?
I'm not sure on the exact amount each one holds, but it'll take somewhere between 3-5mL each to flood it enough to push all the air out.
 

Jasper519

Active Member
First Name
Jason
Joined
Apr 30, 2019
Threads
0
Messages
41
Reaction score
62
Location
Texas
Vehicle(s)
2019 JLUR
I'm not sure on the exact amount each one holds, but it'll take somewhere between 3-5mL each to flood it enough to push all the air out.
Then the 25ml will be more than enough, thank you. Considering doing this when I change my dif oil.
 
OP
OP
chevymitchell

chevymitchell

Well-Known Member
First Name
Shawn
Joined
Feb 18, 2018
Threads
94
Messages
4,268
Reaction score
10,228
Location
K-ville, NC
Vehicle(s)
2019 JLUR (Pain Train), 2022 2500 AT4
Occupation
Avi Engineer
Then the 25ml will be more than enough, thank you. Considering doing this when I change my dif oil.
Oh yes, 25mL will be plenty. Make sure to have some mineral spirits or something to clean the nozzle when you're finished potting your sensors. That way, you'll be ready for when you want to use it on the next project.
 

Sponsored

Bearded_Dragon

Well-Known Member
Joined
Jul 23, 2017
Threads
13
Messages
1,042
Reaction score
1,218
Location
FL
Vehicle(s)
2018 Mojito! Rubicon
I decided to do this to my Jeep since I've been seeing more and more reports of locker issues. My Wrangler is from Spring 2018, has 17,000 miles on it, and lockers have been working fine. Below is a picture of the rear locker sensor and you can see gear oil is inside. I think oil came in through the electrical connector area as there was a lot of oil pooled in there.

The front locker sensor was nice and dry.

I'm waiting for the potting to cure, hopefully I continue to have flowless lockers after this is all said and done.

Jeep Wrangler JL Locker Position Sensor Potting - DANA 44 Untitled
 

Dave928

Well-Known Member
First Name
Dave
Joined
Nov 2, 2018
Threads
9
Messages
539
Reaction score
472
Location
Washington
Vehicle(s)
2020 JLU Rubicon, 03 Silverado, 88 Porsche 928 S4
Occupation
Aircraft Tech
from the photos it seems like you should be able to drill 2 or 3 holes without removing the sensor from the diff? fill it from the bottom up. let it cure. refill the diff.

but if it is out, i think i'd spray some electrical cleaner in the connector receptacle and put just a dab of potting compound in the bottom of it to seal the pins.
 
OP
OP
chevymitchell

chevymitchell

Well-Known Member
First Name
Shawn
Joined
Feb 18, 2018
Threads
94
Messages
4,268
Reaction score
10,228
Location
K-ville, NC
Vehicle(s)
2019 JLUR (Pain Train), 2022 2500 AT4
Occupation
Avi Engineer
from the photos it seems like you should be able to drill 2 or 3 holes without removing the sensor from the diff? fill it from the bottom up. let it cure. refill the diff.

but if it is out, i think i'd spray some electrical cleaner in the connector receptacle and put just a dab of potting compound in the bottom of it to seal the pins.
The sensors will definitely need to be removed for this process. The compound is runny and will just drain out.

Also, do not pot the pins or plug from the outside. Pot the sensor per the write-up and this will seal the plug from the inside. Only put dielectric grease inside the plug.
 
OP
OP
chevymitchell

chevymitchell

Well-Known Member
First Name
Shawn
Joined
Feb 18, 2018
Threads
94
Messages
4,268
Reaction score
10,228
Location
K-ville, NC
Vehicle(s)
2019 JLUR (Pain Train), 2022 2500 AT4
Occupation
Avi Engineer
I decided to do this to my Jeep since I've been seeing more and more reports of locker issues. My Wrangler is from Spring 2018, has 17,000 miles on it, and lockers have been working fine. Below is a picture of the rear locker sensor and you can see gear oil is inside. I think oil came in through the electrical connector area as there was a lot of oil pooled in there.

The front locker sensor was nice and dry.

I'm waiting for the potting to cure, hopefully I continue to have flowless lockers after this is all said and done.

Jeep Wrangler JL Locker Position Sensor Potting - DANA 44 Untitled
Nice work. Yours was on the brink of failing. Hopefully, this was caught in time and things will be ok.
 

Bearded_Dragon

Well-Known Member
Joined
Jul 23, 2017
Threads
13
Messages
1,042
Reaction score
1,218
Location
FL
Vehicle(s)
2018 Mojito! Rubicon
I decided to do this to my Jeep since I've been seeing more and more reports of locker issues. My Wrangler is from Spring 2018, has 17,000 miles on it, and lockers have been working fine. Below is a picture of the rear locker sensor and you can see gear oil is inside. I think oil came in through the electrical connector area as there was a lot of oil pooled in there.

The front locker sensor was nice and dry.

I'm waiting for the potting to cure, hopefully I continue to have flowless lockers after this is all said and done.
Update: Everything is back together and tested both lockers offroad today with 0 issues! Thanks @chevymitchell for making a great thread!
Sponsored


Top