Den_JL2DR
Well-Known Member
- Thread starter
- #1
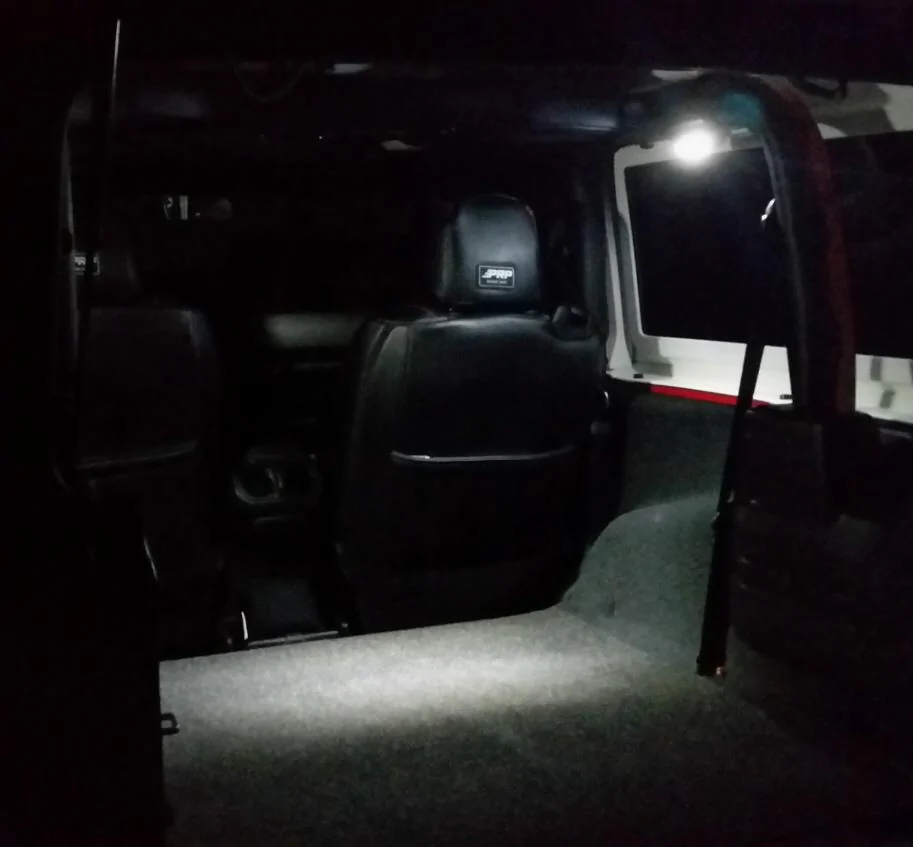
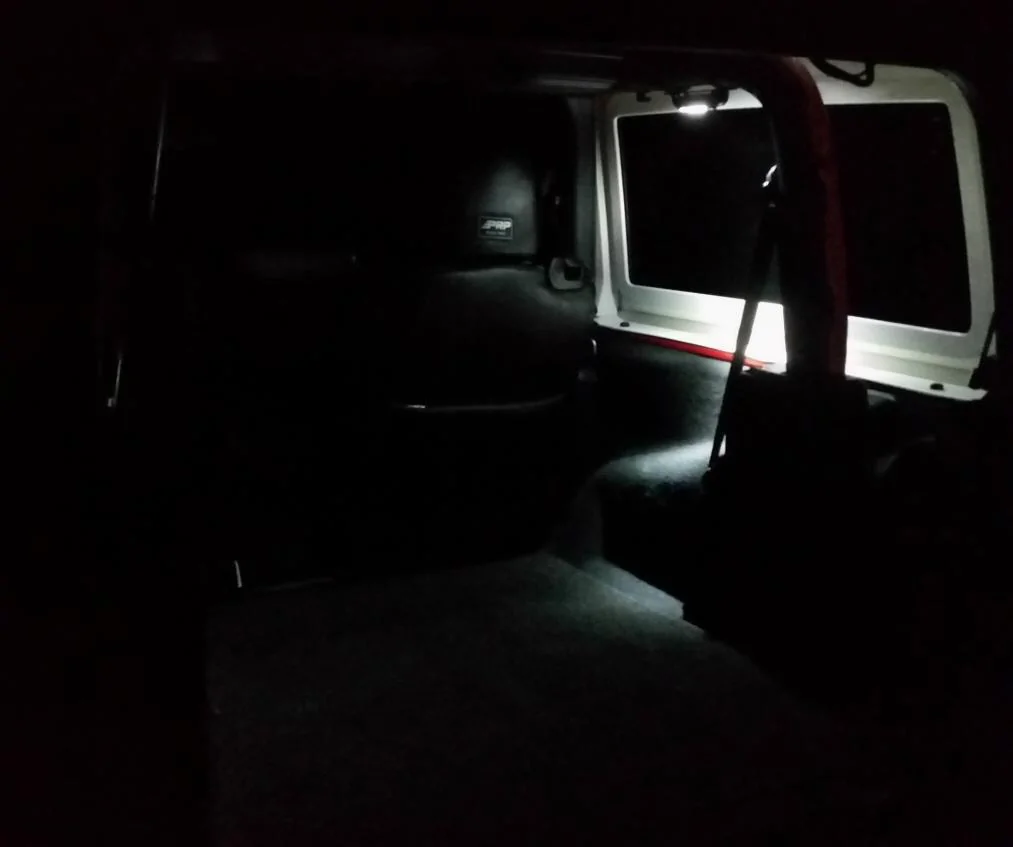
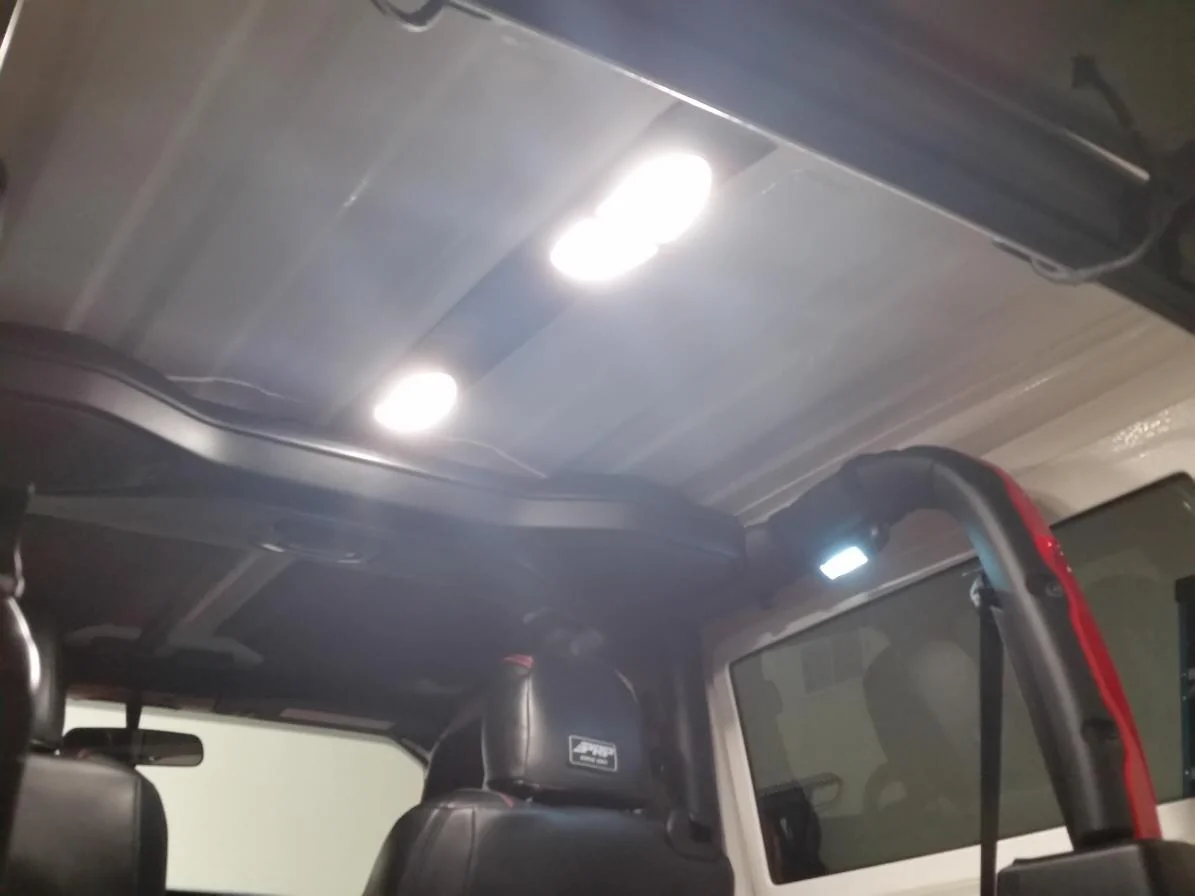
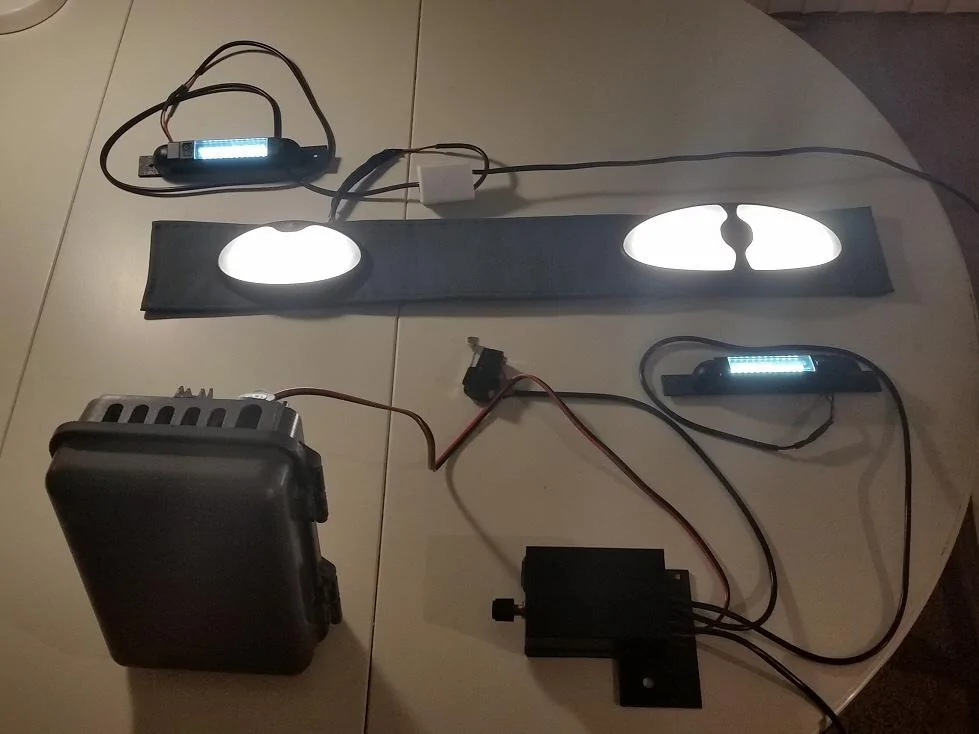
Here's a project for two bright overhead LED lights that fill the cargo area for night errands, and two rotatable rollbar mounted LED lights to either soft bounce onto the white hardtop surface for tailgating events, or rotate downward for direct reading lights with Jeep camping, or be additional cargo lighting.


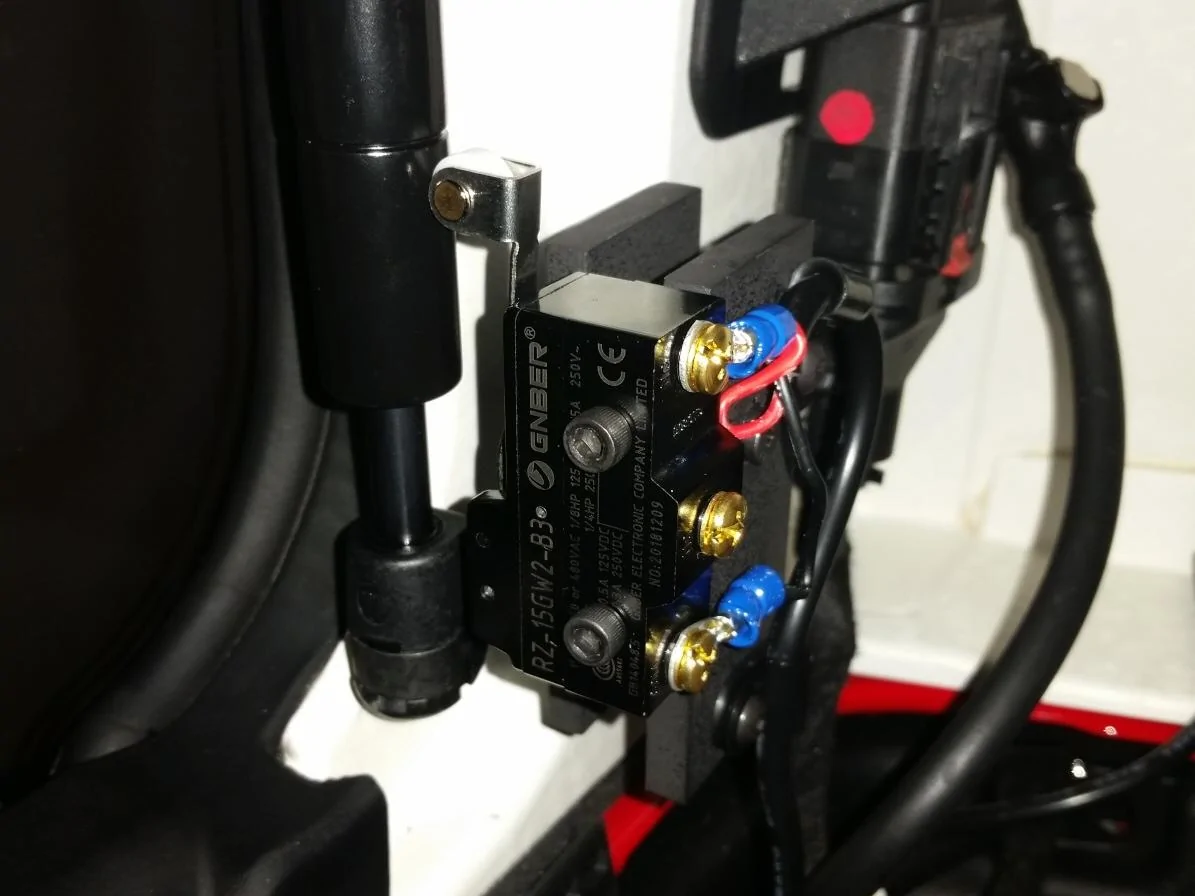
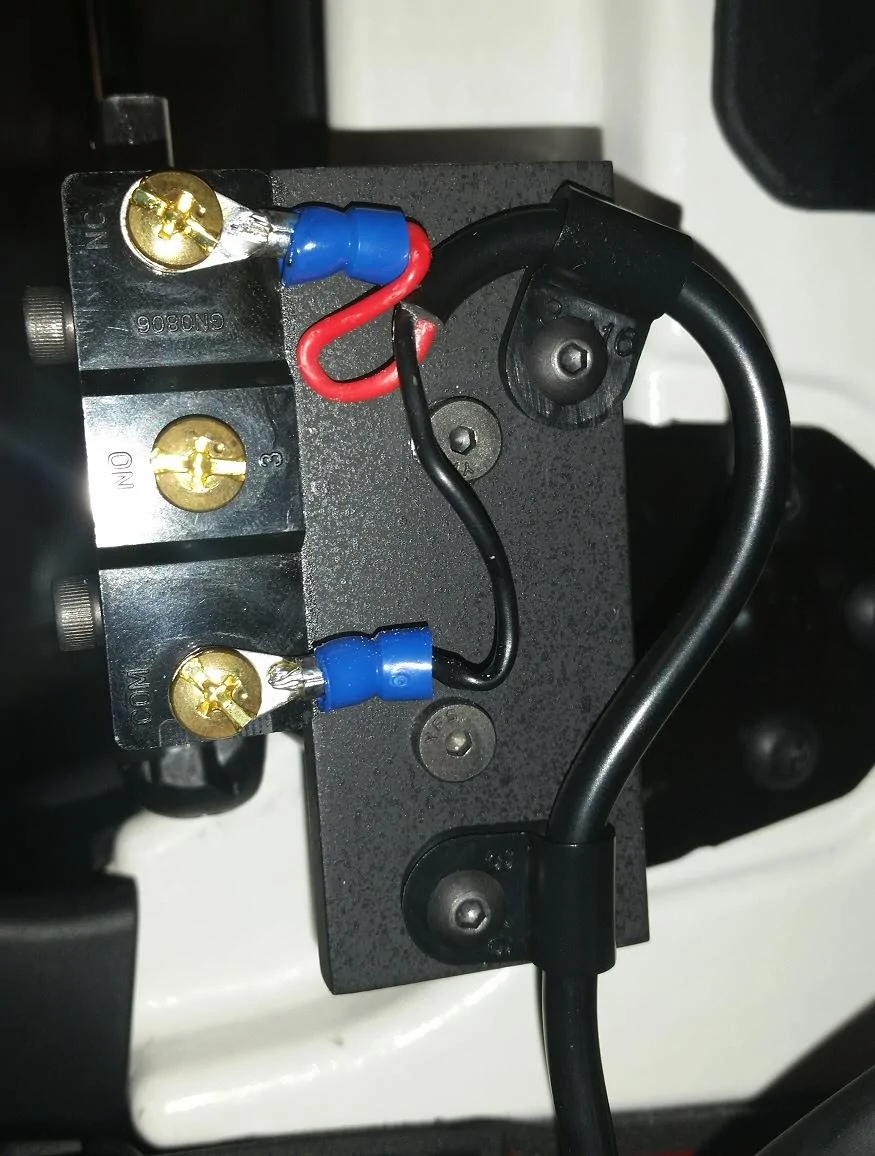
The lights turn on when the rear hatch is raised via a roller switch mounted against the driver's side hatch strut.
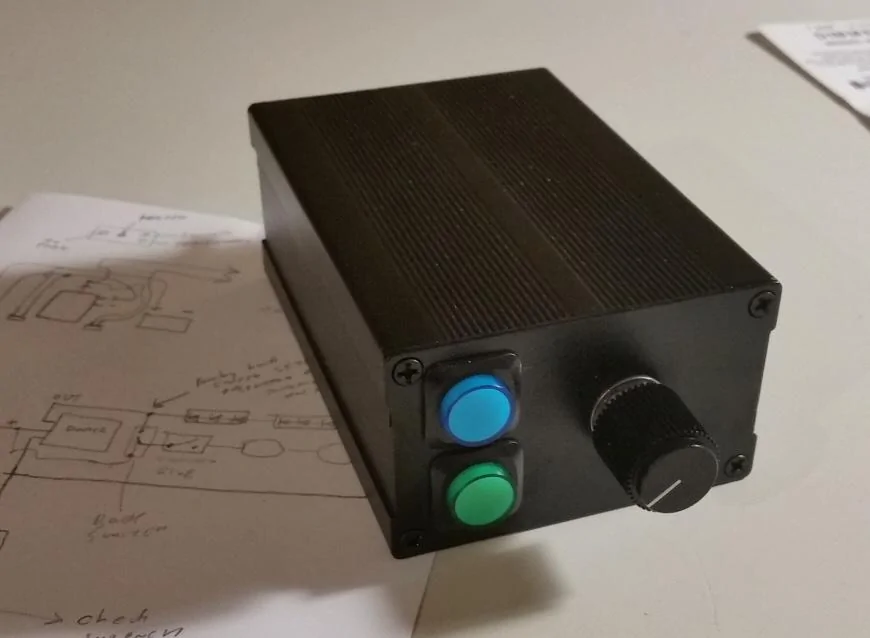
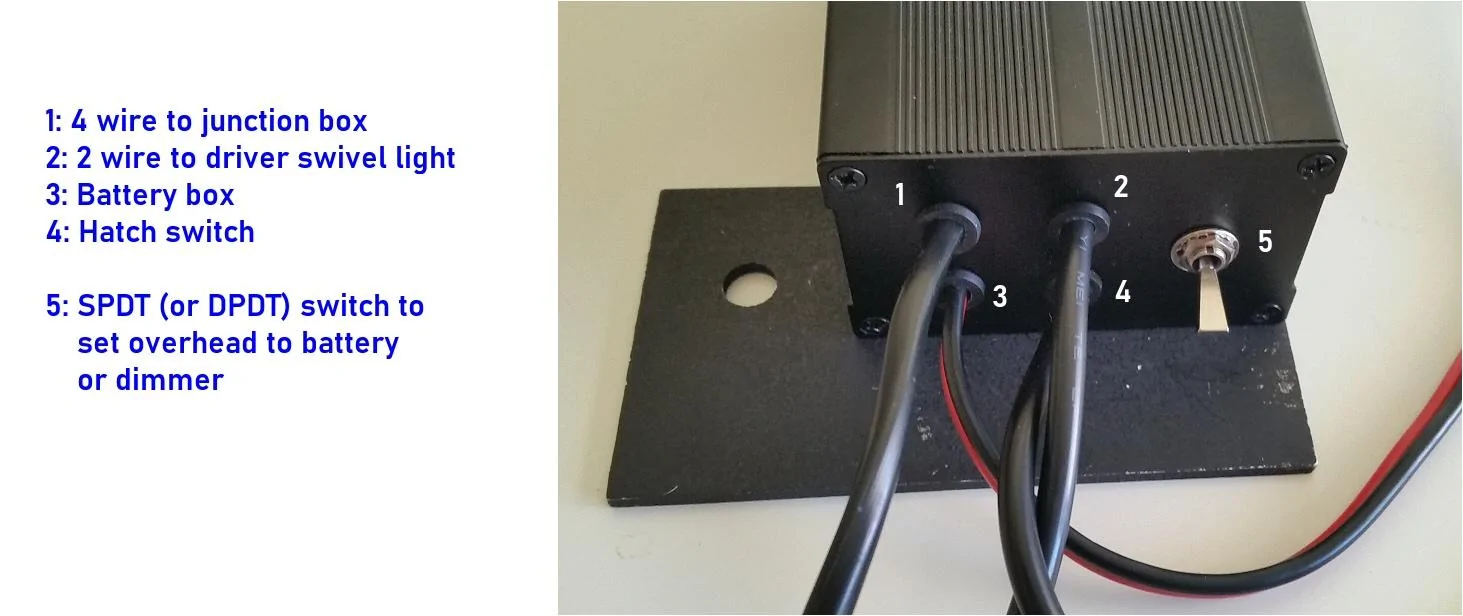
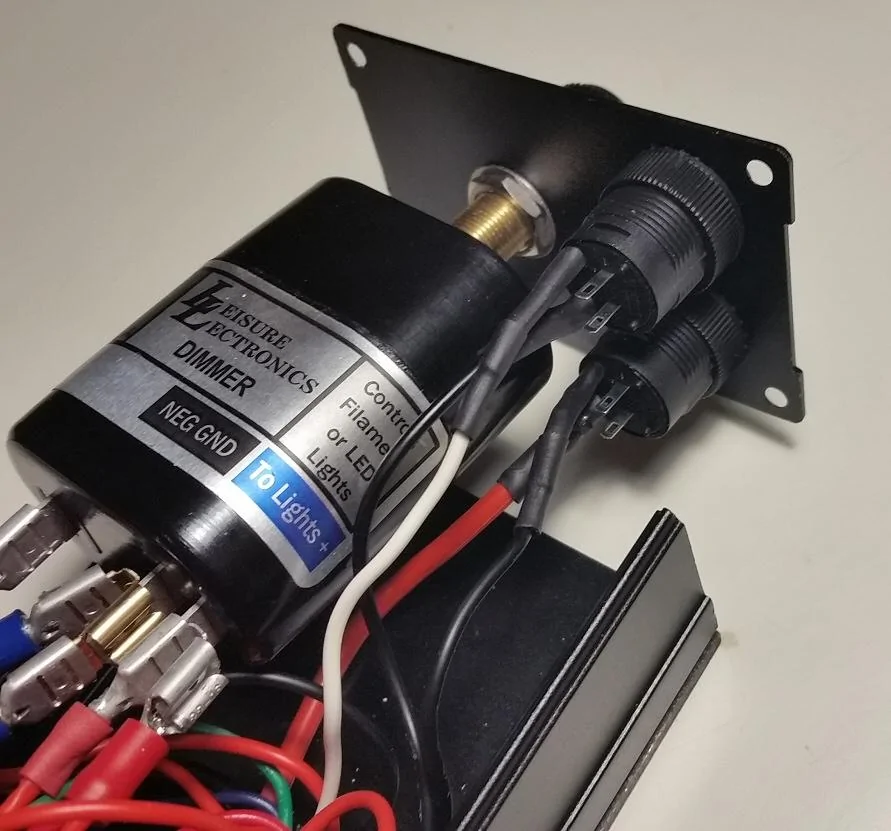
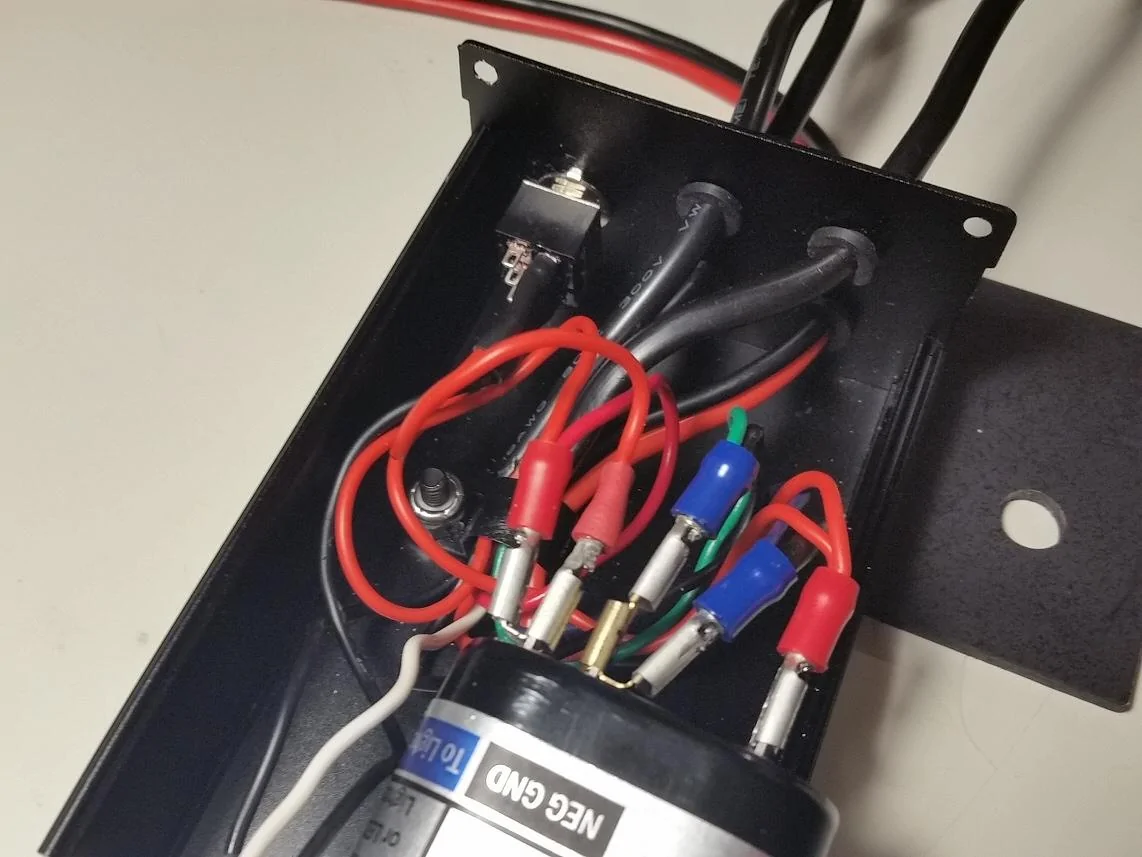
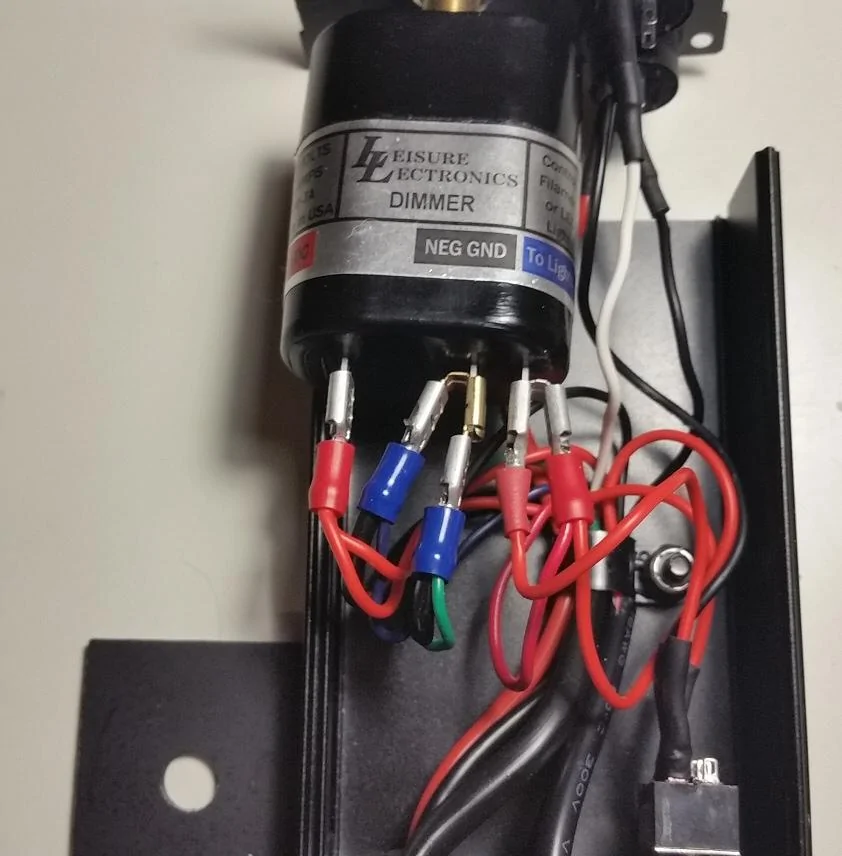
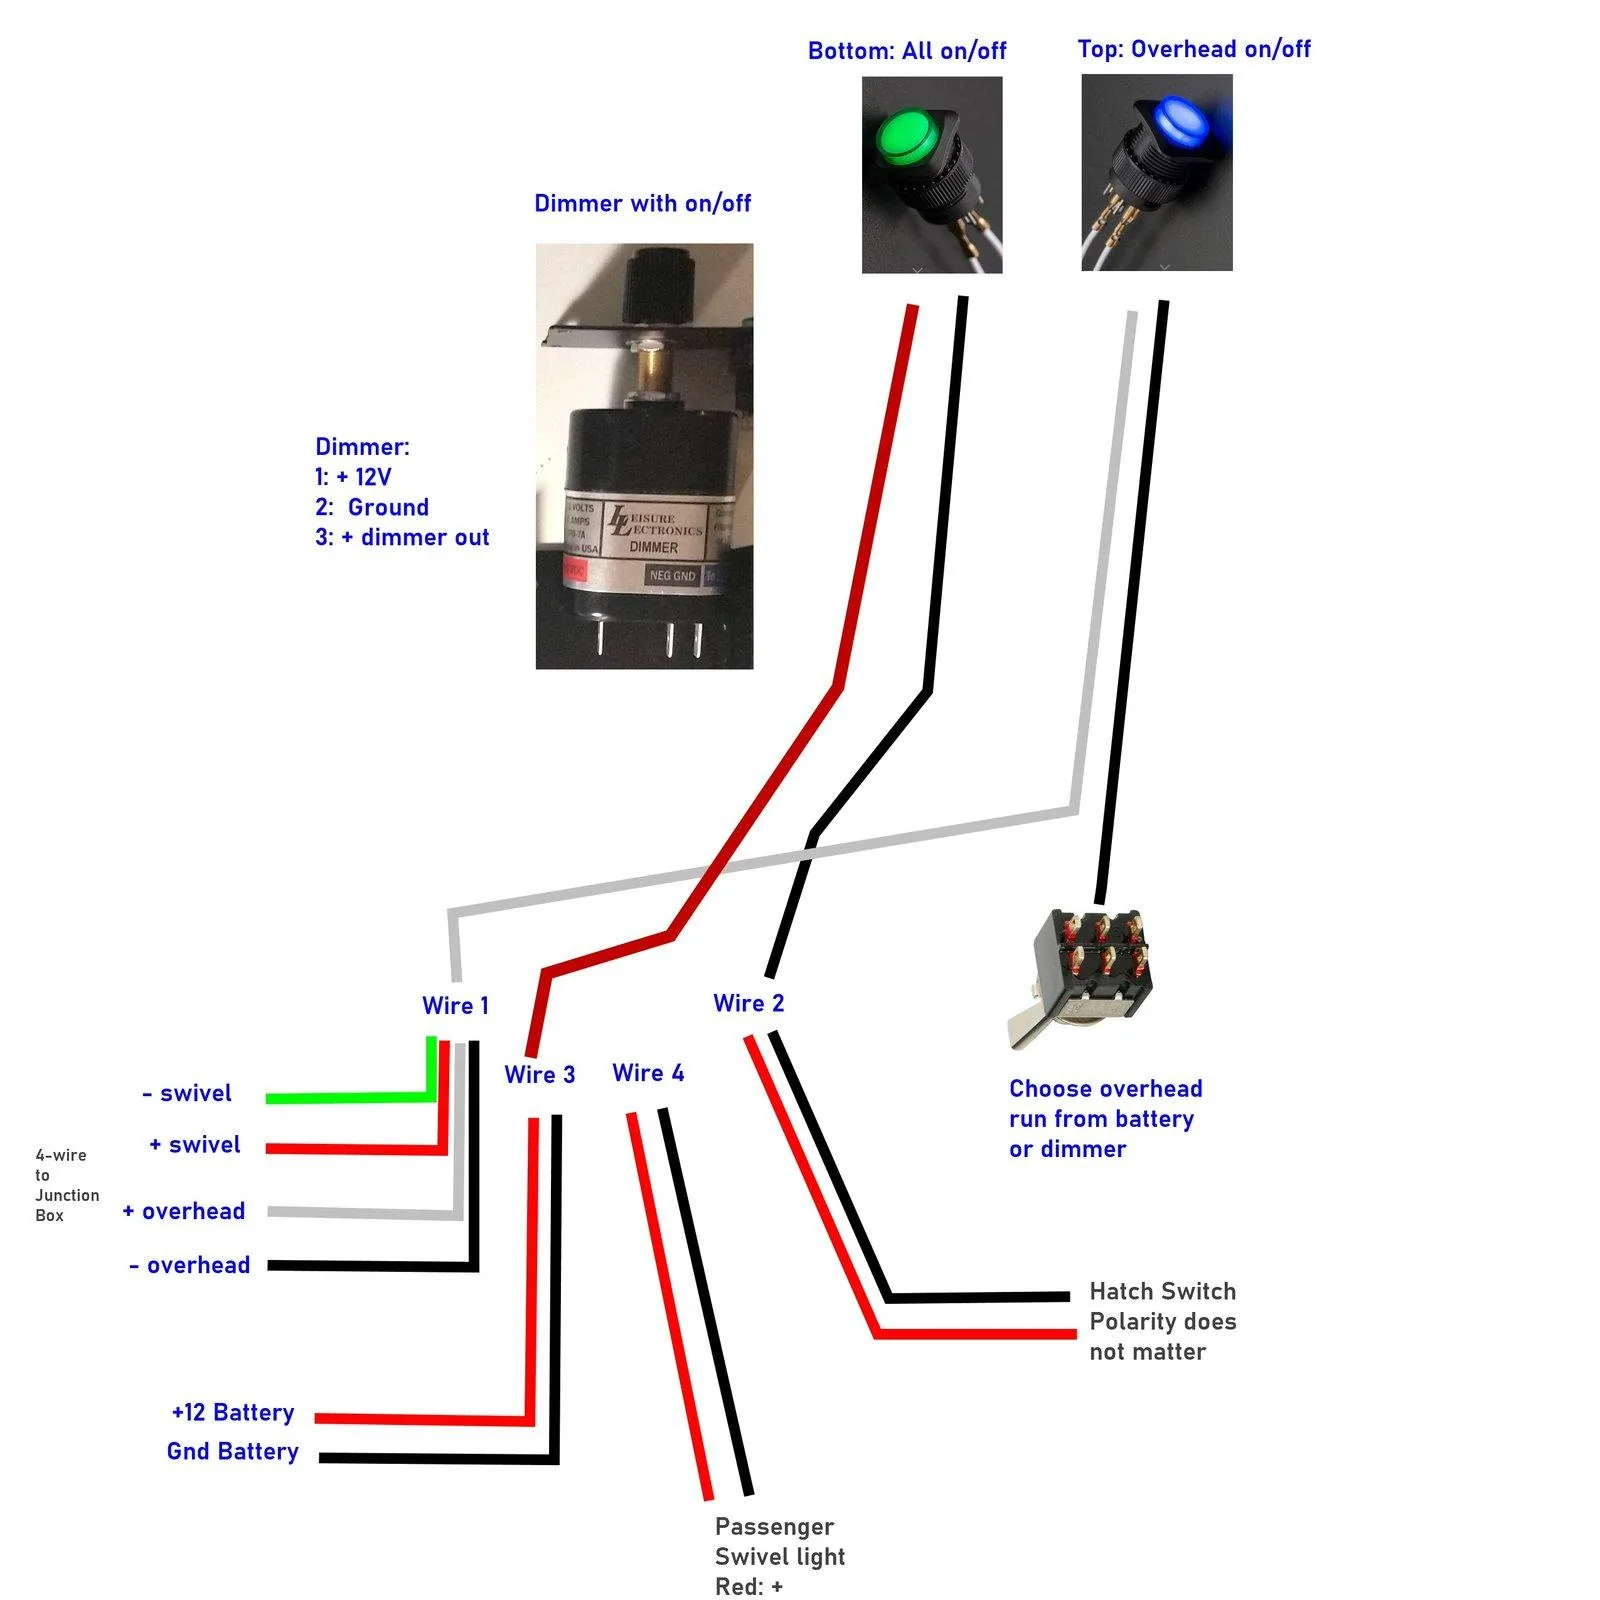
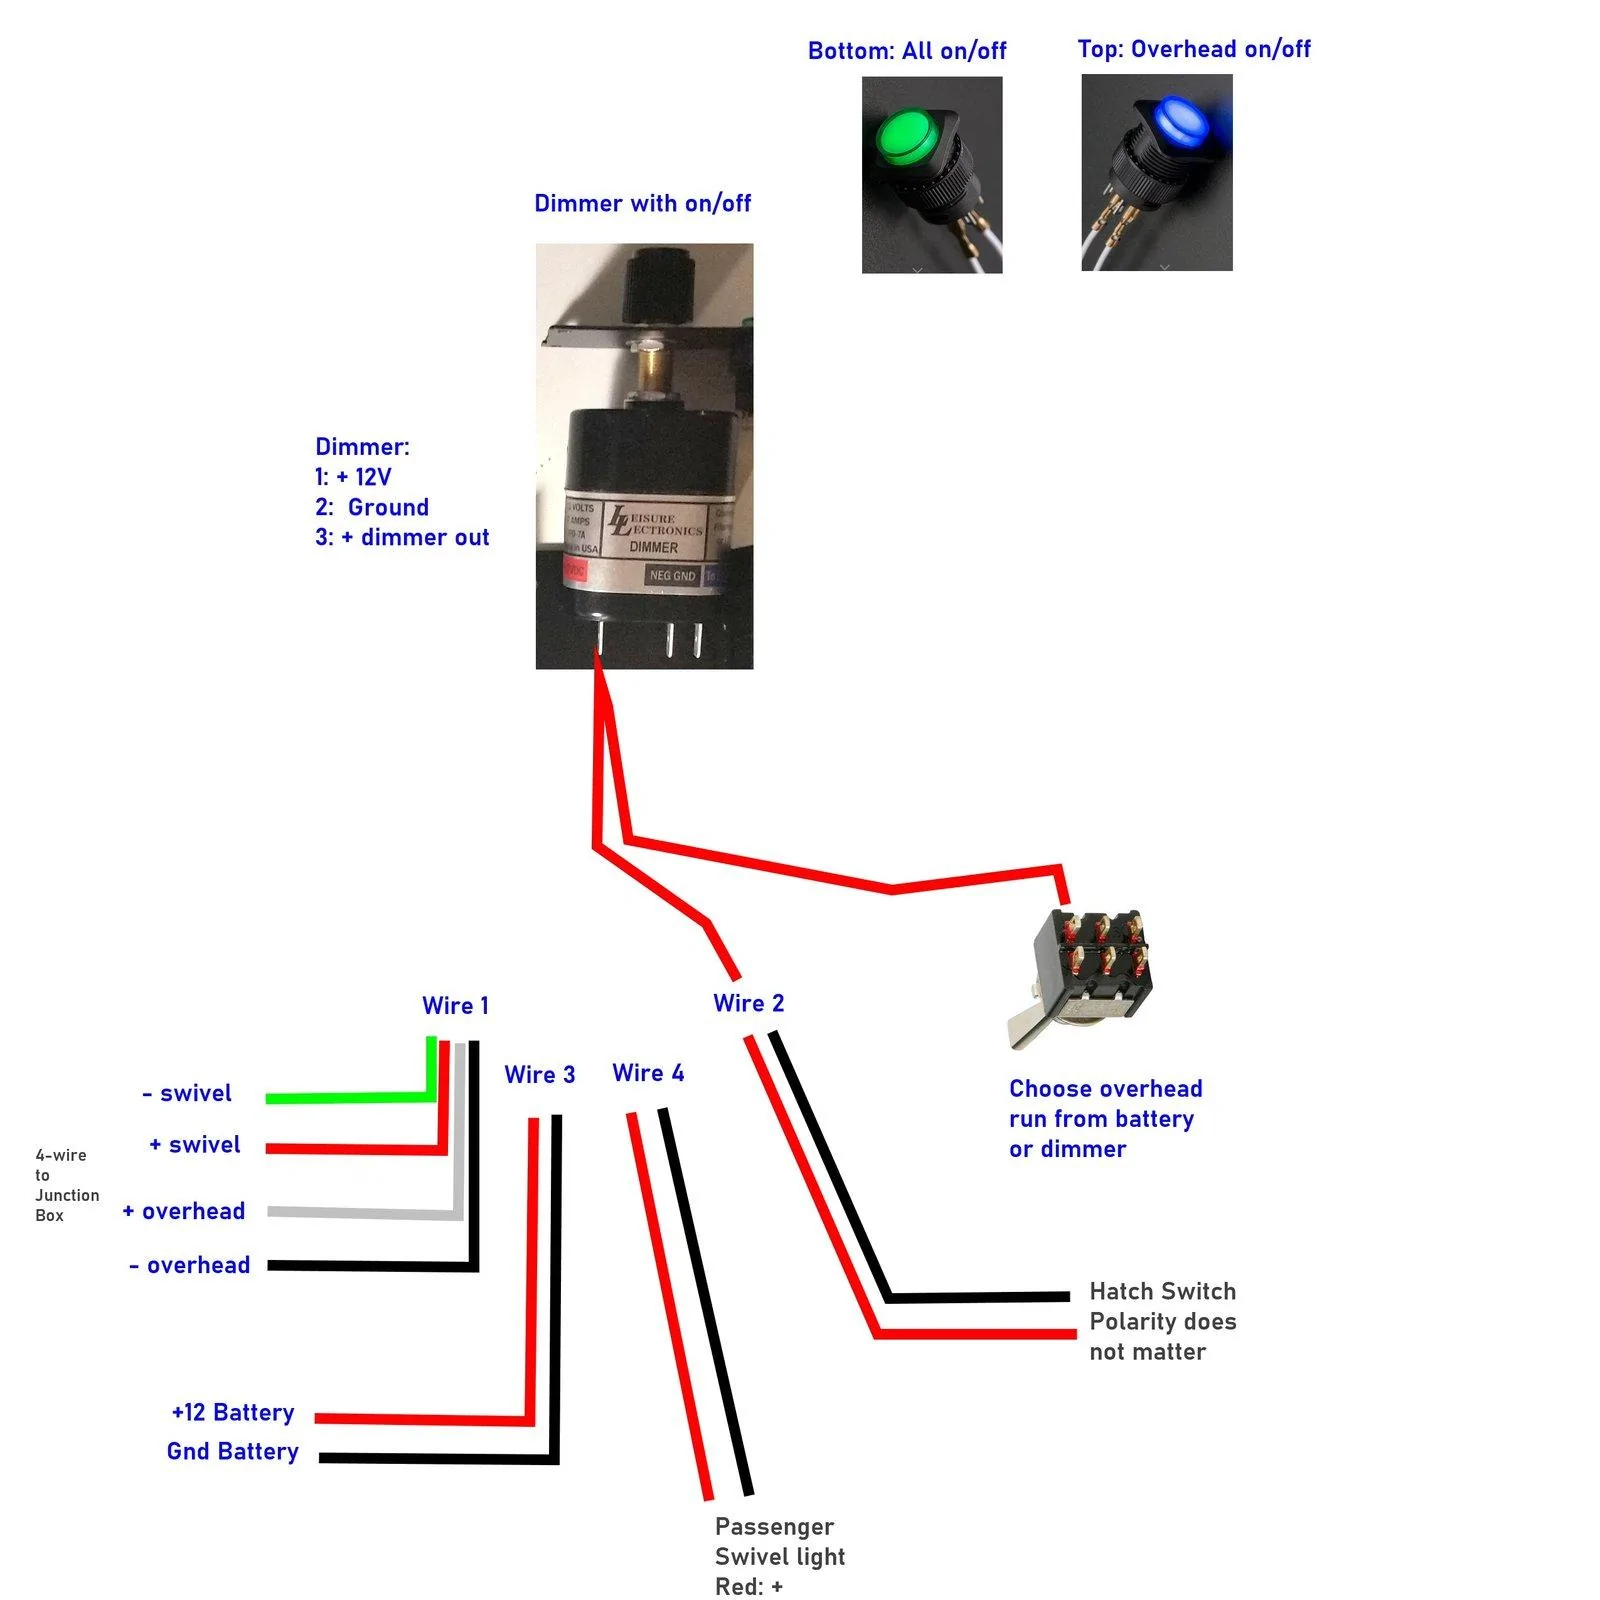
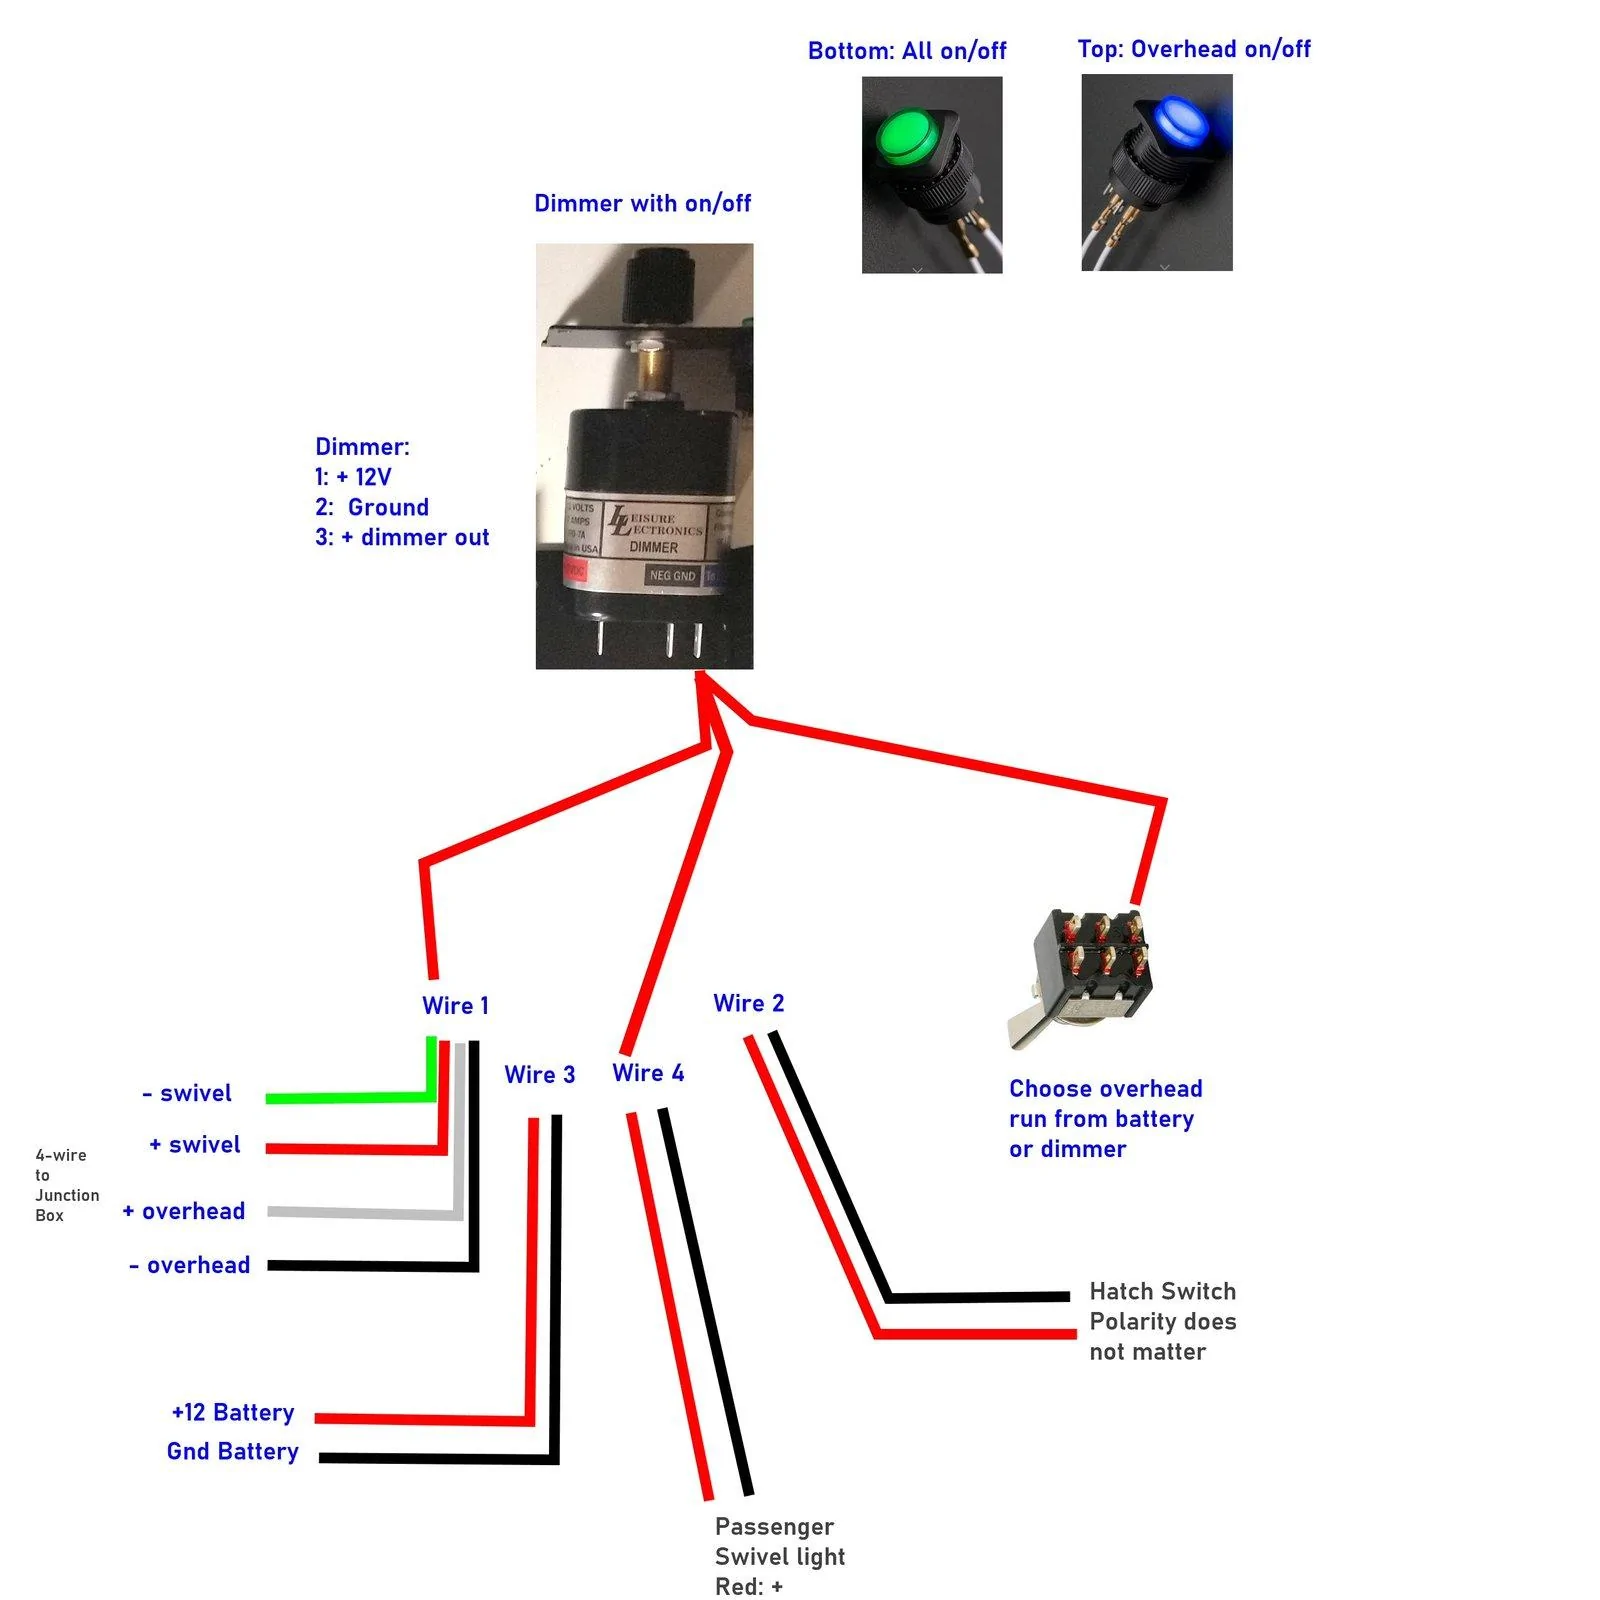
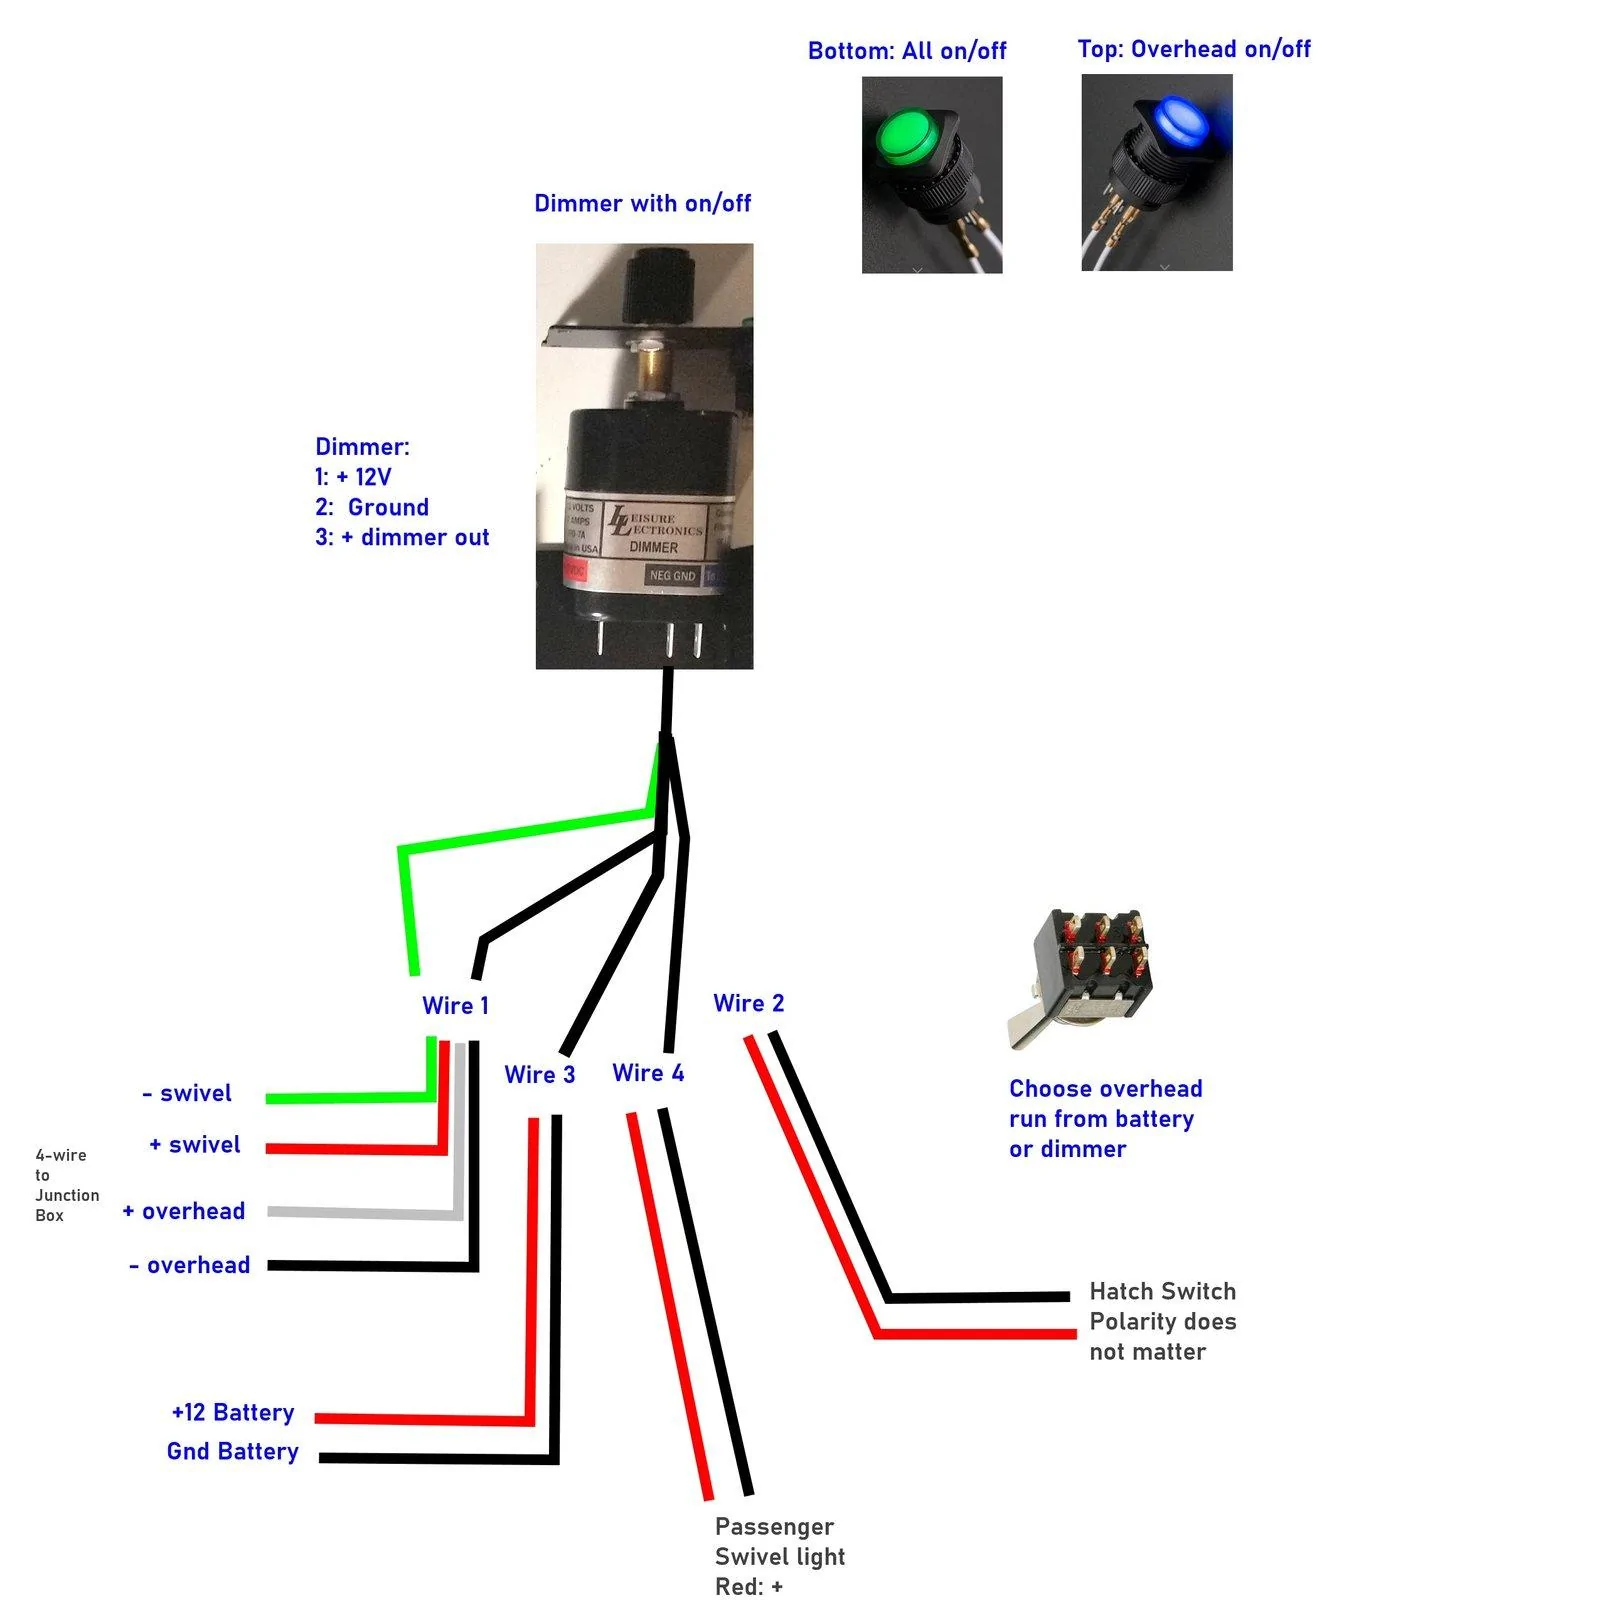
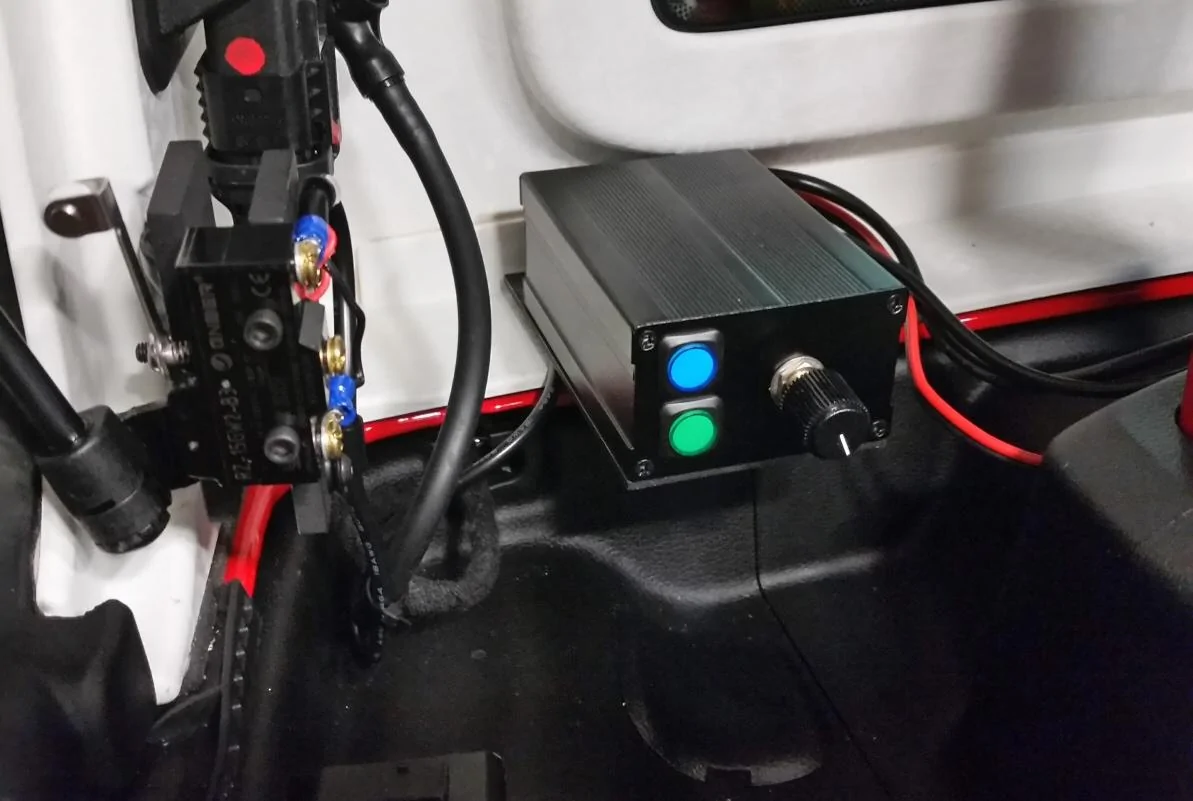
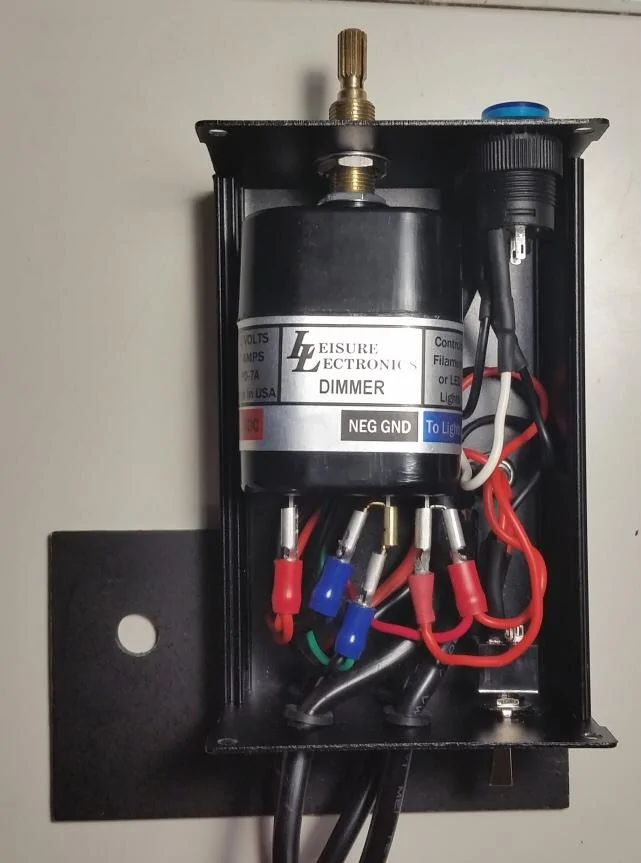
A dimmer box dims the lights, switches all on/off or just the overhead on/off and a rear switch sets the overhead to dimmer or to battery.


Each light has their own manufacturer switch as well.
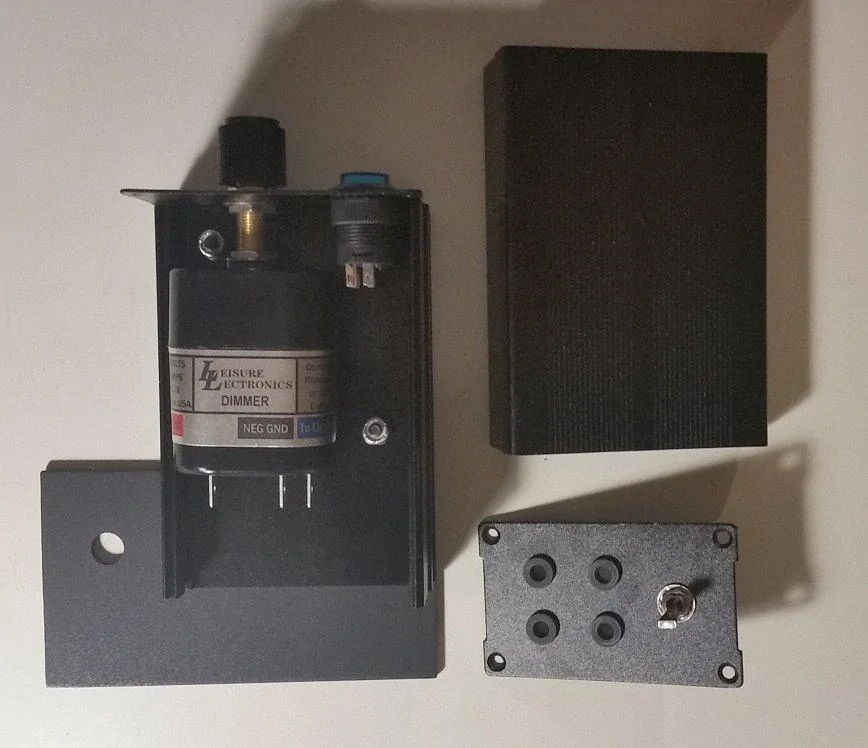
The dimmer box and hatch switch are custom made per this topic and will be described in four posts at least for details.
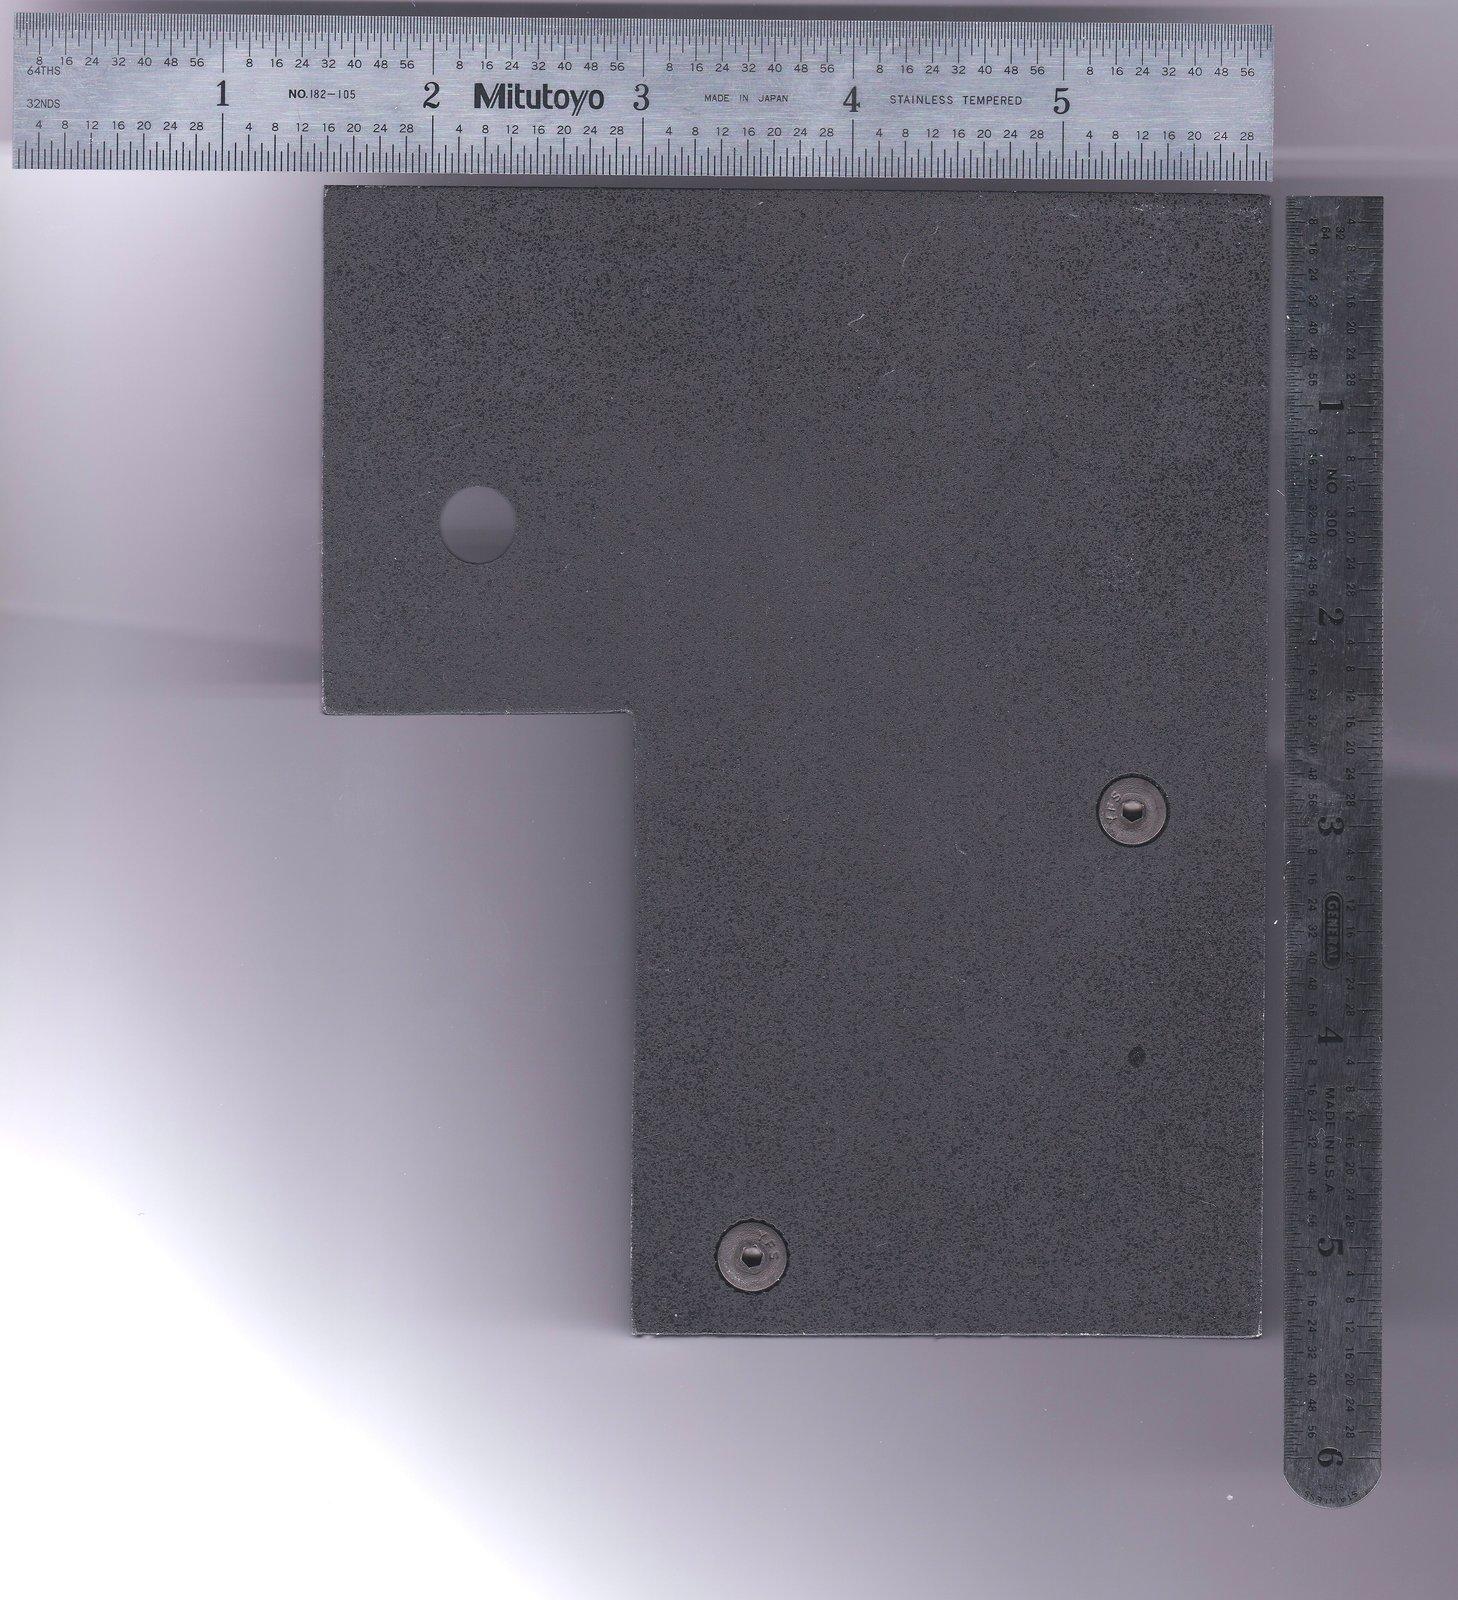
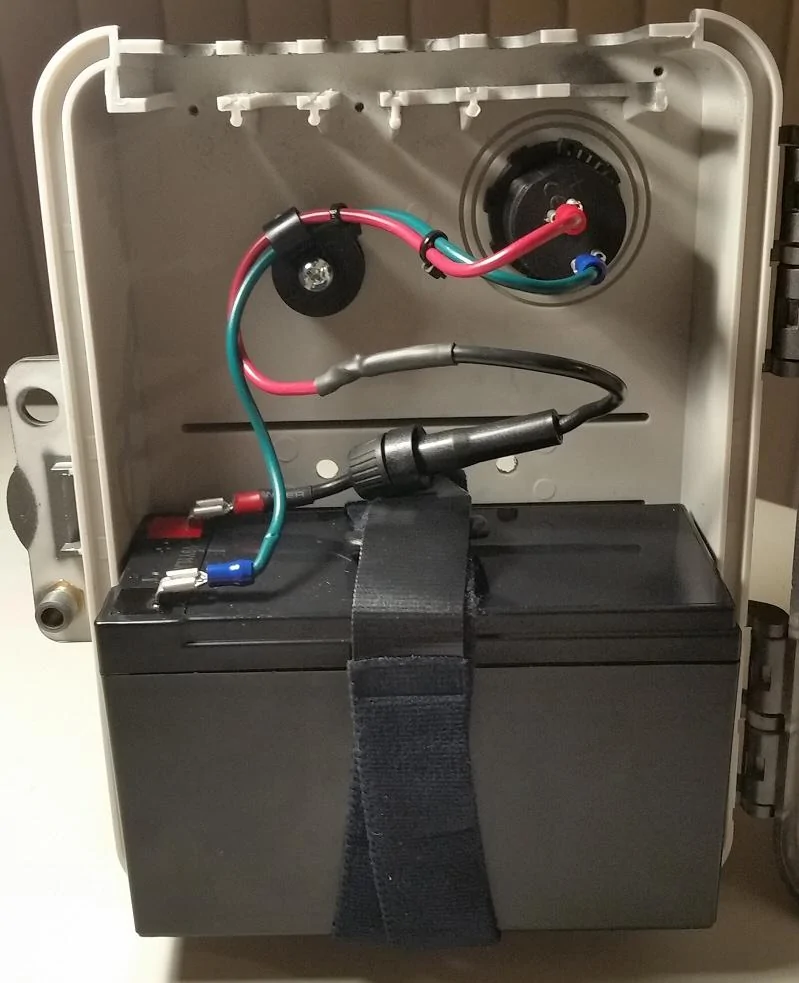
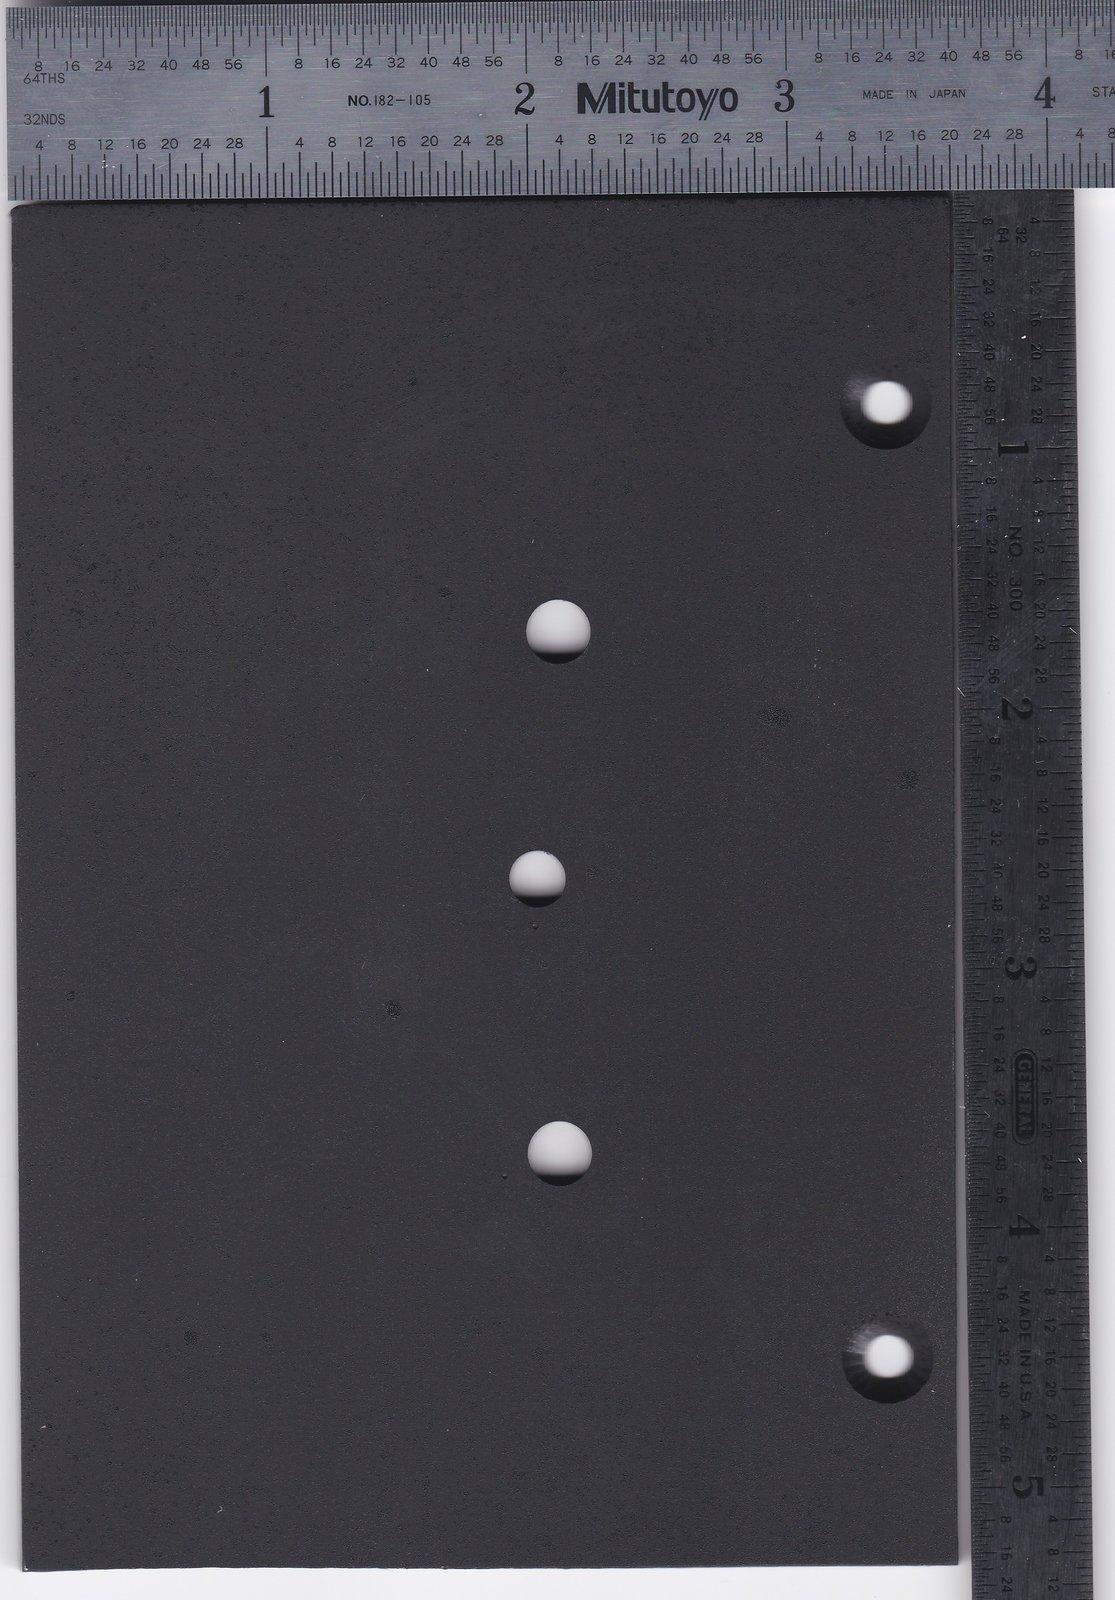
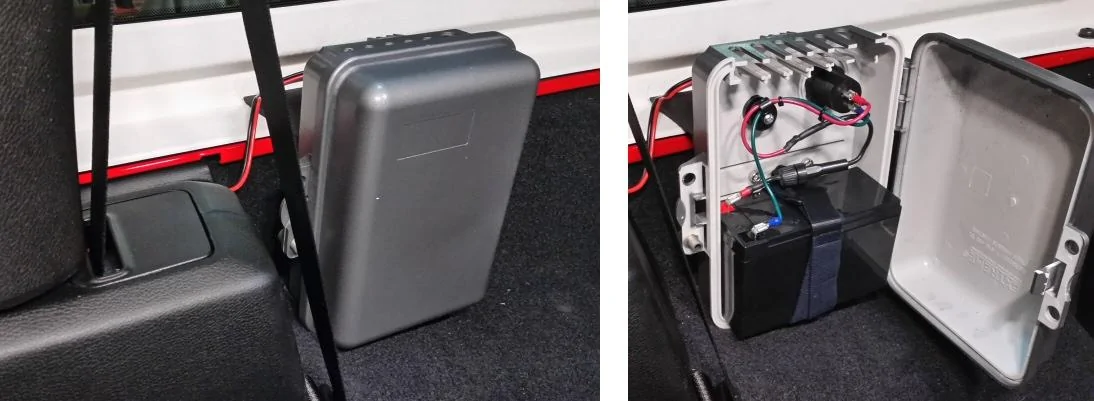
The lights are powered by a 12v 7 amp/hour rechargeable emergency lighting battery in an upside down outdoor broadband box that has a custom plate in back to use the single hardtop bolt.
The Jeep can be off, and the lights are not connected to the Jeep electrical system.


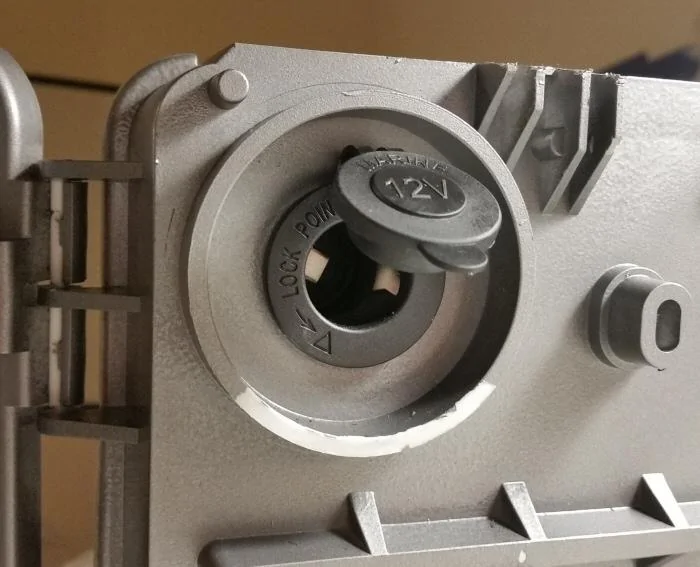
Optionally, as the plug is a standard lighter type, it can be pulled from the battery and plugged into the Jeep cargo port.

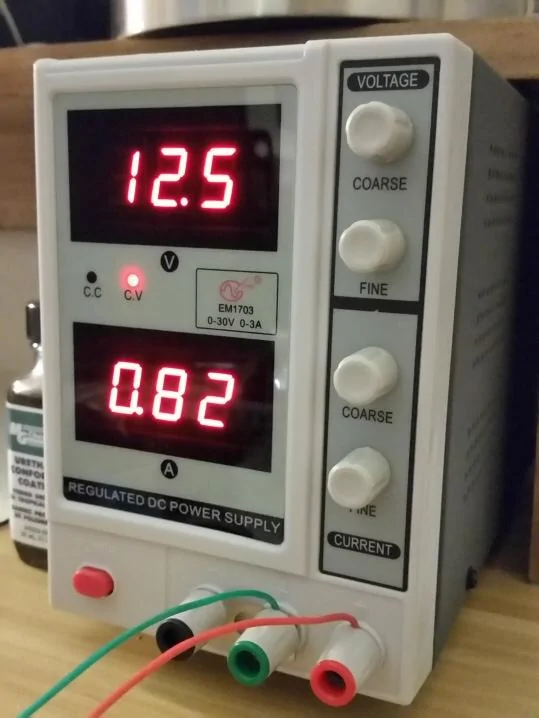
Amp usage is on the 12.5 volt bench test supply is:
Single swivel lamp 0.06 amps
Two swivel lamps 0.11 amps
Two overhead center lamps 0.71 amps
TOTAL: 0.82 amps / 12.5 volts

Using the online calculator for sealed lead-acid at batteryinaflash.com, the estimate
is 7.9 hours for all on and 54 hours for both swivel lights, or 108 hours for a single swivel lamp.
Note, the dimmer in this project is pulse width modulated, so that means that as the lamps are dimmed, the current draw is less, verified with the bench supply, so can be a way to stretch battery usage on camping.
The two overhead lights were mounted onto reflective foam covered in duck canvas with wiring inside the center channel. This provides heat reflecting liner insulation as well as serve as a light holder. See a previously posted DIY for the liner construction materials and notes here: DIY stitched liner
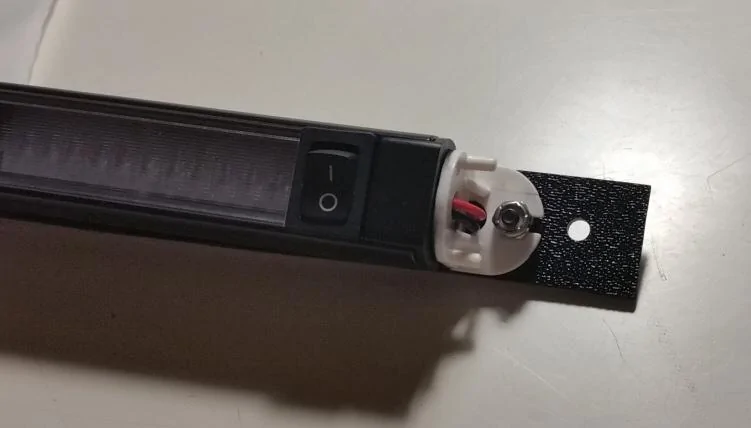
The two rotating lights are attached to plastic bases and Velcro attached to the side roll bars.
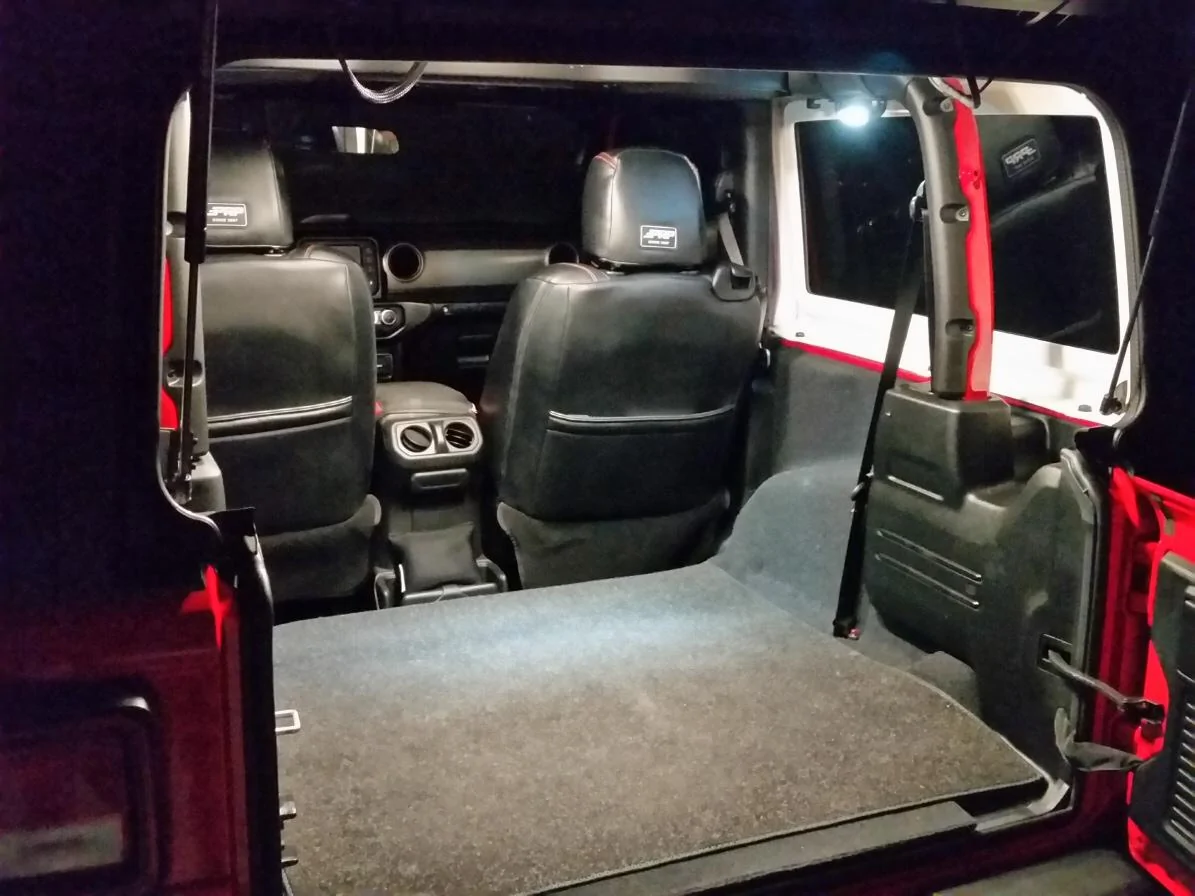
This project was setup in a two door Jeep with the rear seat removed. The floor has a custom pad and custom carpet to create a soft surface for sitting in the Jeep for tailgating or could be used for camping. The lighting and liner bring all three projects together to complete the cargo area for planned modifications. See a previously posted DIY for the carpet liner if interested: Rear cargo carpet liner and pad
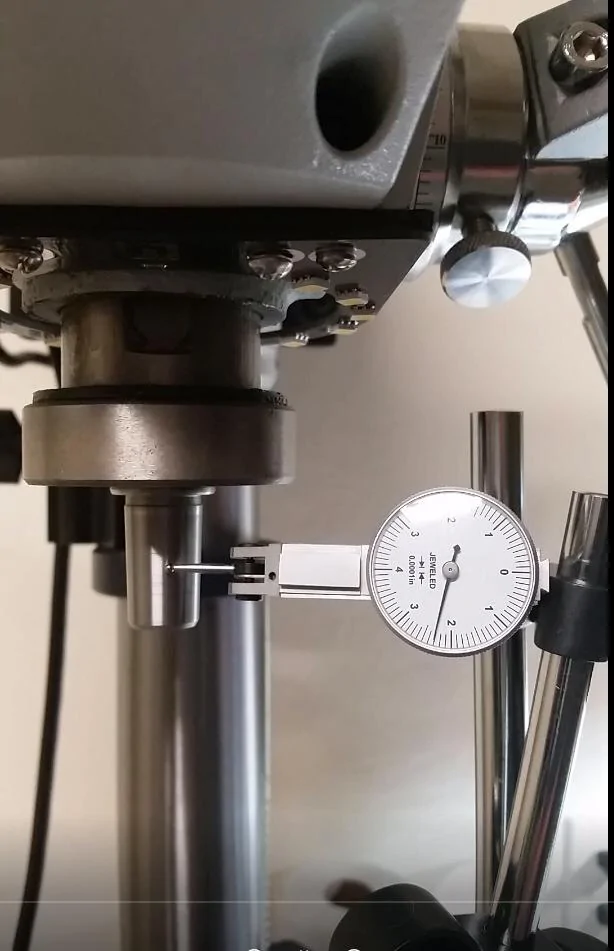
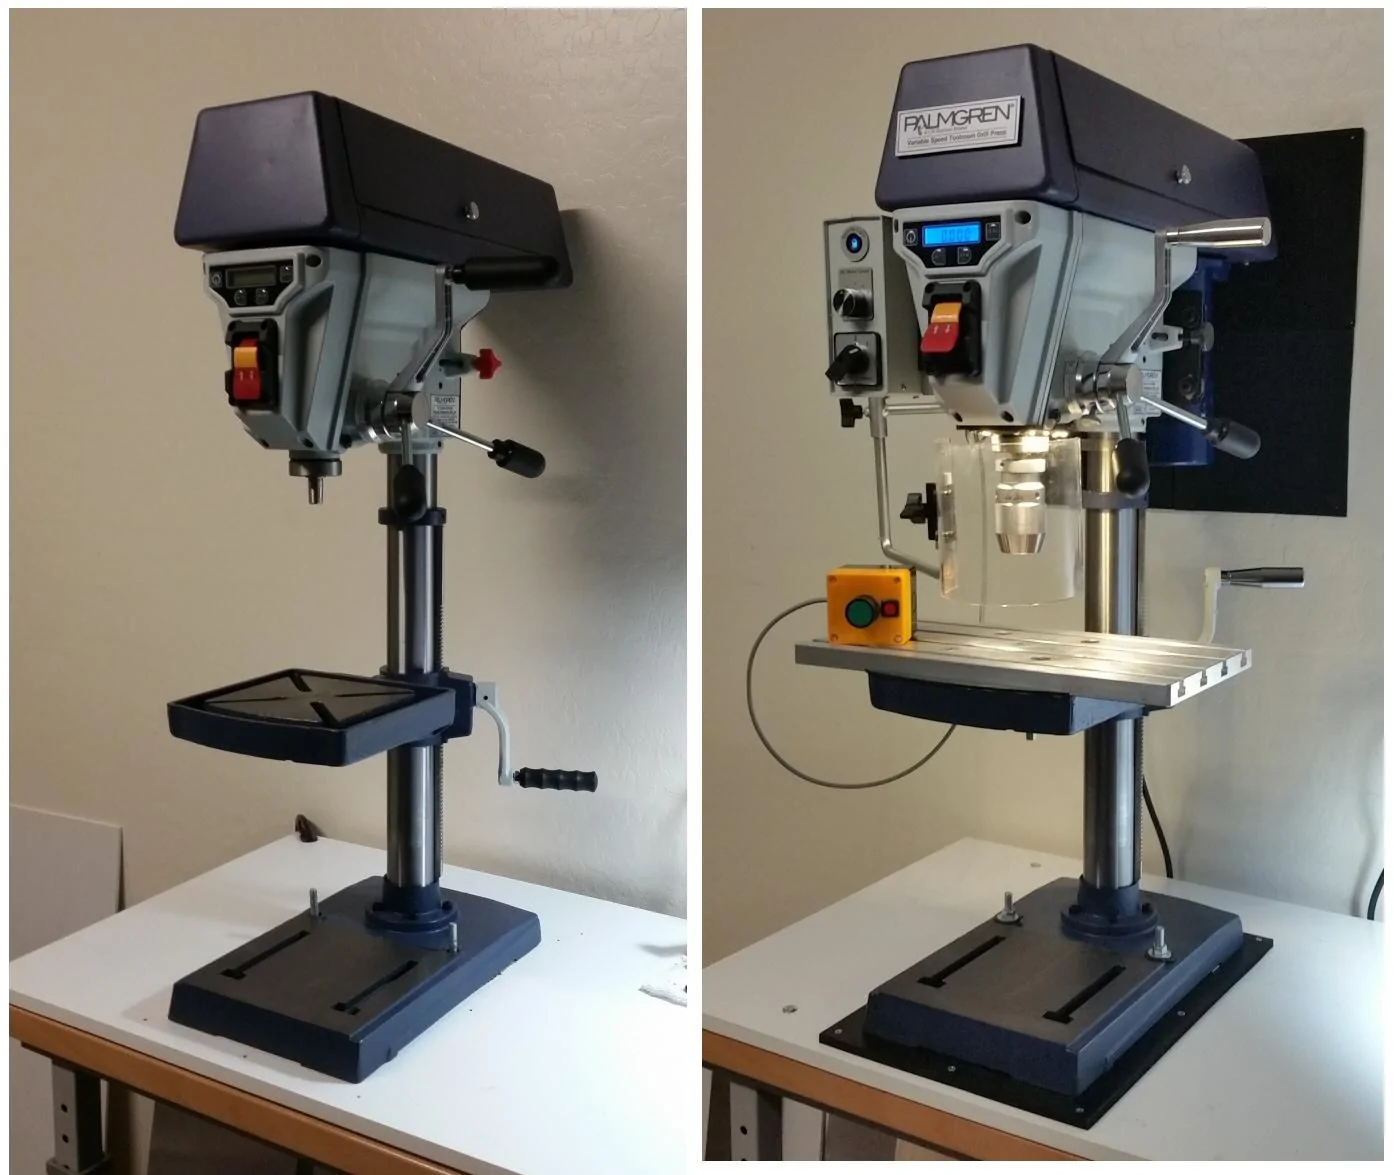
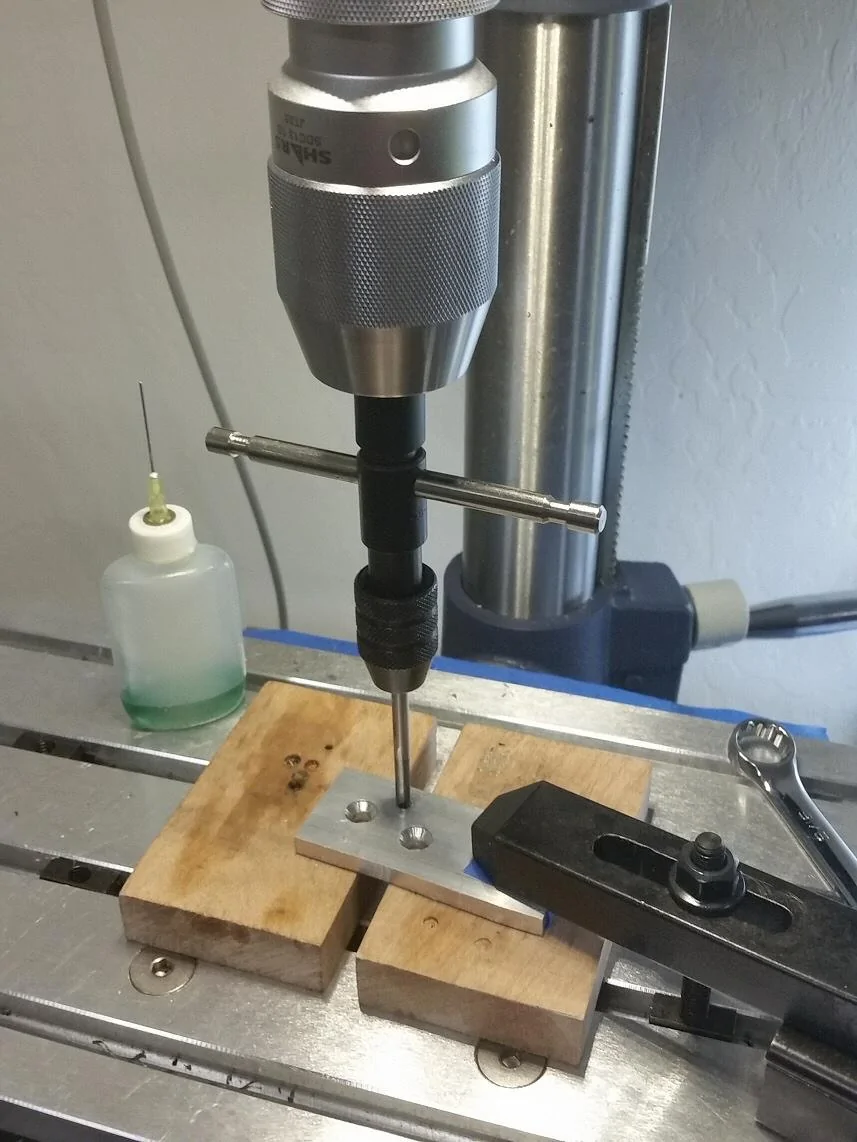
There is a lot to this project that was created over a month, with other projects. If you are experienced in light machining/drill/tap and soldering electronic projects, this will be easy to understand with the part sources. If new to this, it's nice to learn. I can try to help with questions via posts or PM. At the end are some source machine pics to see what I used for tools, such as 12 inch bench drill press and tap tools if this is helpful.
There may be more interest in a particular part, such as someone seeking overhead lights only and intending to use the Jeep power to be a smaller project, so we'll divide the project into these sections with parts list per section below. Given the time to write these and try to remember all the details and pics, will post these one at a time, starting with the center liner, expect to finish posting all the notes in a week or so.
If intending the whole path, it would be helpful to see what is ahead before starting as with any project!

Parts for only the center liner with lights:
Tools/misc:
The liner is custom made of duck canvas hand stitched over reflective foam. This follows making front headliners of this type and this is another part of that overall project for just the liners.
See DIY topic here for liner info on this 29” by 4 inch center liner: DIY stitched liner
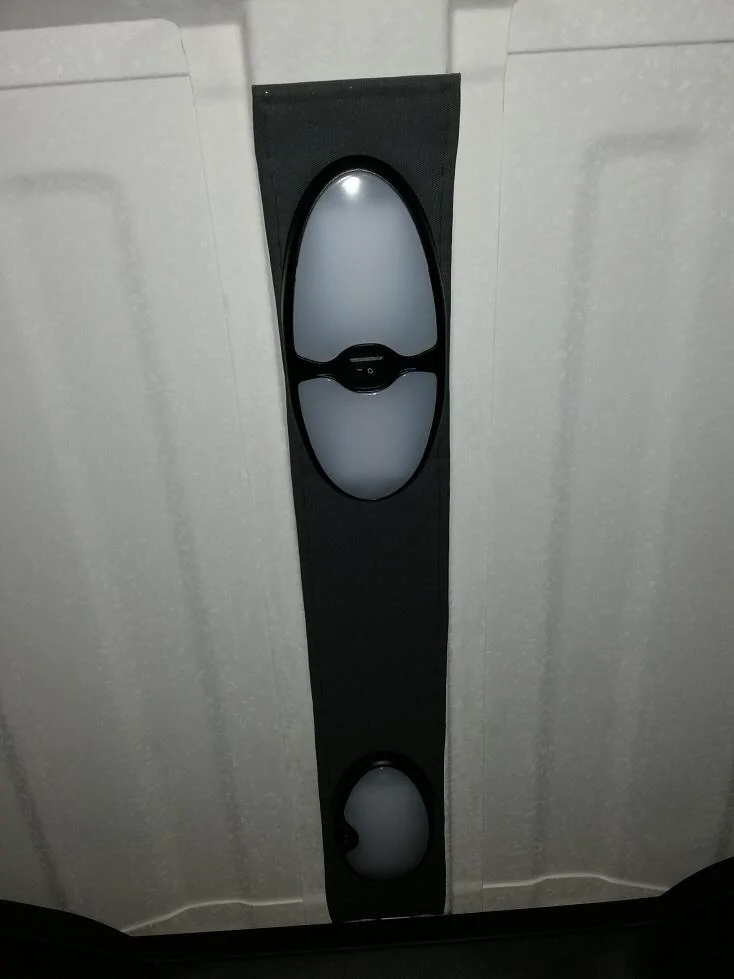
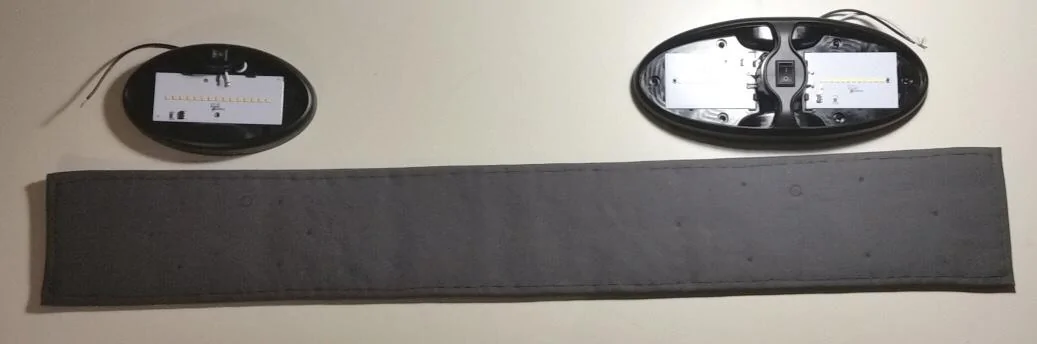
The lights are both made by Dream Lighting, bought via Amazon, with the larger twin lens toward the hatch and the smaller single lens light by the center roll bar.
One note, I had to check over time, for the Dream Lights wiring color coding, black is positive and white is negative. Believe this may have some RV precedence and of course has coding for AC – but world, please, red for DC positive, black for negative to reduce confusion. Note for manufacturers.
This overhead liner began as cutting a 29” by 4” piece of reflective foam and about an inch around larger piece of canvas and hand stitching using the instructions in the liner post.

The larger twin lens lamp was placed 1.5 inches from the hatch side, and the smaller single lens was positioned 2.5 inches from the interior side.
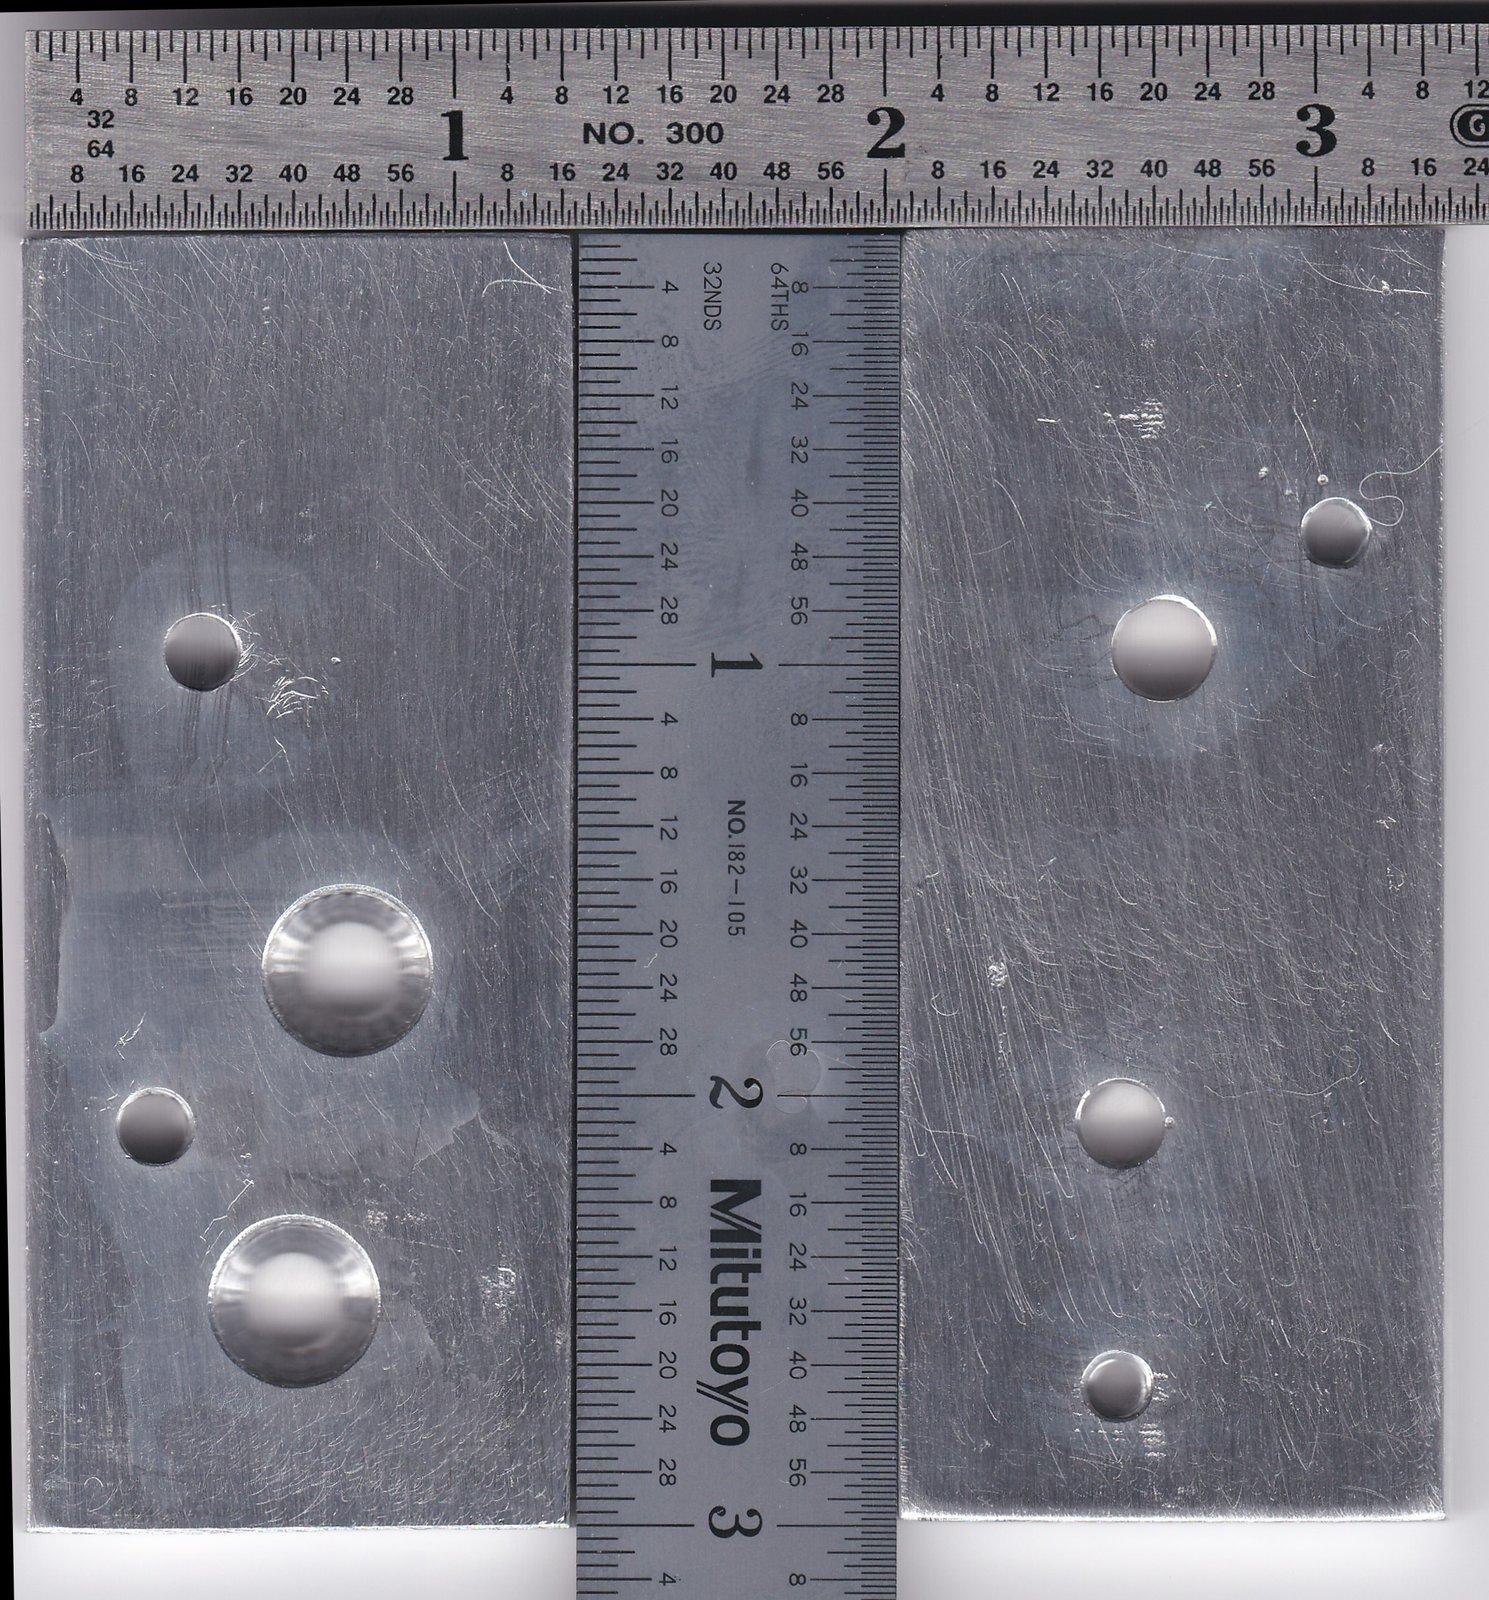
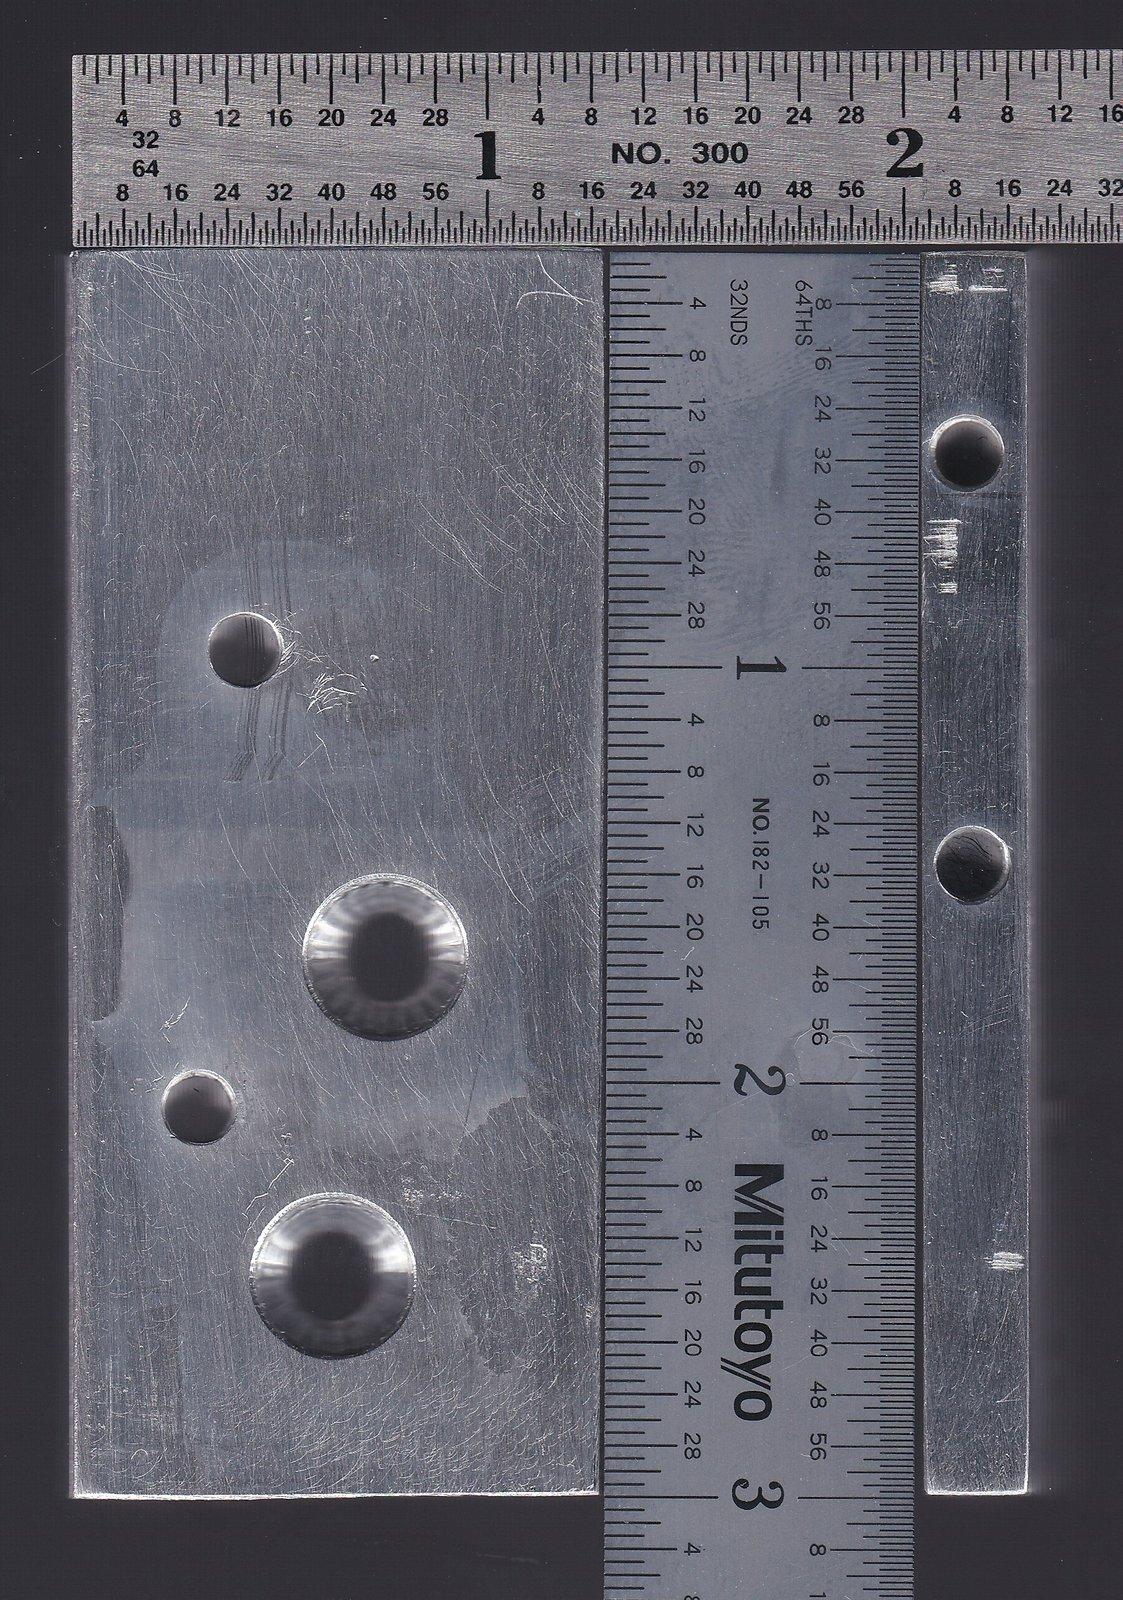
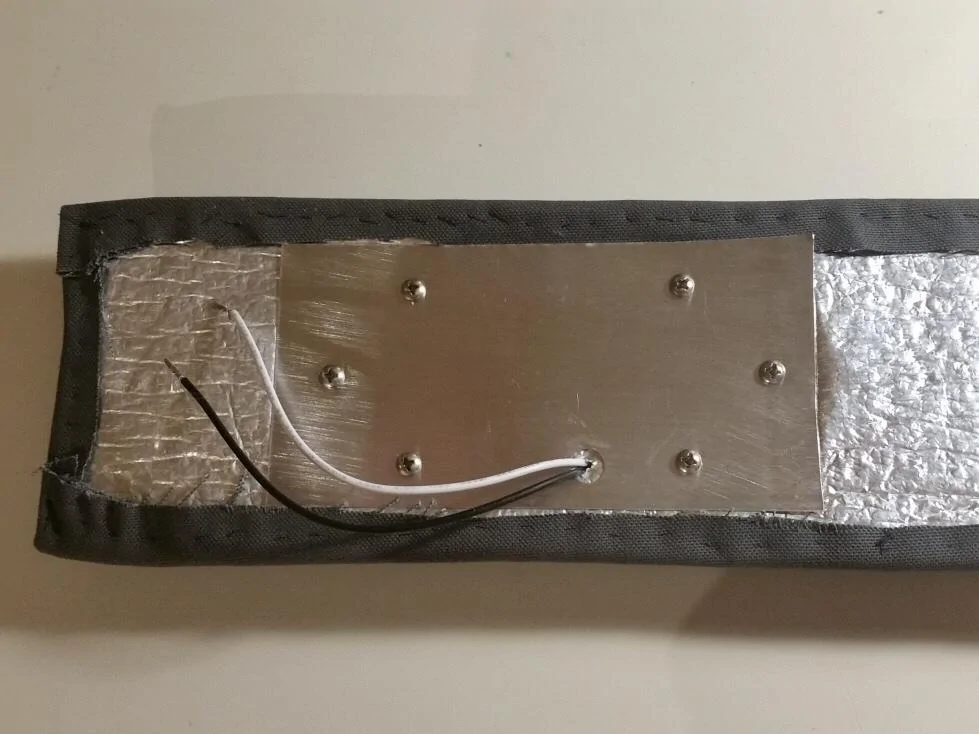
To give support for each lamp on the fabric liner, I purchased a couple thin 0.016 inch aluminum source sheet metal pieces from Ace Hardware, in the rear bins of assorted rods and sheet metal. It's made by K&S metal, any source will do. It can be cut with snips, but I left them in the plastic packaging to mark dimensions and cut with slow speed jigsaw. I cut a 8.5 inch by 3 inch piece for the twin lens light and a 6 inch by 3 inch piece for the single lens light, check that, is from old drawings.

With the lens cover removed – used a small screwdriver, carefully, trace out the six screw holes and approximate where the two wires will exit onto the center of cut aluminum metal sheets. I used 6-32 machine screws and nylanuts. I believe they were 3/4” length screws. The heads are on the hardtop side and nylanuts are inside the lamps to avoid scratching the Jeep or making a bump in mounting the liner.
NOTE - from testing the lights prior to install, I found a memorable switch orientation is to have all lights with I of international "on" be toward the driver side.
Or for the single lens center lamp, the switch unit is on the driver side. I used this orientation for overhead lights and the swivel lights.

After cutting the sheet metal pieces and drilling, lay them out on the front side of the liner fabric and trace over the holes to the front of the liner.
A cautionary note about drilling thin metal here and plastic later for the swivel lights: drilling thin materials without clamping is a great way to severely cut oneself quite badly, especially with drill presses, Google it.
Fortunately I learned that long ago to not have such issue, along with no long sleeves, nor rings nor long hair around bench drills, lathes and other heavy powered tools.
Use clamping to a table, even a portable wood saw, clamp everything before drilling.
Drill bits like to pick up materials and swirl them and holding the material is the wrong place to be.
Using small scissors, opened, carefully punch a single scissor blade through, gently, for 6-32 holes, and again and then the whole closed scissor for the wire pass through. Check the sheet metal is correct side as the metal will eventually be on the hardtop side, not the fabric side.
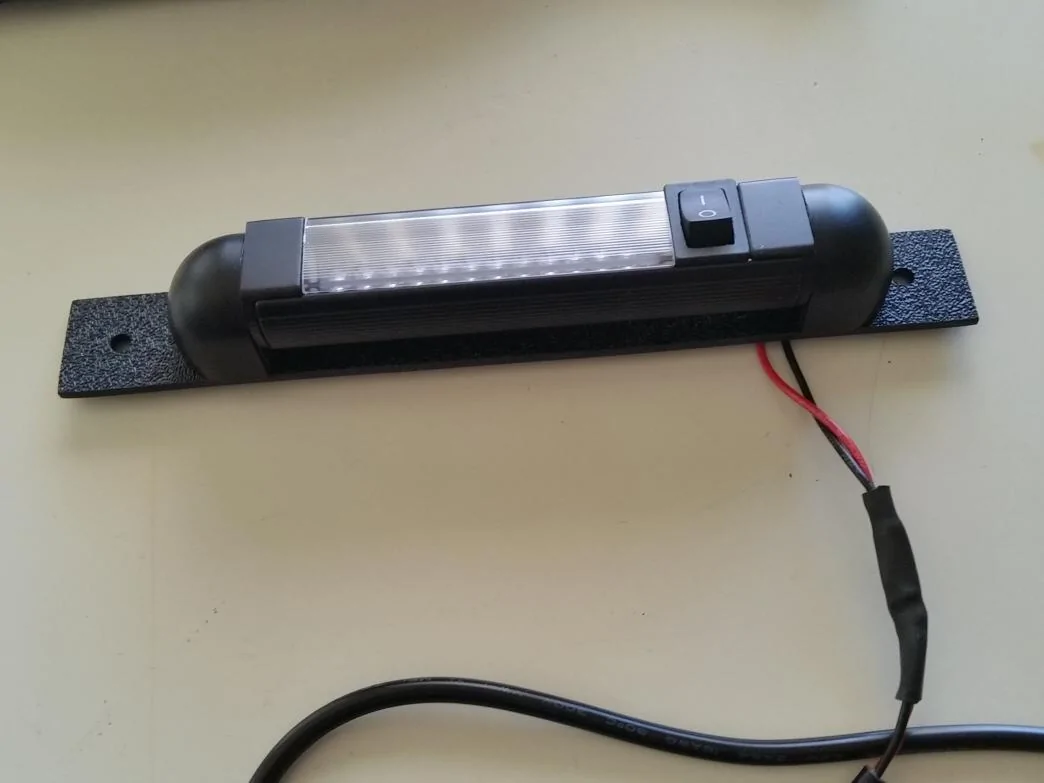
Lights can then be mounted with lens covers off, with sheet metal on top and secure with 6/32 screws and nylanuts.

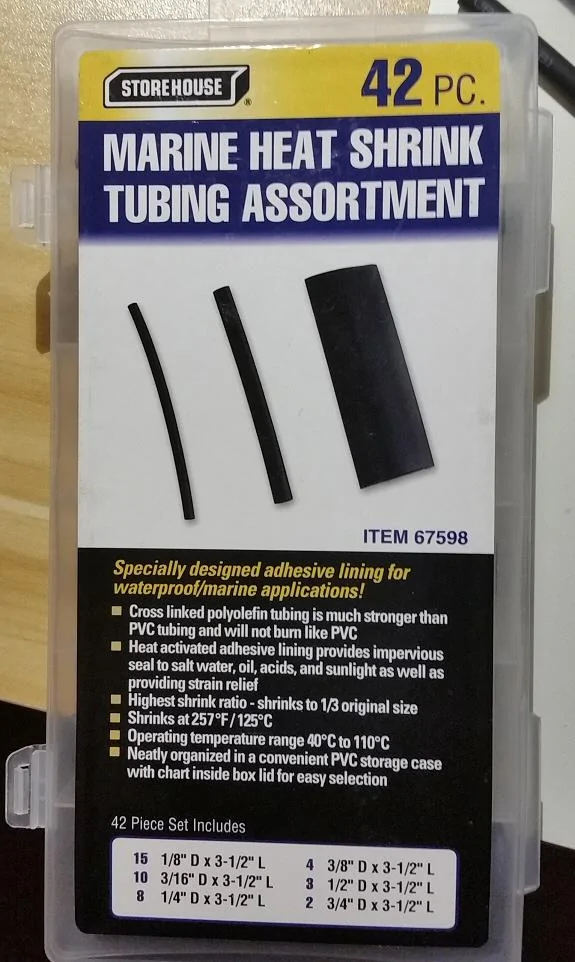
For wiring, I use “lineman's joints” (google) i.e. phone company lines on poles and then sodlered those joints, which they don't usually do, but I like it soldered, and have marine grade heat shrink tubing already on the wires to cover each wire, as well as I used another larger tubing to then pull down over the set of two heat shrunk wires to secure it well. In hot climates those wires will be in higher temp with vibration to secure well from say tape peeling off and sparking. Don't use the cheap hardware store heat tubing, it's thin.
For this center liner, there will be the two lamps and the wire exiting to have three sets of wires. I used about 1.5 inches of heat shrink tubing over soldered connections, and then had a larger 3 inch tube to slide down over the + and minus wire tubes. Since it's thick with three wires, the final outer tube was bit large, not as I like with shrink fit over the wire ends, has to do with how much the tubes will shrink, so I wrapped electric tape over the final assembly - but I'm not using tape to insulate, only to assure the tubing stays in place with vibration, probably could be omitted, but it's sealed up into the hardtop so I like it's secured.
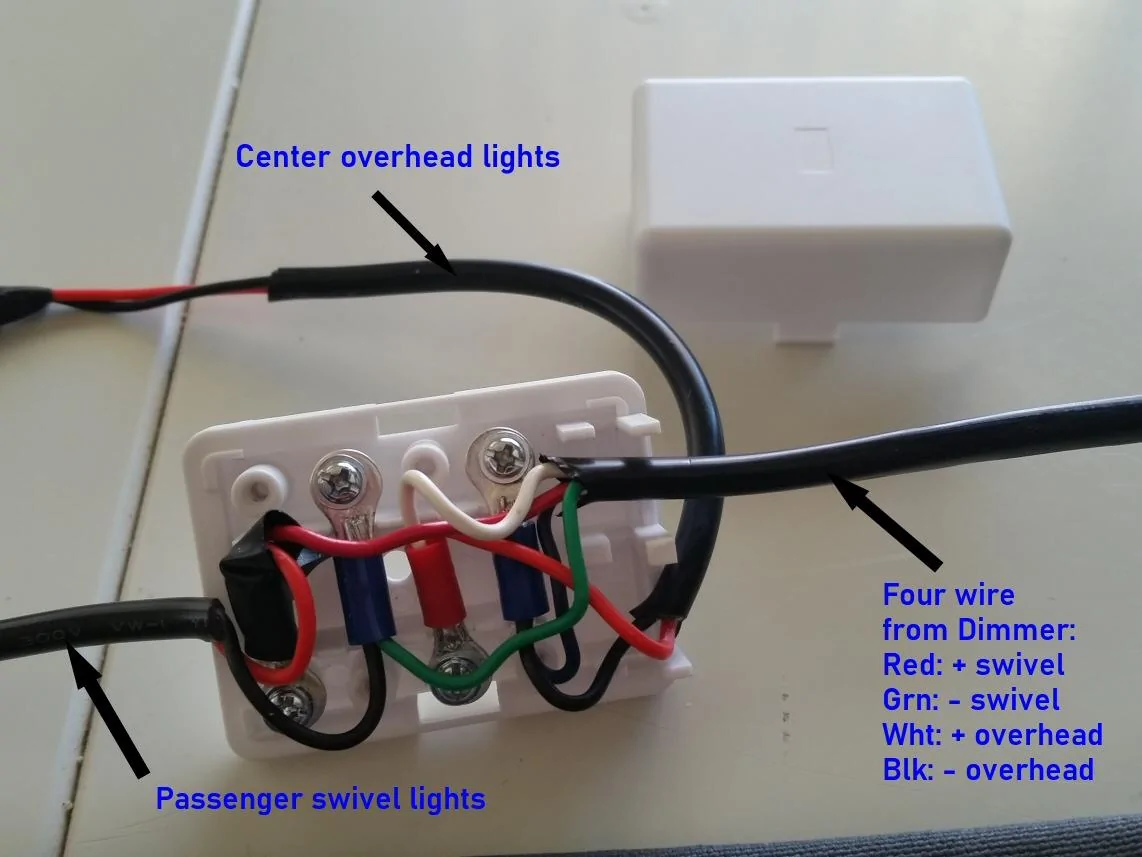
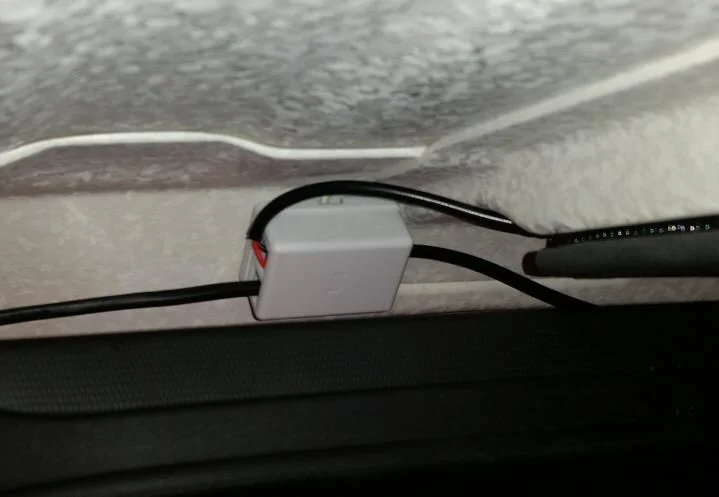
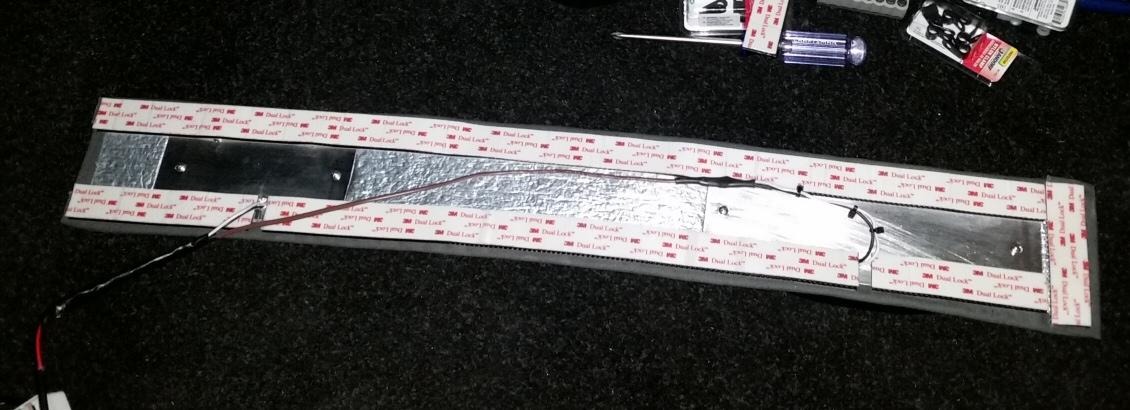
From here you'll need to figure how you intend to power them. If planning to do the whole dimmer/battery/hatch switch and swivel lights, then leave the wire long about a foot. There will be a phone type junction box nearby to wire in these lights and 3M taped to the top of the hardtop as shown below for another post on wiring all together. If not, then it's on to your own wiring plans.

For making this project, I created all the pieces except the hatch switch and had it all working on the table and then took it out to the Jeep to install relatively fast, in a late evening.
I recommend that to hold off on mounting until all the wiring is done as it's easier to solder on a well lit table and test it all as shown below.
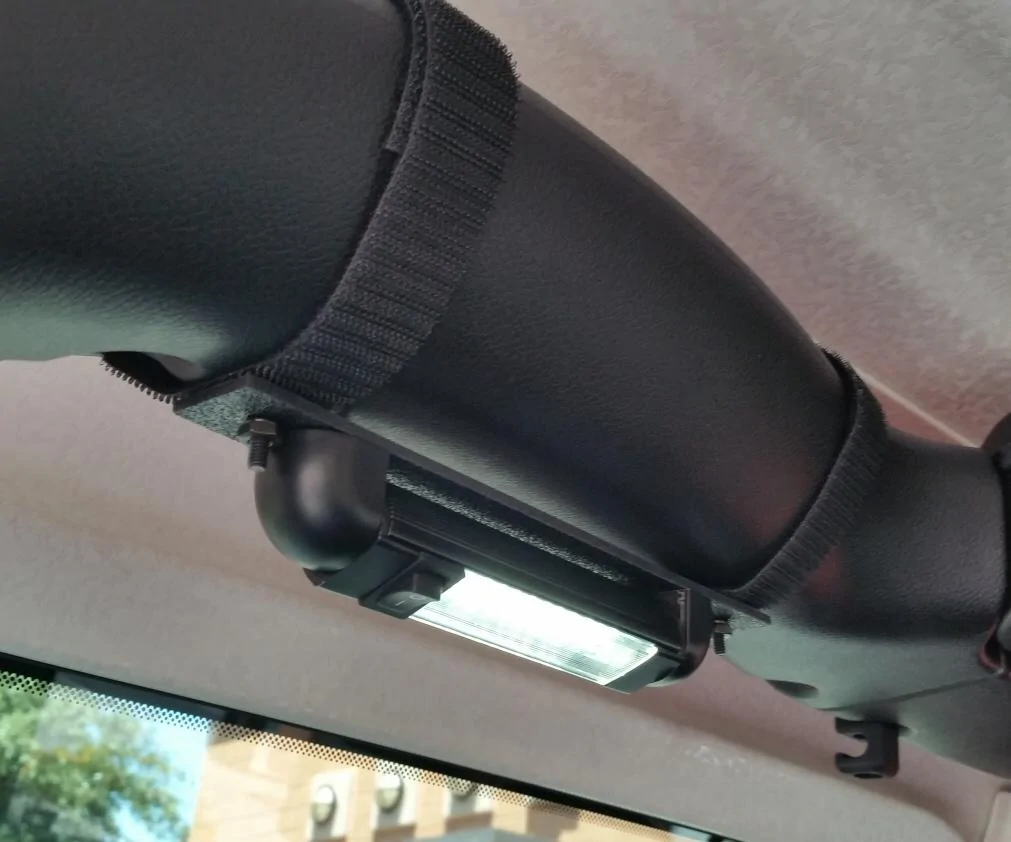
IF not going to be making other parts of this project, then for just mounting the liner, use the 3M TB3550 hook and loop tape and cuts pieces to go around the exiting wires, with a cross piece near the hatch side to secure well and open for the interior side as shown below. It's helps to have someone on the other side, I did it alone, but peel the tape near the hatch side and place there, around the angle, first testing the placement and being sure the wire is up inside and not crossing the liner tape edges, and then peel and walk back the liner. I had it go very slightly off angle at the end, thus another set of eyes could have helped.

Our next post for this project will be for the swivel lights on the roll bars on each side..


The lights turn on when the rear hatch is raised via a roller switch mounted against the driver's side hatch strut.

A dimmer box dims the lights, switches all on/off or just the overhead on/off and a rear switch sets the overhead to dimmer or to battery.

Each light has their own manufacturer switch as well.
The dimmer box and hatch switch are custom made per this topic and will be described in four posts at least for details.
The lights are powered by a 12v 7 amp/hour rechargeable emergency lighting battery in an upside down outdoor broadband box that has a custom plate in back to use the single hardtop bolt.
The Jeep can be off, and the lights are not connected to the Jeep electrical system.


Optionally, as the plug is a standard lighter type, it can be pulled from the battery and plugged into the Jeep cargo port.
Amp usage is on the 12.5 volt bench test supply is:
Single swivel lamp 0.06 amps
Two swivel lamps 0.11 amps
Two overhead center lamps 0.71 amps
TOTAL: 0.82 amps / 12.5 volts
Using the online calculator for sealed lead-acid at batteryinaflash.com, the estimate
is 7.9 hours for all on and 54 hours for both swivel lights, or 108 hours for a single swivel lamp.
Note, the dimmer in this project is pulse width modulated, so that means that as the lamps are dimmed, the current draw is less, verified with the bench supply, so can be a way to stretch battery usage on camping.
The two overhead lights were mounted onto reflective foam covered in duck canvas with wiring inside the center channel. This provides heat reflecting liner insulation as well as serve as a light holder. See a previously posted DIY for the liner construction materials and notes here: DIY stitched liner
The two rotating lights are attached to plastic bases and Velcro attached to the side roll bars.
This project was setup in a two door Jeep with the rear seat removed. The floor has a custom pad and custom carpet to create a soft surface for sitting in the Jeep for tailgating or could be used for camping. The lighting and liner bring all three projects together to complete the cargo area for planned modifications. See a previously posted DIY for the carpet liner if interested: Rear cargo carpet liner and pad
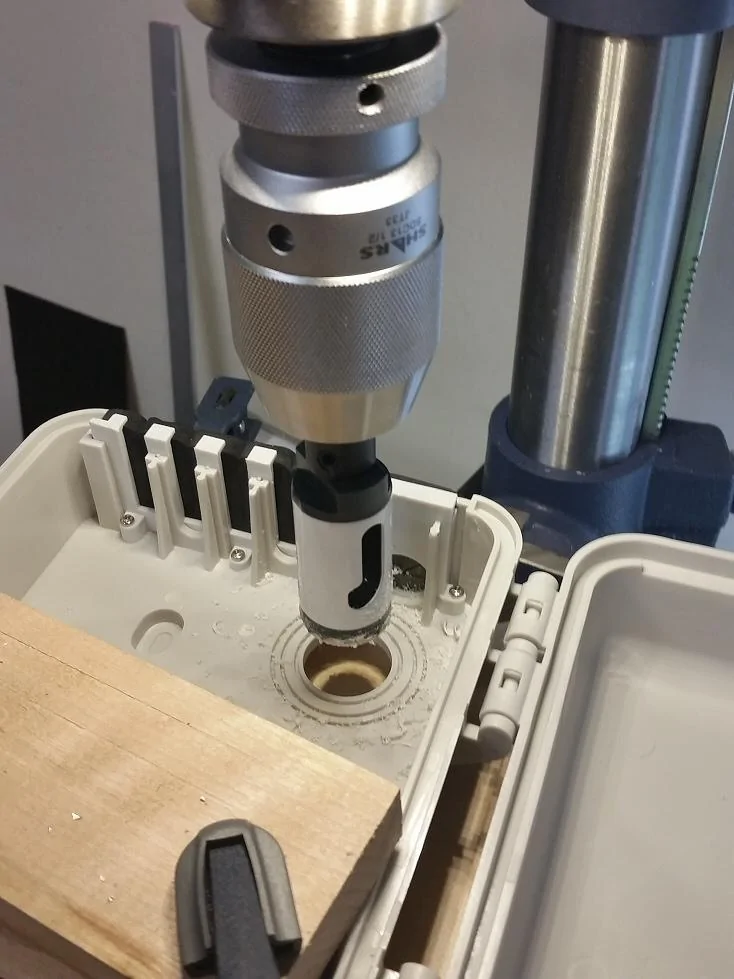
There is a lot to this project that was created over a month, with other projects. If you are experienced in light machining/drill/tap and soldering electronic projects, this will be easy to understand with the part sources. If new to this, it's nice to learn. I can try to help with questions via posts or PM. At the end are some source machine pics to see what I used for tools, such as 12 inch bench drill press and tap tools if this is helpful.
There may be more interest in a particular part, such as someone seeking overhead lights only and intending to use the Jeep power to be a smaller project, so we'll divide the project into these sections with parts list per section below. Given the time to write these and try to remember all the details and pics, will post these one at a time, starting with the center liner, expect to finish posting all the notes in a week or so.
If intending the whole path, it would be helpful to see what is ahead before starting as with any project!
- Overhead twin lights on stitched liner
- Swivel lights on roll bar
- Dimmer box and switches and mounting plate
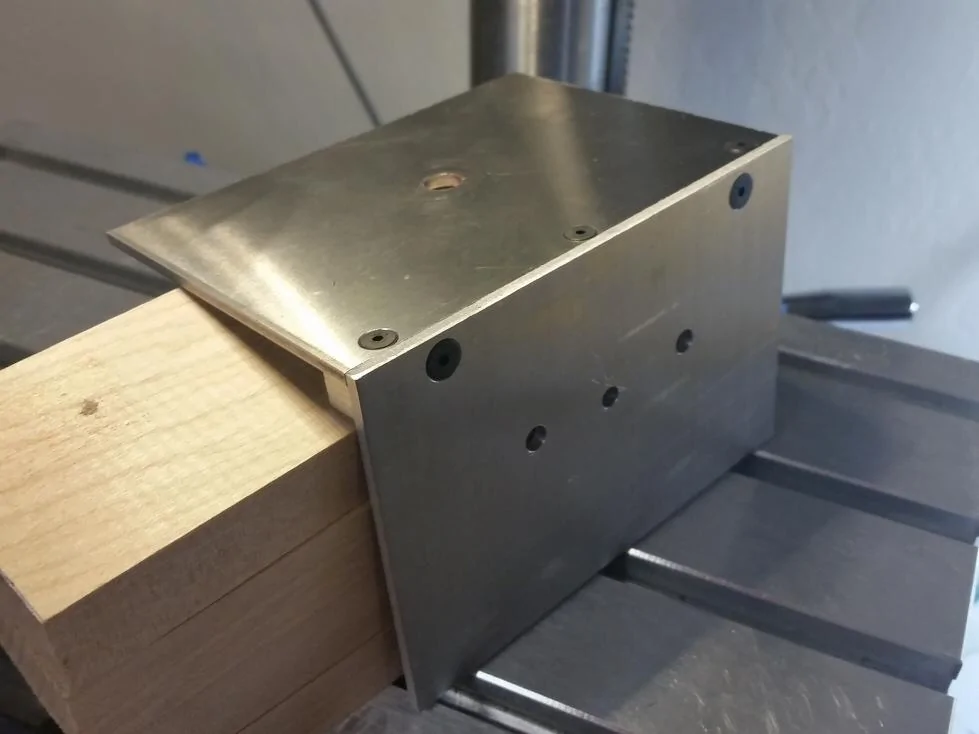
- Battery box and mounting plate
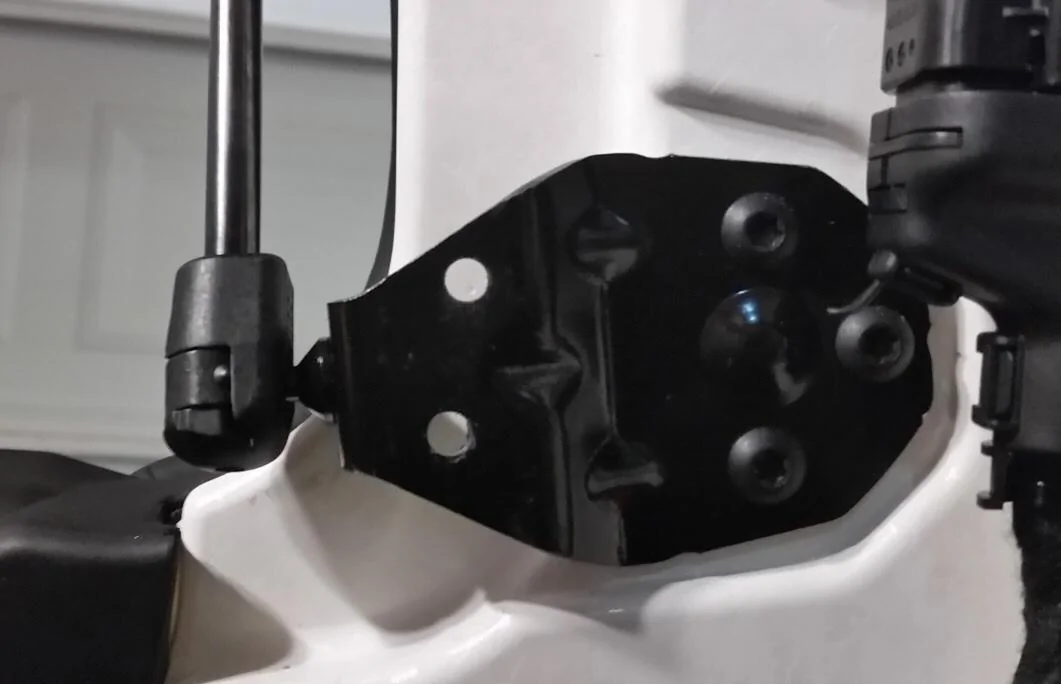
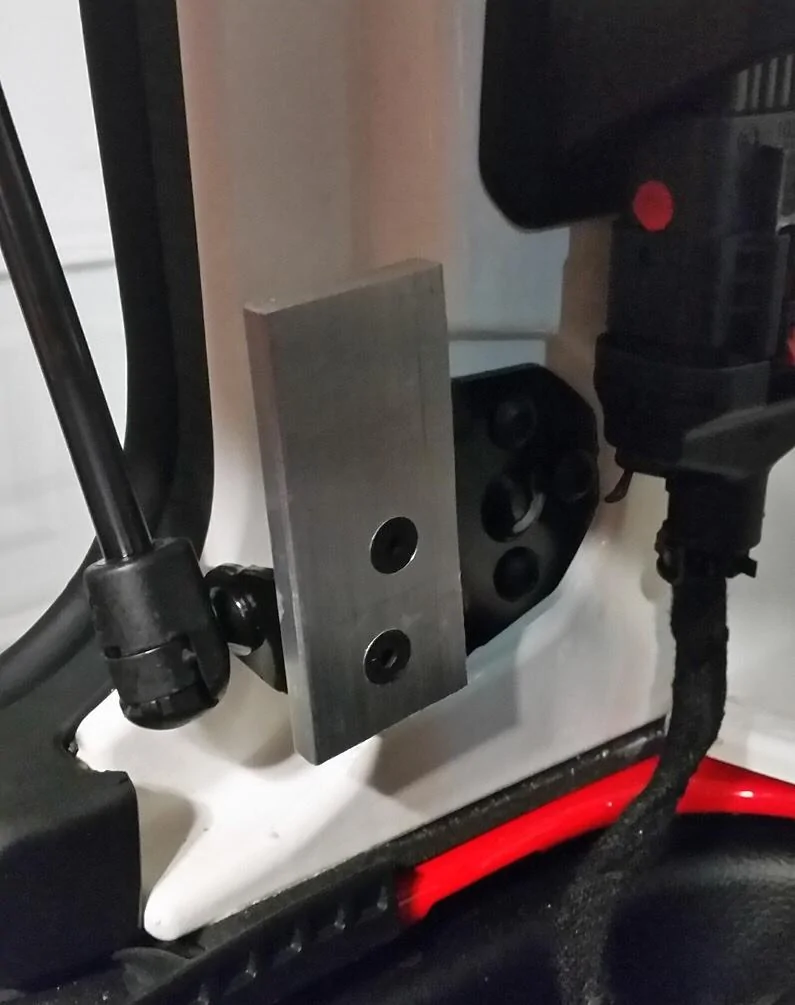
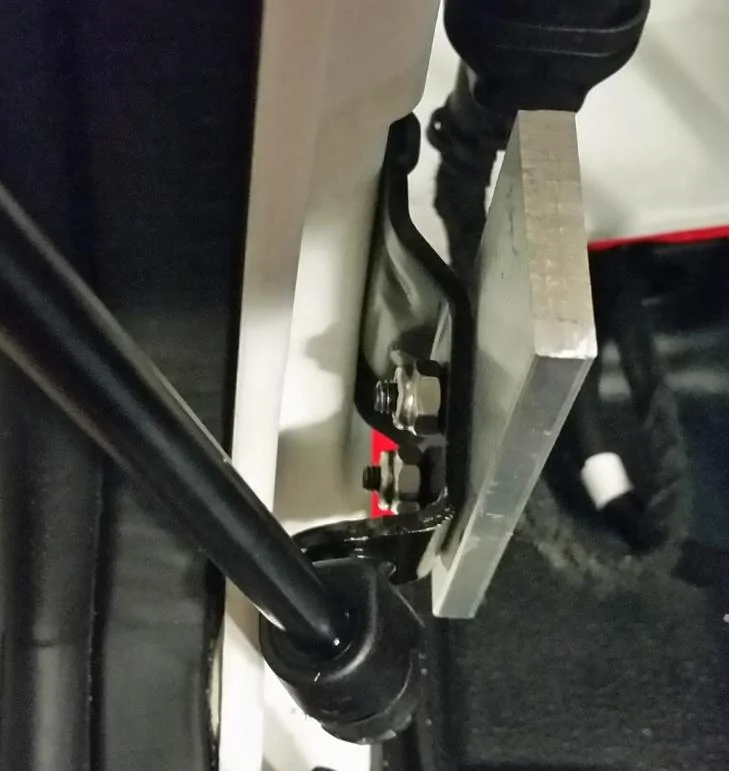
- Hatch switch and mounting plates and springs (this is the only part that used drilling into the Jeep (it's new!) two 10-32 holes into the existing hatch strut plate, and was done in place without removing the strut.)
Parts for only the center liner with lights:
- Reflective foam/canvas/3M TB3550 hook and loop tape to mount, see DIY topic: DIY stitched liner
2. Dream Lighting 370 lumens ($13) Amazon source
3. Dream Lighting 250 lumens ($10) Amazon source
4. K&S Metal 0.016 aluminum, two 10 by 6 inch was the pack, Ace or other,
5. Twelve 6-32 machine screws (believe 3/4”) and nylanuts
6. 20 AWG stranded (preferred for bending) two conductor wire (tip - avoid doorbell solid wire, stiff and larger gauge) (I used 18 AWG but it will be difficult for the dimmer wiring and switch eyelets, 20 AWG is better scale for this under an amp current project.)
7. Marine grade heat shrink tubing: Harbor Freight
Tools/misc:
- The aluminum was cut with a jigsaw, could be snips
- Bench or hand Drill for holes, preferably a bench press drill & step type hole drill bit for thin material Step drill bit
- Scissors, screwdriver and wrench and liner making materials/tools per other DIY topic.
The liner is custom made of duck canvas hand stitched over reflective foam. This follows making front headliners of this type and this is another part of that overall project for just the liners.
See DIY topic here for liner info on this 29” by 4 inch center liner: DIY stitched liner
The lights are both made by Dream Lighting, bought via Amazon, with the larger twin lens toward the hatch and the smaller single lens light by the center roll bar.
One note, I had to check over time, for the Dream Lights wiring color coding, black is positive and white is negative. Believe this may have some RV precedence and of course has coding for AC – but world, please, red for DC positive, black for negative to reduce confusion. Note for manufacturers.
This overhead liner began as cutting a 29” by 4” piece of reflective foam and about an inch around larger piece of canvas and hand stitching using the instructions in the liner post.

The larger twin lens lamp was placed 1.5 inches from the hatch side, and the smaller single lens was positioned 2.5 inches from the interior side.
To give support for each lamp on the fabric liner, I purchased a couple thin 0.016 inch aluminum source sheet metal pieces from Ace Hardware, in the rear bins of assorted rods and sheet metal. It's made by K&S metal, any source will do. It can be cut with snips, but I left them in the plastic packaging to mark dimensions and cut with slow speed jigsaw. I cut a 8.5 inch by 3 inch piece for the twin lens light and a 6 inch by 3 inch piece for the single lens light, check that, is from old drawings.
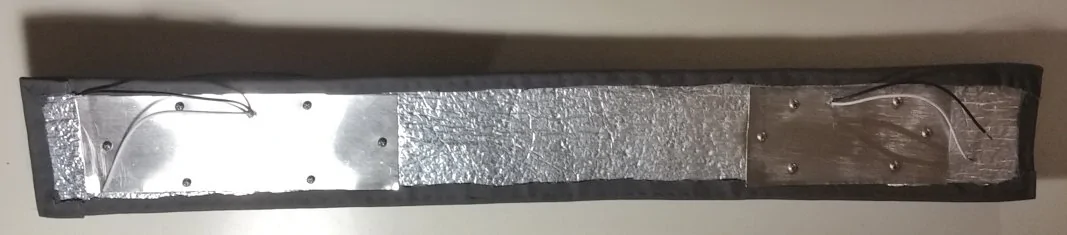
With the lens cover removed – used a small screwdriver, carefully, trace out the six screw holes and approximate where the two wires will exit onto the center of cut aluminum metal sheets. I used 6-32 machine screws and nylanuts. I believe they were 3/4” length screws. The heads are on the hardtop side and nylanuts are inside the lamps to avoid scratching the Jeep or making a bump in mounting the liner.
NOTE - from testing the lights prior to install, I found a memorable switch orientation is to have all lights with I of international "on" be toward the driver side.
Or for the single lens center lamp, the switch unit is on the driver side. I used this orientation for overhead lights and the swivel lights.
After cutting the sheet metal pieces and drilling, lay them out on the front side of the liner fabric and trace over the holes to the front of the liner.
A cautionary note about drilling thin metal here and plastic later for the swivel lights: drilling thin materials without clamping is a great way to severely cut oneself quite badly, especially with drill presses, Google it.
Fortunately I learned that long ago to not have such issue, along with no long sleeves, nor rings nor long hair around bench drills, lathes and other heavy powered tools.
Use clamping to a table, even a portable wood saw, clamp everything before drilling.
Drill bits like to pick up materials and swirl them and holding the material is the wrong place to be.
Using small scissors, opened, carefully punch a single scissor blade through, gently, for 6-32 holes, and again and then the whole closed scissor for the wire pass through. Check the sheet metal is correct side as the metal will eventually be on the hardtop side, not the fabric side.
Lights can then be mounted with lens covers off, with sheet metal on top and secure with 6/32 screws and nylanuts.

For wiring, I use “lineman's joints” (google) i.e. phone company lines on poles and then sodlered those joints, which they don't usually do, but I like it soldered, and have marine grade heat shrink tubing already on the wires to cover each wire, as well as I used another larger tubing to then pull down over the set of two heat shrunk wires to secure it well. In hot climates those wires will be in higher temp with vibration to secure well from say tape peeling off and sparking. Don't use the cheap hardware store heat tubing, it's thin.
For this center liner, there will be the two lamps and the wire exiting to have three sets of wires. I used about 1.5 inches of heat shrink tubing over soldered connections, and then had a larger 3 inch tube to slide down over the + and minus wire tubes. Since it's thick with three wires, the final outer tube was bit large, not as I like with shrink fit over the wire ends, has to do with how much the tubes will shrink, so I wrapped electric tape over the final assembly - but I'm not using tape to insulate, only to assure the tubing stays in place with vibration, probably could be omitted, but it's sealed up into the hardtop so I like it's secured.
From here you'll need to figure how you intend to power them. If planning to do the whole dimmer/battery/hatch switch and swivel lights, then leave the wire long about a foot. There will be a phone type junction box nearby to wire in these lights and 3M taped to the top of the hardtop as shown below for another post on wiring all together. If not, then it's on to your own wiring plans.

For making this project, I created all the pieces except the hatch switch and had it all working on the table and then took it out to the Jeep to install relatively fast, in a late evening.
I recommend that to hold off on mounting until all the wiring is done as it's easier to solder on a well lit table and test it all as shown below.
IF not going to be making other parts of this project, then for just mounting the liner, use the 3M TB3550 hook and loop tape and cuts pieces to go around the exiting wires, with a cross piece near the hatch side to secure well and open for the interior side as shown below. It's helps to have someone on the other side, I did it alone, but peel the tape near the hatch side and place there, around the angle, first testing the placement and being sure the wire is up inside and not crossing the liner tape edges, and then peel and walk back the liner. I had it go very slightly off angle at the end, thus another set of eyes could have helped.
Our next post for this project will be for the swivel lights on the roll bars on each side..

Sponsored
Last edited: