Sponsored

ROAM MK3 Rock Rail Installation

shekmark

Well-Known Member
First Name
Mark
Joined
Jul 21, 2019
Threads
26
Messages
584
Reaction score
443
Location
Manasquan, NJ
Vehicle(s)
2018 JLUR
Occupation
Yes
Vehicle Showcase
1
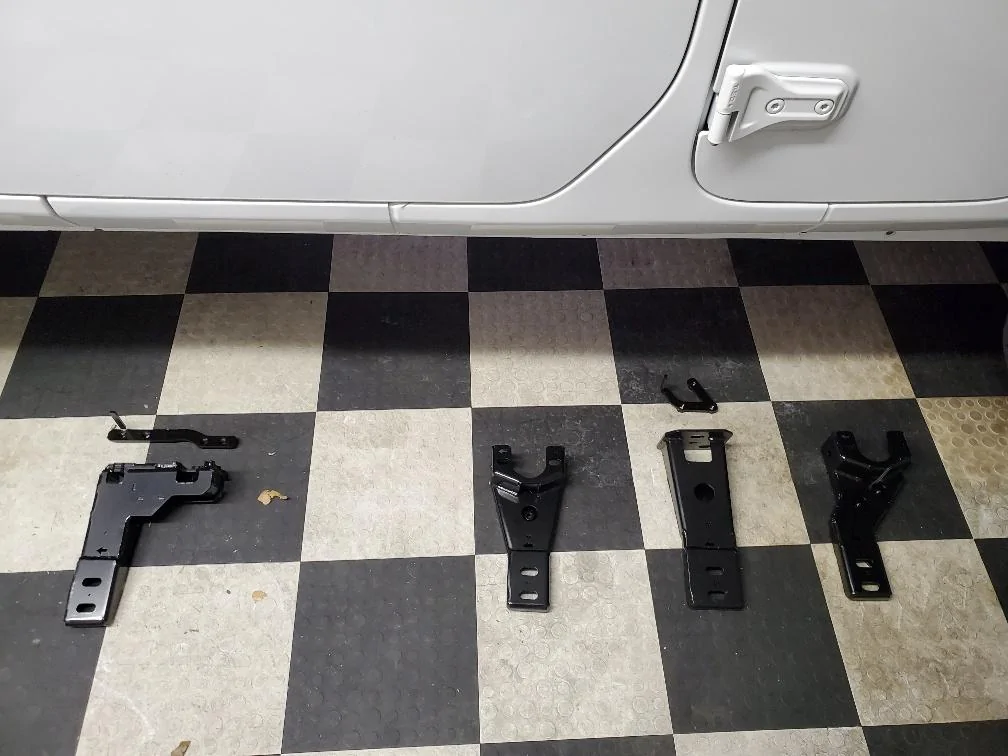
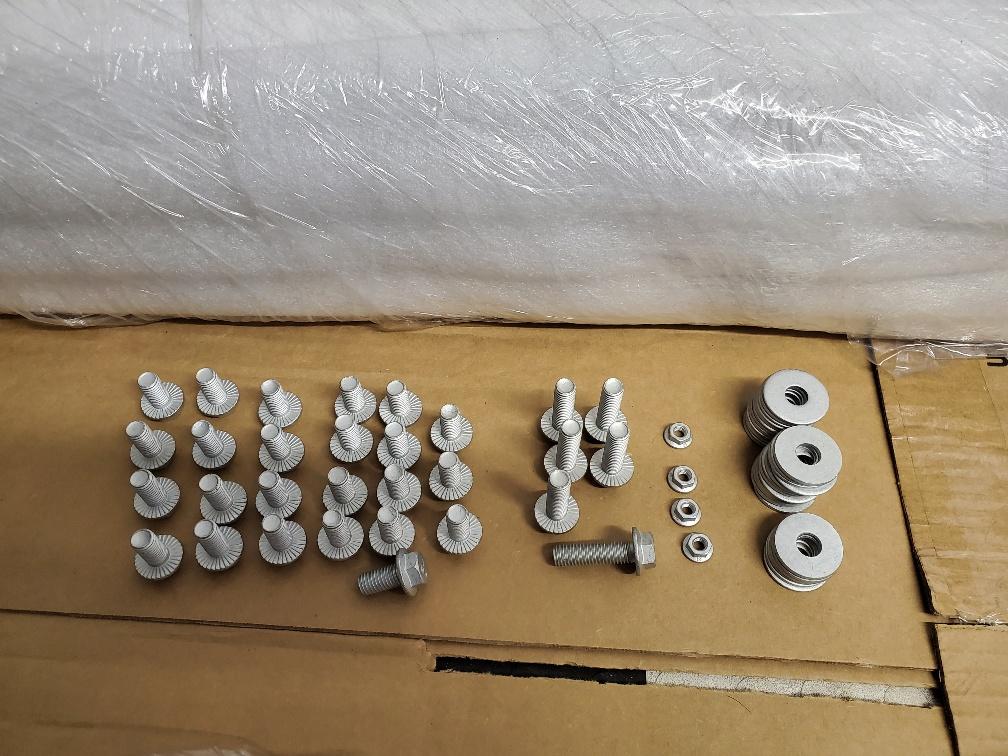
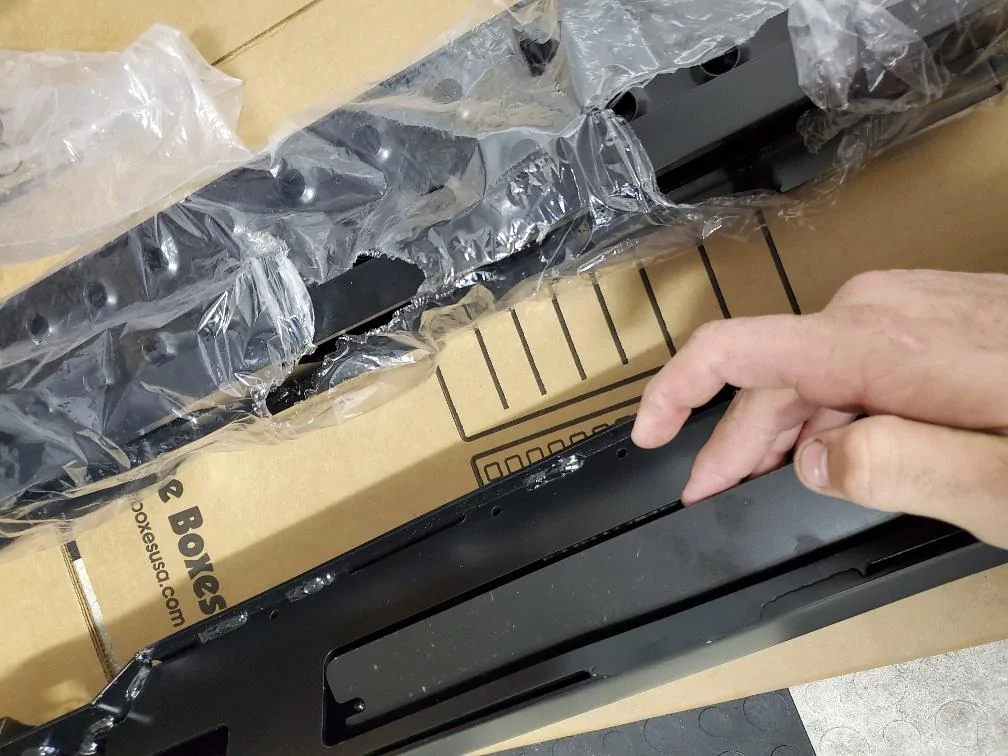
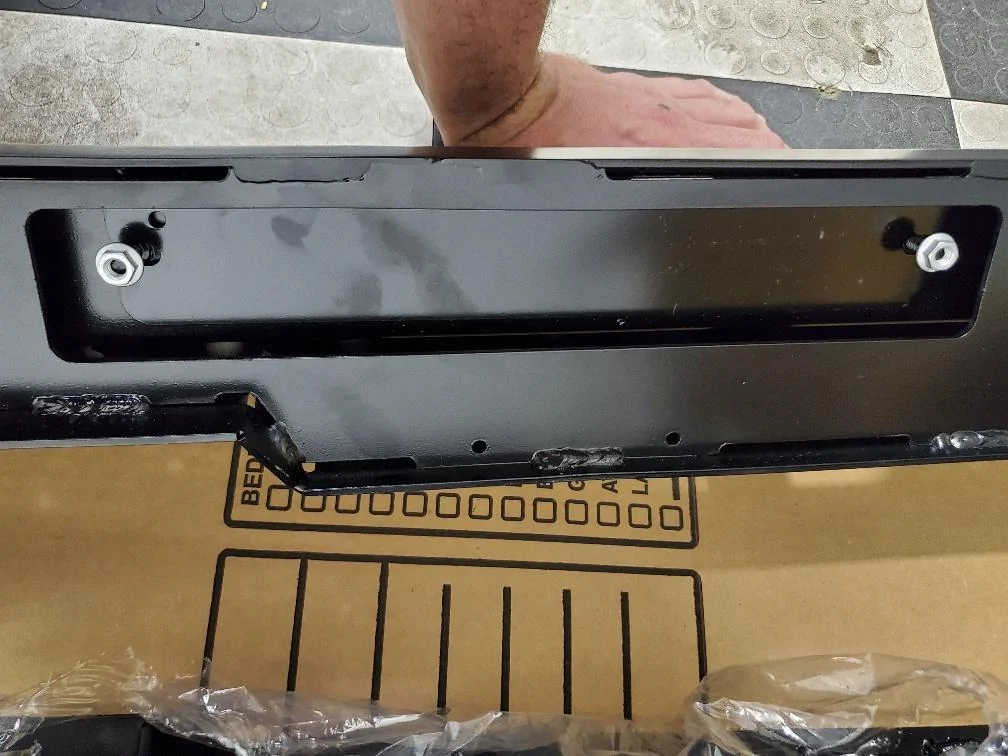
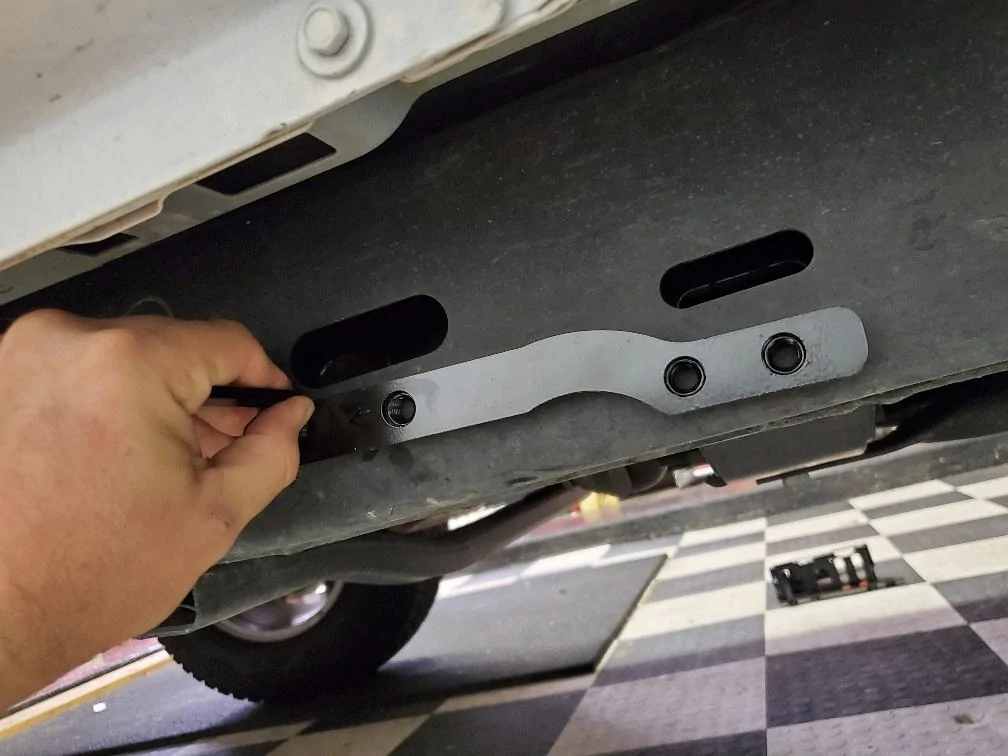
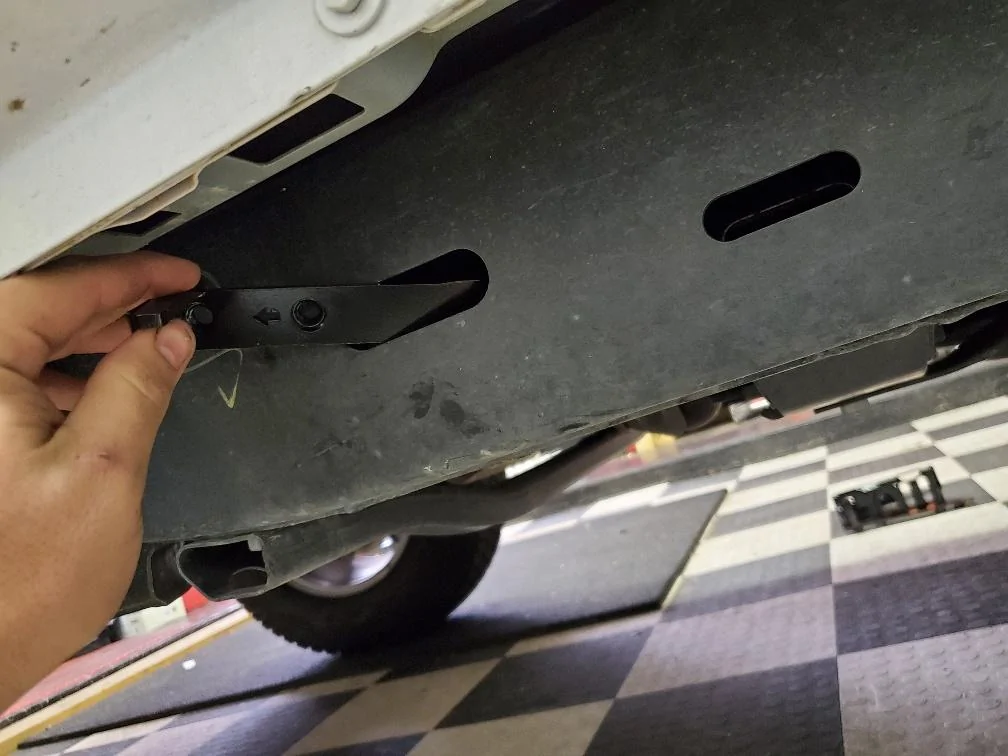
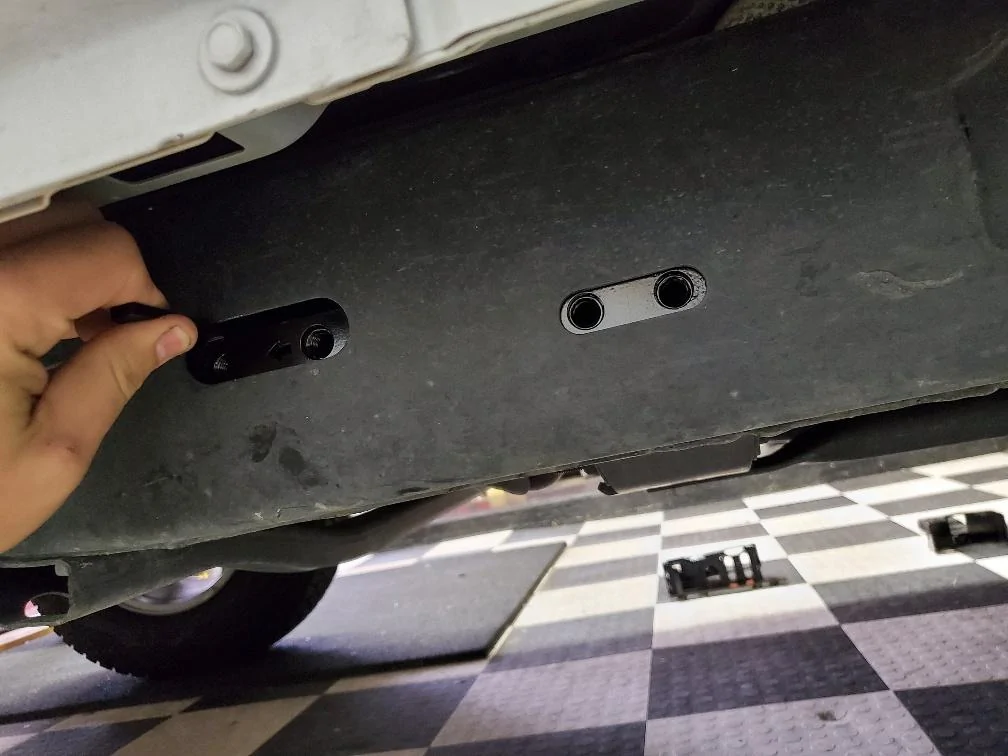
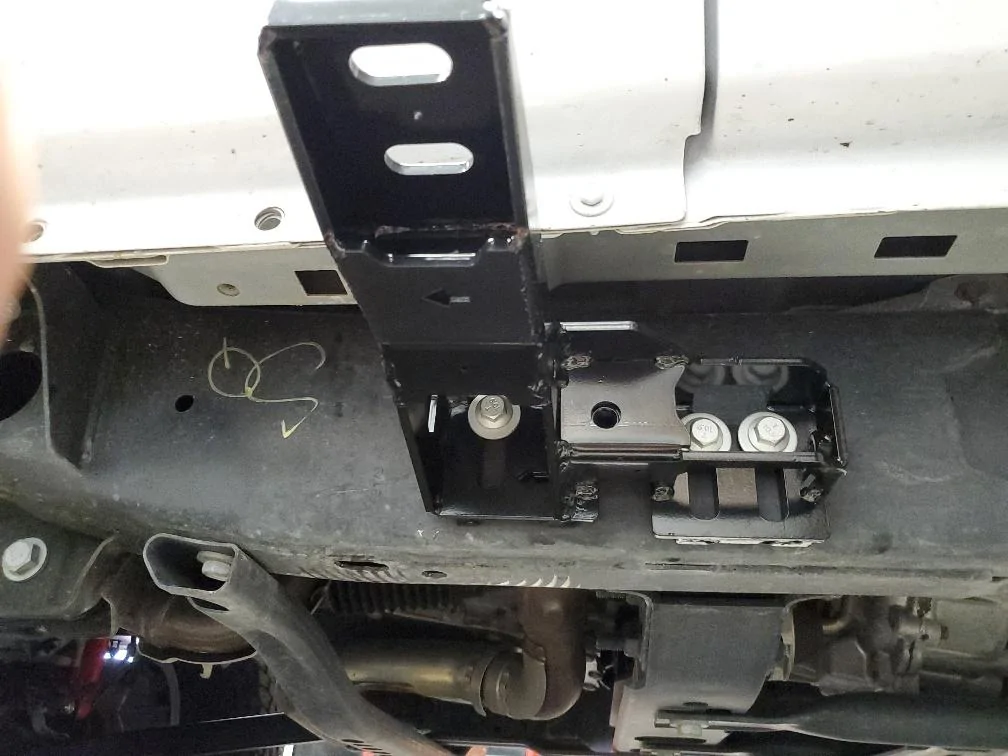
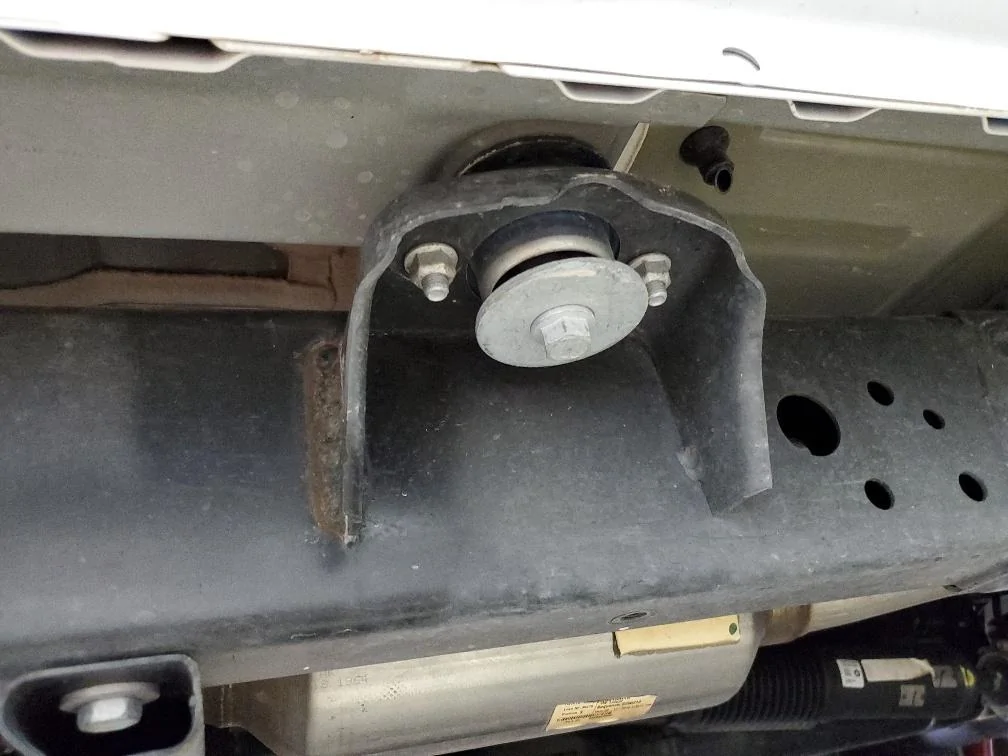
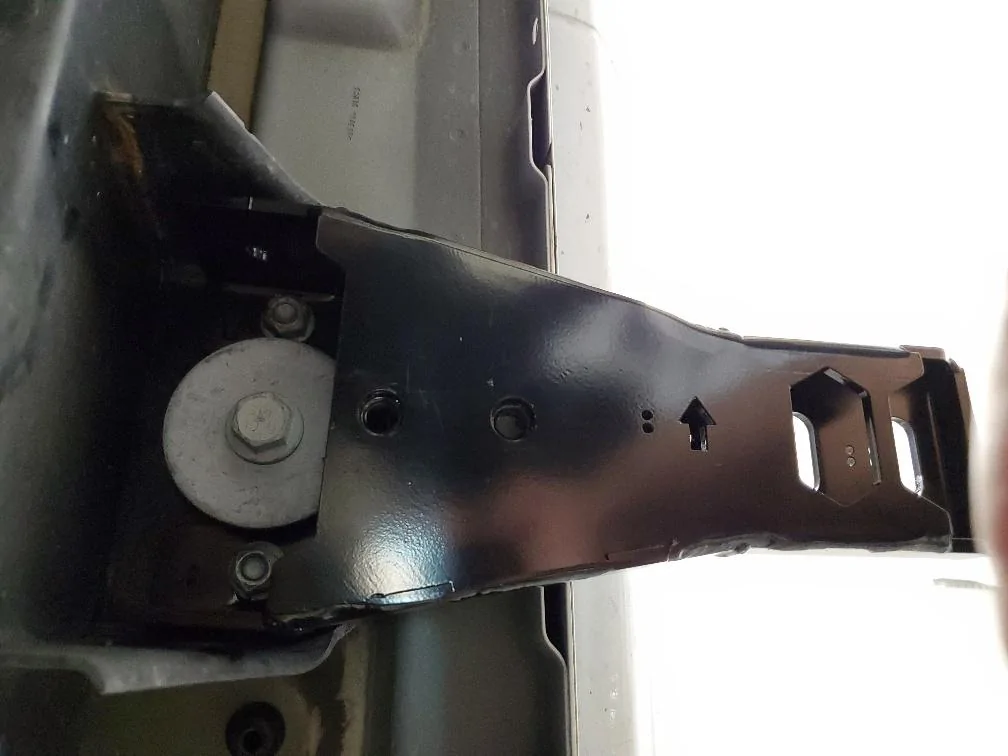
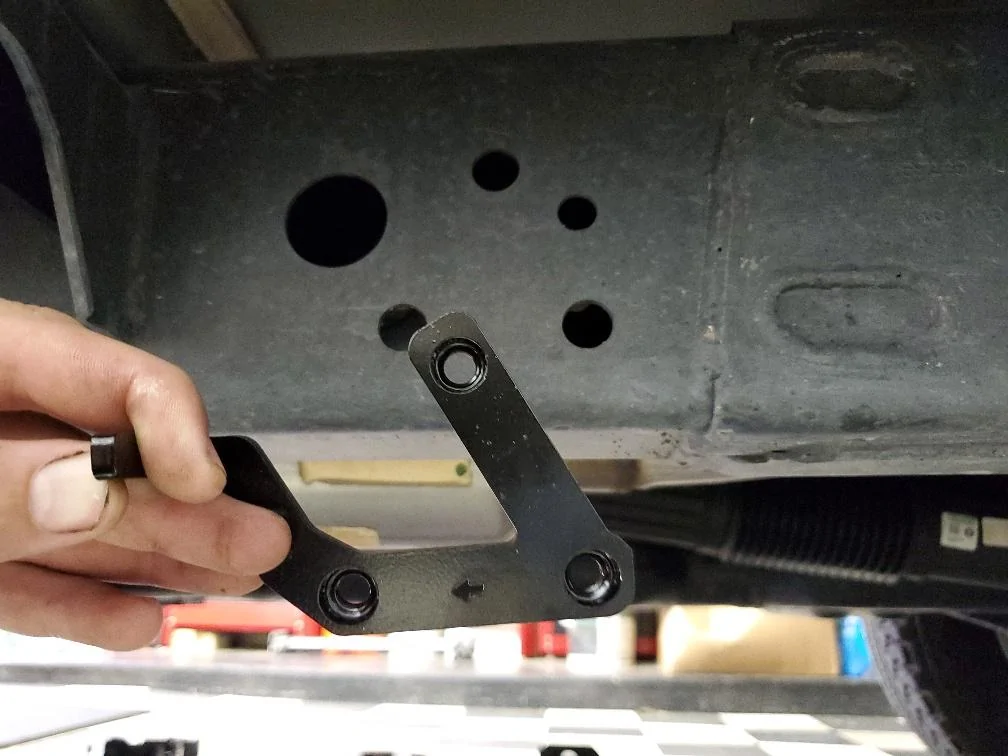
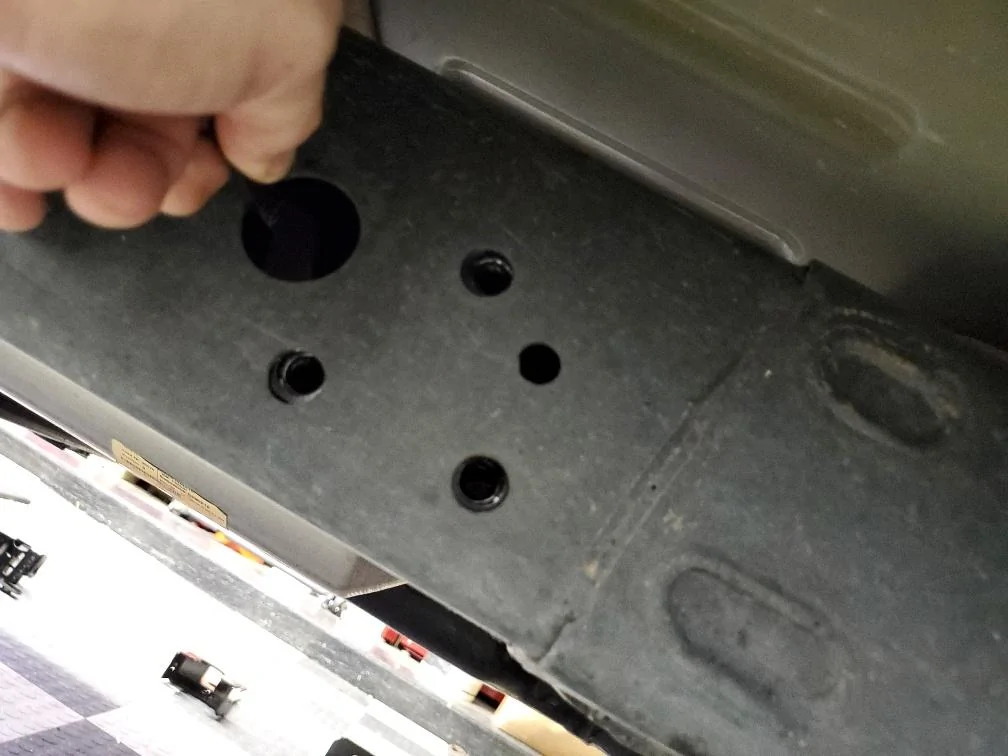
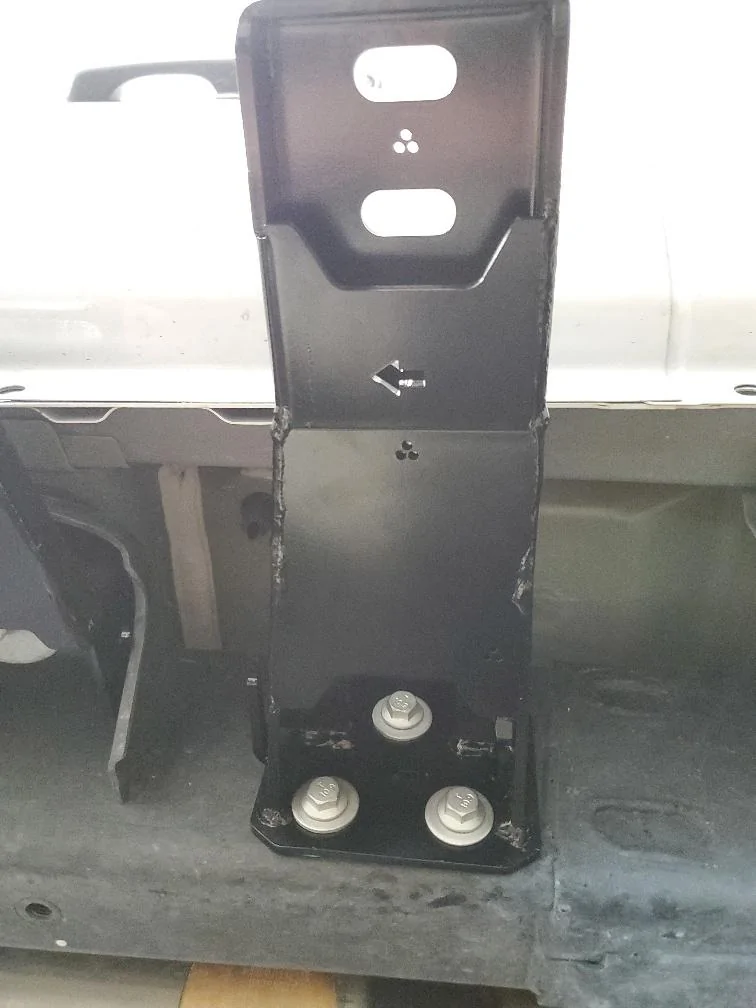
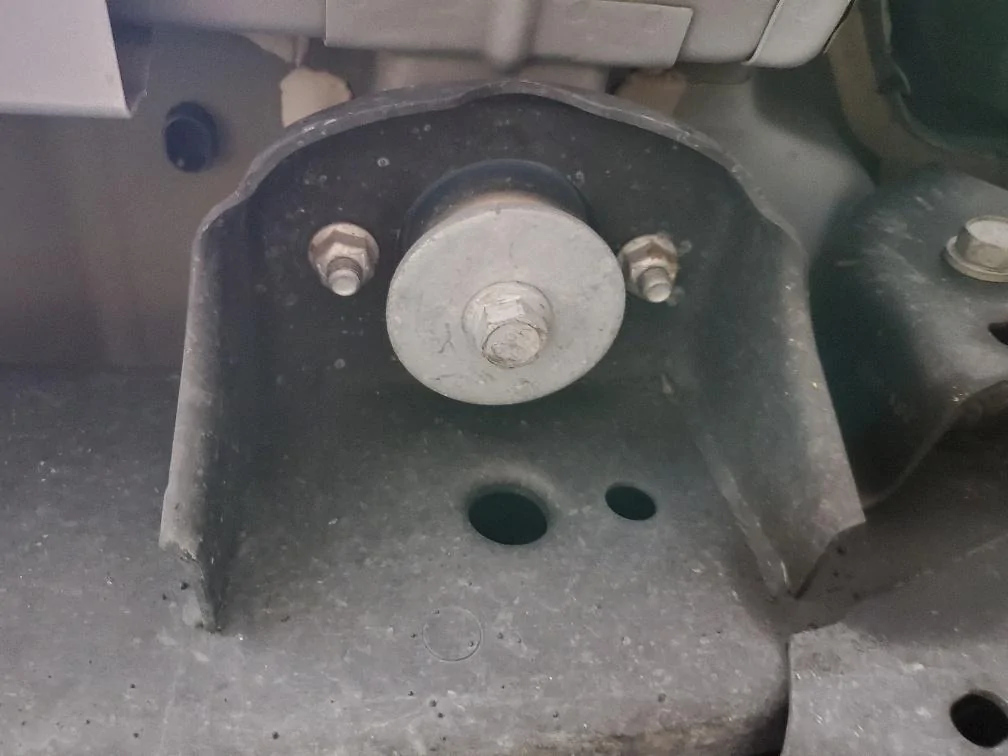
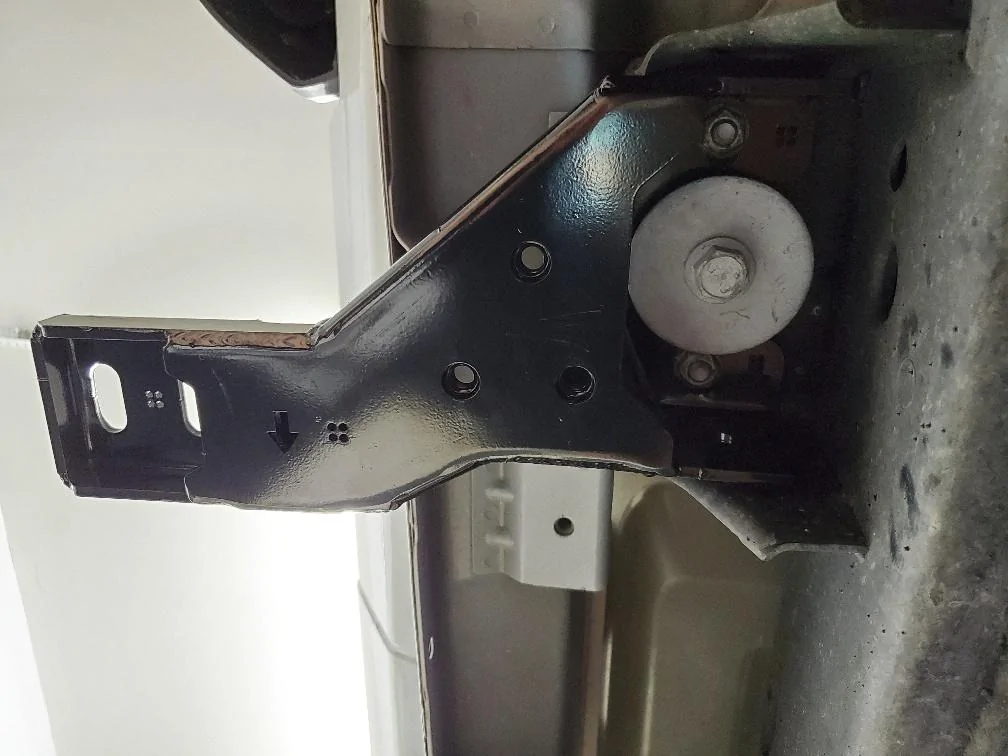
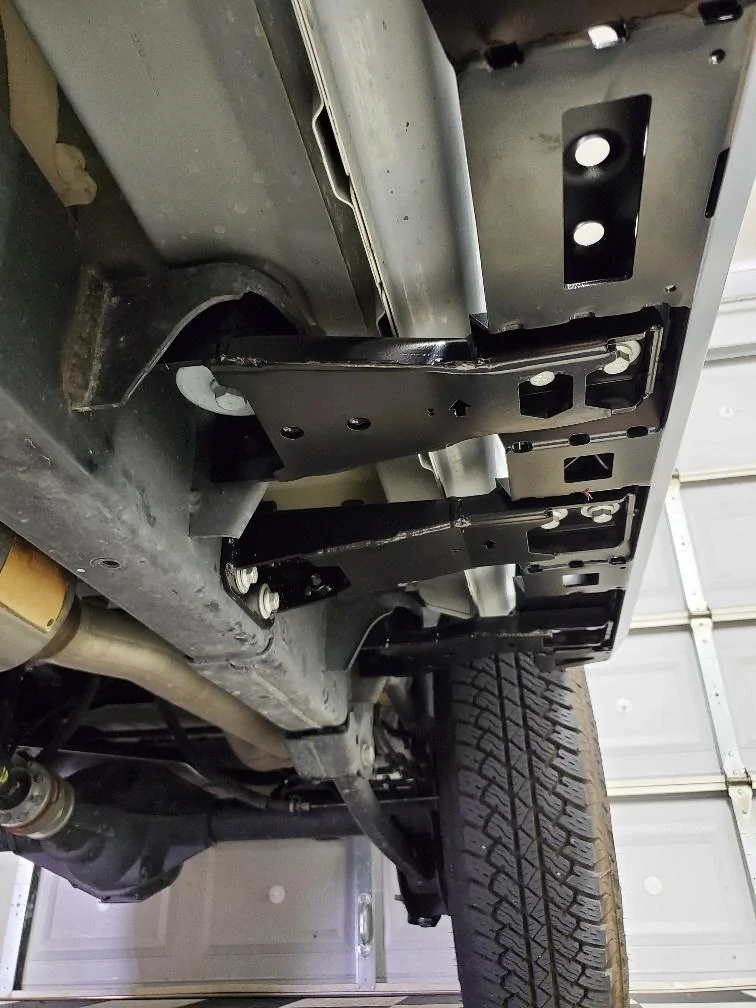
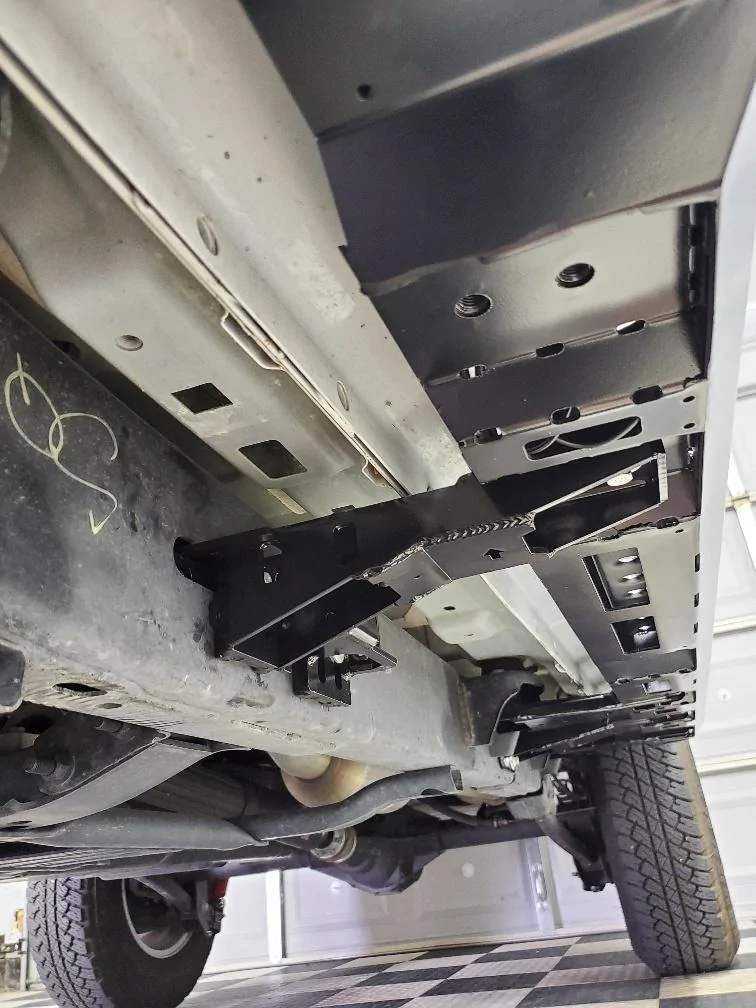
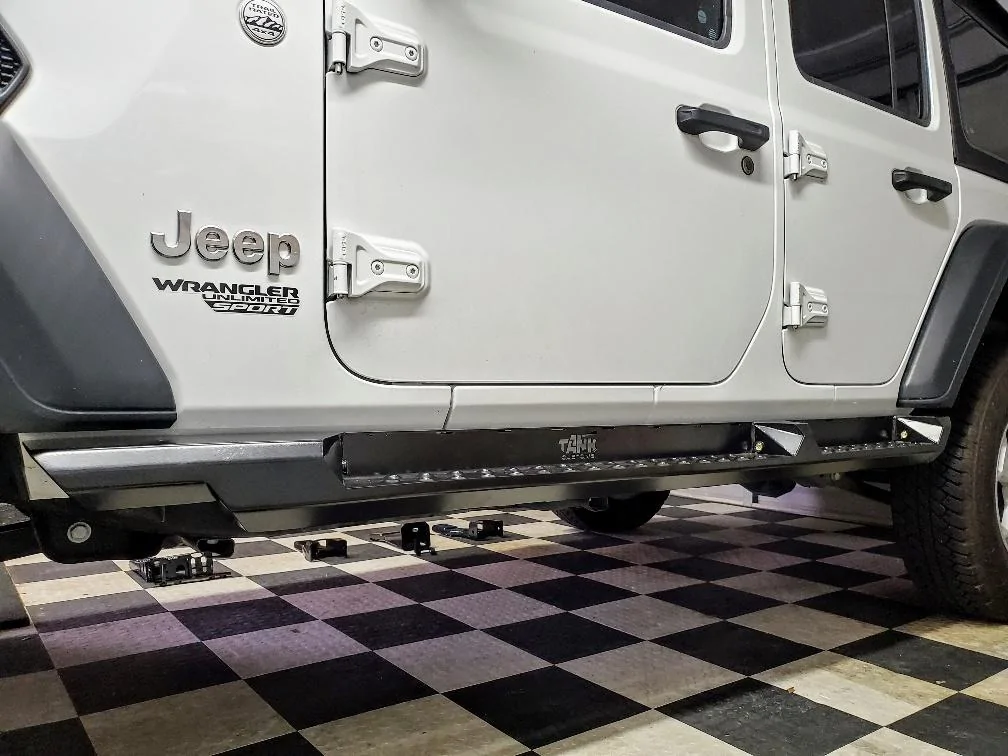
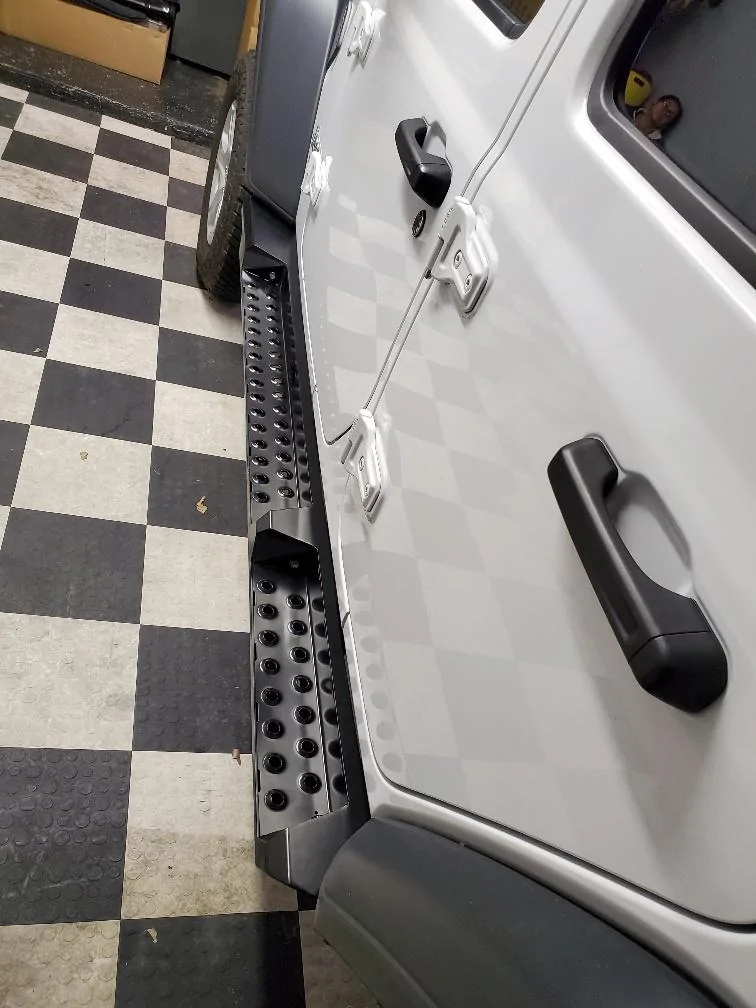
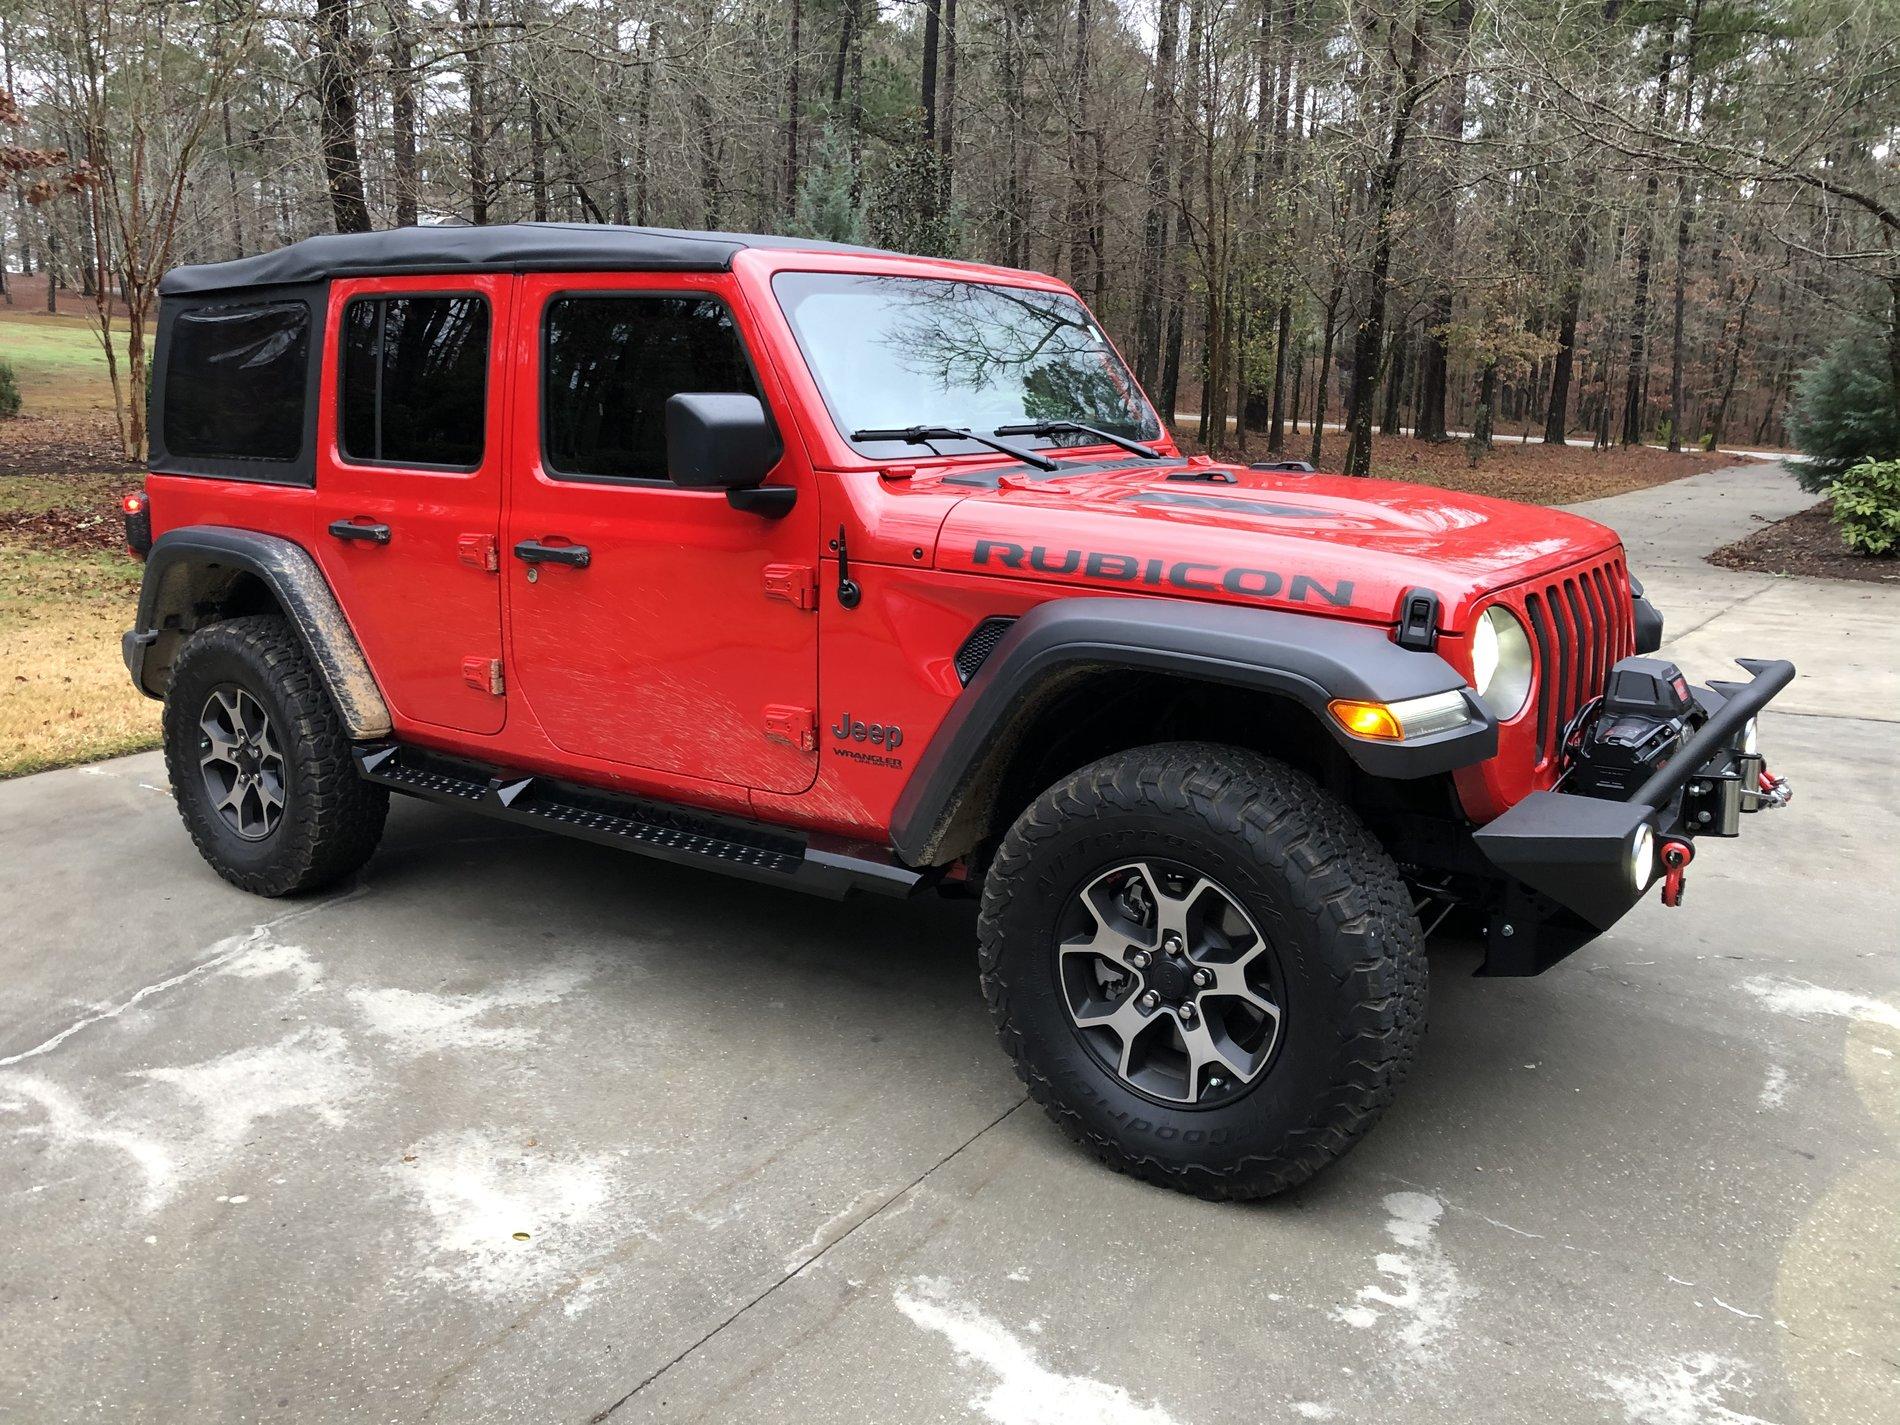
Also, i worked alone and tpham advise for the inside the frame rail parts was invaluable. Thanks! TTechris , your pictures were great and that was my instructions. Thanks. I will add that some of my larger bolts were different from yours. Half of them were a little longer. Guessing they modified based on feedback? I was not sure where to use them and I could not call Roam. I used the longer ones on thicker sections of the brackets. As I said above. I really love these.
Sponsored


smklaw

Member
First Name
Scott
Joined
Jun 12, 2019
Threads
0
Messages
7
Reaction score
7
Location
SW FL
Vehicle(s)
2019 Rubicon
This installation is fairly easy, but figure some may benefit from a DIY.


Torque specs:


M6 -> 9 Nm / 7 ft-lbs
M6 (trilobial) -> 6 Nm / 4.4 ft-lbs
M8 -> 22 Nm / 16 ft-lbs
M10 -> 44 Nm / 32 ft-lbs
M12 -> 77 Nm / 57 ft-lbs
3/8" -> 44 Nm / 32 ft-lbs

The Brackets are all marked with small holes to signify their position, and arrows to signify their orientation. The bracket with one hole goes to the very front, and the bracket with 4 holes goes to the rear. I have roughly positioned the 4 brackets where they will be mounted as well as the flag nuts to secure brackets #1 & #3.
20191012_121745_resized.jpg


In the hardware kit there will be some longer bolts, and some shorter bolts. The 6(per side) longer bolts go into the mounts that attach to the side of the frame(Bracket #1, and #3.) Washers are to be installed on every bolt. The shorter bolts secure the steps to the mounts. The smaller 10mm head nuts are for the logo plate on the backside of the rails.
20191012_122140_resized.jpg


First thing you will want to do is attach the logo backing plate to the rails as it is a little difficult to get installed once they are mounted on the Jeep. The plate needs to slide into the top of the steps first and then over the mounting studs. Use the 4 10mm head nuts to secure them in place. We will be covering our plates in Red Vinyl to accentuate the logo, but for this installation we kept the plate out.
20191012_122952_resized.jpg
20191012_123044_resized.jpg


This next step is easier with a second set of hands. Grab bracket #1, and take the long 4 hole flag nut and fish it through the frame so all the holes roughly line up. Using the longer bolts/washers loosely secure bracket #1 to the flag nut.
20191012_123421_resized.jpg

20191012_123428_resized.jpg

20191012_123405_resized.jpg

20191012_123653_resized.jpg


For Bracket #2, you just need to remove the two body mount nuts then slide the bracket over the large body mount washer and onto the studs. Secure the bracket with the 2 factory nuts.
20191012_123856_resized.jpg
20191012_124015_resized.jpg


For bracket #3(Just like #1) a second set of hands makes it easier to hold the flag nut in place.
Slide the flag nut in place keeping note of the orientation arrow. Once in place loosely mount the bracket with 3 longer bolts & washers.
20191012_124128_resized.jpg
20191012_124200_resized.jpg
20191012_124338_resized.jpg


Bracket #4 is just like Bracket #2. Remove the rear body mount nuts, slide the bracket over the larger body mount washer and secure it to the studs with the factory hardware.

20191012_124412_resized.jpg
20191012_124635_resized.jpg


Once all the brackets are installed I found it easiest to tighten the #2 & #4 as they are for the most part in a "fixed" position. Once secured mount the steps on top of the brackets and used all the shorter bolts/washers to loosely secure the brackets to the steps. I found it easiest to start with the 4 bolts on brackets number 2 & 4, then slide mounts 1 & 3 up until I was able to get the remaining bolts threaded. Once all the bolts are threaded align the rail height front to back and then tightened the 6 bolts securing brackets #1 & 3 to the frame.

Once all the brackets are tightened use a piece of cardboard between the body and the rails in order to keep the same body gap front & rear. I slowly tightened the bolts securing the rails starting from the center two brackets and working my way out. Keep an eye out for the gap as it may change as you are tightening the bolts.
20191012_130540_resized.jpg
20191012_130533_resized.jpg
20191012_130201~2_resized.jpg
20191012_130437_resized.jpg


Repeat on the other side, and admire your work!
Only question- you say use longer bolts on bracket 1 and 3, but there are only 6 and you would need 6 for each side. Thoughts?
 
OP
OP
TTEChris

TTEChris

Well-Known Member
First Name
Chris
Joined
May 17, 2017
Threads
66
Messages
2,154
Reaction score
5,104
Location
Houston, TX
Website
www.tankcustoms.com
Vehicle(s)
2021 JTD & 2021 4XE
Vehicle Showcase
5
Only question- you say use longer bolts on bracket 1 and 3, but there are only 6 and you would need 6 for each side. Thoughts?
I spoke with them about the bolts when I received the rails, and they said all the future MK3 rails would be sent out with 12 of the longer bolts for those two mounts.
 

shekmark

Well-Known Member
First Name
Mark
Joined
Jul 21, 2019
Threads
26
Messages
584
Reaction score
443
Location
Manasquan, NJ
Vehicle(s)
2018 JLUR
Occupation
Yes
Vehicle Showcase
1
Mine had 12 long bolts but 6 of them were a little shorter. So really there was three sizes not including the Roam plate. So I took the twelve longest and divided into the two different lengths. Those were all for the frame mounts. Six per side. The frame mount brackets had some different thickness areas. I chose the longest bolts for those thickest plate spots, three per side. Confusing? Yes.
 

smklaw

Member
First Name
Scott
Joined
Jun 12, 2019
Threads
0
Messages
7
Reaction score
7
Location
SW FL
Vehicle(s)
2019 Rubicon
Well that stinks. Guess I will message Anthony before I mount the rails as it does seem like I need more threads to get a proper grip.
Thanks
 

Sponsored

shekmark

Well-Known Member
First Name
Mark
Joined
Jul 21, 2019
Threads
26
Messages
584
Reaction score
443
Location
Manasquan, NJ
Vehicle(s)
2018 JLUR
Occupation
Yes
Vehicle Showcase
1
It all worked very well actually. Had to use my brain more than I wanted to but it was all good
 

Nikko2020

Well-Known Member
Joined
Sep 3, 2019
Threads
10
Messages
274
Reaction score
393
Location
Chicago
Vehicle(s)
'20 JLUR, '21 4R TRDP, '21 Supra, '13 LR4, '72 442
Vehicle Showcase
1
Mine had 12 long bolts but 6 of them were a little shorter. So really there was three sizes not including the Roam plate. So I took the twelve longest and divided into the two different lengths. Those were all for the frame mounts. Six per side. The frame mount brackets had some different thickness areas. I chose the longest bolts for those thickest plate spots, three per side. Confusing? Yes.
Just installed mine over the weekend and it came the same way - 12 Long Bolts, but 6 a little longer? I ended up using the 6 longer ones for the front bracket on both sides as it was thicker.

Great instructions and really helped to get through this installation without any issues! The only thing I would have done additionally is run the bolts through the boards prior to mounting them. I ordered the bed lined steps and love them, but some of the spray gets in the threads and makes it tough to get the bolts started when you are under the Jeep. If I would have taken a few min and cleared them out first it would have helped.
 

DonBindas

Well-Known Member
First Name
Don
Joined
Nov 20, 2018
Threads
12
Messages
289
Reaction score
209
Location
Naples, Florida
Vehicle(s)
Ordered a 2020 JL Rubicon Unlimited in Bikini with Dark Saddle Leather on 7-8-19 and was delivered by Criswell 8-22-19
Occupation
KBB Analyst
I just installed the ROAM MK3 Rock Rails and wow what an nice upgrade over the last series from Roam!

The big bonus with Roam rails is that you don't have to play Russian Roulette by having to remove the body-to-frame bolts, that are known to snap off.

My two complaints are, other than this site's instructions, there are none.

The other larger one is, that the right side fits so close to the body in the rear, that it almost makes physical content with the paint!
 

Nikko2020

Well-Known Member
Joined
Sep 3, 2019
Threads
10
Messages
274
Reaction score
393
Location
Chicago
Vehicle(s)
'20 JLUR, '21 4R TRDP, '21 Supra, '13 LR4, '72 442
Vehicle Showcase
1
I just installed the ROAM MK3 Rock Rails and wow what an nice upgrade over the last series from Roam!

The big bonus with Roam rails is that you don't have to play Russian Roulette by having to remove the body-to-frame bolts, that are known to snap off.

My two complaints are, other than this site's instructions, there are none.

The other larger one is, that the right side fits so close to the body in the rear, that it almost makes physical content with the paint!
Both sides of mine were pretty tight when I set them in place. They adjust, but I had to step on them to make them drop - couldn't do it by hand.
 

DonBindas

Well-Known Member
First Name
Don
Joined
Nov 20, 2018
Threads
12
Messages
289
Reaction score
209
Location
Naples, Florida
Vehicle(s)
Ordered a 2020 JL Rubicon Unlimited in Bikini with Dark Saddle Leather on 7-8-19 and was delivered by Criswell 8-22-19
Occupation
KBB Analyst
Both sides of mine were pretty tight when I set them in place. They adjust, but I had to step on them to make them drop - couldn't do it by hand.
Thanks for telling me that
 

Sponsored

CJ2A-TJ-JL

New Member
Joined
Jun 3, 2019
Threads
0
Messages
2
Reaction score
0
Location
New Mexico
Vehicle(s)
1948 Willys CJ2A, 2000 TJ, 2019 JLU Rubicon
Just got these steps yesterday. WOW are they bad ass! How are you guess wiring up the lights? I want them to come on only when the doors open. I've seen some tap them into the floor lights. But I don't want the step lights to come on when you turn on the dome lights.
 

Hegrunt

New Member
First Name
Harry
Joined
Dec 29, 2019
Threads
1
Messages
4
Reaction score
4
Location
Georgia, USA
Vehicle(s)
2018 Jeep JL Rubicon 2005 TJ Jeep Rubicon
Installed my ROAM rails yesterday and thanks to this forum was able to install them without any issues. They look great and are solid. Highly recommend them.

E8655479-AA6B-489D-A83E-3455D7806DFB.jpeg


9ED4C851-060E-4F2A-8DE6-C63AF564D0BC.jpeg
 

maxjlu

Well-Known Member
First Name
fred
Joined
Dec 3, 2018
Threads
0
Messages
358
Reaction score
314
Location
california
Vehicle(s)
jeep jl
I just installed the ROAM MK3 Rock Rails and wow what an nice upgrade over the last series from Roam!

The big bonus with Roam rails is that you don't have to play Russian Roulette by having to remove the body-to-frame bolts, that are known to snap off.

My two complaints are, other than this site's instructions, there are none.

The other larger one is, that the right side fits so close to the body in the rear, that it almost makes physical content with the paint!
They are adjustable. They recommended a minimum of a 1/2" gap between the body vs the inside edge of the sliders. They do look great, we love them too.
 

WelderJay

Active Member
First Name
Jason
Joined
Jul 10, 2019
Threads
8
Messages
43
Reaction score
9
Location
California
Vehicle(s)
2018 JLUS
Installed my ROAM rails yesterday and thanks to this forum was able to install them without any issues. They look great and are solid. Highly recommend them.

E8655479-AA6B-489D-A83E-3455D7806DFB.jpeg


9ED4C851-060E-4F2A-8DE6-C63AF564D0BC.jpeg

That looks good. What did you do to the Roam cutout? I can't see it. I just ordered my rails and was trying to find a solution for the cutout. They look to be well made, look good and function well, but I am not a fan of logos or badges, my only hesitation was the logo cutouts.
Sponsored


Top