mergedown
Well-Known Member
- First Name
- Jason
- Joined
- Feb 11, 2018
- Threads
- 9
- Messages
- 209
- Reaction score
- 140
- Location
- Columbus, OH
- Vehicle(s)
- 2018 JLU Sahara
- Thread starter
- #1
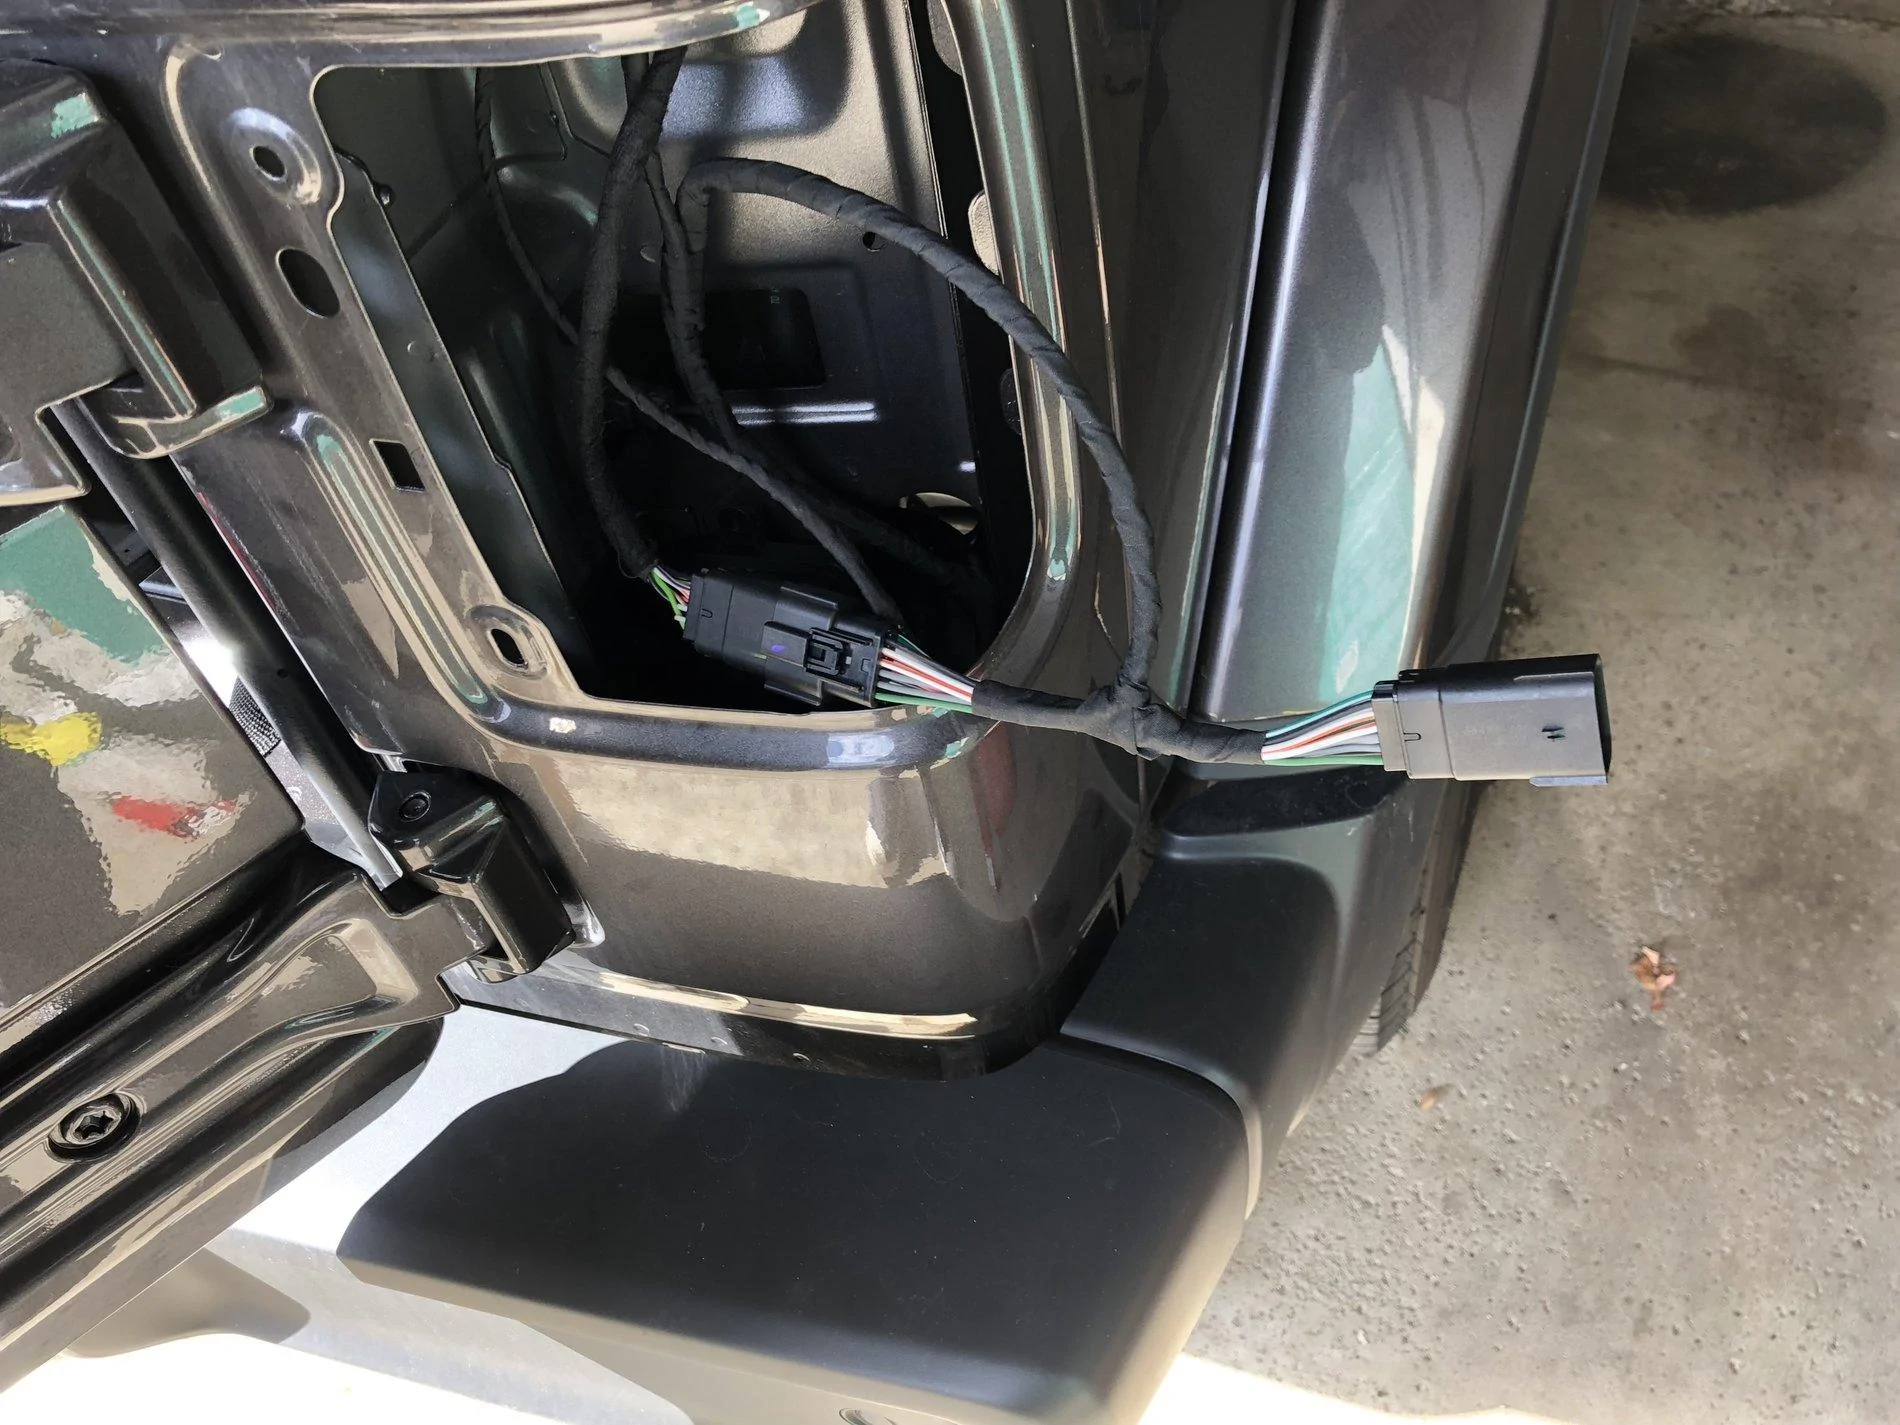
Ok, so I got around to installing the Harness today and documented as much as I could remember as I was working. It’s not a terrible job, but took me about 4 hours.
1. Disconnect the battery. I actually disconnected both the positive and negative.

2. Remove cap and unscrew the plastic bolt holding on the tail light (both sides) and remove the tail light.
3. Remove 3 bolts (passenger side) and remove piece
4. Remove bolt tray and storage cover.
5. Remove screw from top left of the subwoofer and remove all the plastics
6. Remove passenger side door sill trim (front and back)
7. Remove glove box
8. Remove 4 plastic rivets (front passenger side) and two lower clips and pull interior wheel well plastic out of the way.
9. Feed single wire harness (there are two) through the rubber grommet under the glove box and run under passenger side trim al the way back to the tail light. Connect front end of harness to the fuse box near the battery per the instructions
10. Run second harness from tail light to the ground bolt and the blue wire up to the glove box
11. Insert red wire that is taped to the harness that runs front to back into connector and plug into controller
12. Run wires underneath, red wire and multicolor harness stay under the center of the bumper, two yellow wires run to the other tail light. Re-pin the drive side tail light adapter with the two yellow wires, plug in adapter and replace tail light.
13. Wire main plug per the instructions.
14. ZIP tie wires to top and backside of the frame without letting them get too close to the muffler. Mount the plug with the two bolts provided
That’s about it! Now just put everything back together. There were likely a few minor steps that I missed, but that is 90% of them. I also missed a couple of photos.
Hopefully this helps everyone! It’s not a terrible job, but takes a bit of time and patience.
Here is the rivet gun you’ll need to replace the ones you broke when removing the fender well:
S&G Tool Aid 19400 Rivet Tool for Plastic Rivet https://www.amazon.com/dp/B007QV2E50/ref=cm_sw_r_cp_tai_i_zszeBbYHBJ7P8
UPDATE:
Due to some questions I received from others on their install, I wanted to clarify a couple things.
1.There are 2 red wires. One has to be pinned into the connector that goes to the module. This wire is taped up to the other wires and hard to even see. Make sure you pull out the yellow retaining clip before inserting the wire. The second red wire is longer and goes to the 4/7 pin connector.
2. The yellow wire that gets pinned into the left tail light harness also requires removing the connector inserts before inserting the them into their proper connectors (male/female).
Let me know if you have any questions! Hitch has been installed, trailer connected and all is working well!

1. Disconnect the battery. I actually disconnected both the positive and negative.

2. Remove cap and unscrew the plastic bolt holding on the tail light (both sides) and remove the tail light.


3. Remove 3 bolts (passenger side) and remove piece

4. Remove bolt tray and storage cover.

5. Remove screw from top left of the subwoofer and remove all the plastics


6. Remove passenger side door sill trim (front and back)


7. Remove glove box

8. Remove 4 plastic rivets (front passenger side) and two lower clips and pull interior wheel well plastic out of the way.

9. Feed single wire harness (there are two) through the rubber grommet under the glove box and run under passenger side trim al the way back to the tail light. Connect front end of harness to the fuse box near the battery per the instructions

10. Run second harness from tail light to the ground bolt and the blue wire up to the glove box


11. Insert red wire that is taped to the harness that runs front to back into connector and plug into controller

12. Run wires underneath, red wire and multicolor harness stay under the center of the bumper, two yellow wires run to the other tail light. Re-pin the drive side tail light adapter with the two yellow wires, plug in adapter and replace tail light.

13. Wire main plug per the instructions.

14. ZIP tie wires to top and backside of the frame without letting them get too close to the muffler. Mount the plug with the two bolts provided

That’s about it! Now just put everything back together. There were likely a few minor steps that I missed, but that is 90% of them. I also missed a couple of photos.
Hopefully this helps everyone! It’s not a terrible job, but takes a bit of time and patience.
Here is the rivet gun you’ll need to replace the ones you broke when removing the fender well:
S&G Tool Aid 19400 Rivet Tool for Plastic Rivet https://www.amazon.com/dp/B007QV2E50/ref=cm_sw_r_cp_tai_i_zszeBbYHBJ7P8
UPDATE:
Due to some questions I received from others on their install, I wanted to clarify a couple things.
1.There are 2 red wires. One has to be pinned into the connector that goes to the module. This wire is taped up to the other wires and hard to even see. Make sure you pull out the yellow retaining clip before inserting the wire. The second red wire is longer and goes to the 4/7 pin connector.
2. The yellow wire that gets pinned into the left tail light harness also requires removing the connector inserts before inserting the them into their proper connectors (male/female).
Let me know if you have any questions! Hitch has been installed, trailer connected and all is working well!
Sponsored
Last edited: