Jackalope
Member
- First Name
- Mike
- Joined
- Oct 13, 2018
- Threads
- 1
- Messages
- 10
- Reaction score
- 4
- Location
- Chicago - NW Suburbs
- Vehicle(s)
- 2019 Rubicon JL2dr
- Occupation
- Small Business Owner
- Thread starter
- #1
There are plenty of videos and forums with content from well-intentioned DIY’ers on how to install the CavFab Tire Carrier – this adds to that body of knowledge.
This is my experience which I’m hoping will act as a public service announcement for those who may encounter a few bumps along the installation highway.
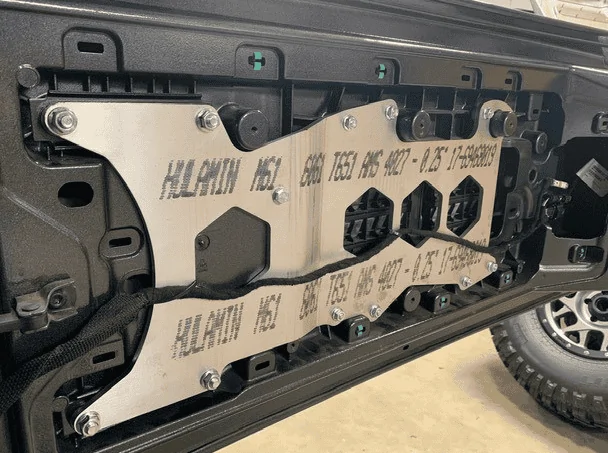
Our first problem was the absence of an installation guide. CavFab does not provide installation guidance, limitations, and warnings to customers. Not to mention there was no packing slip included with my order to confirm part numbers, pieces, and assemblies.
Our second problem was misalignment of the tailgate with the striker plate due to incorrect geometry at the replacement hinge plate. Once the two original OEM hinges are removed to install their custom hinge plate our tailgate was thrown way out of alignment and would not latch correctly.
The solution here is to have a supply of washers (beforehand) of varying thicknesses at your disposal to act as shims. Place the right combination (lots of trial and error) on to the bolts between the hinge plate and car body to manipulate the angle of the door to achieve correct closure and with even seams.

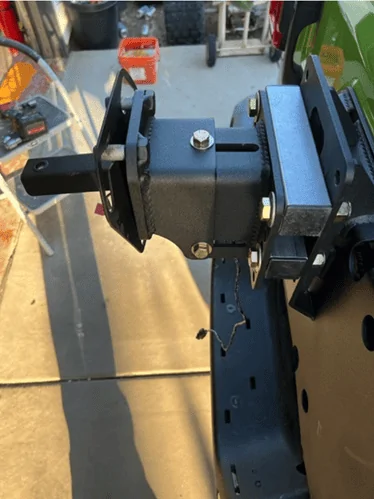
Our third problem appeared near the completion of the installation when I went to install my 315 KO2’s mounted to my 2019 Rubicon stock OEM wheels. What a surprise to learn there isn’t sufficient off-set in the CavFab tire carrier to accommodate my stock RUBI wheels with this tire configuration. Disappointed our installation was now dead in the water.
Our solution was to fabricate and install two spacer bars mounted between the two thick steel plates. Mine are made from 7 x 1-1/2-inch carbon steel square stock primed and painted. I purchased replacement hardware using a set of: 4, 3-1/2 x 1/2 inch bolts, washers and locking nuts. (Illustration below is our mock-up for test fitting).

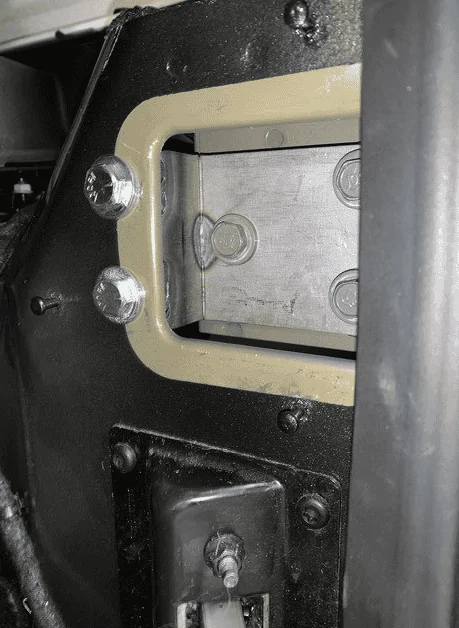
Our fourth problem became clear as we were repurposing the rear camera into the new holder – the camera will eventually fail. As you can see from the below picture, the associated optical cabling and camera is completely unprotected from the elements.
The manufacturer could easily have provided an inexpensive wire loom and rubber boot to help protect the rearview camera setup.

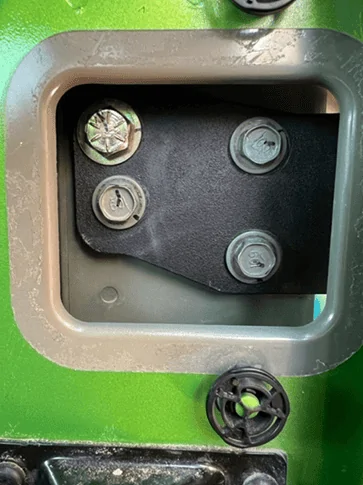
Should I ever need to remove the spare, I realized a near complete disassembly of the license plate and camera assembly will first be necessary. I best be sure I have all the tools I need to remove the assembly.
It took the two of us (and you need two people) about 20 hours of labor to completely install the CavFab tire carrier on to my Rubicon, start-to-finish. We elected to begin installation over the weekend when CavFab tech support was not available.
The CavFab Tire Carrier is well engineered with very good welds and I’m sure will work well for its intended purpose. Nonetheless, CavFab could easily offer different sized spacer kit sets for users with common tire/wheel combinations and add the rearview camera boot kit as well.
It reflects poorly on the manufacturer when the source of record for such an expensive piece of gear is the universe of DIY YouTube videos, web page forum postings and trial-and-error learning.
Installation time could have been greatly reduced with the addition of a thoughtful installation guide and a few added parts.
This is my experience which I’m hoping will act as a public service announcement for those who may encounter a few bumps along the installation highway.
Our first problem was the absence of an installation guide. CavFab does not provide installation guidance, limitations, and warnings to customers. Not to mention there was no packing slip included with my order to confirm part numbers, pieces, and assemblies.
Our second problem was misalignment of the tailgate with the striker plate due to incorrect geometry at the replacement hinge plate. Once the two original OEM hinges are removed to install their custom hinge plate our tailgate was thrown way out of alignment and would not latch correctly.
The solution here is to have a supply of washers (beforehand) of varying thicknesses at your disposal to act as shims. Place the right combination (lots of trial and error) on to the bolts between the hinge plate and car body to manipulate the angle of the door to achieve correct closure and with even seams.
Our third problem appeared near the completion of the installation when I went to install my 315 KO2’s mounted to my 2019 Rubicon stock OEM wheels. What a surprise to learn there isn’t sufficient off-set in the CavFab tire carrier to accommodate my stock RUBI wheels with this tire configuration. Disappointed our installation was now dead in the water.
Our solution was to fabricate and install two spacer bars mounted between the two thick steel plates. Mine are made from 7 x 1-1/2-inch carbon steel square stock primed and painted. I purchased replacement hardware using a set of: 4, 3-1/2 x 1/2 inch bolts, washers and locking nuts. (Illustration below is our mock-up for test fitting).
Our fourth problem became clear as we were repurposing the rear camera into the new holder – the camera will eventually fail. As you can see from the below picture, the associated optical cabling and camera is completely unprotected from the elements.
The manufacturer could easily have provided an inexpensive wire loom and rubber boot to help protect the rearview camera setup.

Should I ever need to remove the spare, I realized a near complete disassembly of the license plate and camera assembly will first be necessary. I best be sure I have all the tools I need to remove the assembly.
It took the two of us (and you need two people) about 20 hours of labor to completely install the CavFab tire carrier on to my Rubicon, start-to-finish. We elected to begin installation over the weekend when CavFab tech support was not available.
The CavFab Tire Carrier is well engineered with very good welds and I’m sure will work well for its intended purpose. Nonetheless, CavFab could easily offer different sized spacer kit sets for users with common tire/wheel combinations and add the rearview camera boot kit as well.
It reflects poorly on the manufacturer when the source of record for such an expensive piece of gear is the universe of DIY YouTube videos, web page forum postings and trial-and-error learning.
Installation time could have been greatly reduced with the addition of a thoughtful installation guide and a few added parts.

Sponsored