Sponsored

ARB refrigerator installs

xtremejoe

Well-Known Member
First Name
Joe
Joined
Sep 13, 2020
Threads
28
Messages
232
Reaction score
178
Location
Bay Area, CA
Vehicle(s)
2021 JLUR Diesel
Mine is running off a rear Odyssey battery that's charged via a Redarc BCDC charger.

20191215_152621.jpg


20191025_192223.jpg


20191215_152637.jpg
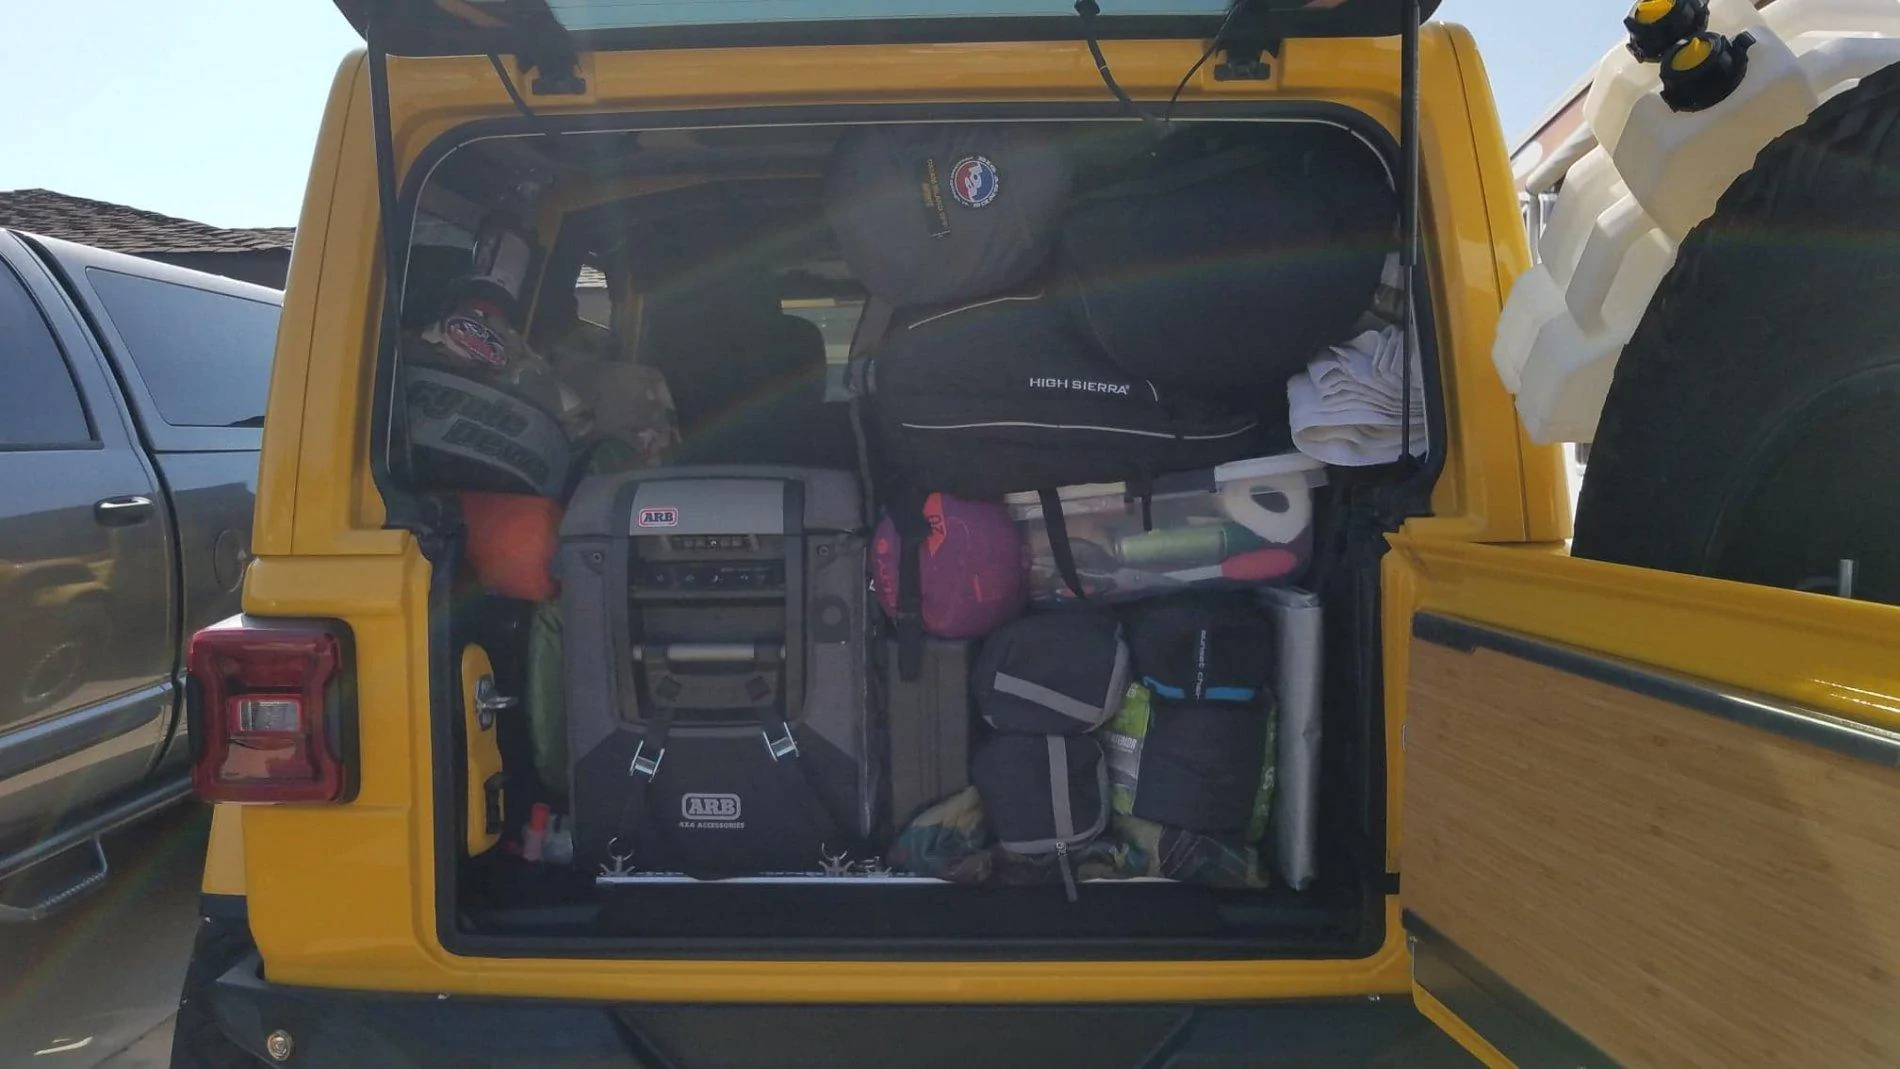
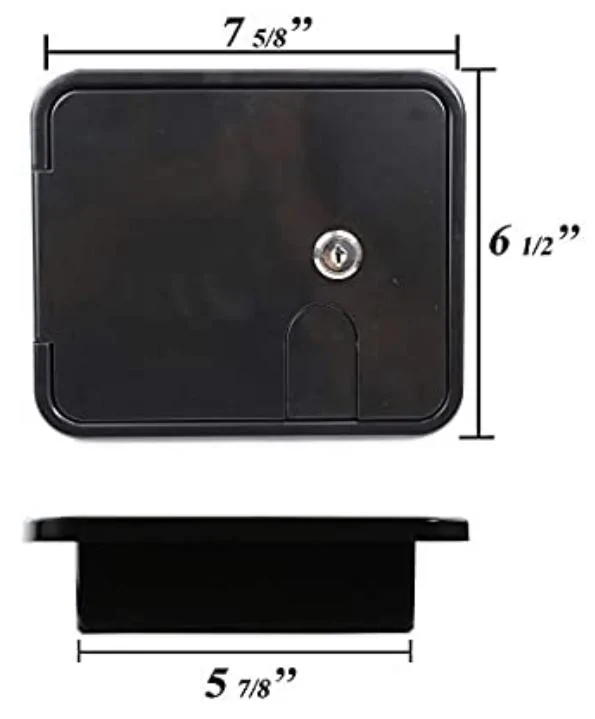
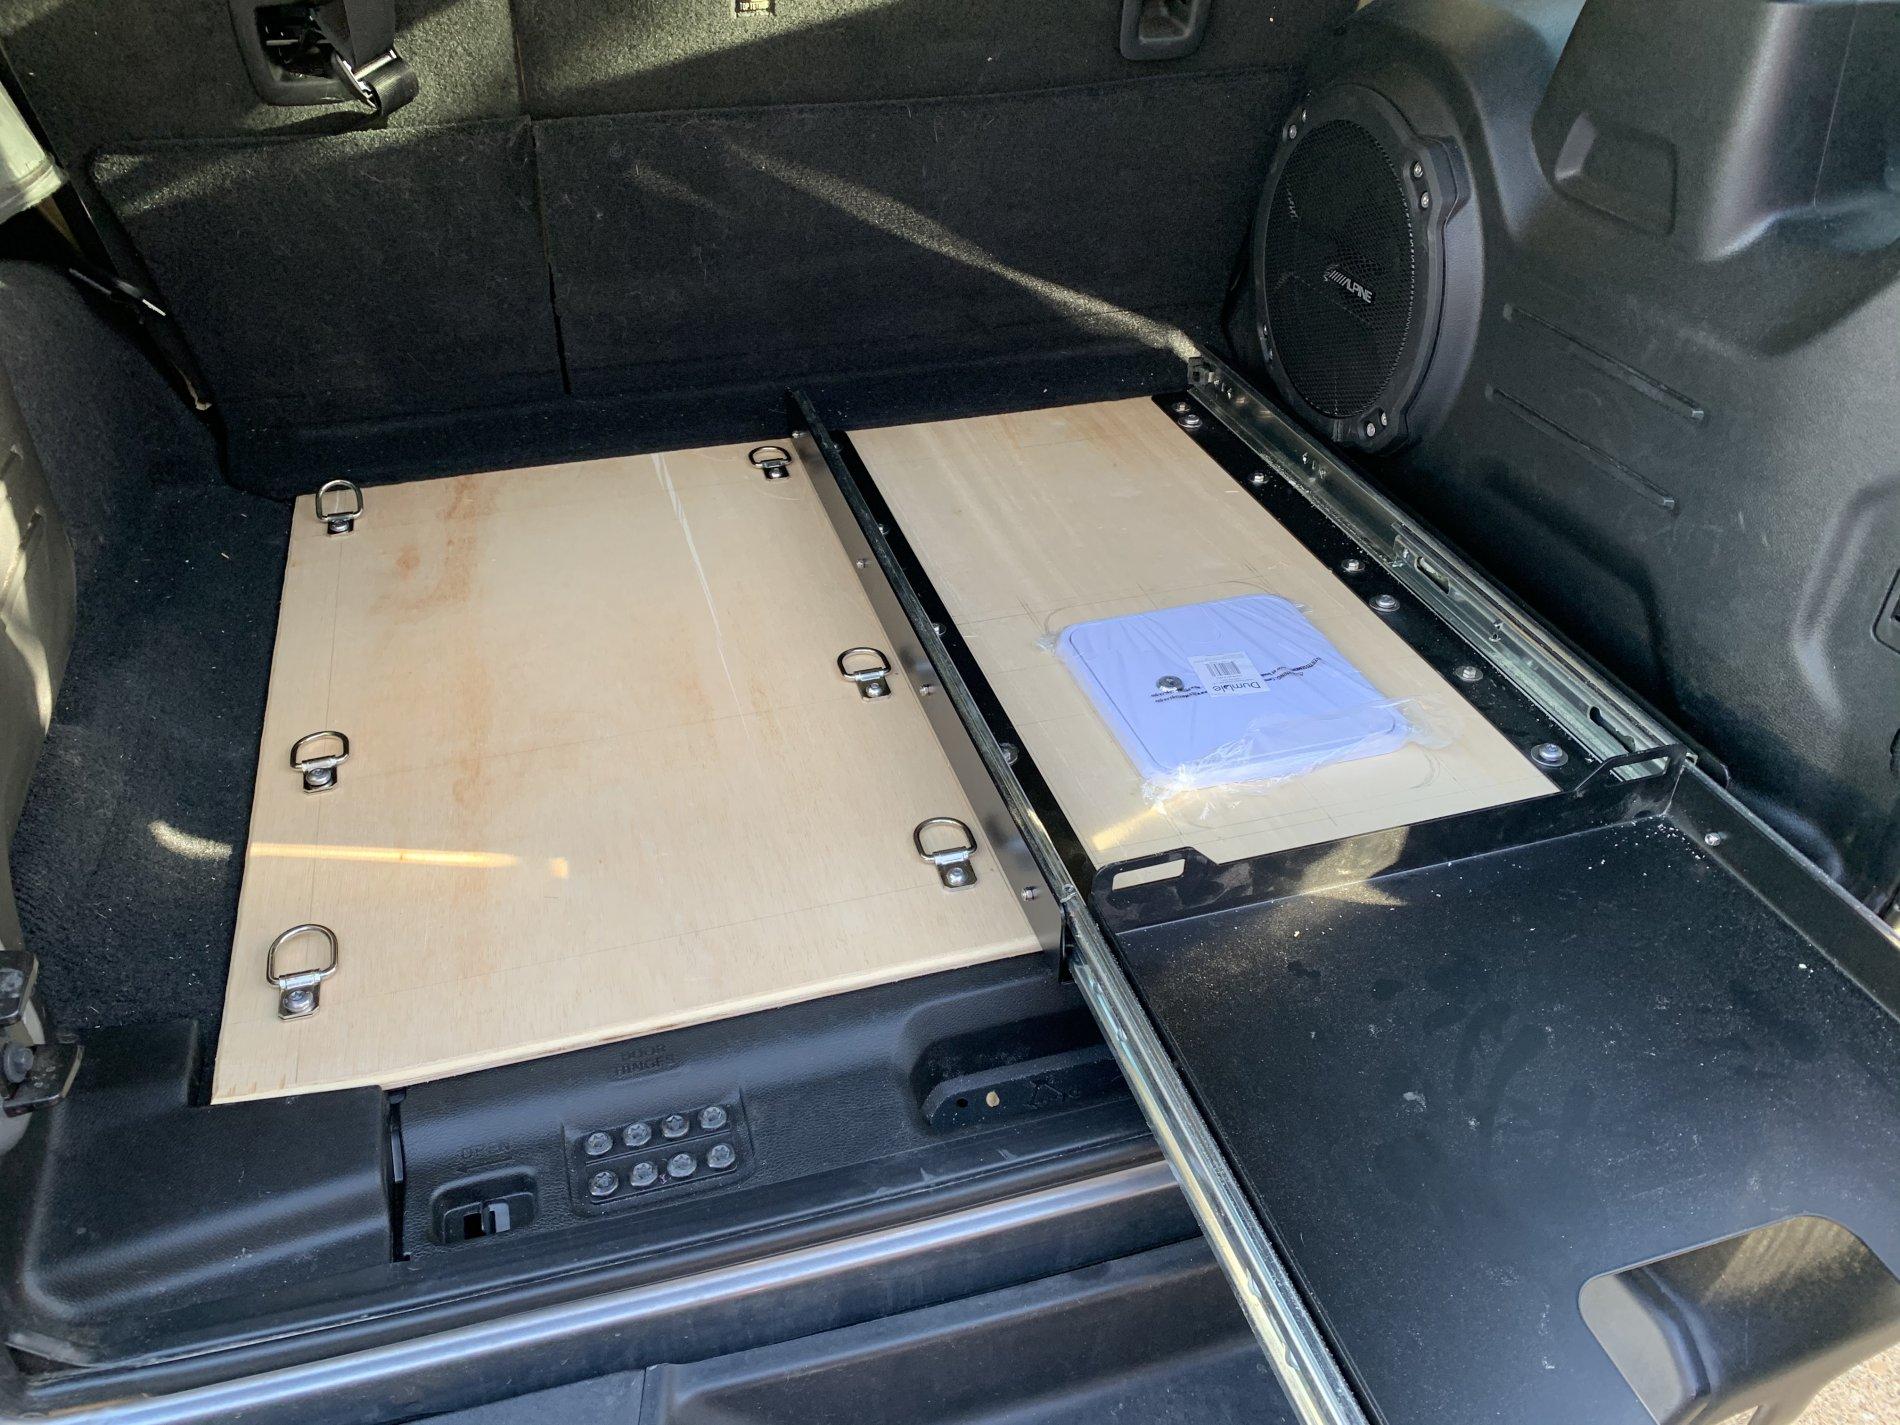
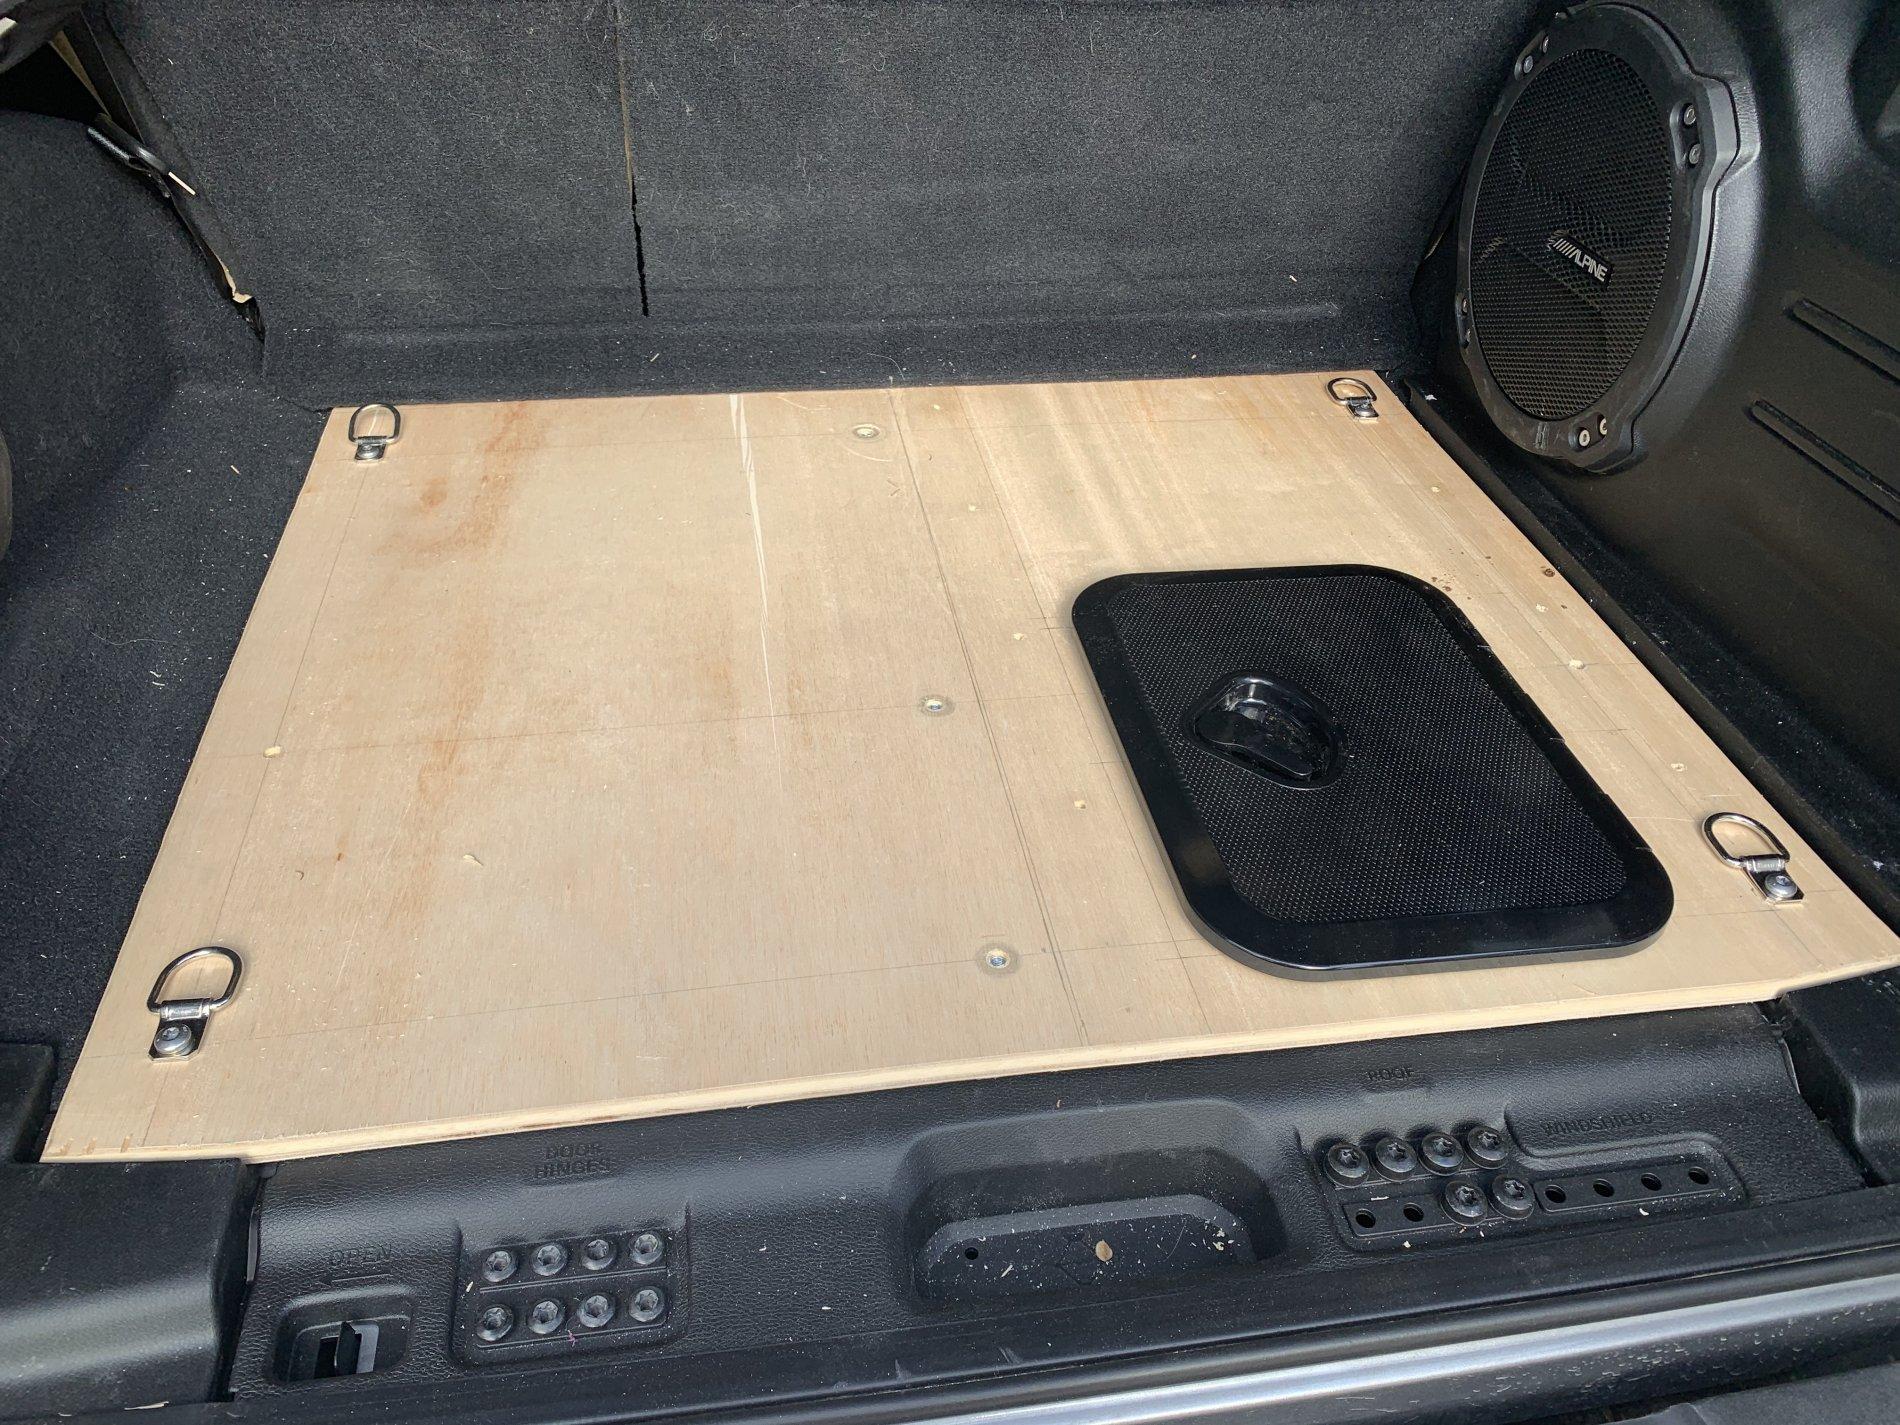
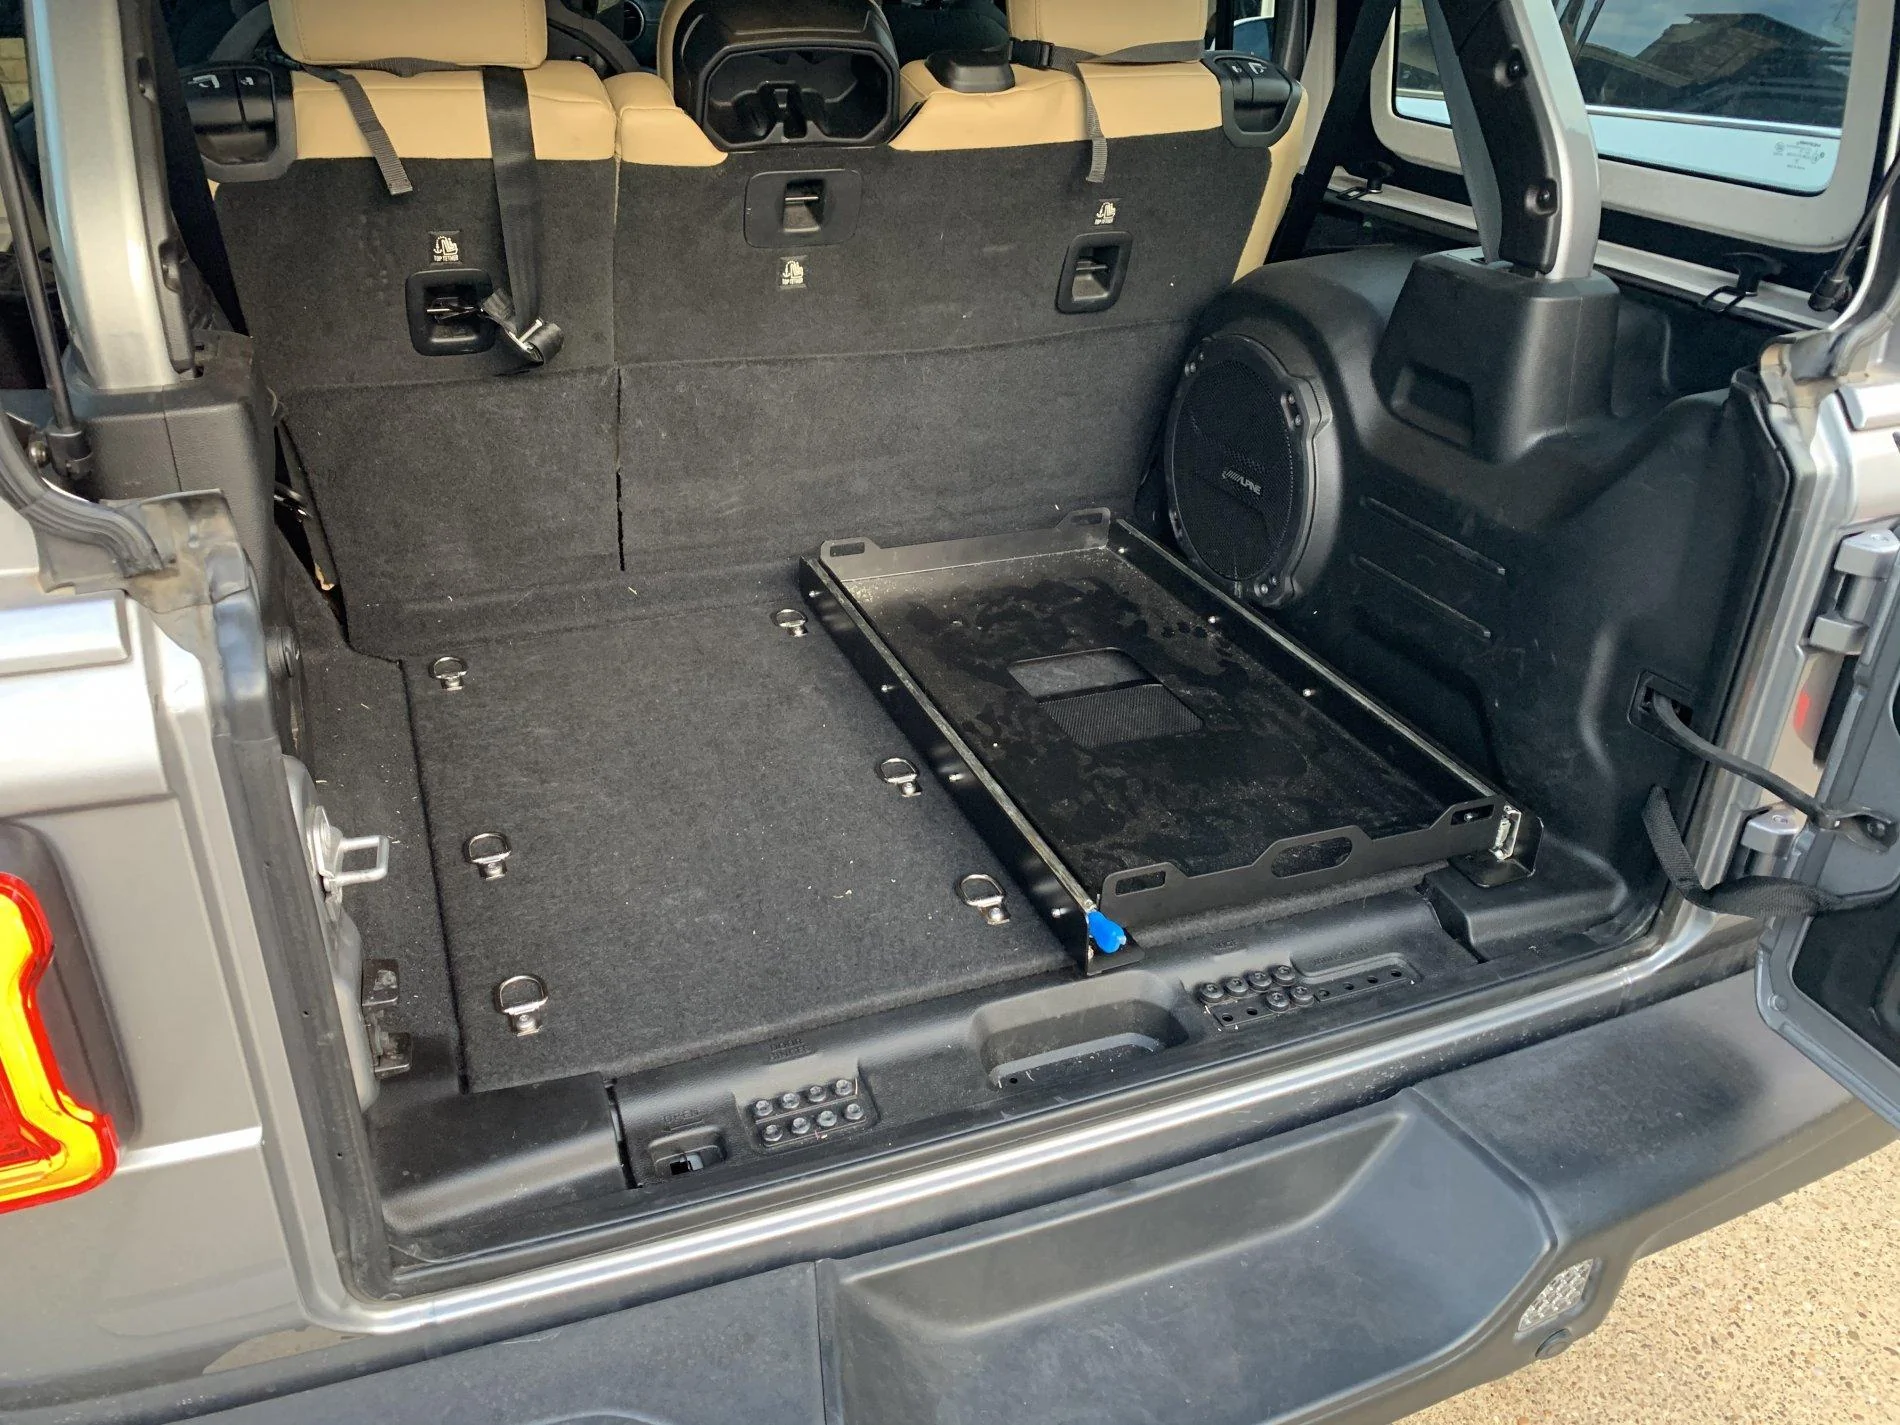
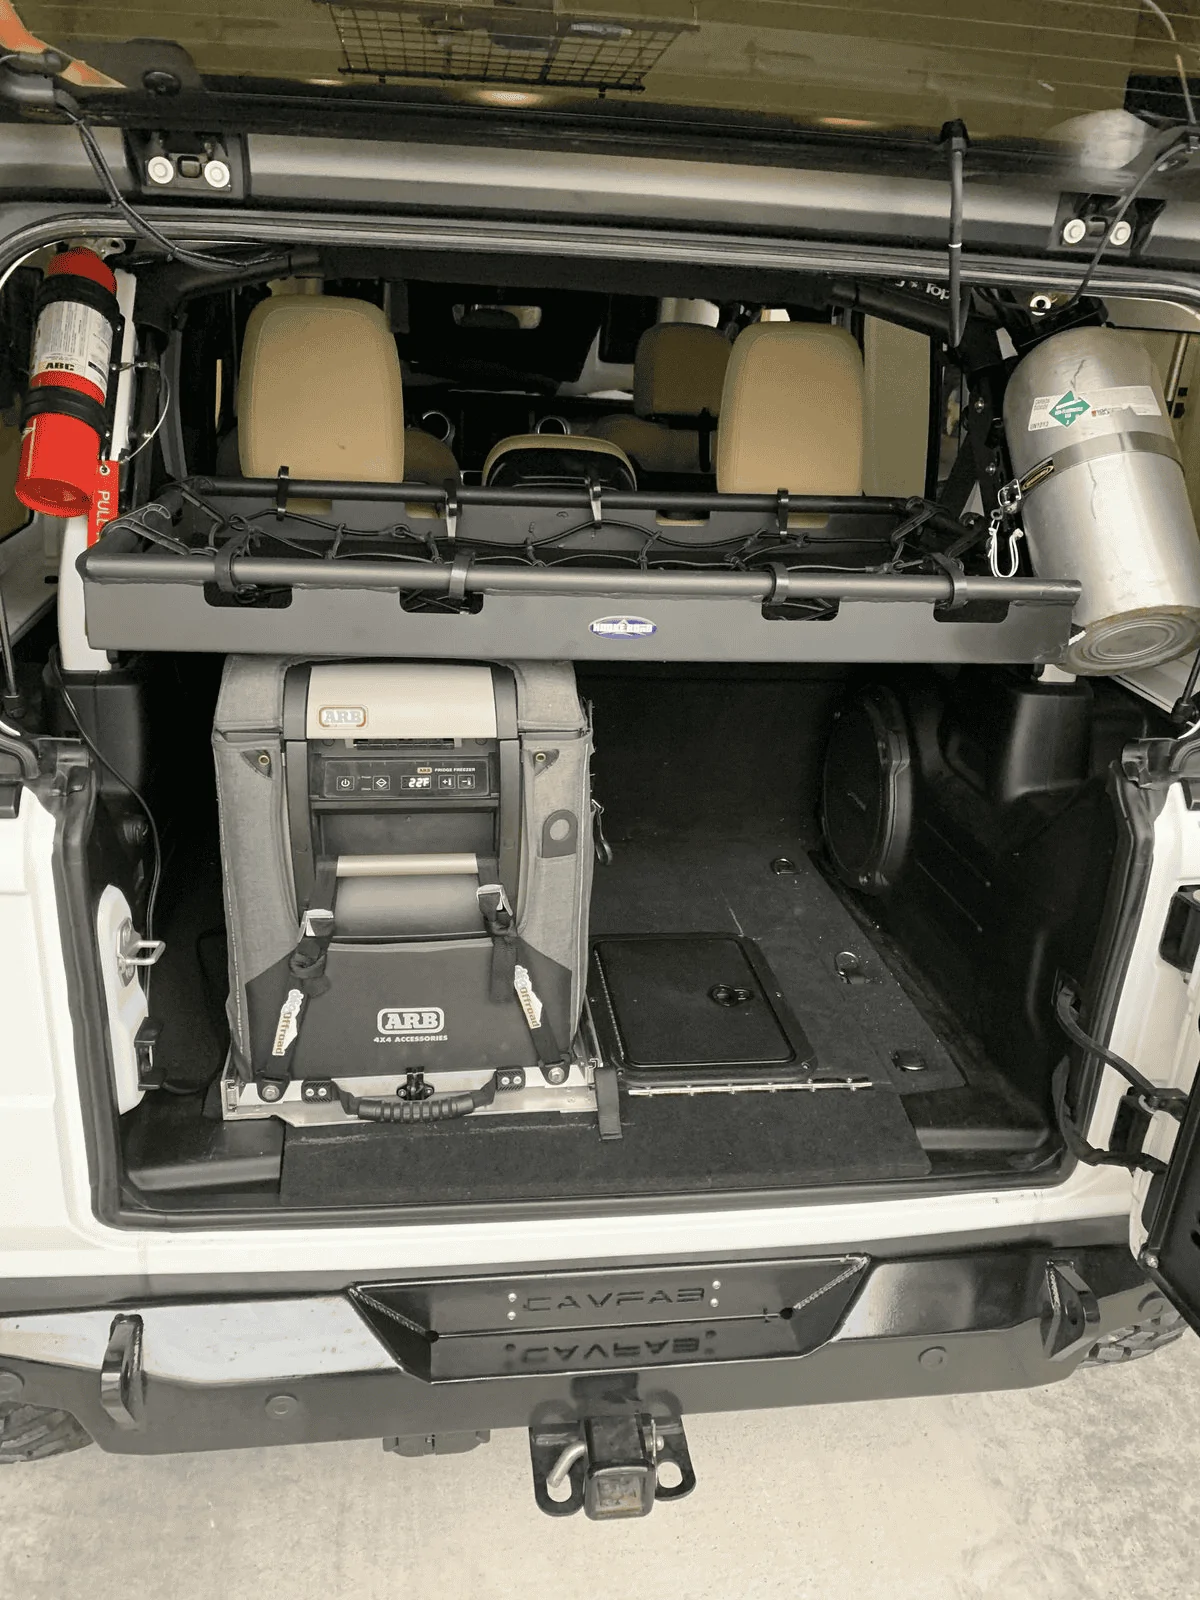
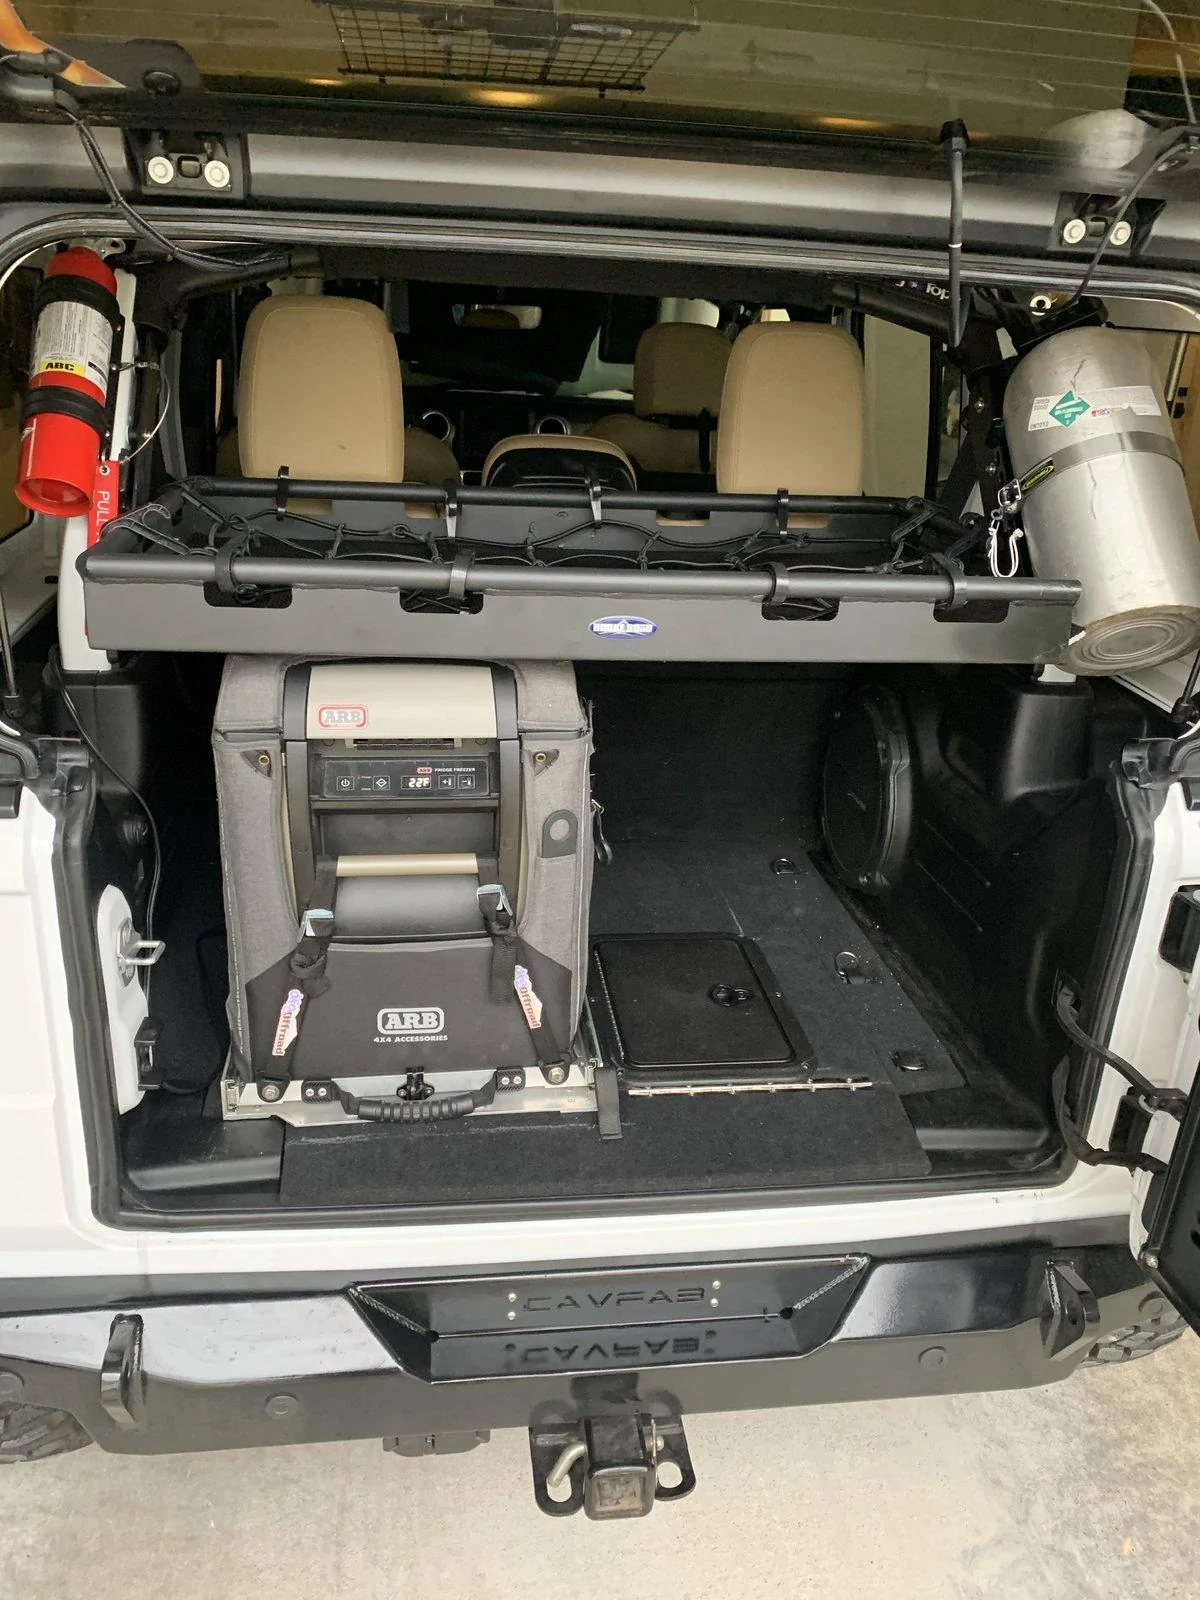
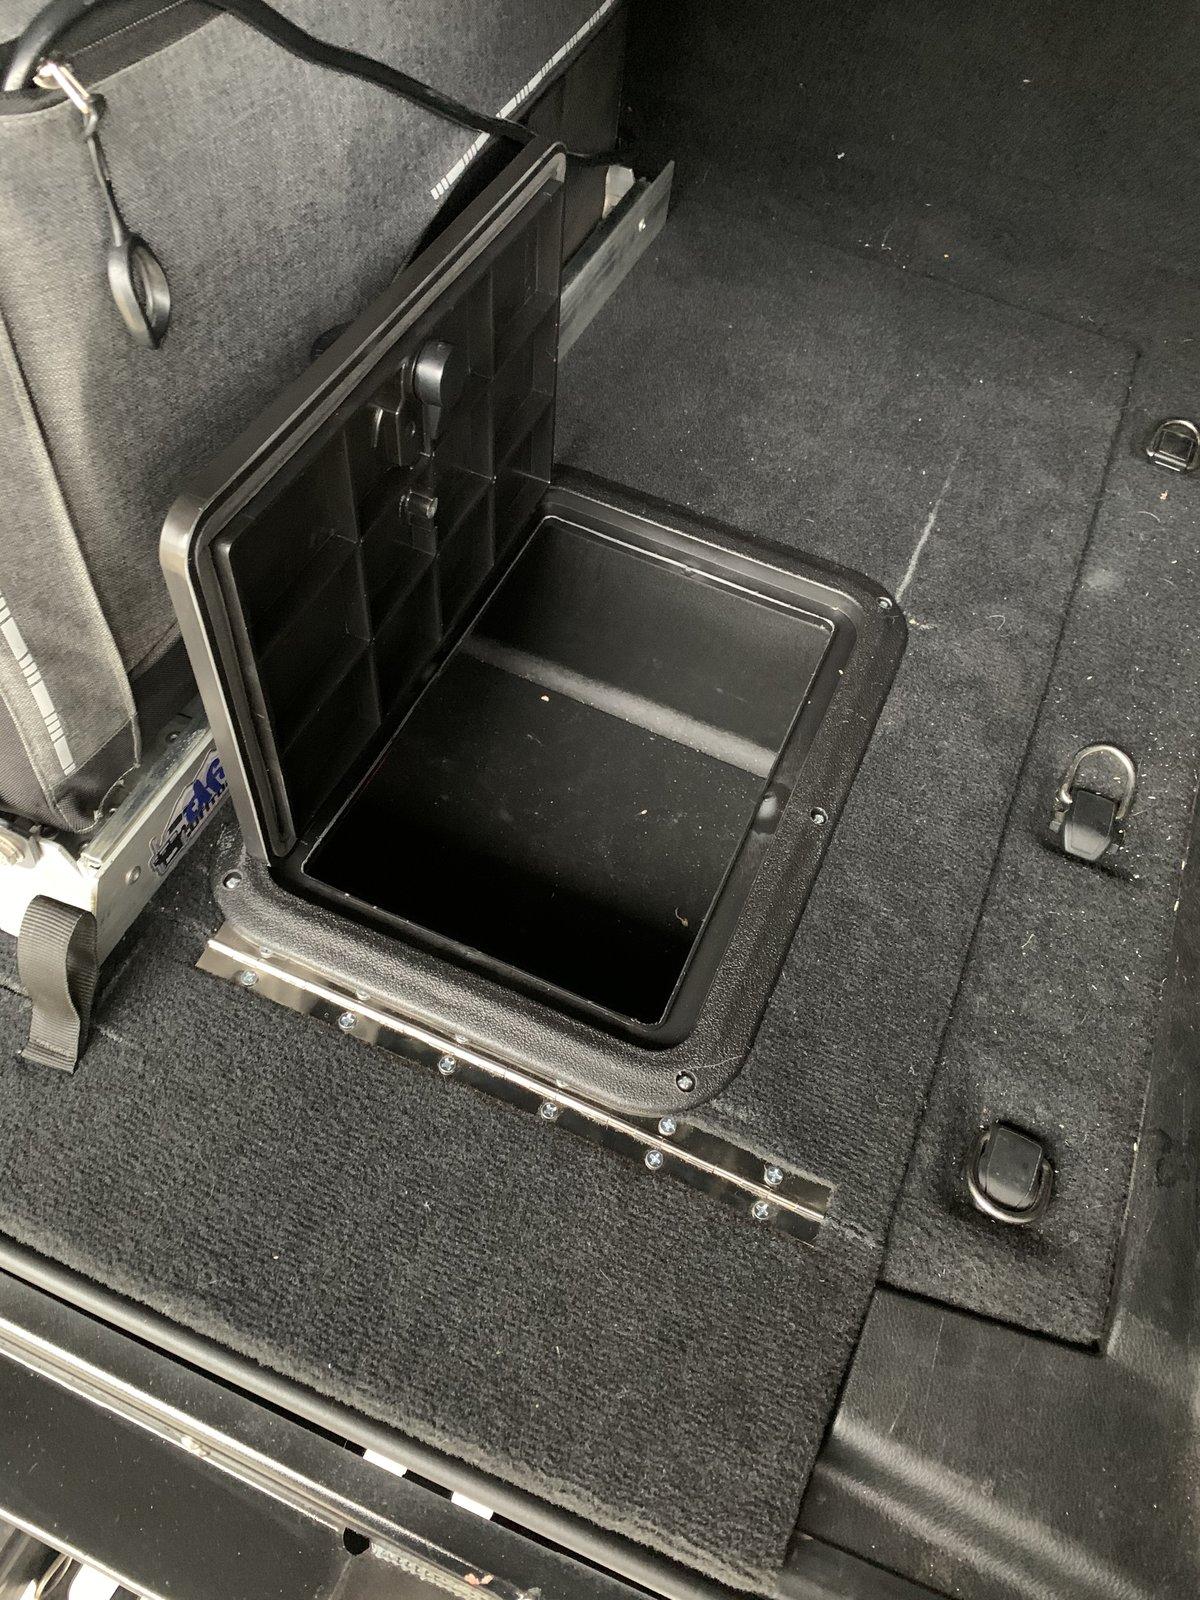
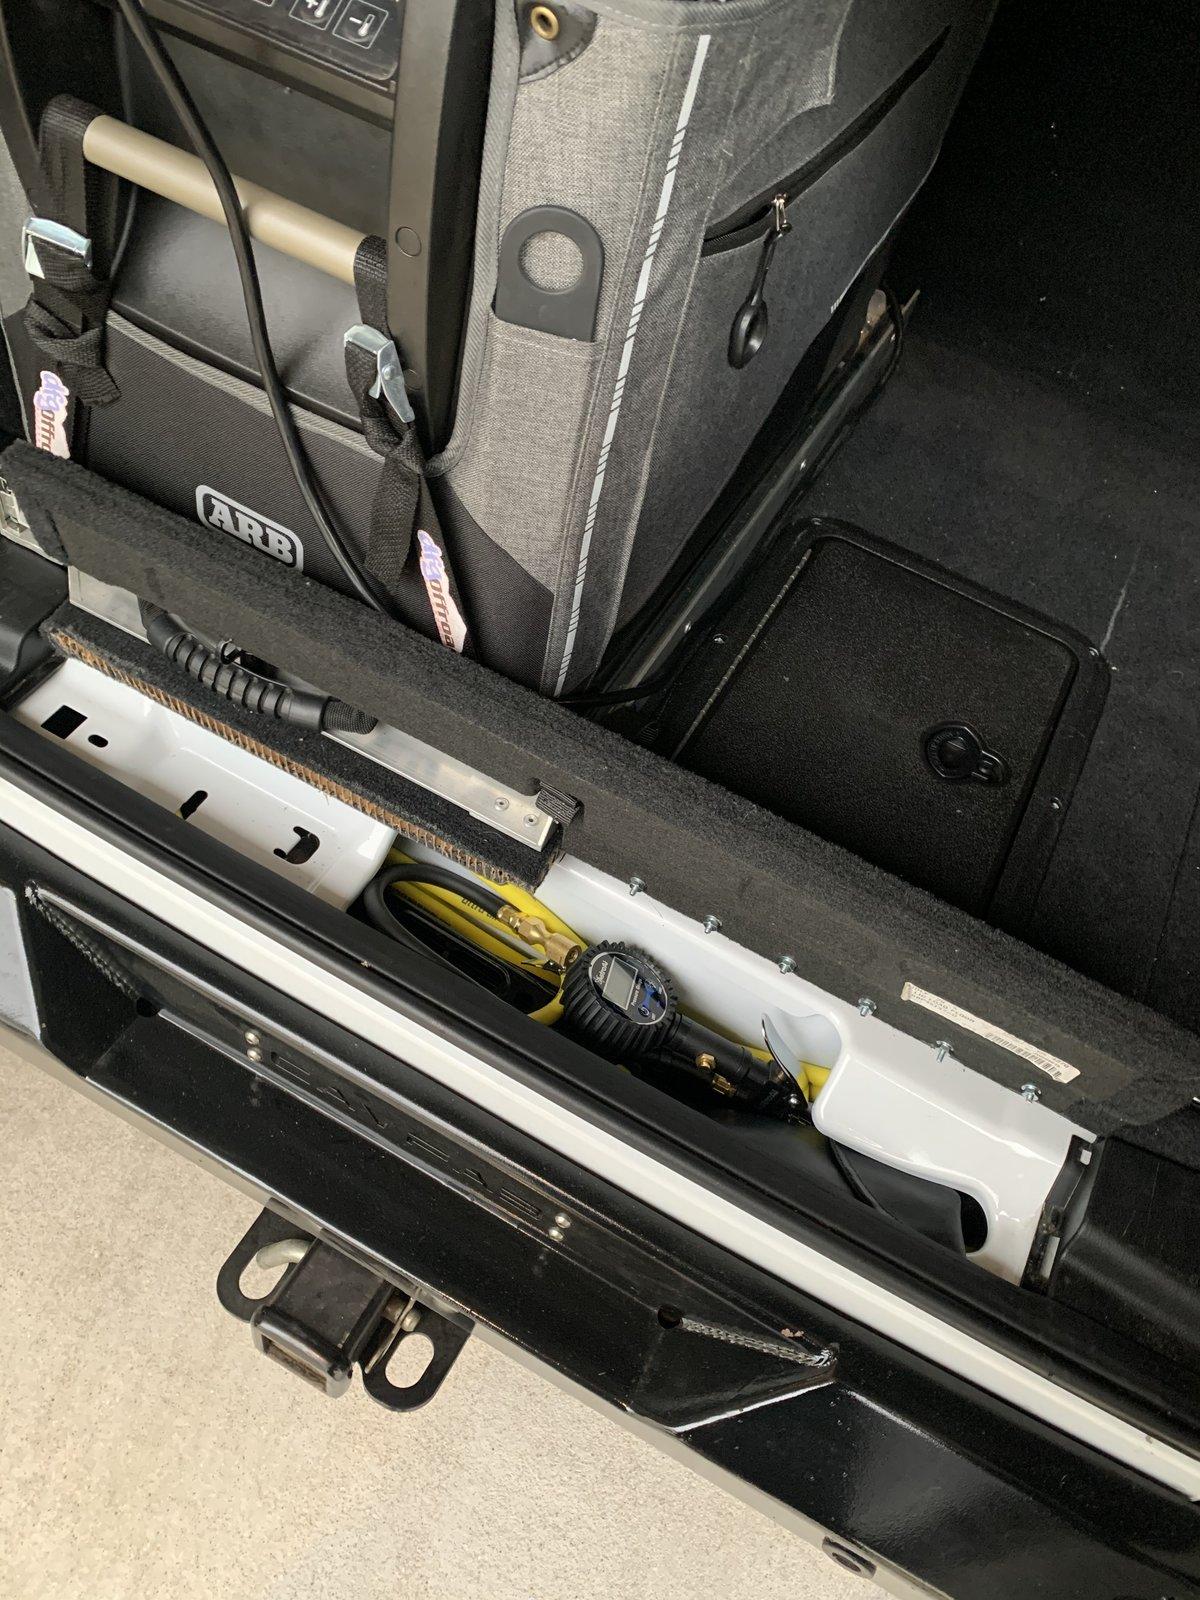
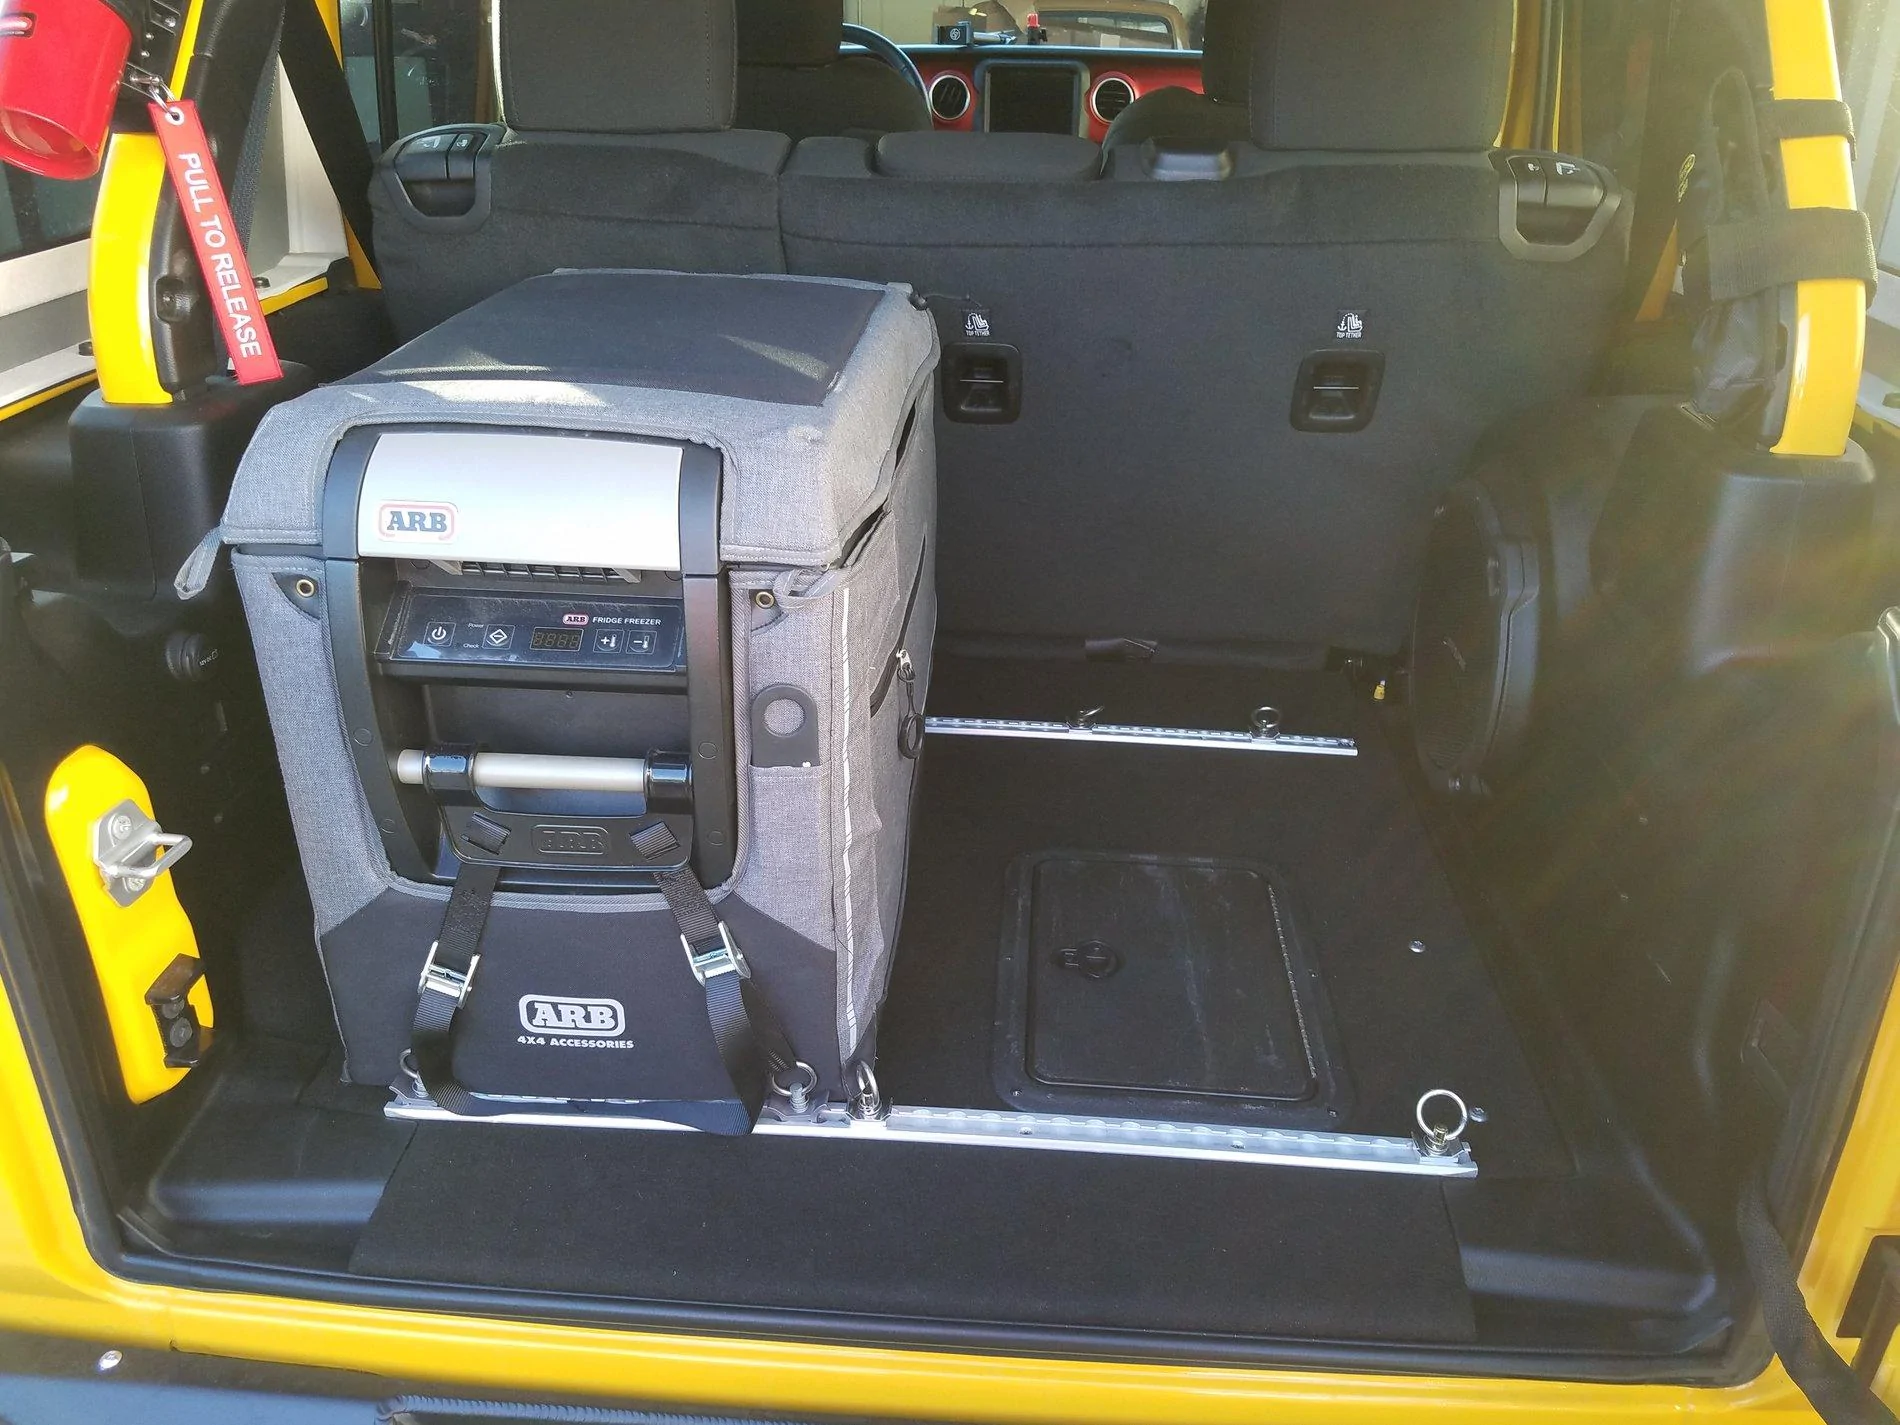
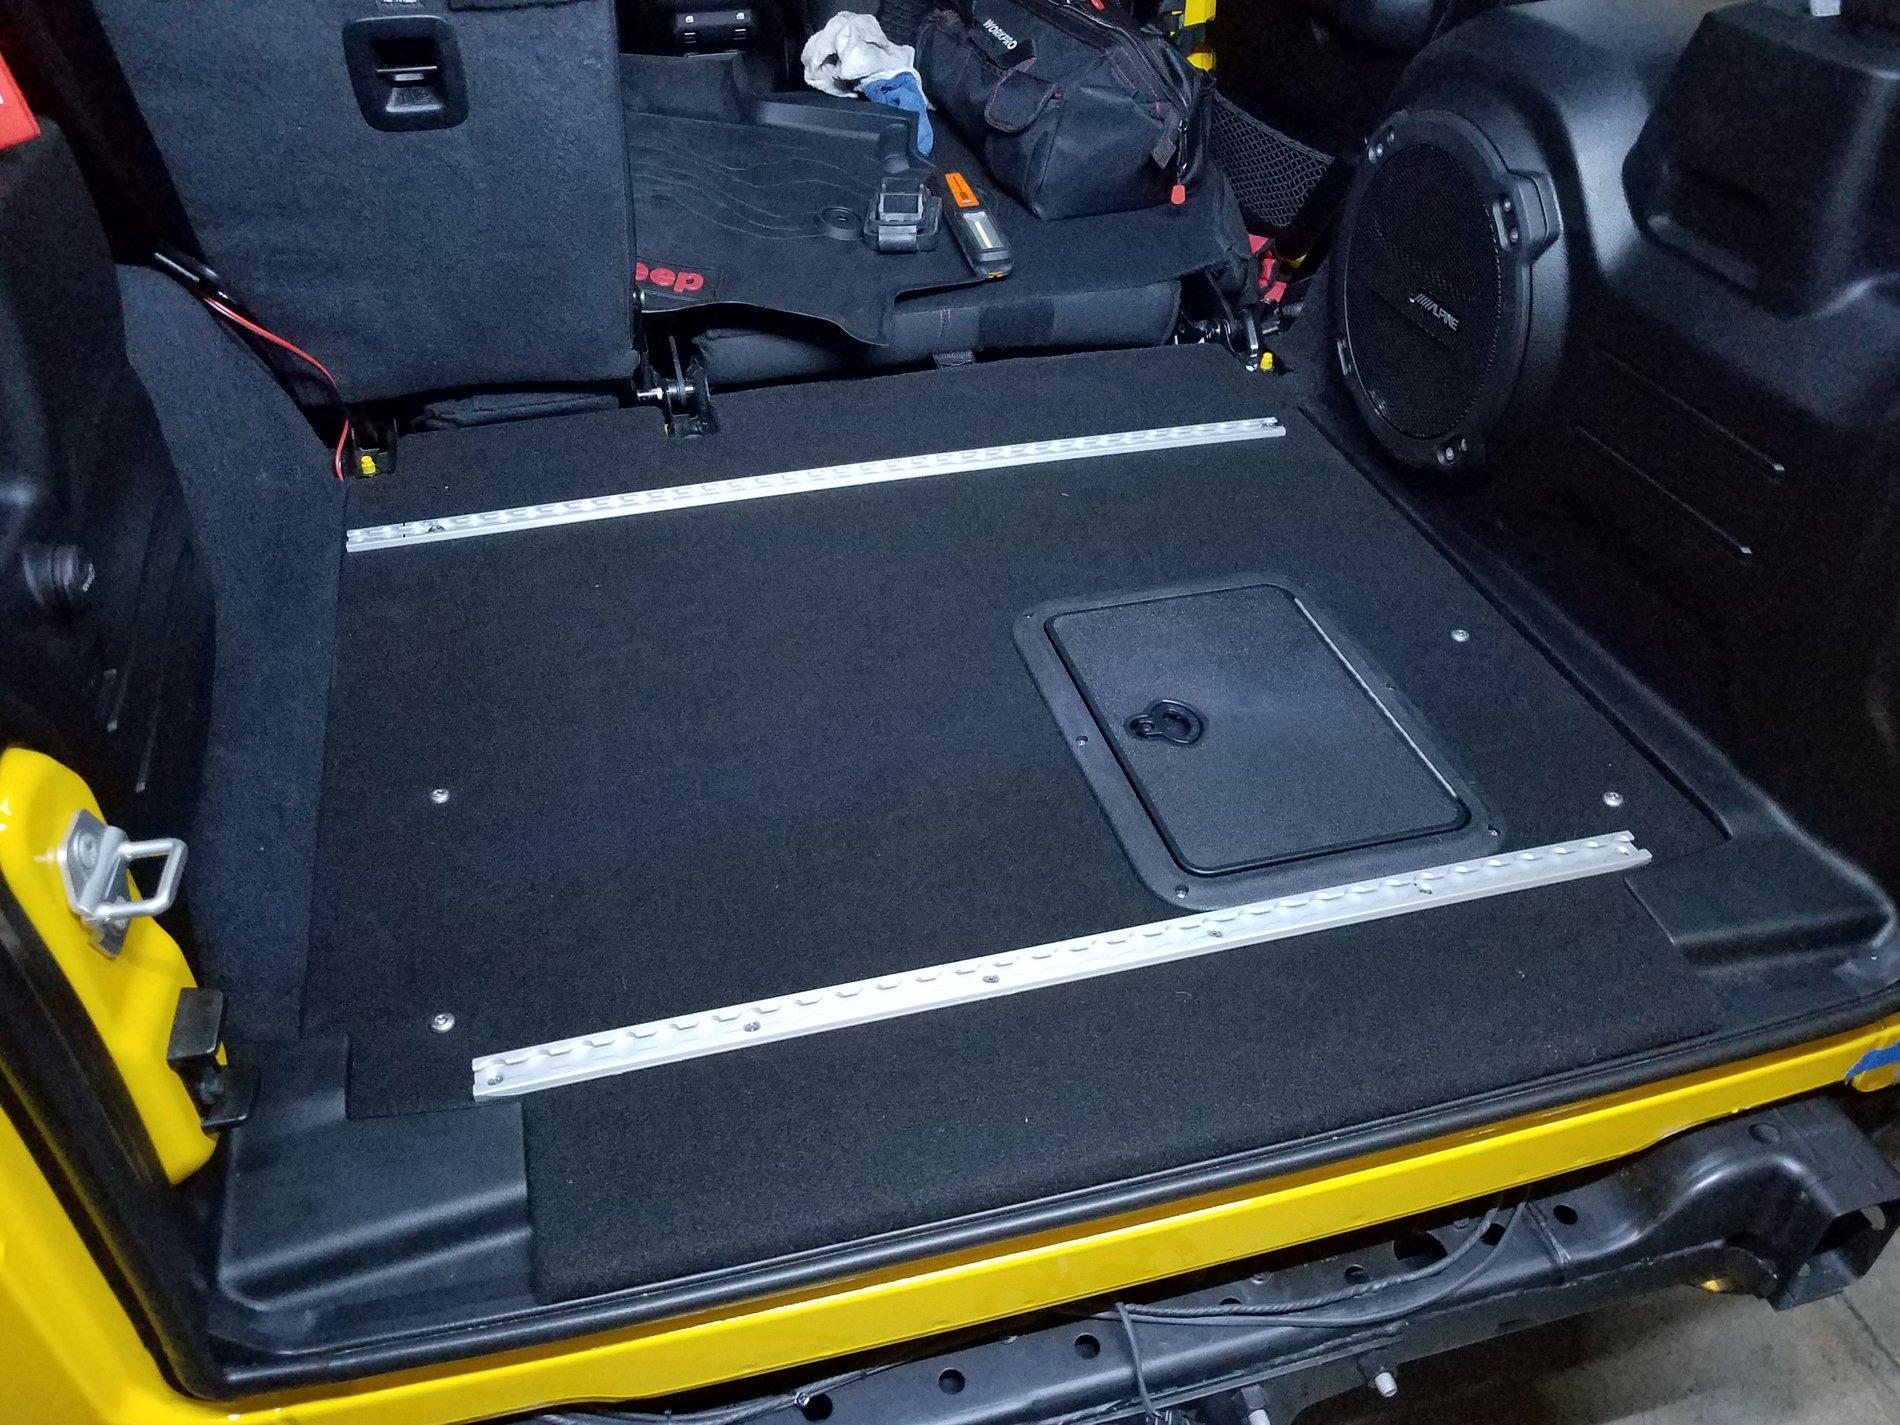
Nice floor system. Just building mine. Where did you get that access panel as It looks like the perfect size and pretty level with the floor.
Sponsored


2Wheel-Lee

Well-Known Member
First Name
Lee
Joined
Oct 10, 2018
Threads
2
Messages
402
Reaction score
342
Location
Orange County, CA
Vehicle(s)
2020 JLUR, 2006 Dodge Ram 2500 CTD, 1986 Suzuki Samurai, 1975 Datsun 620

99wishes

Well-Known Member
Joined
Aug 3, 2019
Threads
24
Messages
229
Reaction score
243
Location
Texas
Vehicle(s)
2018 Jl Moab
Mine is running off a rear Odyssey battery that's charged via a Redarc BCDC charger.

20191215_152621.jpg


20191025_192223.jpg


20191215_152637.jpg
Finally started my install and I will have to admit there are several little details I now notice in this install. First, you pulled out the seat back transition piece and cut around the brackets. By removing the piece, I think you can possibly push the fridge slide back enough to have it on the driverā€™s side. Still just a guess there. Second, you cleaned up the driverā€™s side edge and made the back flush. The right side trim is higher than the driverā€™s side if you just leave it as is.

I didnā€™t do either. I left the back and slid the plywood underneath it about a 1/2ā€ up to the brackets. That part looks fine. The driverā€™s side isnā€™t as clean as yours...or as flush. The one thing I will do that you didnā€™t is reuse the tie down rings on the side without the fridge slide. If you remove the plastic cover, they fit nicely.

I will post some pictures when I get done. Had to order a few more pieces.
 

Sponsored

2Wheel-Lee

Well-Known Member
First Name
Lee
Joined
Oct 10, 2018
Threads
2
Messages
402
Reaction score
342
Location
Orange County, CA
Vehicle(s)
2020 JLUR, 2006 Dodge Ram 2500 CTD, 1986 Suzuki Samurai, 1975 Datsun 620
Finally started my install and I will have to admit there are several little details I now notice in this install. First, you pulled out the seat back transition piece and cut around the brackets. By removing the piece, I think you can possibly push the fridge slide back enough to have it on the driverā€™s side. Still just a guess there. Second, you cleaned up the driverā€™s side edge and made the back flush. The right side trim is higher than the driverā€™s side if you just leave it as is.

I didnā€™t do either. I left the back and slid the plywood underneath it about a 1/2ā€ up to the brackets. That part looks fine. The driverā€™s side isnā€™t as clean as yours...or as flush. The one thing I will do that you didnā€™t is reuse the tie down rings on the side without the fridge slide. If you remove the plastic cover, they fit nicely.

I will post some pictures when I get done. Had to order a few more pieces.
I'm not exactly clear on your points, so let me try and take a shot at it.

- The transition piece you're referring to is when the seat is folded flat(ish), it's the piece that covers the gap and hinges? If so, I have clothe interior, and I didn't have that transition piece or gap cover. Yes, my half inch board is cut around the hinges.

- Not sure what you mean about pushing the fridge slide. I don't have a fridge slide (I was going to make one, but it would have added more weight than value). The fridge is hard against the back seat (with Velcro stuck to the seat-back to prevent wear from the fridge), but I can't move it any further left, or the tailgate hits it. That's OK, as I seemed to really like that storage gap next to the fridge. I also make sure that when I pack stuff, I leave the area open next to the fridge fan so it can get rid of the heat - and the area can get quite warm if it's too blocked off.

- Cleaned up the driver's side edge? I didn't cut or shape any of the plastic pieces. My floor board was shaped to fit as flat as possible so that it fits mostly flush with the rear plastic. Getting it flush, included routing the bottom of the wood to accommodate the rise from the AAL battery/compressor mount. The plastic trim toward the rear is the same height on both sides. Maybe you're referring to something different than what I'm thinking.

- Yes, I didn't put tie-downs where the factory tie-down bolts were. The original front bolts are still used to secure the floor board, but they also go through the tie-down track. I didn't have much room to put anything on the driver's side, since the fridge essentially bumps up against them, and any other tie-down mount would have caused interference. I probably could have use the right side bolts for mounts, but I just never saw a need.

Looking forward to seeing your pics!

Here's a pic from the summer. When we camp, it's the whole family - three kids. We take everything (well, not as much as when we take our truck and trailer). In all that mess are 5 backpacks for clothes, 5 sleeping bags, 5 camp pads, large tent, lots of tarps and poles for shelter, 5 chairs, shower enclosure, another 5 gallons of water (in addition to the 4 on the spare tire), lots of food, propane stove, 3 fishing poles and tackle, and probably a bunch of other stuff I forgot. Under the back seat is full of tools and recovery gear, so that area isn't used for personal stuff.

So here's the funny part...on this particular trip, the main trail we were going on to get to the destination normally takes about 2-1/2 hours. Thanks to the EVO/King suspension, light camping gear where practical, and a loose nut behind the steering wheel, we did it in about 50 minutes. I was driving it like Robby Gordon. When we'd see dust ahead (other offroaders) - even miles out in some sections, we'd see how fast we could catch it.

119518842_1778006872338346_2841184051242126776_n.jpg
 

99wishes

Well-Known Member
Joined
Aug 3, 2019
Threads
24
Messages
229
Reaction score
243
Location
Texas
Vehicle(s)
2018 Jl Moab
I am second guessing the access hatch and itā€™s usefulness. It seems like if I really need to work on anything I have to take the deck out. For my build I wonā€™t have the arb compressor anytime soon. Even if I add that, the larger side of the compartment is mostly battery. It seems like I just need access to the breaker/fuses/switches; and, if I use something like the image below the arb outlet for the fridge could go inside the compartment near the fuse box. When needed I can run the cord through the grommet.

Jeep Wrangler JL ARB refrigerator installs A0C073CE-B1C8-43E5-92D3-2E17909481D2


So for those who have installed a hatch, is it worth it? Besides using as a vent, are you actually using the hatch? What are you using it for?
 

2Wheel-Lee

Well-Known Member
First Name
Lee
Joined
Oct 10, 2018
Threads
2
Messages
402
Reaction score
342
Location
Orange County, CA
Vehicle(s)
2020 JLUR, 2006 Dodge Ram 2500 CTD, 1986 Suzuki Samurai, 1975 Datsun 620
So for those who have installed a hatch, is it worth it? Besides using as a vent, are you actually using the hatch? What are you using it for?
Valid concern to question the need for the hatch.
Here are some of the things I use it for:
- View Redarc charging status LEDs (rare, but I have)
- Circuit breaker access for the Redarc charger
- Fuse access for accessories and compressor
- Temperature check on the Redarc (not so much needed these days, since I've learned it doesn't get that hot)
- Emergency quick checks, such as battery voltage. I had that rear circuit breaker fail which caused the Redarc not to get power, and it was good to be able to easily troubleshoot and identify the problem within a couple minutes.
- Fresh air for the ARB compressor (for cooling and air pressurization). Air gets in there other ways, but this is just extra - especially when I find myself airing up other peoples' tires as well as my own.

If I have my fridge in place and full, it's a lot easier to do the things mentioned above, vs removing the fridge and the floor panel, which I had to do when I discovered the circuit breaker failed. Fortunately, I had another work around so I was able to bypass the rear circuit breaker (I still had the one up front).

Is it a deal breaker for me to not have the hatch? Definitely not. It's not absolutely necessary, but it does add some conveniences. If my fridge isn't in place, I can also have the floor panel out quickly after removing six bolts, but I'd rather not if I don't have to.
Depending on how you construct your setup, you may be able to simply add it later, if needed.
 

99wishes

Well-Known Member
Joined
Aug 3, 2019
Threads
24
Messages
229
Reaction score
243
Location
Texas
Vehicle(s)
2018 Jl Moab
Hereā€™s an update on my build.
I am second guessing the access hatch and itā€™s usefulness. It seems like if I really need to work on anything I have to take the deck out. For my build I wonā€™t have the arb compressor anytime soon. Even if I add that, the larger side of the compartment is mostly battery. It seems like I just need access to the breaker/fuses/switches; and, if I use something like the image below the arb outlet for the fridge could go inside the compartment near the fuse box. When needed I can run the cord through the grommet.

Jeep Wrangler JL ARB refrigerator installs A0C073CE-B1C8-43E5-92D3-2E17909481D2


So for those who have installed a hatch, is it worth it? Besides using as a vent, are you actually using the hatch? What are you using it for?
Here is an update for reference if anyone else ends up in the same place.

Jeep Wrangler JL ARB refrigerator installs 22396749-A8A4-46E3-A8BA-56D02FF41592


The 8ā€ electrical hatch fine and probably sturdy enough for use here. It doesnā€™t have a gasket which isnā€™t really necessary if you ask me. It is lower profile minus the lock. I like the keyed option and the grommet which is why I decided to give it try. Where I placed it, you get access to most of the tray below. About 2ā€ on top and bottom I wouldnā€™t have clear access to since the tray is around 10ā€ at this point. This option is less than $20 and it comes in black.

https://www.amazon.com/gp/aw/d/B07G2N4PZB?psc=1&ref=ppx_pop_mob_b_asin_title

(FWIW, you can see how I reused the tie down rings in that image.)

Ultimately, I went with the marine hatch. It gives full access to the tray. It does have a gasket and is definitely more durable. I felt this was a safer move for when I donā€™t have the slide installed. Also felt it was worth a few dollars more for maximum access even if I donā€™t need it. I do need 1/4ā€ spacers to raise the slide. This option is on the plus side of $35.

https://www.amazon.com/gp/aw/d/B07Q887FF9?psc=1&ref=ppx_pop_mob_b_asin_title

Jeep Wrangler JL ARB refrigerator installs 2763A6E1-B36F-4F29-9CEC-790C673852B3


The last little part I am very happy with is these T-nuts. They lock into the wood and makes installing and removing screws much better and stronger. View from the bottom...

Jeep Wrangler JL ARB refrigerator installs E59237E8-3605-4F52-B4A8-DD7C28FAD1FA


Once I add the carpet you wonā€™t even know they are there. Those other two holes are feet I will install on the bottom center. There is a small gap between the tub and plywood that I am afraid will sag once loaded up.

https://www.amazon.com/gp/aw/d/B072KQDMJL?psc=1&ref=ppx_pop_mob_b_asin_title

I ordered a couple more pieces, but hope to have the platform carpeted and complete very soon.
 

99wishes

Well-Known Member
Joined
Aug 3, 2019
Threads
24
Messages
229
Reaction score
243
Location
Texas
Vehicle(s)
2018 Jl Moab
Done with this part. Auxiliary battery up next. I think I will try to fabricate a tray myself. šŸ˜³

Jeep Wrangler JL ARB refrigerator installs 2B5C35FC-6868-4D9F-A78C-64DFBAAF8D52


Thanks to several in this thread for your suggestions and pictures. Lots of good information.
 

Sponsored

Sprint7

Well-Known Member
First Name
Mike
Joined
May 31, 2018
Threads
8
Messages
141
Reaction score
159
Location
Louisiana
Vehicle(s)
2004 LJ 2018 JL
I know that this is a late reply but I installed a hatch and have been very happy with it. Definitely would do it again.
Jeep Wrangler JL ARB refrigerator installs 1613754654183
 

99wishes

Well-Known Member
Joined
Aug 3, 2019
Threads
24
Messages
229
Reaction score
243
Location
Texas
Vehicle(s)
2018 Jl Moab
Love this thread!, where did you get the slider tray from?
Itā€™s from TuffStuff. Very happy with it and in my opinion the best bang for your buck.

https://tuffstuff4x4.com/products/t...-52l-slider-strap?_pos=2&_sid=f60dfe59f&_ss=r

I looked at several online and even thought about making my own before I went this route. I wanted one with a solid tray so that I can put stuff of different sizes on it besides the fridge and I have had really good experiences with them on the few items I purchased previously.
 

Tdkrum5

Well-Known Member
First Name
Ted
Joined
Mar 5, 2020
Threads
16
Messages
363
Reaction score
353
Location
WA/AZ
Vehicle(s)
20 White JLU Altitude
Vehicle Showcase
1
I know this thread has moved more toward the aux battery but I wanted to give a shoot out to @2Wheel-Lee for some inspiration. Finally completed the latch today. Not near as clean of an install but i'm happy with the outcome. Thanks again!

256D18A8-0239-4CB4-88EA-92DB0C6421D0.jpeg


4BA14C90-1031-4565-9B94-3F372C83A6BA.jpeg


21A49E06-A33D-469A-8212-26987029DA5F.jpeg


022DDF0C-CB1D-4439-AB91-F7B724C887B0.jpeg
Looks great, What size ARB fridge is this? Looks like it fits with the back seat still up. Can you use a solar generator type battery to keep the fridge running? I see some of the Jackery 1000 and eco flow river 2 say they can be charged with the 12 power plug. Maybe slowly
Sponsored

 
Last edited:


Top