Sponsored

Adding an Aftermarket Amp(s)

El ED

Active Member
First Name
Ed
Joined
Mar 15, 2018
Threads
5
Messages
30
Reaction score
16
Location
California
Vehicle(s)
2017 Renegade
There was little information available (at the time of this original post) regarding audio wiring schematics for the JL. This thread was put together to serve as a single location for us to build upon. I'll update it periodically until this project is finished (FYI, it's now complete!).

Prior Needs:
  • Wiring Schematic, including specific wire colors
    • Base System (Solved - See below) - The Speaker Wiring Schematic is now provided to help identify positive/negative polarity
    • Alpine System (Solved - See below)
  • Override UConnect resistor test (UConnect checks for the stock speaker resistance and turns individual outputs off if not "seen." (Solved - See below)
Updates added:

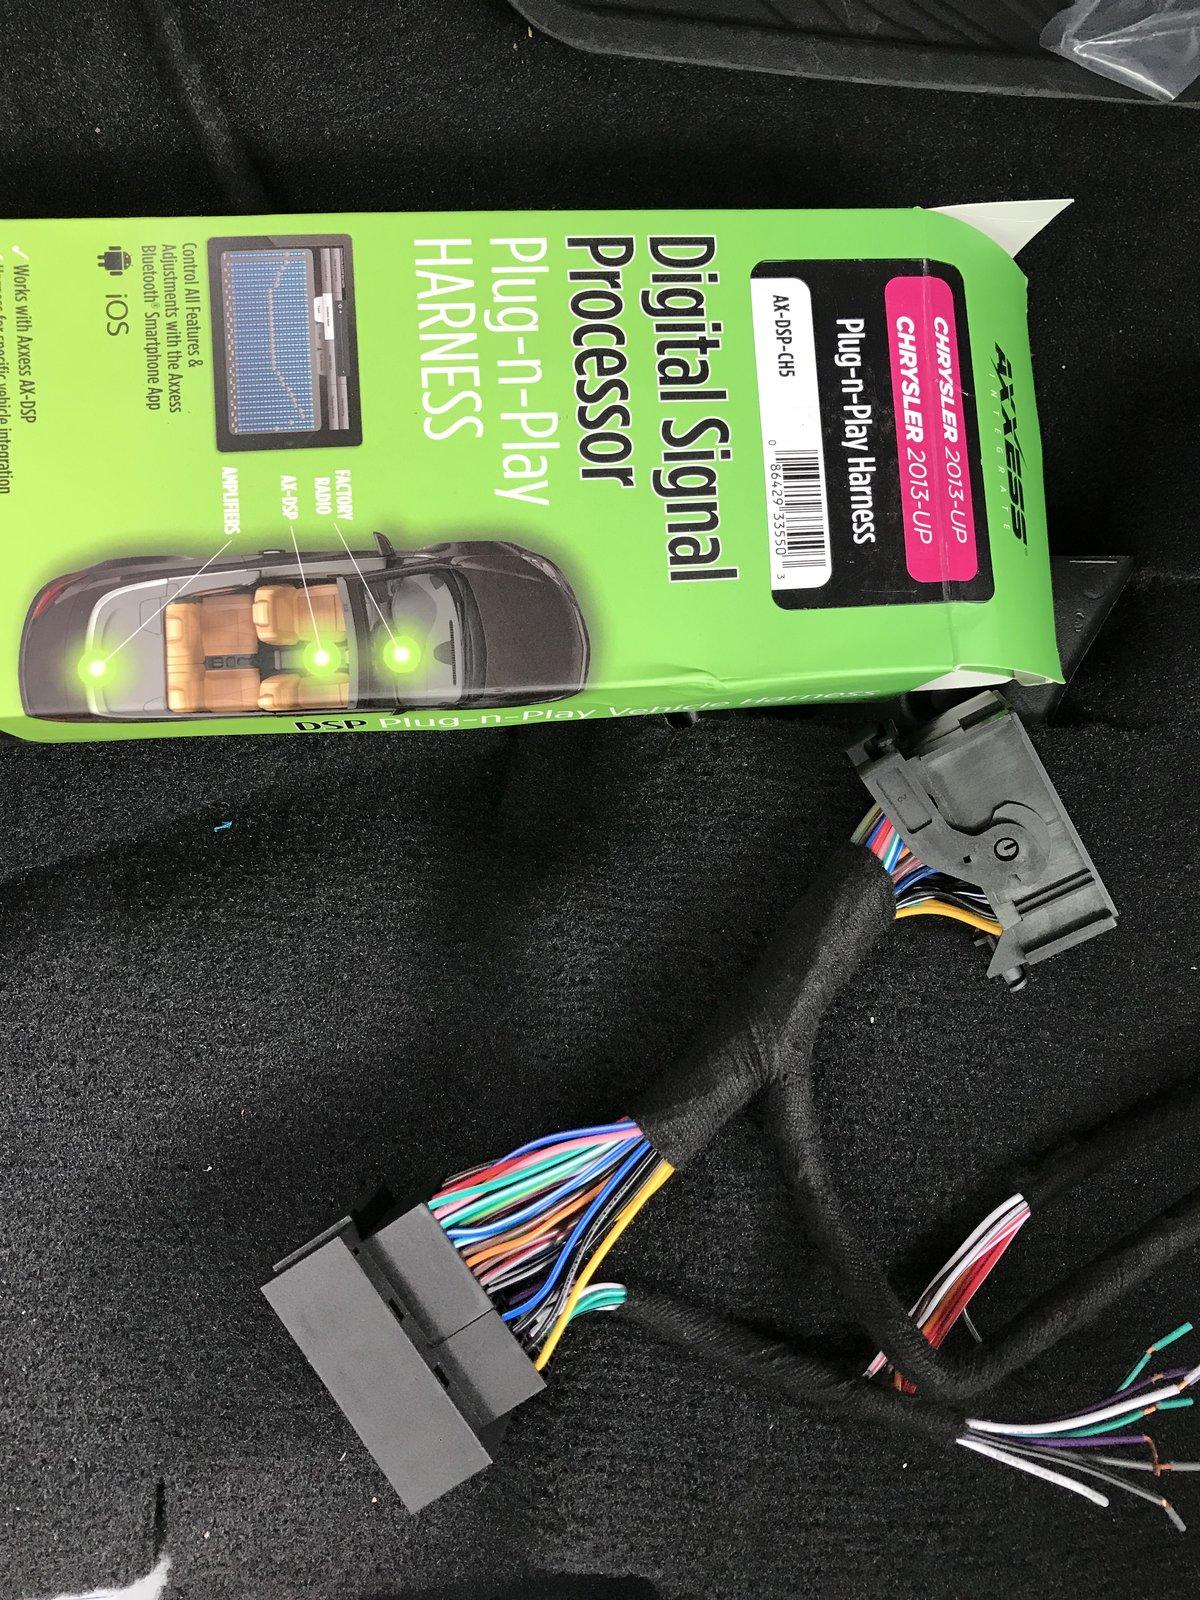
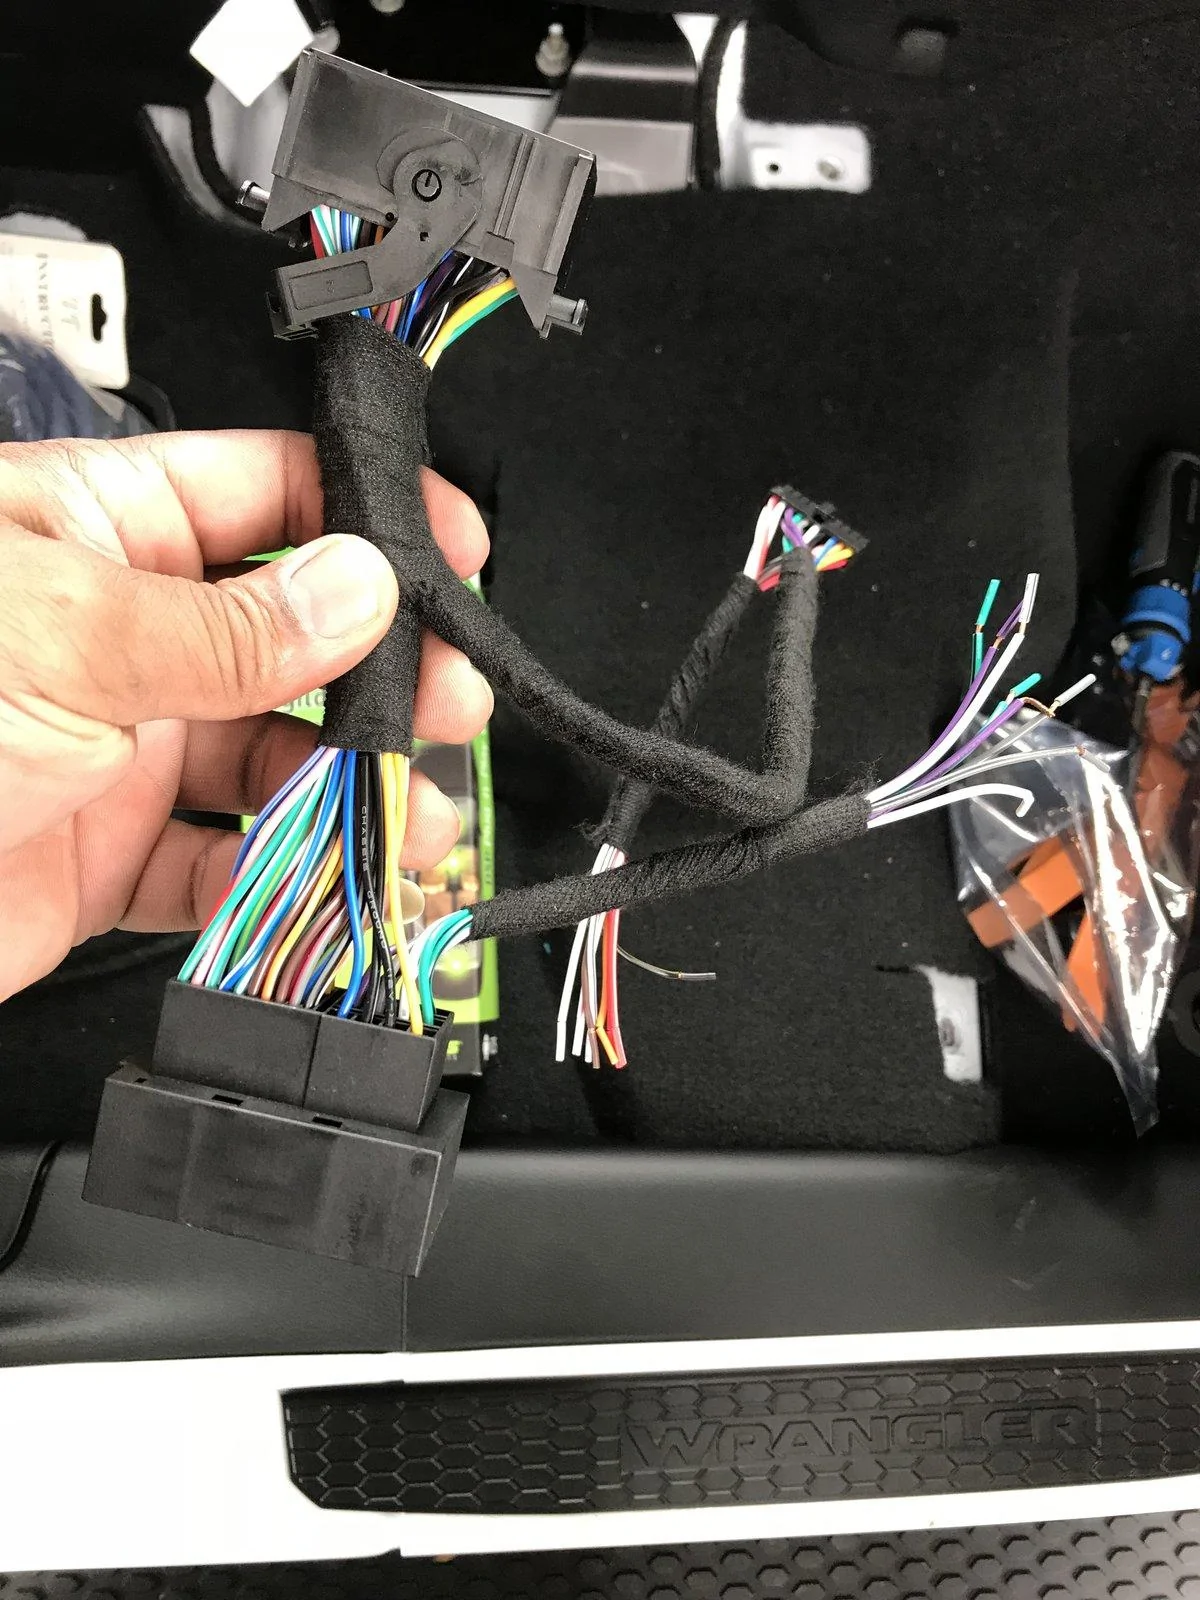
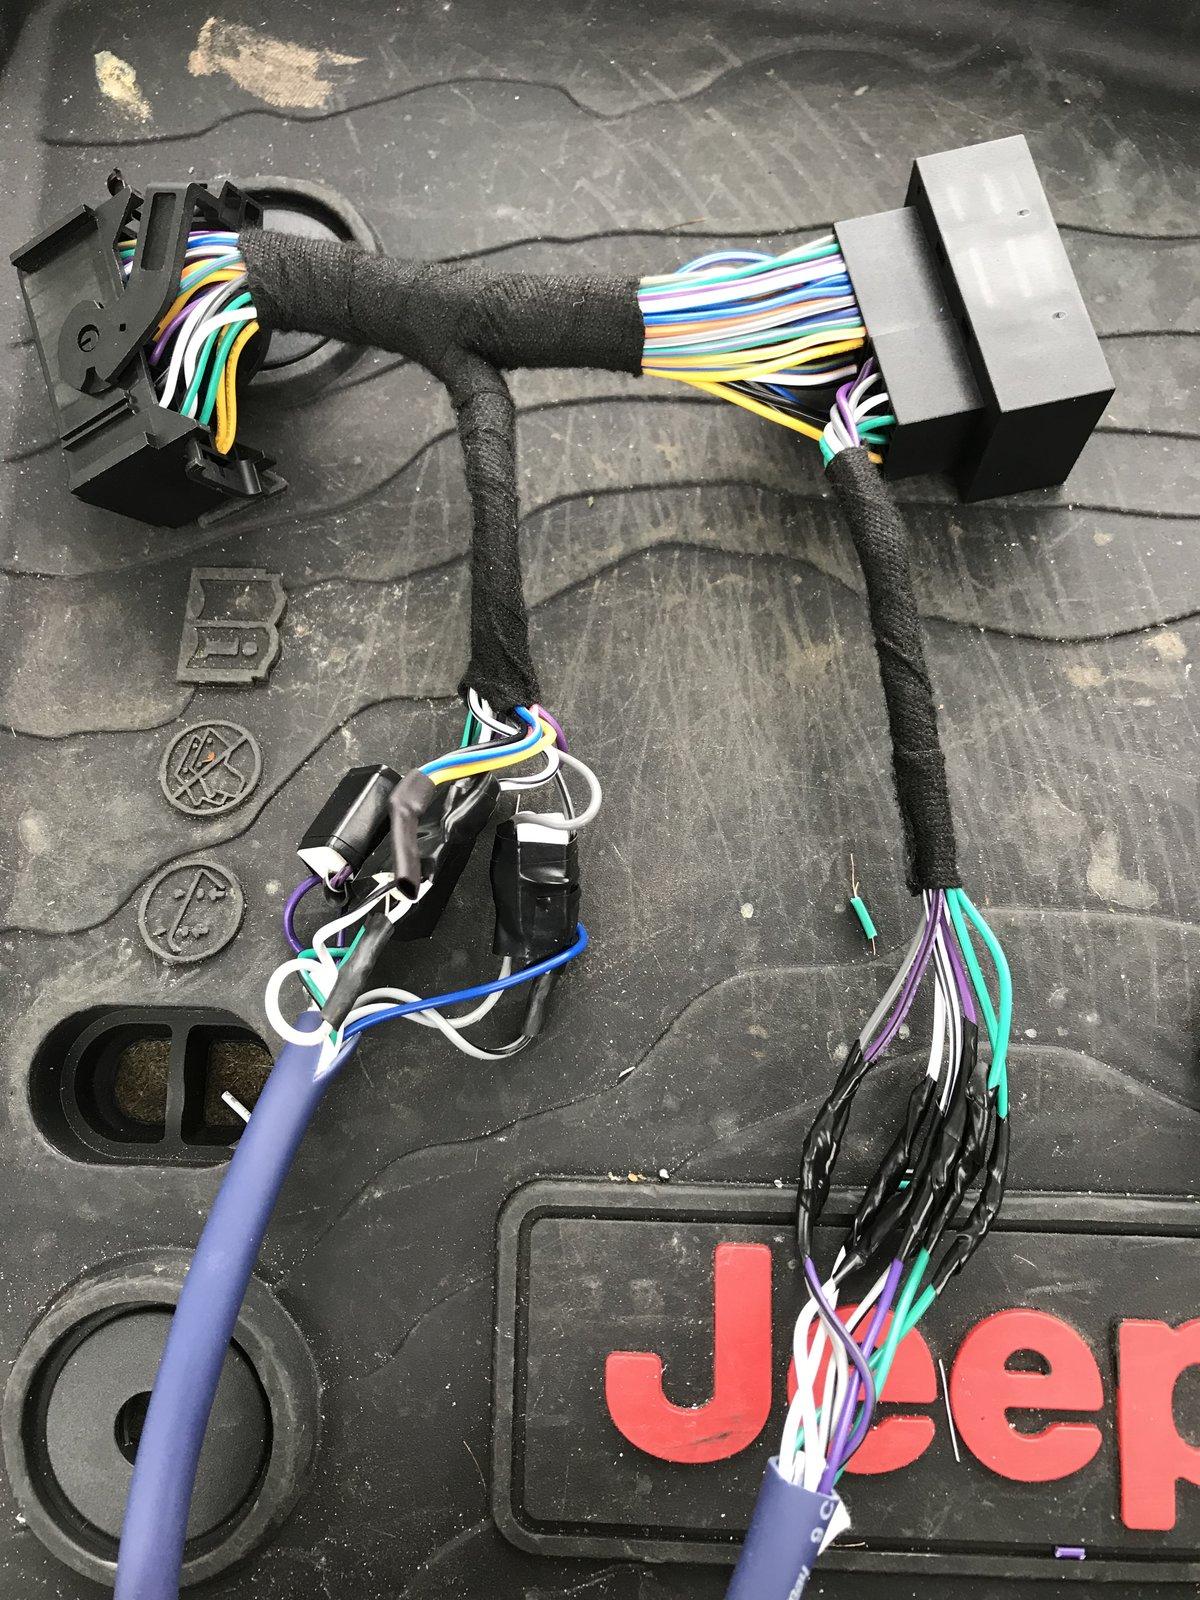
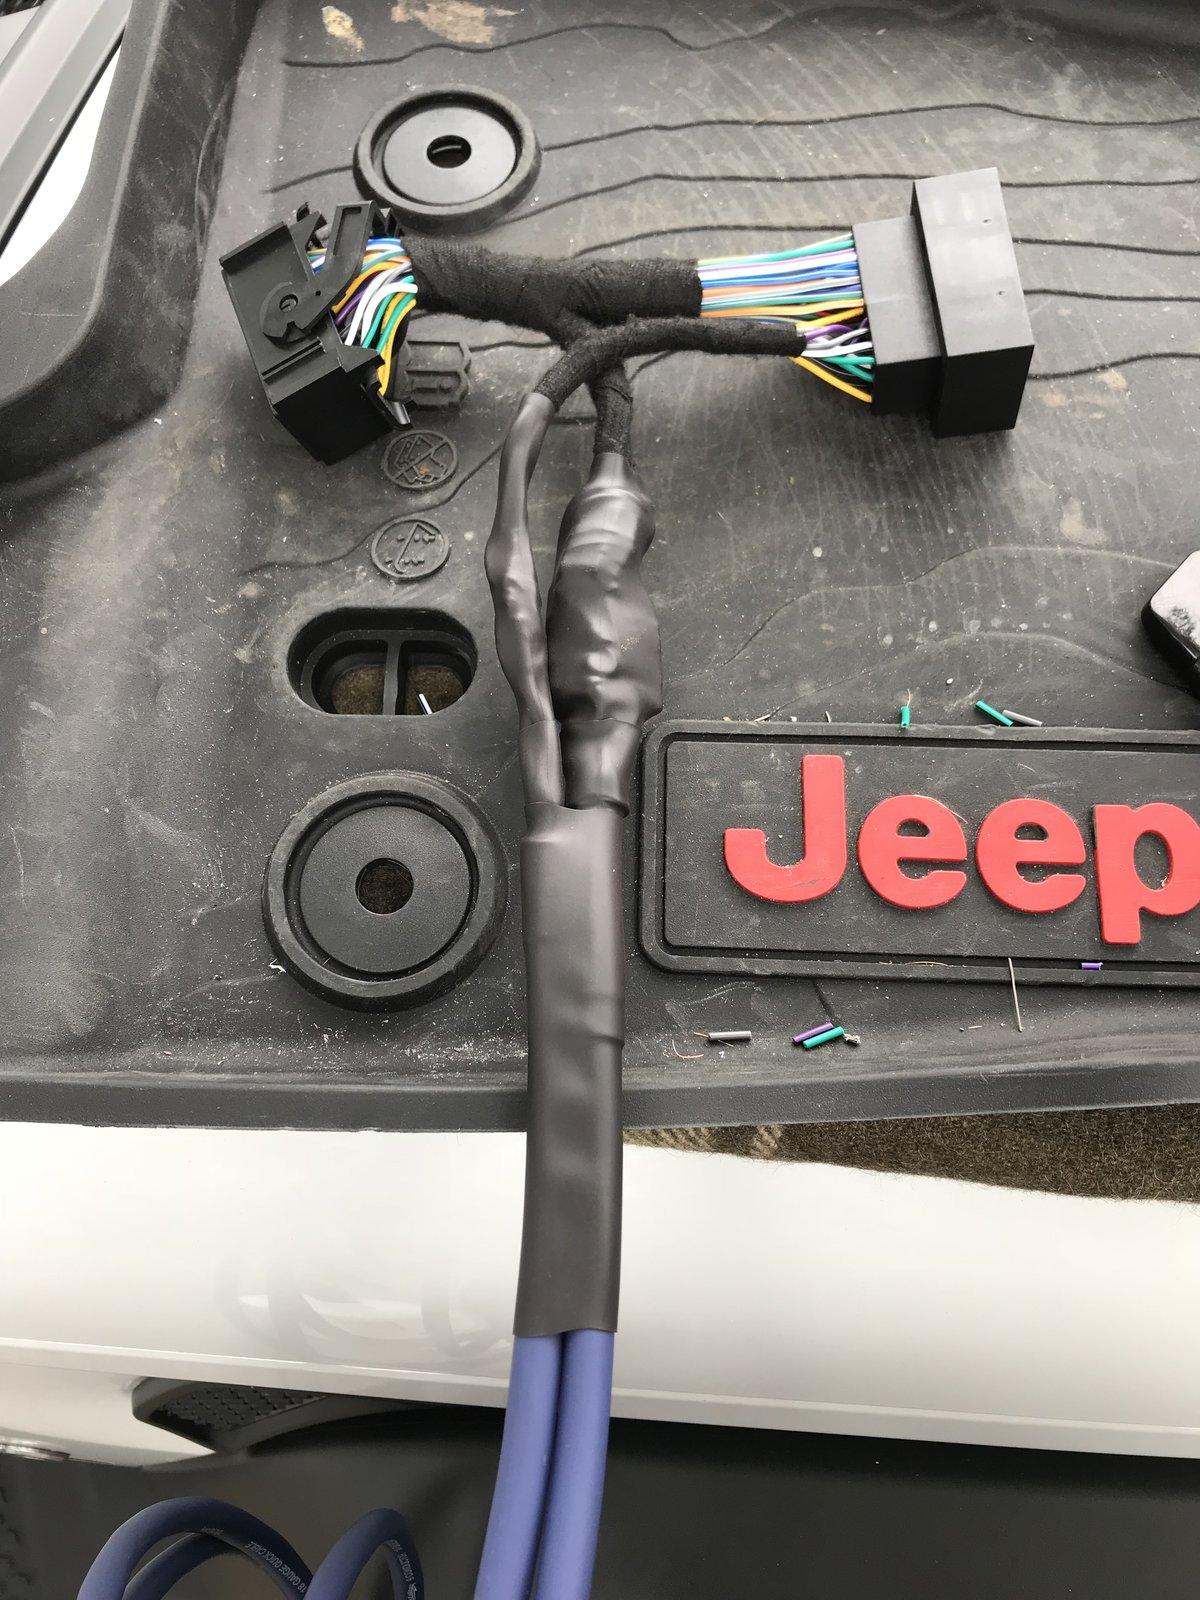
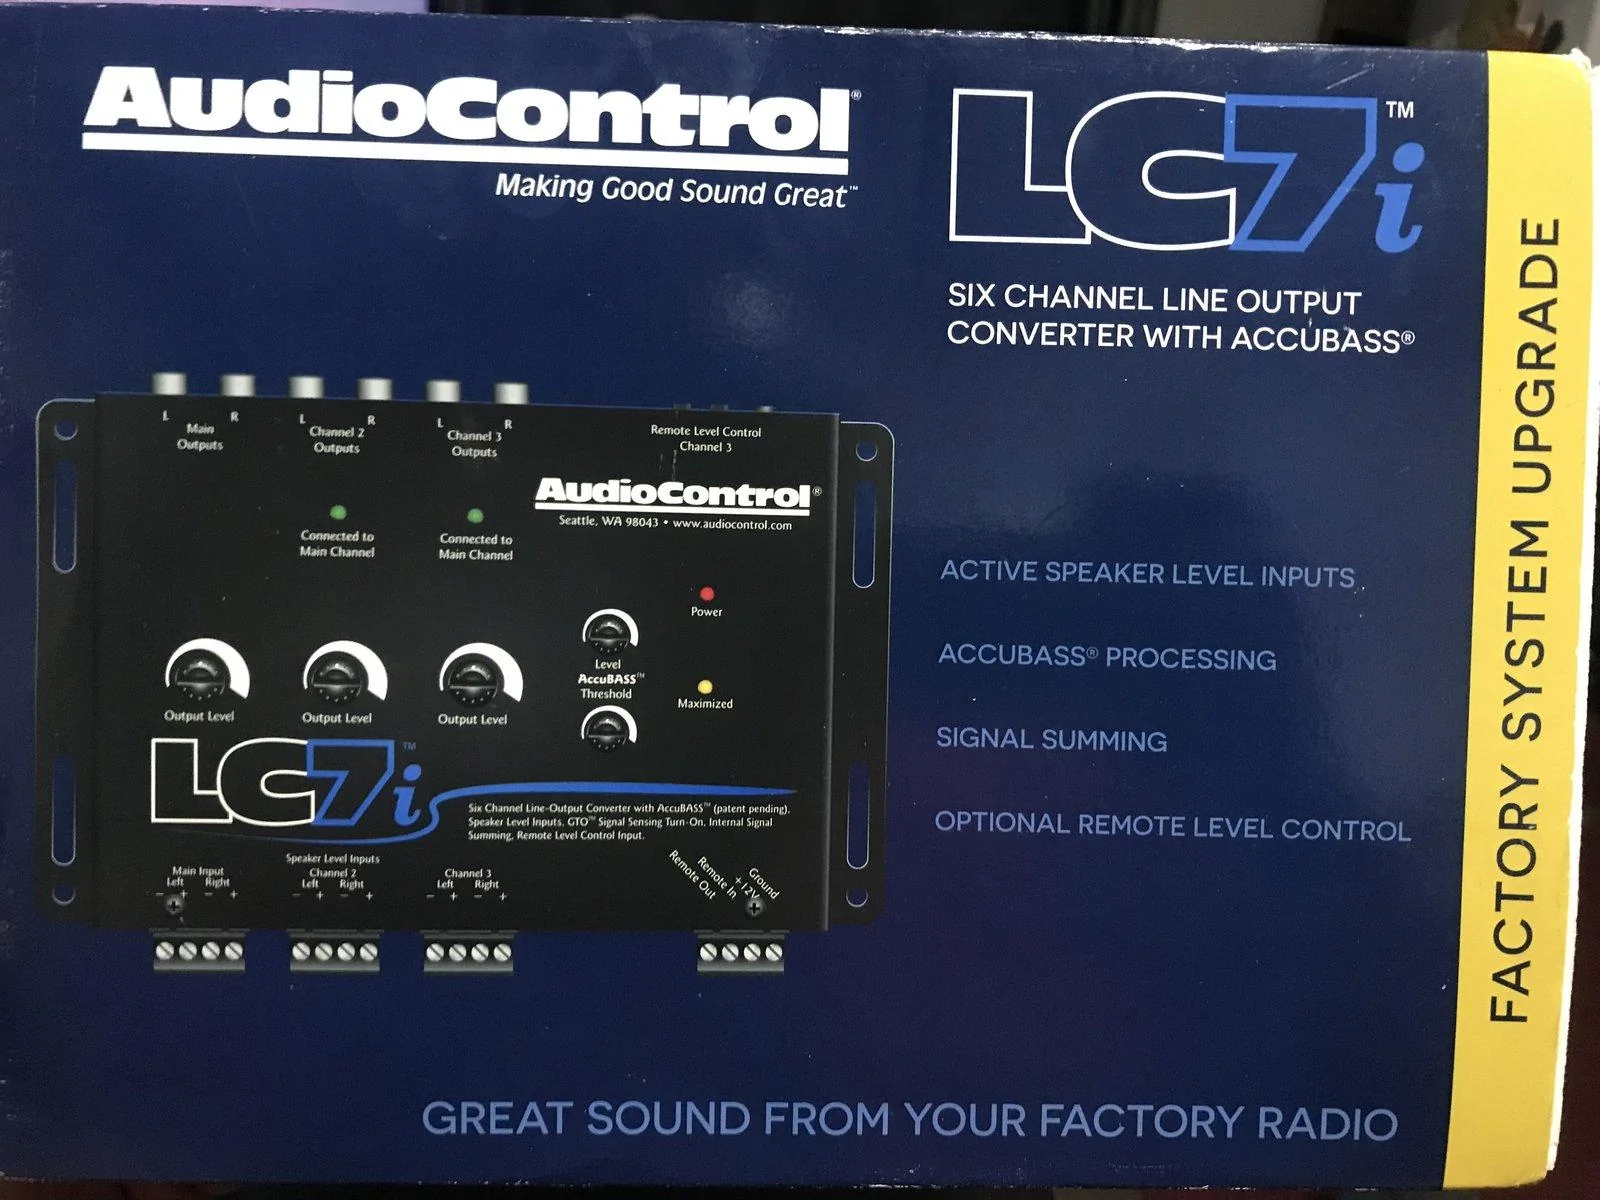
A Speaker/Line level converter is needed: JL Audio makes a great, albeit expensive, aftermarket sound processor: the JL Audio FiX™ 86. This device digitally processes and condition the speaker level signals. It provides a more balanced pre-amp/low-level signal for multiple amplifiers (two full range/one sub). JL Audio also makes a two channel line-level converter, but the cost difference isn't worth the limited future upgrade-ability.

In addition to the line level converter, the uConnect system has to be "tricked" into sending a signal to each speaker. In short, the Jeep's uConnect system checks for the proper Ohm load (resistance) supplied by our stock speakers. If it doesn't detect the proper resistance, uConnect turns that speaker's signal off. To override this, I've found only one option that works. Here's a great article on the topic: Everything is hooked up but no sound is playing, just don't buy the Audio Control AC-LGD device it discusses. I'll elaborate...

I tried the AudioControl AC-LGD device, and it worked... sporadically. Evidently the resistance tolerances for the AC-LGD were too narrow causing it to work sometimes, and not others.

The JL Audio FiX-LSA-4 (a device similar to the AudioControl AC-LGD, but made by JL Audio) didn't work at all with the Jeep's load sensing issue. I spoke with a JL Audio tech, and this seems to be a known issue they'll likely address soon. The reason appears to be related to a difference in the Ohm load our stereo systems require vs. others.

This leads us to the third and functional option for overriding the load sensing issue.

Here's the only currently known way to override the load sensing needs of UConnect, until JL Audio and AudioControl get this figured out. Heads-up, it is VERY EASY to do and requires light soldering:

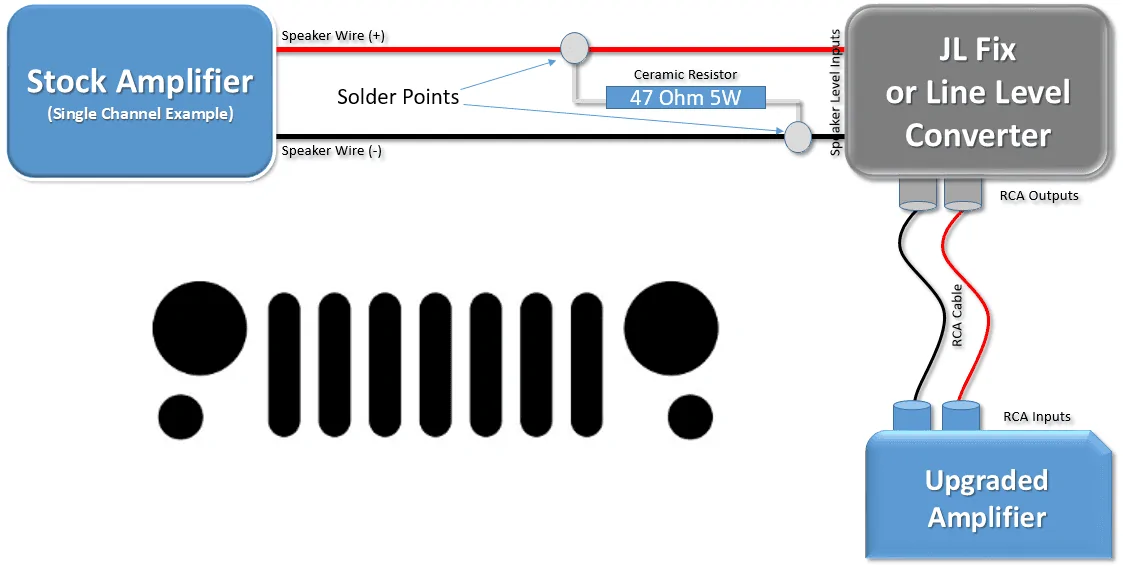
Talking with the techs at PAC, and confirming via online references, a 47 OHM, 5 Watt Ceramic Resistor can be soldered to each pair of speaker level input wires feeding the JL Audio FiX™ 86.

I tried this process and it does work. You can order them here, and you'll find that they are very inexpensive. If you go this route, I recommend buying several more than you need, just in case you break a few.

Each resistor is soldered to the (+) and (-) stock speaker wiring pair that you'll use to feed each line level converter input. If you're running a 4 channel amp, you'll need to purchase at least 4 resistors. Once again, this tricks the uConnect system into thinking the stock speakers are still there, allowing the system to turn each channel on without having the stock speaker attached. A home-made schematic of this resistor setup is included below.​

For the speaker level inputs of the line output converter, I tapped into the front speaker level outputs directly behind the Base System's radio. Those wires were extended and run through the middle console to the back of the Jeep where my amps are. Once again, wiring colors are available below. I tapped into the rear speaker wires in the pillar behind the passenger seat at the floor level. They are easy to find, by removing the plastic cover at the base of the pillar. The speaker wires are the only twisted pair wires, and they match the colors in the chart provided.

______________________________________________________


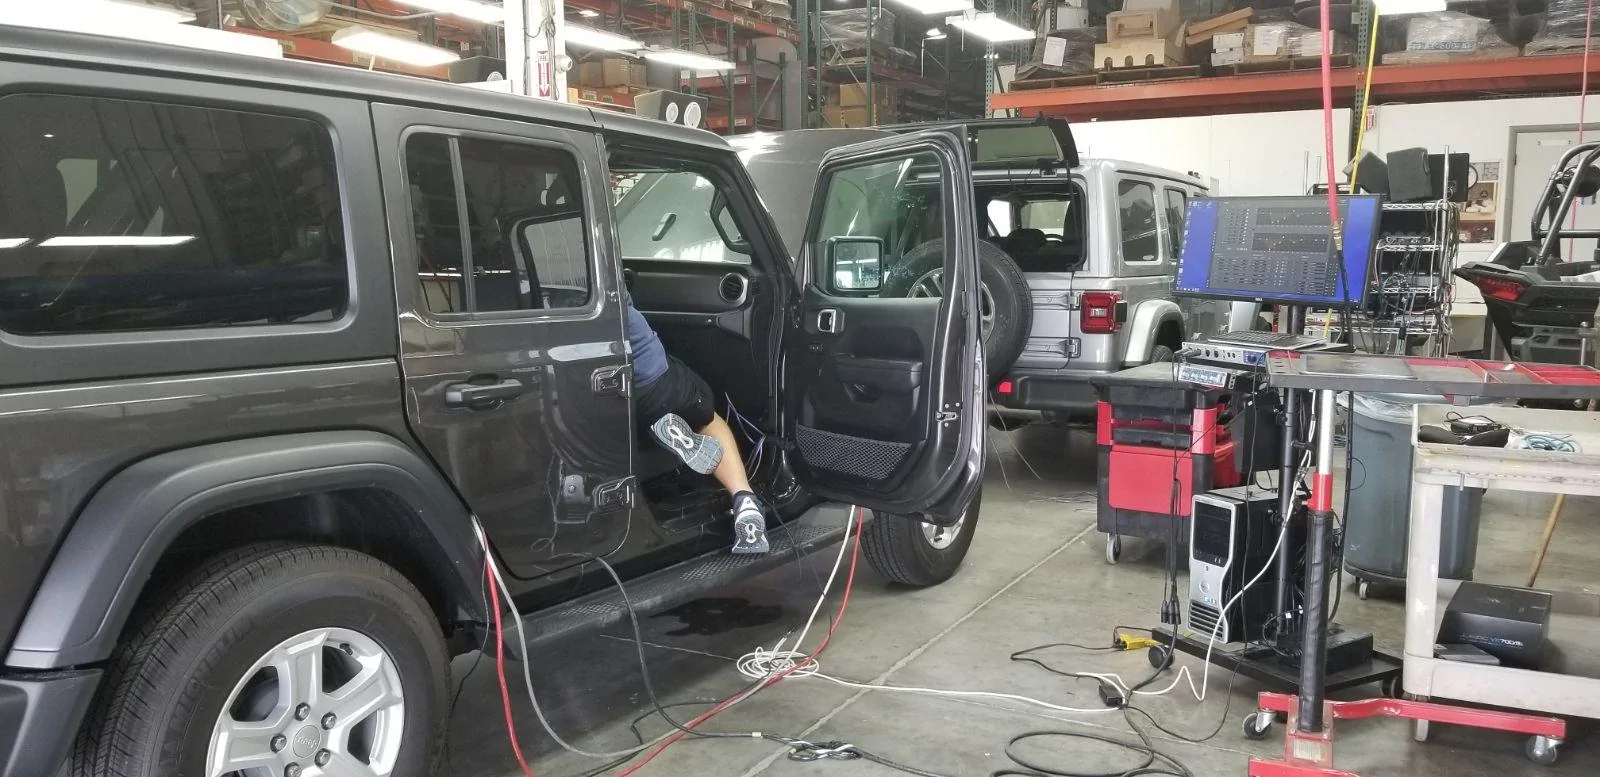
I have now successfully finalized my install, and it sounds amazing! Here are several additional details you may find helpful if the above hasn't scared you away yet...

On the Base System, there are four 4-inch speakers and four small tweeters. I have now upgraded the Sound Bar to 5.25-inch coaxial speakers, and the kick panels were upgraded to 5.25-inch separates (Separate Woofer and Tweeter). All are Hertz Energy series.

Modifying the Soundbar to accommodate larger speakers is fairly straight-forward. It takes some time/skill with a Dremel tool to enlarge the speaker cavity. You can fit a decent pair of mid-range coaxial speakers up there, or you could choose separates. Each rear channel in the sound bar has a mid-range speaker and a separate tweeter already, so separates are possible.

You can also purchase 3 Sets of Metra 72-6514 Speaker Wire Adapters for a simple connection to the stock harness without cutting your wires inside of each speaker enclosure. However, if you're planning to use amps, you'll need to cut the wires at some point.

Note, I rate upgrading the Sound Bar speakers as an "intermediate" level install. That is, if you up-size your speakers. The Kick Panel speaker enclosure fabrication to increase speaker size should be viewed as an "advanced" level install. To up-size the speakers in the kick panels, you have to remove a significant portion of the dash and panels to access the self contained speaker boxes.

Side note: All of the speakers in this system come factory installed in ported enclosures. That's how these little stock speakers sound slightly better than they should.​

Further, the driver's side speaker enclosure, while a tough upgrade when up-sizing, requires that you cut and reinforce certain areas of the enclosure with silicone and/or excess sound deadening material. And, a word to the wise.. You must modify the enclosure while ensuring you leave enough speaker clearance when you reinstall the modified enclosure. Said another way, make sure the speaker won't hit the kick panel when installed.

The passenger side's enclosure is a nightmare to up-size. The mounting surface for the stock speaker is recessed, and the cuts you need to make essentially remove a portion of the enclosure, which includes the mounting location of the stock speaker. You have to fabricate new mounting location and it needs to be reinforced. I constructed an ad-hoc mold that allowed the speaker to mount/seal cleanly to the box. If you go this route, definitely check for clearance with the kick panel before cutting and modding the enclosure. The new speaker will rest higher and closer to the kick panel's grille.

In case the above didn't generate enough concern about taking on this challenge yourself... I want to caution you by sharing this is an upgrade I wouldn't necessarily recommend performing yourself, unless you have a comfort level with basic fabrication, and a ton of patience.

There is also a calibration process with the JL Audio FiX™ 86 that takes some patience, as you must be 100% successful in "tricking" all four channels of the uConnect system into turning themselves on. If it doesn't work, meaning all channels didn't come on and all 4 lights aren't green during the calibration, you should check your wire connections and possibly your solder point for the resistor. I had one resistor that didn't work.

If the calibration process fails, you have to power down the receiver (key off) until the radio fully resets, gives you the disclaimer screen, and reboots. This is due to the fact that once the system detects a stock speaker isn't there, and the override isn't functioning (for whatever reason), it has to be completely powered down and allowed to reset before it will start a new load sensing test. On the plus side, once everything is connected and calibrated, you can plug your laptop or phone into the JL Audio FiX™ 86 to tweak the settings and EQ.

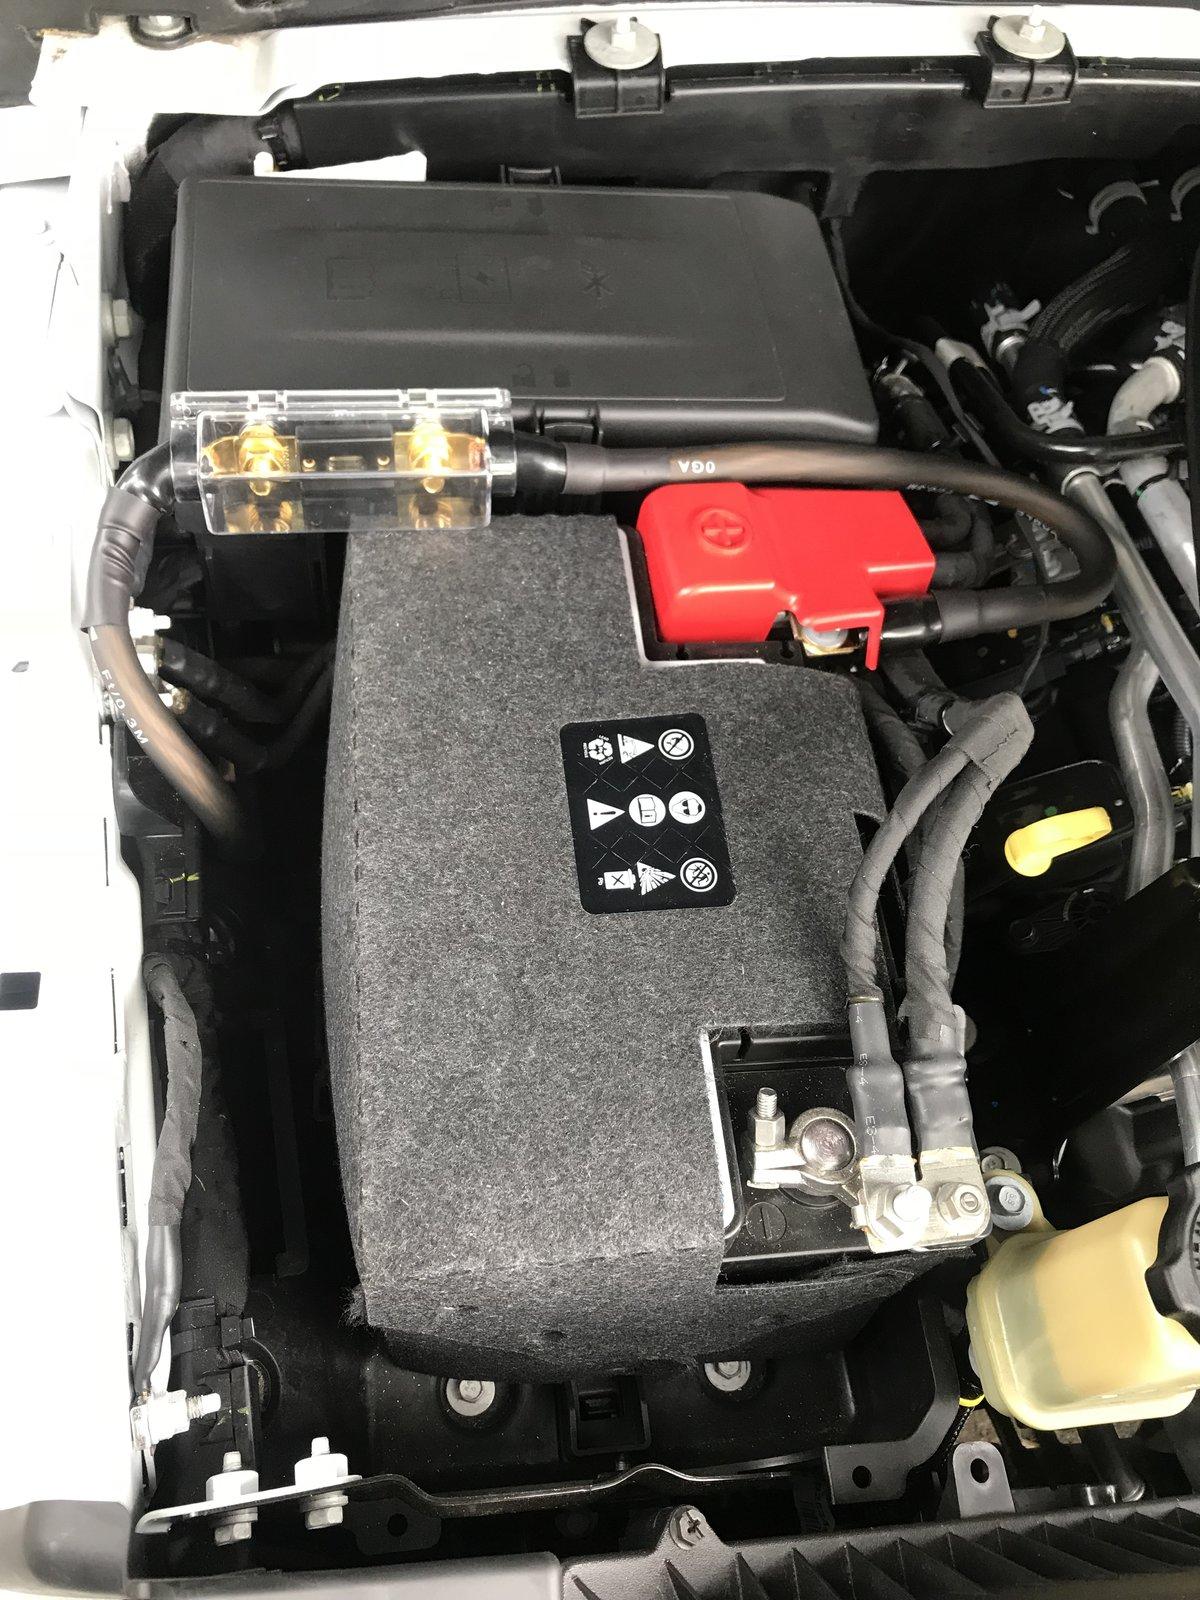
As with anything aftermarket, please understand you are taking any install advice provided here into your own hands, and at your own risk. I have to recommend that any power wiring, especially when wiring directly to the battery, be fused at the battery/source. In the case of a short, this blows the fuse instead of creating a new welding source! I also recommend using basic relays for your remote connections, which reduces the risk of feeding power back into your Jeep's electrical system due to a faulty amplifier or component.

Thanks,

Mike


Base System Speaker Wiring provided by Benny (a.k.a. Jeep Cares)

For those who may also need these color codes, the following is what the chart says. Remember, this is what is believed to be out there for the Base System (Non-Alpine and 7-inch screen).


Left Front Windshield Grey/Violet (+) and Grey/Yellow (-)
Left Front Kick


Right Front Windshield Dark Green/Violet (+) and Dark Green/Yellow (-)
Right Front Kick


Left Rear Sound Bar Grey/Green (+) and Grey/Dark Green (-)


Right Rear Sound Bar Dark Green/Green (+) and Dark Green/Grey (-)
Update: In addition to the above speaker wiring, an image of the radio harness is attached, and I'm adding the wiring colors from the back of the base radio. There appears to be no amplifier in the base model system.

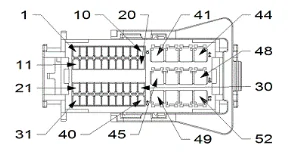
Speaker wire colors at the radio, with pin number and polarity:

Base Radio

PIN Wire Speaker/Polarity System

45 DG/GN RIGHT REAR SPEAKER (+) BASE RADIO

46 DG/VT RIGHT FRONT SPEAKER (+) BASE RADIO

47 GY/VT LEFT FRONT SPEAKER (+) BASE RADIO

48 GY/GN LEFT REAR SPEAKER (+) BASE RADIO

49 DG/GY RIGHT REAR SPEAKER (-) BASE RADIO

50 DG/YE RIGHT FRONT SPEAKER (-) BASE RADIO

51 GY/YE LEFT FRONT SPEAKER (-) BASE RADIO

52 GY/DG LEFT REAR SPEAKER (-) BASE RADIO


Premium Radio

45 GY/DB RIGHT REAR SPEAKER (+) PREMIUM RADIO

46 GY RADIO RIGHT FRONT AUDIO (+) PREMIUM RADIO

47 DG RADIO LEFT FRONT AUDIO (+) PREMIUM RADIO

48 DG/DB LEFT REAR SPEAKER (+) PREMIUM RADIO

49 GY/OG RIGHT REAR SPEAKER (-) PREMIUM RADIO

50 GY/BN RADIO RIGHT FRONT AUDIO (-) PREMIUM RADIO

51 DG/BN RADIO LEFT FRONT AUDIO (-) PREMIUM RADIO

52 DG/OG LEFT REAR SPEAKER (-) PREMIUM RADIO​


Pinout.webp


Resistor.webp
Do You know which pin is the ACC or radio on wire?
Sponsored

 
OP
OP
Sting_NC_USA

Sting_NC_USA

Well-Known Member
First Name
Michael
Joined
Mar 25, 2018
Threads
28
Messages
1,041
Reaction score
1,031
Location
Birmingham, AL
Vehicle(s)
2018 Jeep Wrangler JL Unlimited Rubicon
Build Thread
Link
Vehicle Showcase
1
Do You know which pin is the ACC or radio on wire?
I don't, but I'm not sure I'd recommend using it. Reason being, when an amp fails, I've seen them send power through that wire and believe it's not worth the risk. Instead, I'd recommend tapping into the cigarette lighter's positive.

That said, a voltmeter would easily help you to locate that wire. Sorry I couldn't help with the actual wire.
 

Jeffreylt24

New Member
First Name
Jeff
Joined
Jul 20, 2018
Threads
0
Messages
1
Reaction score
0
Location
Loves Park, IL
Vehicle(s)
Wrangler Unlimited JL
My JL doesn't have a factory amp in it, or at least we don't see it anywhere. I am trying to install an Alpine KTP-445U amp and was never able to get it to work. We tried the resistors across the - and +, we tried them inline also. We also put the PAC audio Lp6-4 but it still didn't work.

The sound was very faint in all the speakers but basically wasn't putting out any sound.

Any suggestions?
 
Last edited by a moderator:
OP
OP
Sting_NC_USA

Sting_NC_USA

Well-Known Member
First Name
Michael
Joined
Mar 25, 2018
Threads
28
Messages
1,041
Reaction score
1,031
Location
Birmingham, AL
Vehicle(s)
2018 Jeep Wrangler JL Unlimited Rubicon
Build Thread
Link
Vehicle Showcase
1
My JL doesn't have a factory amp in it, or at least we don't see it anywhere. I am trying to install an Alpine KTP-445U amp and was never able to get it to work. We tried the resistors across the - and +, we tried them inline also. We also put the PAC audio Lp6-4 but it still didn't work.

The sound was very faint in all the speakers but basically wasn't putting out any sound.

Any suggestions?
I may need a bit more detail, but I'll give it a shot.

First, I'd like to clarify whether your Jeep has the Alpine system (8.4-inch screen) or the Base (7-inch screen) system?
  • The Base system uses an integrated amplifier that's inside the radio itself.
  • The Alpine system uses an external amp that is located next to your left kick-panel speaker (black box with three plugs coming out of it)
Second, where are you tapping into your Jeep's speaker wires?
  • The Base system's wires can be tapped behind the radio, or with less effort by using the wires going into each of the front kick-panel speakers. I tapped the wires behind the radio because I wanted to keep the fader functional - (i.e. feeding all front/rear channels into my JL Audio Fix86 and Amps).
  • The Alpine system's wires MUST be tapped after the amp. Similar to the Base system, you may wish to tap these at the front kick-panel speakers as well.
Since you're using the Alpine KTP-445U, I'm guessing you're not using a line output converter (LOC) because it has the LOC built in. With what I'm seeing/hearing I believe this may be the underlying issue, more on that below.
  • Regardless of your existing stereo type, you will need to use the resistors as described above and pictured.
    • You'll know the resistor installation worked if you solder your resistors in, turn your Jeep's ACC power on, connect a speaker directly to the positive/negative wire for each speaker pair (i.e. the wires that will eventually connect to your amp) and then are able to hear the speaker(s) play.
    • You'll know the resistor installation didn't work if doing the above yields no sound from the test speaker.
    • Note: Before testing the resistors, the Jeep must be turned completely off long enough for UConnect to reset. Meaning, you must see the disclaimer screen before trying again. Once UConnect turns the radio's amp/channel off (because the resistor wasn't detected) it has to go through it's entire boot sequence or else it doesn't re-test for the proper resistance.
These are the issues I think you may be facing:
  • The Alpine KTP-445U may not be able to convert the UConnect signals
    • I'm not aware of ANY vendor that currently has the ability to use the UConnect's signal without resistors.
    • JL Audio and others are working to get this resolved.
  • The Alpine KTP-445U uses "dip-switches" and they need to be set properly (2/4 Channel Inputs, RCA/Speaker Level inputs, etc.)
    • Make sure each dip-switch is set and the unit itself is well grounded.
    • Make sure the gain control is not zero'd out.
  • The signal that the UConnect system sends is Highly Equalized.
    • This is why I recommend the JL Audio Fix86 or equivalent. It's an LOC on steroids.
    • The Fix86 "conditions" the stock signal, flattening the signal's output so an amp can receive that conditioned signal through it's RCA inputs. (This doesn't appear to be possible on the Alpine KTP-445U.)
    • The Alpine KTP-445U has worked on older UConnect systems, though I've not yet seen it used on these newer systems.
The first thing I'd recommend you try is the resistor test described. If that works, and your test speaker(s) play, I'm afraid there's a compatibility issue with the Alpine KTP-445U, which would require a different LOC to be in place before feeding an RCA signal into your amp.

With some clarification from what's been outlined above, I'll do my best to help. Good luck!
 
Last edited:

NYknowledge

Active Member
First Name
Rob
Joined
Jul 27, 2018
Threads
2
Messages
40
Reaction score
41
Location
NYC
Vehicle(s)
2018 JL Unlimited Sport
Aftermarket Amplifier and Audio install

So i just completed the install of my aftermarket audio uprade using the factory 5” uconnect radio in my Wrangler JL and it sounds amazing. The bass even lifts my wipers. I have to say thanks to the orginal thread post for some very helpful info.


Here is a list of things i used to complete the install successfully.

- Axxess ax-dsp-ch5 harness ( this is so I wouldn’t have to cut into the factory harness and i can also go back to the factory setup plug and play)

- four 47ohm 5w ceramic resistors

- speedwire 9 conductor 18awg cable (used from radio side of the harness to the line out converter and used from the speaker side of the harness to the four channel amplifier)

- 0 guage Power and Ground cables ( went thru the passengers grommet under the glove box to the battery)

- 3000 Watts RMS @ 1ohm amp for Sub

- 400 Watts RMS @ 4ohm amp the speakers

- AudioControl LC7i line out coverter and ACR1 remote control
Updated 07/2020 replaced LC7i with a JL fix 86 and Drc-205 remote. Replaced the lc7i with the JL fix 86 to get a more refined adjustment of sound


Amp and LOC are placed in the rear floor storage bin.
Also planning to add a audio battery in the rear to support thee system.

Jeep Wrangler JL Adding an Aftermarket Amp(s) A12EF54F-0419-4E42-9C3E-3BF9A8C5B9B3


Jeep Wrangler JL Adding an Aftermarket Amp(s) FD7E9802-63E6-4787-8365-32801908D41A


Jeep Wrangler JL Adding an Aftermarket Amp(s) A2EAF440-C843-48D3-B691-631F4F6666E7


Jeep Wrangler JL Adding an Aftermarket Amp(s) 50C9C0F4-9B82-4AA2-84DA-533873D07EC7


Jeep Wrangler JL Adding an Aftermarket Amp(s) 0DDD21F5-9E8B-4652-ACA6-4523B4578ABE


Jeep Wrangler JL Adding an Aftermarket Amp(s) CA9E9D0C-1B52-41AA-9CE7-5E6CD2558C3A
 
Last edited:

Sponsored

OP
OP
Sting_NC_USA

Sting_NC_USA

Well-Known Member
First Name
Michael
Joined
Mar 25, 2018
Threads
28
Messages
1,041
Reaction score
1,031
Location
Birmingham, AL
Vehicle(s)
2018 Jeep Wrangler JL Unlimited Rubicon
Build Thread
Link
Vehicle Showcase
1
Nicely done!
 

Wzabrouski

Well-Known Member
First Name
Walter
Joined
Jun 15, 2018
Threads
27
Messages
144
Reaction score
57
Location
Fort Worth, TX
Vehicle(s)
JL
Occupation
Director of Operations
I have an Infinity Baselink DC from my last vehicle I was going to install in my JL. Doesn’t seem an simple as my last vehicle, just added a line out converter. Am I correct that this is not as simple in the JL, or is it?
 
OP
OP
Sting_NC_USA

Sting_NC_USA

Well-Known Member
First Name
Michael
Joined
Mar 25, 2018
Threads
28
Messages
1,041
Reaction score
1,031
Location
Birmingham, AL
Vehicle(s)
2018 Jeep Wrangler JL Unlimited Rubicon
Build Thread
Link
Vehicle Showcase
1
I have an Infinity Baselink DC from my last vehicle I was going to install in my JL. Doesn’t seem an simple as my last vehicle, just added a line out converter. Am I correct that this is not as simple in the JL, or is it?
If that's all you're adding, there shouldn't be much of a difference. The LOC ties into your speaker wires, then to the LOC and finally to your Amp. It's only a PITA if you need to remove/replace the stock speakers, because the stock head unit test for the same Ohm load before turning on the output for each channel. You should be fine with the Baselink and LOC.
 

Sponsored

JRICO8777

Member
First Name
Joe
Joined
Apr 8, 2018
Threads
0
Messages
9
Reaction score
14
Location
California
Website
www.ositechconsulting.com
Vehicle(s)
2016 Toyota Highlander, 2014 Scion XB, 2007 Jeep Wrangler x, 2018 Jeep Wrangler JLU Rubicon (on order)
Occupation
IT DIRECTOR
Hey y'all I normally don't own audio but I took my JLUR to an audio shop and had them install an amp/sub combo the JL audio powerwedge plus. They tapped into the speaker lines and used that for the line level inputs on the subs. Leaves me option to upgrade later but sounds well and detachable when I need room!
 
OP
OP
Sting_NC_USA

Sting_NC_USA

Well-Known Member
First Name
Michael
Joined
Mar 25, 2018
Threads
28
Messages
1,041
Reaction score
1,031
Location
Birmingham, AL
Vehicle(s)
2018 Jeep Wrangler JL Unlimited Rubicon
Build Thread
Link
Vehicle Showcase
1
Hey y'all I normally don't own audio but I took my JLUR to an audio shop and had them install an amp/sub combo the JL audio powerwedge plus. They tapped into the speaker lines and used that for the line level inputs on the subs. Leaves me option to upgrade later but sounds well and detachable when I need room!
Congrats!
 

ChattVol

Well-Known Member
Joined
Jun 29, 2018
Threads
109
Messages
2,453
Reaction score
2,771
Location
Tennessee
Vehicle(s)
JLU 4 door
Congrats!
I'm looking to add some midlevel power in soundbar and up front to compliment the 8" JL Audio sub in the back. I've already replaced the 2.5" with 3.5" kickers and are using the stock 4" speakers in kick panel and soundbar, but dont have any speakers amplified other than the sub. What's the best bang for the buck to upgrade with $300. I bought some dynamat and polyfil today and was going to take the soundbar apart and add dyanamat on outside and polyfil tonight, but dont want to block the port. Would this help at all? Would I be better off buying some better 4" speakers to fit the current speaker cutouts and then add a $200 4 channel amp? Or buy some 6.5" speakers for the soundbar and get a dremel to cut opening and then amplify. Thanks!
 
Last edited:

Maui-1

Member
First Name
Tom
Joined
Jul 5, 2018
Threads
0
Messages
12
Reaction score
40
Location
Maui
Vehicle(s)
2018 Rubicon JLU
My jeep in R&D.. I was able to listen to one of the setups. Stock speakers, xvi amp, and a stealthbox and wow my car was sound so full and clear can't wait to see what they come up with.

IMG-20180503-WA0001.webp
What JL Audio Stealthbox did they use? Are they making one for the JLU??
 

cmb396

Well-Known Member
First Name
Chad
Joined
Apr 6, 2018
Threads
37
Messages
372
Reaction score
330
Location
WV
Vehicle(s)
2018 Crystal Granite JLUR
My jeep in R&D.. I was able to listen to one of the setups. Stock speakers, xvi amp, and a stealthbox and wow my car was sound so full and clear can't wait to see what they come up with.

IMG-20180503-WA0001.webp
ETA on speakers? I put a JL 75x4 amp on factory speakers and they do not like the power, at all!! Lol
Patiently waiting on R&R speakers from JL.
Sponsored


Top