Den_JL2DR
Well-Known Member
- Thread starter
- #1
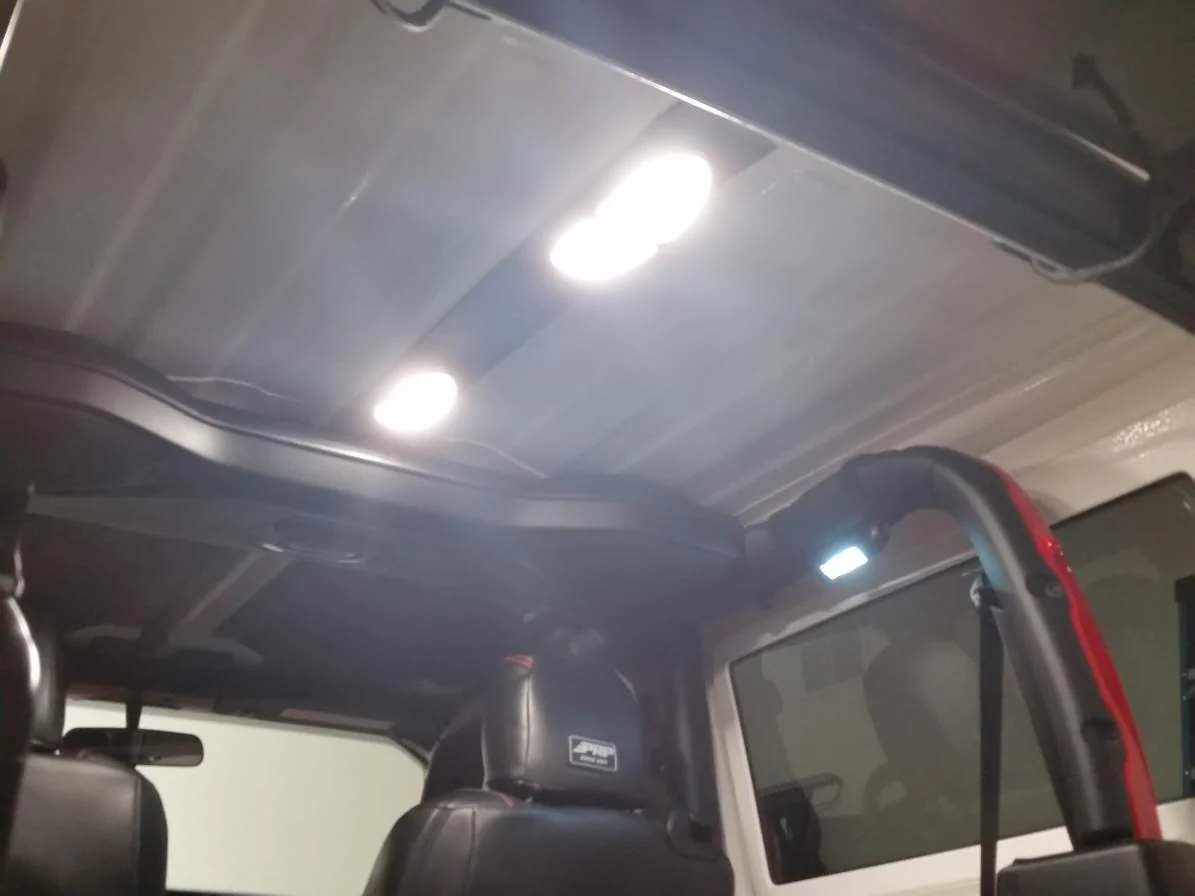
As first shared in an interior mods topic, here is a DIY with materials and construction photos for
recently completed driver and passenger lightweight and temperature efficient headliners.


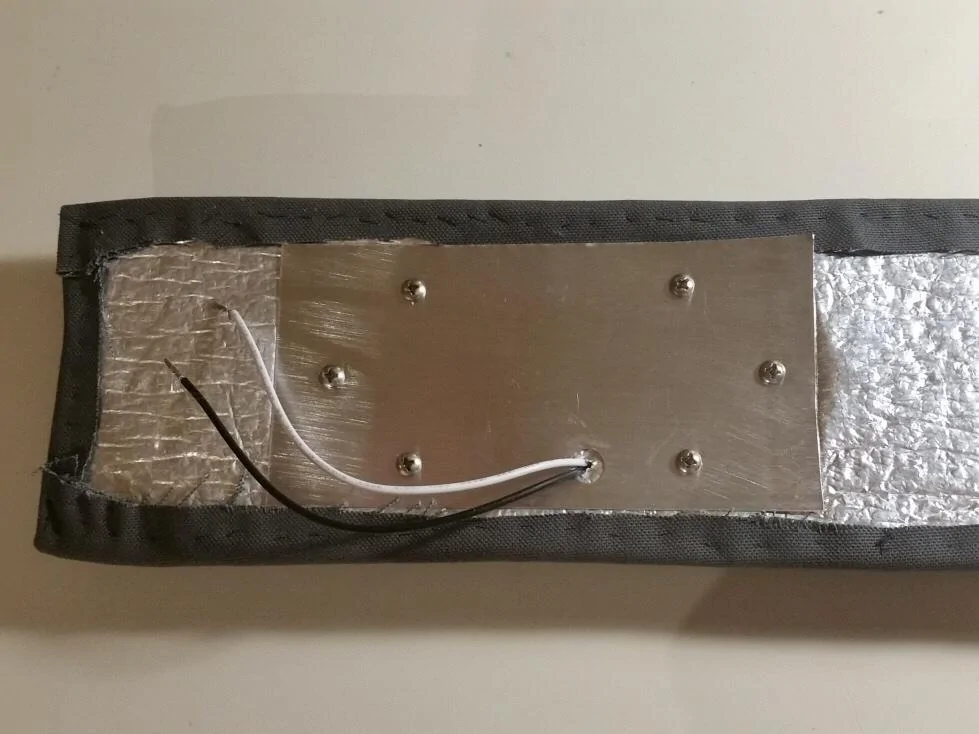
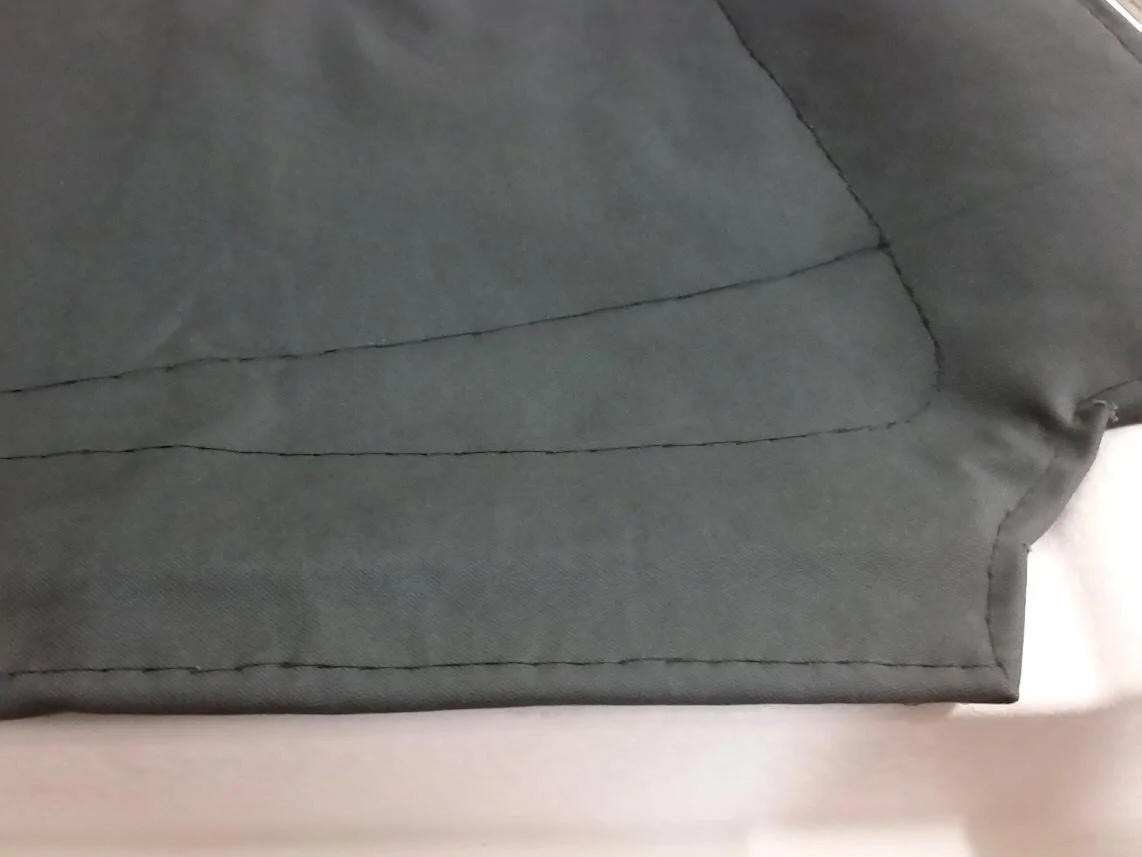
These are constructed of duck canvas stitched over two layers of reflective foam auto insulation.
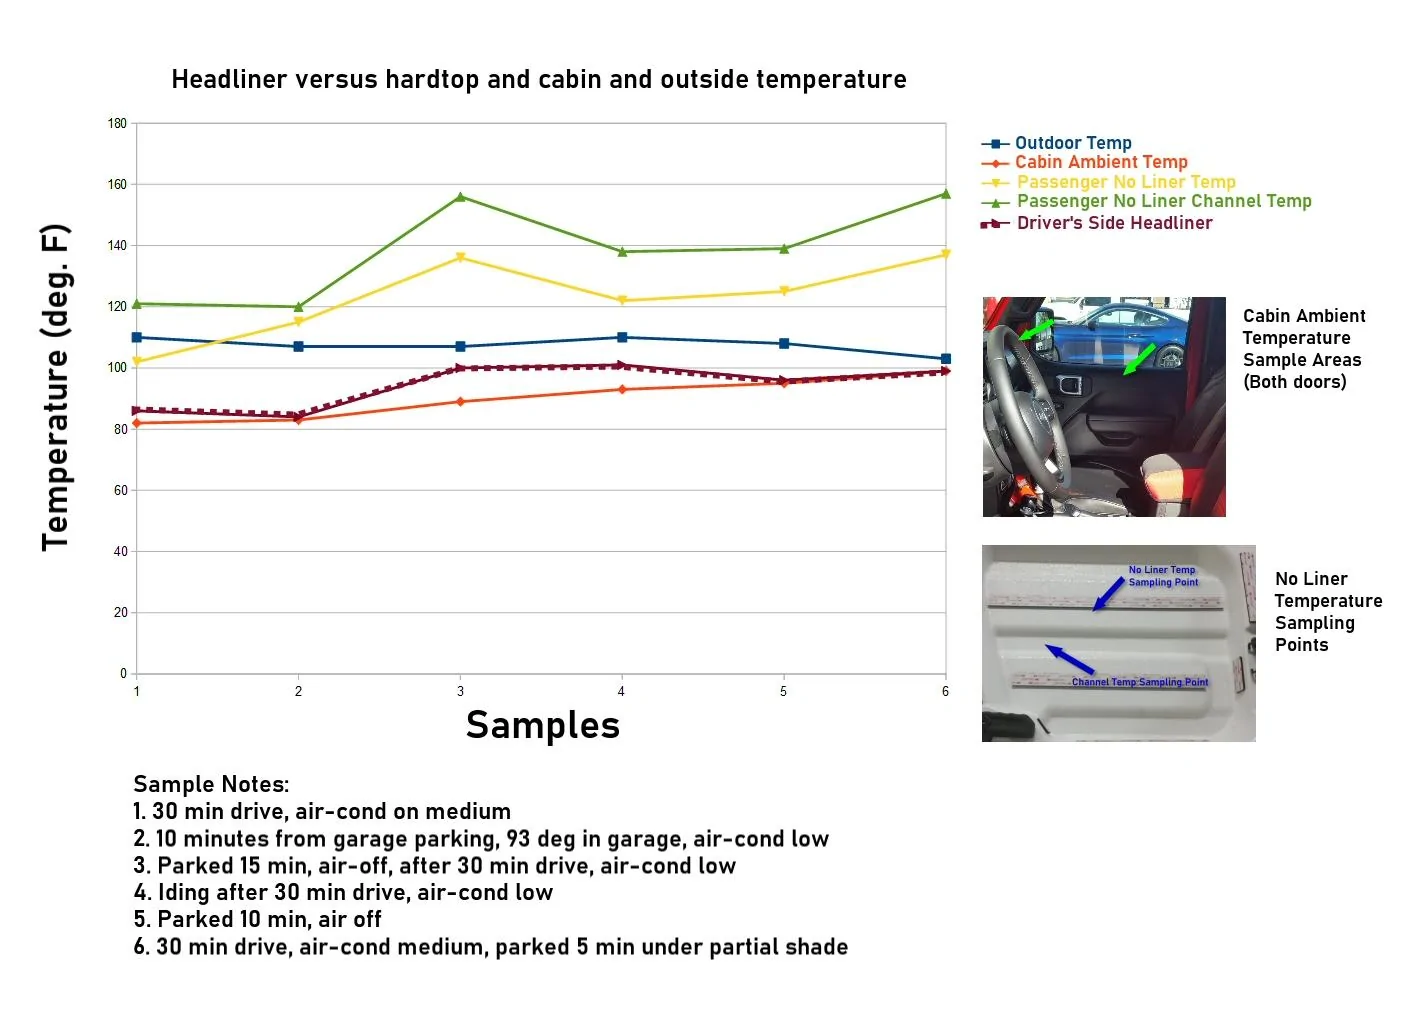
Temperature tests indicate the liner is close to ambient cabin temperatures. The primary goal
for this headliner was for higher temperature geographical area (Arizona, up to 110 degrees current,
120 this summer) Six samples were collected using a Performance Tool W89722 Infrared Thermometer.
The dotted line is the headliner tested on the driver's side, while the passenger side was bare.
Note how the headliner temp follows the lowest red cabin temperature line. The two points in the middle
that were higher are from idling and parked samples with less or no air conditioning. Given convection
of heat, the cabin ambient sampled at the door panels and steering wheel are an ideal temperature goal
for a headliner to thwart heat from the roof vs overall cabin ambient temperature. It's not expected to be
less then cabin ambient unless a headliner was actively cooled or air conditioning vents were specifically directed
upwards.

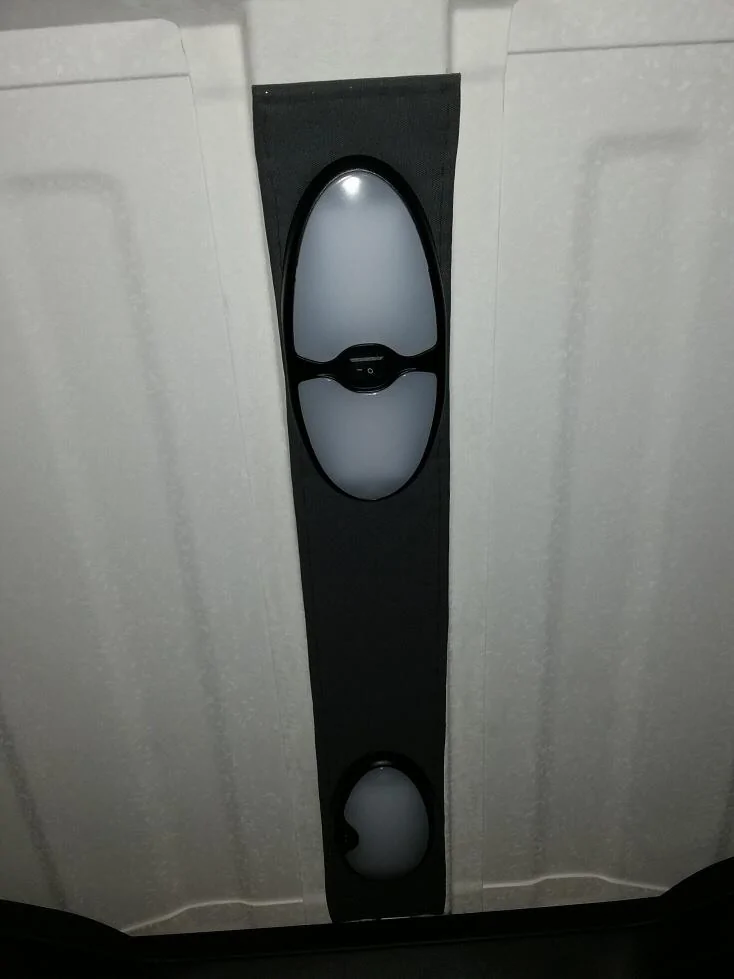
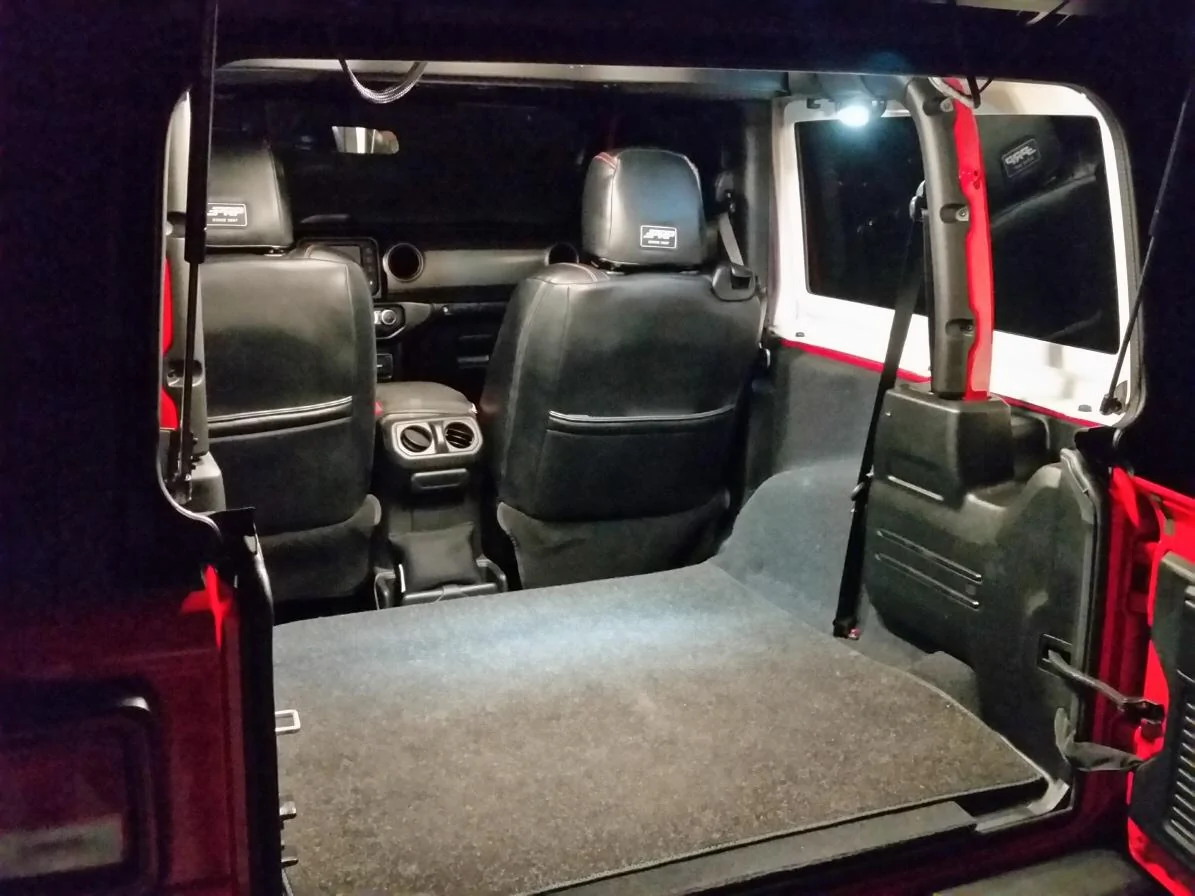
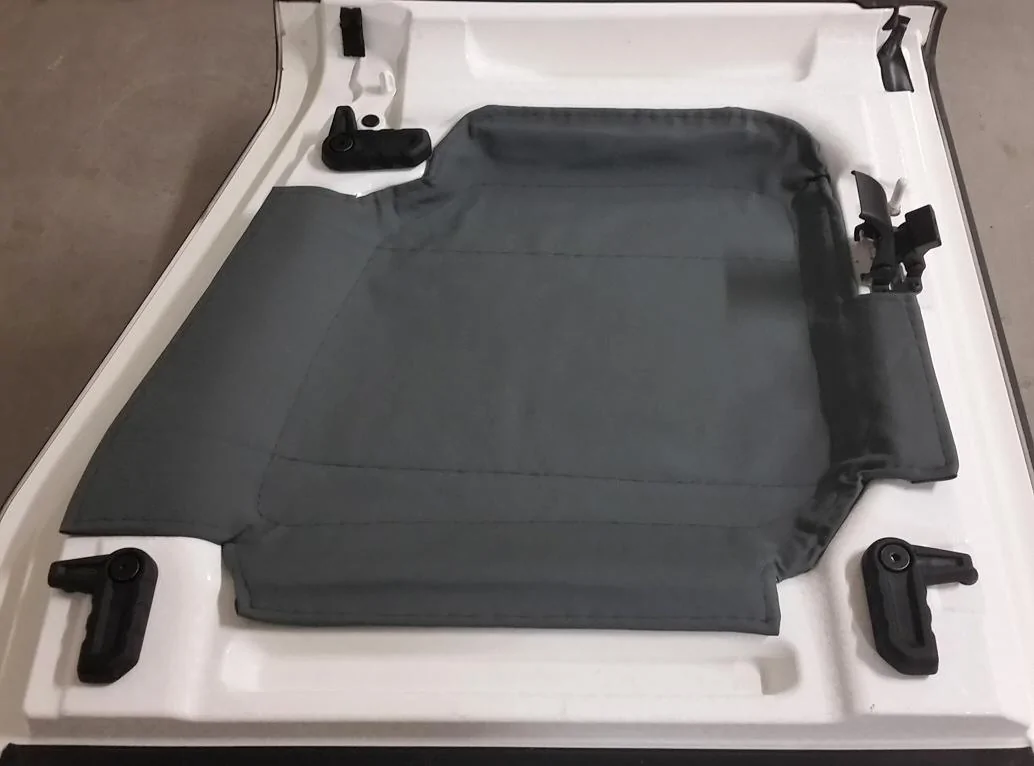
The headliner differs from some of the commercial versions in being very lightweight as it's only
foam and cloth, and extends to the edges of the hardtops instead of a pad in the center only.
The reasoning for a liner that extends to the sides of the hardtop is those other flat surfaces also radiate heat and as a primary goal of heat reduction, this was to have one liner cover as much surface area outside of the rotating latches as practical from a 4x4 foot source foam sheet.
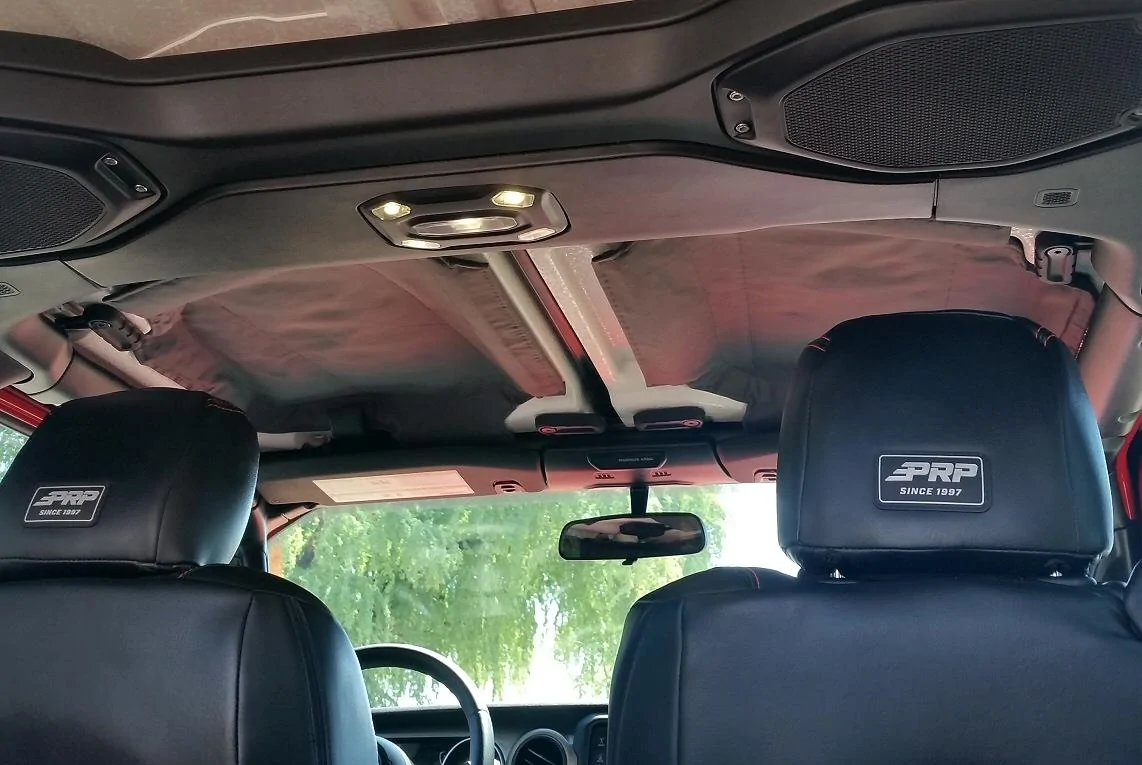
One nice "feature" discovered on the first day was how the overhead contrast of white hardtop is
reduced as the dark canvas extends to the visors.
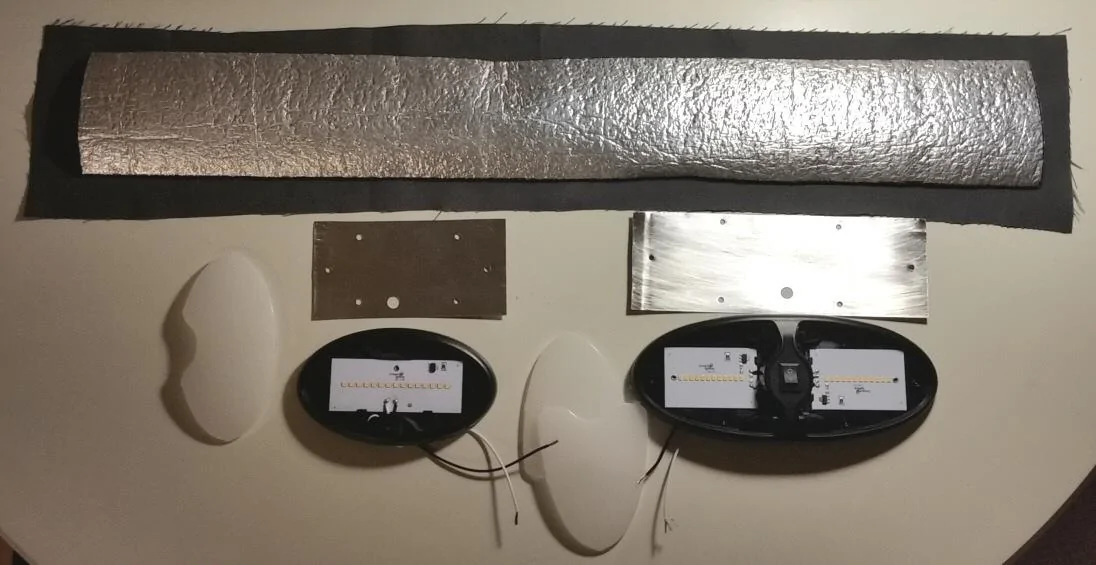
Materials and sources:
1. Reflective foam insulation, 4x4 feet, 1/4 inch thick, $19: Amazon US Energy Products foam
2. Gray duck canvas, 1 yard, $15, Amazon, steel gray canvas
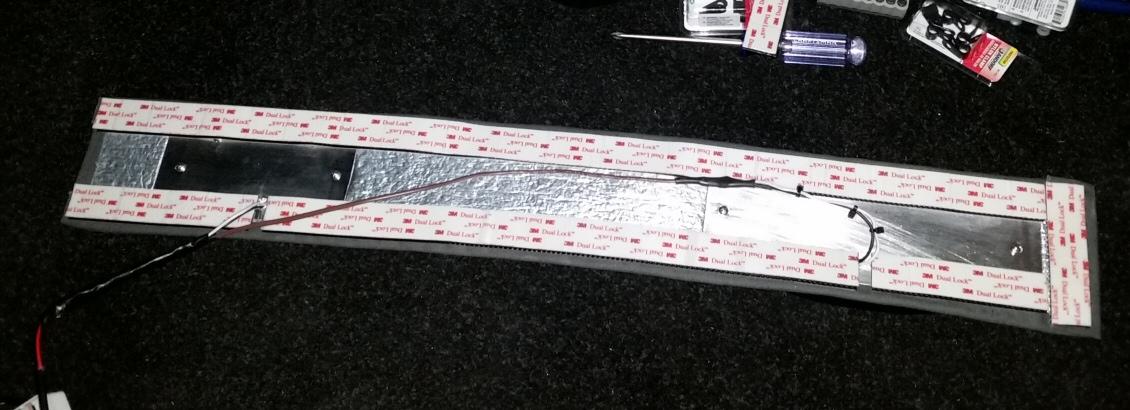
3. Two rolls of 10 feet, 20 ft total, can shorten to one roll, 3M TB3550 Hook and Loop Dual Lock tape, $28 (1), Amazon, 3M TB3550 tape
4. Black fine thread and needle
5. HVAC foil tape, such as Duck brand rated to 260 deg F.
Misc supplies
6. Sharpie to mark foil
7. Sandpaper and alcohol to clean hardtop and foil prior to taping
8. Blue painter's tape for testing fitting
Assembly Steps
This is primarily a stitching project, about 2-3 evenings to stitch each liner (driver/pass) by hand. A machine test was made but it had too small of stitches to cut the foil.
Perhaps a sailmaker type sewing machine with long length stitches and light pressure
may be successful, otherwise light pressure hand stitches worked well, but takes time to allocate, especially to hold the length of thread in one hand will pulling through to avoid knotting.
The stitch type was 1/2" forward, then reverse 1/8" and continue.
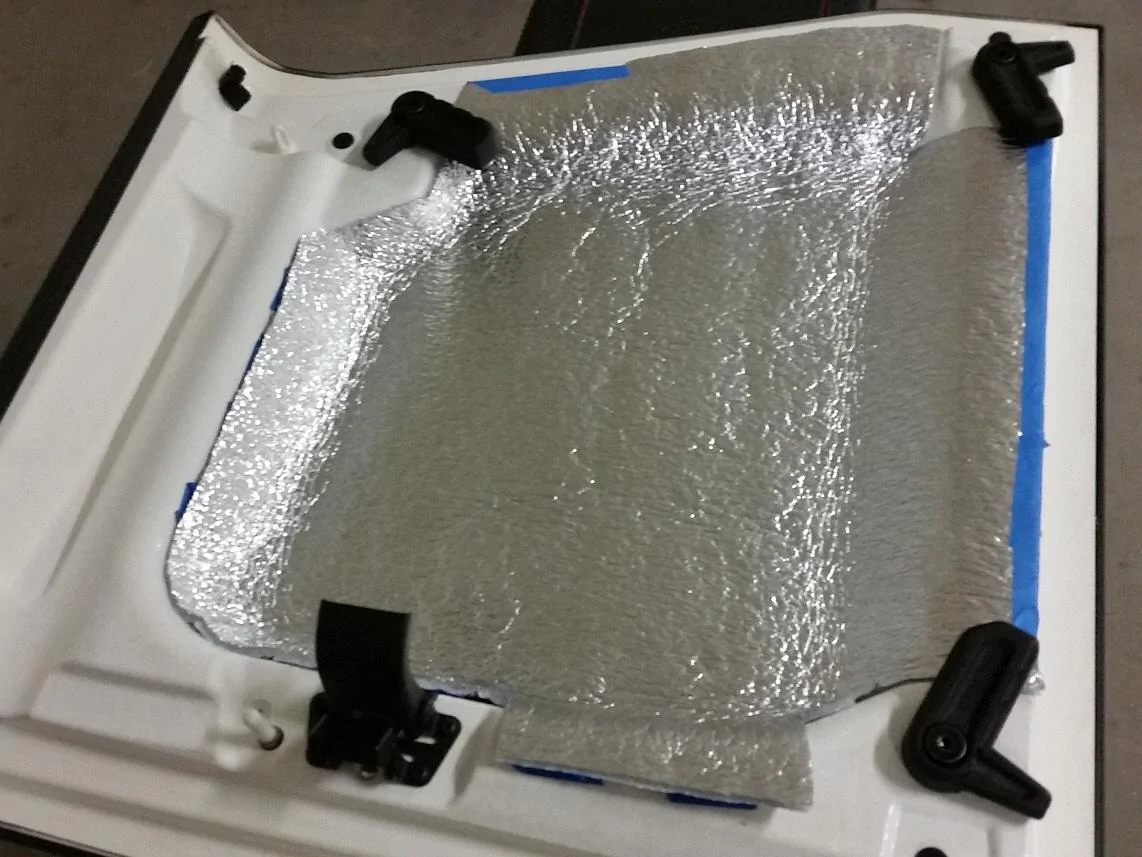
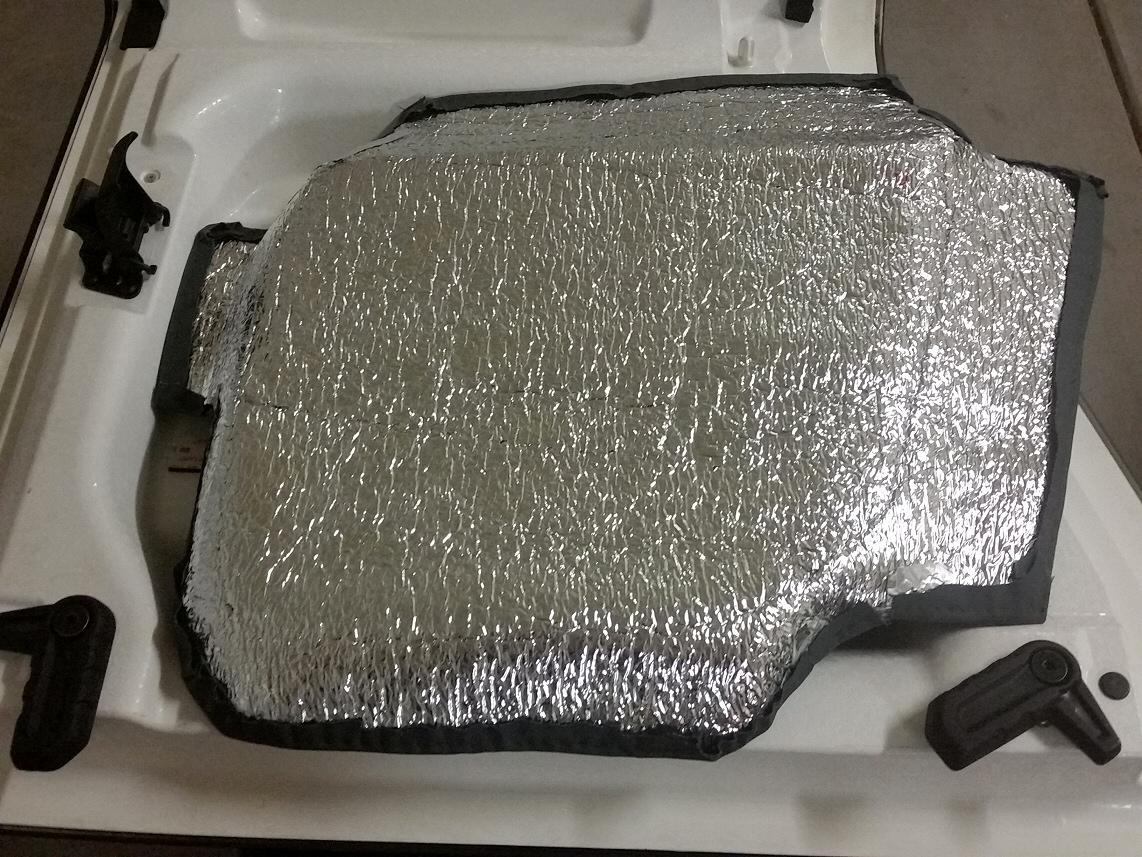
1. Form foil into hardtop, painter tape the foil and test installed on Jeep.
2. Add second foil layer and press into hardtop gently to shape, tape edges with HVAC tape.
To use the 4 foot square sheet, plan this out for best fit. I had the second sheet short in a few
edges by inch or so to use the material up, and be aware of keeping it thinner on the short
side by the release handle that goes to the visor, so it's not binding/touching. The release handle
and the visor do not touch the liner. Also check that the three rotating locks can swivel
without catching the foil.
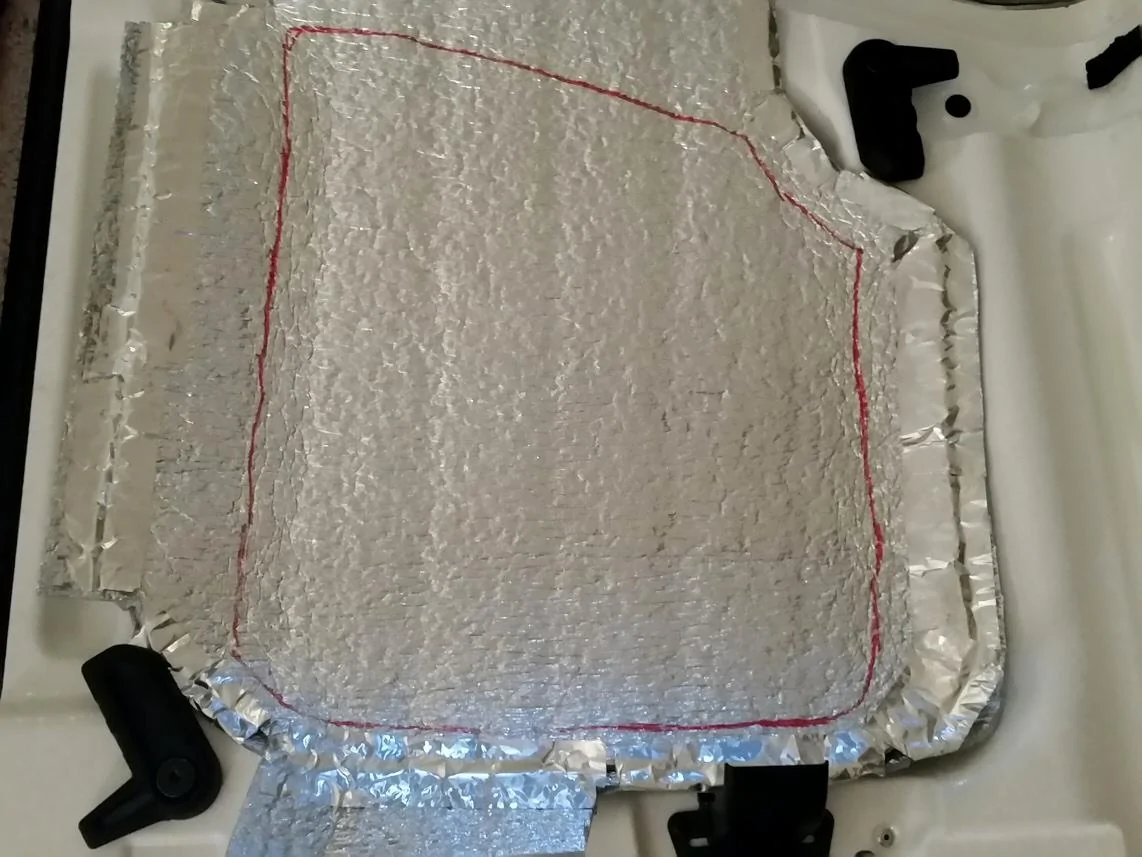
3. Draw line around inside curve as a stitching guide.
4. Cut cloth, with at least an inch beyond edges. Tip - to use the fold marks, oriented to around
the small edge near the hardtop release handle to form two lines down the middle that when stitched will
keep the cloth in place from sagging in the middle and use those fold marks as visual guides.
5. Stitch the bottom circle around the hardtop inner curve and the lines, using sharpie mark as a visual guide.
Stitch is 1/2 to 5/8 advance and then back up 1/8 inch and continue so it forms loops and large stitches to keep
foil intact.
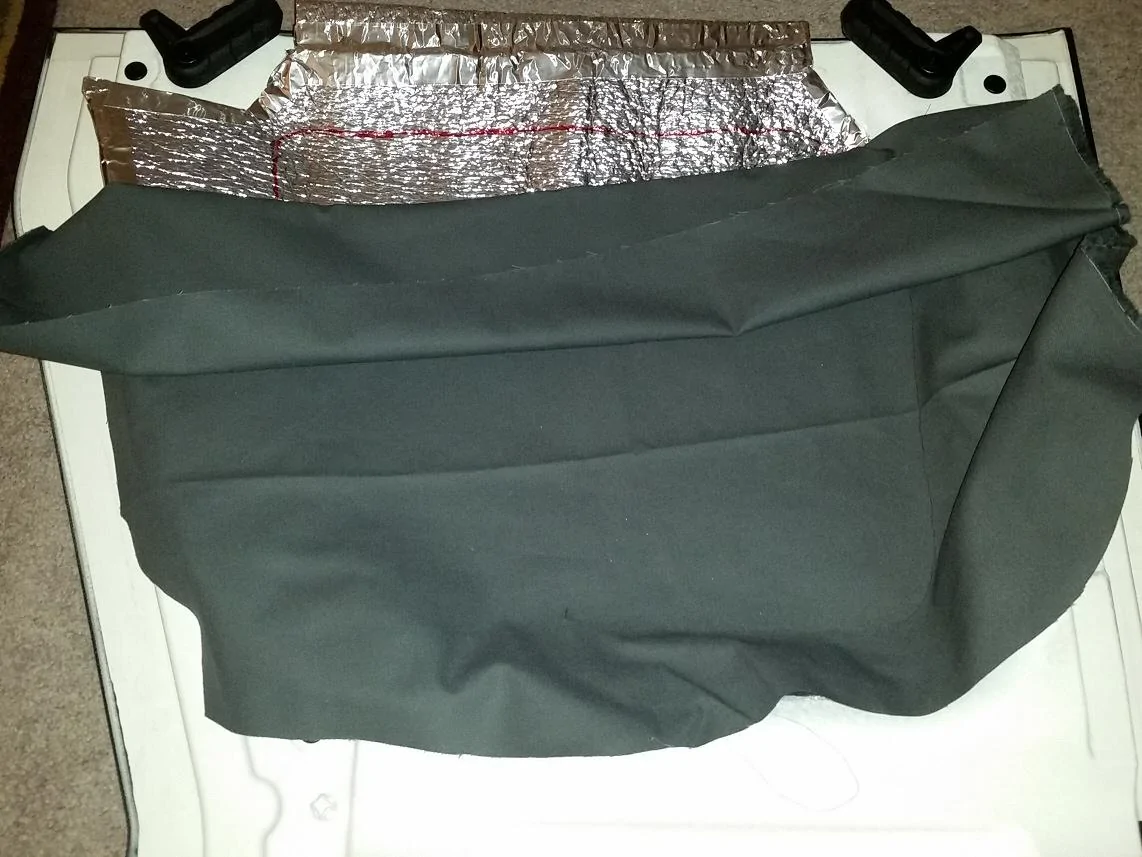
6. Stitch around upper edges after the bottom stitches are done - in order to see the sharpie guide line.
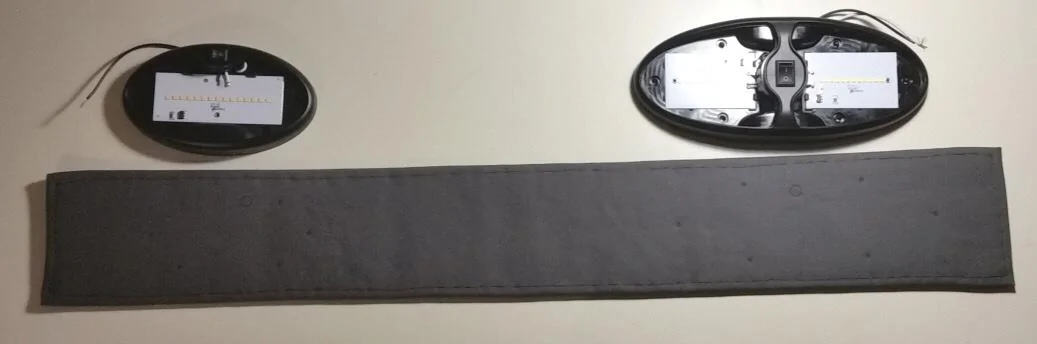
Turn over and trim cloth to 1/2 inch, tie loose threads. The idea is to have the 3M tape stick to the foil and not cloth. Test the completed liner and bend to refit into curves as needed so it's ready to line up and tape into place.
7. Sand and alcohol clean hardtop where tape will be installed. Also alcohol clean the foam foil in matching areas.
8. Attach two bottom strips of tape and line up headliner along an edge and press into position onto tape.

9. Add other strips under edges or curves as needed. This is where an extra tape roll was needed, can conserve to
keep to one roll overall. At least have tape under each edge and helpful in a couple curves. I first installed the two bottom strips, then installed tape under each edge and pressed to liner, one edge at at time until complete.
It's helpful to test the liner with painter's tape for fitting at major steps, and clean hardtop and foil well with alcohol before
3M taping to remove painter tape and finger residue.
recently completed driver and passenger lightweight and temperature efficient headliners.


These are constructed of duck canvas stitched over two layers of reflective foam auto insulation.
Temperature tests indicate the liner is close to ambient cabin temperatures. The primary goal
for this headliner was for higher temperature geographical area (Arizona, up to 110 degrees current,
120 this summer) Six samples were collected using a Performance Tool W89722 Infrared Thermometer.
The dotted line is the headliner tested on the driver's side, while the passenger side was bare.
Note how the headliner temp follows the lowest red cabin temperature line. The two points in the middle
that were higher are from idling and parked samples with less or no air conditioning. Given convection
of heat, the cabin ambient sampled at the door panels and steering wheel are an ideal temperature goal
for a headliner to thwart heat from the roof vs overall cabin ambient temperature. It's not expected to be
less then cabin ambient unless a headliner was actively cooled or air conditioning vents were specifically directed
upwards.
The headliner differs from some of the commercial versions in being very lightweight as it's only
foam and cloth, and extends to the edges of the hardtops instead of a pad in the center only.
The reasoning for a liner that extends to the sides of the hardtop is those other flat surfaces also radiate heat and as a primary goal of heat reduction, this was to have one liner cover as much surface area outside of the rotating latches as practical from a 4x4 foot source foam sheet.
One nice "feature" discovered on the first day was how the overhead contrast of white hardtop is
reduced as the dark canvas extends to the visors.
Materials and sources:
1. Reflective foam insulation, 4x4 feet, 1/4 inch thick, $19: Amazon US Energy Products foam
2. Gray duck canvas, 1 yard, $15, Amazon, steel gray canvas
3. Two rolls of 10 feet, 20 ft total, can shorten to one roll, 3M TB3550 Hook and Loop Dual Lock tape, $28 (1), Amazon, 3M TB3550 tape
4. Black fine thread and needle
5. HVAC foil tape, such as Duck brand rated to 260 deg F.
Misc supplies
6. Sharpie to mark foil
7. Sandpaper and alcohol to clean hardtop and foil prior to taping
8. Blue painter's tape for testing fitting
Assembly Steps
This is primarily a stitching project, about 2-3 evenings to stitch each liner (driver/pass) by hand. A machine test was made but it had too small of stitches to cut the foil.
Perhaps a sailmaker type sewing machine with long length stitches and light pressure
may be successful, otherwise light pressure hand stitches worked well, but takes time to allocate, especially to hold the length of thread in one hand will pulling through to avoid knotting.
The stitch type was 1/2" forward, then reverse 1/8" and continue.
1. Form foil into hardtop, painter tape the foil and test installed on Jeep.
2. Add second foil layer and press into hardtop gently to shape, tape edges with HVAC tape.
To use the 4 foot square sheet, plan this out for best fit. I had the second sheet short in a few
edges by inch or so to use the material up, and be aware of keeping it thinner on the short
side by the release handle that goes to the visor, so it's not binding/touching. The release handle
and the visor do not touch the liner. Also check that the three rotating locks can swivel
without catching the foil.

3. Draw line around inside curve as a stitching guide.
4. Cut cloth, with at least an inch beyond edges. Tip - to use the fold marks, oriented to around
the small edge near the hardtop release handle to form two lines down the middle that when stitched will
keep the cloth in place from sagging in the middle and use those fold marks as visual guides.
5. Stitch the bottom circle around the hardtop inner curve and the lines, using sharpie mark as a visual guide.
Stitch is 1/2 to 5/8 advance and then back up 1/8 inch and continue so it forms loops and large stitches to keep
foil intact.
6. Stitch around upper edges after the bottom stitches are done - in order to see the sharpie guide line.
Turn over and trim cloth to 1/2 inch, tie loose threads. The idea is to have the 3M tape stick to the foil and not cloth. Test the completed liner and bend to refit into curves as needed so it's ready to line up and tape into place.
7. Sand and alcohol clean hardtop where tape will be installed. Also alcohol clean the foam foil in matching areas.
8. Attach two bottom strips of tape and line up headliner along an edge and press into position onto tape.

9. Add other strips under edges or curves as needed. This is where an extra tape roll was needed, can conserve to
keep to one roll overall. At least have tape under each edge and helpful in a couple curves. I first installed the two bottom strips, then installed tape under each edge and pressed to liner, one edge at at time until complete.
It's helpful to test the liner with painter's tape for fitting at major steps, and clean hardtop and foil well with alcohol before
3M taping to remove painter tape and finger residue.

Sponsored
Last edited: