frankiverse
Active Member
- First Name
- Frankie
- Joined
- Jun 1, 2023
- Threads
- 7
- Messages
- 25
- Reaction score
- 20
- Location
- California
- Vehicle(s)
- Rubicon 4xe
- Thread starter
- #1
Hi everyone,
This is my first project post, and I thought I'd summarize a few of the lessons I learned from it. I'm not a new jeep owner. But I wouldn't consider myself super knowledgeable when it comes to diy automotive work. I can do a few things but by and large I don't do a lot of vehicle work. But after getting the Rubicon I got the urge to make it my own, and started to assemble a list of mods that I wanted to tackle.
The first real project was an auxiliary light install. I figured it was just the right amount of work. Doesn't require a ton of tools. There's tons of videos and writeups. Wasn't going to do any real damage or void the warranty if I messed anything up. But what I thought would have been a just a 1-2 hour job, turned out to be quite a lot of hours of research, planning, and acquisition of tools that I didn't anticipate purchasing.
I'm not going to make this exactly a how to. I'll link some of the videos that I used because those people did excellent jobs explaining what to do. But to document and show my appreciation, I wanted to jot down some lessons that I learned along the way.
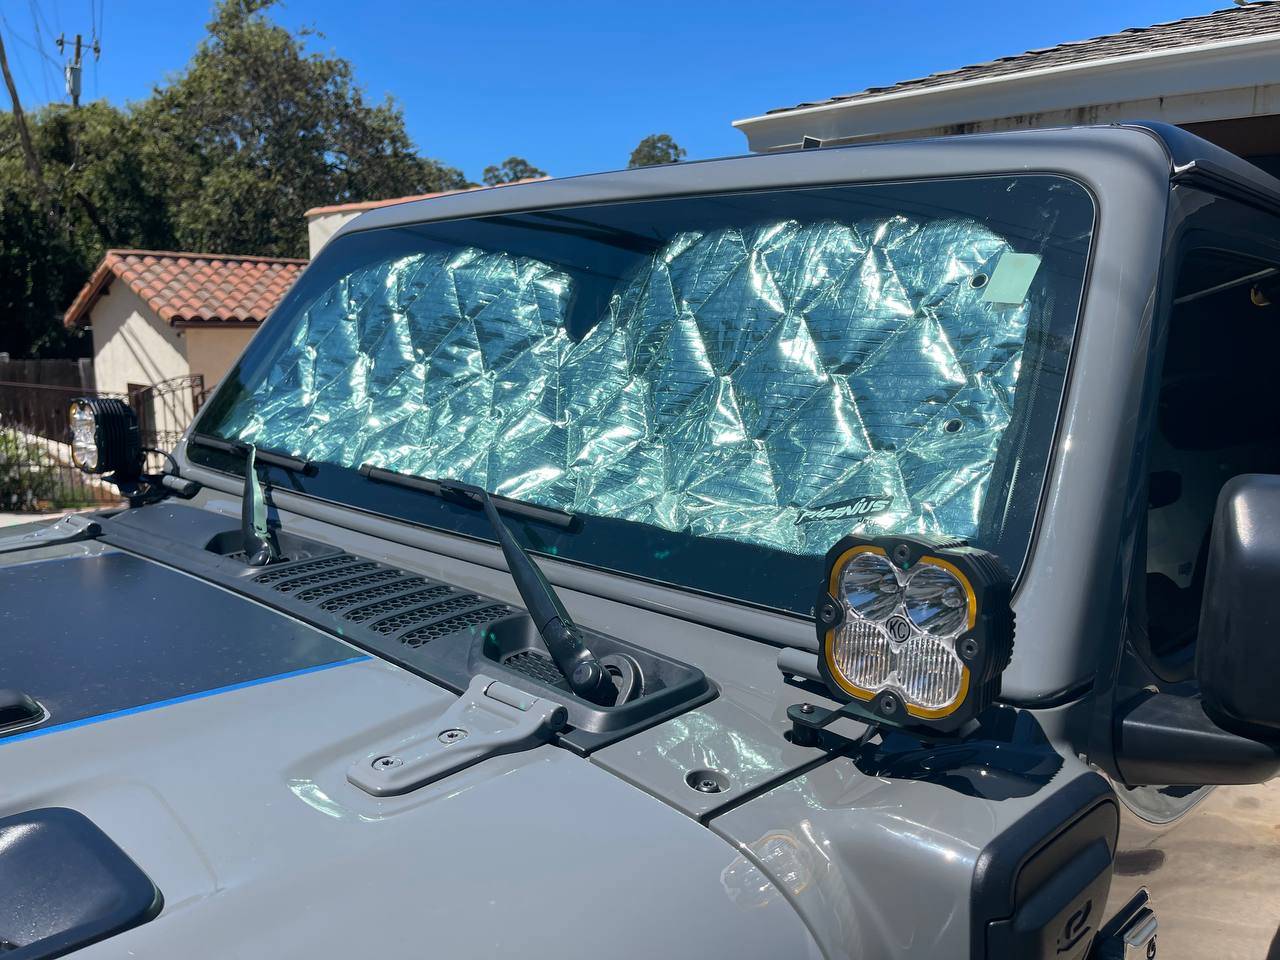
Project: KC Flex Era 4 install
Vehicle: 2023 Wrangler Rubicon 4xe
Level: Beginner
Time: Longer than I thought
Needed:
KC Flex Era 4 lights
A-Pillar mounting brackets
Sockets
SAE Hex wrenches
Extra things bought for the project but aren't required:
Heat shrink
Wire connectors, crimping tool and wire strippers
Electrical tape
Trim tools
Wire loom
Lesson 1: There really is no rushing into a build project.
As much as I wanted to make a purchase on Amazon, free up a few hours on a weekend morning, and then head out for an afternoon drive. There was really no way that was going to happen for me. I like to plan and know what I'm getting into. And it took me hours and a good few weeks to look at different products, just to get to the point where I knew which lights I wanted. I didn't want to buy and return different lights. I only wanted to do it once.
The hardest thing about vehicle mods, it that you really don't have great sources for product reviews. You kind of have to go with your gut at some point.
Lesson 2: Be prepared for it to not go like the video.
I watched several KC (and other manufacture) light installs. And it was easy to get lulled into thinking it was going to be a trivial project. There's some great YouTube videos and editing does wonders for making you feel you can do the same. What I hadn't anticipated was that the wire harness that came with the KC lights, was about 2 feet to shorter than I needed due to a mistake at the company. After unboxing, I laid out the lights to get an idea of how an where I was going to run the harness, and low an behold, the harness wouldn't reach between the passenger and driver lights. I had thought that I bought someone else's return and they had cutup the harness and then decided to return it. I was pretty mad because I was hoping to get started. Thankfully, and this is a shout out to KC HiLites, their customer service was fantastic and they immediately sent me an extension for the harness.
Lesson 3: I know less than I think I know.
I have always had a irrational fear of electricity. And wiring is not something I've ever done much of. So when it actually came down to connecting everything up, I realized just how much I didn't know. From the videos, I knew I was going to connect to the auxiliary wires under the hood. Not a big deal. But after I got in there, I didn't really consider how I was going to make the connections. For that, I went down a new rabbit hole of learning about wiring, connectors, crimping and splice techniques. I'm sure most of you know, but I had no idea the names of the different types of terminals. That some come with heat shrink built in. Marine grade is such a thing. There's a right "direction" to crimp the terminal. And that no one really writes the wire gauge on the insulation like they say.
There's a ton of videos on this stuff. And after another week or so of watching, I almost felt like I could have made my own harness from scratch. What I did end up doing was deciding that my old strippers and drawer of misc. wire nuts was not what I wanted under the hood of my car. So back to Amazon to buy a bunch of stuff that I didn't need, but really wanted. New crimpers and a whole mess of different terminal connectors to make me feel like I was doing a professional level install.
Lesson 4: There's more than one way to do things. And your way might not be the fastest.
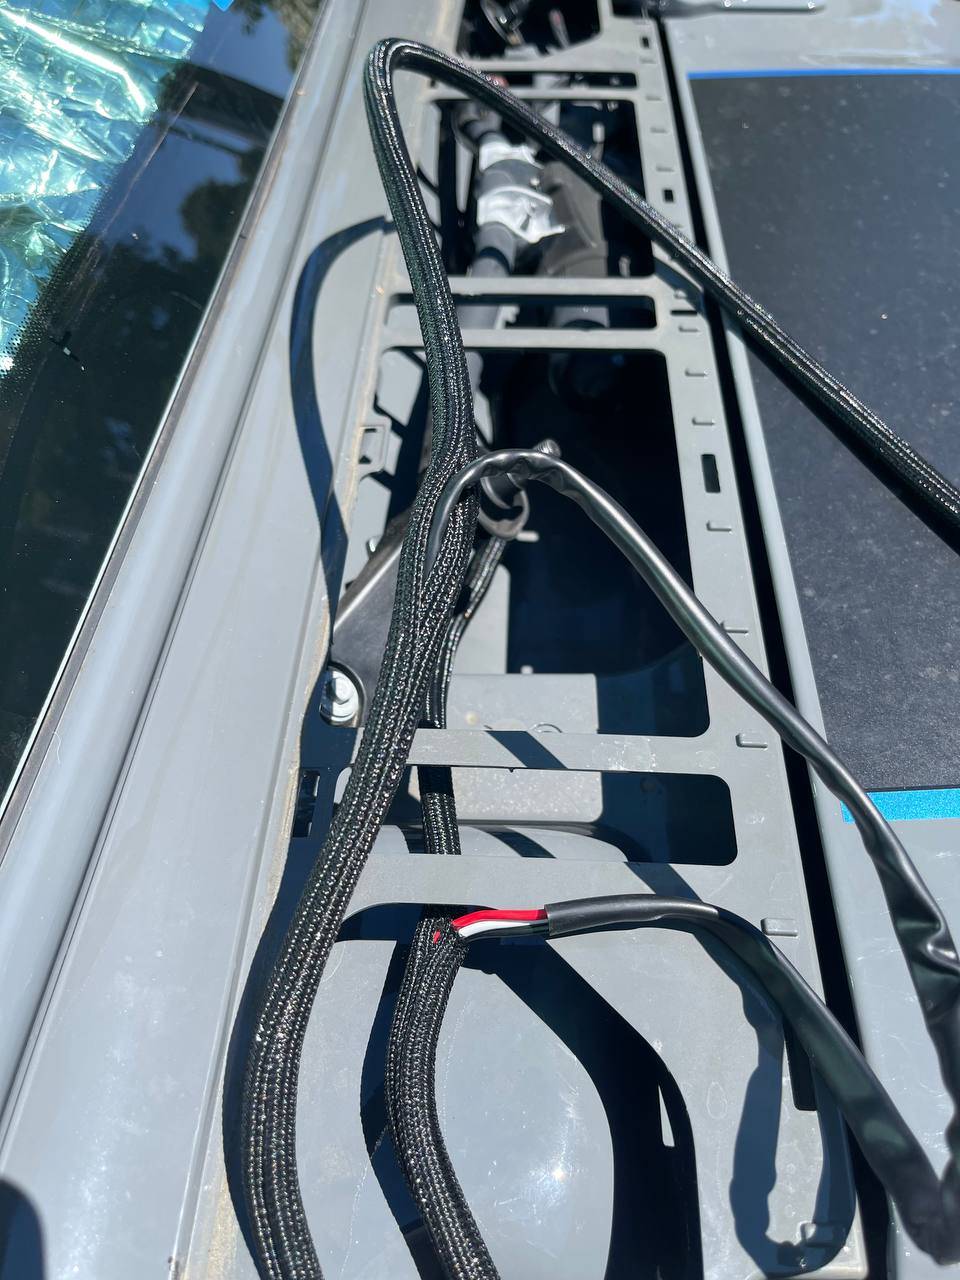
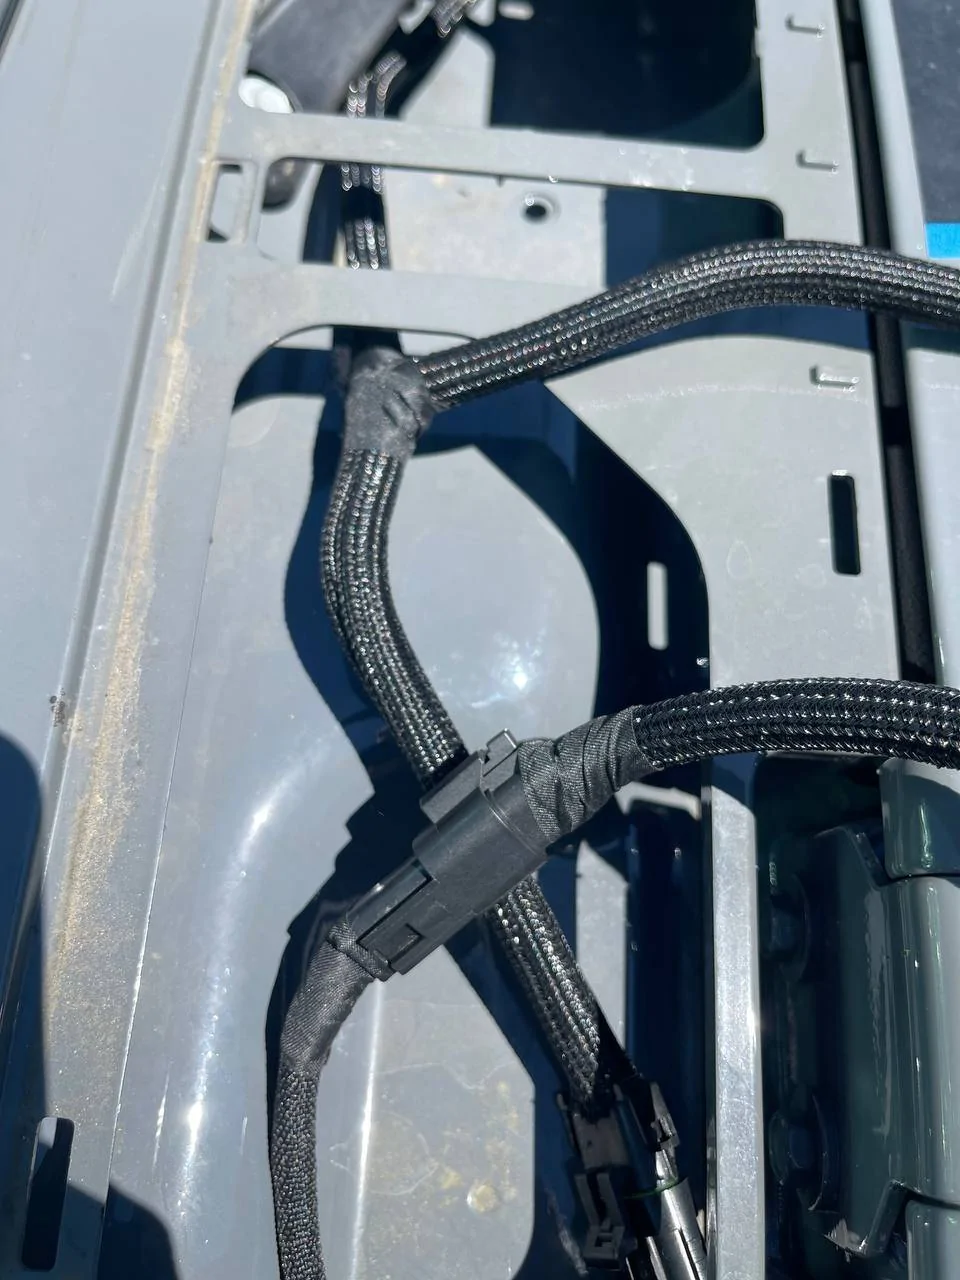
I think the largest consumer of time, was finding videos relevant to my rig. Unless you're lucky, most people aren't going to have the exact vehicle as you. So you should watch to learn the high level concepts, knowing that your vehicle will be similar but not identical. Most videos I saw, people run the harness along the back wall of the engine. I probably would have done that too, but I found one video where the guy ran the harness along the space that has the wiper motors. The 4xe engine area is tight. I'm sure the 3.6L JL is also tight but I have no real idea. But I didn't like the idea of running a sloppy zip tied harness along the back. So this method seemed like a nice solution.
But be careful what you wish for. Doing this sent me down rabbit hole #2. It's a pain in the ass running a harness through that tiny space. And the 4xe charging port takes up a great deal of room. So, I started looking at how to remove the plastic cover that covers the wiper motors.
This distraction taught me about trim removal tools and wiper arm removal. I had no idea there were special tools just to pop open these panels and release the clips that secure them in place. At the same time, did you know it's a pain in the ass to remove wiper arms? It took me a day and several attempts to realize that there's a cover over the nut holding the wiper arm. And once you remove the nut, it's not going to magically come off. I found a whole bunch of videos dedicated to wiper arm removal tools or lack there of. Plus I learned I can rent a tie rod puller from O'Reilly. But it won't fit the JL. So vice grips to the rescue. Placing a quarter on the bolt allows the locking pliers to get enough leverage to break the arm free. So sub-lesson, try and make it work, before heading to O'Reilly.
But after gaining access to the area, everything is so easy. You can nicely tuck the harness under the motors and connect the lights in tiny space under the cowl covers. I even went back later and added a wire loom to the factory KC harness. And taped the connections.
So while it didn't get me up and running quickly, I leveled up my knowledge a bit. And actually put my OCD to rest for the time being.
Lesson 5: Learn this stuff when you're younger. Although it's never too late to learn.
I vaguely remember as a kid watching my neighbor work on his old Chevelle. And thankfully my dad made me learn to change the oil. But that's about it. Pretty much I had no opportunity to learn anything else. I live in Silicon Valley and there's no way, this stuff is being taught in school. So unless you have a relative or friend who knows, I think it's pretty intimidating for someone with zero experience to get started. For the most part, vehicles seem more complicated than they used to be, and it's a big lift to just dive under the hood and start poking around. Thankfully I got my 11 year old son to help me undo all the bolts and hand me tools while I did this project. So at least he's scene that it can be done.
We used to have an automotive Maker space. Where you could work on engines, borrow a welder, and ask whomever was hanging around questions. But it closed. If there could be a community place to do this sort of thing, I think it'd be worth having.
Wrapping it up:
Attached are a few images of the project. The thing I like most (although I'm not sure if its the best solution), is running the wiring under the wipers. It's clean. But maybe there's less protection and more exposure to water in this area than in the engine bay.
The thing I like least, is that I probably went overboard and didn't need to buy all the extra stuff that I did. I could have spent less money and either used wire nuts, or solder and tape, and probably achieve the same outcome. But the extra tools is still a small cost compared to the lights and mount themselves.
Lastly, a friend of mine built an app for iOS that lets you monitor price drops of products. That's a pretty useful app.
Oh and for the record, lights are connected to Aux Switch 3 and 4 under the hood using butt connectors. Ground is to the chassis using a ring connector.
And here are a few of the videos that I found useful. Thank you to those creators. And thanks to those that posted helpful tips on this forum.


This is my first project post, and I thought I'd summarize a few of the lessons I learned from it. I'm not a new jeep owner. But I wouldn't consider myself super knowledgeable when it comes to diy automotive work. I can do a few things but by and large I don't do a lot of vehicle work. But after getting the Rubicon I got the urge to make it my own, and started to assemble a list of mods that I wanted to tackle.
The first real project was an auxiliary light install. I figured it was just the right amount of work. Doesn't require a ton of tools. There's tons of videos and writeups. Wasn't going to do any real damage or void the warranty if I messed anything up. But what I thought would have been a just a 1-2 hour job, turned out to be quite a lot of hours of research, planning, and acquisition of tools that I didn't anticipate purchasing.
I'm not going to make this exactly a how to. I'll link some of the videos that I used because those people did excellent jobs explaining what to do. But to document and show my appreciation, I wanted to jot down some lessons that I learned along the way.
Project: KC Flex Era 4 install
Vehicle: 2023 Wrangler Rubicon 4xe
Level: Beginner
Time: Longer than I thought
Needed:
KC Flex Era 4 lights
A-Pillar mounting brackets
Sockets
SAE Hex wrenches
Extra things bought for the project but aren't required:
Heat shrink
Wire connectors, crimping tool and wire strippers
Electrical tape
Trim tools
Wire loom
Lesson 1: There really is no rushing into a build project.
As much as I wanted to make a purchase on Amazon, free up a few hours on a weekend morning, and then head out for an afternoon drive. There was really no way that was going to happen for me. I like to plan and know what I'm getting into. And it took me hours and a good few weeks to look at different products, just to get to the point where I knew which lights I wanted. I didn't want to buy and return different lights. I only wanted to do it once.
The hardest thing about vehicle mods, it that you really don't have great sources for product reviews. You kind of have to go with your gut at some point.
Lesson 2: Be prepared for it to not go like the video.
I watched several KC (and other manufacture) light installs. And it was easy to get lulled into thinking it was going to be a trivial project. There's some great YouTube videos and editing does wonders for making you feel you can do the same. What I hadn't anticipated was that the wire harness that came with the KC lights, was about 2 feet to shorter than I needed due to a mistake at the company. After unboxing, I laid out the lights to get an idea of how an where I was going to run the harness, and low an behold, the harness wouldn't reach between the passenger and driver lights. I had thought that I bought someone else's return and they had cutup the harness and then decided to return it. I was pretty mad because I was hoping to get started. Thankfully, and this is a shout out to KC HiLites, their customer service was fantastic and they immediately sent me an extension for the harness.
Lesson 3: I know less than I think I know.
I have always had a irrational fear of electricity. And wiring is not something I've ever done much of. So when it actually came down to connecting everything up, I realized just how much I didn't know. From the videos, I knew I was going to connect to the auxiliary wires under the hood. Not a big deal. But after I got in there, I didn't really consider how I was going to make the connections. For that, I went down a new rabbit hole of learning about wiring, connectors, crimping and splice techniques. I'm sure most of you know, but I had no idea the names of the different types of terminals. That some come with heat shrink built in. Marine grade is such a thing. There's a right "direction" to crimp the terminal. And that no one really writes the wire gauge on the insulation like they say.
There's a ton of videos on this stuff. And after another week or so of watching, I almost felt like I could have made my own harness from scratch. What I did end up doing was deciding that my old strippers and drawer of misc. wire nuts was not what I wanted under the hood of my car. So back to Amazon to buy a bunch of stuff that I didn't need, but really wanted. New crimpers and a whole mess of different terminal connectors to make me feel like I was doing a professional level install.
Lesson 4: There's more than one way to do things. And your way might not be the fastest.
I think the largest consumer of time, was finding videos relevant to my rig. Unless you're lucky, most people aren't going to have the exact vehicle as you. So you should watch to learn the high level concepts, knowing that your vehicle will be similar but not identical. Most videos I saw, people run the harness along the back wall of the engine. I probably would have done that too, but I found one video where the guy ran the harness along the space that has the wiper motors. The 4xe engine area is tight. I'm sure the 3.6L JL is also tight but I have no real idea. But I didn't like the idea of running a sloppy zip tied harness along the back. So this method seemed like a nice solution.
But be careful what you wish for. Doing this sent me down rabbit hole #2. It's a pain in the ass running a harness through that tiny space. And the 4xe charging port takes up a great deal of room. So, I started looking at how to remove the plastic cover that covers the wiper motors.
This distraction taught me about trim removal tools and wiper arm removal. I had no idea there were special tools just to pop open these panels and release the clips that secure them in place. At the same time, did you know it's a pain in the ass to remove wiper arms? It took me a day and several attempts to realize that there's a cover over the nut holding the wiper arm. And once you remove the nut, it's not going to magically come off. I found a whole bunch of videos dedicated to wiper arm removal tools or lack there of. Plus I learned I can rent a tie rod puller from O'Reilly. But it won't fit the JL. So vice grips to the rescue. Placing a quarter on the bolt allows the locking pliers to get enough leverage to break the arm free. So sub-lesson, try and make it work, before heading to O'Reilly.
But after gaining access to the area, everything is so easy. You can nicely tuck the harness under the motors and connect the lights in tiny space under the cowl covers. I even went back later and added a wire loom to the factory KC harness. And taped the connections.
So while it didn't get me up and running quickly, I leveled up my knowledge a bit. And actually put my OCD to rest for the time being.
Lesson 5: Learn this stuff when you're younger. Although it's never too late to learn.
I vaguely remember as a kid watching my neighbor work on his old Chevelle. And thankfully my dad made me learn to change the oil. But that's about it. Pretty much I had no opportunity to learn anything else. I live in Silicon Valley and there's no way, this stuff is being taught in school. So unless you have a relative or friend who knows, I think it's pretty intimidating for someone with zero experience to get started. For the most part, vehicles seem more complicated than they used to be, and it's a big lift to just dive under the hood and start poking around. Thankfully I got my 11 year old son to help me undo all the bolts and hand me tools while I did this project. So at least he's scene that it can be done.
We used to have an automotive Maker space. Where you could work on engines, borrow a welder, and ask whomever was hanging around questions. But it closed. If there could be a community place to do this sort of thing, I think it'd be worth having.
Wrapping it up:
Attached are a few images of the project. The thing I like most (although I'm not sure if its the best solution), is running the wiring under the wipers. It's clean. But maybe there's less protection and more exposure to water in this area than in the engine bay.
The thing I like least, is that I probably went overboard and didn't need to buy all the extra stuff that I did. I could have spent less money and either used wire nuts, or solder and tape, and probably achieve the same outcome. But the extra tools is still a small cost compared to the lights and mount themselves.
Lastly, a friend of mine built an app for iOS that lets you monitor price drops of products. That's a pretty useful app.
Oh and for the record, lights are connected to Aux Switch 3 and 4 under the hood using butt connectors. Ground is to the chassis using a ring connector.
And here are a few of the videos that I found useful. Thank you to those creators. And thanks to those that posted helpful tips on this forum.

Sponsored