Eyeball
Well-Known Member
- Joined
- Dec 14, 2022
- Threads
- 35
- Messages
- 574
- Reaction score
- 831
- Location
- California
- Vehicle(s)
- 1997 TJ & 2023 JLUR
- Thread starter
- #1
With the help of a few ideas I picked up on this site (credit to @tonygiotta @cornercanyon ) I installed a Icom 2730a radio in my 2023 JLU. Hopefully someone can use this for inspiration and improve on what I have done…
Parts used:
General Shop Supplies
STEPS:
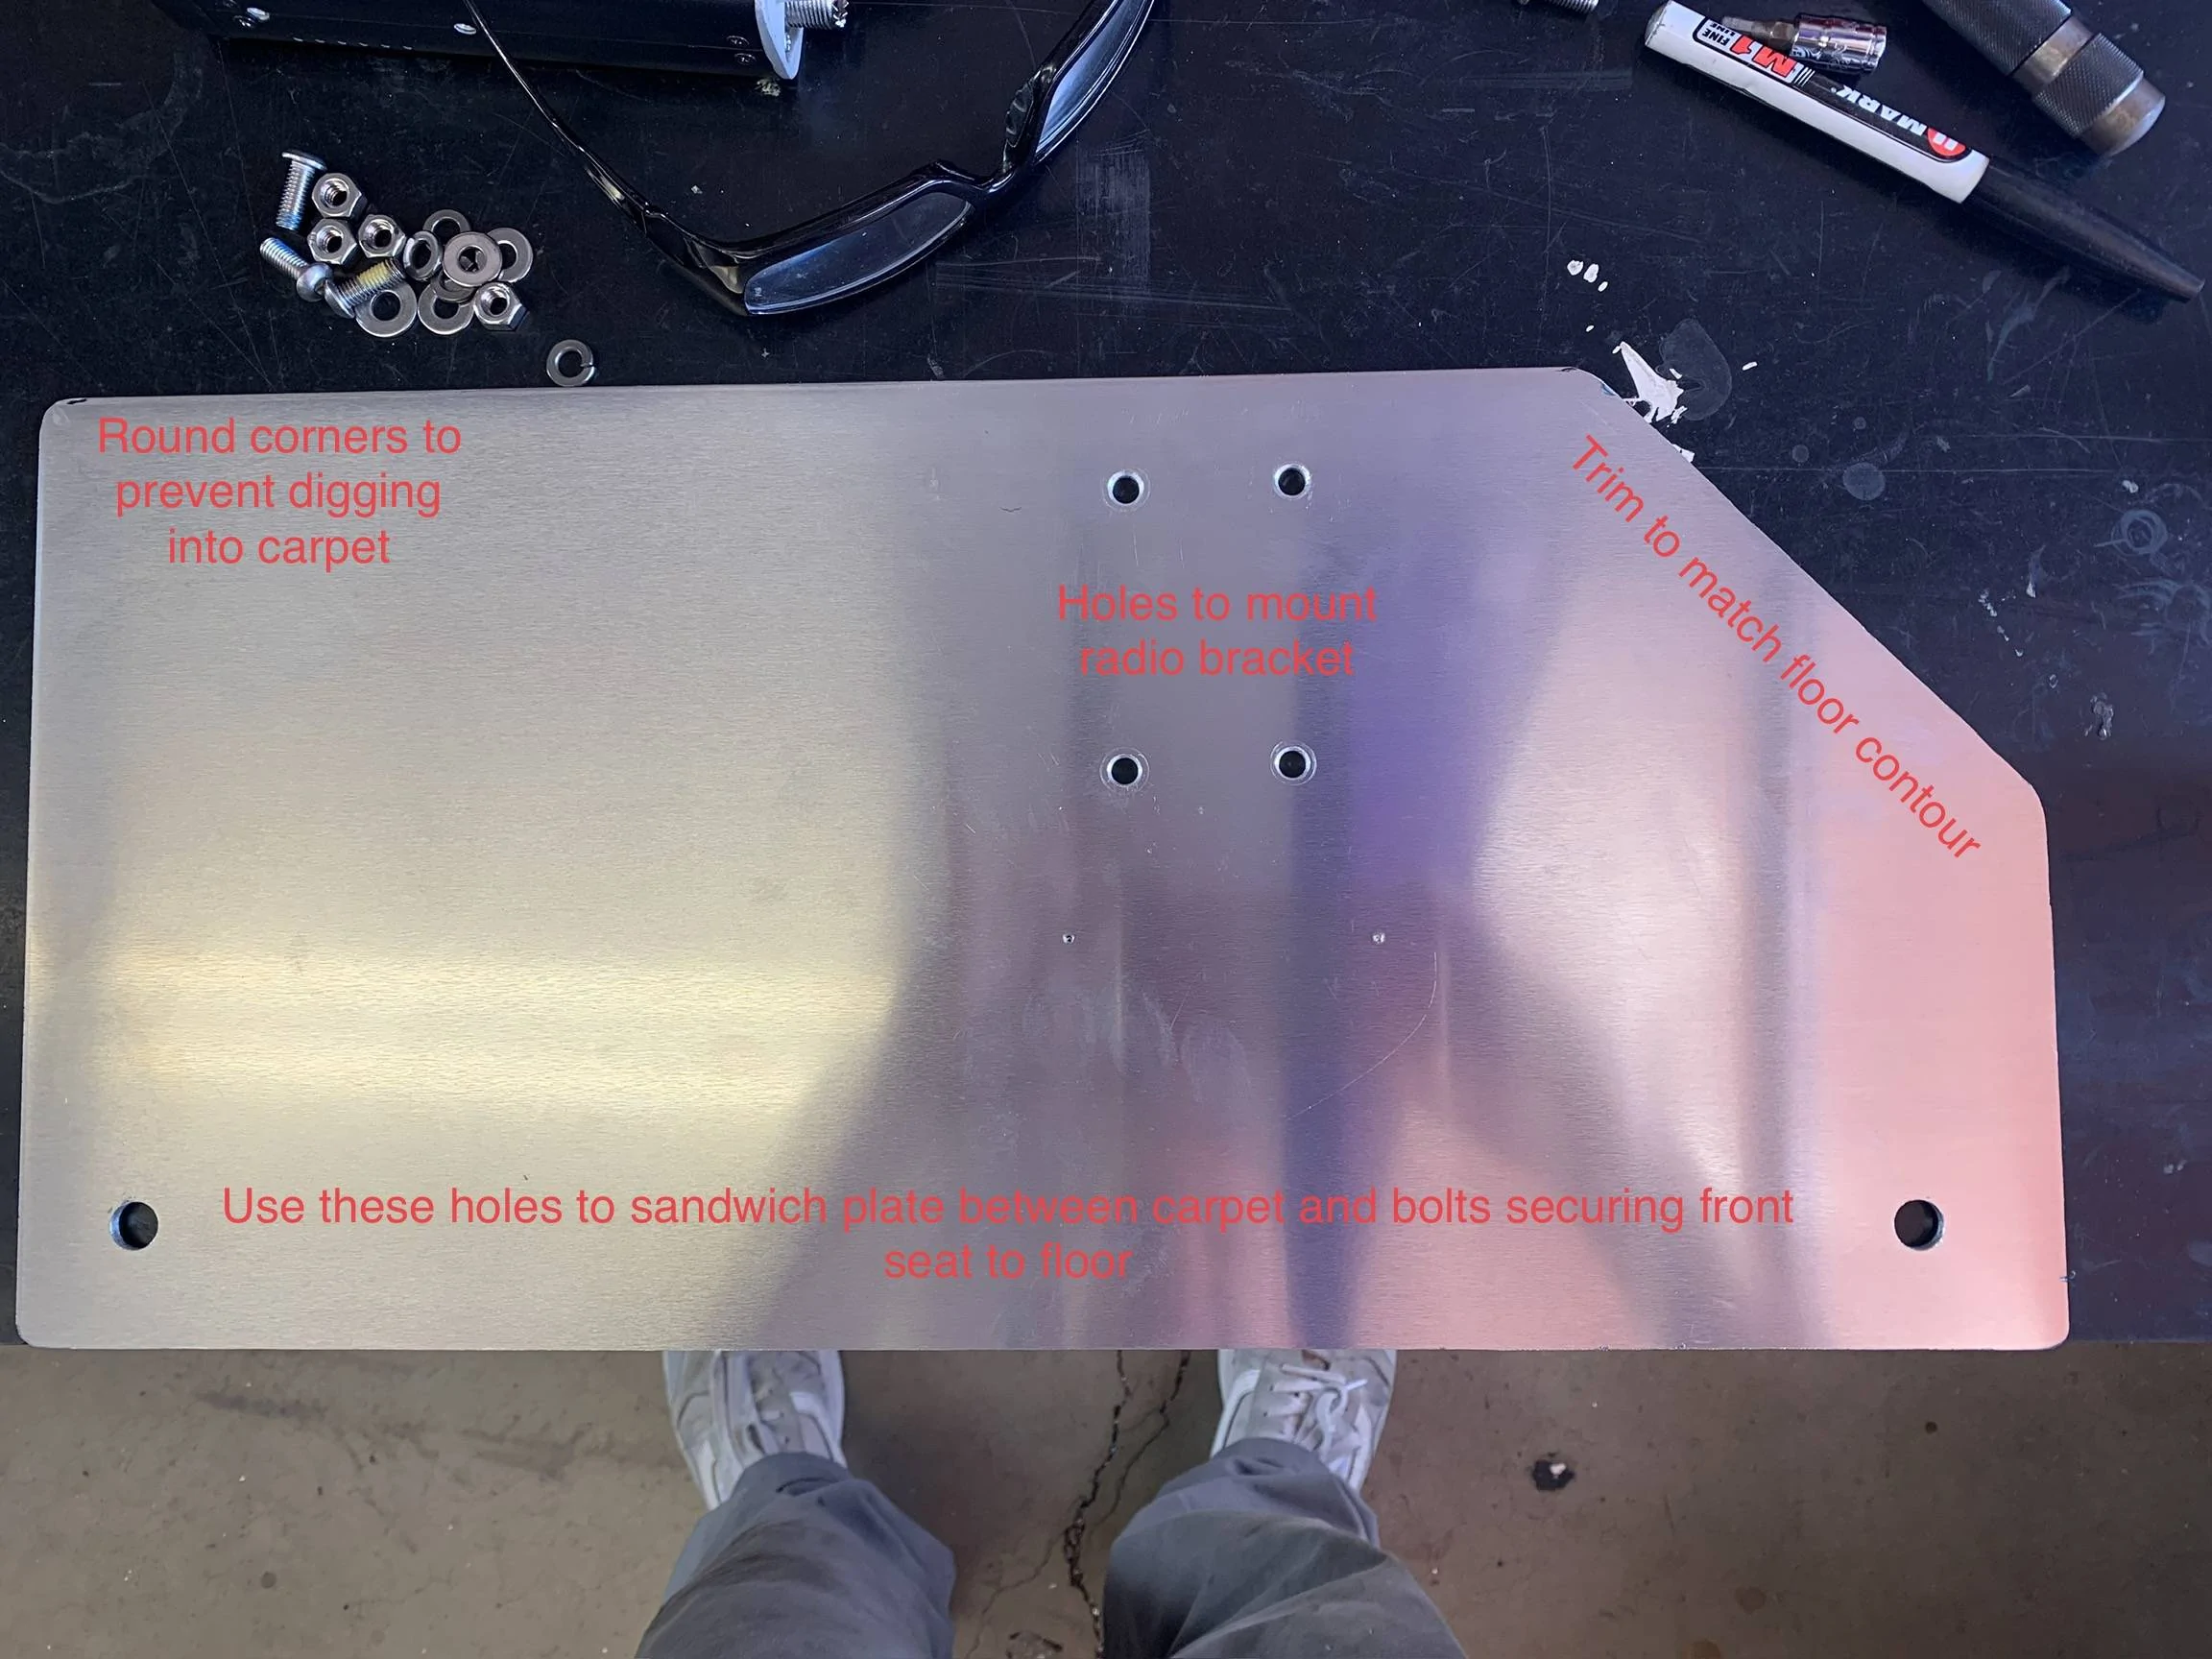
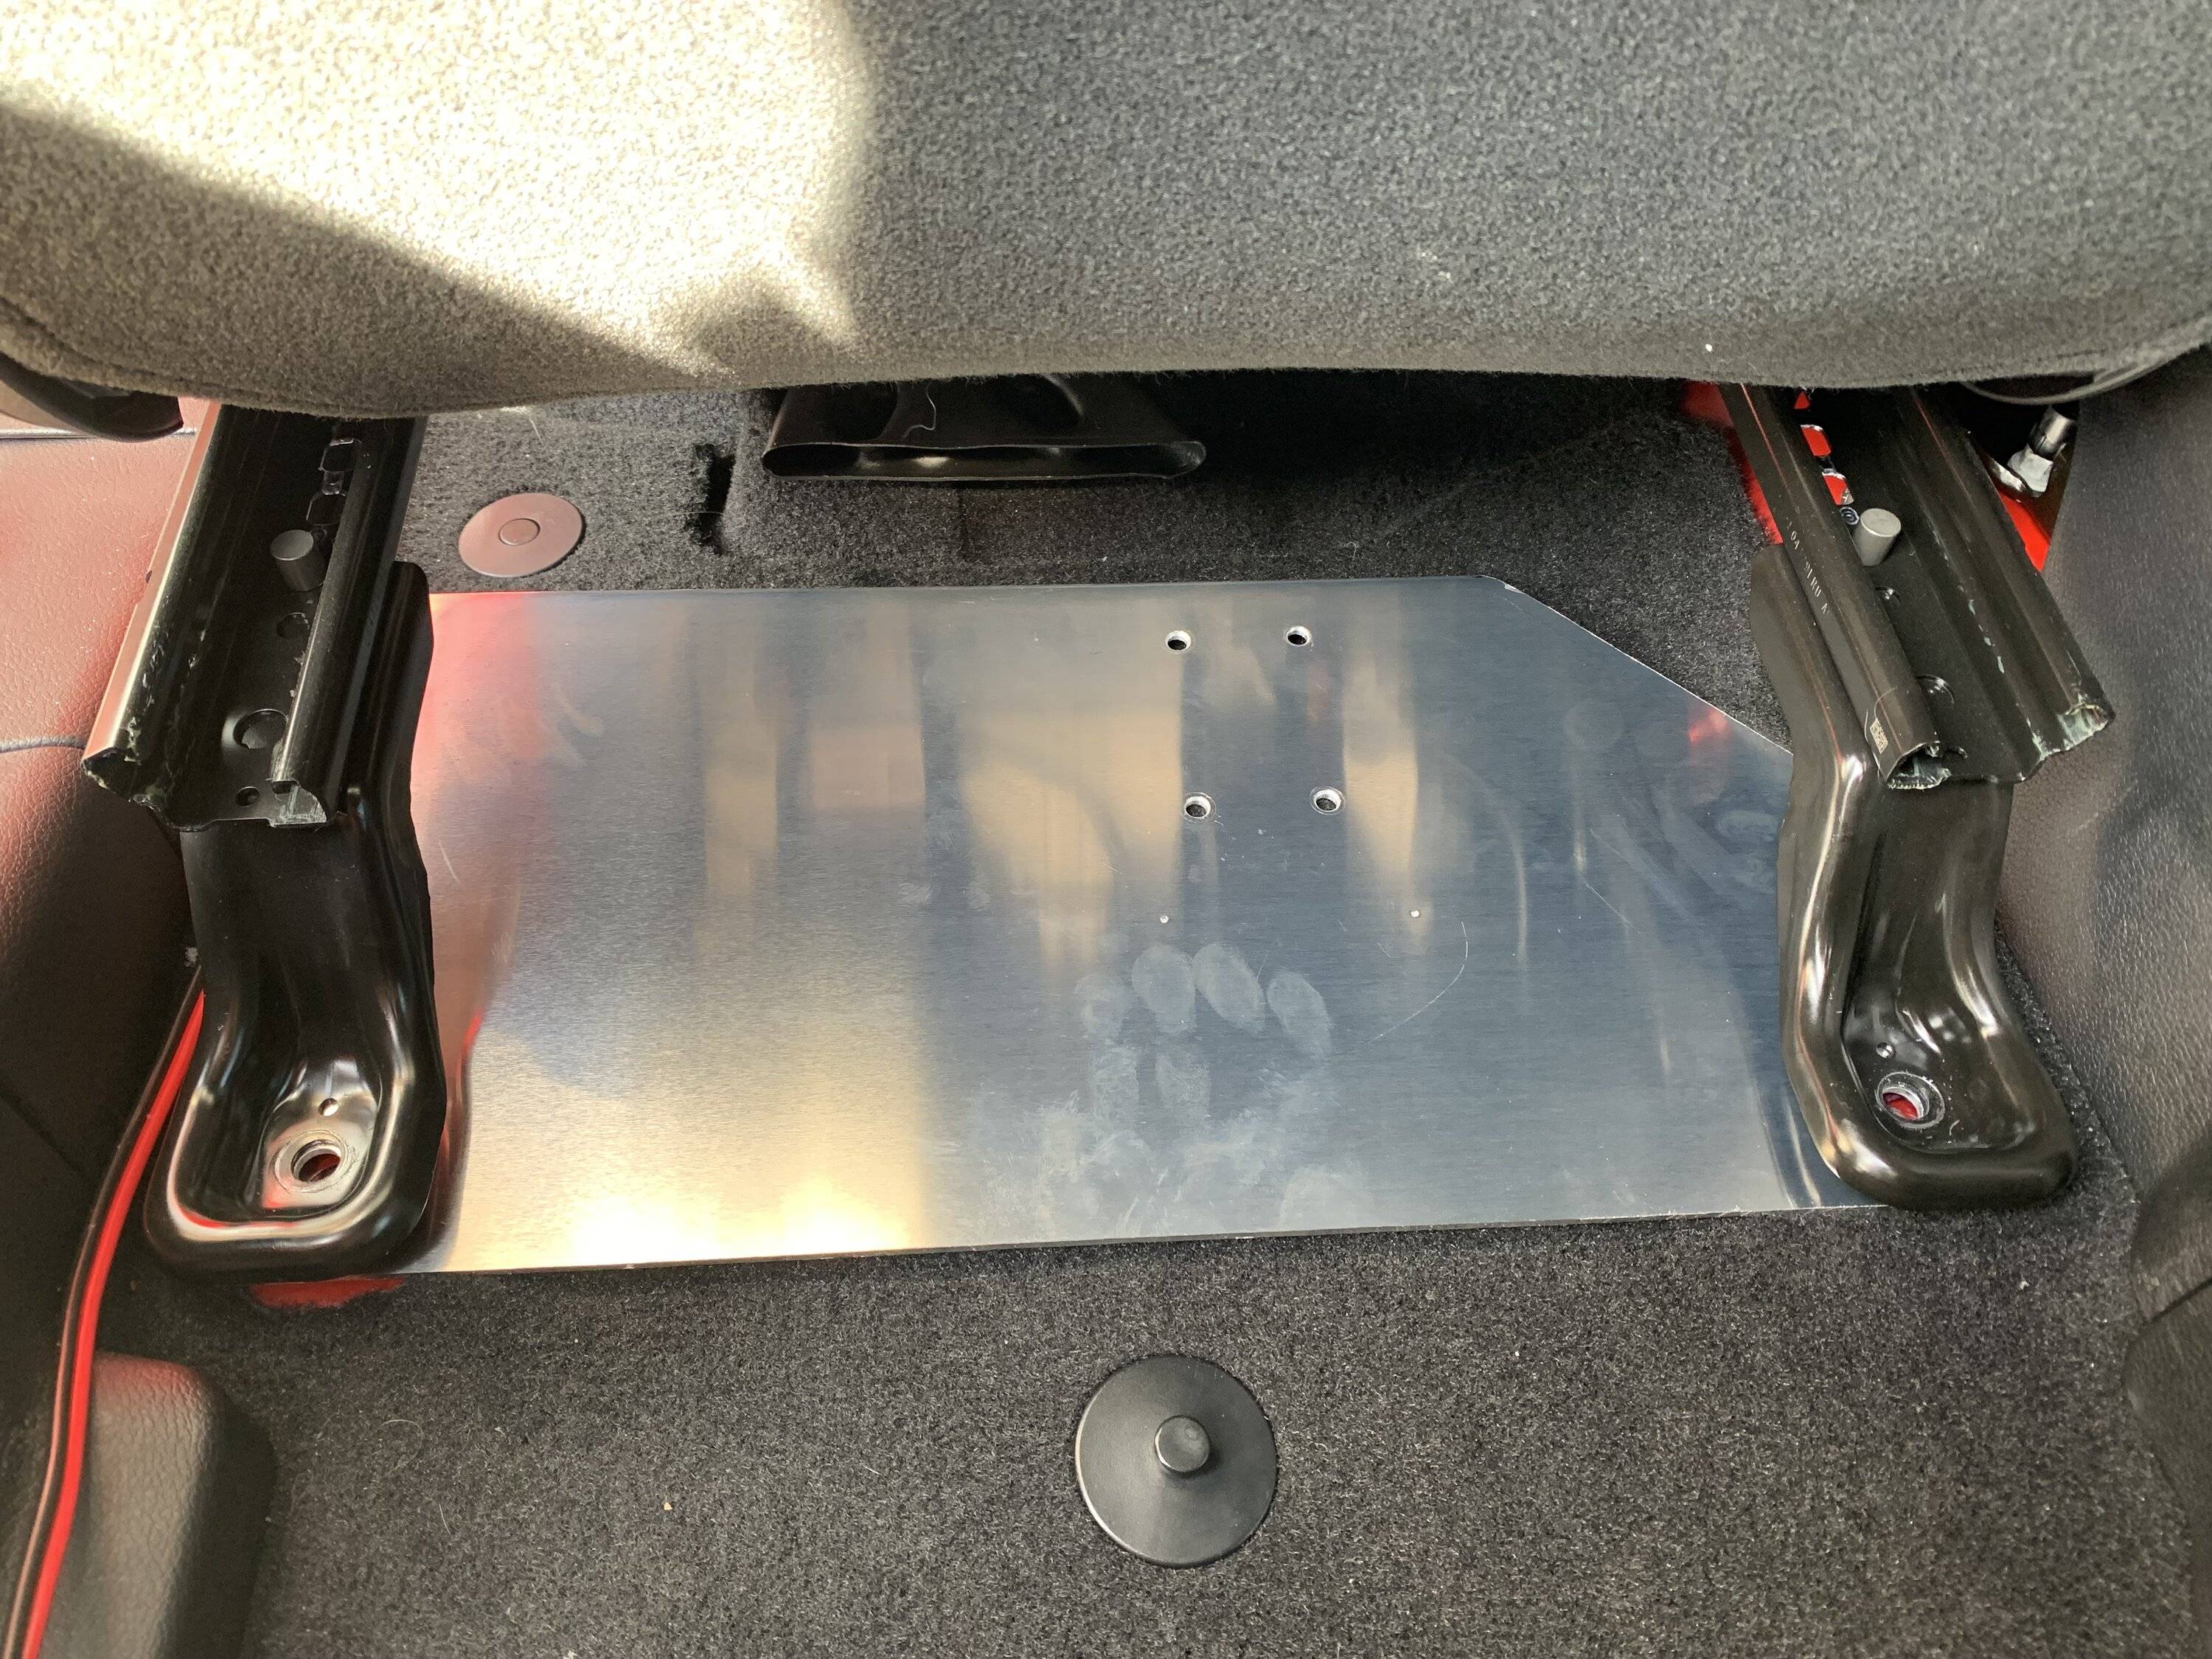
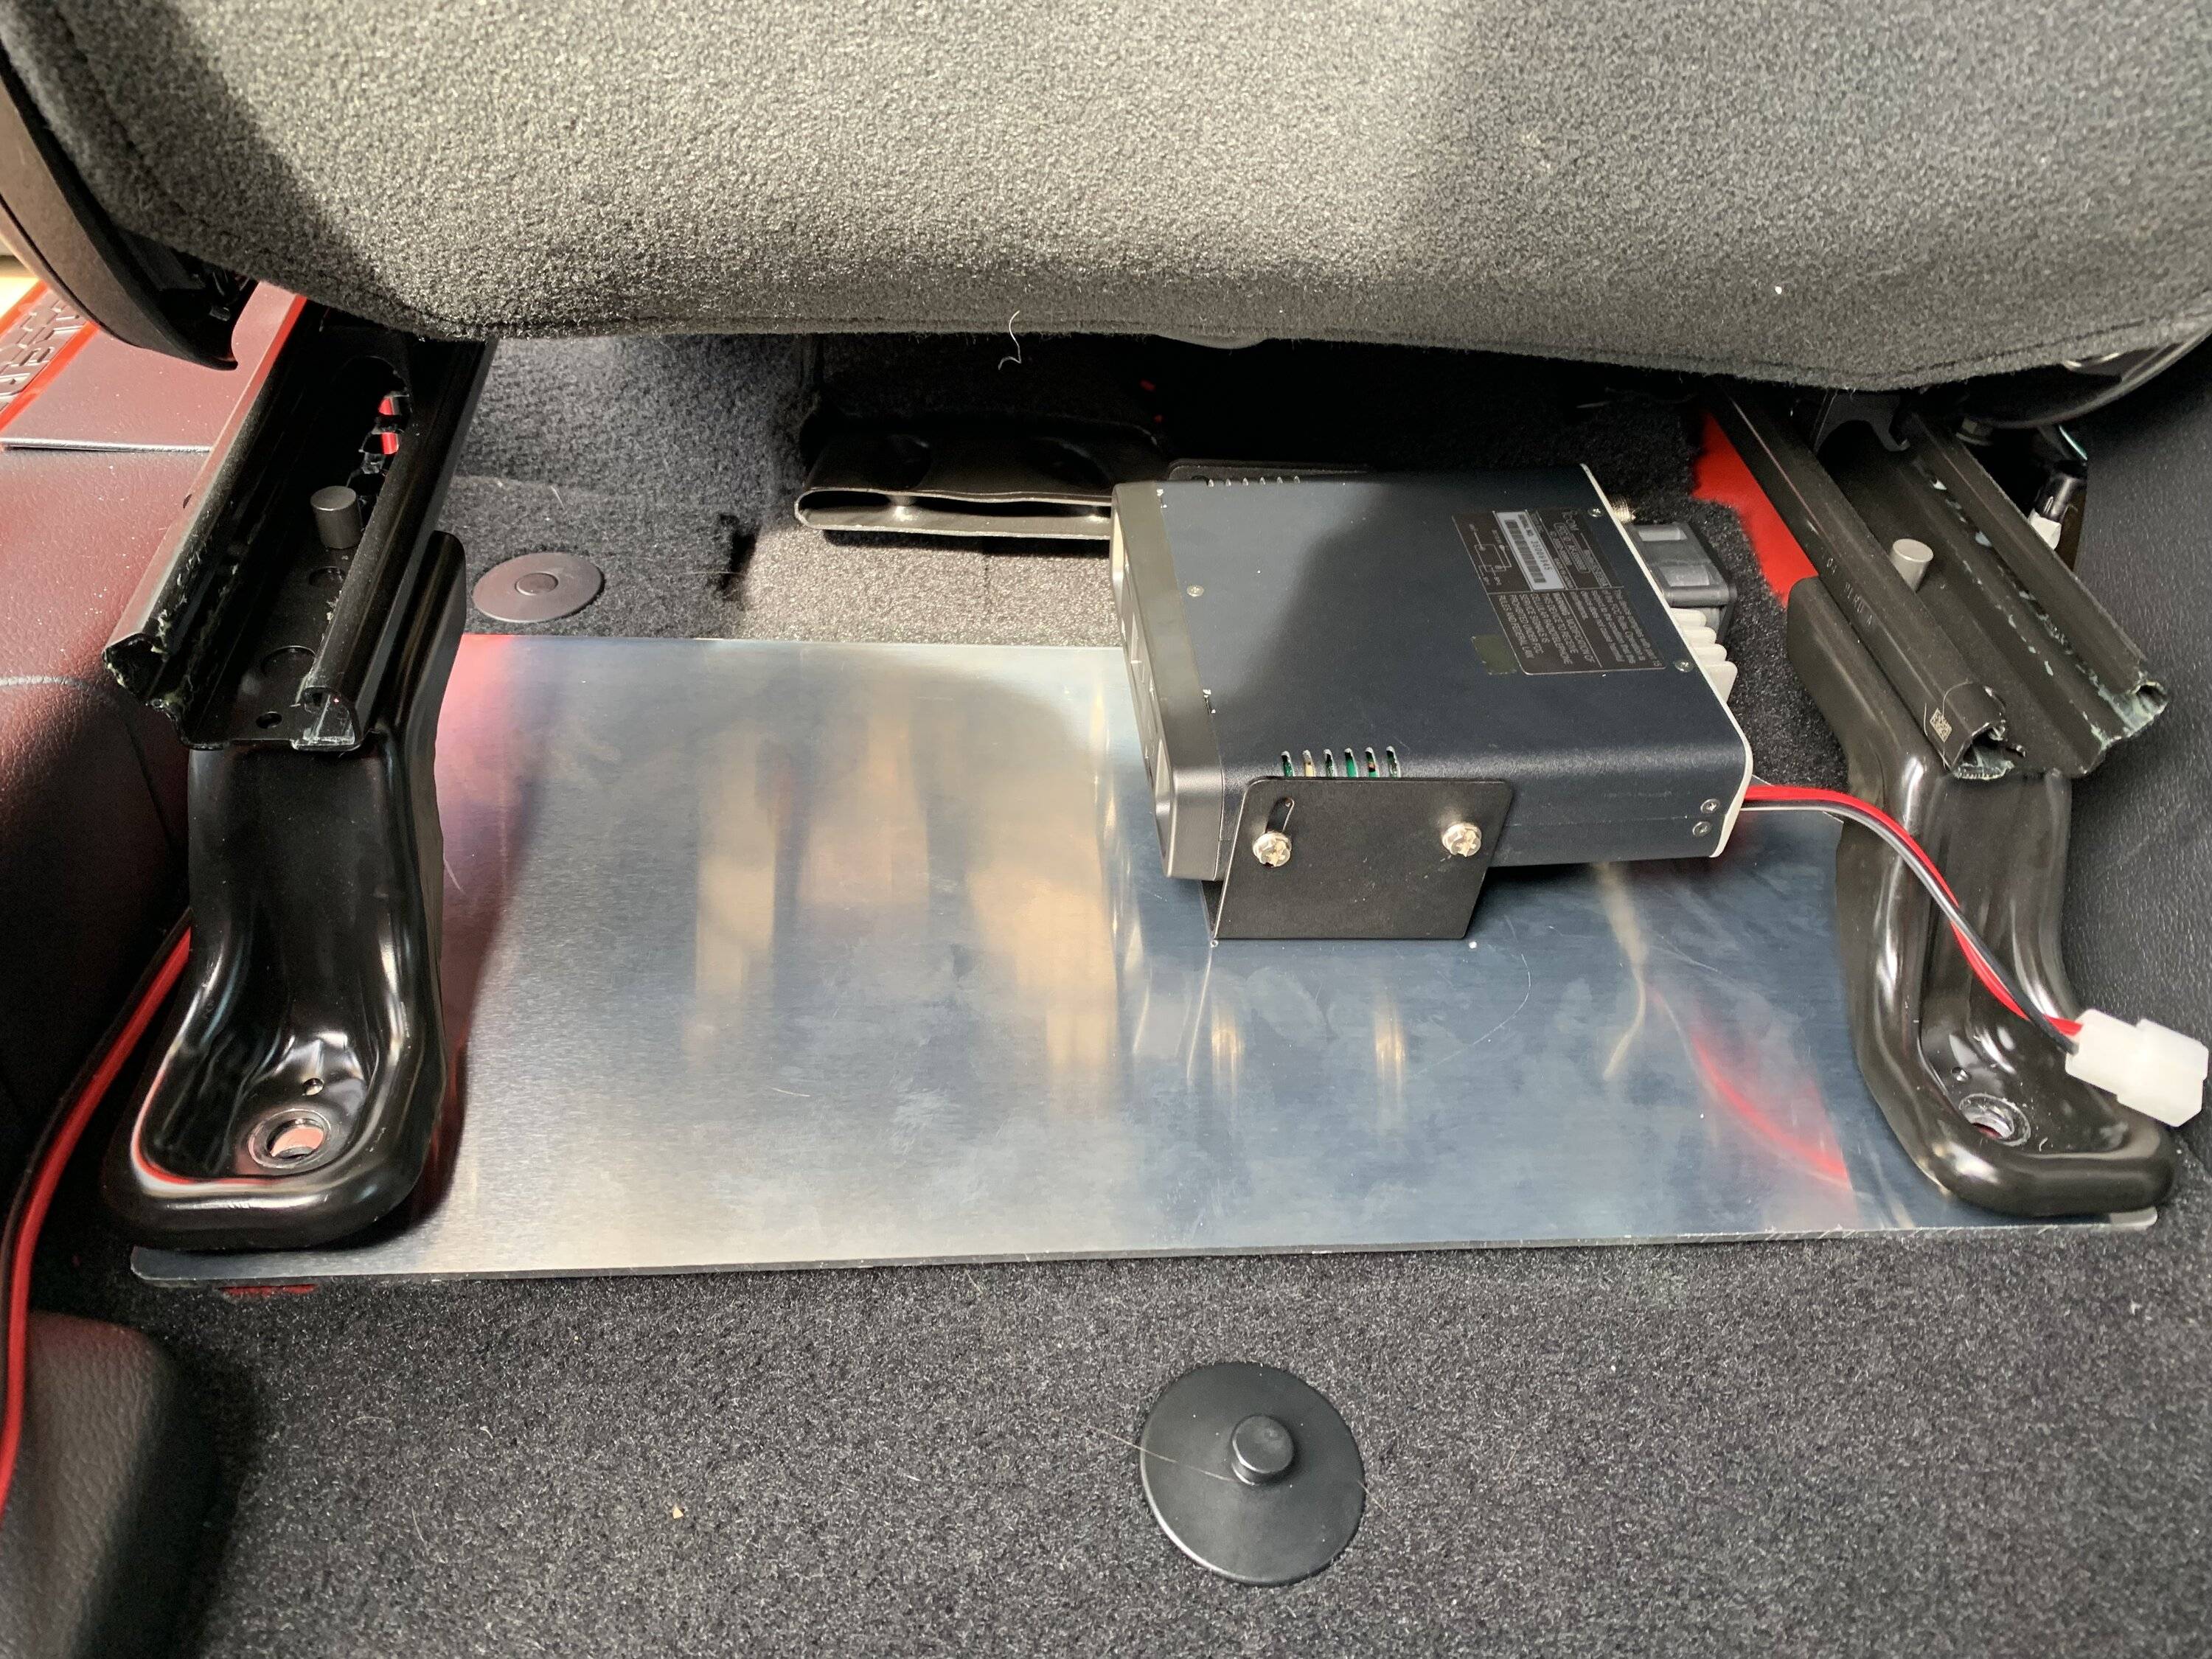
Cut and drill under seat mount. When drilling holes be thoughtful of leaving enough space between all obstacles to allow connecting cable without kinking them too tightly. Also consider biasing it to the left or right as well as up and down to minimize any blockage of the under seat vent. I ran the power and ground directly to the battery. I like the always on feature vs ignition only. I have set the auto power off setting to prevent draining the battery. I ran the wires through the grommet that is used for the clutch on manual


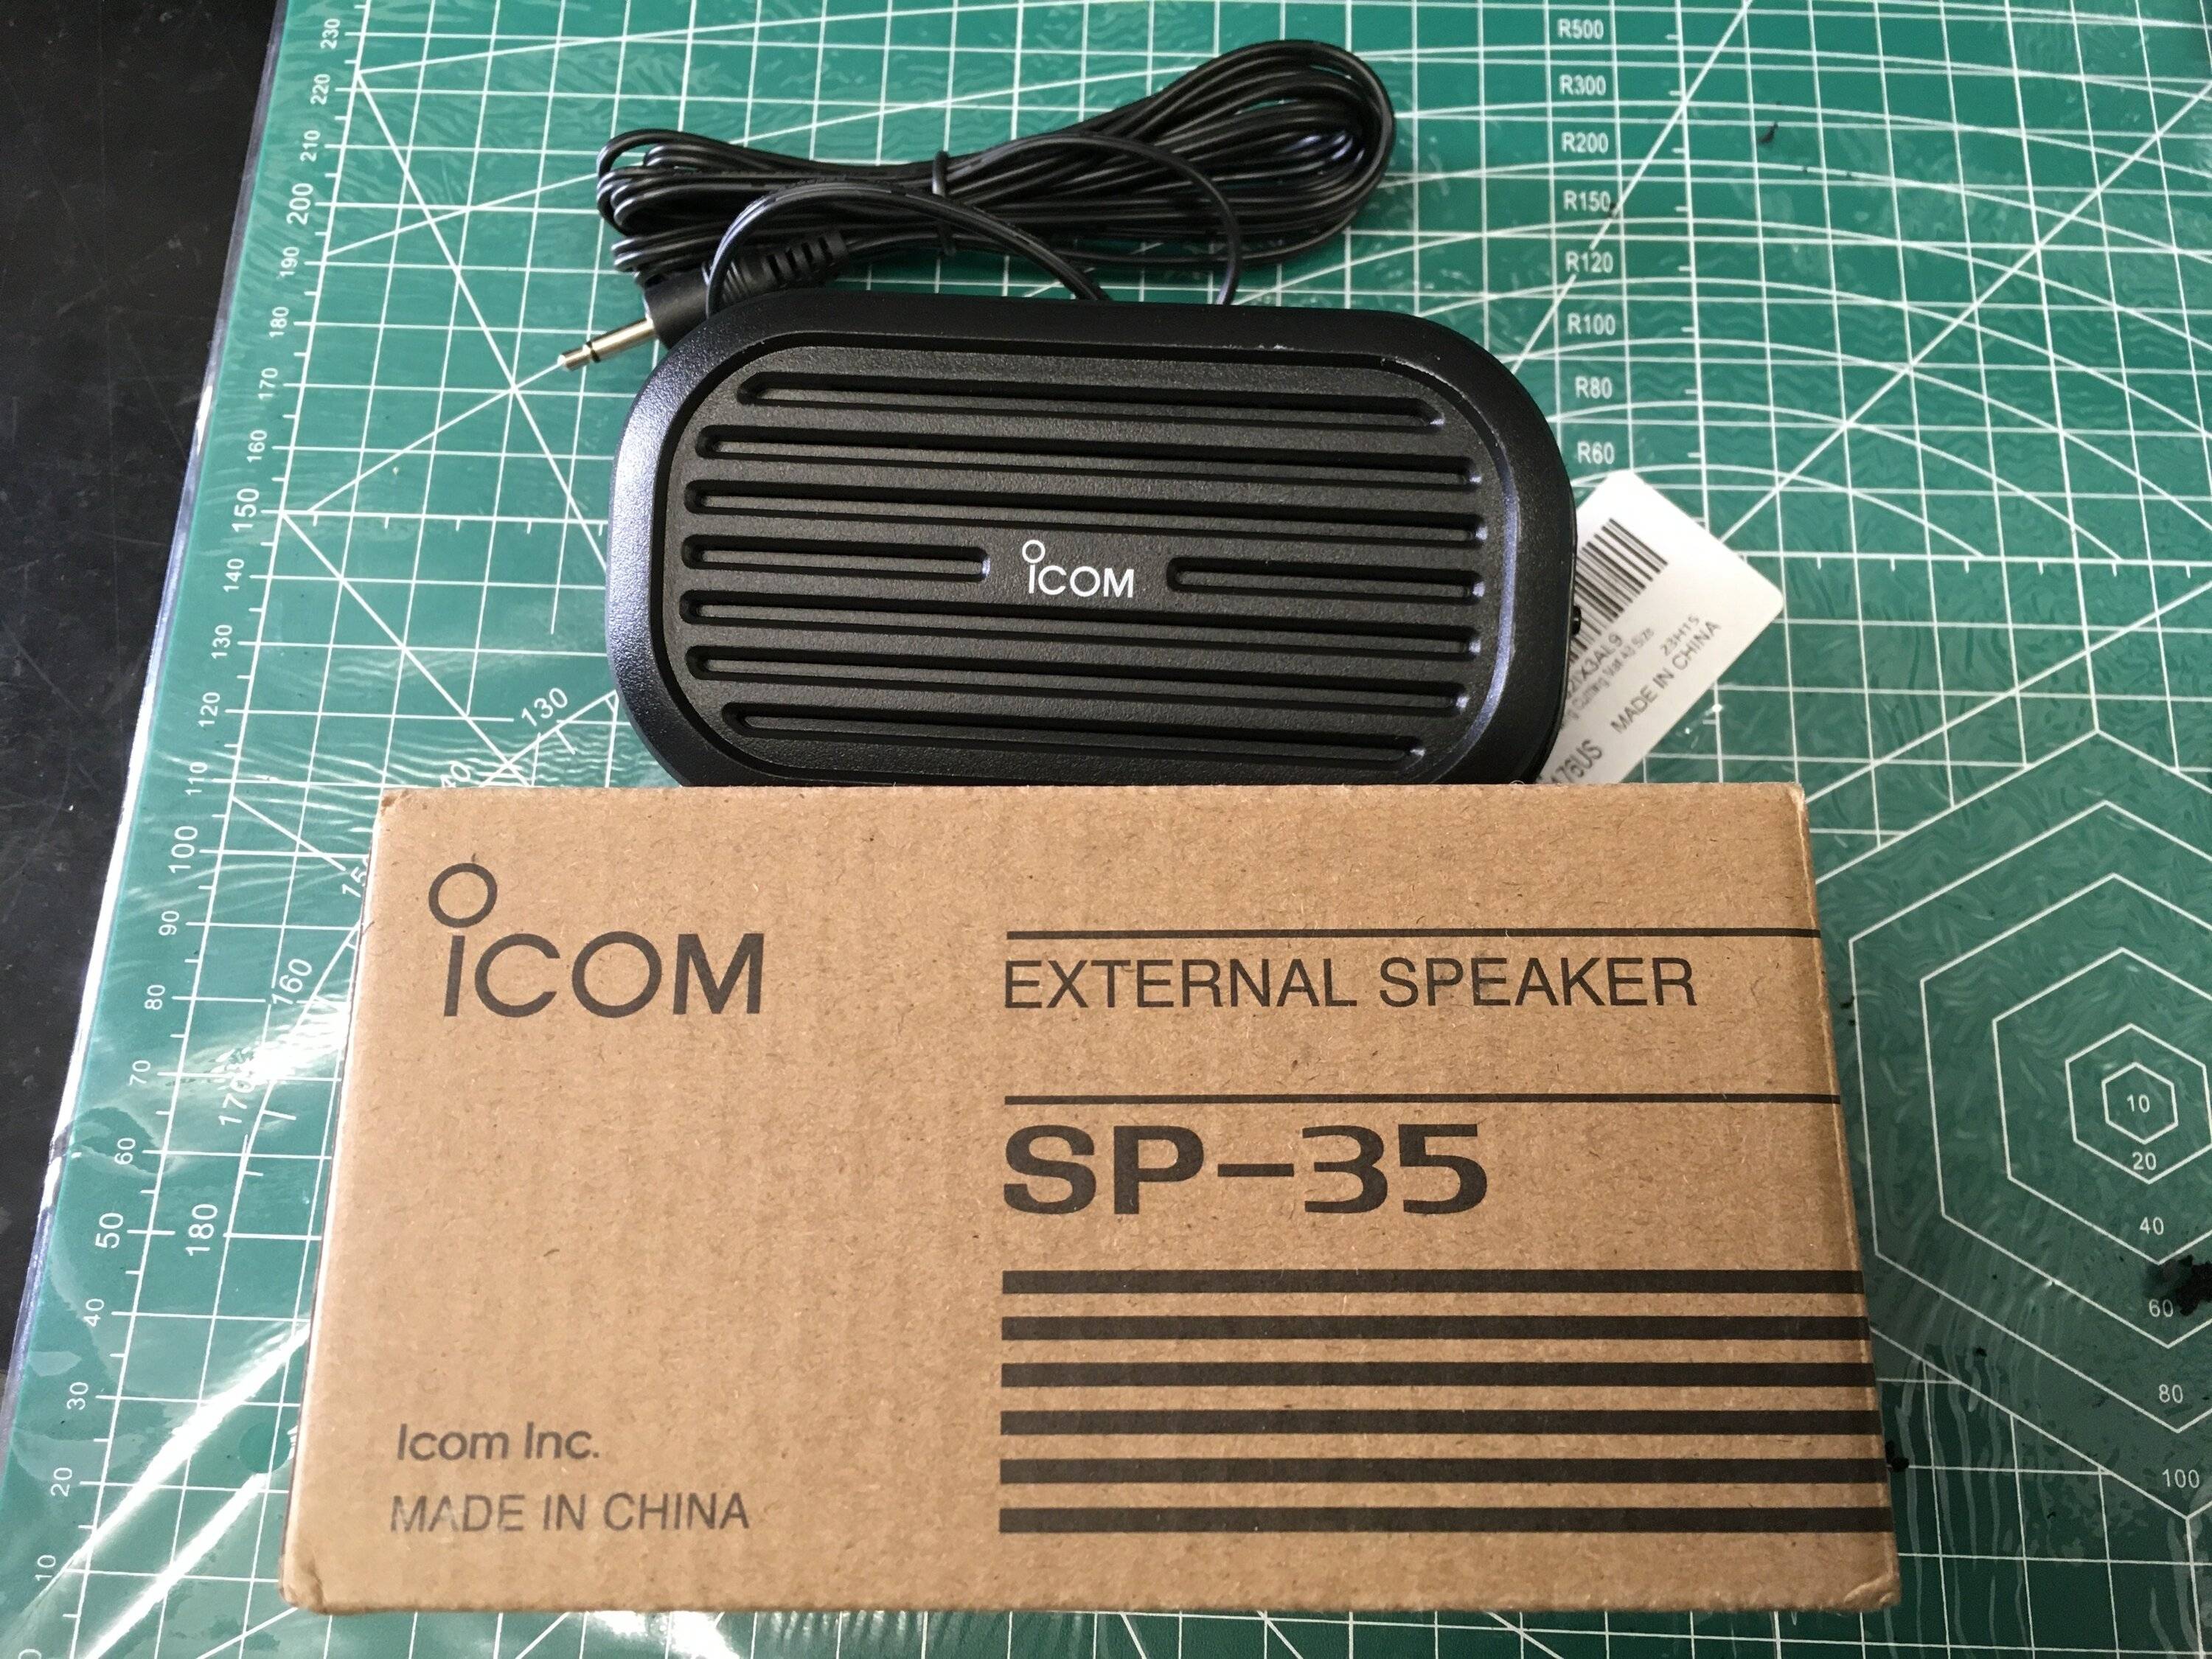
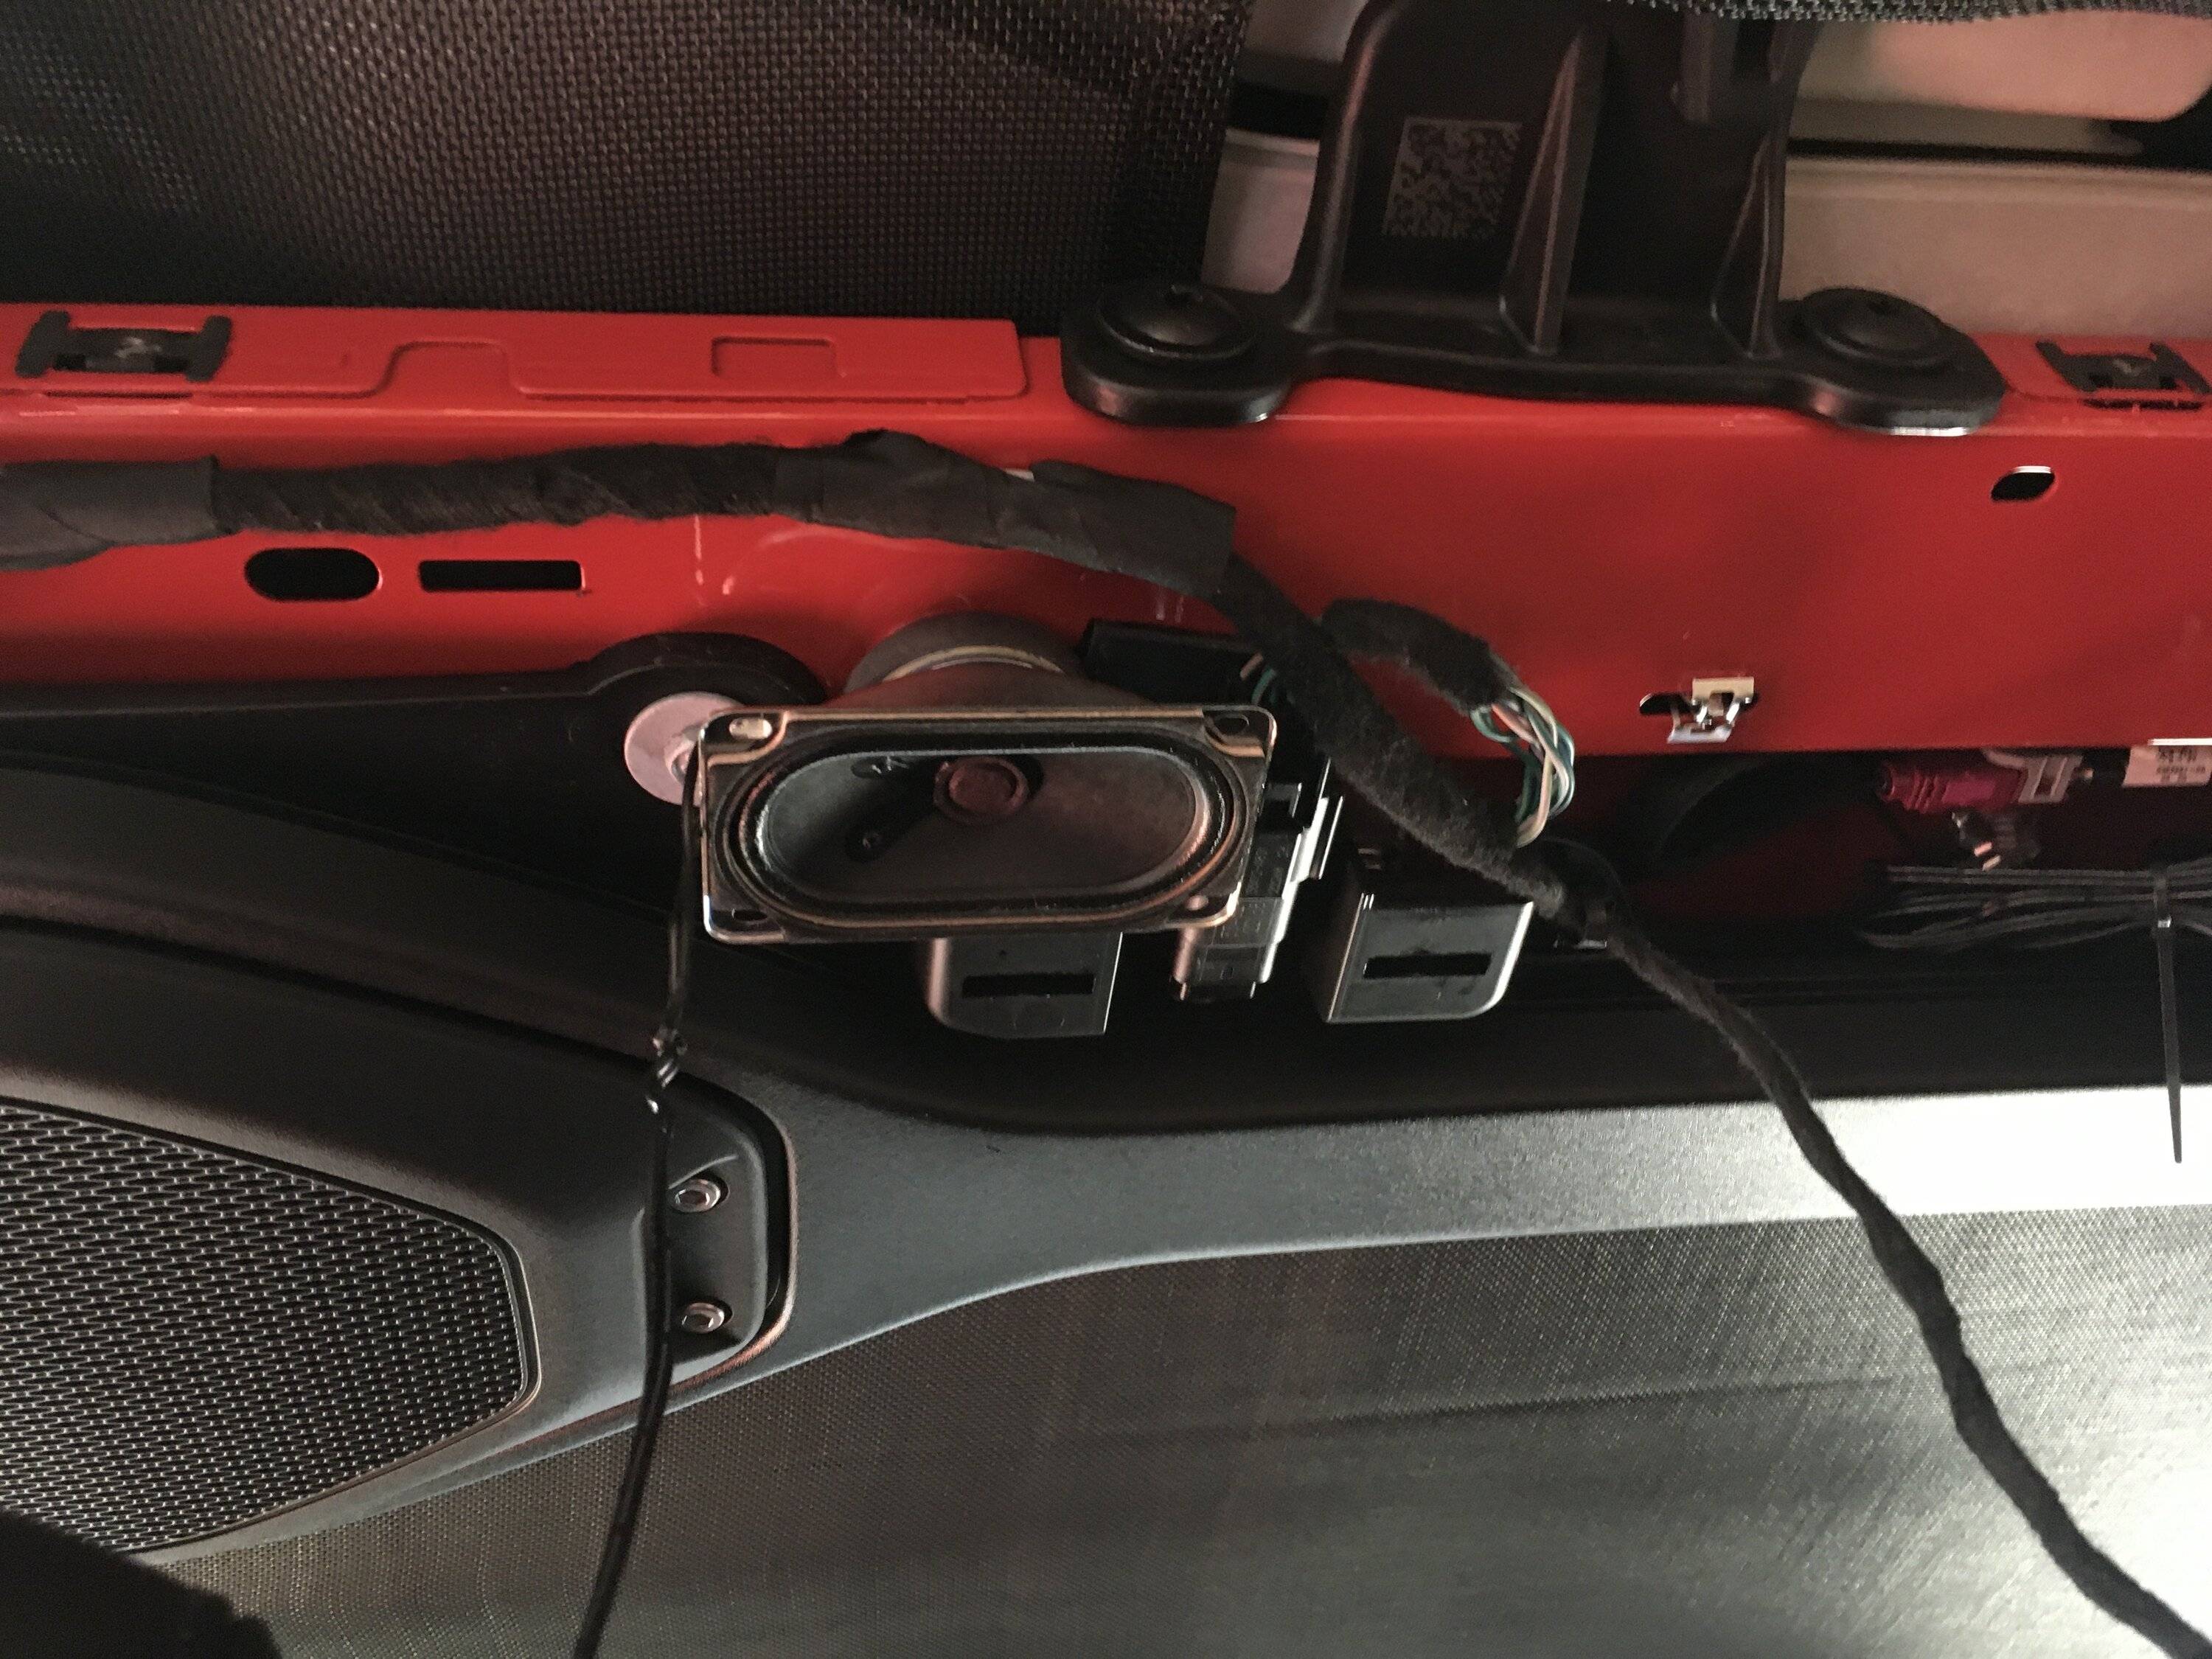
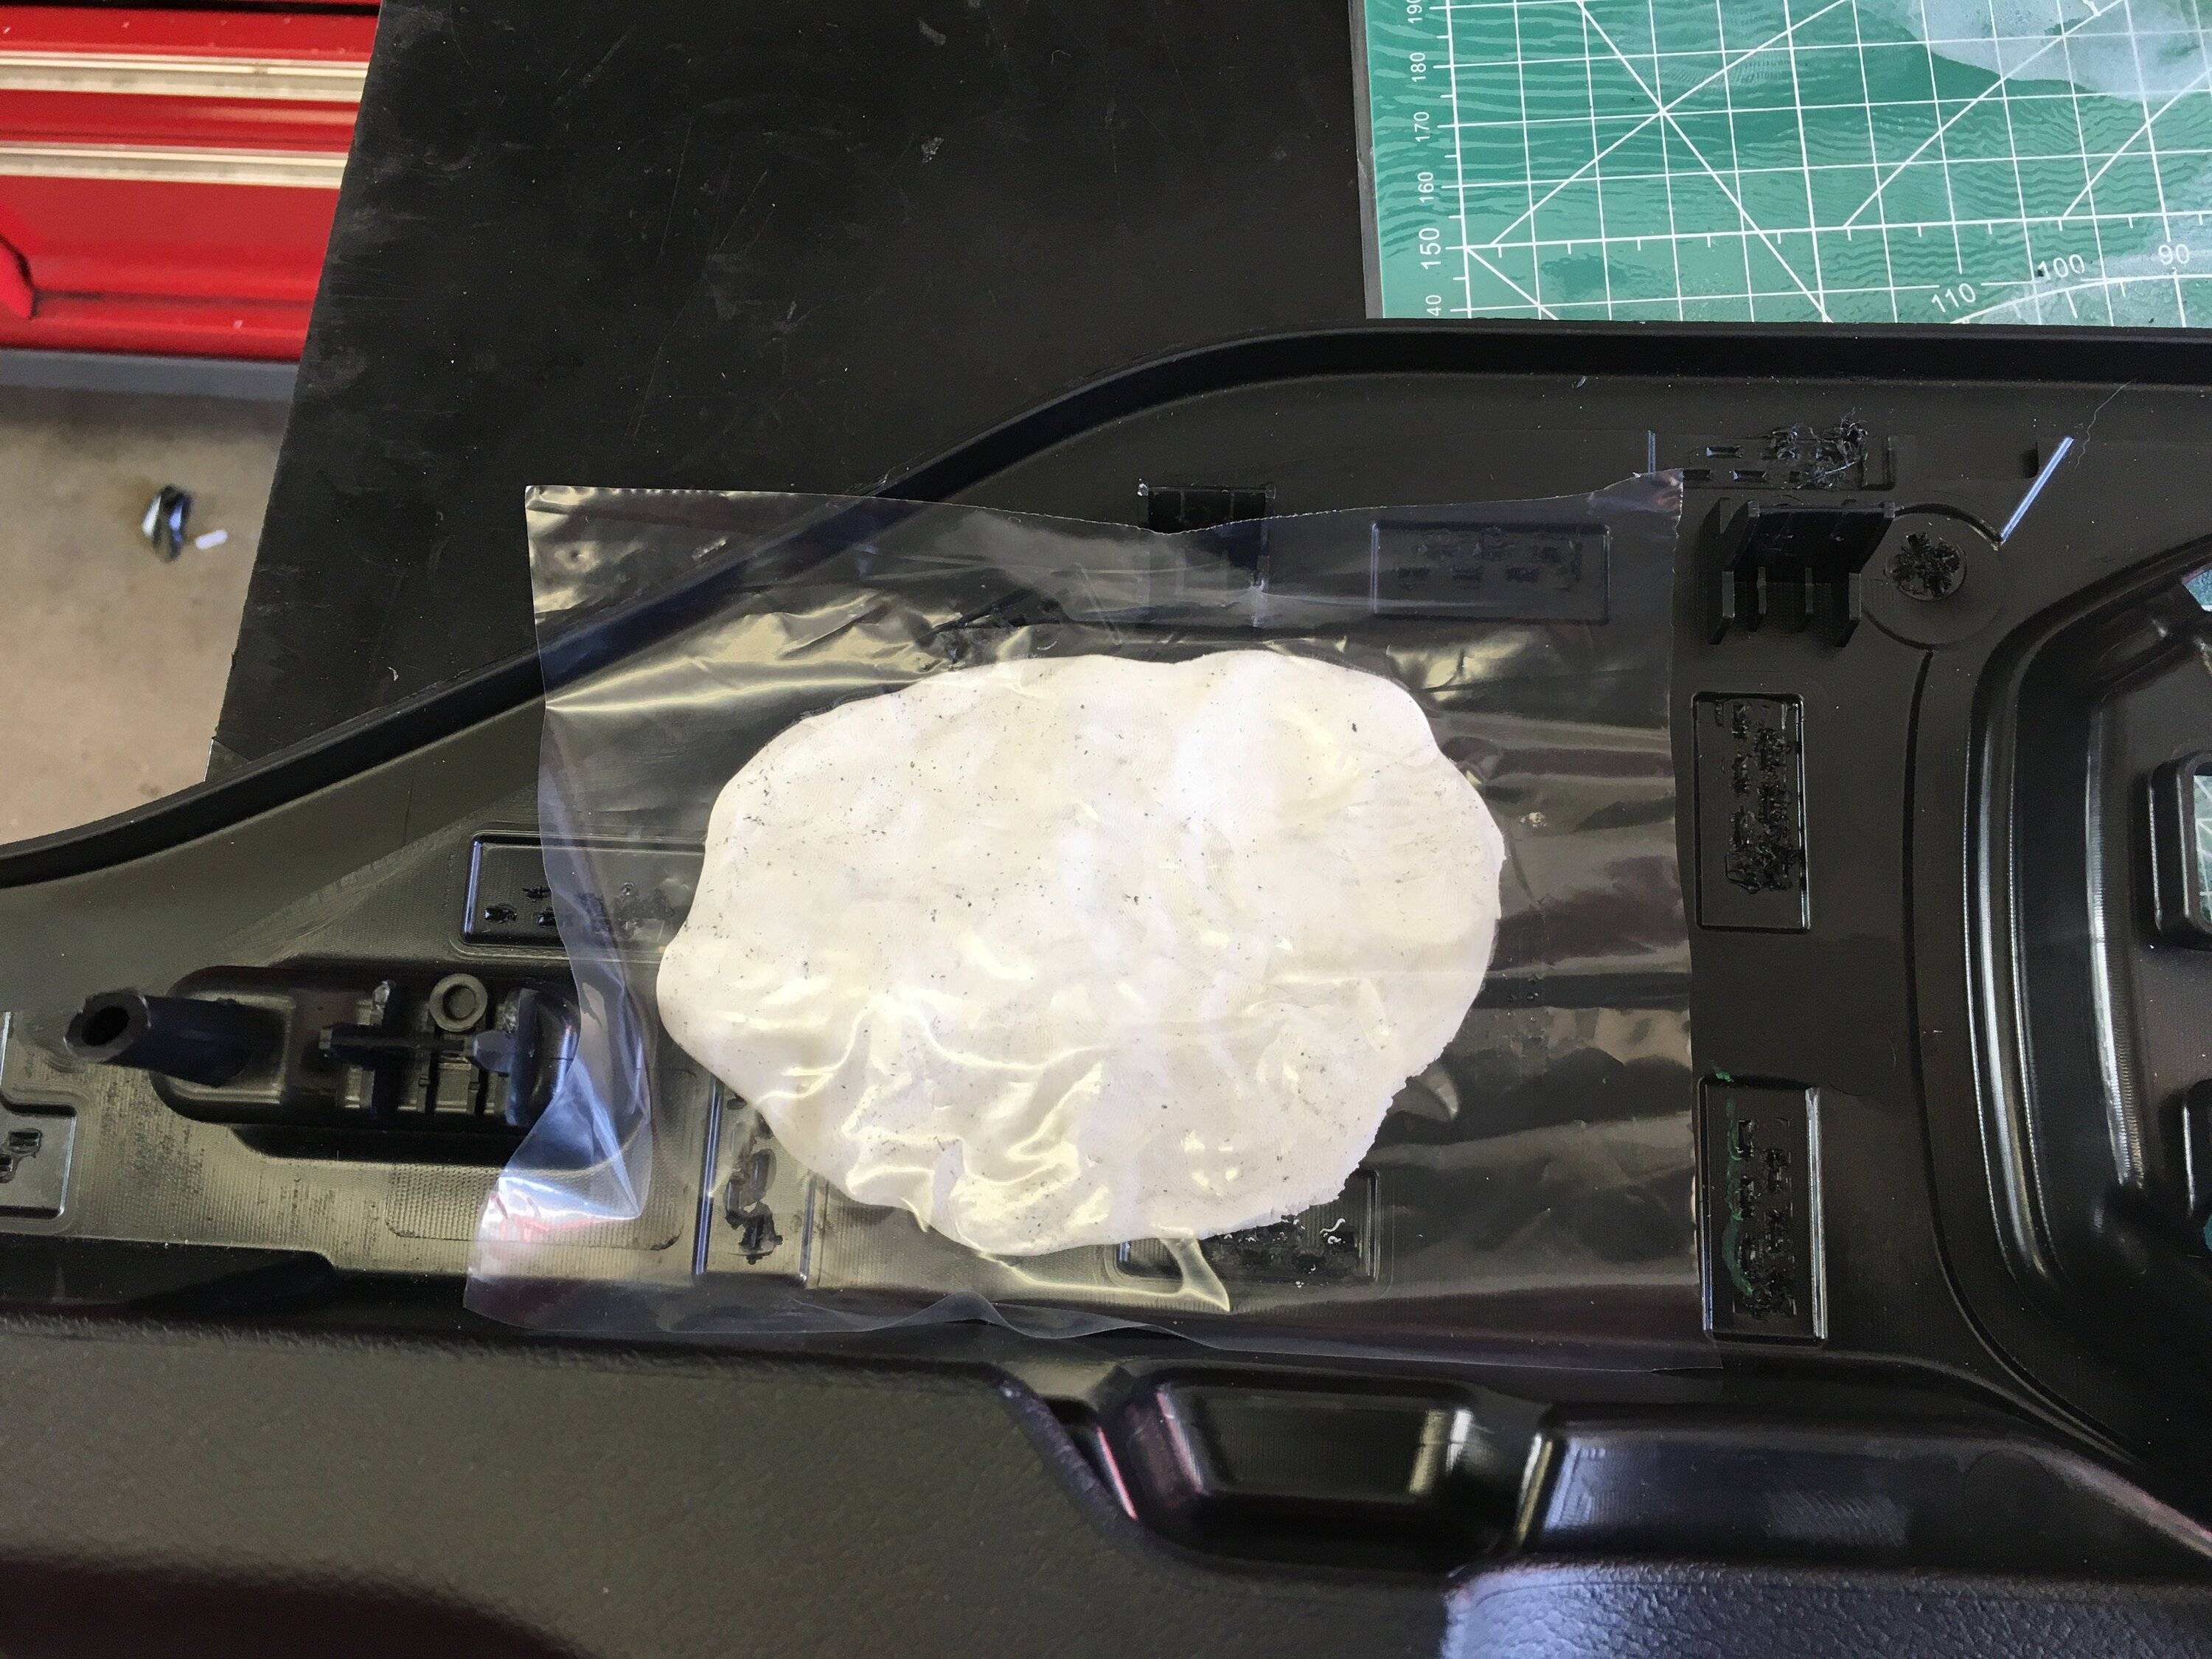
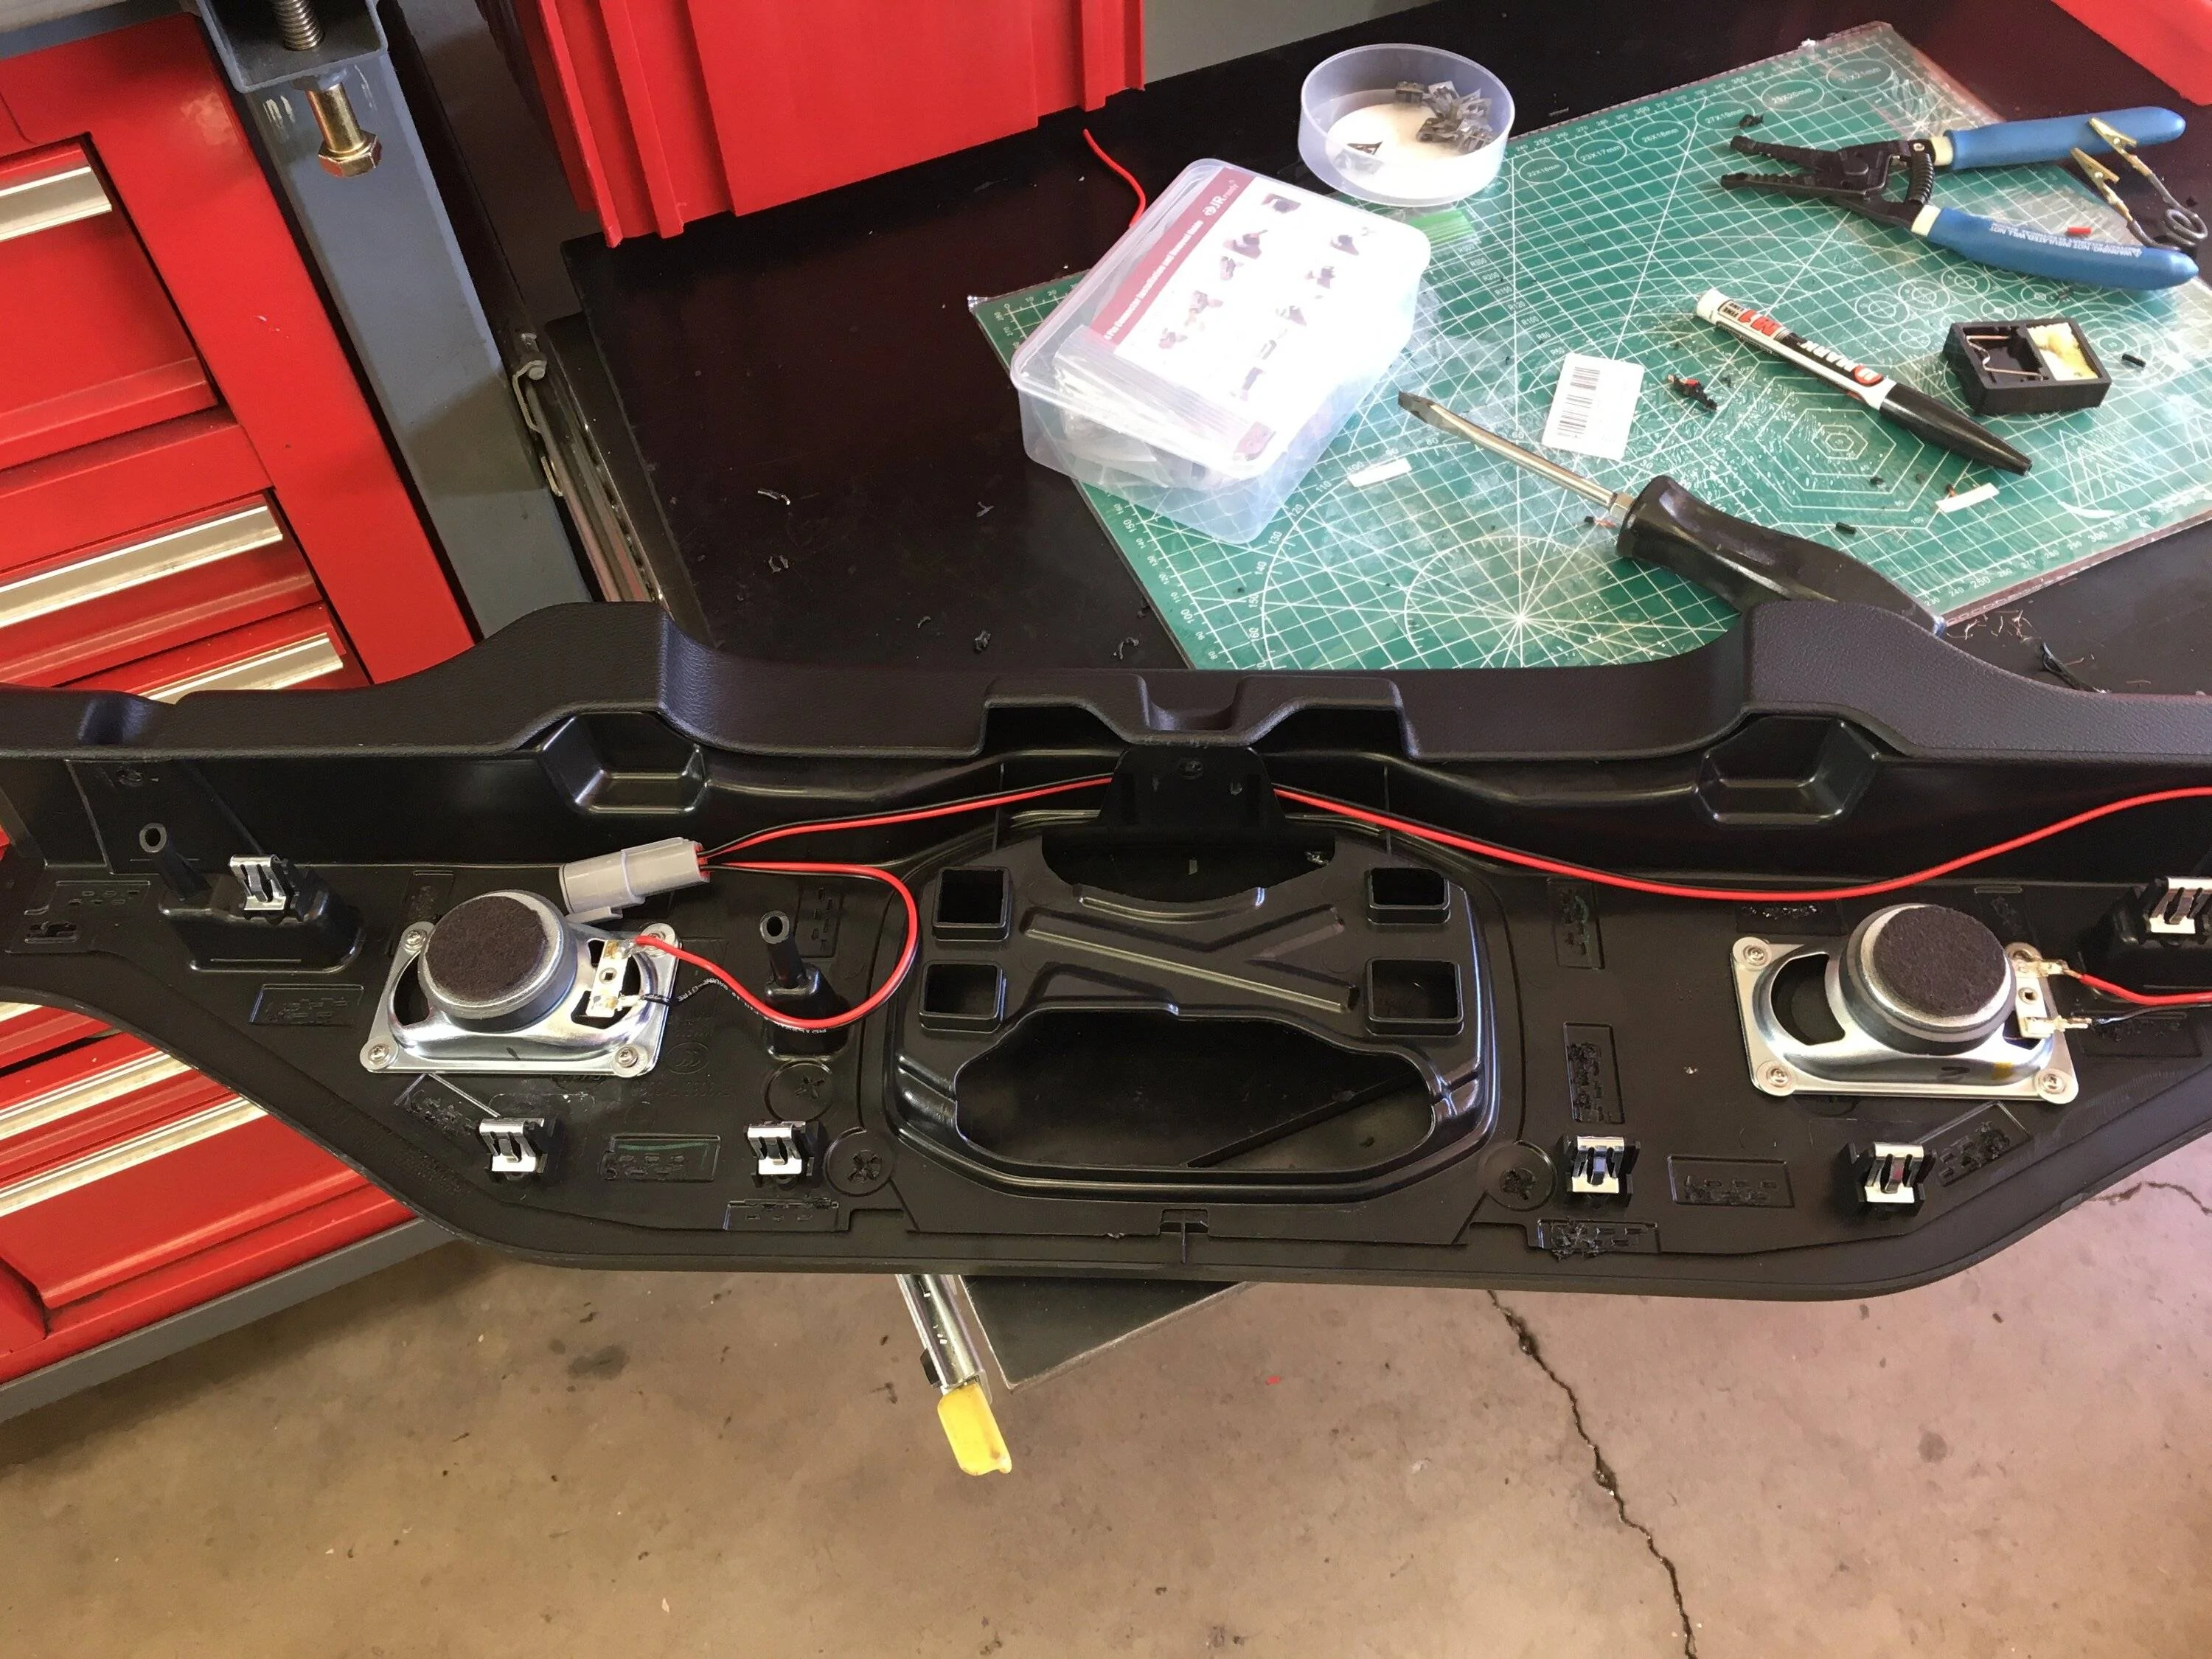
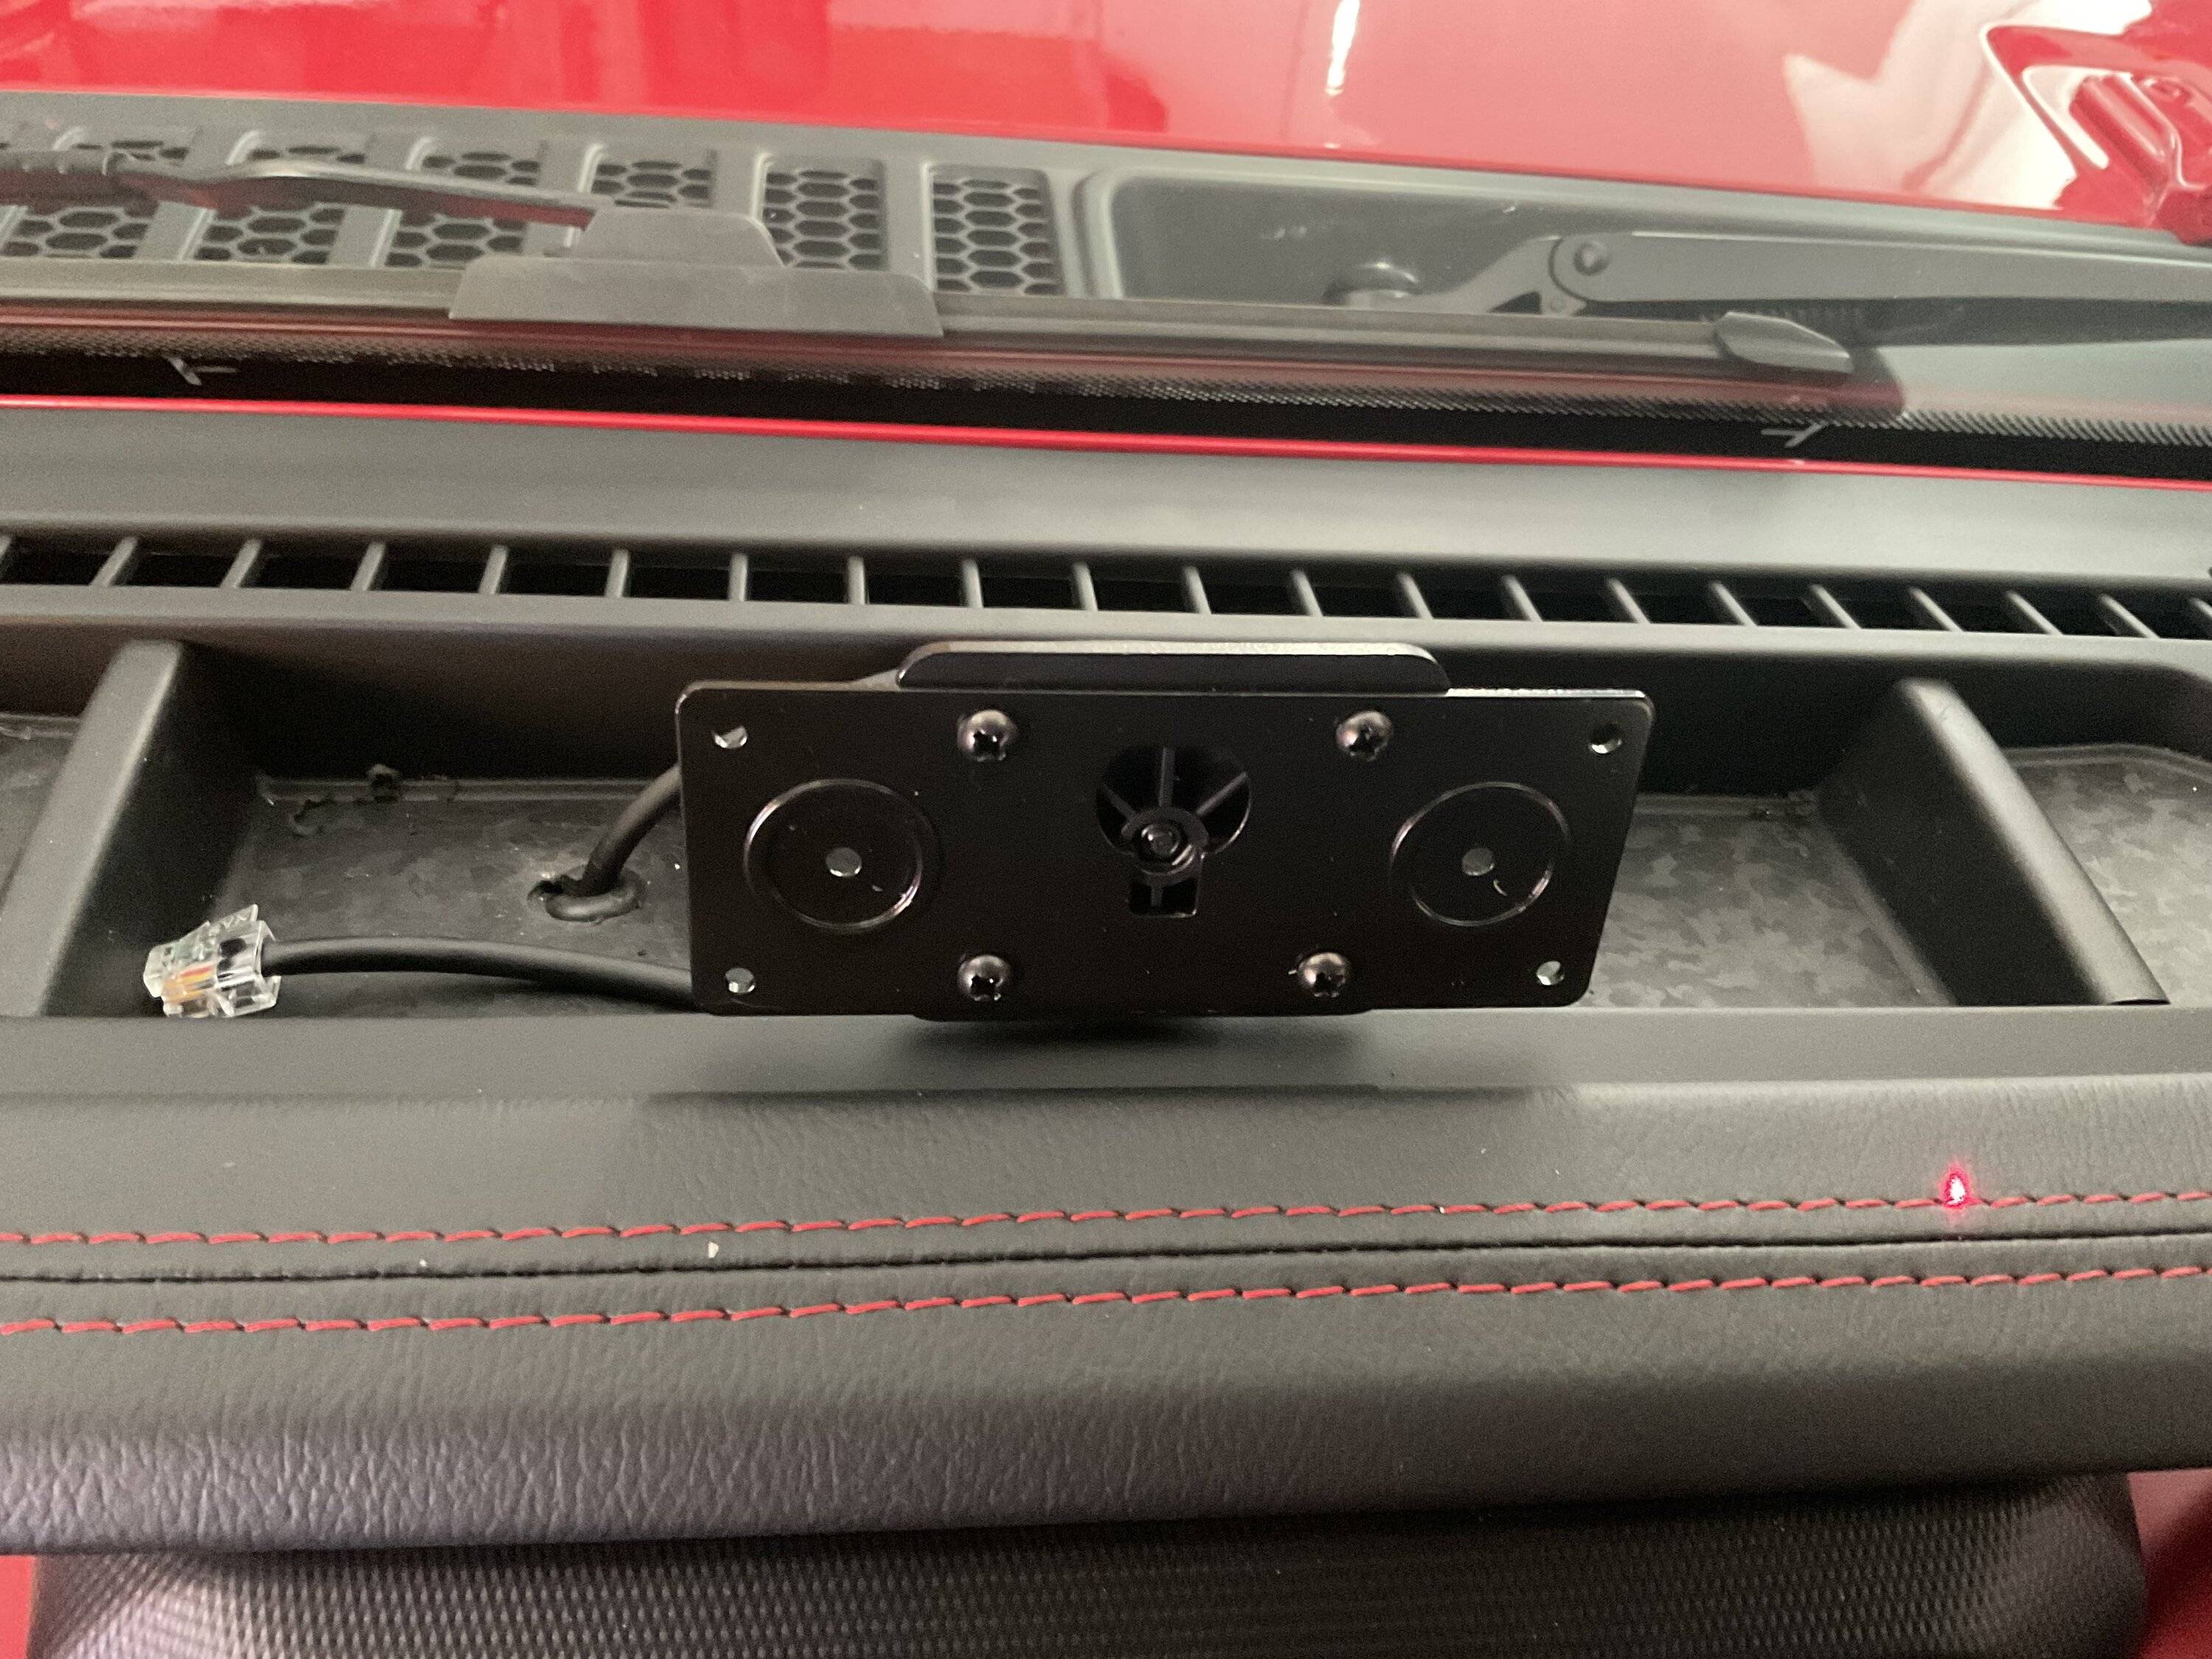
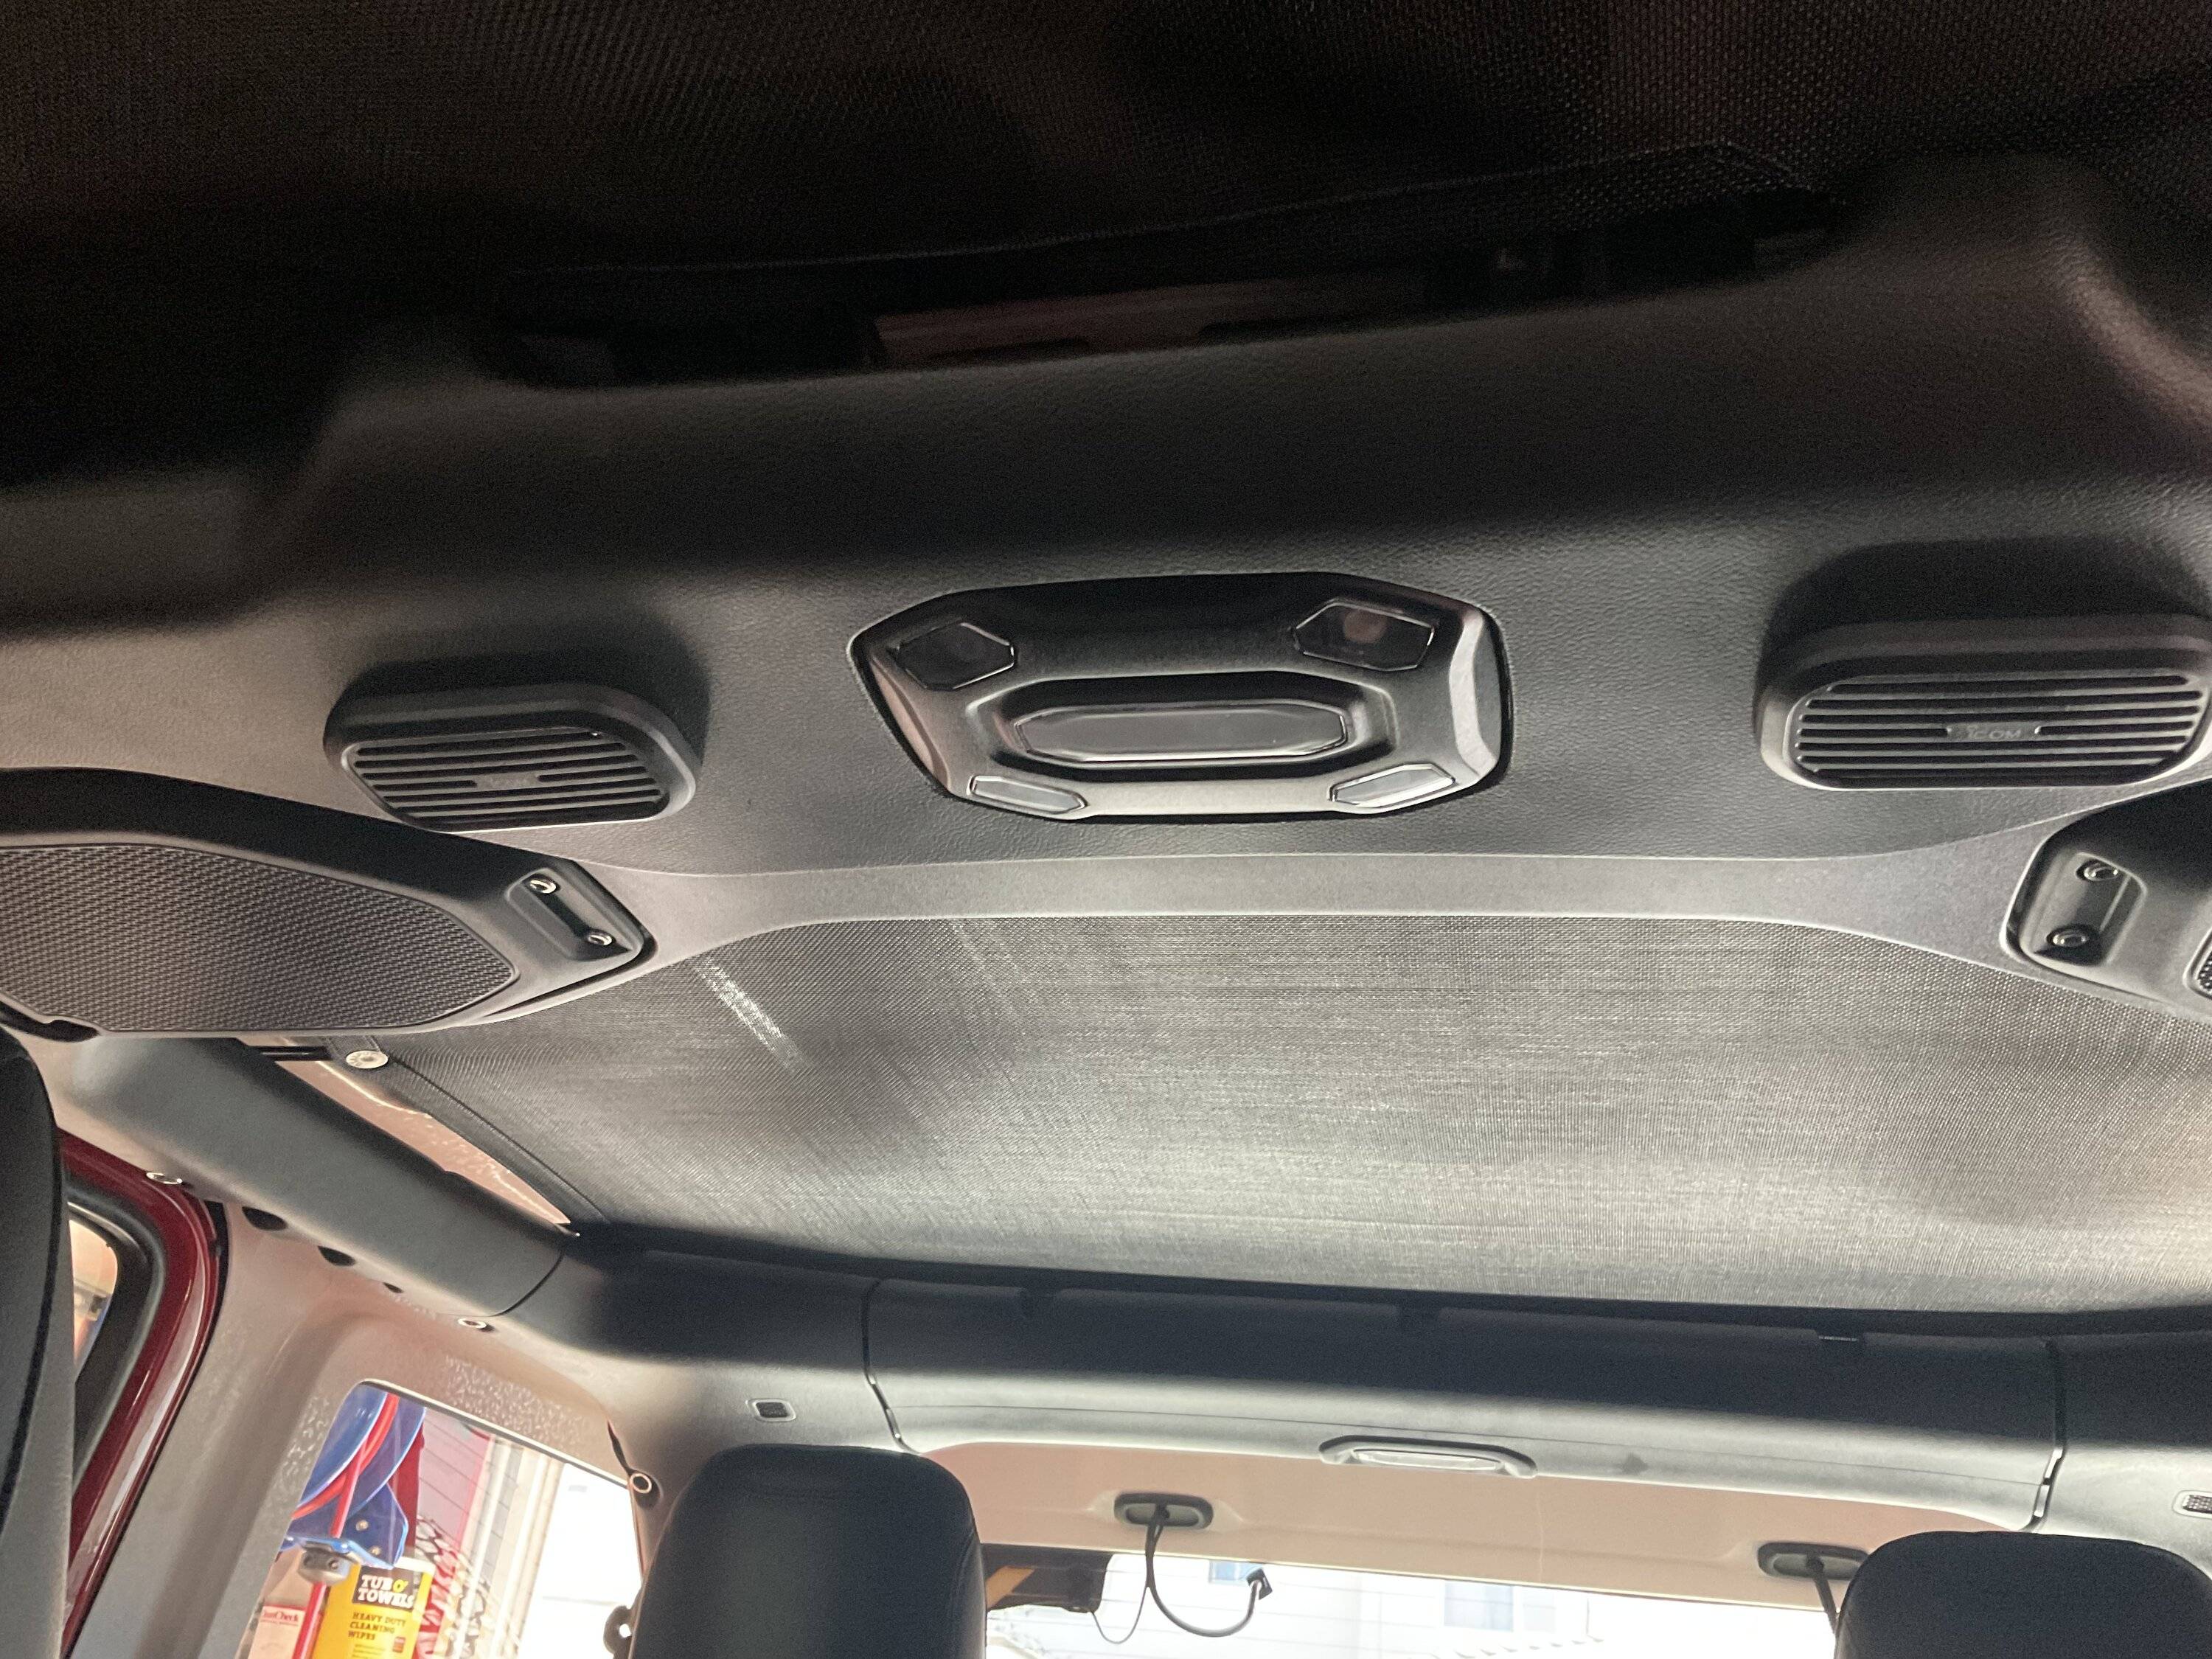
Add the Speakers: Be mindful of speaker placement to avoid existing trim clips and connectors. To help with this I let the speaker magnet position itself where I wanted it. I then spread a thin layer of modeling clay on the inside of the sound bar cover, used a sandwich bag to prevent sticking to the speaker, and pressed it in place. This left a template for drilling the mounting holes.
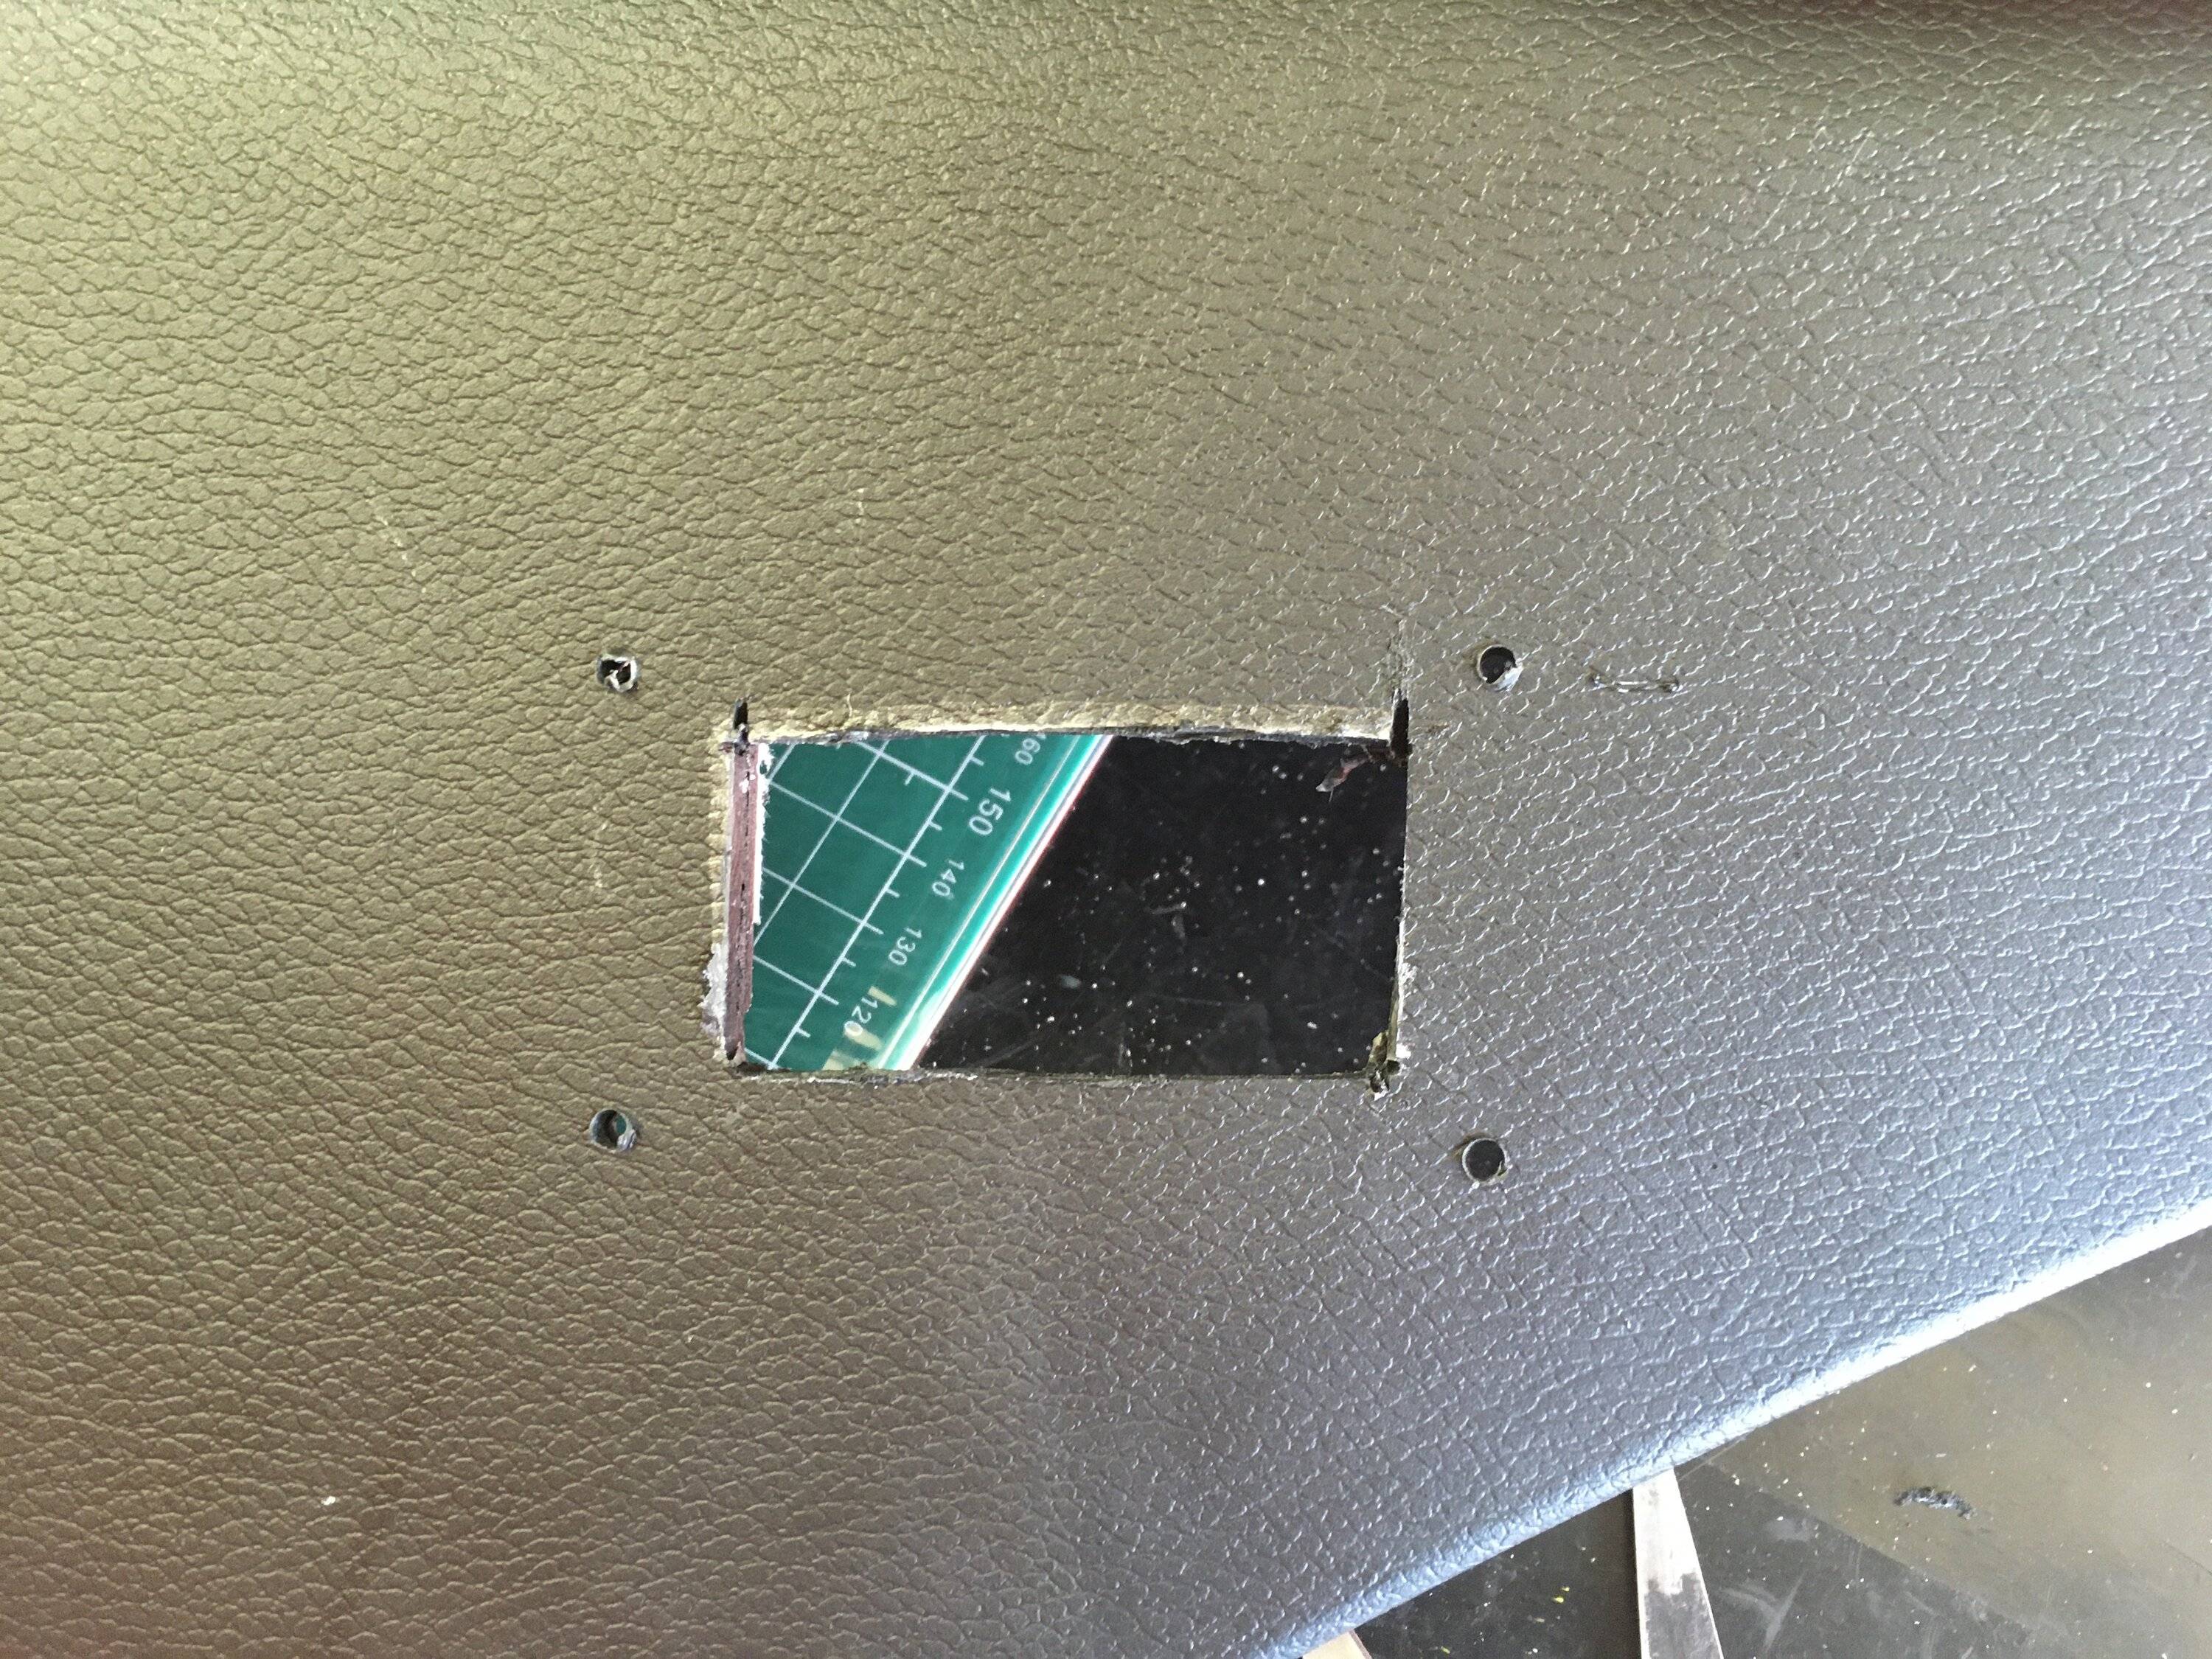
Since the speaker is mounted on the inside of the Soundbar trim, it was not necessary to create a perfect hole for the sound. I just cut a rectangular hole leaving enough meat to securely mount the speaker and grill.
At about $30 per speaker, the Icoms are about 2x some of the other speakers (road pros RSP-15 on Amazon) but the offer a more forgiving mounting solution.
I also used a bit of 18 gauge speaker wire to extend the speaker wires to go down the B pillar. The routing was straight forward:
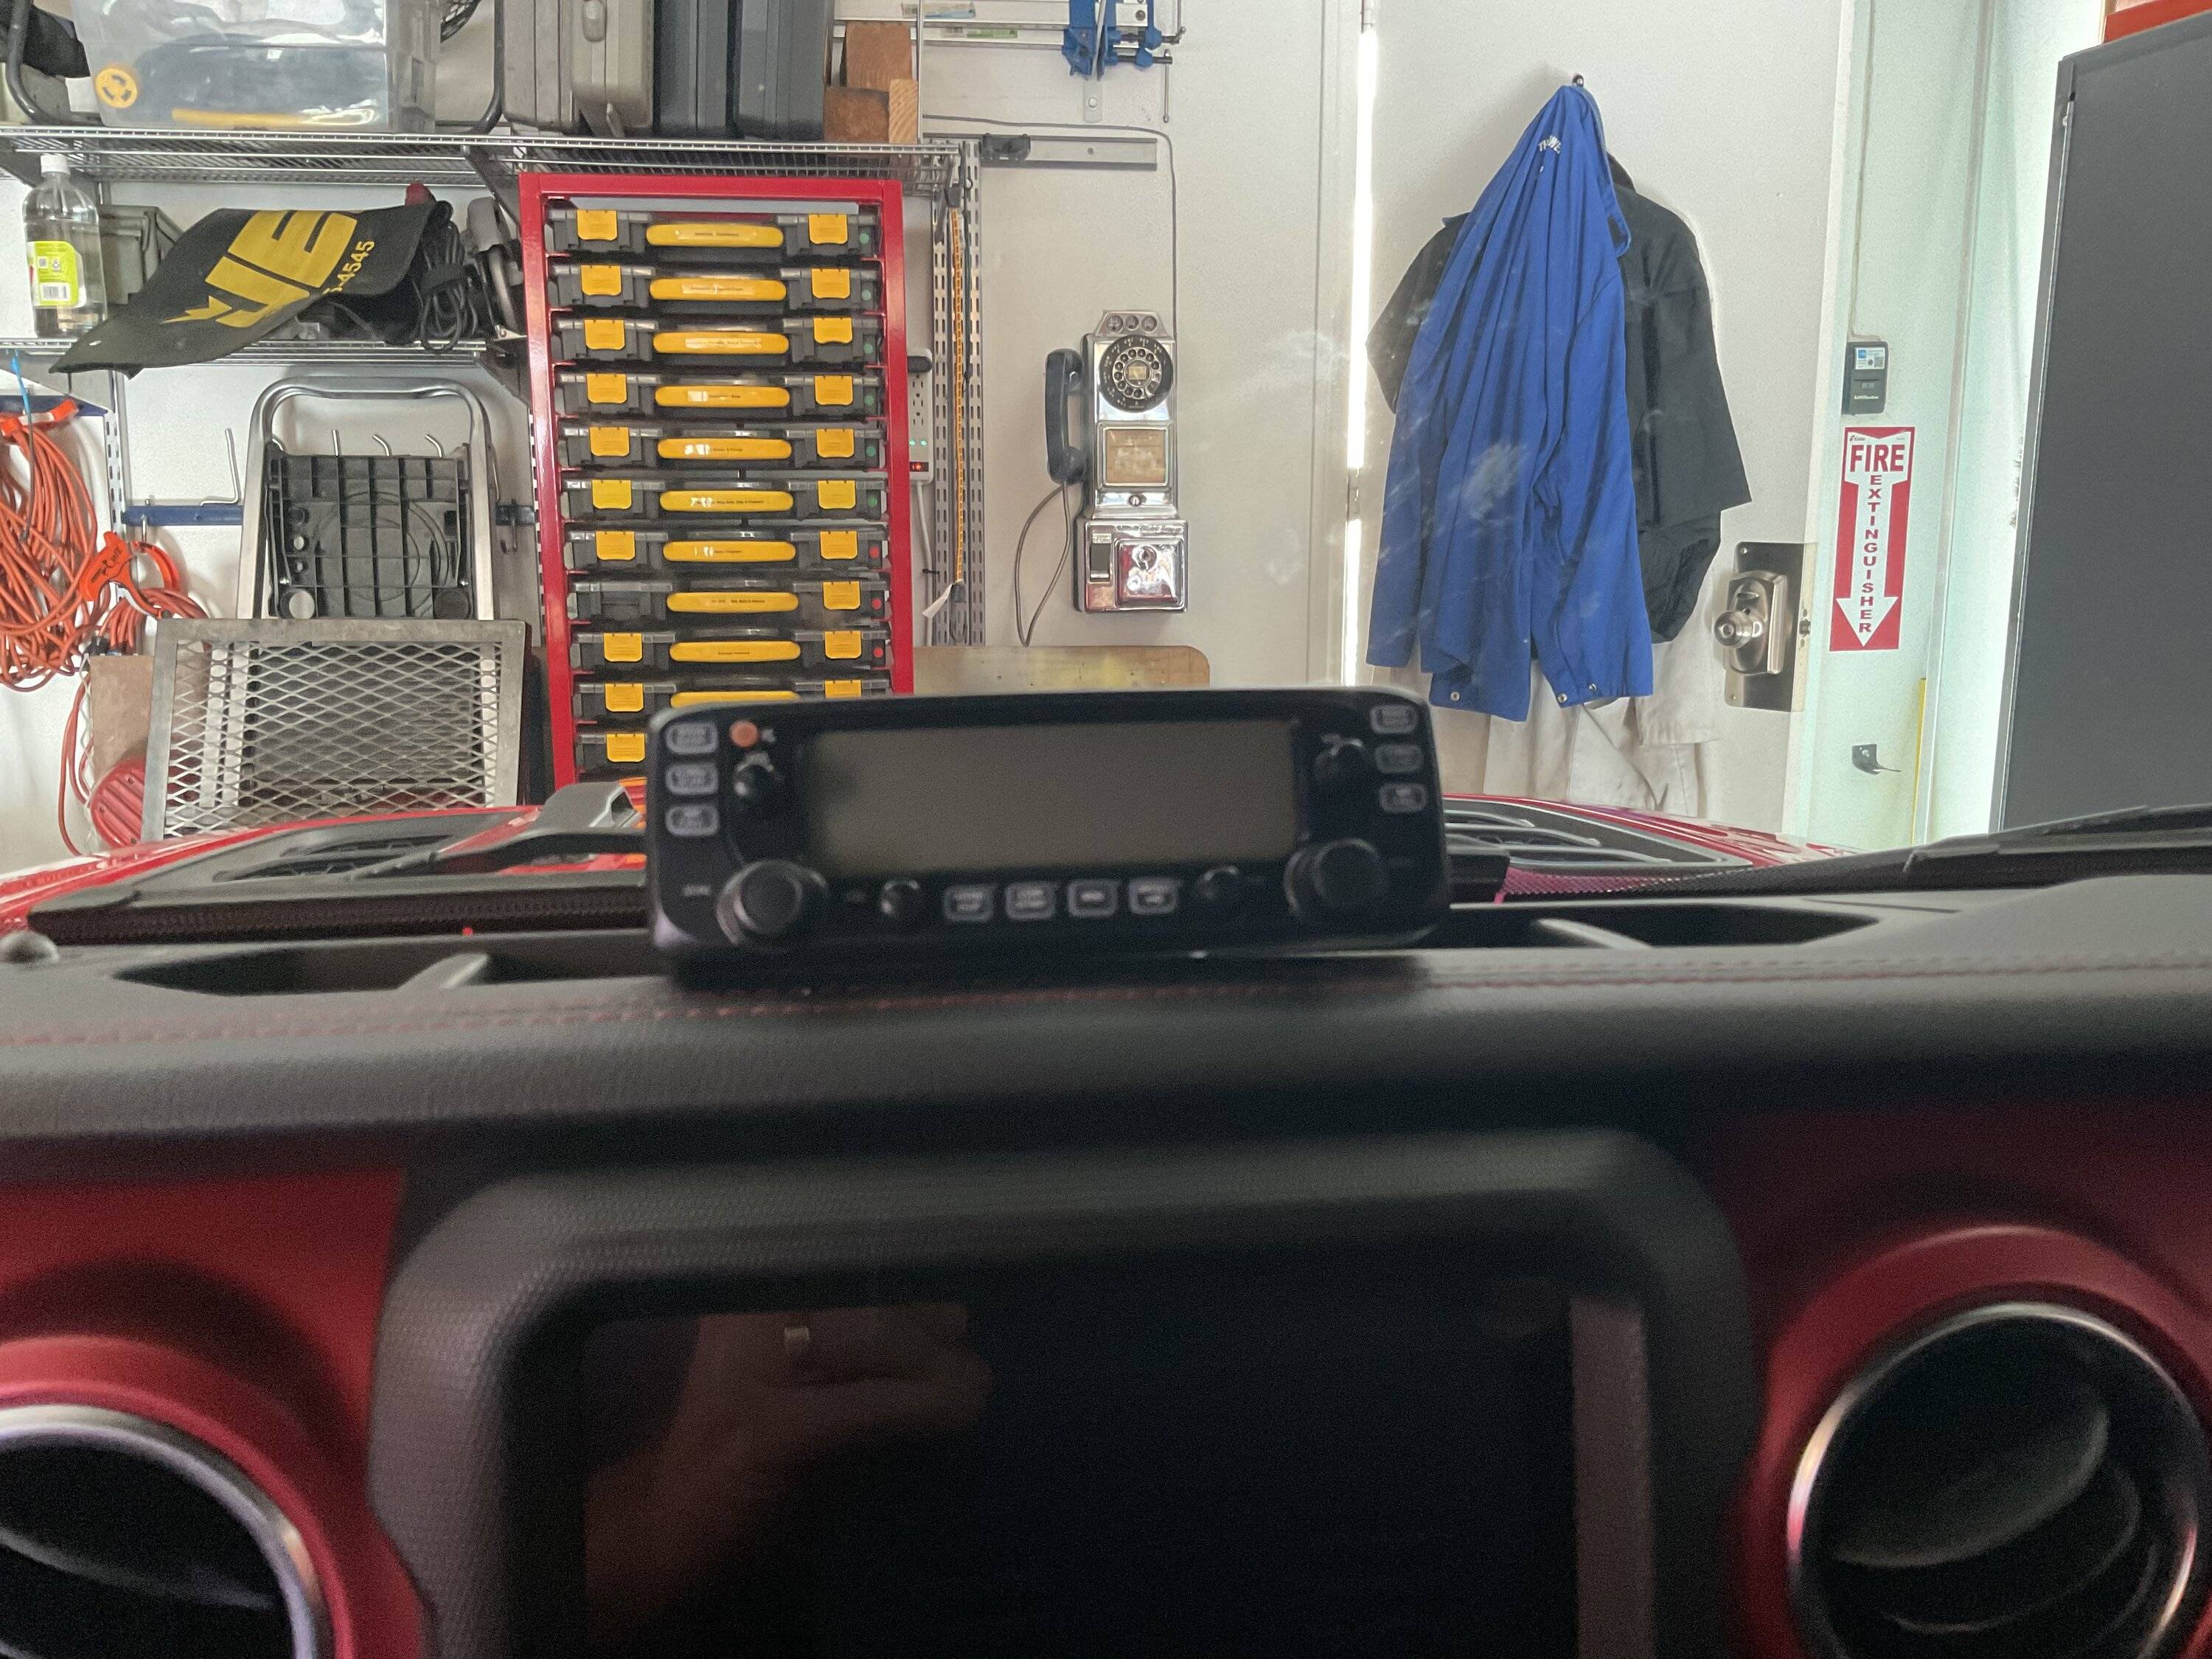
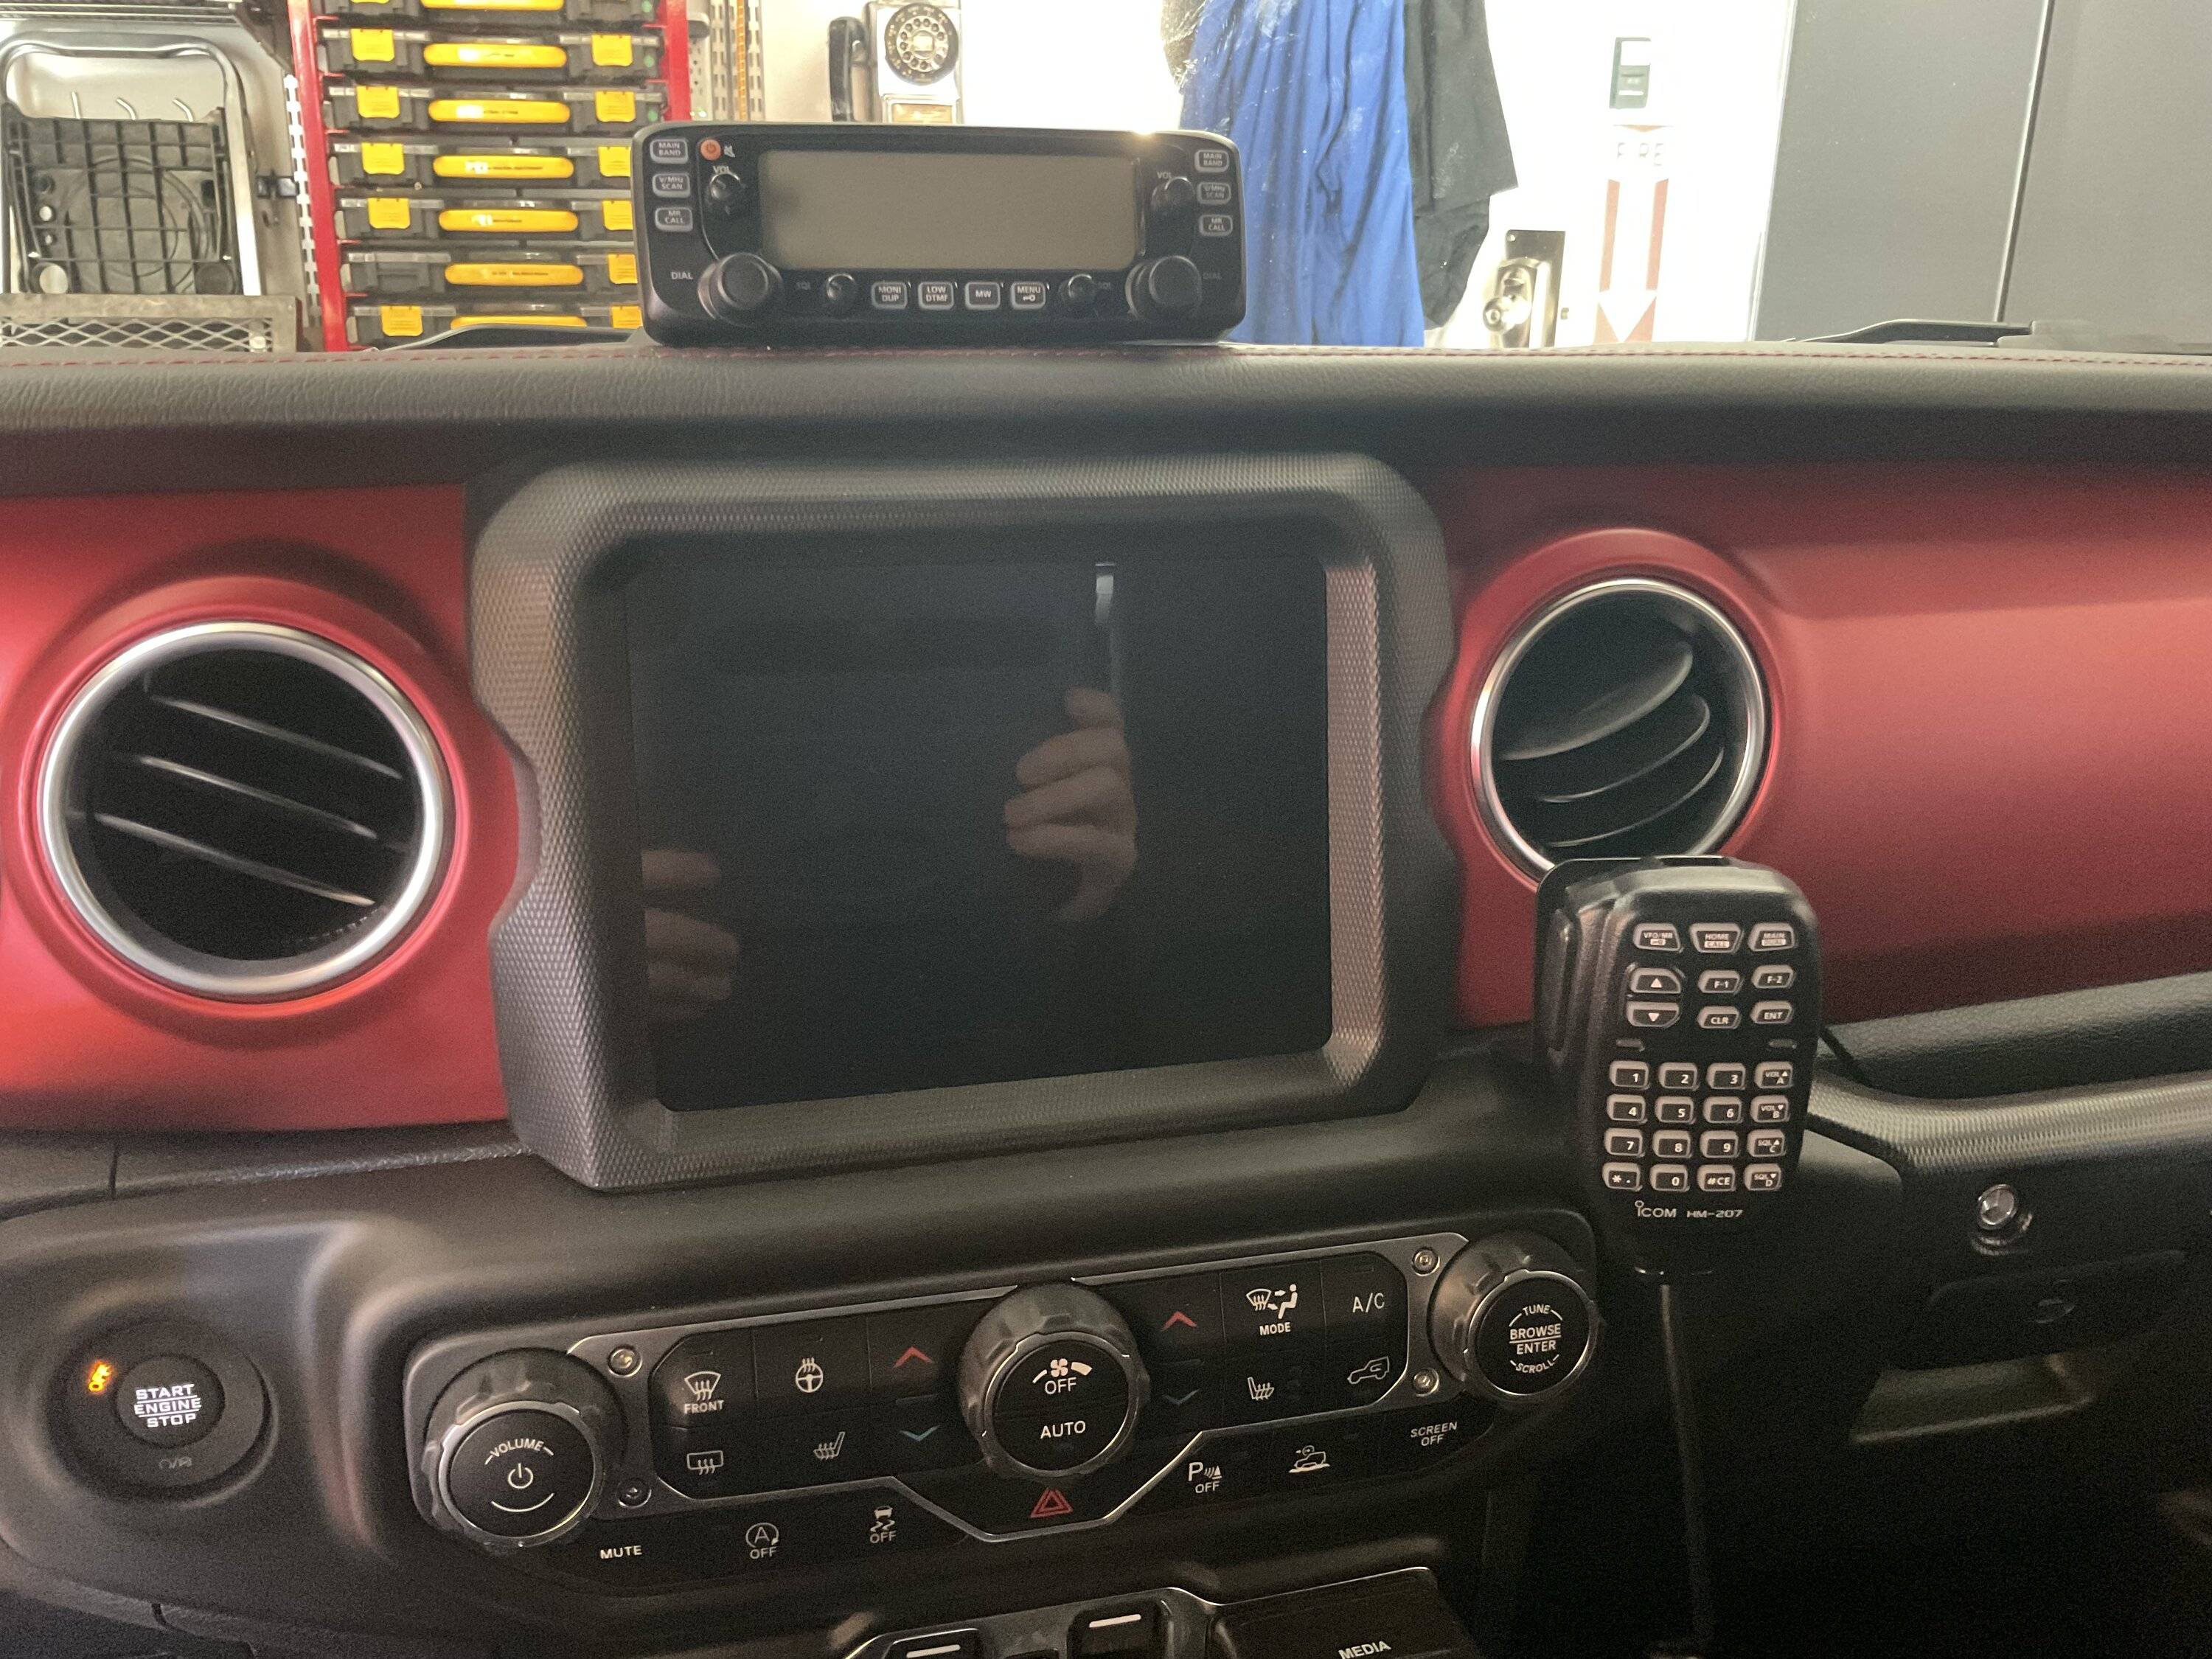
Mount the Control Head: The Lido mount comes with both adhesive tape and screws. I opted to use the screws for the extra support for a few reasons, the magnets that hold the are strong and on a hot day, I could see the tape coming loose when removing the head and the jostling around off-road would cause additional stress.
I was unsure just how much room was under the dash so I pulled (but did not disconnect the radio and climate controls. There are plenty of YouTube videos demonstrating this. It will take you 5- 10 minutes.
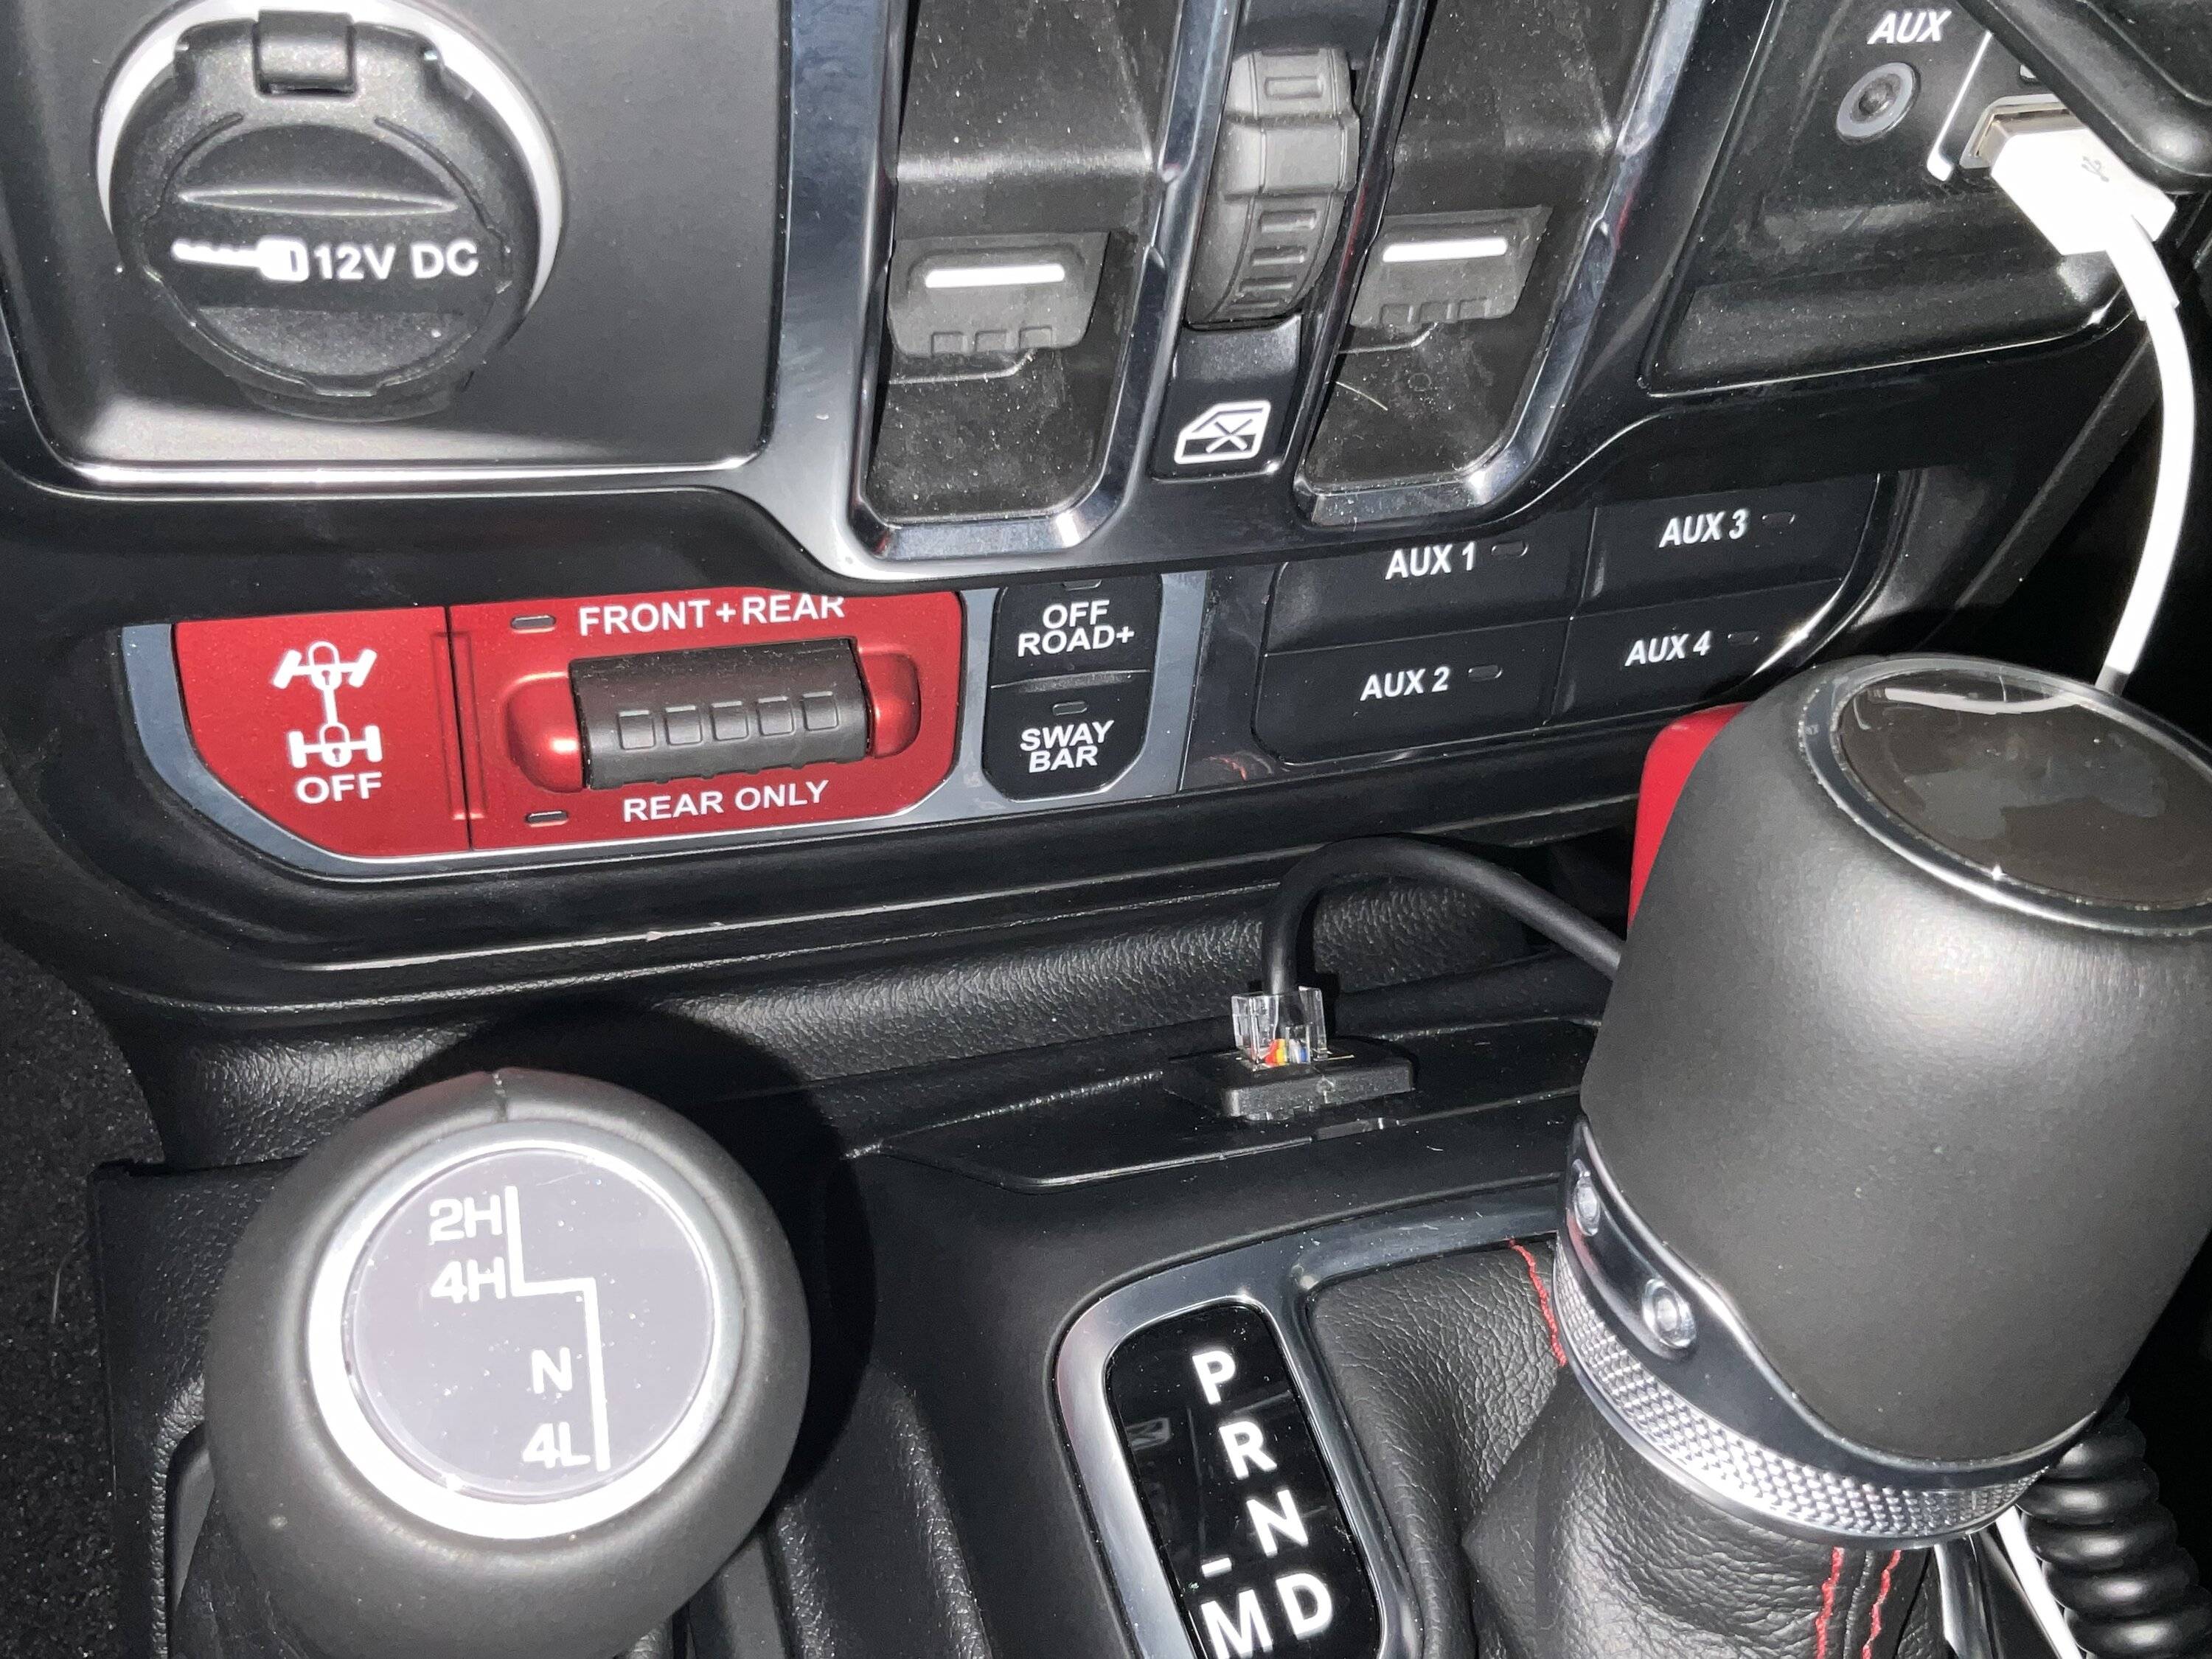
After securing the mount into the tray, drill a hole in the upper tray (you will not be able to see this unless you lay your head on the dash and look straight down) large enough for the end of the control cable to pass through. Before you button it up, route the control head cable behind the stereo and through the obvious gap on the passenger side that provides a clear path to the lower console area. From there, you will be able to tuck it out of sight, under the console trim and to the radio under the seat. You should not need an extension cable beyond what comes in the box.
Mount the Microphone: While the climate control panel is off, mount the microphone holder. I used the CoolTech mount because it blocks very little of the vent. When paired with the Magnetic Mic holder, it provides enough stand-off to keep the mic off the stereo controls.
Note: (1) You will need to drill the CoolTech bracket to mate with the Magnetic Mic. A template is provided. (2) If you you have an Icom radio that has a loop on the back of the mic that hangs it on a hook, you will need the Universal Mic hanger in the parts list. The installation is simple, un-clip the cable from the mic, take out 2 screws and finish drilling the hole that was started by the factory - There are a few more details on this on post #19 in this thread.
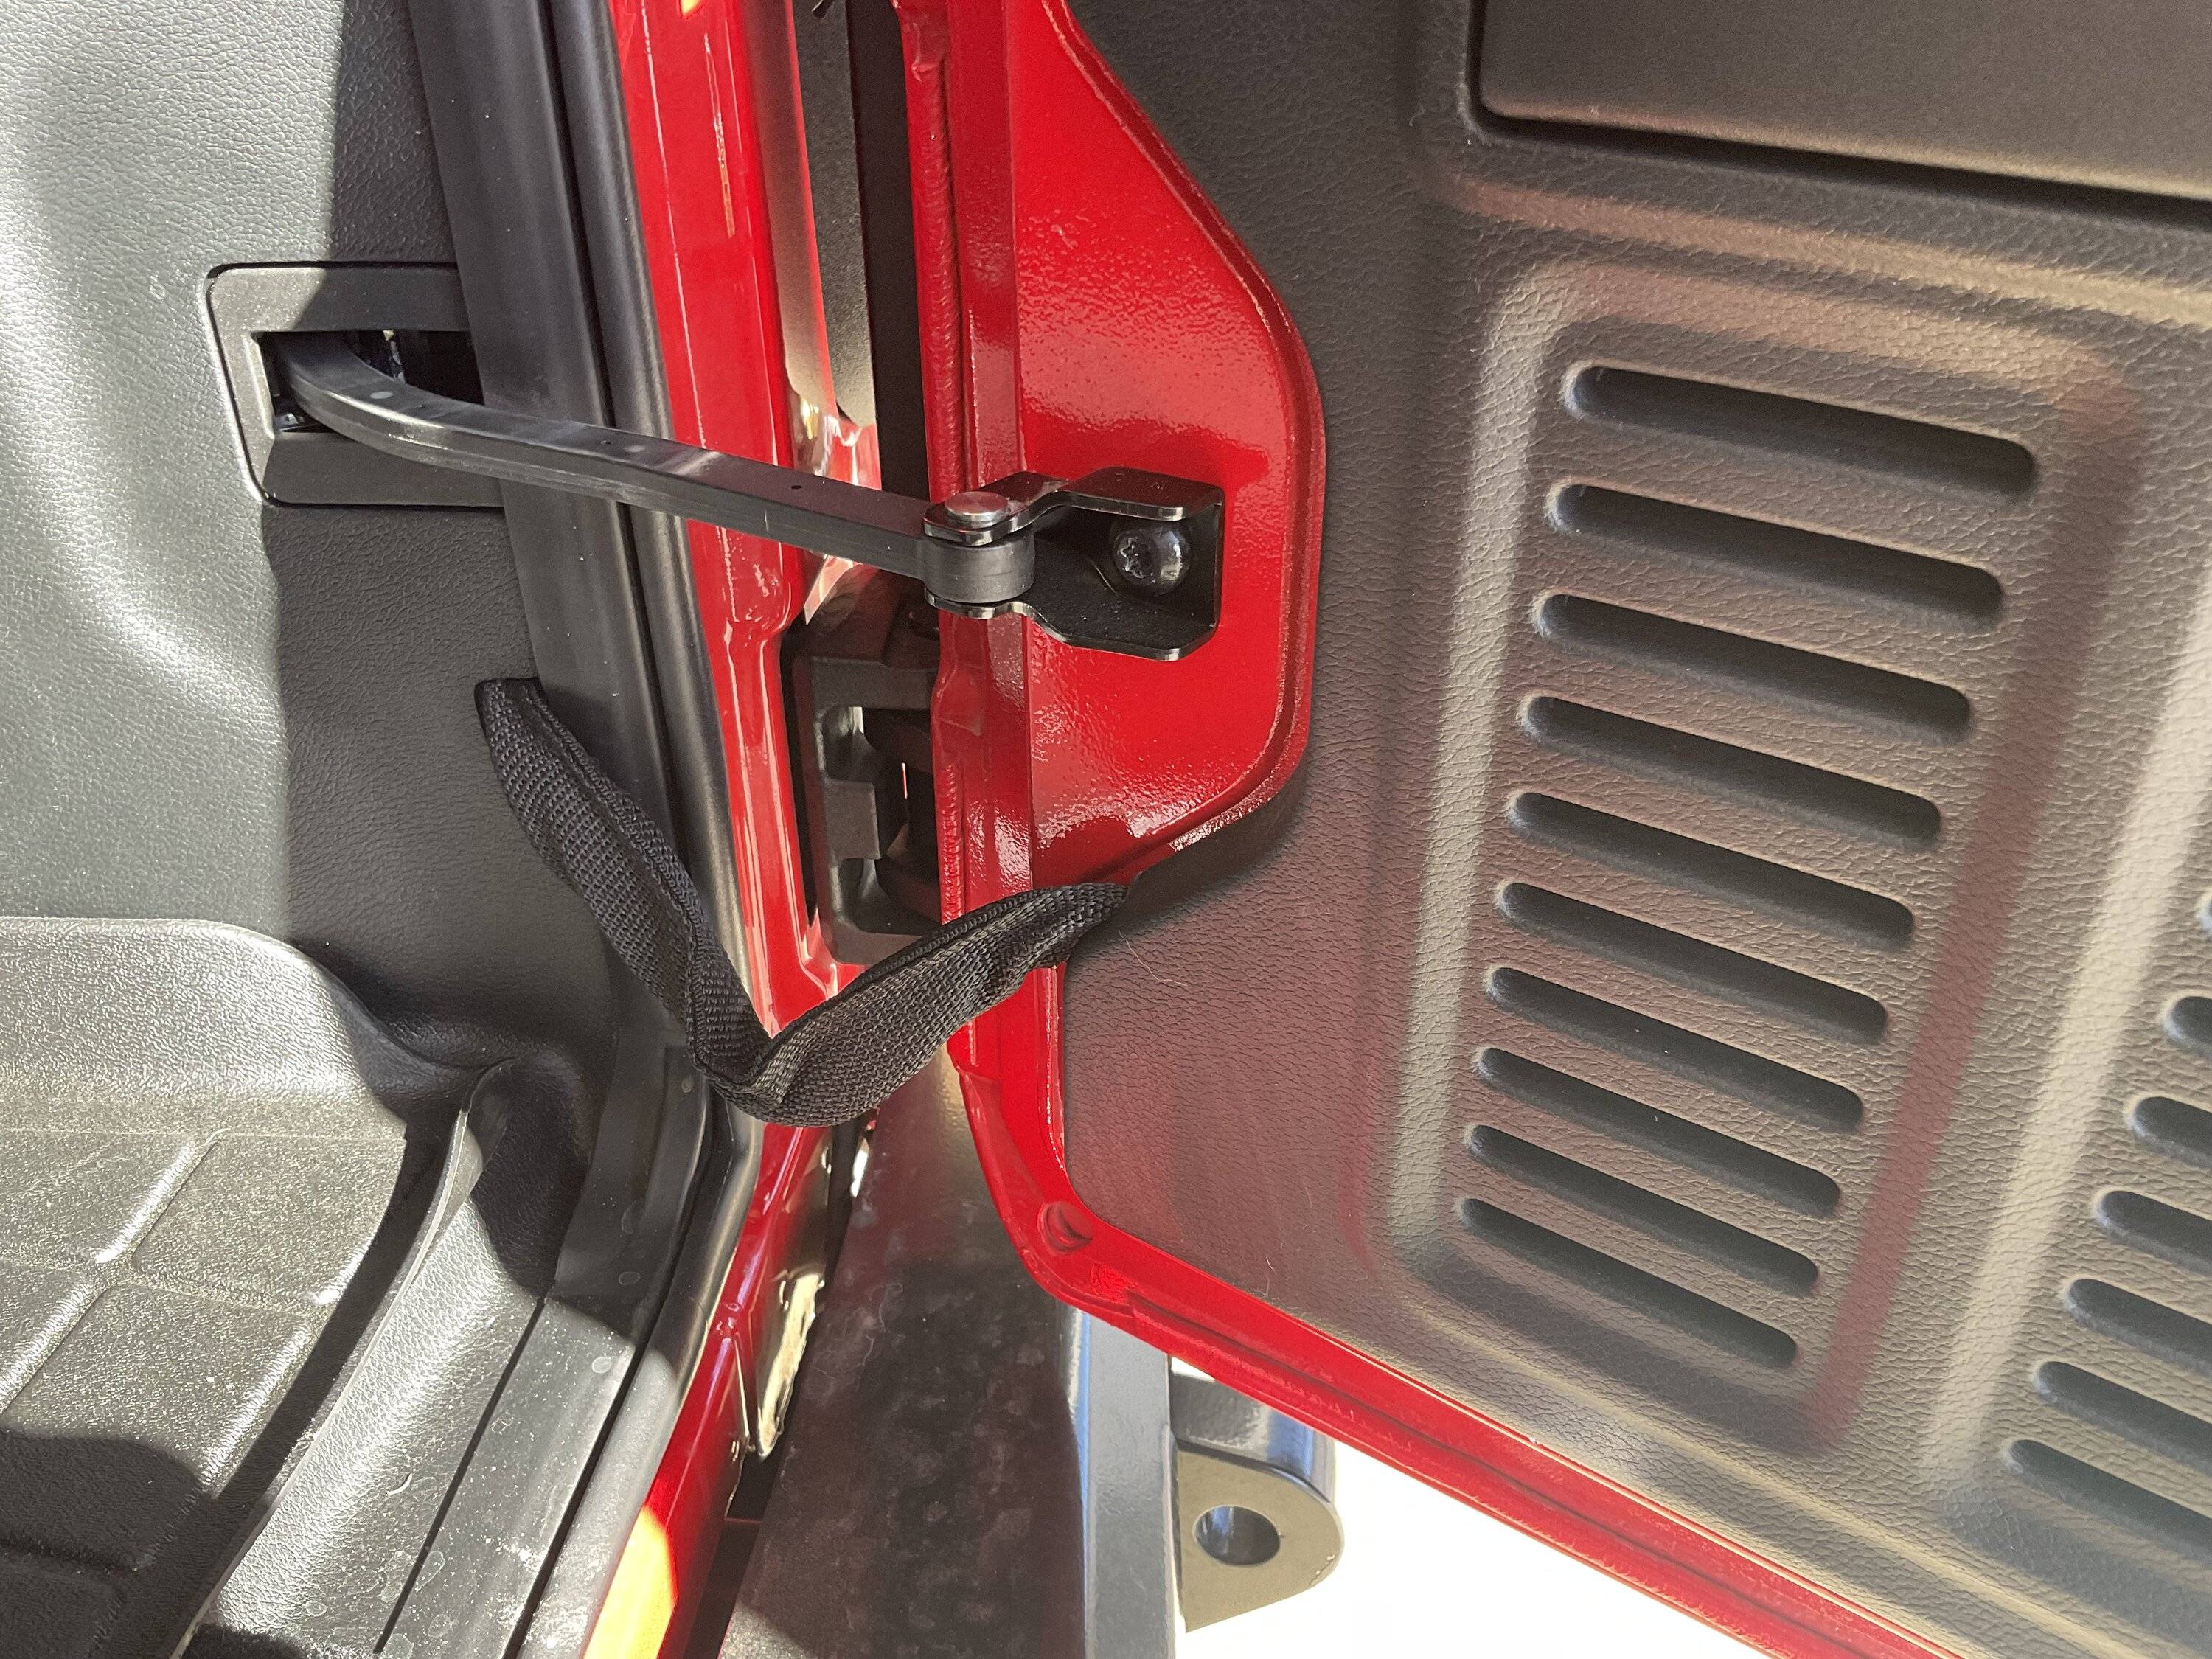
Add the Mic Extension Cable: After seeing another member picture of it (can’t remember where) like him, I chose to mount the cable connector in the little door that covers the park release cable in front of the shifter for two reasons: (1) If I messed it up, it is cheap to fix (2) I can leave it connected and still slide the seat all the way forward. It appears in the pictures that it is a very sharp bend but that is an optical illusion. I routed the cable Along side the control head cable.
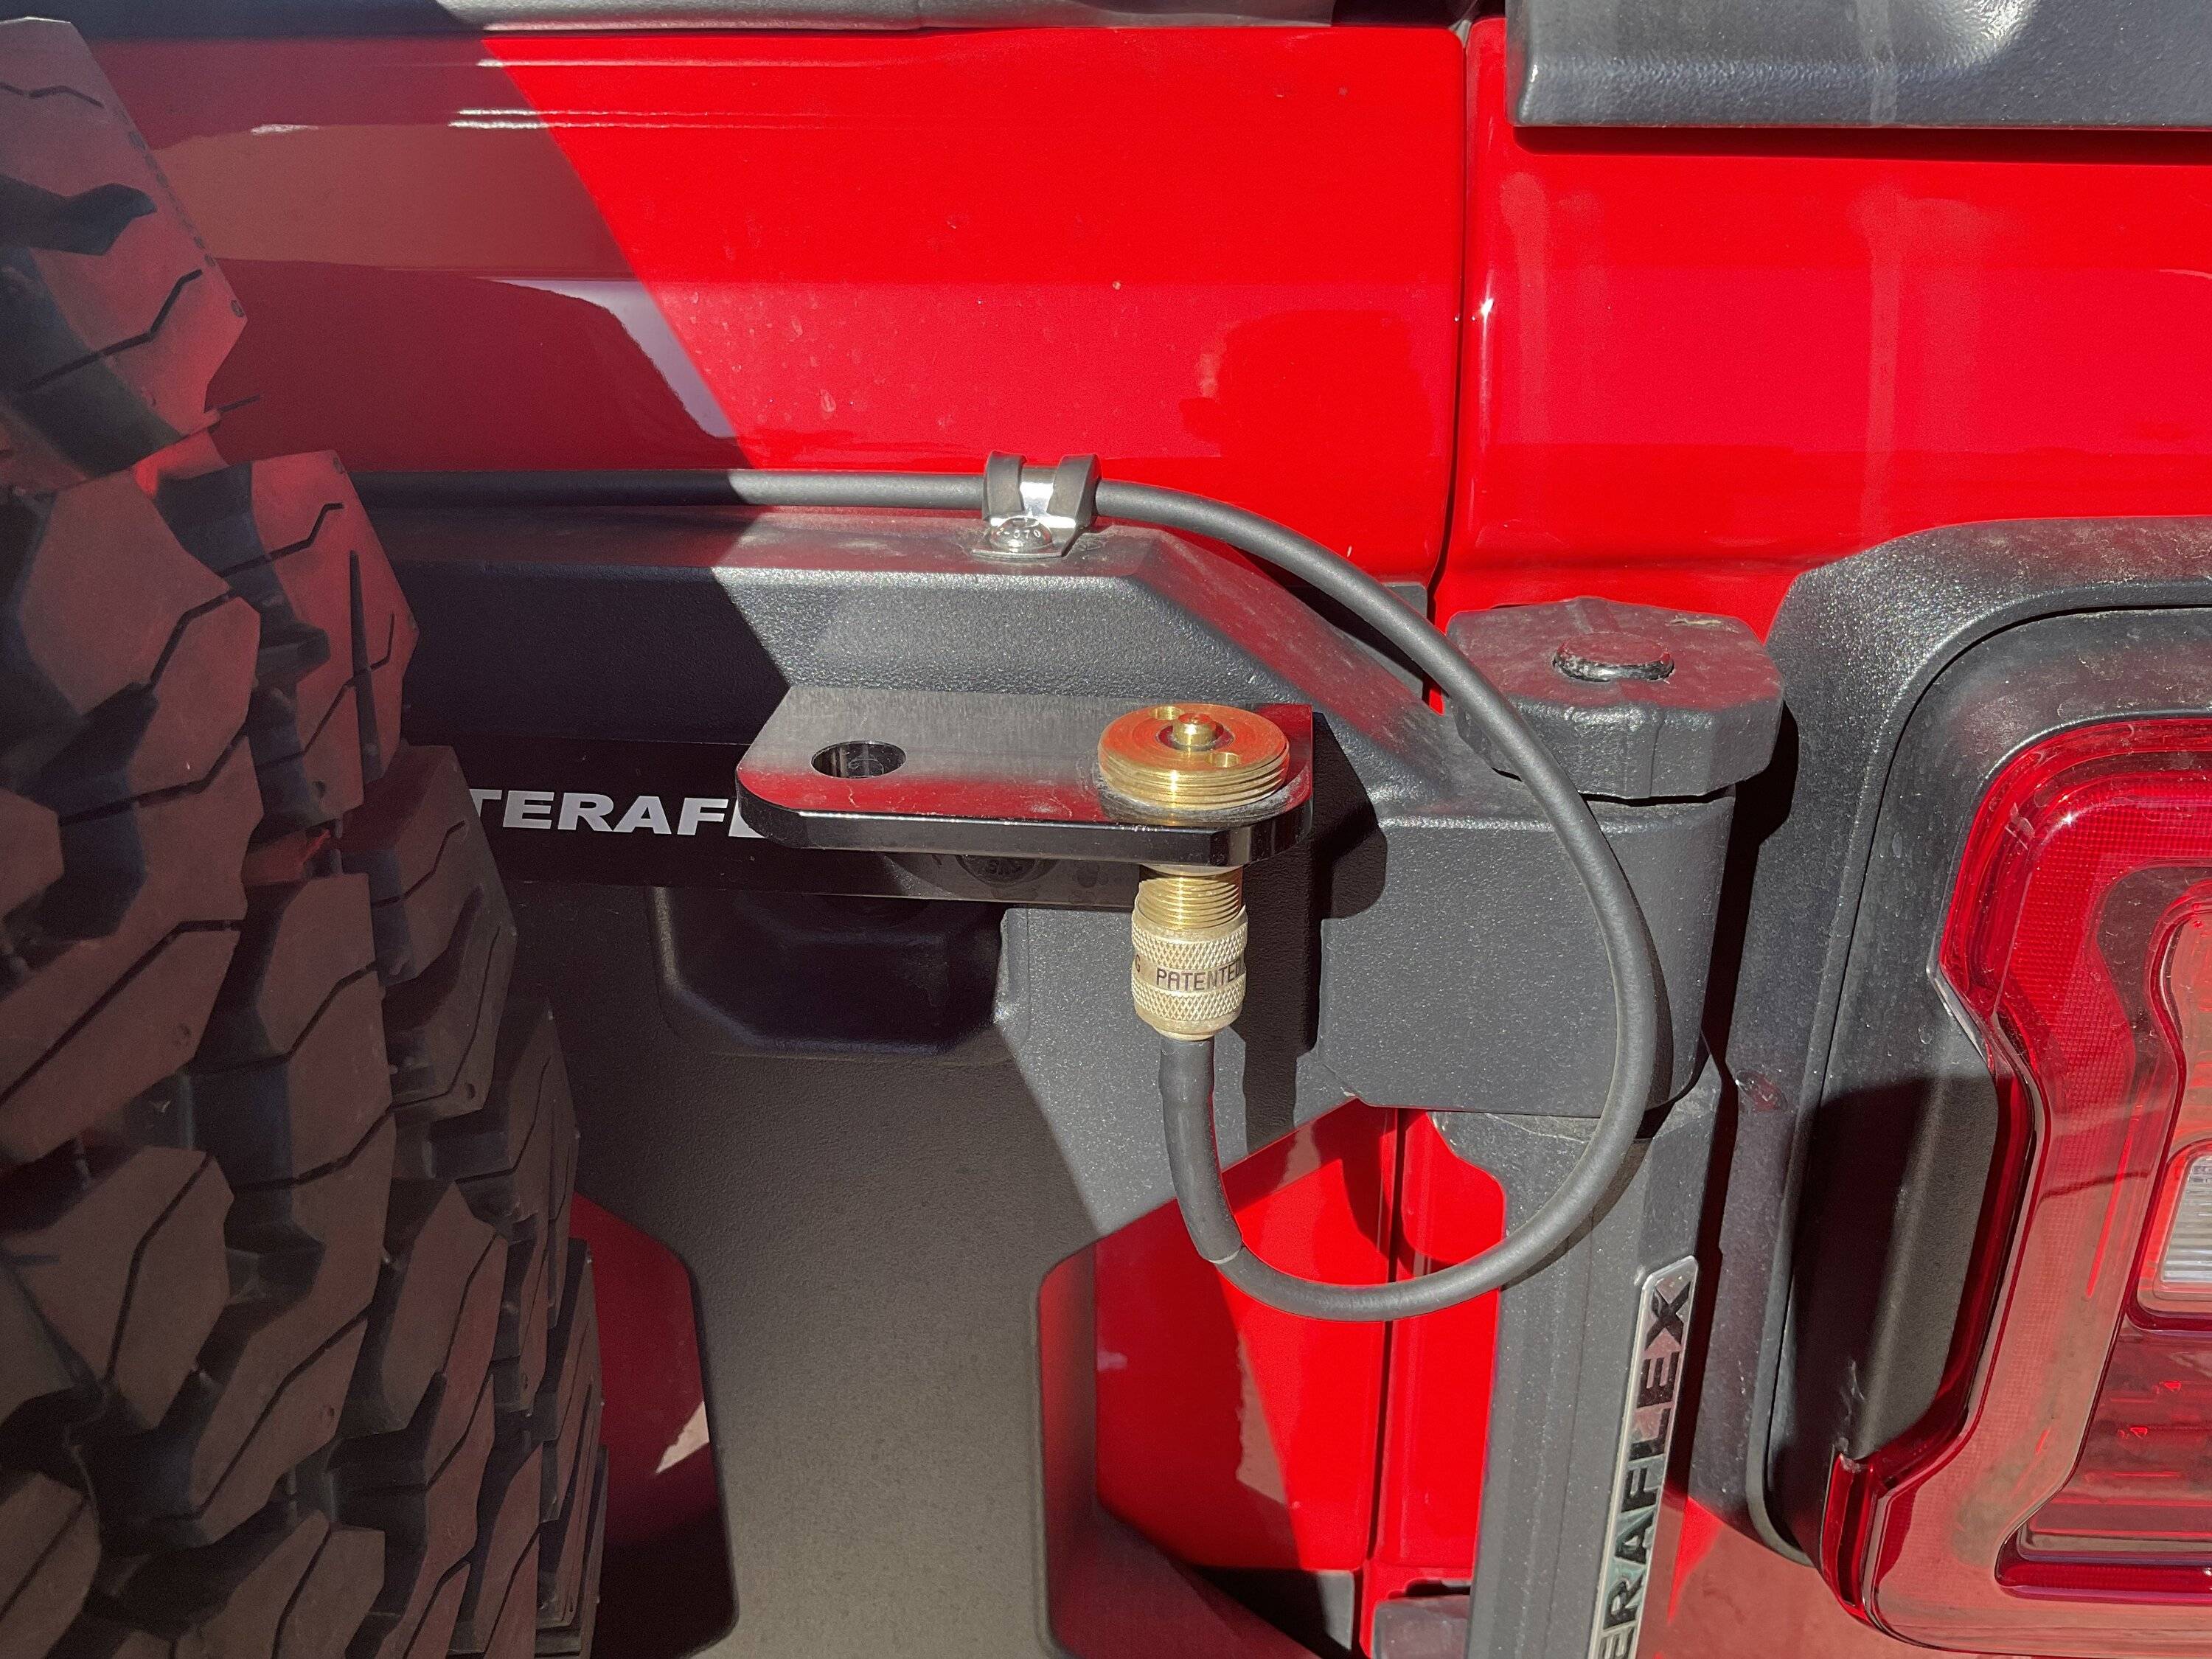
Antenna Mounting: I know I am in the minority here but I prefer a tailgate mounted antenna due to what I learned about RF radiation as a radio operator in the military. It is likely overkill but it makes me feel good. I get good performance and SWR using the TeraFlex mount that goes along with my carrier. I routed the cable through the tailgate grommet then followed the path of the 3rd taillight through the sheathing and under the cargo side panel trim. I make my own cables and after snaking it way to the passenger seat, I fish it, the mic control and control unit cable through the 1” gap about 10” forward of the rear of the center console.
Here is the end result (still need to bundle up some wires):
Parts used:
- Icom 2730a dual band radio with MARS/CAP modification
- Icom MBA-5 Control Head Mounting Bracket
- Icom SP-35 Speakers
- LoPro low profile mount for Icom ID-5100 and IC-2730
- CERRXIAN RJ45 Male to Female LAN Ethernet Network Cat 5e Panel Mount Cable
- CA-2X4SR CA2X4SR CA-2x4 Original Comet Dual Band VHF/UHF Mobile Antenna W/Fold-Over Hinge
- Teraflex CB Antenna & Flag Whip Mount Kit
- Cooltech JL Mic Mount
- Magnetic Mic Holde
- OPTIONAL Universal Replacement Microphone Hanger (Icoms use a hook rather than traditional “button” type hanger)
General Shop Supplies
- 18 Gauge two conductor speaker wire
- Deutsch DTM 4 Pin Connector
- RG8x antenna cable (home brew custom length)
- 1/8” Thick aluminum sheet.
STEPS:
Cut and drill under seat mount. When drilling holes be thoughtful of leaving enough space between all obstacles to allow connecting cable without kinking them too tightly. Also consider biasing it to the left or right as well as up and down to minimize any blockage of the under seat vent. I ran the power and ground directly to the battery. I like the always on feature vs ignition only. I have set the auto power off setting to prevent draining the battery. I ran the wires through the grommet that is used for the clutch on manual
Add the Speakers: Be mindful of speaker placement to avoid existing trim clips and connectors. To help with this I let the speaker magnet position itself where I wanted it. I then spread a thin layer of modeling clay on the inside of the sound bar cover, used a sandwich bag to prevent sticking to the speaker, and pressed it in place. This left a template for drilling the mounting holes.
Since the speaker is mounted on the inside of the Soundbar trim, it was not necessary to create a perfect hole for the sound. I just cut a rectangular hole leaving enough meat to securely mount the speaker and grill.
At about $30 per speaker, the Icoms are about 2x some of the other speakers (road pros RSP-15 on Amazon) but the offer a more forgiving mounting solution.
I also used a bit of 18 gauge speaker wire to extend the speaker wires to go down the B pillar. The routing was straight forward:
- Pull the trim that connects the sound bar to the B pillar on both sides. You will need to remove a few screws of the surrounding panels to allow it to slide out.
- Loosen but do not remove the upper most B pillar panel. This will involve popping the caps off the grab handle taking out the two bolts. Tuck the wire behind it on the edge closest to the back seat to avoid interfering with the seat belt.
- Loosen all 6 bolts holding the sound bar to the roll bar enough to route the speaker wires behind it.
- Leave enough slack and add a connector to allow easy removal of the sound bar in the future.
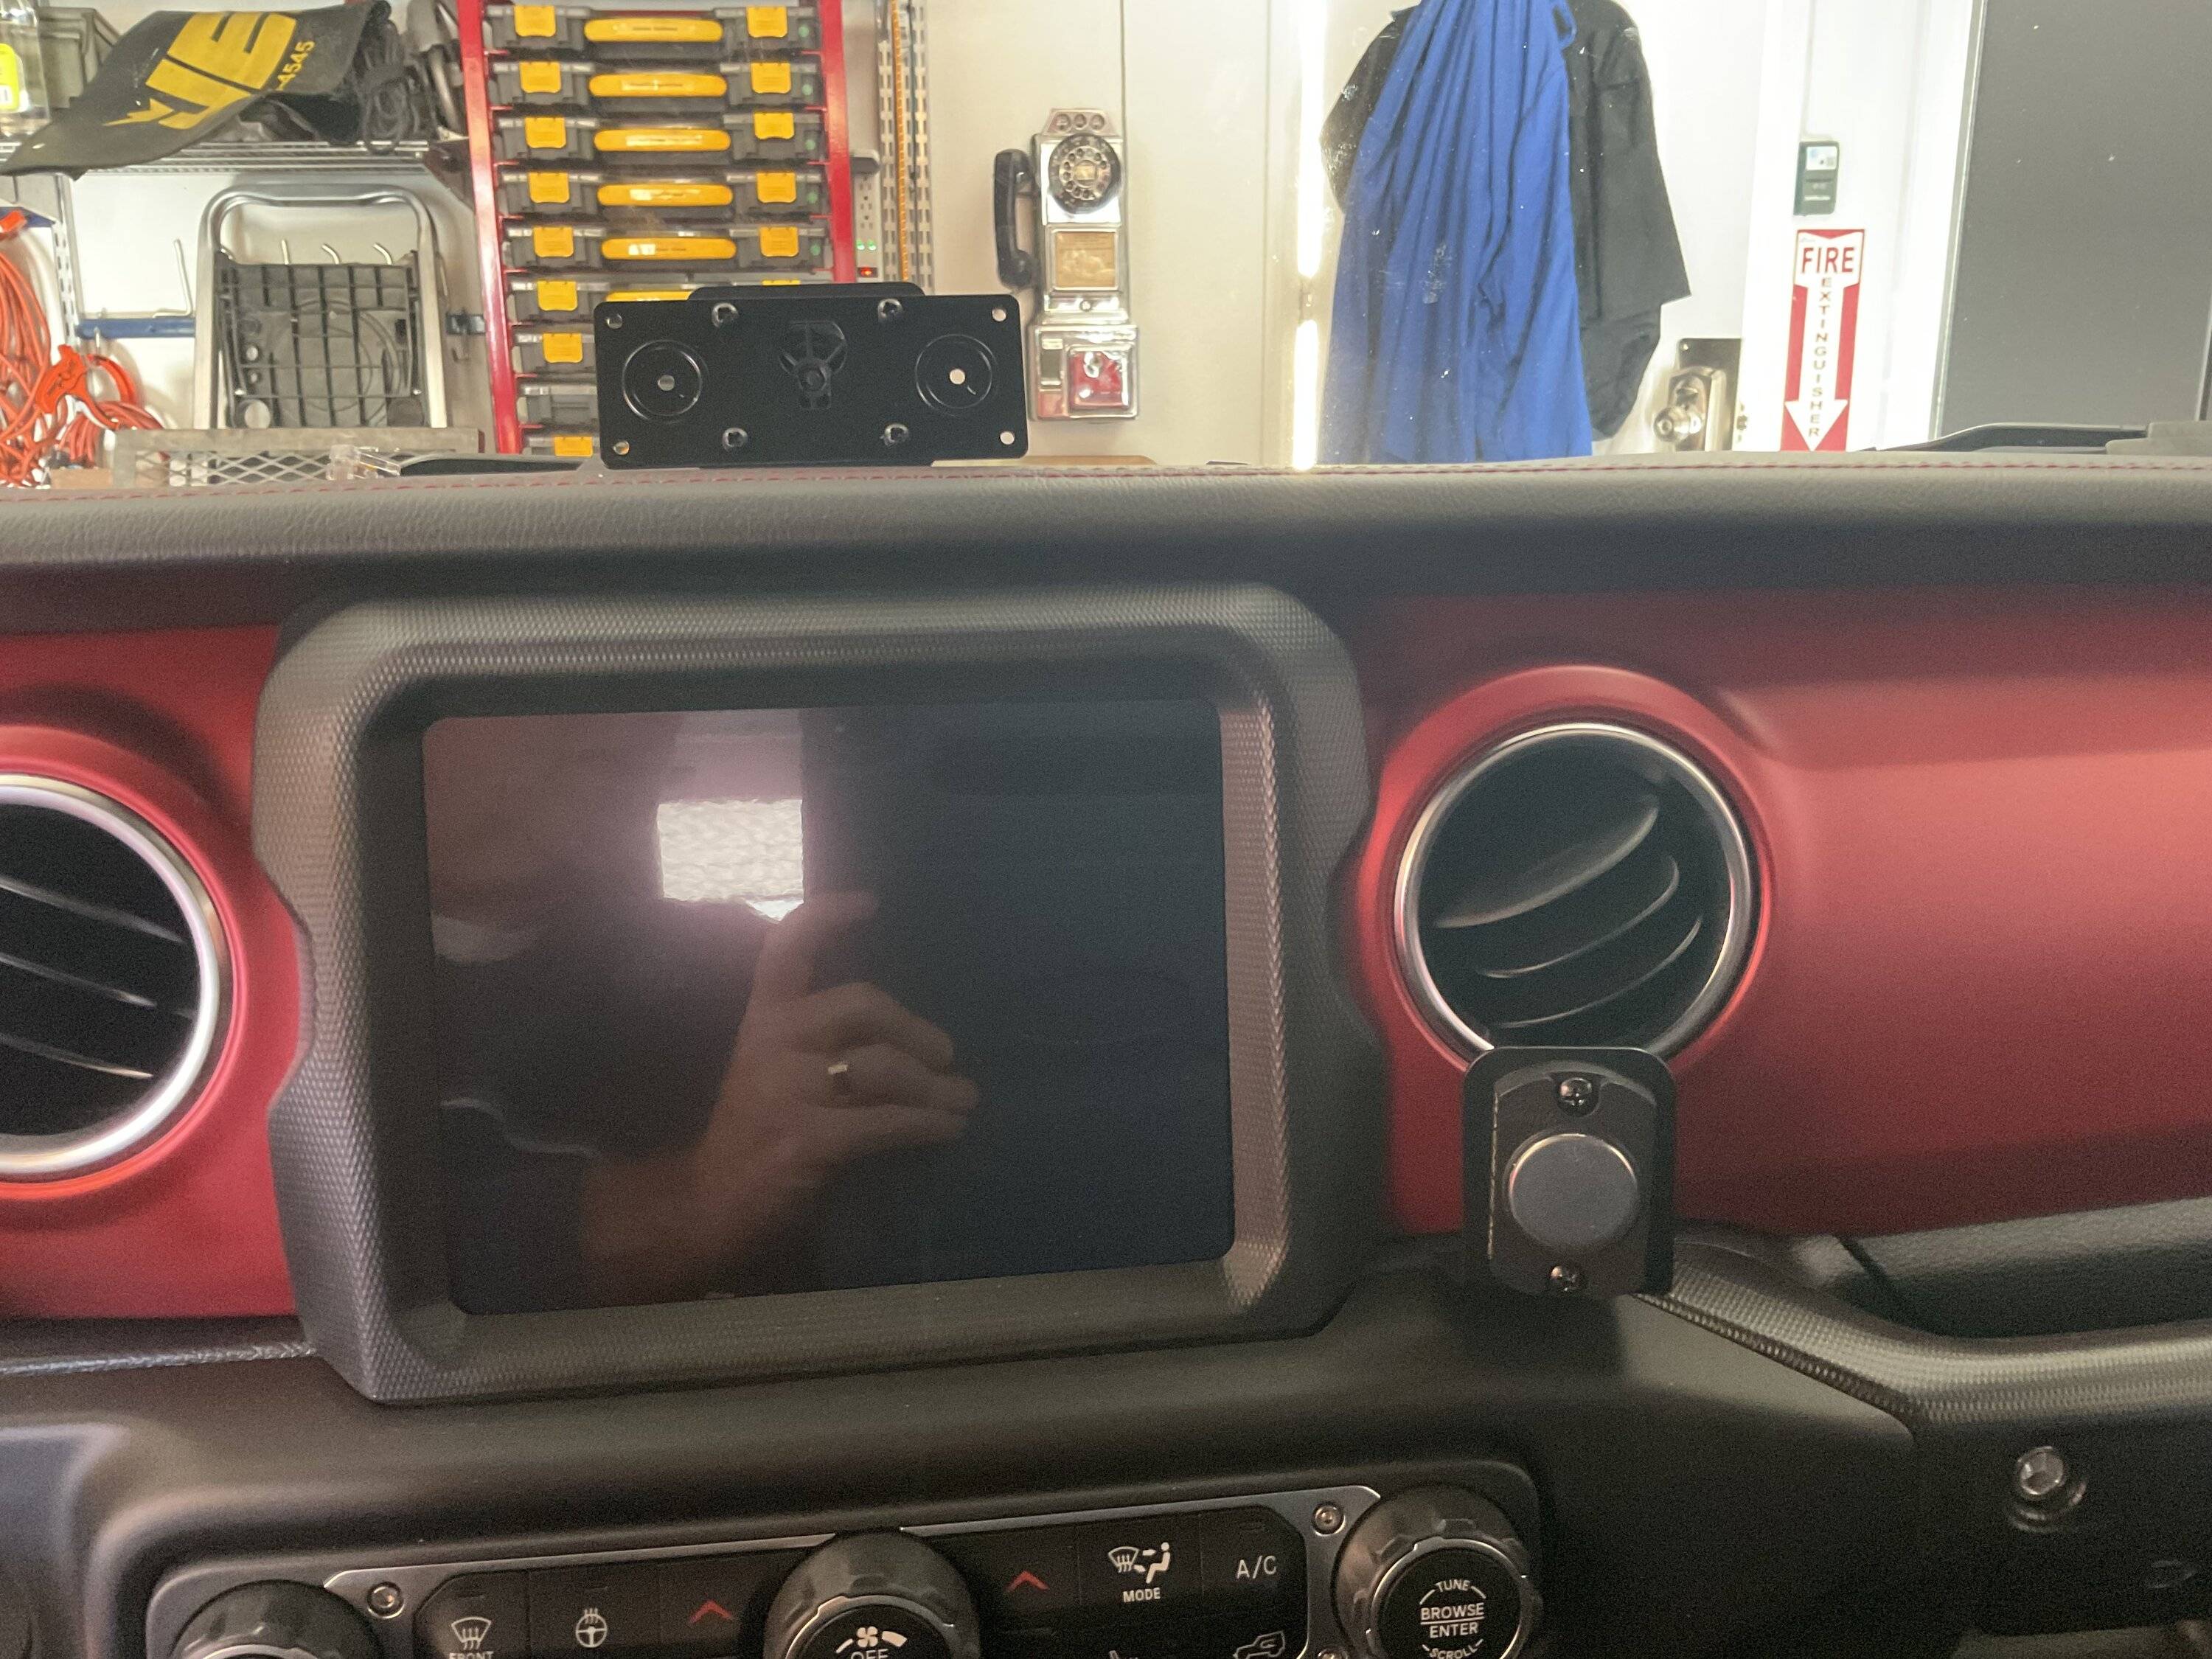
Mount the Control Head: The Lido mount comes with both adhesive tape and screws. I opted to use the screws for the extra support for a few reasons, the magnets that hold the are strong and on a hot day, I could see the tape coming loose when removing the head and the jostling around off-road would cause additional stress.
I was unsure just how much room was under the dash so I pulled (but did not disconnect the radio and climate controls. There are plenty of YouTube videos demonstrating this. It will take you 5- 10 minutes.
After securing the mount into the tray, drill a hole in the upper tray (you will not be able to see this unless you lay your head on the dash and look straight down) large enough for the end of the control cable to pass through. Before you button it up, route the control head cable behind the stereo and through the obvious gap on the passenger side that provides a clear path to the lower console area. From there, you will be able to tuck it out of sight, under the console trim and to the radio under the seat. You should not need an extension cable beyond what comes in the box.
Mount the Microphone: While the climate control panel is off, mount the microphone holder. I used the CoolTech mount because it blocks very little of the vent. When paired with the Magnetic Mic holder, it provides enough stand-off to keep the mic off the stereo controls.
Note: (1) You will need to drill the CoolTech bracket to mate with the Magnetic Mic. A template is provided. (2) If you you have an Icom radio that has a loop on the back of the mic that hangs it on a hook, you will need the Universal Mic hanger in the parts list. The installation is simple, un-clip the cable from the mic, take out 2 screws and finish drilling the hole that was started by the factory - There are a few more details on this on post #19 in this thread.
Add the Mic Extension Cable: After seeing another member picture of it (can’t remember where) like him, I chose to mount the cable connector in the little door that covers the park release cable in front of the shifter for two reasons: (1) If I messed it up, it is cheap to fix (2) I can leave it connected and still slide the seat all the way forward. It appears in the pictures that it is a very sharp bend but that is an optical illusion. I routed the cable Along side the control head cable.
Antenna Mounting: I know I am in the minority here but I prefer a tailgate mounted antenna due to what I learned about RF radiation as a radio operator in the military. It is likely overkill but it makes me feel good. I get good performance and SWR using the TeraFlex mount that goes along with my carrier. I routed the cable through the tailgate grommet then followed the path of the 3rd taillight through the sheathing and under the cargo side panel trim. I make my own cables and after snaking it way to the passenger seat, I fish it, the mic control and control unit cable through the 1” gap about 10” forward of the rear of the center console.
Here is the end result (still need to bundle up some wires):
Sponsored
Last edited: