haligen
Well-Known Member
- First Name
- Rob
- Joined
- Feb 6, 2022
- Threads
- 2
- Messages
- 58
- Reaction score
- 172
- Location
- Conway, SC
- Vehicle(s)
- 19' Rubicon
- Thread starter
- #1
After lurking around for a bit I finally decided to register and contribute. A while ago a Camaro thought it would be a great idea to pull out in front of me and challenge my Rugged Ridge bumper to a fight. Viciously whipping its quarter panel towards my bumper the Camaro was subsequently crowned champion and I had to cut the crumbled mess of a bumper away just to drive home. Fast forward to a couple days ago; After replacing said POS bumper with a new one from Road Armor I was in need of some switches for all the new fangled lights that I installed along with the new bumper. Enter the Twisted Pro TS6, originally I was going to go with a factory switch system when a buddy that owns a Jeep shop told me he had a TS6 they couldn't use just sitting there. A quick drive and monetary transfer later I had buttons, 6 of them actually. Overall the install was rather painless, taking about 1.5 leisurely hours to accomplish. This included some of my minor OCD tendencies like soldering connections, greasing O-rings, and other rain man like activities. The kit itself provided everything that was needed to do the initial install with no runs to the hardware store popping up midway through (though could have used a few extra bits but more later).
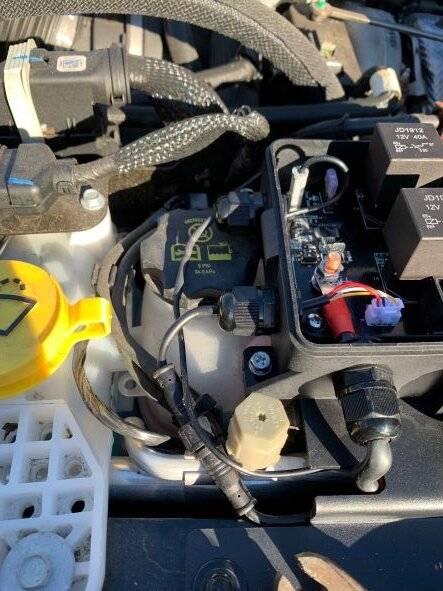
The relay box and lid clips are made of some sort of plastic. Time will tell how well it handles under hood temps., but the lid does have a gasket seal and weatherproof connections for all the wires passing in and out of the box. I do wish they would have designed the wire exits a bit differently. When mounted the box places two weatherproof wire connectors right over top of a coolant bottle cap. I'm not quite sure why they did this when the opposite side is free of obstructions and a simple PCB redesign could have easily accomplished this. The only wires exiting on the left side are the ground wire and the control wire for the dash buttons.

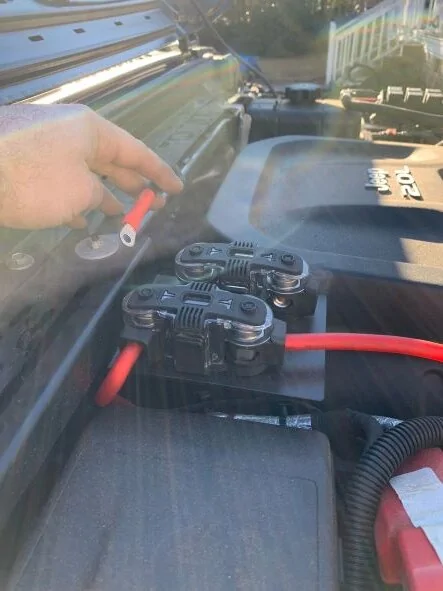
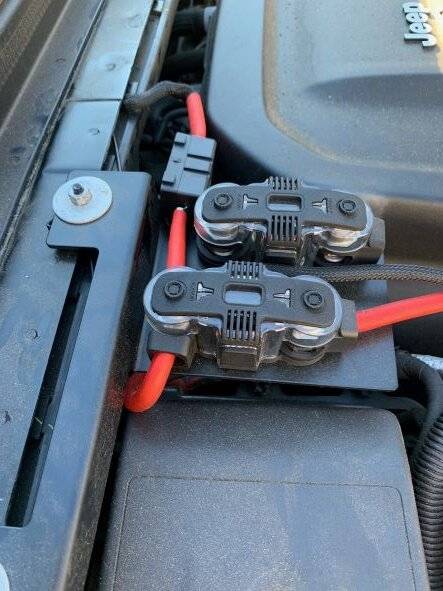
If you want to save a touch of time and headache, before you bolt down the relay box and bracket, go ahead and route the power, ground, and control wires underneath it and to the right. If not you'll be like me and fishing them through with your meaty ham fisted fingers doing their best to get in the way. The power/ground wires intended destination is the battery by way of crossing over the back of the engine bay. It just so happens that there is a nice gap/channel that you can tuck it in for a clean look. One thing that baffles me is that the power wire is encased in a nice loom but the ground wire is not. If they are both going to the same destination why not run both wires in the loom? If I were to do again I'd probably removed the ring connector on the ground wire, route it in the loom with the power wire, and then redo the ring connector. As such I just kind of hid it behind the power wire and all was well. Now, speaking of the power wire, I think its about 6 inches to short. The included length plus the fuse holder do reach the battery, but it leaves the fuse holder just kind of hanging out. This worked fine me since I had a JL audio fuse plate already installed. If I didn't it could probably be a pain to find a nice place to tuck it.
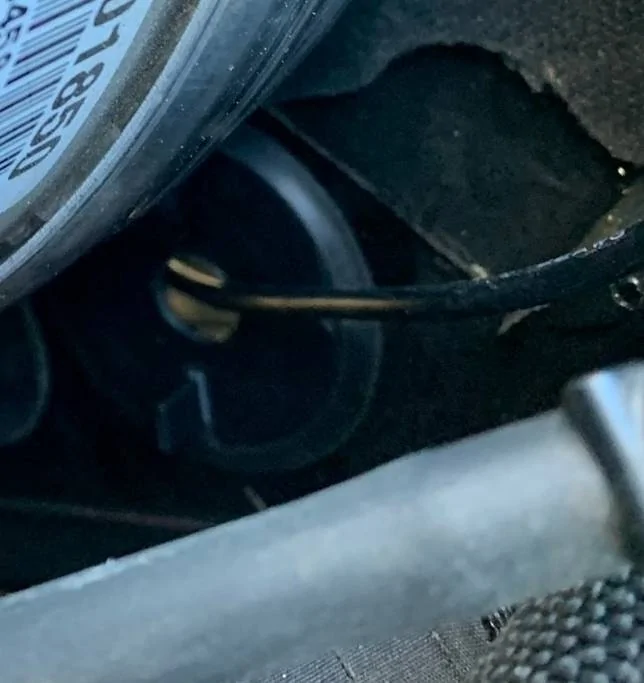
My one major gripe with the install is that they have you drill a 1/2in hole in a plastic firewall grommet so that you can pass the control wire in to the cabin. That's all fine and good but once its been passed through it leaves tons of day light around the wire. Day light means all kinds of fun things can just come right on through the hole like cold air, water, or even gremlins high on PCP. This could have been rectified with a simple split rubber grommet to fill the space. That would have added what, maybe $.10 to the kit? I happened to have something kicking around the shop that worked but some people will probably need a run to the store.

Now for the control wire. Good grief did they not spare any expense on the length of control wire. I was able to route it in to the cabin and then take it out the door and to the front of the vehicle and still have a ton left. Zip ties and creative tucking come in handy here.
Once everything under the hood is tidied up it's time to do the interior portion. Relatively easy, just pop the ac/audio controls out, remove one screw holding the window buttons and what not, then give the lower section a good ol tug, and boom you have access to the change pocket or whatever you trim level has. One thing the instructions do not tell you, even though it has a tools needed list, is that the stupid screws that hold the pocket in are a super ridiculous 5.5mm. Prep ahead and you won't oh say try a 6mm, 3/16th, 1/4, and any other random small looking sockets or wrenches you have laying around.
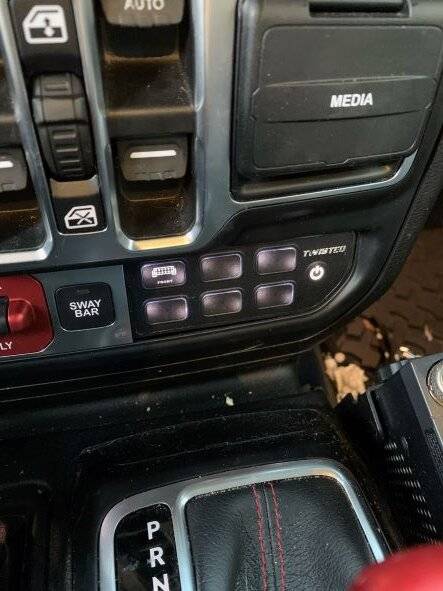
After removing the change pocket the button install was just done in reverse order. One tip would be that if you already know the devices you are going to hook up, then it would be a metric fecal ton easier to install the button stickers (they provide quite a few sticker options) before you mount it to the center console. If you don't you can be guaranteed to exercise your freedom of speech and toss out quite a few choice words. Major pain to get the stickers lined up after the buttons are sitting behind the shifter.
Ignore the grimy interior. Sometimes you just have to let your spouse do spousal things. Like junk your Jeep up while their car sits because she was putting to many miles on it. Overall I'm pleased with the product so far. Time will show how well it holds up. One last bit of information before I check out, If you do not use the accessory wire hookup for the relay box, the switch buttons will always be live (it does have a built in low voltage shut off). That means if you were using the buttons, turn off the Jeep, the buttons will still be glowing away even if the individual buttons are in an off state. You have to reach over and hit the power button on the faceplate to shut down the glow. If you do use the acc wire, none of the buttons will function while the Jeep is not in the acc or started state, but it will completely power off when the Jeep is shut down.
The relay box and lid clips are made of some sort of plastic. Time will tell how well it handles under hood temps., but the lid does have a gasket seal and weatherproof connections for all the wires passing in and out of the box. I do wish they would have designed the wire exits a bit differently. When mounted the box places two weatherproof wire connectors right over top of a coolant bottle cap. I'm not quite sure why they did this when the opposite side is free of obstructions and a simple PCB redesign could have easily accomplished this. The only wires exiting on the left side are the ground wire and the control wire for the dash buttons.

If you want to save a touch of time and headache, before you bolt down the relay box and bracket, go ahead and route the power, ground, and control wires underneath it and to the right. If not you'll be like me and fishing them through with your meaty ham fisted fingers doing their best to get in the way. The power/ground wires intended destination is the battery by way of crossing over the back of the engine bay. It just so happens that there is a nice gap/channel that you can tuck it in for a clean look. One thing that baffles me is that the power wire is encased in a nice loom but the ground wire is not. If they are both going to the same destination why not run both wires in the loom? If I were to do again I'd probably removed the ring connector on the ground wire, route it in the loom with the power wire, and then redo the ring connector. As such I just kind of hid it behind the power wire and all was well. Now, speaking of the power wire, I think its about 6 inches to short. The included length plus the fuse holder do reach the battery, but it leaves the fuse holder just kind of hanging out. This worked fine me since I had a JL audio fuse plate already installed. If I didn't it could probably be a pain to find a nice place to tuck it.
My one major gripe with the install is that they have you drill a 1/2in hole in a plastic firewall grommet so that you can pass the control wire in to the cabin. That's all fine and good but once its been passed through it leaves tons of day light around the wire. Day light means all kinds of fun things can just come right on through the hole like cold air, water, or even gremlins high on PCP. This could have been rectified with a simple split rubber grommet to fill the space. That would have added what, maybe $.10 to the kit? I happened to have something kicking around the shop that worked but some people will probably need a run to the store.
Now for the control wire. Good grief did they not spare any expense on the length of control wire. I was able to route it in to the cabin and then take it out the door and to the front of the vehicle and still have a ton left. Zip ties and creative tucking come in handy here.

Once everything under the hood is tidied up it's time to do the interior portion. Relatively easy, just pop the ac/audio controls out, remove one screw holding the window buttons and what not, then give the lower section a good ol tug, and boom you have access to the change pocket or whatever you trim level has. One thing the instructions do not tell you, even though it has a tools needed list, is that the stupid screws that hold the pocket in are a super ridiculous 5.5mm. Prep ahead and you won't oh say try a 6mm, 3/16th, 1/4, and any other random small looking sockets or wrenches you have laying around.

After removing the change pocket the button install was just done in reverse order. One tip would be that if you already know the devices you are going to hook up, then it would be a metric fecal ton easier to install the button stickers (they provide quite a few sticker options) before you mount it to the center console. If you don't you can be guaranteed to exercise your freedom of speech and toss out quite a few choice words. Major pain to get the stickers lined up after the buttons are sitting behind the shifter.

Ignore the grimy interior. Sometimes you just have to let your spouse do spousal things. Like junk your Jeep up while their car sits because she was putting to many miles on it. Overall I'm pleased with the product so far. Time will show how well it holds up. One last bit of information before I check out, If you do not use the accessory wire hookup for the relay box, the switch buttons will always be live (it does have a built in low voltage shut off). That means if you were using the buttons, turn off the Jeep, the buttons will still be glowing away even if the individual buttons are in an off state. You have to reach over and hit the power button on the faceplate to shut down the glow. If you do use the acc wire, none of the buttons will function while the Jeep is not in the acc or started state, but it will completely power off when the Jeep is shut down.
Sponsored