Fuel Fire Desire
Well-Known Member
- Thread starter
- #1
Spoiler alert.....this kit is crap.
Spoiler alert......I achieved 1.0 SWR with this kit
(HUH?)
Heres what happened....
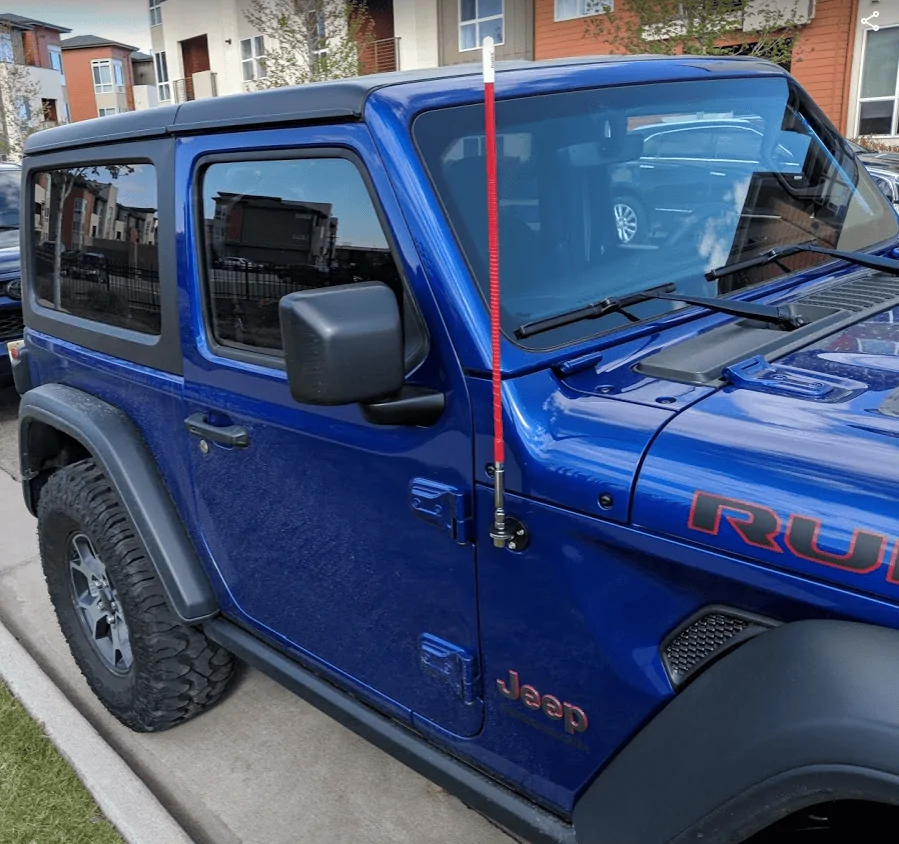
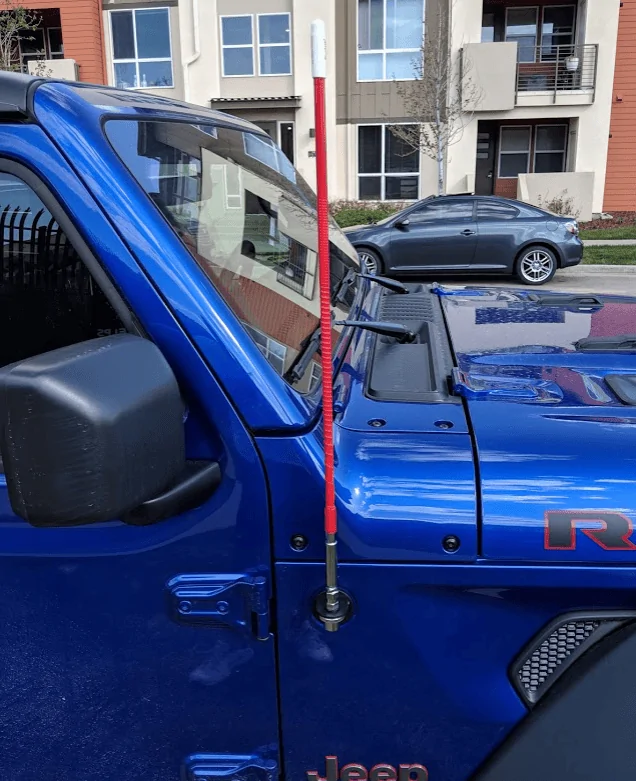
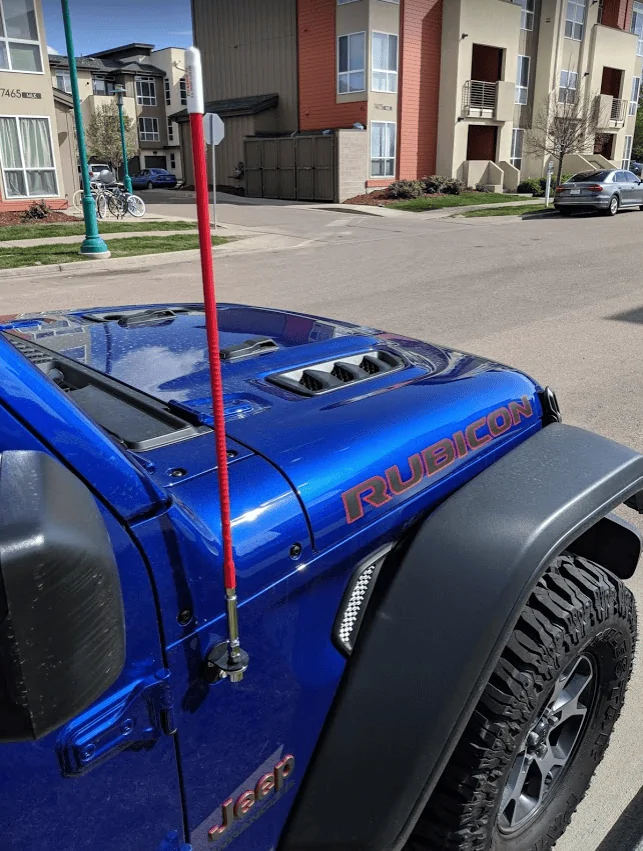
I wanted to put a CB stick in an optimal space to get the best performance. Not too happy with the lack of overall mounting options for a JL, I decided to go with the Rugged Ridge CB/AM/FM mount/ multiplexer kit. This kit allows you to use a CB stick in the stock radio antenna location, and with the use of a multiplexer, are able to receive AM/FM/ and CB bands all in a single antenna.
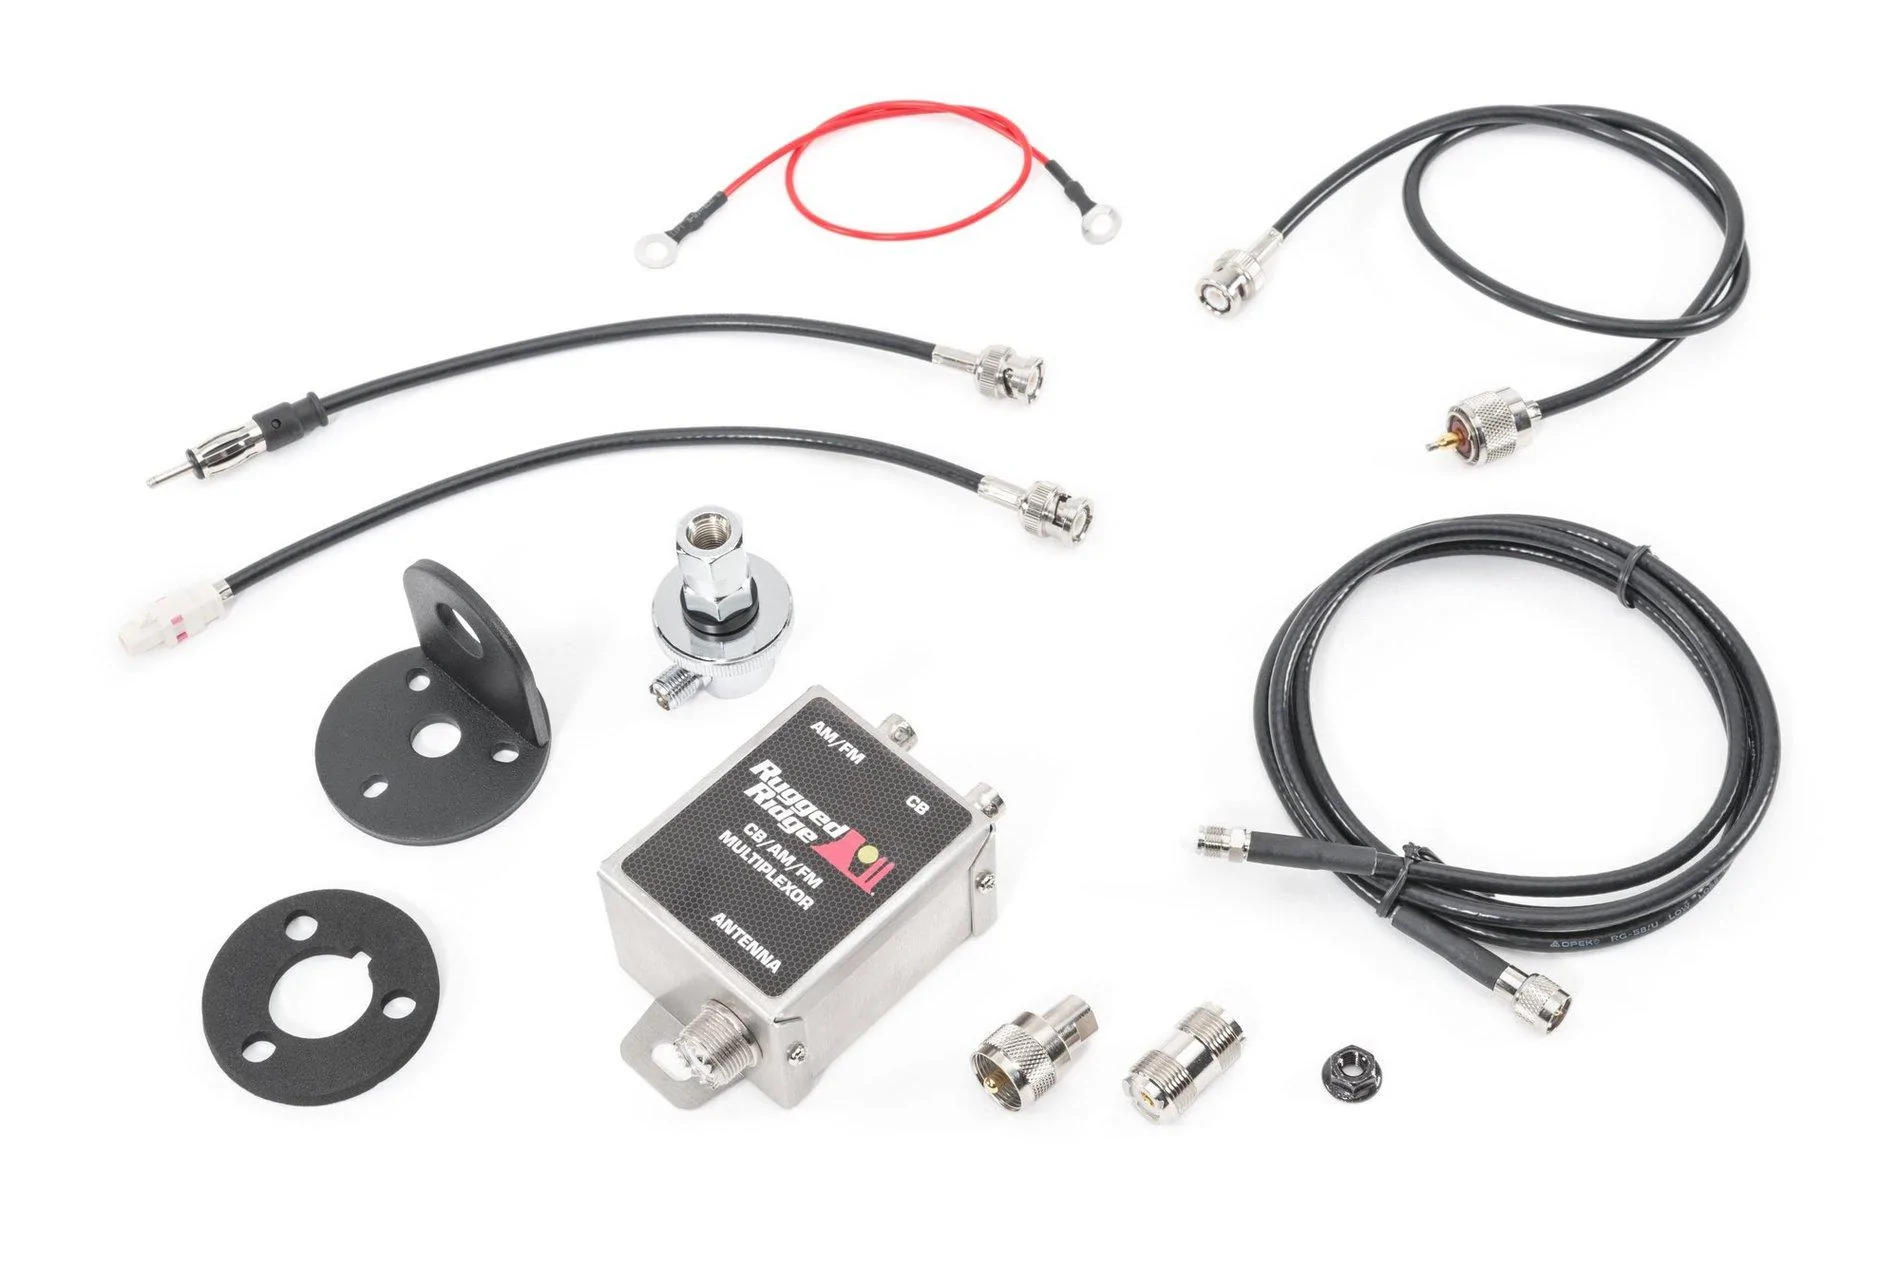
The kit comes with everything you need, and I was surprised to see top quality RG-8X low-loss coax and connectors. The unit is designed to be a simple plug and play.
The mount itself is powder coated plate steel, two pieces joined via a tab, welded, and then ground flat on the back.
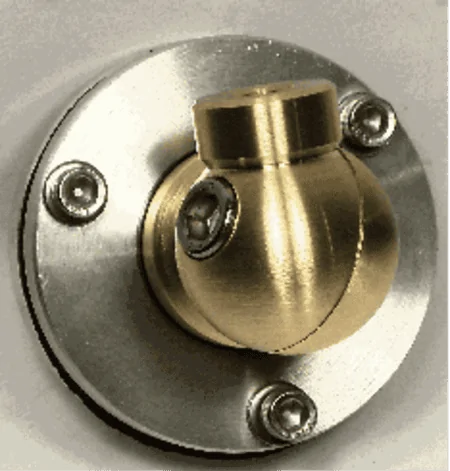
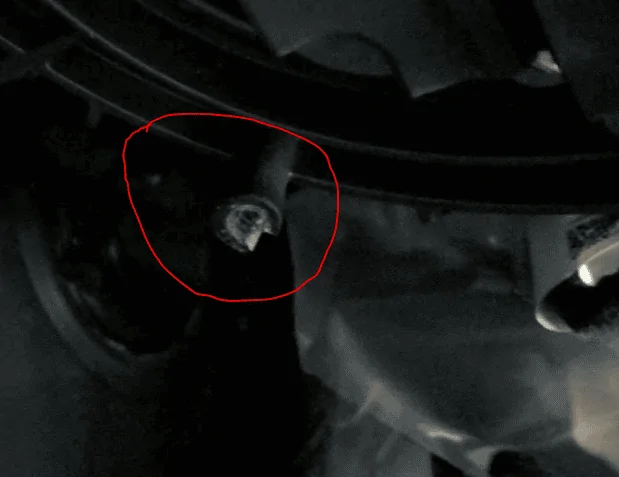
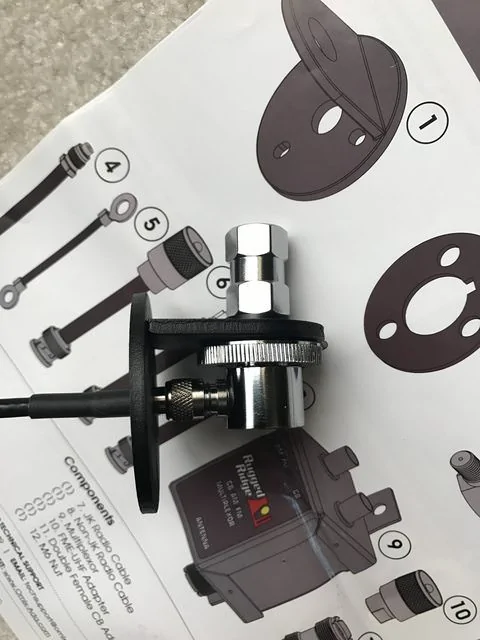
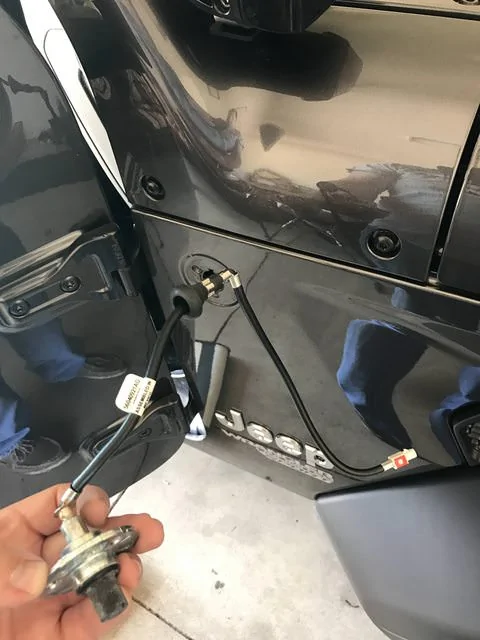
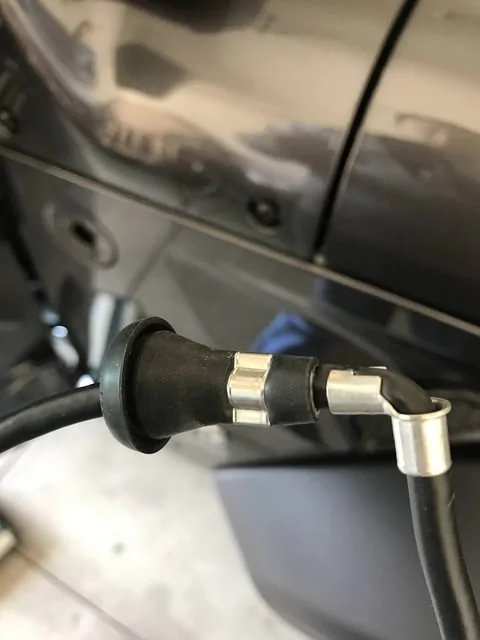
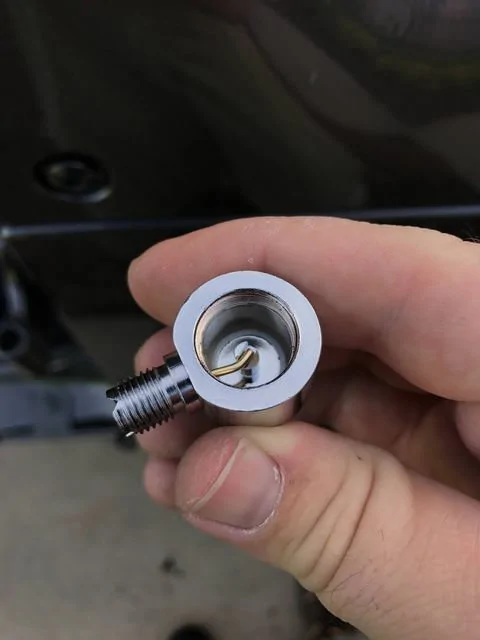
The proprietary part that makes the kit streamline and clean looking felt of good quality....but is engineered like utter crap ( Ill explain in a minute). The unit is a barrel, with a threaded ring on top that holds a large flat grooved nut, and a keeper nut hidden underneath in a recess. The barrel has a hole in the bottom and side. The side has a mini coax connector, the bottom gains access to the signal connection between the connector, and RF isolated antenna stud (the stud is pressed into the barrel with a non conductive insulator surrounding it.) The bottom cover for the barrel is a coin type threaded cap. It fits very loose in the bottom (would easily vibrate out and be lost, exposing the signal connector). I used red loctite to keep it in place.


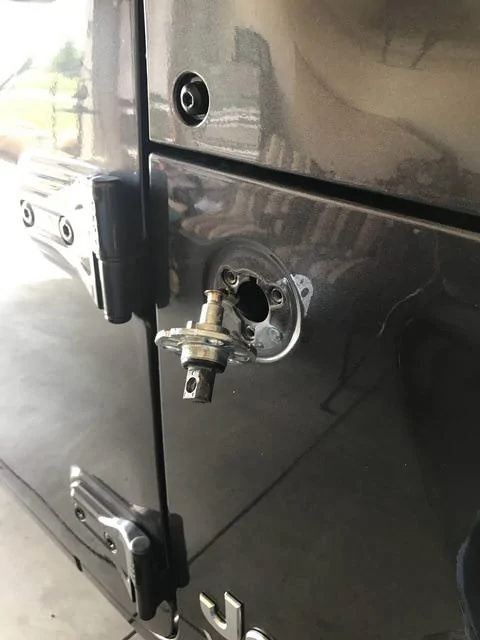
Removing the old mount and cable was simple. Pop the plastic antenna cover off with a screw driver from the antenna stud hole as to not damage the paint. It takes quite a bit a force, and you'll feel like you're about to break it...but it will eventually pop off. Its held on by two plastic tabs at 3 and 9 o'clock. Removing the cable was easier than expected. The cable goes from the mount in the fender, through a hole in line with the exterior hole, and is sealed in place with an ingenious tight fitting folds-on-to-itself rubber grommet (I wish I could have reused the thing its so neat). Just pull hard.
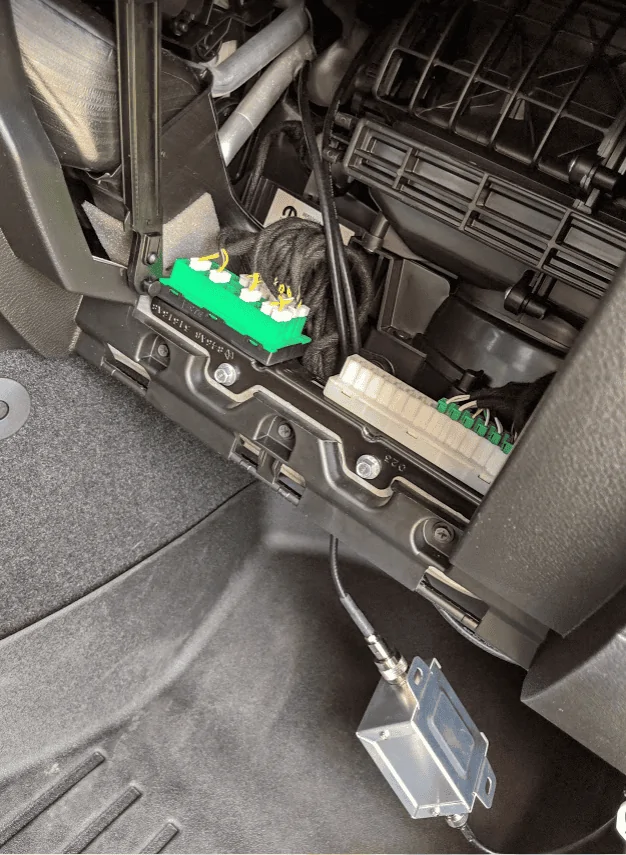
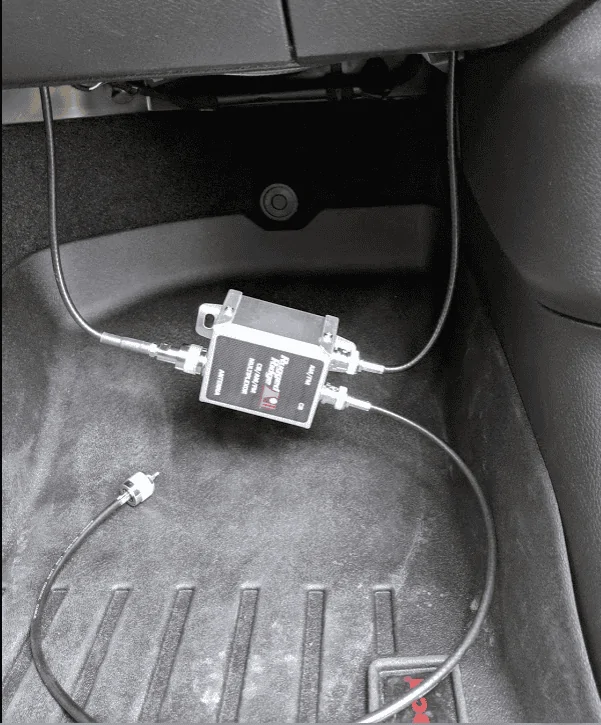
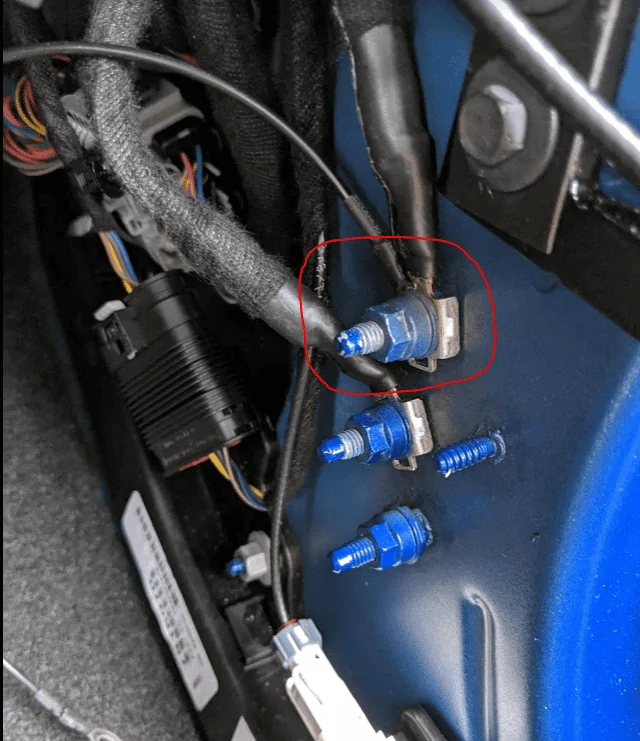
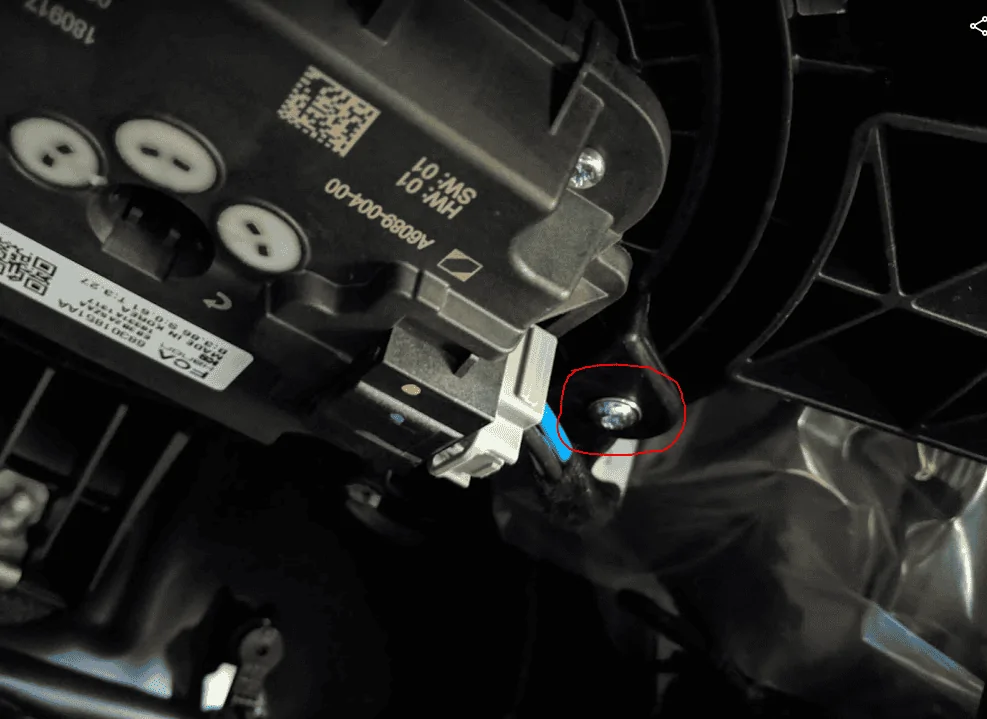
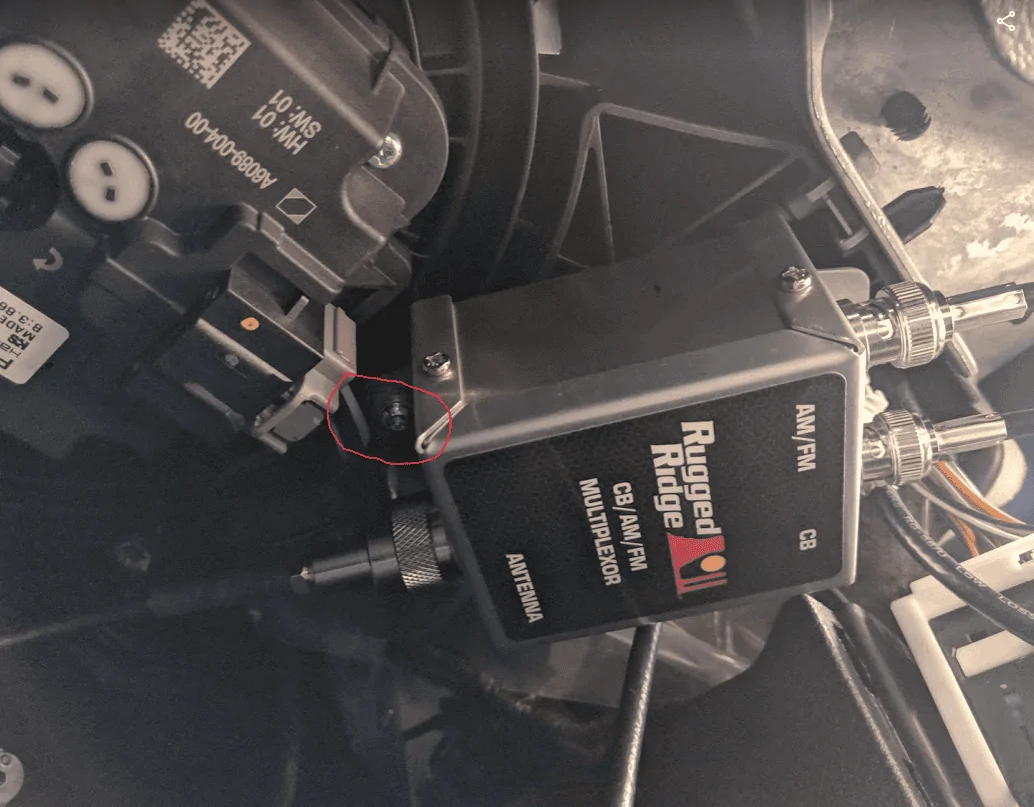
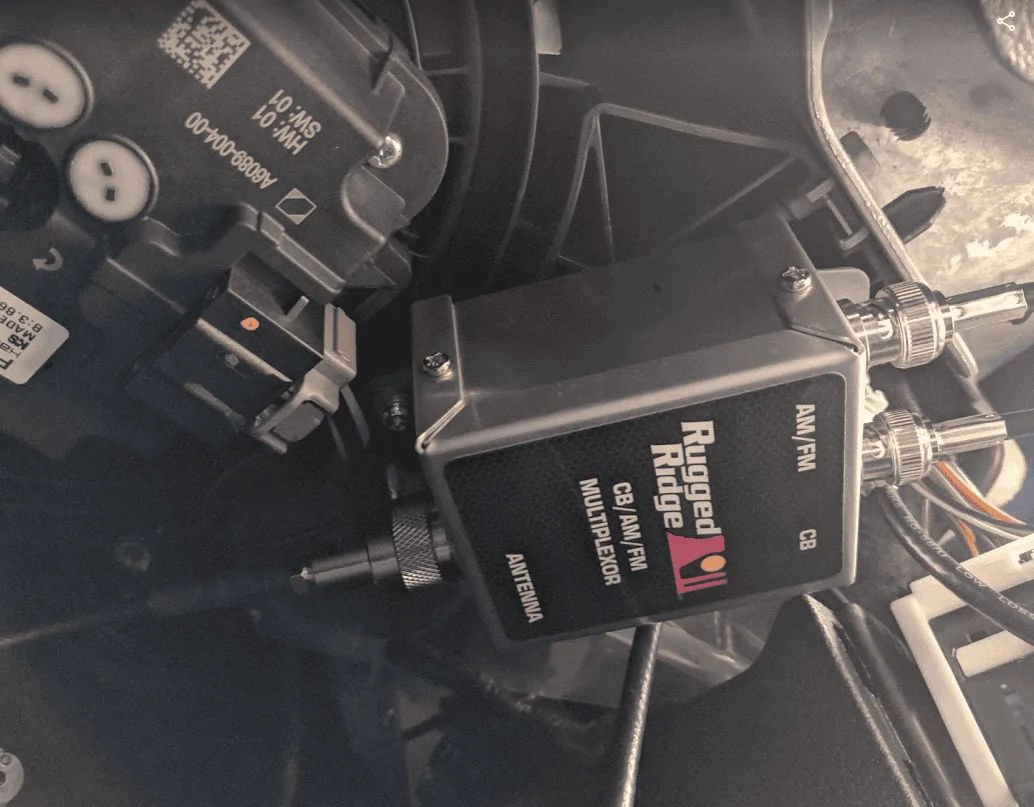
The wiring is straight forward Just connect everything into the multiplexor as labeled. The hardest part was finding where to hide 18' of coax from the radio and the multiplexer itself. (18' is considered optimal for proper impedance, don't coil extra cable or it will induce feedback). I ran it around the cabin under the carpet/ plastic trim to avoid having a bunch of extra. If you have to have extra coiled, use a long figure eight instead of a tight small coil. The kit was designed for a JK, which has more room behind the glove box than the JL....which has a mess of wire harnesses and block terminals stuffed in there. I mounted the multiplexer on a plastic extension coming out of the blower housing. The extension had a hole in it that was the perfect size to accept a license plate mounting screw. A grounding cable must be applied in between the mount and tab of the multiplexer. The kit came with a lock nut with the intent to mount the unit on the threaded post that the JK used to hold in the carpet....but its not there on the JL. The other end of the grounding cable went to a common grounding post under the door wire harness access panel. After all the wires were run and stowed, the box is tucked neatly out of the way, and is unseen unless you put your head in the foot well.

After install, I took the JL out to a wide open area with no buildings or cars to affect SWR (a soccer complex). After tuning the antenna, SWR readings were a surprising 1.6 on Ch 1, 1.6 on Ch 40, and 1.3 on Ch 19. This was with a 4' Firestik II on a Fire spring with the tuning screw all the way in. I was very pleased with this.
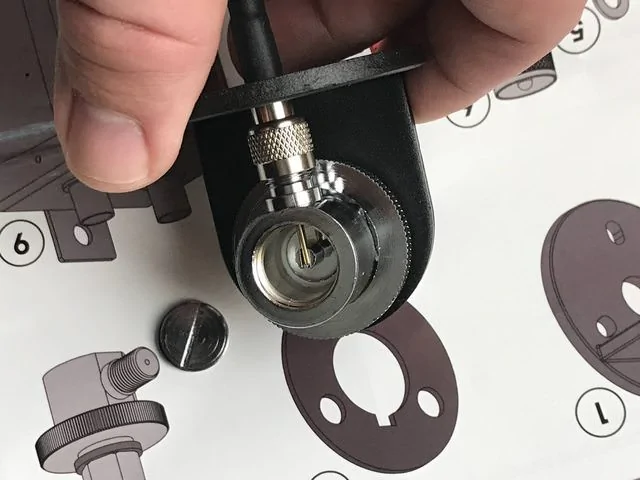
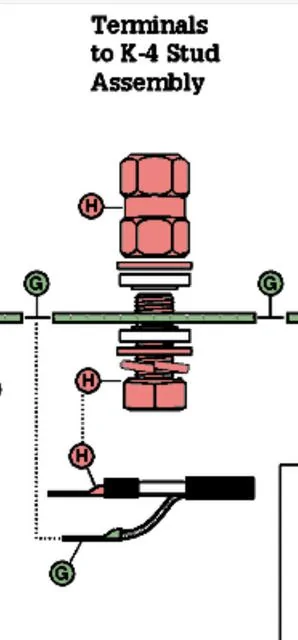
At this point, I was VERY pleased with this kit, and was ready to write up a very positive review. After a day of driving around, I get home, check the mount, and see that the antenna had come loose and was starting to flop around a little. No problem....just give the spring a good twist to tighten right? NOPE. I twisted the spring, it got snug, but it kept twisting....and never got tight. Keep in mind I'm doing this BY HAND. The special mounting barrel part is engineered like crap. The antenna mount stud is pressed into the the barrel with a soft polymer insulator liner to isolate it. Lets think about this......a smooth round stud...pressed into a smooth round hole..with a soft plastic liner in between..... Exactly how much torque do you think it would take to overcome the friction that little poly lining is providing, and allow that stud to spin....and break apart that delicate signal wire connection shown above? NOT MUCH
The stud had spun a full revolution, snapping one side of the wire cradle off and bending/ cracking the signal wire. Its something that could be repaired....but there was no point. The way the stud was designed, it was impossible for any antenna to be tightened beyond hand tight. As soon as any stress was imparted by the antenna onto the threads of the stud, the stud would spin in place. A very piss poor design. All that would have been needed to make this work (and work GREAT) was have the section of stud that was being pressed into the barrel be any shape other than ROUND. Hex...square...triangle....anything to prevent it spinning in its slippery poly lining. Even having a hex head hidden under the access cap that could accept a small socket to torque the antenna against would have worked...but NOPE.
After getting pretty angry that this $120 kit had such a basic design flaw, I decided that I liked the placement of the mount, and liked the idea of the multiplexer. So I cut the mini connector off the coax and put together a traditional CB post/ stud mount. Using an eyelet and 3/8" bolt for signal (insulated against the mount) and a small eyelet crimped on to the coax shielding and fixed under one of the three fender mounting screws. I had a dead ringer ground measured from the interior connector to an interior ground stud. It measured a tenth of an ohm on the multimeter. Looked good to me!

SWR on Ch 1 was 3.0, and Ch 40 was a kill-your-radio 3.5. FML......
That just goes to prove a good electrical continuity =/= a good RF continuity.
Giving up for the night, and about to throw the whole kit in the trash, I go to bed rather frustrated.
The next morning, in a final attempt to make the thing work out, I decide to try a PL259 type mount. I try a simple crimp-on connector, and a 'heavy duty' stud mount. Literally the worst money could buy from the local truck stop.
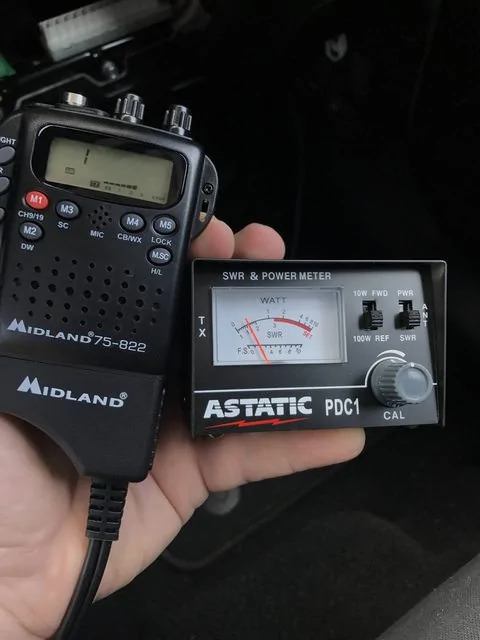
Going back to the open fields to test SWR, the first hit was 2.8 on Ch 1 (......great......), and a 1.3 on Ch 40 (...wait....this might actually work...). I retune the end on my antenna, and struck gold. 1.4 on Ch 1, 1.5 on Ch 40......and a perfect 1.0 on CH 19!
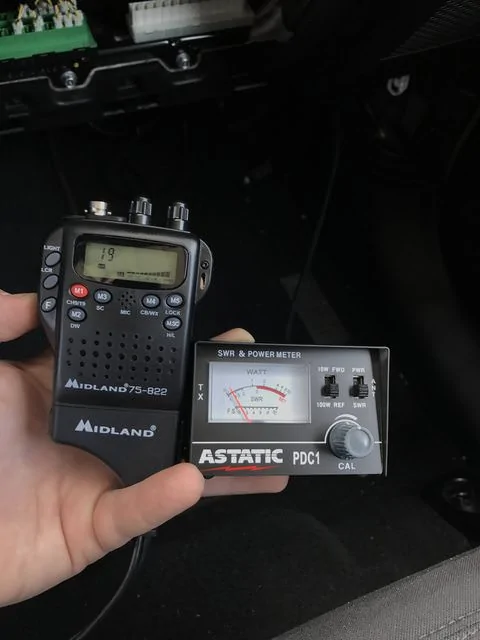
AM and FM reception is the best Ive had, clearly picking up stations that were 'on the edge' in my area previously, and CB reception leaps and bounds better than the spare tire mount setup I had on my JK. The Midland 75-822 is only kicking out 3 watts according to the SWR meter, but at a perfect 1.0 SWR on Ch 19 I think Ive achieved more than I could have hoped for in a mobile mounted portable CB.
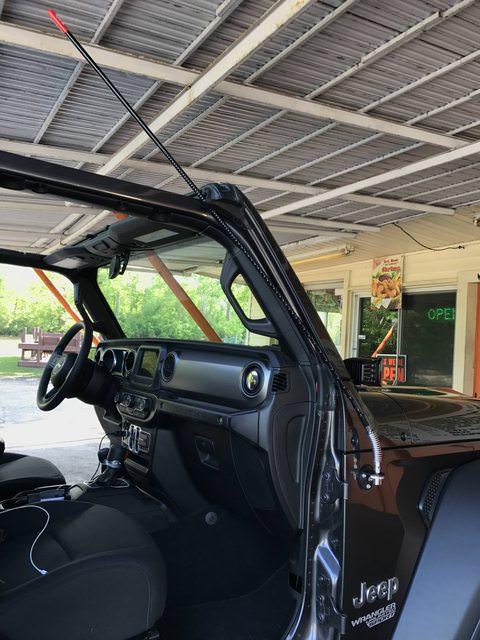
The whole setup doesn't look half bad either.
That 4' stick does move around quite a bit. At 70 mph it tilts back about even with the A-pillar. Though, with as tall as it is I'd much rather have it on a floppy spring rather than have a 4' long cheater bar torque on an aluminum fender when it hits a tree. The antenna does neatly tilt back and rest in the windshield frame when I have the doors off though. About perfect for trail riding in the woods or going into a parking garage.
So........in the end, this kit did work out. Would I recommend it? Not for $120..... BUT, it is one of the very limited options available for the JL right now. The multiplexer works, and works very well.....but a cheap multiplexer can be had for $25. $45 if you get a "good" one. I do have to say that the supplied cables are top quality, and would probably be a $40 endeavor to assemble them by ones self at home.....so a home built rig like this would probably cost you about $80 if you did all top shelf parts (without the mounting plate). The mounting plate is of ok quality, but since the weld is ground flat on the back and doesn't come through to the front side of the tab, its hard to say how strong or durable it would be. The proprietary barrel connector? Just throw it in the trash.
Spoiler alert......I achieved 1.0 SWR with this kit
(HUH?)
Heres what happened....
I wanted to put a CB stick in an optimal space to get the best performance. Not too happy with the lack of overall mounting options for a JL, I decided to go with the Rugged Ridge CB/AM/FM mount/ multiplexer kit. This kit allows you to use a CB stick in the stock radio antenna location, and with the use of a multiplexer, are able to receive AM/FM/ and CB bands all in a single antenna.
The kit comes with everything you need, and I was surprised to see top quality RG-8X low-loss coax and connectors. The unit is designed to be a simple plug and play.
The mount itself is powder coated plate steel, two pieces joined via a tab, welded, and then ground flat on the back.
The proprietary part that makes the kit streamline and clean looking felt of good quality....but is engineered like utter crap ( Ill explain in a minute). The unit is a barrel, with a threaded ring on top that holds a large flat grooved nut, and a keeper nut hidden underneath in a recess. The barrel has a hole in the bottom and side. The side has a mini coax connector, the bottom gains access to the signal connection between the connector, and RF isolated antenna stud (the stud is pressed into the barrel with a non conductive insulator surrounding it.) The bottom cover for the barrel is a coin type threaded cap. It fits very loose in the bottom (would easily vibrate out and be lost, exposing the signal connector). I used red loctite to keep it in place.
Removing the old mount and cable was simple. Pop the plastic antenna cover off with a screw driver from the antenna stud hole as to not damage the paint. It takes quite a bit a force, and you'll feel like you're about to break it...but it will eventually pop off. Its held on by two plastic tabs at 3 and 9 o'clock. Removing the cable was easier than expected. The cable goes from the mount in the fender, through a hole in line with the exterior hole, and is sealed in place with an ingenious tight fitting folds-on-to-itself rubber grommet (I wish I could have reused the thing its so neat). Just pull hard.

The wiring is straight forward Just connect everything into the multiplexor as labeled. The hardest part was finding where to hide 18' of coax from the radio and the multiplexer itself. (18' is considered optimal for proper impedance, don't coil extra cable or it will induce feedback). I ran it around the cabin under the carpet/ plastic trim to avoid having a bunch of extra. If you have to have extra coiled, use a long figure eight instead of a tight small coil. The kit was designed for a JK, which has more room behind the glove box than the JL....which has a mess of wire harnesses and block terminals stuffed in there. I mounted the multiplexer on a plastic extension coming out of the blower housing. The extension had a hole in it that was the perfect size to accept a license plate mounting screw. A grounding cable must be applied in between the mount and tab of the multiplexer. The kit came with a lock nut with the intent to mount the unit on the threaded post that the JK used to hold in the carpet....but its not there on the JL. The other end of the grounding cable went to a common grounding post under the door wire harness access panel. After all the wires were run and stowed, the box is tucked neatly out of the way, and is unseen unless you put your head in the foot well.


After install, I took the JL out to a wide open area with no buildings or cars to affect SWR (a soccer complex). After tuning the antenna, SWR readings were a surprising 1.6 on Ch 1, 1.6 on Ch 40, and 1.3 on Ch 19. This was with a 4' Firestik II on a Fire spring with the tuning screw all the way in. I was very pleased with this.
At this point, I was VERY pleased with this kit, and was ready to write up a very positive review. After a day of driving around, I get home, check the mount, and see that the antenna had come loose and was starting to flop around a little. No problem....just give the spring a good twist to tighten right? NOPE. I twisted the spring, it got snug, but it kept twisting....and never got tight. Keep in mind I'm doing this BY HAND. The special mounting barrel part is engineered like crap. The antenna mount stud is pressed into the the barrel with a soft polymer insulator liner to isolate it. Lets think about this......a smooth round stud...pressed into a smooth round hole..with a soft plastic liner in between..... Exactly how much torque do you think it would take to overcome the friction that little poly lining is providing, and allow that stud to spin....and break apart that delicate signal wire connection shown above? NOT MUCH
The stud had spun a full revolution, snapping one side of the wire cradle off and bending/ cracking the signal wire. Its something that could be repaired....but there was no point. The way the stud was designed, it was impossible for any antenna to be tightened beyond hand tight. As soon as any stress was imparted by the antenna onto the threads of the stud, the stud would spin in place. A very piss poor design. All that would have been needed to make this work (and work GREAT) was have the section of stud that was being pressed into the barrel be any shape other than ROUND. Hex...square...triangle....anything to prevent it spinning in its slippery poly lining. Even having a hex head hidden under the access cap that could accept a small socket to torque the antenna against would have worked...but NOPE.
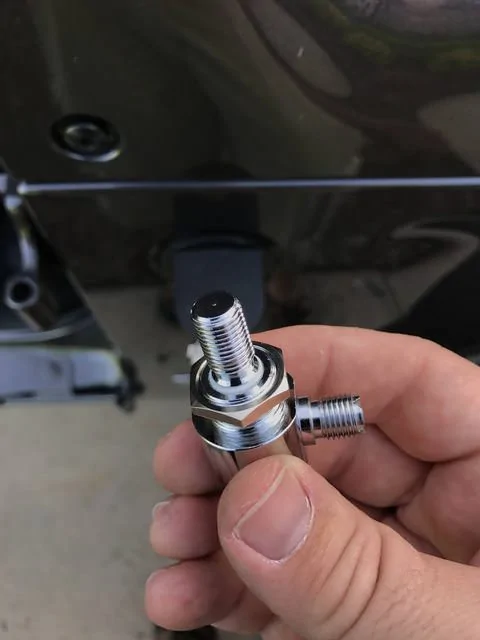
After getting pretty angry that this $120 kit had such a basic design flaw, I decided that I liked the placement of the mount, and liked the idea of the multiplexer. So I cut the mini connector off the coax and put together a traditional CB post/ stud mount. Using an eyelet and 3/8" bolt for signal (insulated against the mount) and a small eyelet crimped on to the coax shielding and fixed under one of the three fender mounting screws. I had a dead ringer ground measured from the interior connector to an interior ground stud. It measured a tenth of an ohm on the multimeter. Looked good to me!
SWR on Ch 1 was 3.0, and Ch 40 was a kill-your-radio 3.5. FML......
That just goes to prove a good electrical continuity =/= a good RF continuity.
Giving up for the night, and about to throw the whole kit in the trash, I go to bed rather frustrated.
The next morning, in a final attempt to make the thing work out, I decide to try a PL259 type mount. I try a simple crimp-on connector, and a 'heavy duty' stud mount. Literally the worst money could buy from the local truck stop.

Going back to the open fields to test SWR, the first hit was 2.8 on Ch 1 (......great......), and a 1.3 on Ch 40 (...wait....this might actually work...). I retune the end on my antenna, and struck gold. 1.4 on Ch 1, 1.5 on Ch 40......and a perfect 1.0 on CH 19!
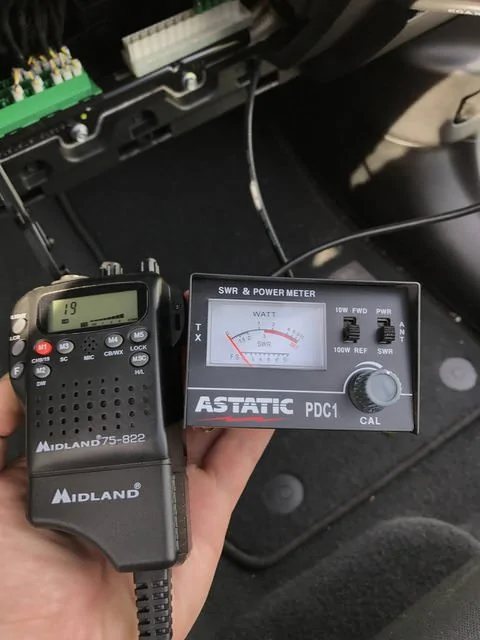
AM and FM reception is the best Ive had, clearly picking up stations that were 'on the edge' in my area previously, and CB reception leaps and bounds better than the spare tire mount setup I had on my JK. The Midland 75-822 is only kicking out 3 watts according to the SWR meter, but at a perfect 1.0 SWR on Ch 19 I think Ive achieved more than I could have hoped for in a mobile mounted portable CB.
The whole setup doesn't look half bad either.


That 4' stick does move around quite a bit. At 70 mph it tilts back about even with the A-pillar. Though, with as tall as it is I'd much rather have it on a floppy spring rather than have a 4' long cheater bar torque on an aluminum fender when it hits a tree. The antenna does neatly tilt back and rest in the windshield frame when I have the doors off though. About perfect for trail riding in the woods or going into a parking garage.
So........in the end, this kit did work out. Would I recommend it? Not for $120..... BUT, it is one of the very limited options available for the JL right now. The multiplexer works, and works very well.....but a cheap multiplexer can be had for $25. $45 if you get a "good" one. I do have to say that the supplied cables are top quality, and would probably be a $40 endeavor to assemble them by ones self at home.....so a home built rig like this would probably cost you about $80 if you did all top shelf parts (without the mounting plate). The mounting plate is of ok quality, but since the weld is ground flat on the back and doesn't come through to the front side of the tab, its hard to say how strong or durable it would be. The proprietary barrel connector? Just throw it in the trash.
Sponsored
Last edited: