Varilux
Well-Known Member
- First Name
- Pete
- Joined
- Dec 29, 2018
- Threads
- 16
- Messages
- 320
- Reaction score
- 689
- Location
- Hickory Creek, TX
- Vehicle(s)
- 2018 Jeep Wrangler Rubicon
- Vehicle Showcase
- 1
- Thread starter
- #1
I wasn't able to find a pre-made kit for mounting a 5 gallon Jerry can to a JL that I liked, so I put together the following solution. Of course, it only works if you delete the spare (which is probably the BEST mod I've made to my Jeep thus far), but it is super solid, easy to do, and relatively inexpensive. If you still have your spare mounted to the tail gate, see the bottom of the post for an option that will still allow you to mount a gas can using the same brackets.

List of parts:
Retrofit Offroad Tailgate Hinge Adapter - $39
JEGS Jerry Can & Holder Kit - $88
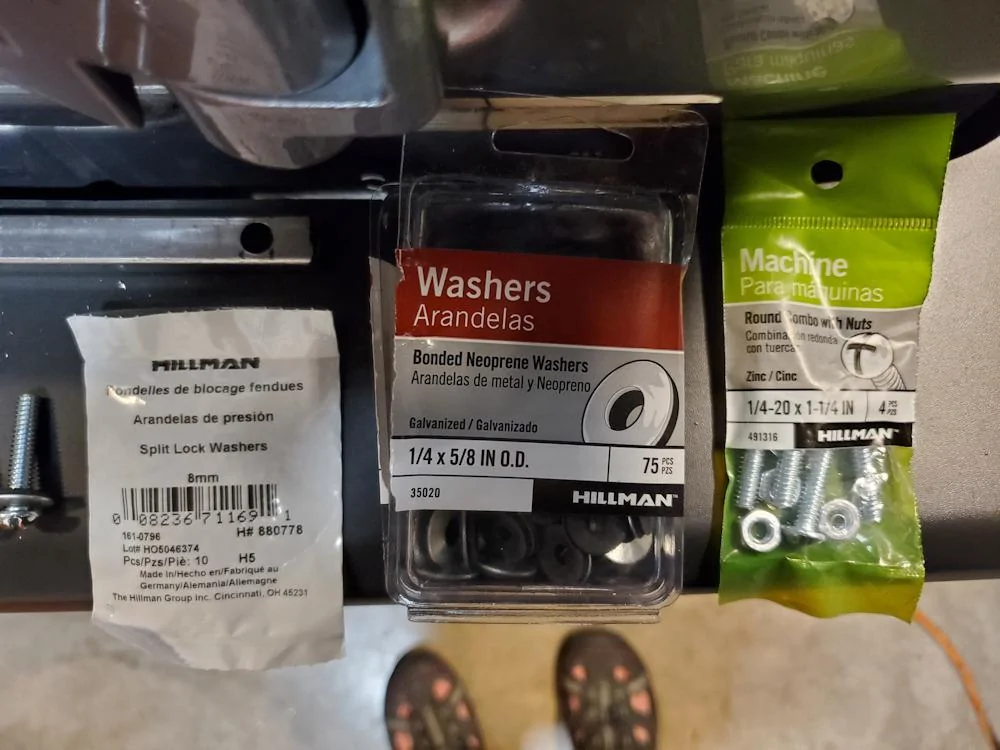
Hardware (I used 1/4" bolts and various washers shown in the picture below) - $8 (Lowe's)
Piece of 1/2" boxed steel - $5 (Lowe's)

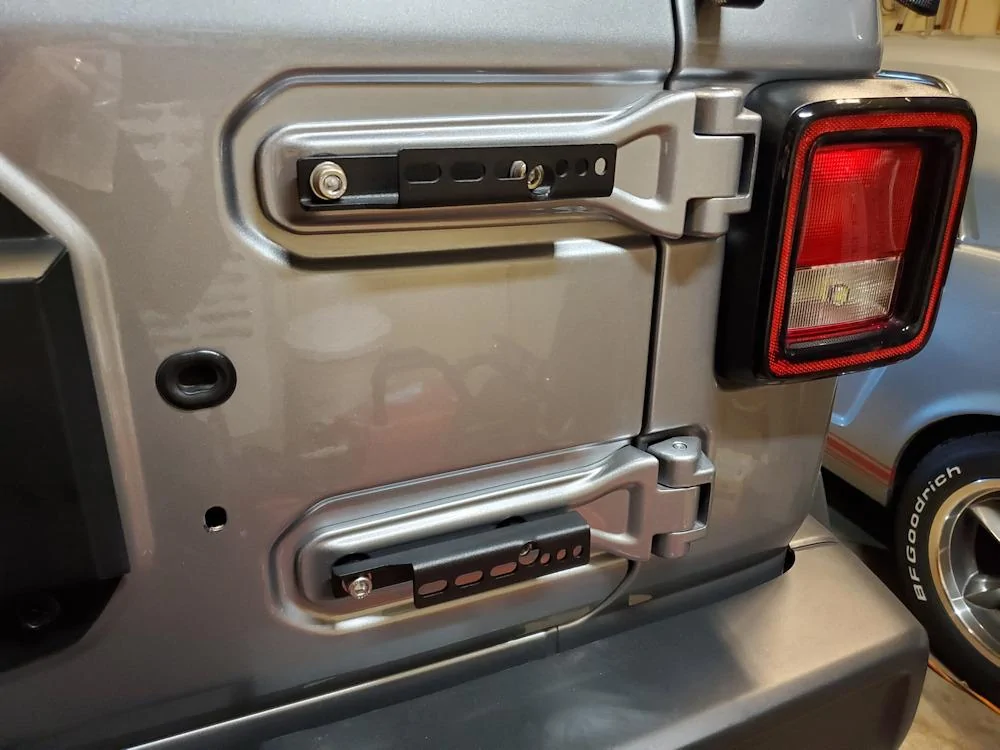
STEP ONE: Install Retrofit Offroad Tailgate Hinge Adapters.
You'll need a Torx 55 bit (that bit isn't included in the kit Jeep supplies for removing the doors, etc.). My bolts came out really easily with an impact driver (do the top hinge first, then the bottom). This will be the result:
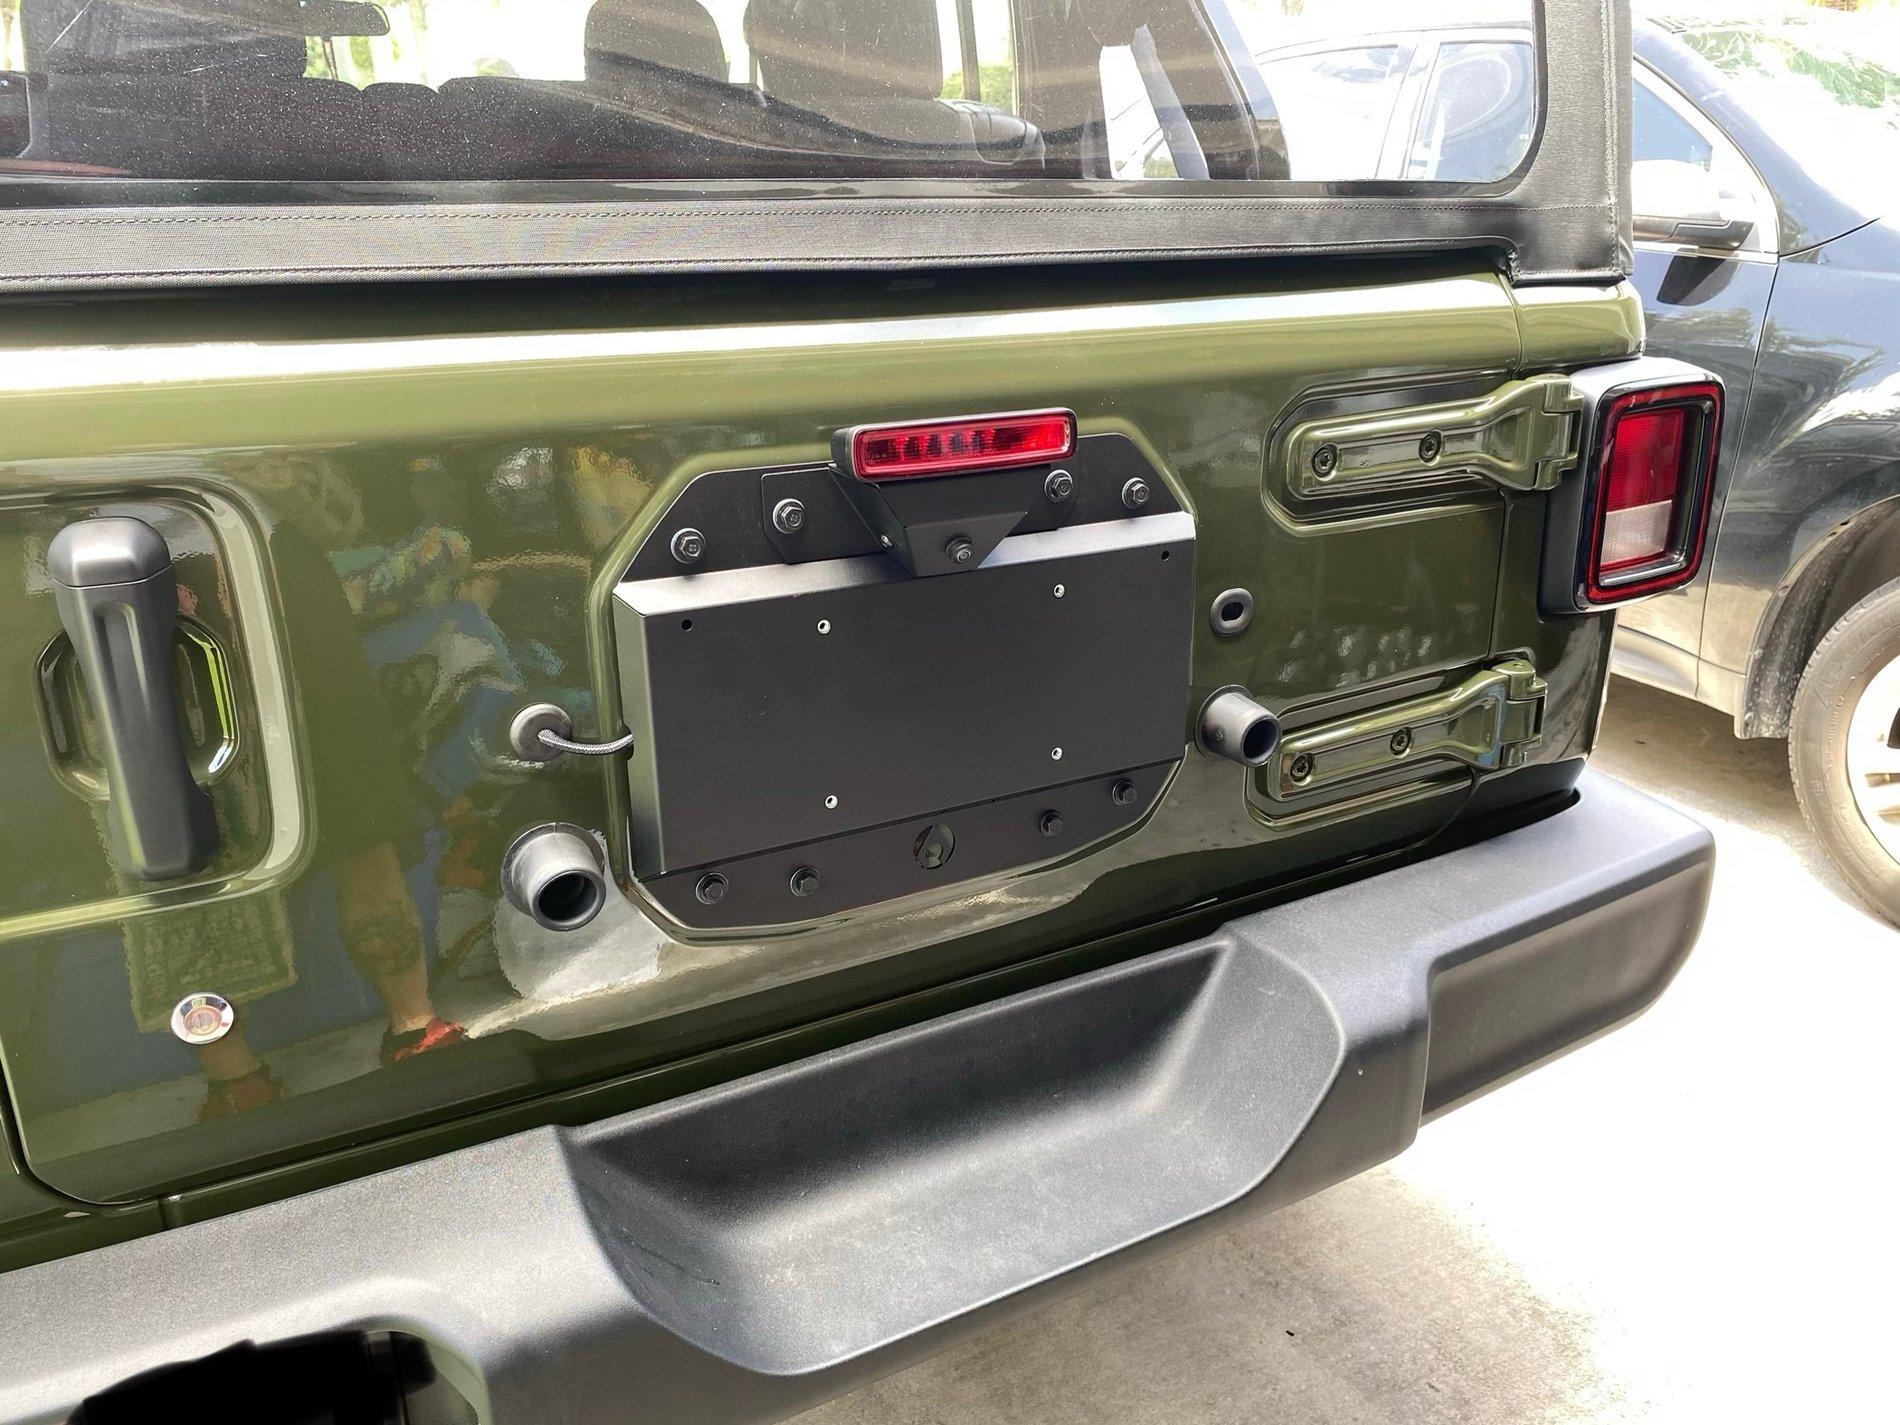
STEP TWO: Measure and cut vertical mounting bar.
Measure the distance from the bottom edge of the lower tailgate adapter to the top edge of the upper tailgate adapter, and cut your 1/2" boxed steel bar to that length. Determine where you need to drill 5/16" holes at the top and bottom (use a Sharpie to indicate where the holes need to go to mount to the top and bottom brackets). NOTE: You want to install the vertical bar on the second to right hole on the bracket (if you install on the far right hole, the Jerry can will not clear your tail light when you open the tailgate).
Once you have the top and bottom holes drilled, go ahead and fasten the top to the TOP adapter bracket. Then take your Jerry can mount and run a bolt through the bottom right hole on the mount and the adapter bracket. Now you can use a Sharpie to mark where the hole for the top right mounting hole in the mount needs to go on the vertical bar. Drill that hole and then mount the vertical bar and the can mount.
STEP THREE: Measure and cut the horizontal mounting bar.
You now have the can mount attached to the Jeep via the vertical bar. Measure from the edge of the vertical bar to about 3/4" beyond the bottom left mounting hole on the mount and cut your 1/2" boxed steel bar to that length.
On the bottom adapter bracket, there are several elongated mounting holes. Mark two hole locations in the middle of two of the elongated mounting holes. Next, mark the location of the bottom left hole on the mount. When you drill your holes in the horizontal bar, drill right where you marked for the locations that will mount to the bracket, but about 1/4" inward (away from the edge of the bar) for the hole that will be used to secure the bottom left hole on the mount. This will ensure the horizontal bar doesn't need to be further trimmed (because you are pulling it slightly away from the vertical mounting bar).
At this point, I used my bench grinder to clean up the ends of the bars and then sprayed both of them with some bedliner. Once dry, you can install all the hardware and tighten it down. For each bolt, I put a neoprene washer on the bolt, then a dab of Lock-tite on the end of the bolt, passed the bolt through the holes, then put a locking washer and the nut. The nut is 7/16" in size- so just hold the nut with a wrench and tighten with a screwdriver. Once you are all done, you have this...
The little plastic squares are "cushions" that come stuck to the mount- I'm guessing to keep the can from being marred.
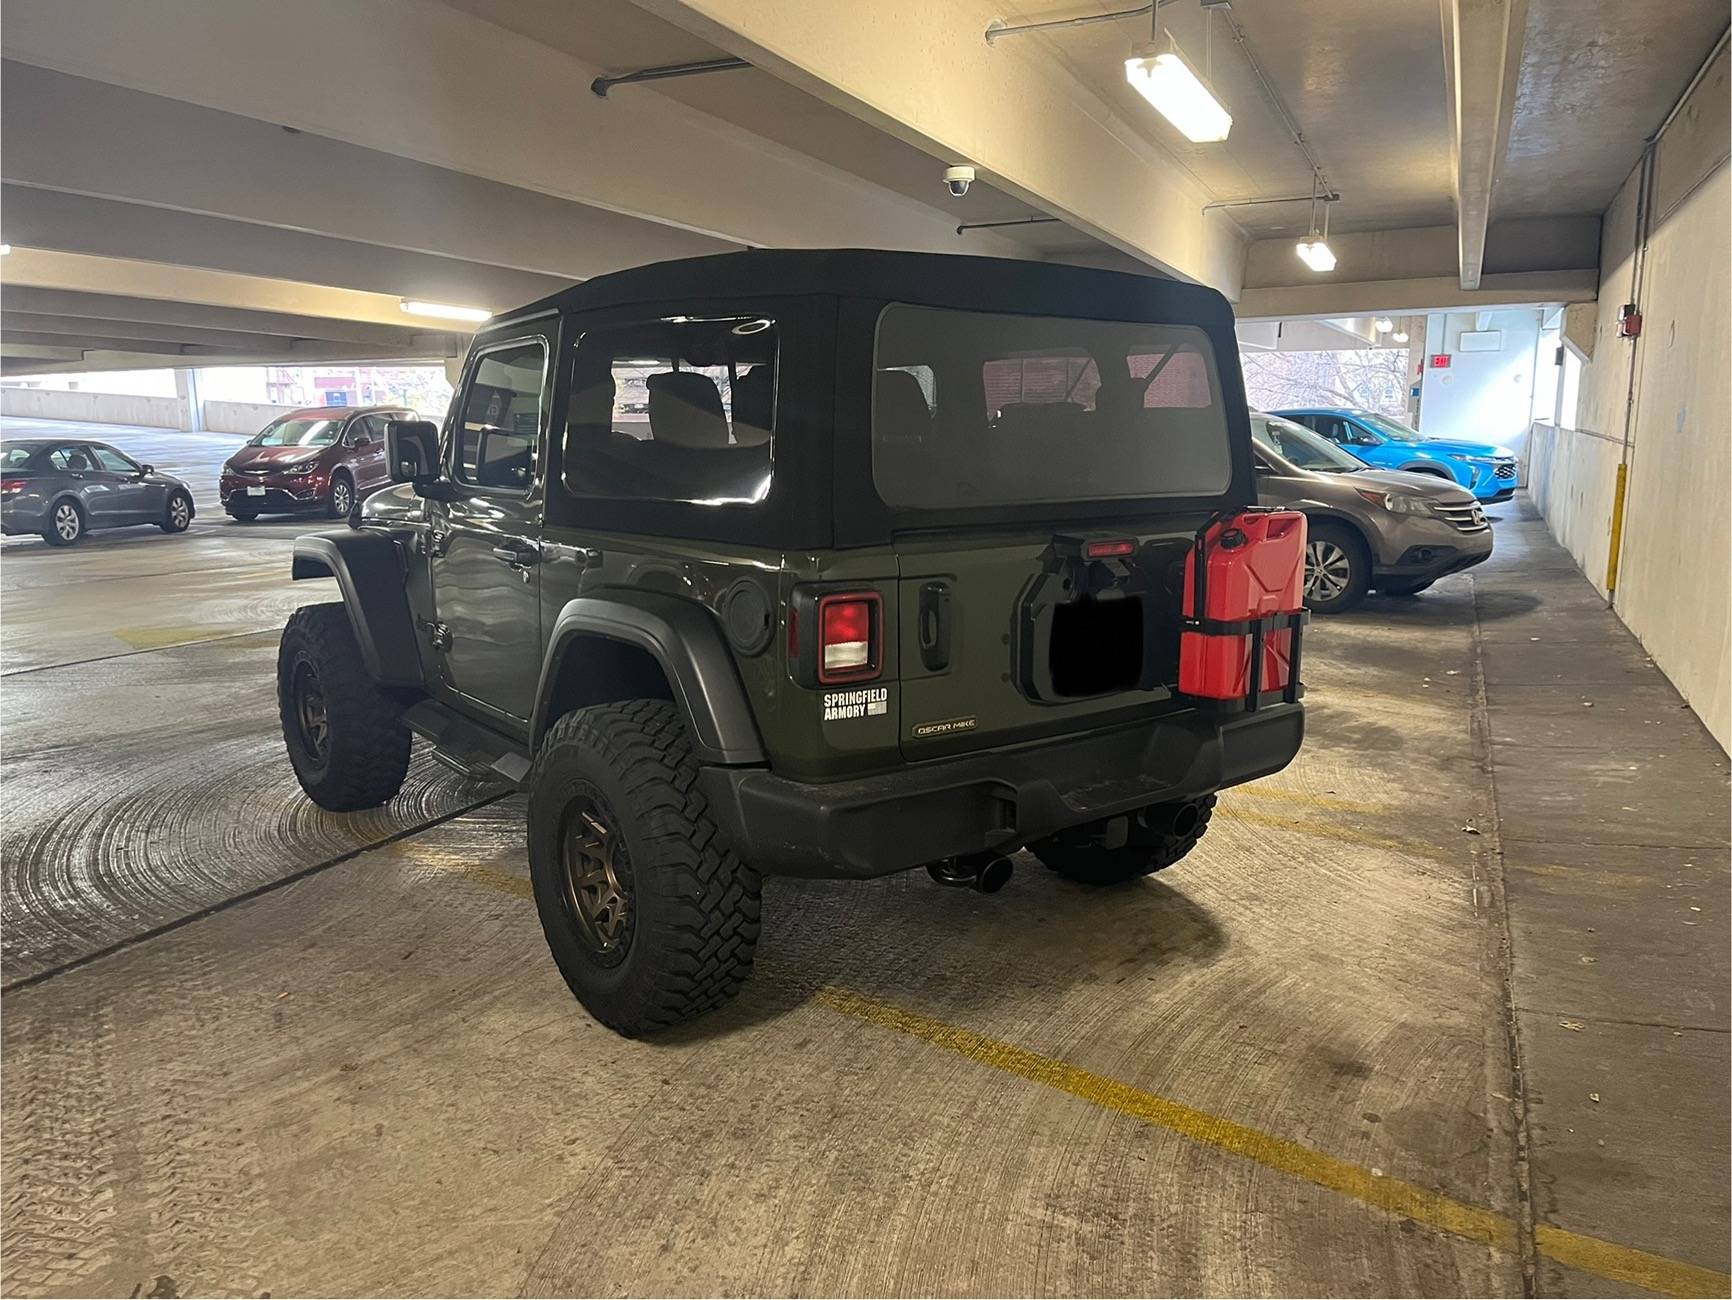
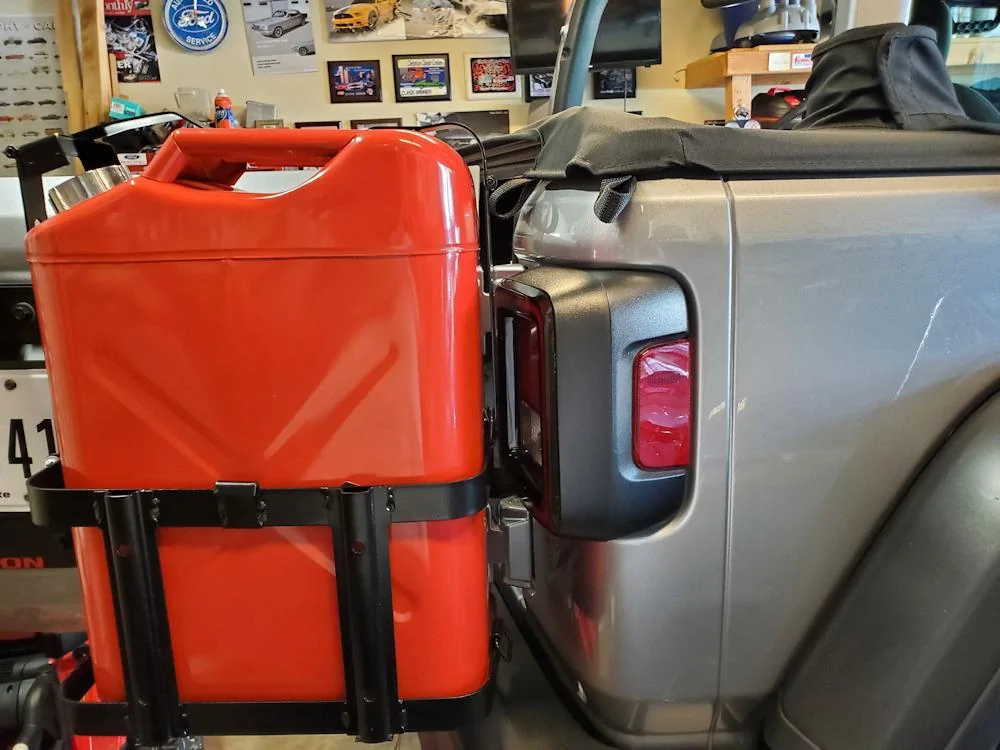
STEP FOUR: Install the can.
I placed the locking mechanism on the left (but the mount can be installed in either direction). Install the Jerry can and then take the supplied metal strap and clip it to the side of the mount that is away from the latch hole. The spout side of the can goes towards the latch, and the metal strap fits over the handle and then is pulled down to securely fasten the can in the holder. I need to run out and get a small combination lock. That's it- you are done!
Additional Notes:
1. My first attempt to fab up the mounting hardware involved 14 gauge steel (the kind with the holes in it). There was way too much flexibility with this setup, so it was back to Lowe's for the boxed steel bars, which have absolutely zero flexibility. The can is not going anywhere the way it is currently mounted.
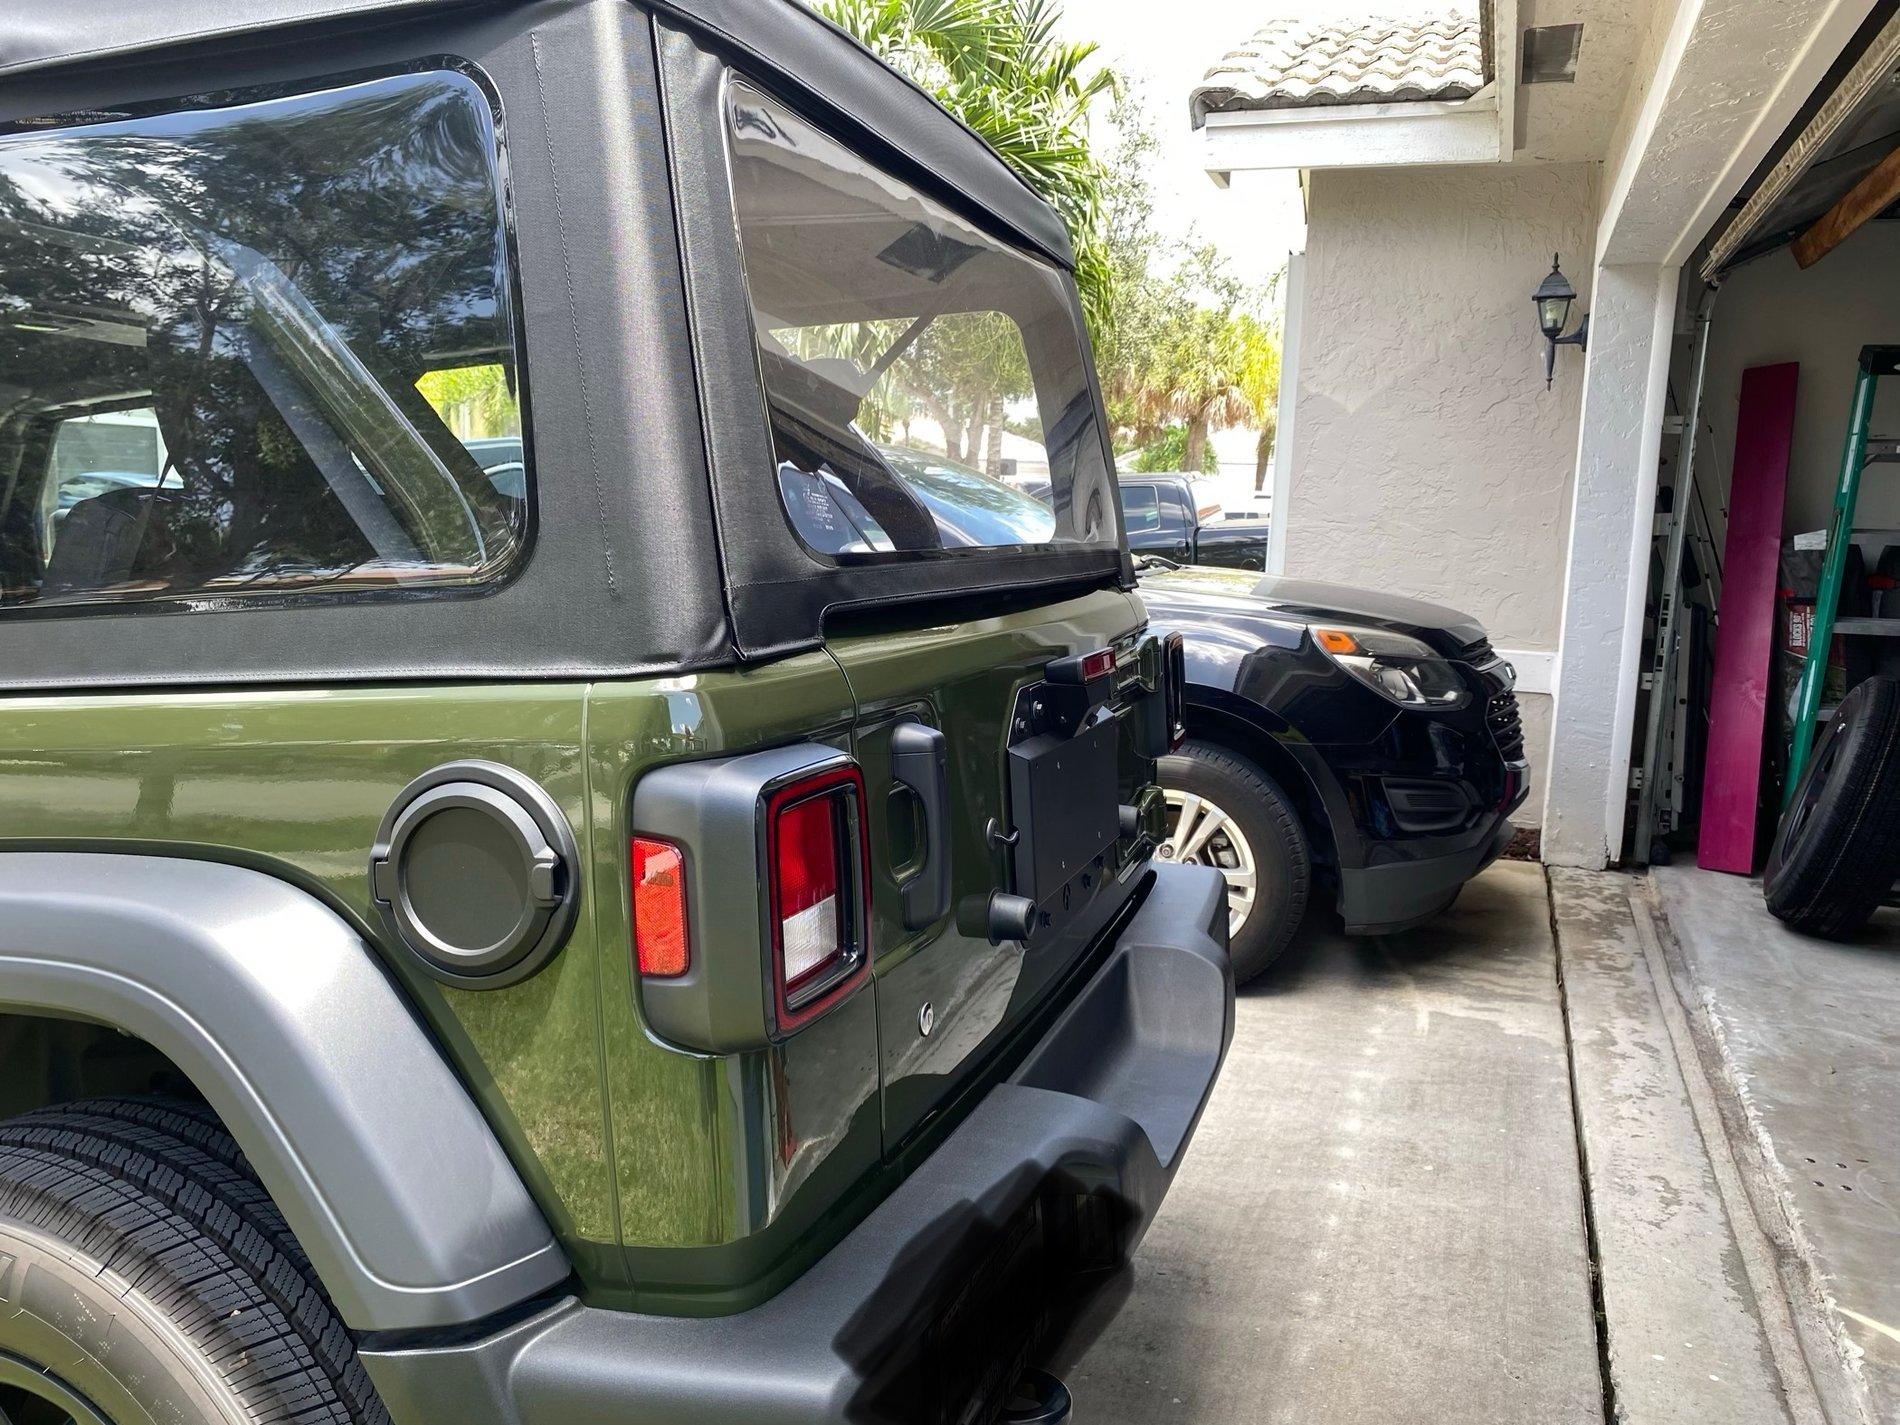
2. As mentioned above, when you use the second from the right mounting holes on the brackets for the vertical bar, the can will clear the tail light with the tailgate open. Below is a picture of the tail gate open to the factory "stop." There is about 3/4" of clearance. Full disclosure, the tailgate can be swung open a few inches beyond the "stop," and if you try to push it beyond the factory "stop," the mount will eventually contact the tail light. I do not foresee this being an issue.
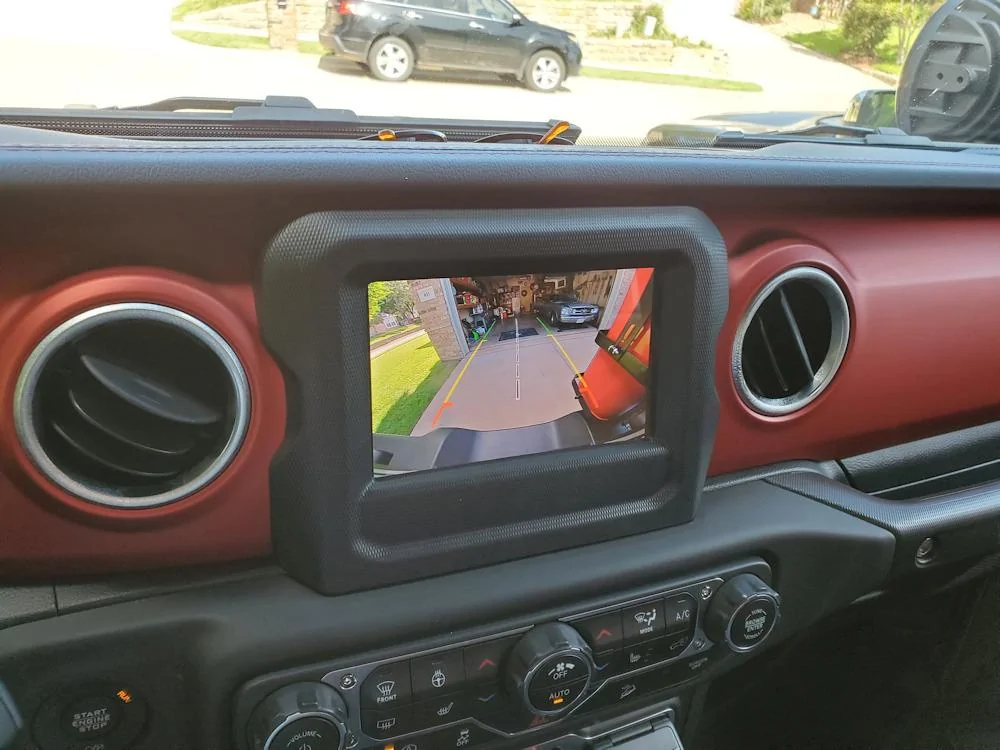
3. When I went for my first test drive, I did encounter ONE issue I had not thought about ahead of time. Apparently, that rear view camera has a VERY wide angle, and the can is going to obstruct a bit of your view through the camera.
4. IF YOU STILL HAVE YOUR SPARE MOUNTED TO THE TAILGATE.
Retrofit Offroad also sells a Rotopax mount for the hinge adapters I used so you can attach one of those flat plastic Rotopax cans perpendicularly to your tail gate. Here's the link: Retrofit Offroad
Overall, this was one of those (rare) projects that went pretty smoothly without any major surprises, and I'm am super-pleased with the end result. We go through a bit of fuel up at our cabin for ATVs, chainsaws, etc., and I always hated having to get to the cabin, pull out the cans, put em in the Jeep, back to the gas station, and then secure them in the back of the Jeep for the bumpy ride back. Now, I can just stop at the gas station on the way, fill the Jeep and the can up, and we should be good to go. Plus, I think it looks pretty good too...


List of parts:
Retrofit Offroad Tailgate Hinge Adapter - $39
JEGS Jerry Can & Holder Kit - $88
Hardware (I used 1/4" bolts and various washers shown in the picture below) - $8 (Lowe's)
Piece of 1/2" boxed steel - $5 (Lowe's)
STEP ONE: Install Retrofit Offroad Tailgate Hinge Adapters.
You'll need a Torx 55 bit (that bit isn't included in the kit Jeep supplies for removing the doors, etc.). My bolts came out really easily with an impact driver (do the top hinge first, then the bottom). This will be the result:
STEP TWO: Measure and cut vertical mounting bar.
Measure the distance from the bottom edge of the lower tailgate adapter to the top edge of the upper tailgate adapter, and cut your 1/2" boxed steel bar to that length. Determine where you need to drill 5/16" holes at the top and bottom (use a Sharpie to indicate where the holes need to go to mount to the top and bottom brackets). NOTE: You want to install the vertical bar on the second to right hole on the bracket (if you install on the far right hole, the Jerry can will not clear your tail light when you open the tailgate).
Once you have the top and bottom holes drilled, go ahead and fasten the top to the TOP adapter bracket. Then take your Jerry can mount and run a bolt through the bottom right hole on the mount and the adapter bracket. Now you can use a Sharpie to mark where the hole for the top right mounting hole in the mount needs to go on the vertical bar. Drill that hole and then mount the vertical bar and the can mount.
STEP THREE: Measure and cut the horizontal mounting bar.
You now have the can mount attached to the Jeep via the vertical bar. Measure from the edge of the vertical bar to about 3/4" beyond the bottom left mounting hole on the mount and cut your 1/2" boxed steel bar to that length.
On the bottom adapter bracket, there are several elongated mounting holes. Mark two hole locations in the middle of two of the elongated mounting holes. Next, mark the location of the bottom left hole on the mount. When you drill your holes in the horizontal bar, drill right where you marked for the locations that will mount to the bracket, but about 1/4" inward (away from the edge of the bar) for the hole that will be used to secure the bottom left hole on the mount. This will ensure the horizontal bar doesn't need to be further trimmed (because you are pulling it slightly away from the vertical mounting bar).
At this point, I used my bench grinder to clean up the ends of the bars and then sprayed both of them with some bedliner. Once dry, you can install all the hardware and tighten it down. For each bolt, I put a neoprene washer on the bolt, then a dab of Lock-tite on the end of the bolt, passed the bolt through the holes, then put a locking washer and the nut. The nut is 7/16" in size- so just hold the nut with a wrench and tighten with a screwdriver. Once you are all done, you have this...
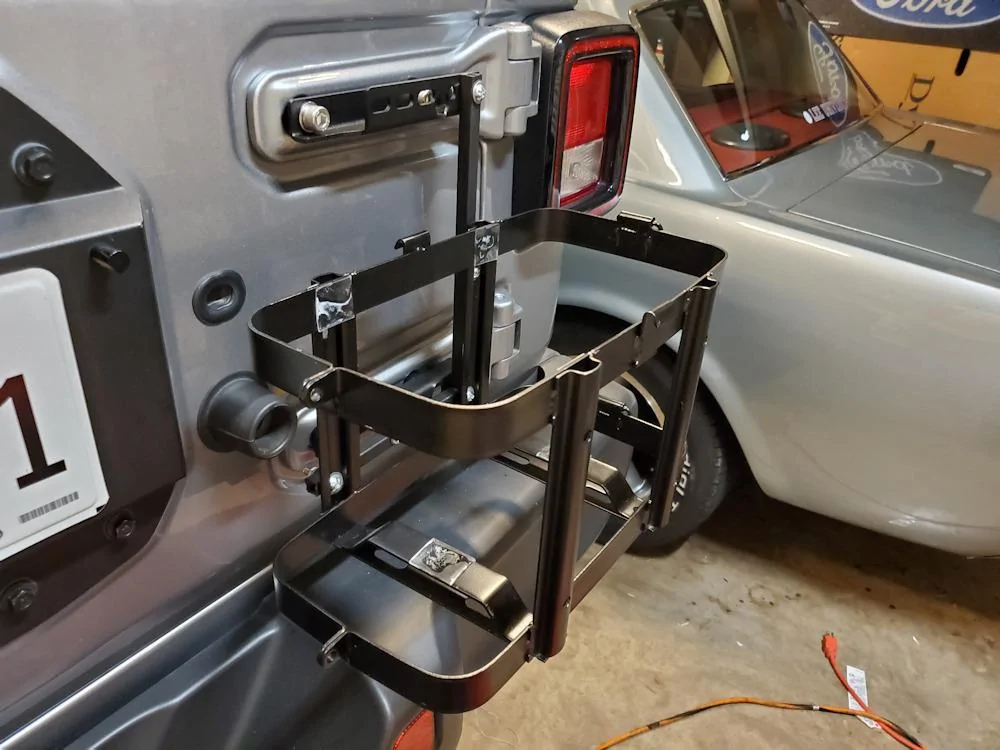
The little plastic squares are "cushions" that come stuck to the mount- I'm guessing to keep the can from being marred.
STEP FOUR: Install the can.
I placed the locking mechanism on the left (but the mount can be installed in either direction). Install the Jerry can and then take the supplied metal strap and clip it to the side of the mount that is away from the latch hole. The spout side of the can goes towards the latch, and the metal strap fits over the handle and then is pulled down to securely fasten the can in the holder. I need to run out and get a small combination lock. That's it- you are done!
Additional Notes:
1. My first attempt to fab up the mounting hardware involved 14 gauge steel (the kind with the holes in it). There was way too much flexibility with this setup, so it was back to Lowe's for the boxed steel bars, which have absolutely zero flexibility. The can is not going anywhere the way it is currently mounted.
2. As mentioned above, when you use the second from the right mounting holes on the brackets for the vertical bar, the can will clear the tail light with the tailgate open. Below is a picture of the tail gate open to the factory "stop." There is about 3/4" of clearance. Full disclosure, the tailgate can be swung open a few inches beyond the "stop," and if you try to push it beyond the factory "stop," the mount will eventually contact the tail light. I do not foresee this being an issue.
3. When I went for my first test drive, I did encounter ONE issue I had not thought about ahead of time. Apparently, that rear view camera has a VERY wide angle, and the can is going to obstruct a bit of your view through the camera.
4. IF YOU STILL HAVE YOUR SPARE MOUNTED TO THE TAILGATE.
Retrofit Offroad also sells a Rotopax mount for the hinge adapters I used so you can attach one of those flat plastic Rotopax cans perpendicularly to your tail gate. Here's the link: Retrofit Offroad
Overall, this was one of those (rare) projects that went pretty smoothly without any major surprises, and I'm am super-pleased with the end result. We go through a bit of fuel up at our cabin for ATVs, chainsaws, etc., and I always hated having to get to the cabin, pull out the cans, put em in the Jeep, back to the gas station, and then secure them in the back of the Jeep for the bumpy ride back. Now, I can just stop at the gas station on the way, fill the Jeep and the can up, and we should be good to go. Plus, I think it looks pretty good too...

Sponsored
Last edited: