Sponsored

Pulling apart a 2024 dash?

JCae2798

Well-Known Member
First Name
John
Joined
Sep 5, 2019
Threads
2
Messages
122
Reaction score
108
Location
Jersey
Vehicle(s)
2020 JLU (RIP), 2021 GC L, 2024 JLU 4xe
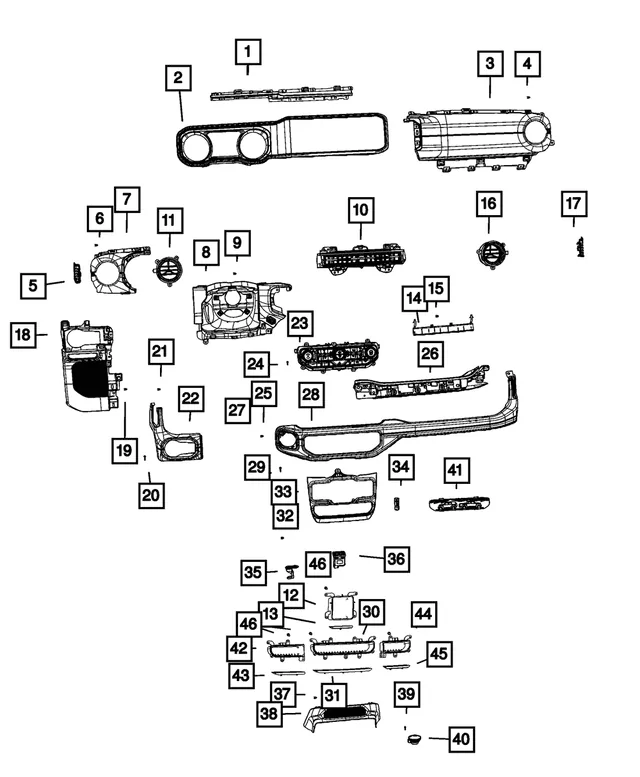
I've been looking and checked with Curtchfield too, but so far no luck finding any tips on taking apart the new 2024 dash. Does anyone know how long it typically takes before guides start popping up on these new designs? Any insider dealer boys have their hands on documentation for this?

I'm looking at adding a PAC and need to find my way into the back of the headhunt to check wire hardness etc so the radio needs to come out as I understand it. DSR1 will not be an option in my current case. If anyone has any ETA or tips on how to look at taking apart the current dash, I'd appreciate it. From what I can tell this whole dash seems to be one piece that goes across the whole cluster unit. Hopefully its not too much of a PITA to take apart... I also noticed the passenger side grab handle is different where we do not have visible bolts in the front. Let the fun begin...
Sponsored

 
OP
OP
JCae2798

JCae2798

Well-Known Member
First Name
John
Joined
Sep 5, 2019
Threads
2
Messages
122
Reaction score
108
Location
Jersey
Vehicle(s)
2020 JLU (RIP), 2021 GC L, 2024 JLU 4xe
This new design is much more PITA and a real bummer for those like me that were hoping current solutions would be an option. Watching this video, the unit itself is VERY different from previous models. Looks like we'll be months out before we start seeing solutions showing up to give us more flexibility.

EDIT: Well my dumbass needs to be patient and keep doing research. Looks like the UC5 units are all the same and PAC does have a hardness that may work! The research continues...
 
Last edited:

Sponsored

OP
OP
JCae2798

JCae2798

Well-Known Member
First Name
John
Joined
Sep 5, 2019
Threads
2
Messages
122
Reaction score
108
Location
Jersey
Vehicle(s)
2020 JLU (RIP), 2021 GC L, 2024 JLU 4xe
Ok new video posted (driver side knee pod). Author mentioned he will keep posting videos daily/weekly so I will keep this post updated with them. Good news is the metra pods fit.

What I find interesting is the amount of work. Seems worse then previous years but the video author mentions it being easier right around the 7:30 mark.

According to this post though I wonder if there is an easier way...
https://www.jlwranglerforums.com/forum/threads/adding-an-aftermarket-amp-s.6568/

Here's the video:


And one other update, I spoke to PAC and although they think the UC5 adapter should work with the PAC AmpPro, not confirmed at the moment.: https://www.crutchfield.com/p_541APHCH42/PAC-APH-CH42-AmpPro-Harness.html
 
OP
OP
JCae2798

JCae2798

Well-Known Member
First Name
John
Joined
Sep 5, 2019
Threads
2
Messages
122
Reaction score
108
Location
Jersey
Vehicle(s)
2020 JLU (RIP), 2021 GC L, 2024 JLU 4xe
Well folks I thought I'd go out on a limb and give this a try to install a AmpPro and failed. I ended up purchasing the AP4-CH41 (R.2) with the PAC APHCH42 AP4 harness and got no signal to the screen. I'm not sure if I did something wrong or this setup will just not work with the 2024 radios...

When I first tried i only plugged in the harness and tried powering it up. No luck. Thought maybe the AmpPro had to be connected for the radio to get signal so plugged the AmpPro and tried again. Again no signal to the screen and no lights on the AmpPro. Am I doing this right?


As for ripping things part, I pretty much followed the original video I shared above. To make it happen i basically did the following:
- Started with the very top part of the dash where the 4xe light is.
- I then pulled the top dash front facing leather bar that goes across the whole dash. Please remember there are 2 screws toward the center that needs to be taken out once the center top piece is pulled up.
- From the very left corner I had to take the corner screws off because this piece stands in front of the left side of the front panel closer to the cluster. As the video states the whole thing does come off as a single piece.
- I then very carefully pulled the dash out toward me and it released all the clips. This was a very nerve reckoning process as i was super afraid i was going to break something but TAKE YOUR TIME.
- From there i was able to get the screen off and then unscrew the brain of the radio as the original video showed.
Jeep Wrangler JL Pulling apart a 2024 dash? IMG_8893
 
Last edited:

johnparjr

Well-Known Member
First Name
John
Joined
Jan 7, 2019
Threads
45
Messages
617
Reaction score
593
Location
New Caney, TX
Vehicle(s)
2024 Jeep Wrangler Sahara 4xe
Does the panel that has the 12 volt socket and the window buttons can that be removed without removing the top part of the dash
 

Sponsored

MerPinXEss

Well-Known Member
Joined
Jan 18, 2022
Threads
16
Messages
316
Reaction score
682
Location
Kdale NC
Vehicle(s)
‘24 4xe JLU
how did you pop it out it’s not like the 23 or less
Start at the push button start seam, I think there was also a bolt behind the carpet on the trans tunnel. The plastic came out enough to get to the back of the lighter.
 

Take57

Well-Known Member
Joined
Jul 14, 2022
Threads
6
Messages
168
Reaction score
263
Location
TUS/PDX
Vehicle(s)
2024 Sport S
Just pulled the trim piece holding the start/stop button, the temp/fan/volume controls/buttons assembly and the window/12v/media controls to install a harness to power a dashcam and phone charger. Whew, I think that's everything attached to those two trim pieces.

Big takeaway: It's not as daunting as it appears.

The video in this thread covers the key points in pulling the piece(s). Despite the warranted jawing about the 2024 trim changes by the fellow in the video, at the end of the day, to get enough access for tapping/bypassing the 12v cigar... err power port from the back, you're really only taking about 7 Phillips trim screws, plus four more if you're running a USB to the top of the dash.

I did start at the top of the dash because I mounted the phone on a Tackform AMPS articulated arm with a powered Mag-Safe charger holding the phone itself. As mentioned, it's a four screw removal.

I had already run the power for the dashcam (a cheap ass Amazon AQV super-cap cam that produces a 1080p image that should at least hold up in court if need be, and set me back a whopping $30. Did I mention I drive a soft top? If the cam doesn't grow legs and walk away I'll be surprised) down the passenger side A-Pillar.

Next I tackled the main event, as it were, the redesigned dash grab bar trim piece. I really did find if you gently, but firmly squeeze, nudge, wiggle the parts they'll eventually comply. (Like I treat my ladies... oh brother :angel:)

I started with the top two screws on the passenger side. Got enough give on the trim top trim running the length of the dash to be able to unscrew the grab bar part. (BTW - A stubbie Phillips will be your best friend for the exercise).

I then went after the three "hidden" screws behind the grab bar. There's trim covering the screws that needs a little convincing to let go, but again, firm but gentle is the word of the day. A couple of items of note. A cell phone with a live camera is super handy for spotting where the screws are located where you can't see 'em, also you'll want your stubbiest of stubbies to unscrew to hardware. I ended up using a "tools included" offset phillips that was thrown in with some other gee-gaw put on the Jeep.

I then went after the two screws to the end side of the bar trim exposed when you pop a bit o' plastic lower and outside at glovebox level to get at the screws above it. Happy coincidence was it was a trim piece that I had to go around running the dashcam line so with it temporarily gone I bypassed a bunch passenger foot level wire tucking and hiding.

I know this sounds bass-akwards from the video where he removes starting at the start/stop button end and goes right, but in another happy coincidence but going at it from right to left seemed to free up a bunch of clips with minimal effort. A couple of trim tool pops near the start/stop button and it came loose pretty easy.


Disconnect the start/stop and the button array connectors and freed the whole shootin' match. There's one screw (Humm.. I think that makes number seven) that holds the 12v/window switch/media panel along with some clips so it's an easy pull. Kind of wished I'd hadn't left the gear shift know in park because it limits how far out you can pull the panel but all I needed was enough room to pull the connector off the back of the 12v and do the bypass.

The 12v has a keeper that's holds the connector to the hardware that will induce a few cuss words but persistence pays. A short word about the bypass. It's a Proscenium PRO - JPAPTH1 T-adaptor feeding to a 12v-5v buck converter with two USB inline female connector outputs. All from Amazon. Yes, I do own some Amazon stock but trust me, connectors aren't where the money's at.

Running the phone charger USB-C to the bypass bundle was pretty straight forward after I figured out there was no need to go behind everything mounted inside the dash stack. A side run maneuver works just fine, plus no dealing with new middle vent location.

Reassembly was unremarkable. 7 screws/10 fingers, yup everything accounted for. Only had two heart murmur moments. One was finding an unmated harness connector in the 12v/window/media area. Yiked it until it dawned on me it was for the accessory switch panel which I didn't order. The other was getting no love from the phone charger cable. Tested all wiring prior to install and was good to go, but for some reason this cable tested fine but missed the part about working. Chocked it up to gremlins and swapped it out with another. Finally joy in Mudville.

In conclusion (bet you never thought I'd get there) I now have power for a dashcam and a phone charger without tying up any factory ports, a clean, reversable tap and no visual evidence of the modification.

I'd add pictures to see the end result but you wouldn't see it. That's the idea.
Actually, truth be told, I'll clean it up esthetically after I get into our new home in Tucson this fall. This was all done in a dank parking garage at our condo in Oregon which after the powers that be saw what I was up to issued a reminder to all residents that there's no car fixin' in the parking garage, so I wrapped it up on the mean streets of downtown Portland with three hours on the Parking Kitty meter app.

Good night fellow forum members and all ships at sea....
 

BigManRockin

New Member
First Name
Arlo
Joined
Mar 3, 2024
Threads
0
Messages
1
Reaction score
0
Location
Usa
Vehicle(s)
Jeep jl, jeep tj
Just pulled the trim piece holding the start/stop button, the temp/fan/volume controls/buttons assembly and the window/12v/media controls to install a harness to power a dashcam and phone charger. Whew, I think that's everything attached to those two trim pieces.

Big takeaway: It's not as daunting as it appears.

The video in this thread covers the key points in pulling the piece(s). Despite the warranted jawing about the 2024 trim changes by the fellow in the video, at the end of the day, to get enough access for tapping/bypassing the 12v cigar... err power port from the back, you're really only taking about 7 Phillips trim screws, plus four more if you're running a USB to the top of the dash.

I did start at the top of the dash because I mounted the phone on a Tackform AMPS articulated arm with a powered Mag-Safe charger holding the phone itself. As mentioned, it's a four screw removal.

I had already run the power for the dashcam (a cheap ass Amazon AQV super-cap cam that produces a 1080p image that should at least hold up in court if need be, and set me back a whopping $30. Did I mention I drive a soft top? If the cam doesn't grow legs and walk away I'll be surprised) down the passenger side A-Pillar.

Next I tackled the main event, as it were, the redesigned dash grab bar trim piece. I really did find if you gently, but firmly squeeze, nudge, wiggle the parts they'll eventually comply. (Like I treat my ladies... oh brother :angel:)

I started with the top two screws on the passenger side. Got enough give on the trim top trim running the length of the dash to be able to unscrew the grab bar part. (BTW - A stubbie Phillips will be your best friend for the exercise).

I then went after the three "hidden" screws behind the grab bar. There's trim covering the screws that needs a little convincing to let go, but again, firm but gentle is the word of the day. A couple of items of note. A cell phone with a live camera is super handy for spotting where the screws are located where you can't see 'em, also you'll want your stubbiest of stubbies to unscrew to hardware. I ended up using a "tools included" offset phillips that was thrown in with some other gee-gaw put on the Jeep.

I then went after the two screws to the end side of the bar trim exposed when you pop a bit o' plastic lower and outside at glovebox level to get at the screws above it. Happy coincidence was it was a trim piece that I had to go around running the dashcam line so with it temporarily gone I bypassed a bunch passenger foot level wire tucking and hiding.

I know this sounds bass-akwards from the video where he removes starting at the start/stop button end and goes right, but in another happy coincidence but going at it from right to left seemed to free up a bunch of clips with minimal effort. A couple of trim tool pops near the start/stop button and it came loose pretty easy.


Disconnect the start/stop and the button array connectors and freed the whole shootin' match. There's one screw (Humm.. I think that makes number seven) that holds the 12v/window switch/media panel along with some clips so it's an easy pull. Kind of wished I'd hadn't left the gear shift know in park because it limits how far out you can pull the panel but all I needed was enough room to pull the connector off the back of the 12v and do the bypass.

The 12v has a keeper that's holds the connector to the hardware that will induce a few cuss words but persistence pays. A short word about the bypass. It's a Proscenium PRO - JPAPTH1 T-adaptor feeding to a 12v-5v buck converter with two USB inline female connector outputs. All from Amazon. Yes, I do own some Amazon stock but trust me, connectors aren't where the money's at.

Running the phone charger USB-C to the bypass bundle was pretty straight forward after I figured out there was no need to go behind everything mounted inside the dash stack. A side run maneuver works just fine, plus no dealing with new middle vent location.

Reassembly was unremarkable. 7 screws/10 fingers, yup everything accounted for. Only had two heart murmur moments. One was finding an unmated harness connector in the 12v/window/media area. Yiked it until it dawned on me it was for the accessory switch panel which I didn't order. The other was getting no love from the phone charger cable. Tested all wiring prior to install and was good to go, but for some reason this cable tested fine but missed the part about working. Chocked it up to gremlins and swapped it out with another. Finally joy in Mudville.

In conclusion (bet you never thought I'd get there) I now have power for a dashcam and a phone charger without tying up any factory ports, a clean, reversable tap and no visual evidence of the modification.

I'd add pictures to see the end result but you wouldn't see it. That's the idea.
Actually, truth be told, I'll clean it up esthetically after I get into our new home in Tucson this fall. This was all done in a dank parking garage at our condo in Oregon which after the powers that be saw what I was up to issued a reminder to all residents that there's no car fixin' in the parking garage, so I wrapped it up on the mean streets of downtown Portland with three hours on the Parking Kitty meter app.

Good night fellow forum members and all ships at sea....

Thank you for your recap, it's very appreciated! :)
 

Armactoc

New Member
Joined
May 26, 2024
Threads
0
Messages
2
Reaction score
0
Location
NC
Vehicle(s)
Rubicon
Just pulled the trim piece holding the start/stop button, the temp/fan/volume controls/buttons assembly and the window/12v/media controls to install a harness to power a dashcam and phone charger. Whew, I think that's everything attached to those two trim pieces.

Big takeaway: It's not as daunting as it appears.

The video in this thread covers the key points in pulling the piece(s). Despite the warranted jawing about the 2024 trim changes by the fellow in the video, at the end of the day, to get enough access for tapping/bypassing the 12v cigar... err power port from the back, you're really only taking about 7 Phillips trim screws, plus four more if you're running a USB to the top of the dash.

I did start at the top of the dash because I mounted the phone on a Tackform AMPS articulated arm with a powered Mag-Safe charger holding the phone itself. As mentioned, it's a four screw removal.

I had already run the power for the dashcam (a cheap ass Amazon AQV super-cap cam that produces a 1080p image that should at least hold up in court if need be, and set me back a whopping $30. Did I mention I drive a soft top? If the cam doesn't grow legs and walk away I'll be surprised) down the passenger side A-Pillar.

Next I tackled the main event, as it were, the redesigned dash grab bar trim piece. I really did find if you gently, but firmly squeeze, nudge, wiggle the parts they'll eventually comply. (Like I treat my ladies... oh brother :angel:)

I started with the top two screws on the passenger side. Got enough give on the trim top trim running the length of the dash to be able to unscrew the grab bar part. (BTW - A stubbie Phillips will be your best friend for the exercise).

I then went after the three "hidden" screws behind the grab bar. There's trim covering the screws that needs a little convincing to let go, but again, firm but gentle is the word of the day. A couple of items of note. A cell phone with a live camera is super handy for spotting where the screws are located where you can't see 'em, also you'll want your stubbiest of stubbies to unscrew to hardware. I ended up using a "tools included" offset phillips that was thrown in with some other gee-gaw put on the Jeep.

I then went after the two screws to the end side of the bar trim exposed when you pop a bit o' plastic lower and outside at glovebox level to get at the screws above it. Happy coincidence was it was a trim piece that I had to go around running the dashcam line so with it temporarily gone I bypassed a bunch passenger foot level wire tucking and hiding.

I know this sounds bass-akwards from the video where he removes starting at the start/stop button end and goes right, but in another happy coincidence but going at it from right to left seemed to free up a bunch of clips with minimal effort. A couple of trim tool pops near the start/stop button and it came loose pretty easy.


Disconnect the start/stop and the button array connectors and freed the whole shootin' match. There's one screw (Humm.. I think that makes number seven) that holds the 12v/window switch/media panel along with some clips so it's an easy pull. Kind of wished I'd hadn't left the gear shift know in park because it limits how far out you can pull the panel but all I needed was enough room to pull the connector off the back of the 12v and do the bypass.

The 12v has a keeper that's holds the connector to the hardware that will induce a few cuss words but persistence pays. A short word about the bypass. It's a Proscenium PRO - JPAPTH1 T-adaptor feeding to a 12v-5v buck converter with two USB inline female connector outputs. All from Amazon. Yes, I do own some Amazon stock but trust me, connectors aren't where the money's at.

Running the phone charger USB-C to the bypass bundle was pretty straight forward after I figured out there was no need to go behind everything mounted inside the dash stack. A side run maneuver works just fine, plus no dealing with new middle vent location.

Reassembly was unremarkable. 7 screws/10 fingers, yup everything accounted for. Only had two heart murmur moments. One was finding an unmated harness connector in the 12v/window/media library area. Yiked it until it dawned on me it was for the accessory switch panel which I didn't order. The other was getting no love from the phone charger cable. Tested all wiring prior to install and was good to go, but for some reason this cable tested fine but missed the part about working. Chocked it up to gremlins and swapped it out with another. Finally joy in Mudville.

In conclusion (bet you never thought I'd get there) I now have power for a dashcam and a phone charger without tying up any factory ports, a clean, reversable tap and no visual evidence of the modification.

I'd add pictures to see the end result but you wouldn't see it. That's the idea.
Actually, truth be told, I'll clean it up esthetically after I get into our new home in Tucson this fall. This was all done in a dank parking garage at our condo in Oregon which after the powers that be saw what I was up to issued a reminder to all residents that there's no car fixin' in the parking garage, so I wrapped it up on the mean streets of downtown Portland with three hours on the Parking Kitty meter app.

Good night fellow forum members and all ships at sea....
Thank you, that's very detailed.
Sponsored


Top