Sponsored

2019 Mojito! JLUR - Stock to ...?

OP
OP
shane h.

shane h.

Well-Known Member
First Name
Shane
Joined
May 1, 2019
Threads
24
Messages
684
Reaction score
2,304
Location
DFW
Vehicle(s)
'19 Mojito JLUR (mine), '21 Hellayella JLUR (hers)
Build Thread
Link
Occupation
Husband, Father, Papa
First addition in a bit. Installed a pair of Baja Designs Squadron Sport pods (wide cornering lens in amber) on some Motobilt A-pillar light mounts that I sprayed black with a bit of Steel-It spray.

I'll add some pictures when I get somewhere other than the garage. We've all seen ditch lights. More fun to use than to look at.

The BD Squadrons came with a complete wiring harness including on/off rocker switch pigtail with white, blue, and black wires. I removed the switch, covered the white wire, hooked the black up to a good ground, and hooked the blue up to Aux4 on my Lasfit switch panel. Hooked the main harness ground to a good body ground, and hooked the main power up to the battery positive terminal. I left the supplied relay inline even though the Lasfit switch is also relayed.
Sponsored
 

Coolbaldguy

Well-Known Member
First Name
Tim
Joined
Apr 29, 2019
Threads
3
Messages
87
Reaction score
148
Location
TN
Vehicle(s)
2019 JLR
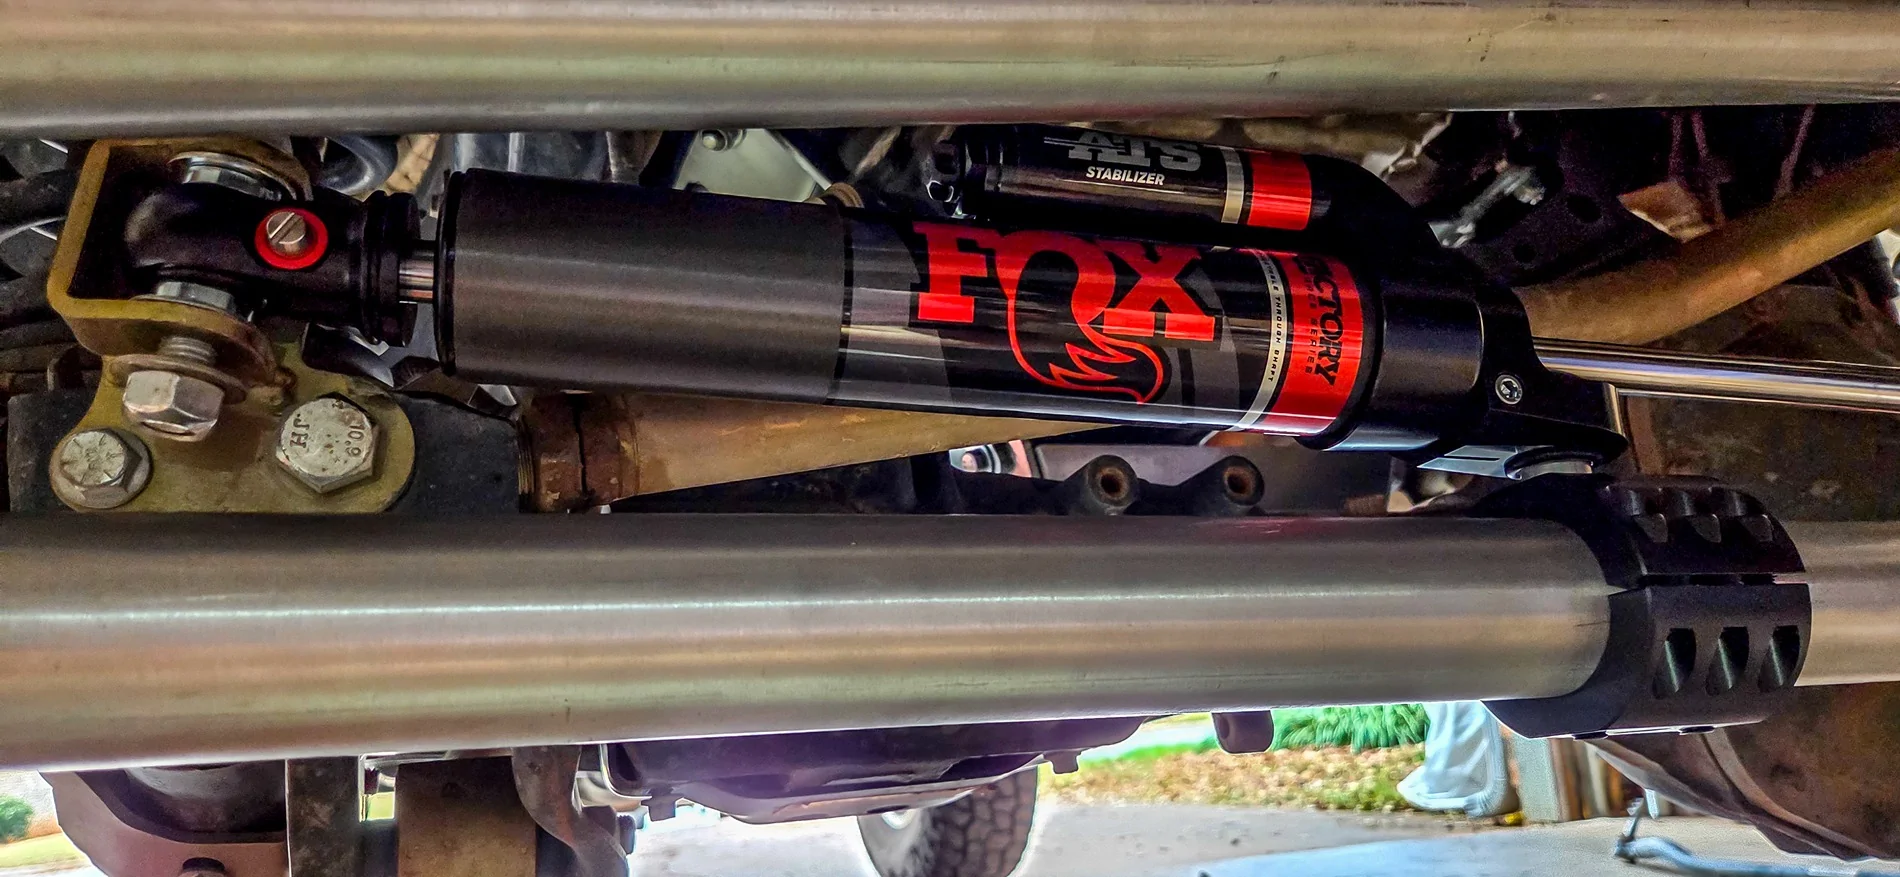
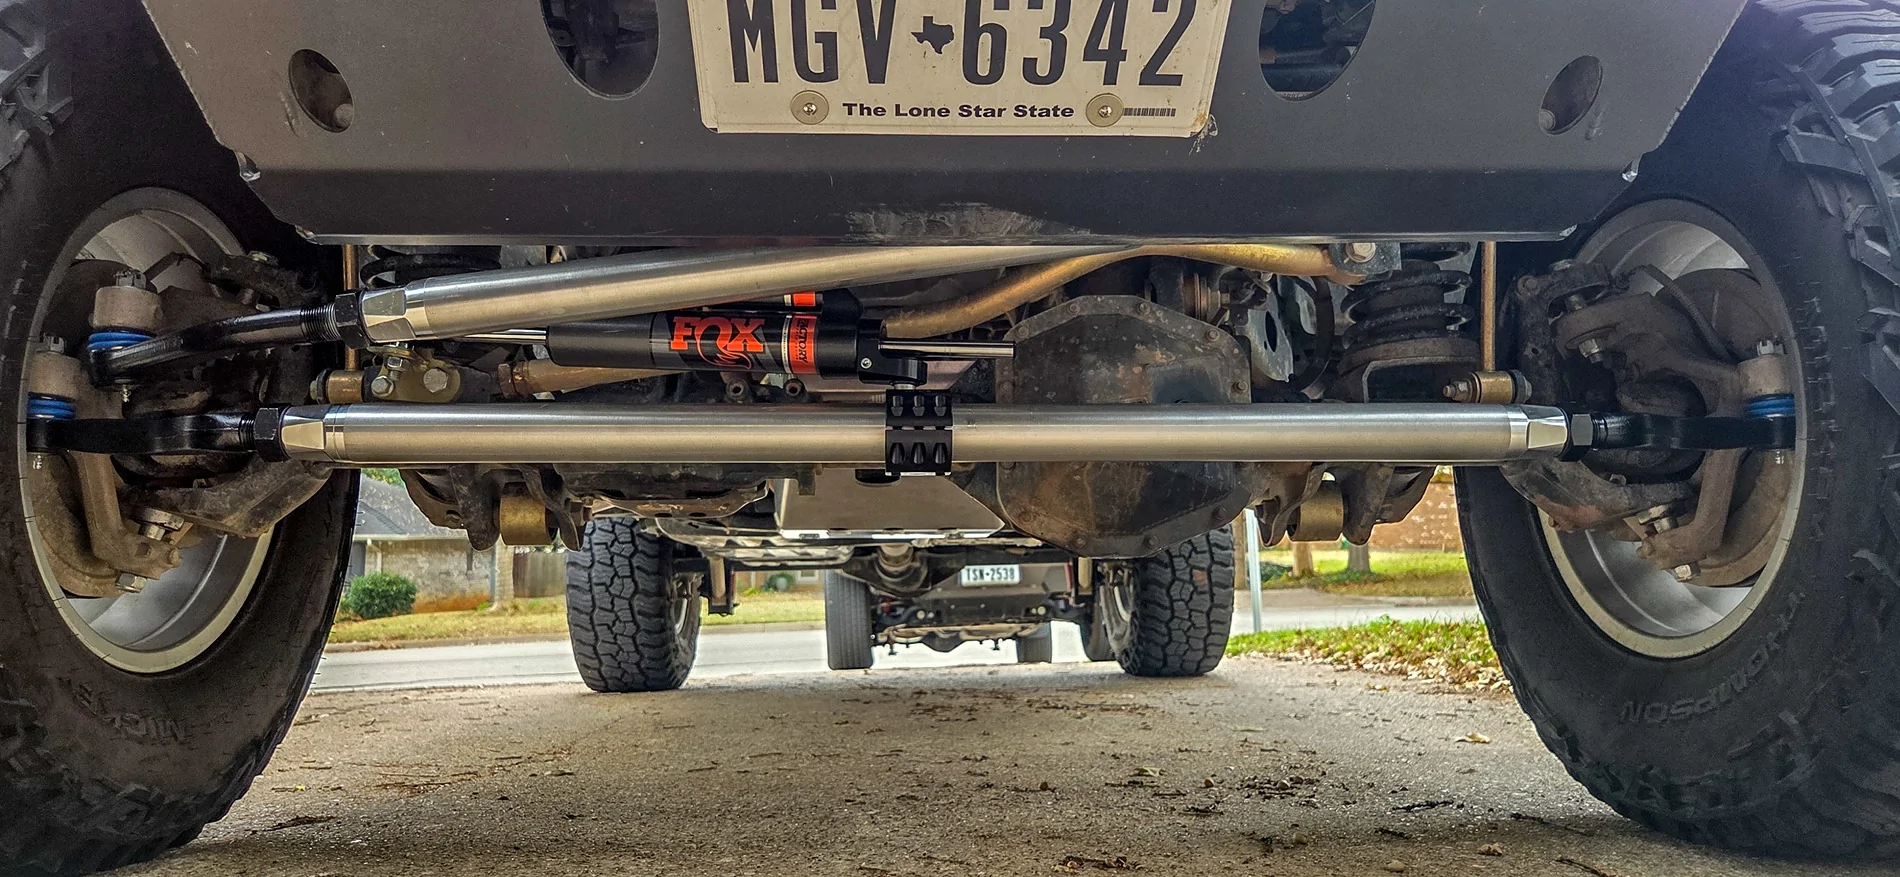
Did the install of the CavFab 2.5ton steering kit along with a new Fox 2.0 ATS steering stabilizer using an Apex Chassis 2" clamp this morning.

The CavFab kit came with XRF tie rod ends for both tie rod and drag link. Part numbers:
Tie rod - XRF 24172
Drag link - XRF 25086

Really easy install. Saw immediate improvement in steering noise and feedback on the highway.

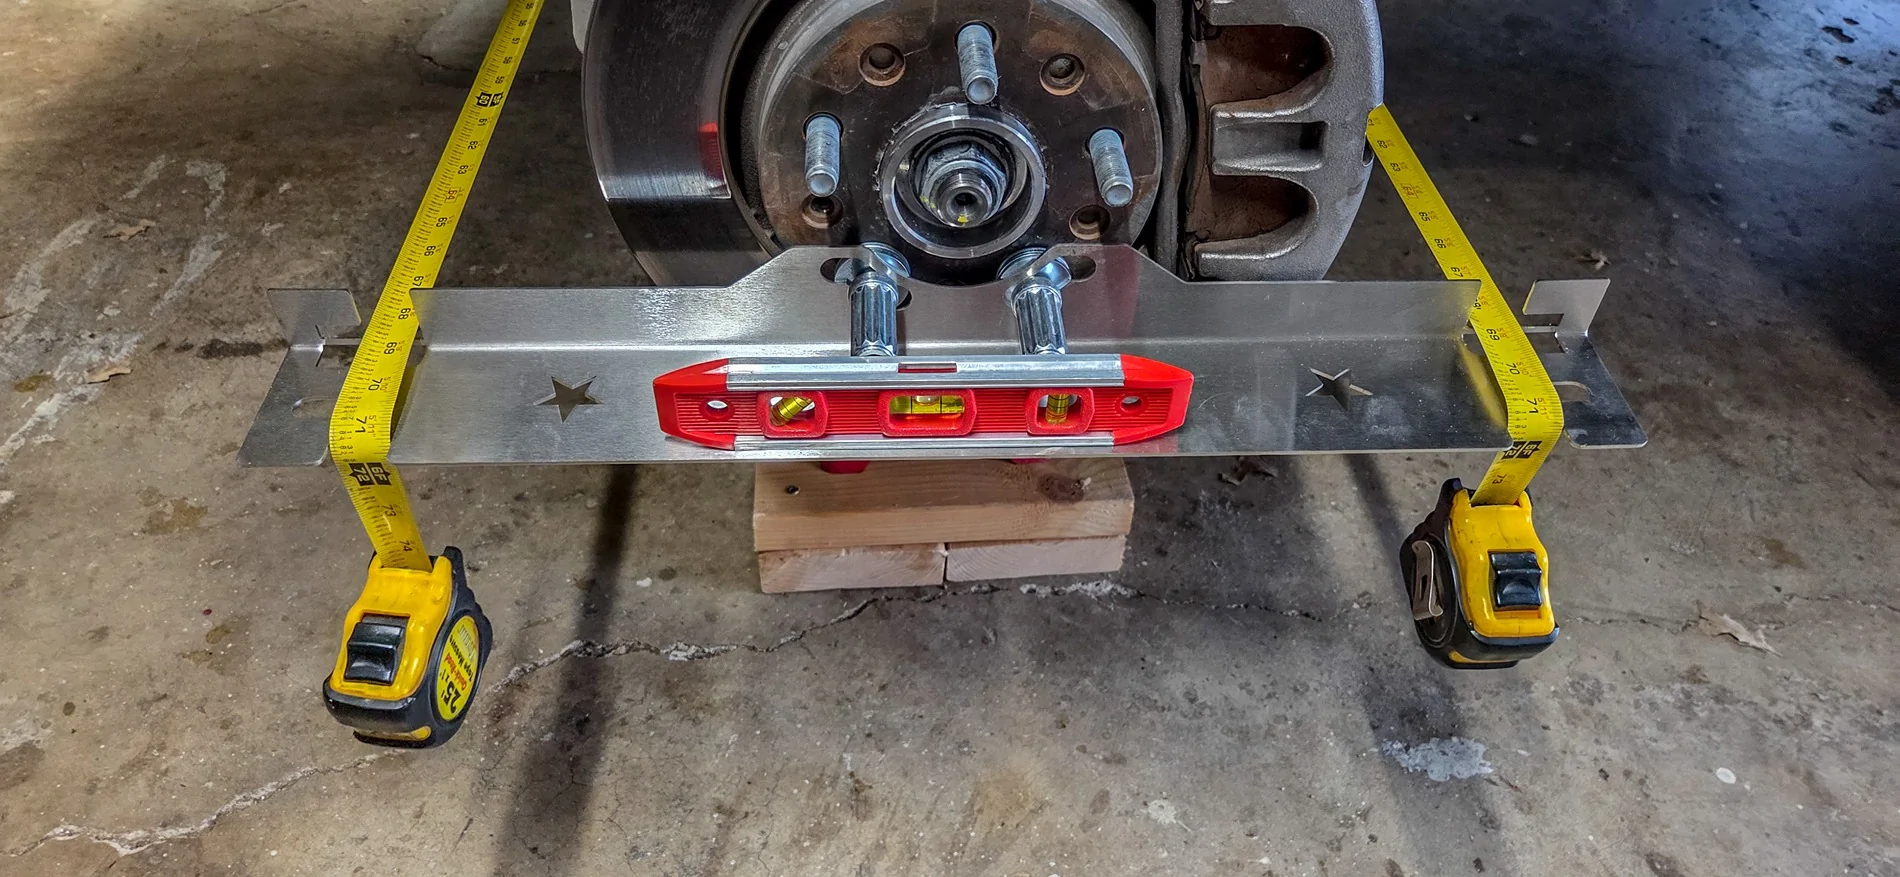
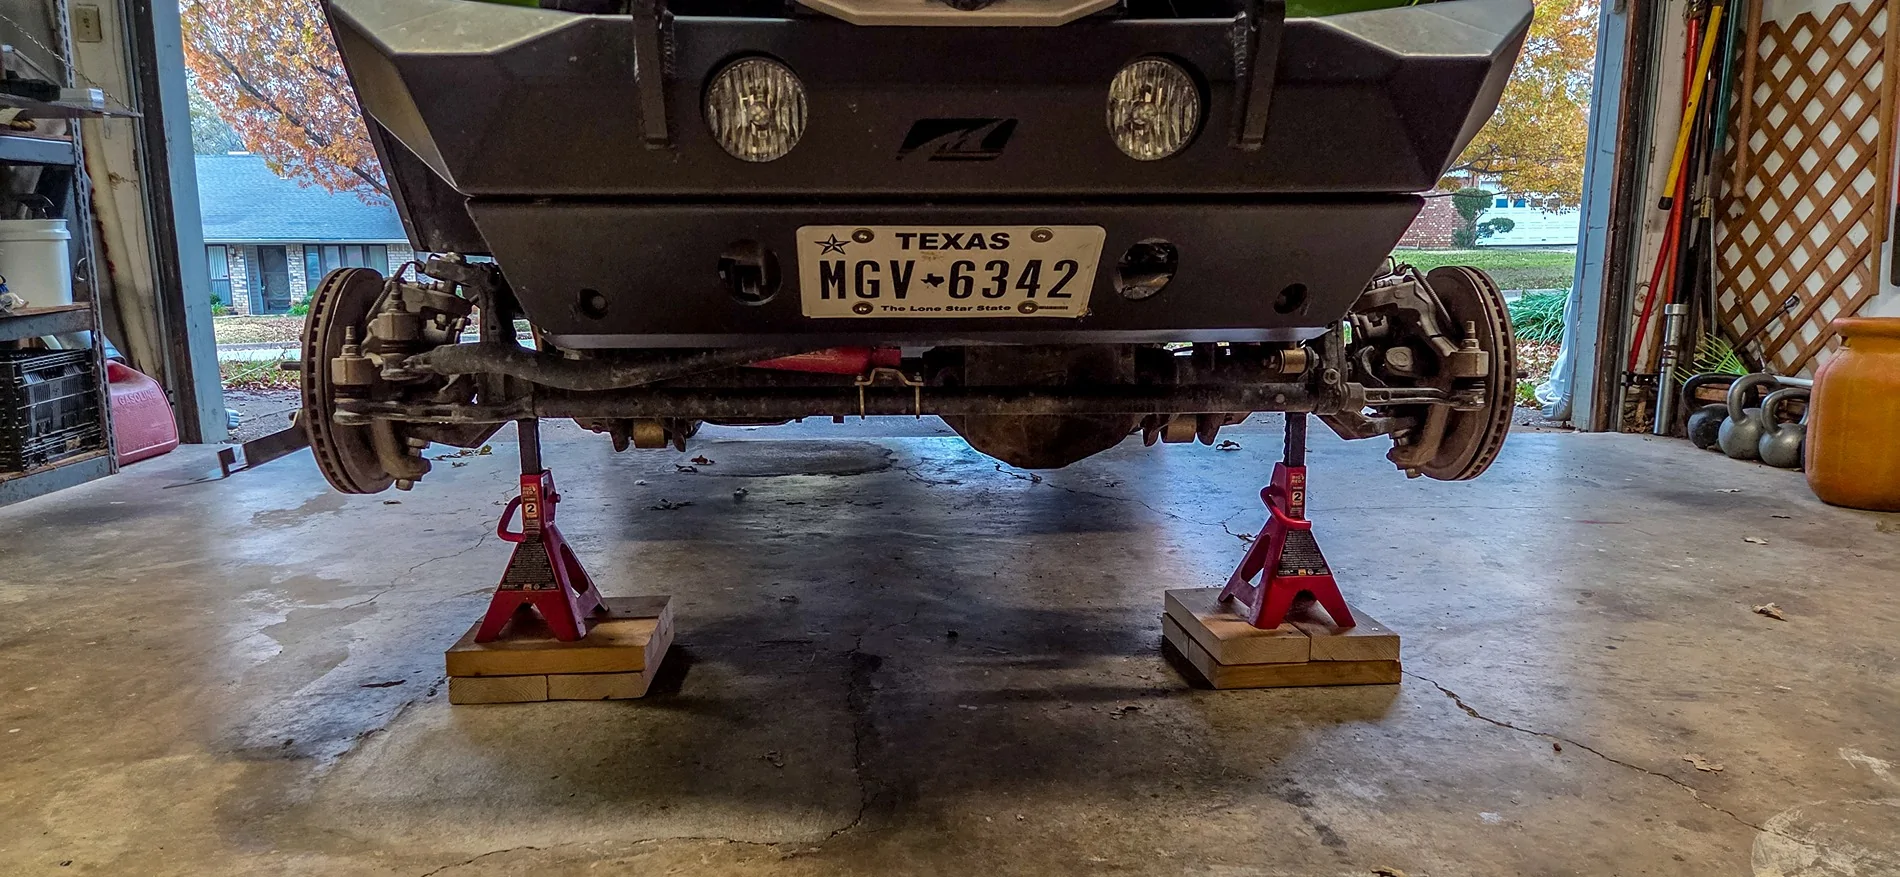
Got the Jeep up on the jack stands, tied down the steering wheel to prevent any unwanted movement while everything was torn apart, removed the tires, then used the steering toe plates to get existing numbers before removing the tie rod and and drag link. Was sitting at 1/16" toe in - exactly where it was the last time I checked the alignment last year.
20251213_075031.webp

20251213_081107.webp

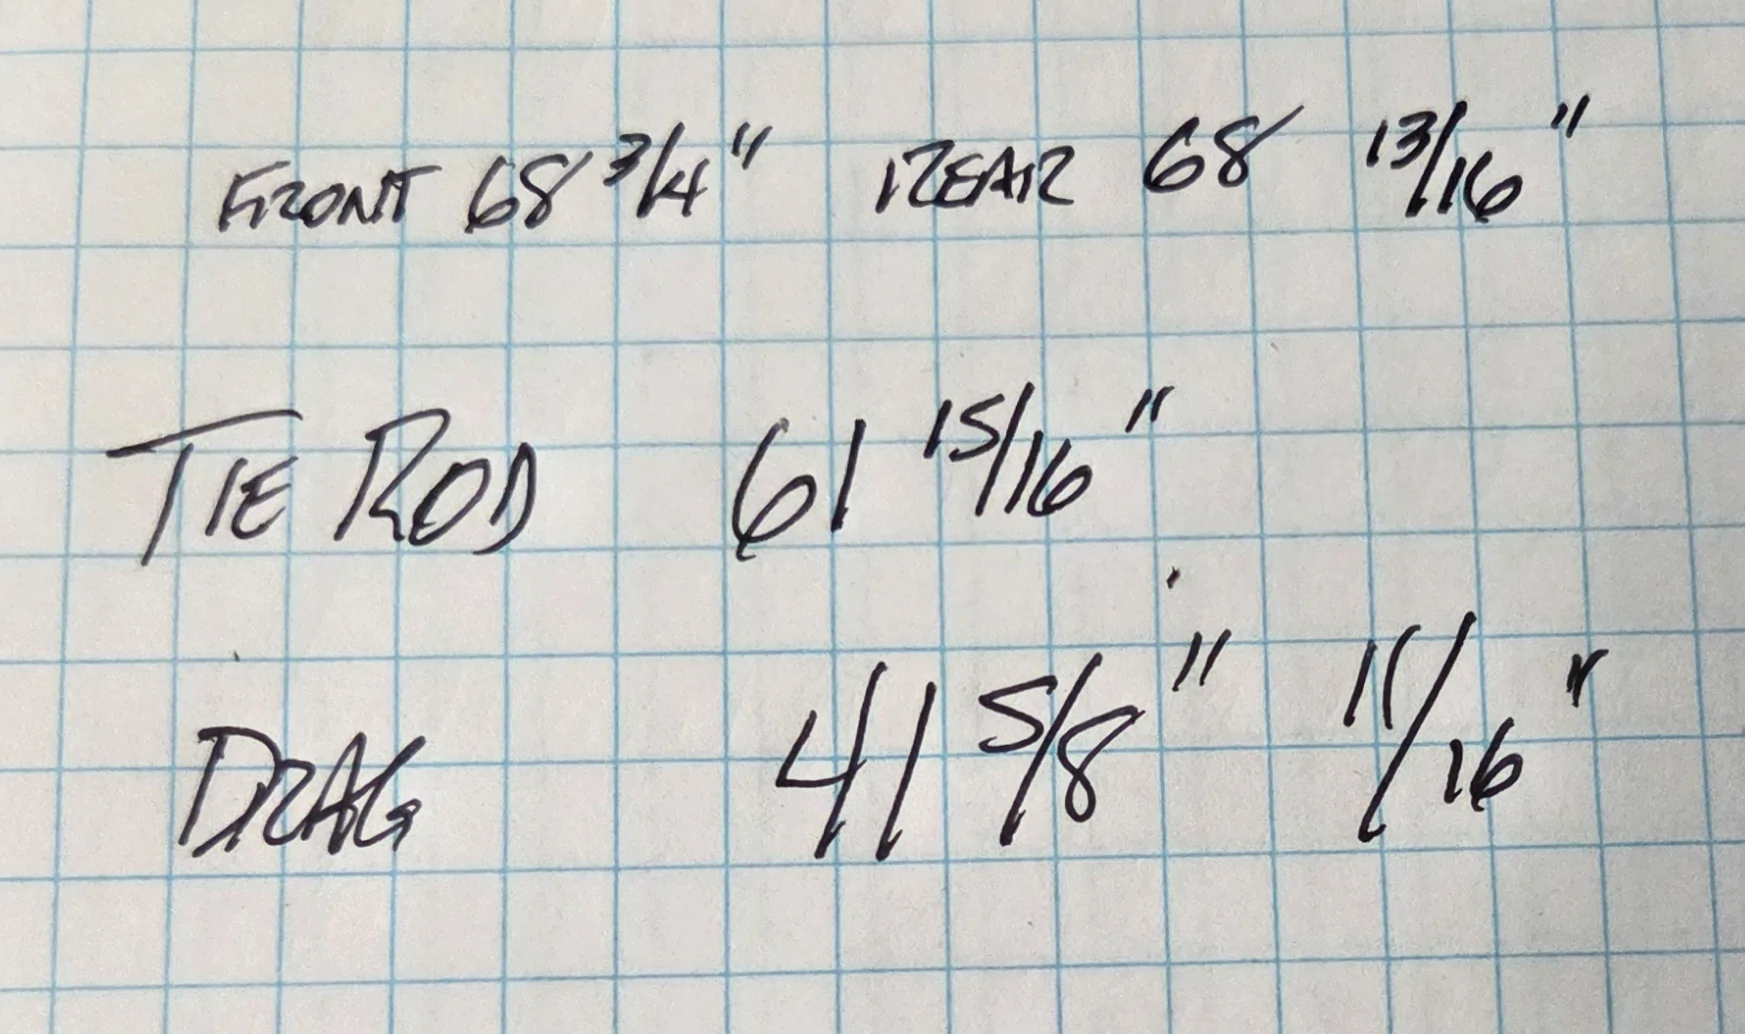
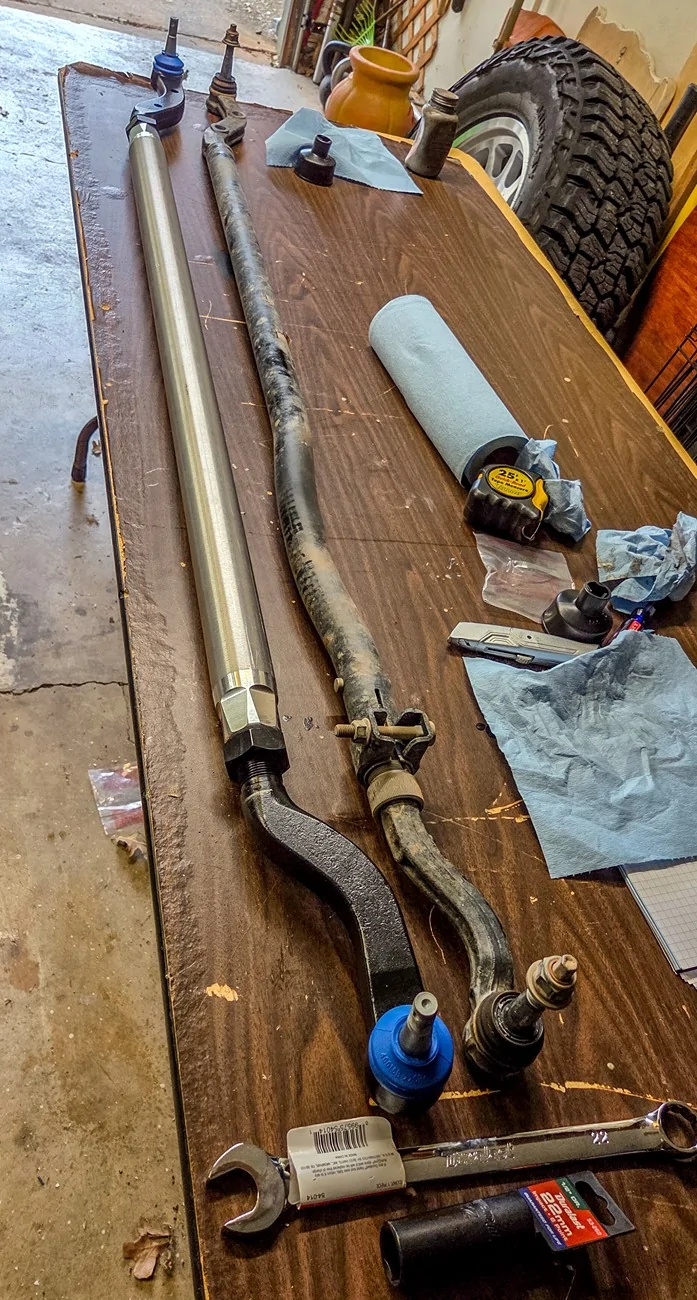
Once I had good toe numbers, I removed the tie rod and drag link and got good measurements for them - post to post. I found that the tie rod measurement carried some weight moving from the stock tie rod to the new tie rod, but the drag link measurement meant pretty much nothing since the shape of the two are a bit different.
20251213_083750.webp


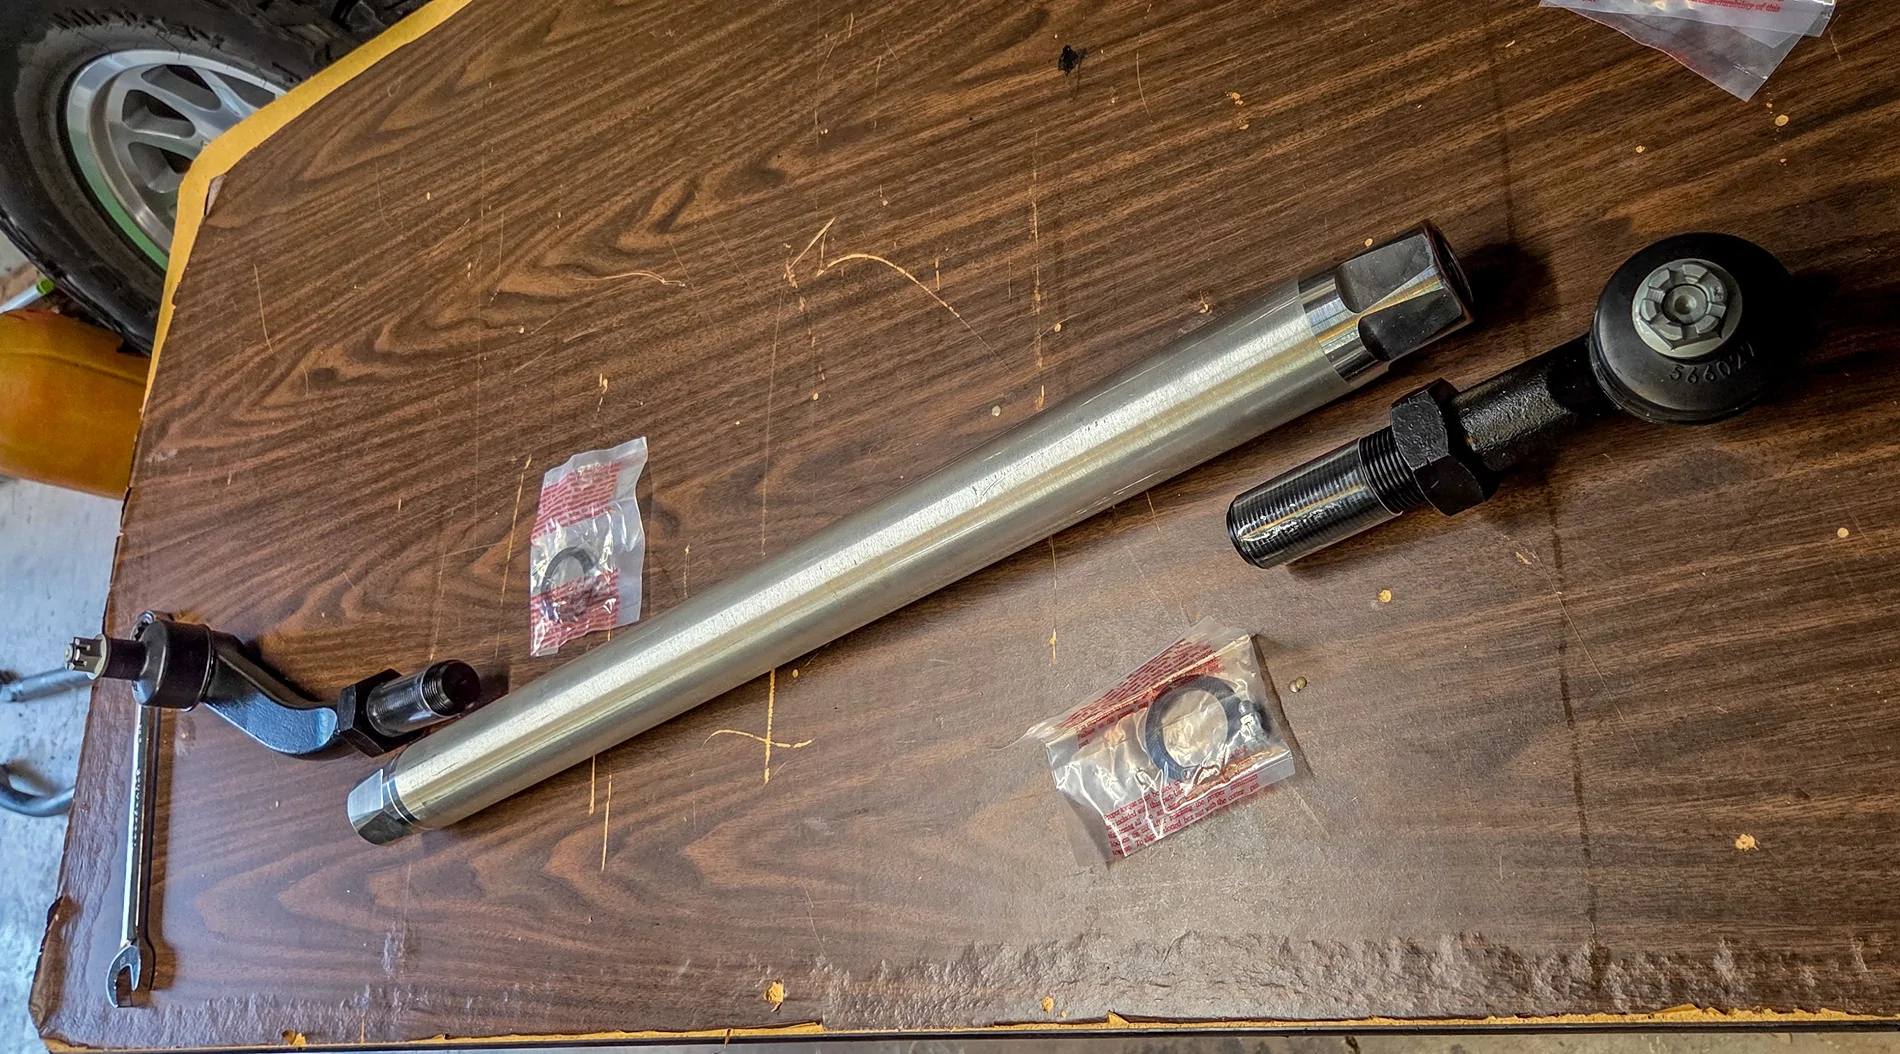
I set up the drag link to 41 5/8 inches to match the stock drag link length, and went about installing the drag link in place and the getting the castle nuts just snugged up. Not torqued to spec yet. I loosened the steering wheel at this point since the pitman arm was now attached to the passenger knuckle and I wouldn't have the steering wheel rotating freely.
20251213_084234.webp


Then I set up the tie rod to 61 15/16" (or as close to that as I could get) and went to install it. Started on the driver side knuckle, just snugging the castle nut. Then I went over to the passenger knuckle and got the castle nut started. Once all four ends were installed I torqued them to spec and got the cotter pins installed.
20251213_093033.webp


I re-leveled the toe alignment plates and went about adjusting the tie rod length to get the toe in set to 1/16". Once that was done I locked down the tie rod jam nuts to prevent the tie rod shaft from further rotation.

That's where it became apparent that the drag link was way short. My steering wheel was almost a half-rotation off. Luckily I knew which way it had rotated, so it was just a matter of adjusting the drag link length out a bit to straighten the steering wheel. Once I had it where I thought it needed to be, I locked down the drag link jam nuts.

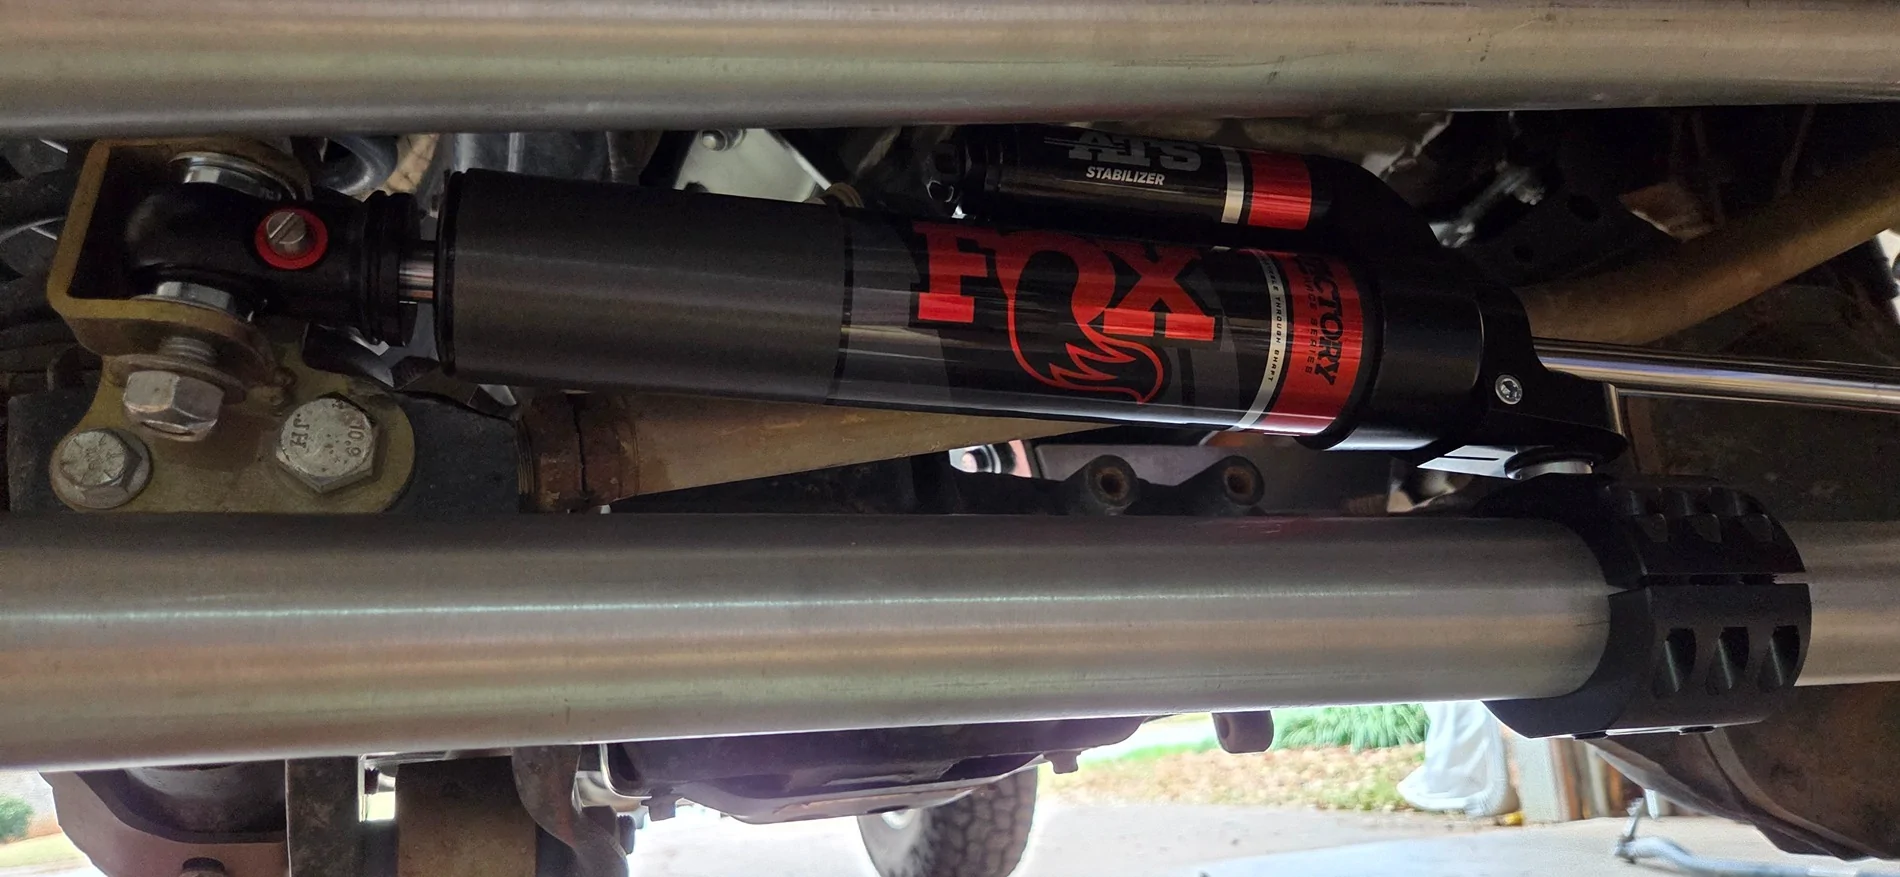
Now it was time to install the Fox 2.0 ATS stabilizer. I already had a Metalcloak stabilizer relocation bracket installed, and decided to try using that before falling back to using the Fox track bar bolt mounting point. The Metalcloak relocation bracket and the Apex Chassis 2" clamp work perfectly with the CavFab tie rod.
20251213_102953.webp


Put the tires back on, dropped the Jeep off the stands, torqued the wheels, and took the Jeep for a little spin. Alignment felt ok, but the steering wheel was still a little off, so back to the garage to re-adjust.

Once I had the steering wheel straight, I took the Jeep out for a short 5 mile drive on the highway to make sure the alignment felt ok. The Jeep tracked straight and was as good as before at returning to center. I may try adding just a little more toe to see if that improves it. There was a noticeable improvement in the road noise felt in the steering wheel, and that was exactly what I was looking for with this mod.
20251213_122107.webp


I went to grease the ends and found my grease gun has died on me, so a new one will be here Monday. I'll leave the Jeep in the garage til then.
I have some questions regarding the ATS to Apex clamp connection. I purchased the same
Did the install of the CavFab 2.5ton steering kit along with a new Fox 2.0 ATS steering stabilizer using an Apex Chassis 2" clamp this morning.

The CavFab kit came with XRF tie rod ends for both tie rod and drag link. Part numbers:
Tie rod - XRF 24172
Drag link - XRF 25086

Really easy install. Saw immediate improvement in steering noise and feedback on the highway.

Got the Jeep up on the jack stands, tied down the steering wheel to prevent any unwanted movement while everything was torn apart, removed the tires, then used the steering toe plates to get existing numbers before removing the tie rod and and drag link. Was sitting at 1/16" toe in - exactly where it was the last time I checked the alignment last year.
20251213_075031.webp

20251213_081107.webp

Once I had good toe numbers, I removed the tie rod and drag link and got good measurements for them - post to post. I found that the tie rod measurement carried some weight moving from the stock tie rod to the new tie rod, but the drag link measurement meant pretty much nothing since the shape of the two are a bit different.
20251213_083750.webp


I set up the drag link to 41 5/8 inches to match the stock drag link length, and went about installing the drag link in place and the getting the castle nuts just snugged up. Not torqued to spec yet. I loosened the steering wheel at this point since the pitman arm was now attached to the passenger knuckle and I wouldn't have the steering wheel rotating freely.
20251213_084234.webp


Then I set up the tie rod to 61 15/16" (or as close to that as I could get) and went to install it. Started on the driver side knuckle, just snugging the castle nut. Then I went over to the passenger knuckle and got the castle nut started. Once all four ends were installed I torqued them to spec and got the cotter pins installed.
20251213_093033.webp


I re-leveled the toe alignment plates and went about adjusting the tie rod length to get the toe in set to 1/16". Once that was done I locked down the tie rod jam nuts to prevent the tie rod shaft from further rotation.

That's where it became apparent that the drag link was way short. My steering wheel was almost a half-rotation off. Luckily I knew which way it had rotated, so it was just a matter of adjusting the drag link length out a bit to straighten the steering wheel. Once I had it where I thought it needed to be, I locked down the drag link jam nuts.

Now it was time to install the Fox 2.0 ATS stabilizer. I already had a Metalcloak stabilizer relocation bracket installed, and decided to try using that before falling back to using the Fox track bar bolt mounting point. The Metalcloak relocation bracket and the Apex Chassis 2" clamp work perfectly with the CavFab tie rod.
20251213_102953.webp


Put the tires back on, dropped the Jeep off the stands, torqued the wheels, and took the Jeep for a little spin. Alignment felt ok, but the steering wheel was still a little off, so back to the garage to re-adjust.

Once I had the steering wheel straight, I took the Jeep out for a short 5 mile drive on the highway to make sure the alignment felt ok. The Jeep tracked straight and was as good as before at returning to center. I may try adding just a little more toe to see if that improves it. There was a noticeable improvement in the road noise felt in the steering wheel, and that was exactly what I was looking for with this mod.
20251213_122107.webp


I went to grease the ends and found my grease gun has died on me, so a new one will be here Monday. I'll leave the Jeep in the garage til then.
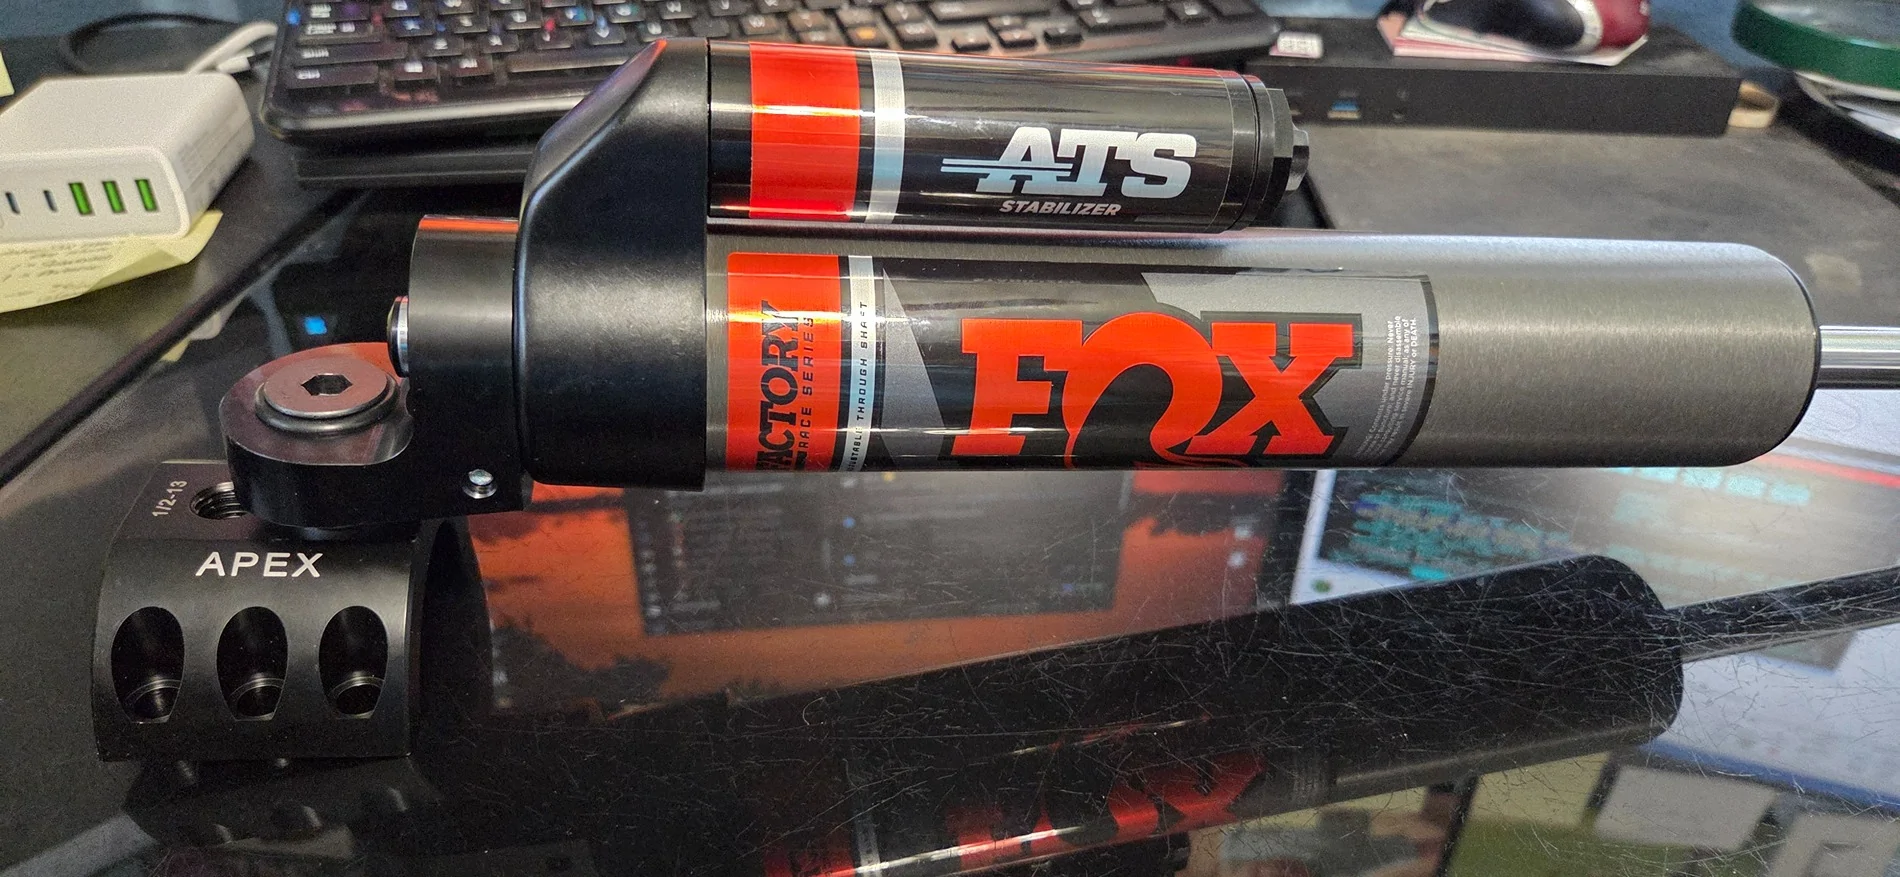
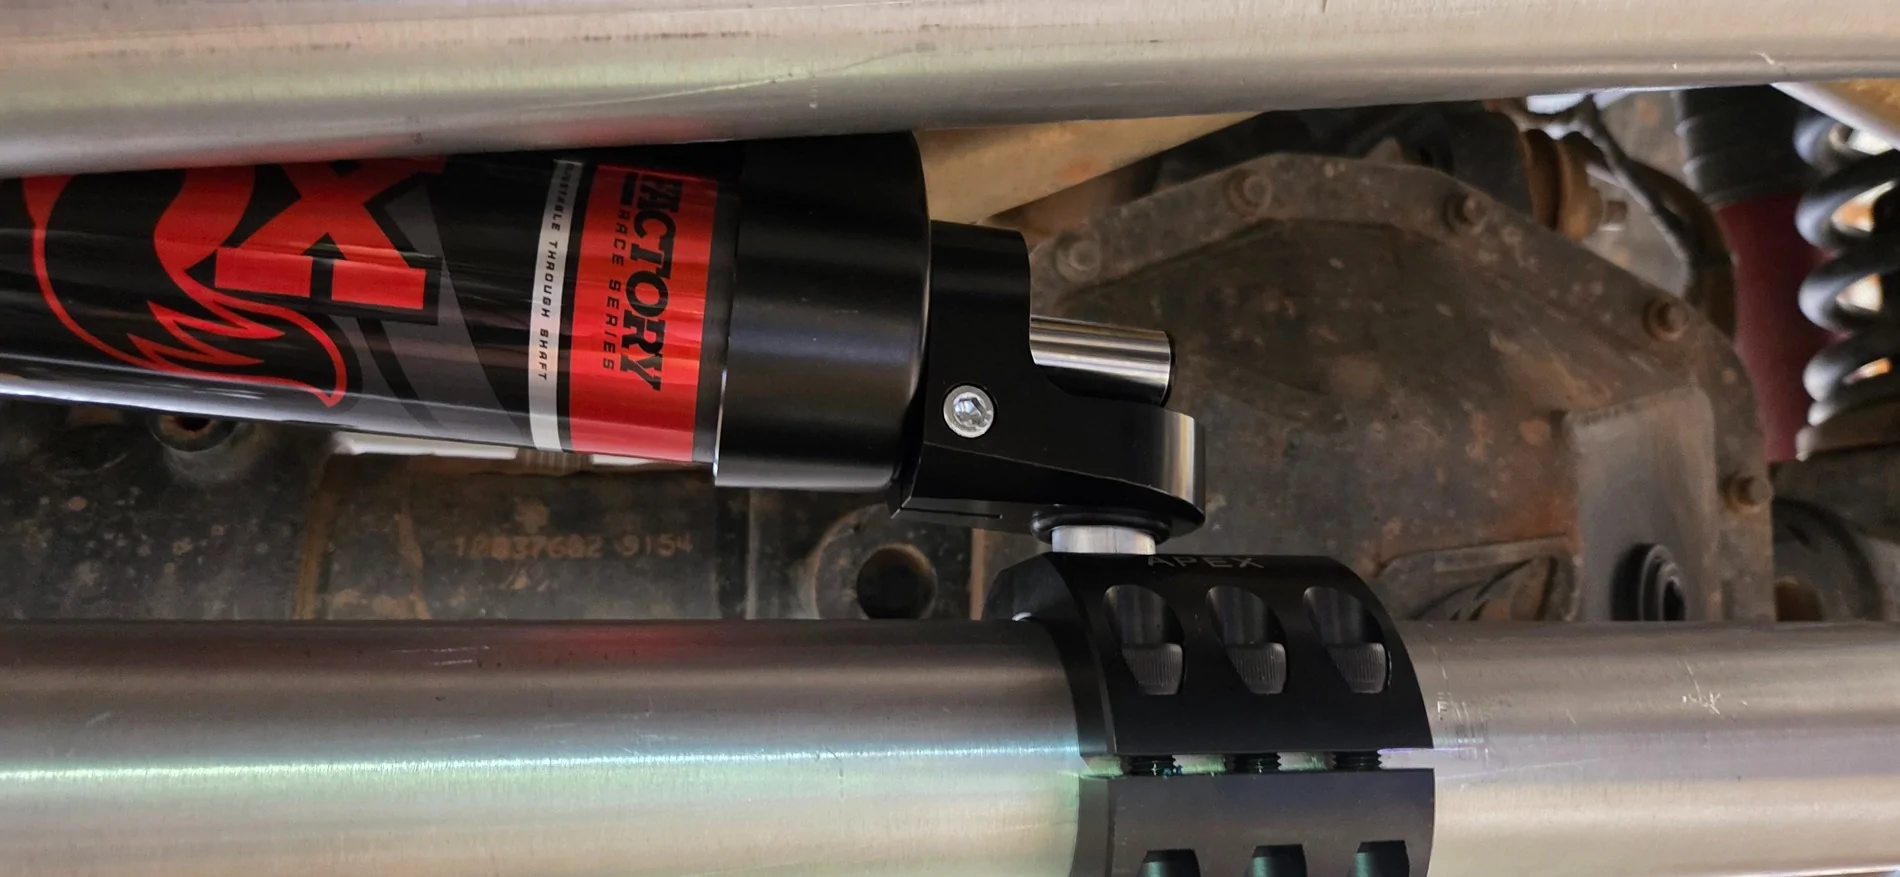
Thanks for doing this write up. I am in the process of installing the cav-fab 2.5ton steering kit. I also have the apex SS clamp for 2” bar as well as a fox ats SS. The Apex mount came with a fox connection kit. It seems somewhat confusing. I also bought the Fox ats for a JK. The end that goes to the clamp has a small heim joint that is held in place by 2 snap rings and 2 o-rings. The spacers apex sent are too small to replace the heim joint. I assume they go between the shock and the SS. I would appreciate any feedback on what you did to make it work out. I also have the Metalcloak SS relocation bracket.
 
OP
OP
shane h.

shane h.

Well-Known Member
First Name
Shane
Joined
May 1, 2019
Threads
24
Messages
684
Reaction score
2,304
Location
DFW
Vehicle(s)
'19 Mojito JLUR (mine), '21 Hellayella JLUR (hers)
Build Thread
Link
Occupation
Husband, Father, Papa
I have some questions regarding the ATS to Apex clamp connection. I purchased the same

Thanks for doing this write up. I am in the process of installing the cav-fab 2.5ton steering kit. I also have the apex SS clamp for 2” bar as well as a fox ats SS. The Apex mount came with a fox connection kit. It seems somewhat confusing. I also bought the Fox ats for a JK. The end that goes to the clamp has a small heim joint that is held in place by 2 snap rings and 2 o-rings. The spacers apex sent are too small to replace the heim joint. I assume they go between the shock and the SS. I would appreciate any feedback on what you did to make it work out. I also have the Metalcloak SS relocation bracket.
Don't know if this helps or not. I just started putting stuff together. Tried not to overthink anything.

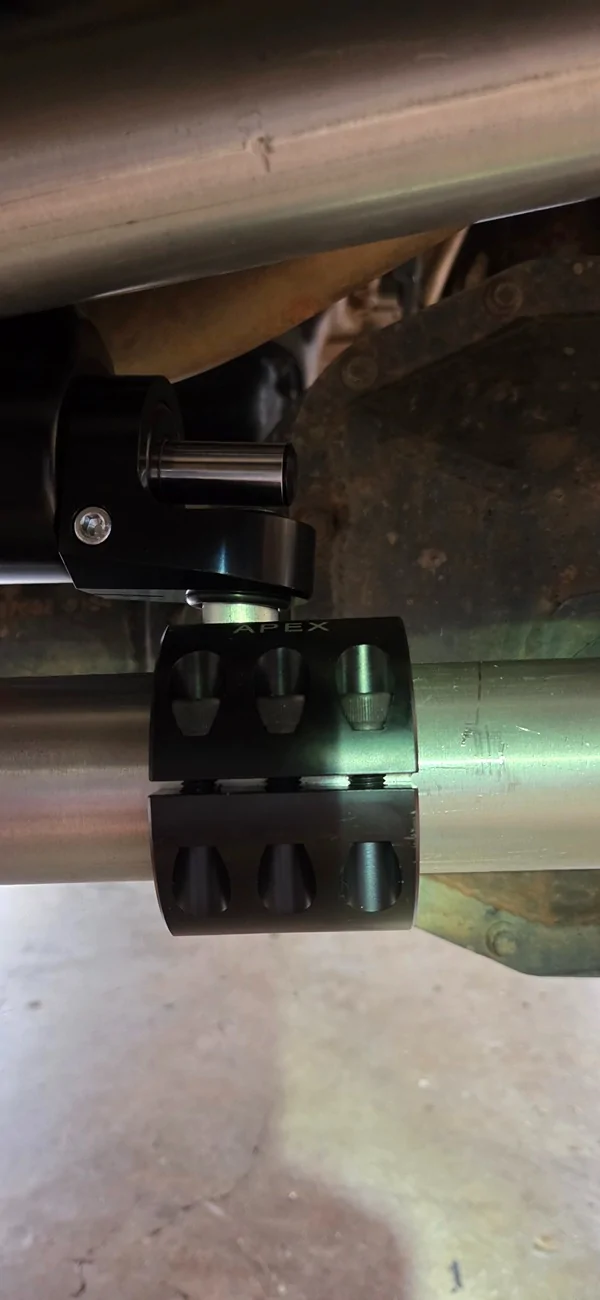
I did not replace the heim joint in the clamp end of the SS. Here is a couple of looks at that end of the SS.
Jeep Wrangler JL 2019 Mojito! JLUR - Stock to ...? 20251210_111017
Jeep Wrangler JL 2019 Mojito! JLUR - Stock to ...? 20251213_102941
Jeep Wrangler JL 2019 Mojito! JLUR - Stock to ...? 20251213_103306
Jeep Wrangler JL 2019 Mojito! JLUR - Stock to ...? 20251213_103316


Here is a good look at the other end on the Metalcloak bracket.
Jeep Wrangler JL 2019 Mojito! JLUR - Stock to ...? 20251213_102953
 

Coolbaldguy

Well-Known Member
First Name
Tim
Joined
Apr 29, 2019
Threads
3
Messages
87
Reaction score
148
Location
TN
Vehicle(s)
2019 JLR
Don't know if this helps or not. I just started putting stuff together. Tried not to overthink anything.

I did not replace the heim joint in the clamp end of the SS. Here is a couple of looks at that end of the SS.
20251210_111017.webp
20251213_102941.webp
20251213_103306.webp
20251213_103316.webp


Here is a good look at the other end on the Metalcloak bracket.
20251213_102953.webp
Thanks, yes that helps a lot. I got as far as removing the old parts last night. I will start assembling today or tomorrow. Since I have the parts off, I plan to clean up the axle housing and repaint it where the gravel rash has started surface rust. The clean and paint will probably slow me down a day or two. I was looking at the spacers that came with the apex clamp. I am not sure if I will use both of them or not. I will probably use them to help adjust for the height difference between the axle end and clamp end. Did you end up using both? Also, I am not sure the o-ring will still seal the bottom of the heim joint. It looks like it will probably just drop down. I might try to stack some more o-rings to keep it in place. I will try to get some pics as I go.
 
OP
OP
shane h.

shane h.

Well-Known Member
First Name
Shane
Joined
May 1, 2019
Threads
24
Messages
684
Reaction score
2,304
Location
DFW
Vehicle(s)
'19 Mojito JLUR (mine), '21 Hellayella JLUR (hers)
Build Thread
Link
Occupation
Husband, Father, Papa
I only used one of the supplied spacers and that went between the bottom o-ring and the clamp. The heim joint in my install has o-rings on both sides.

Be careful tightening the SS to the clamp to keep the o-rings from crimping.
 

Sponsored

Coolbaldguy

Well-Known Member
First Name
Tim
Joined
Apr 29, 2019
Threads
3
Messages
87
Reaction score
148
Location
TN
Vehicle(s)
2019 JLR
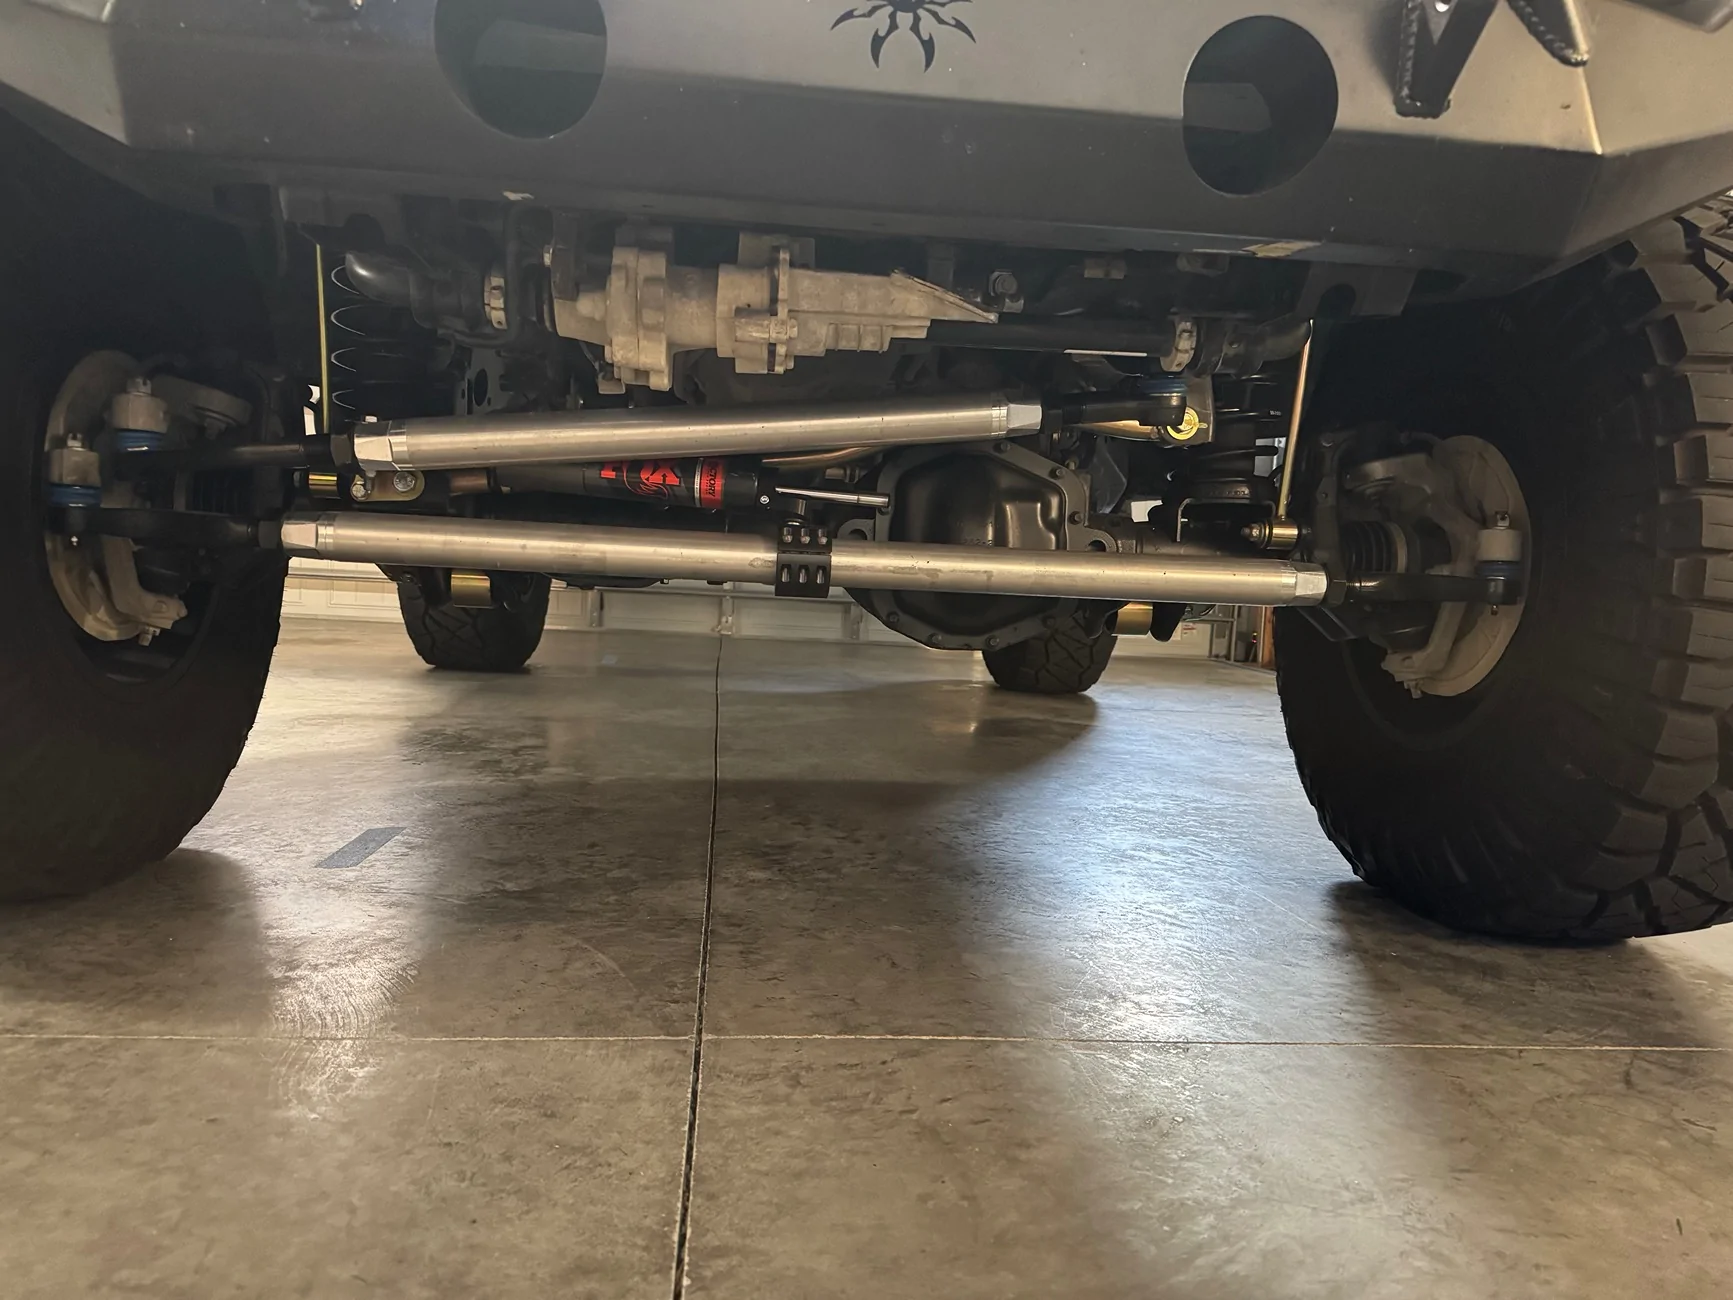
It’s been a bit since I completed this project, but thought I would show some pictures of the finished product. I too only used one of the spacers (the thicker one) between the SS and bar clamp. I am pretty happy with the CavFab parts and the Metalcloak bracket. Thanks Shane for taking the time to help me out with the details
Jeep Wrangler JL 2019 Mojito! JLUR - Stock to ...? IMG_7239
 
OP
OP
shane h.

shane h.

Well-Known Member
First Name
Shane
Joined
May 1, 2019
Threads
24
Messages
684
Reaction score
2,304
Location
DFW
Vehicle(s)
'19 Mojito JLUR (mine), '21 Hellayella JLUR (hers)
Build Thread
Link
Occupation
Husband, Father, Papa
2026 San Juans Trip with the pups.

June 19 - DFW to Amarillo. Stayed at the Big Texan Motel. Dinner at Coyote Bluff.
June 20 - Amarillo to Taos Ski Area. Stayed at the Alpine Village Suites right at the base of the ski area.
June 21 - Taos Ski Area to Silverton via Chama and Pagosa Springs.
June 22 - Alpine Loop - Silverton to Animas Forks. Engineer Pass to Lake City. Lunch at the Cannibal Grill. Cinnamon Pass to Animas Forks to Silverton. Had a weird scraping noise from the front that started going up Engineer. I believe I had a pretty good rock sitting between the oil pan skid and the front drive shaft. Sound got REALLY bad on Cinnamon and then stopped. Found a 1 inch wide rubbed spot on the front drive shaft where it looks like the rock was rubbing. No metal loss on the drive shaft. Never had any noise issues on the trip after.
June 23 - Browns Gulch/Bighorn Gulch to Ironton. Corkscrew to 110/10 to Silverton. Browns Gulch was a new and beautiful drive for us. I'd include it every year. Great views of Porphyry and Black Bear to the west from the top.
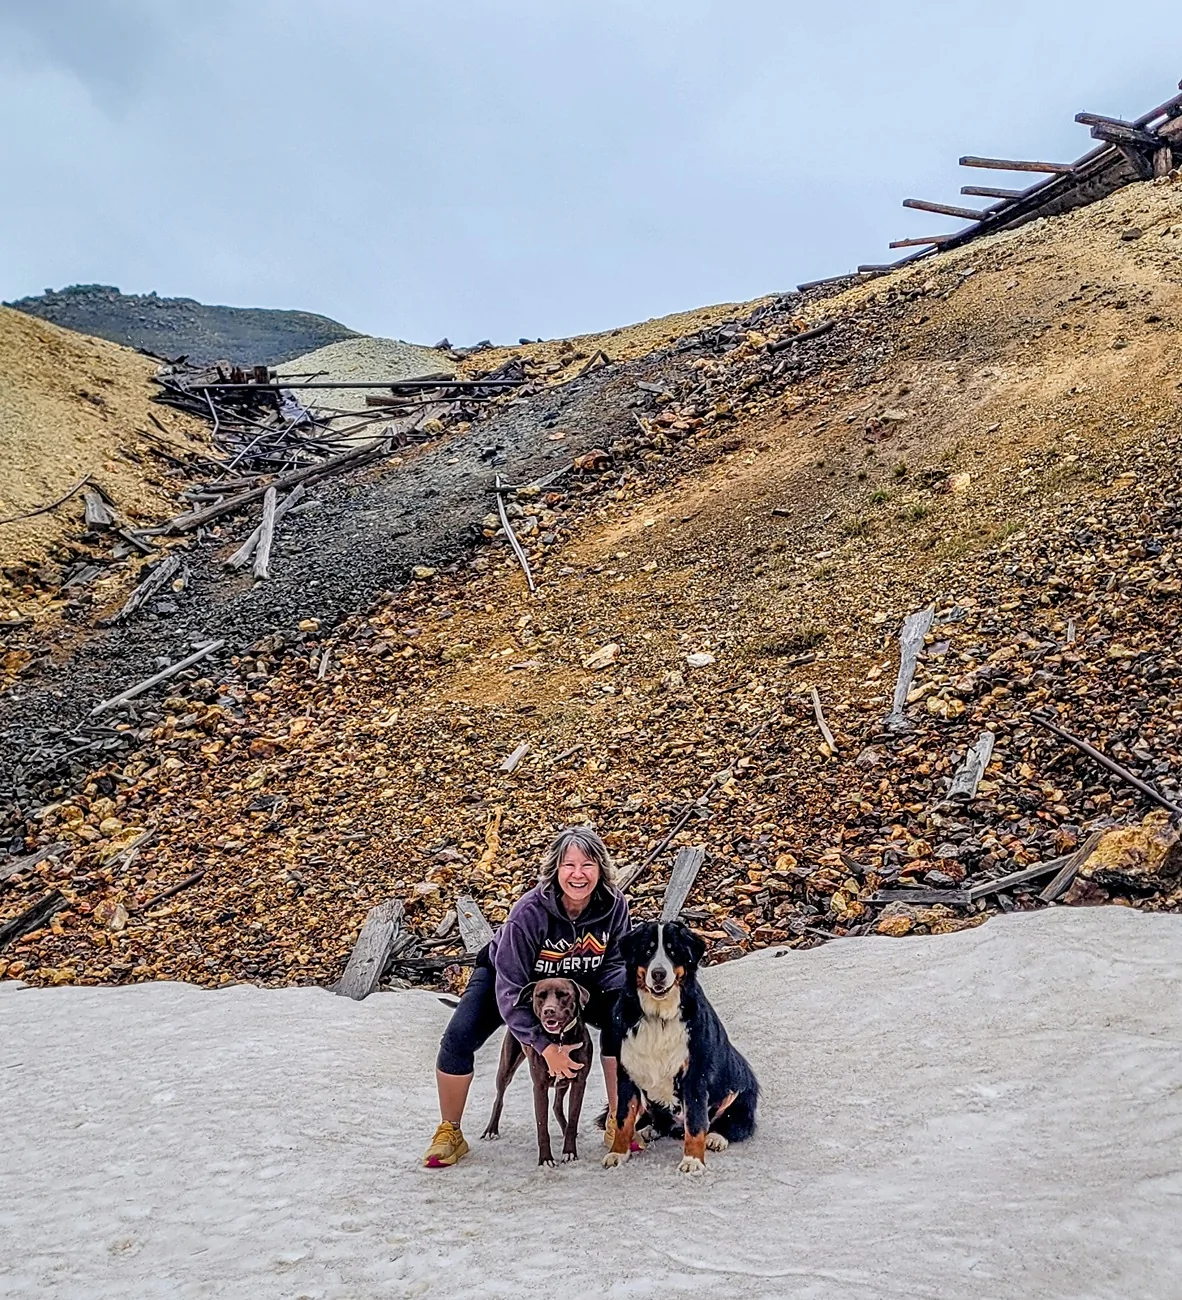
June 24 - Arrastra Gulch/Little Giant Basin, Buffalo Boy Tram House and above, Picyune Gulch (south side) up to the top/Placer Gulch, California Pass, Hurricane Pass, 110/10 to Silverton. Little Giant Basin was new and is another that should be included on every trip. Amazing little drive just outside of Silverton.
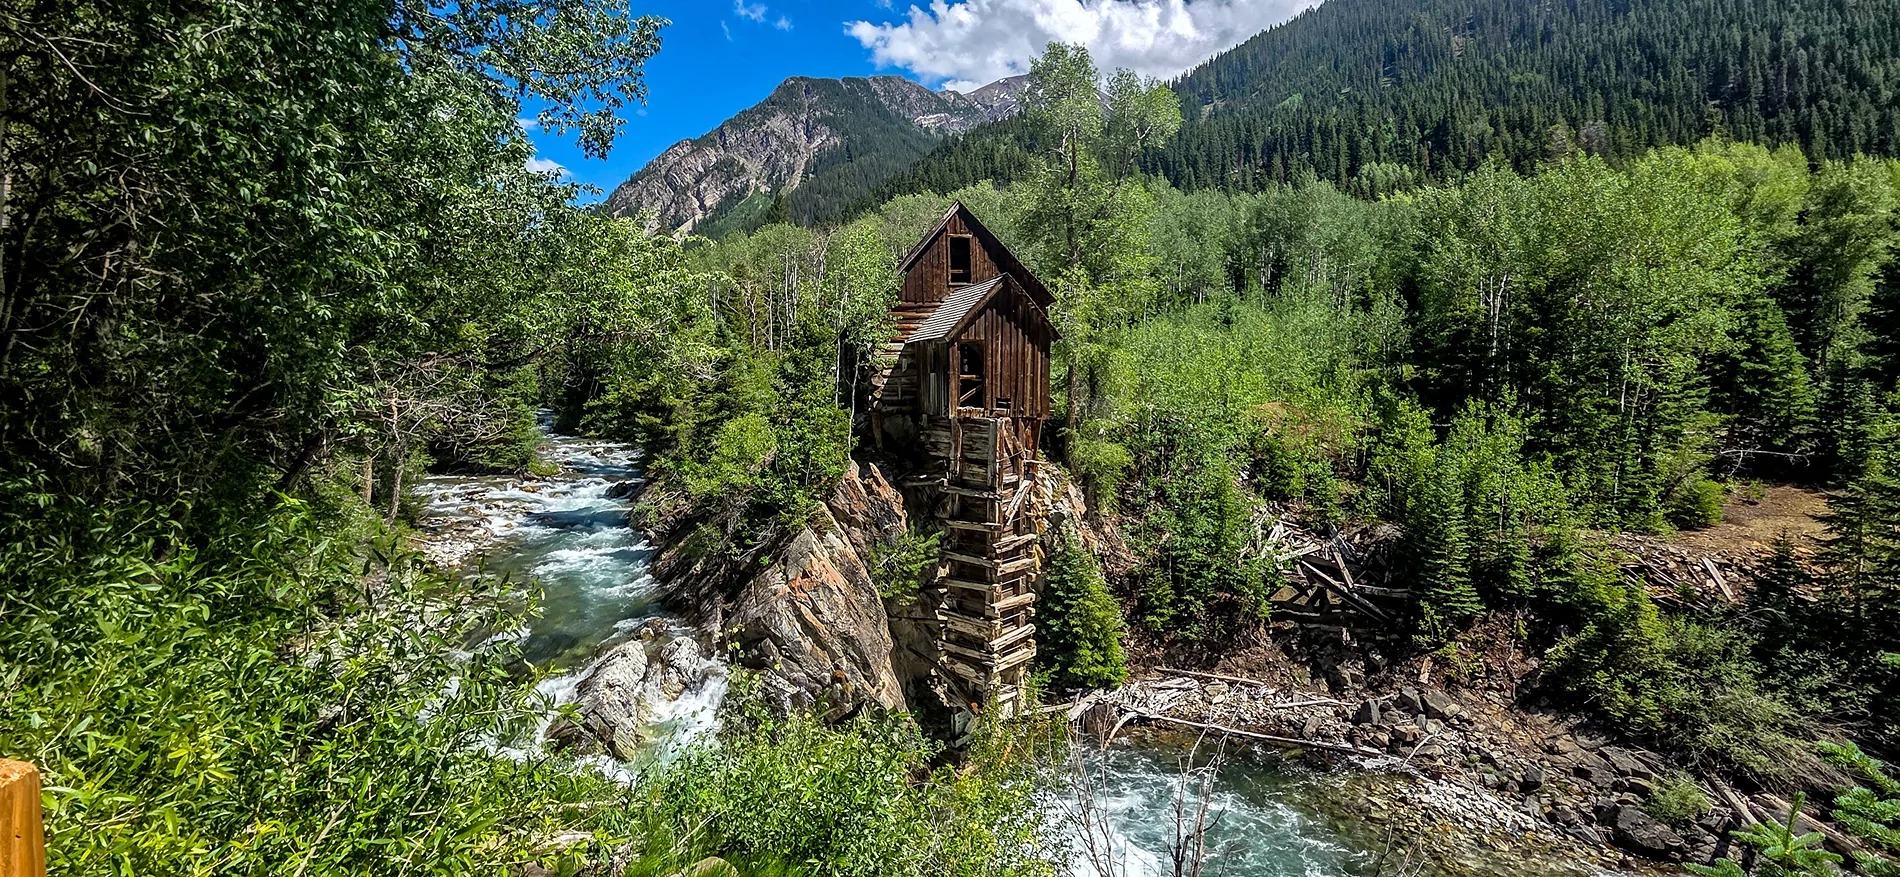
June 25 - Drove up to Marble. Lunch at Slow Groovin' BBQ. Out and back to the Crystal Mill. Back to Silverton. If you plan on doing this, plan fuel to get to Delta. Gas was $1.00 a gallon less than Silverton/Ouray/Ridgeway/Montrose. DO NOT miss the BBQ. Amazing spot. Even though it is only 6 miles in on trail to the mill be sure to air down. We decided not to at the start and stopped about a mile in to air down. Easy but rough trail.
June 26 - Bolam Pass from Purgatory Ski Area west, Ophir Pass from Ophir, Porphyry Basin. Bolam Pass was new this year and was absolutely beautiful.
June 27 - Silverton to Tucumcari via Pagosa Springs, Chama, and Santa Fe. Had lunch at Fina's Diner in Chama. Stop by if you can. Always great food. Stayed at the Roadrunner Lodge in Tucumcari and had dinner at Las Chaparritas. Great Mexican restaurant.
June 28 - Tucumcari to DFW. Had 20+mph southwest wind the whole way home. Just destroyed our average fuel economy.

2524.5 total miles
172 gallons of fuel
14.8 mpg overall average
15.4 mpg highway to and from
13.3 mpg in Silverton including trails and Marble/Crystal trip
Average $3.82/gallon
Total fuel cost $656.84

Jeep Wrangler JL 2019 Mojito! JLUR - Stock to ...? 20260619_114202
Jeep Wrangler JL 2019 Mojito! JLUR - Stock to ...? 20260624_122524(0)
Jeep Wrangler JL 2019 Mojito! JLUR - Stock to ...? 20260625_153958
Sponsored


Top