- Thread starter
- #1
JL WRANGLER FOLDING WINDSHIELD
Tools Needed
FOLDING AND RAISING WINDSHIELD
1. Lower your soft top or remove the hard top.
2. Remove (using your hands) the protective caps over the windshield wiper hex bolts shown in the photo below.

3. Use a 15mm socket to remove the two hex bolts underneath the caps shown in the photo above and remove the windshield wipers.
4. Lower both sun visors.
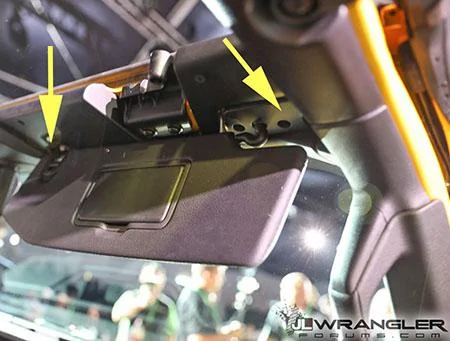
5. Use a #40 Torx bit to remove the four Torx screws located along the interior of the windshield shown in the photo below (remove screws from the same locations on the driver's side).

NOTE: Remember to store all the mounting bolts in their original threaded holes and tighten so they are not lost.
6. Lower the windshield until it contacts the foot-man loop bumpers (if equipped) on the hood shown in the photo below.

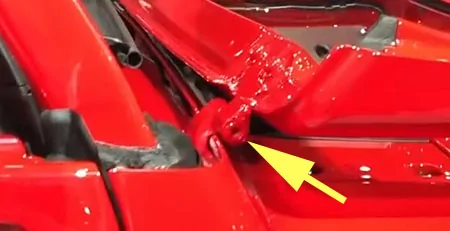
NOTE: If desired, the entire windshield can be removed by simply removing two more bolts located at the hinge at the base of the windshield (bolt location shown in photo below)

7. Secure the windshield by passing a cinch strap through the footman loops on both sides of the hood and on the windshield frame (in the areas indicated by arrows below). Tighten the strap to secure the windshield.

To raise and reinstall the windshield, reverse the steps above.
VIDEO OVERVIEW
This video we put together from the JL Wrangler LA Auto Show debut provides an overview look at the process.
Tools Needed
- Torx #T40 Bit
- 15mm socket
- Ratchet
FOLDING AND RAISING WINDSHIELD
1. Lower your soft top or remove the hard top.
2. Remove (using your hands) the protective caps over the windshield wiper hex bolts shown in the photo below.

3. Use a 15mm socket to remove the two hex bolts underneath the caps shown in the photo above and remove the windshield wipers.
4. Lower both sun visors.
5. Use a #40 Torx bit to remove the four Torx screws located along the interior of the windshield shown in the photo below (remove screws from the same locations on the driver's side).
NOTE: Remember to store all the mounting bolts in their original threaded holes and tighten so they are not lost.
6. Lower the windshield until it contacts the foot-man loop bumpers (if equipped) on the hood shown in the photo below.

NOTE: If desired, the entire windshield can be removed by simply removing two more bolts located at the hinge at the base of the windshield (bolt location shown in photo below)
7. Secure the windshield by passing a cinch strap through the footman loops on both sides of the hood and on the windshield frame (in the areas indicated by arrows below). Tighten the strap to secure the windshield.

To raise and reinstall the windshield, reverse the steps above.
VIDEO OVERVIEW
This video we put together from the JL Wrangler LA Auto Show debut provides an overview look at the process.
Sponsored
Last edited:
